 不小心从SD卡中删除了某些文件?你会很高兴地知道,在大多数情况下,这些文件并没有永久丢失。你行动得越快,找回所有文件的机会就越大。今天,我们将一步一步地向你展示如何在Mac上从SD卡恢复已删除的数据,以及在实际情况下哪些方法真正有效。
快速概述
- 在大多数现实情况下的Mac SD卡恢复中,SD 数据恢复软件完成了大部分工作。你将SD卡连接到Mac,启动工具,运行扫描,预览找到的内容,并将文件恢复到Mac上的其他位置。就是这么简单。
- 如果文件只是被删除(甚至是永久),恢复通常很简单。
- 如果用默认选项快速格式化了卡片,仍有很大机会恢复被删除的文件,因为快速格式化通常只是移除了文件引用,而不是实际数据。
- 如果卡片被完全格式化,恢复的可能性就很小了。一旦扇区被重写,旧数据就消失了。
- 令人惊讶的是,损坏的SD卡也经常可以恢复。当文件系统损坏但原始数据仍然完好时,软件可以跳过损坏的结构,直接从卡片中重新构建文件。
- 还有别忘了那些简单的方法。如果你在SD卡连接Mac时删除了文件,先检查“废纸篓”。我们见过它挽救了整个拍摄内容。
大致就是这样。现在让我们一步一步分解如何从SD卡恢复已删除的数据。
如何在Mac上恢复SD卡中已删除的文件
我们将从SD恢复软件开始,因为在大多数情况下,这实际上是恢复文件的方法。
我们将向您展示几种可以帮助您的工具,每种工具都有其优点,所以让我们从最简单的一种开始。
方法1: 使用 Disk Drill 在 Mac 上恢复 SD 卡中已删除的文件
Disk Drill 是最易于使用的 SD 恢复 Mac 工具之一,并且可以正确处理 SD 卡。它支持你通常会在存储卡上看到的文件系统(exFAT、FAT32,甚至更旧的版本),所以无论该卡片来自 DSLR,安卓设备,还是 GoPro,它都可以无障碍读取。
它还配备了提高恢复几率的功能,同时不会让操作变得复杂。它支持近400种文件类型,拥有用于碎片化视频文件的高级相机恢复模块,提供用于不稳定存储卡的字节对字节磁盘镜像,并包括强大的预览功能,让你可以在恢复前检查文件。
要使用 Disk Drill 从 SD 卡恢复数据,请按照以下步骤操作:
- 首先,从官网下载 下载 Disk Drill for Mac。
- 接下来,从“下载”文件夹中打开 diskdrill.dmg。
- 然后,将 Disk Drill 图标拖动到“应用程序”文件夹。

- 从“应用程序”文件夹打开 Disk Drill。如果这是您第一次打开该应用程序,会弹出提示询问您是否确定要打开 Disk Drill。点击 打开。
- Disk Drill 现在会启动。
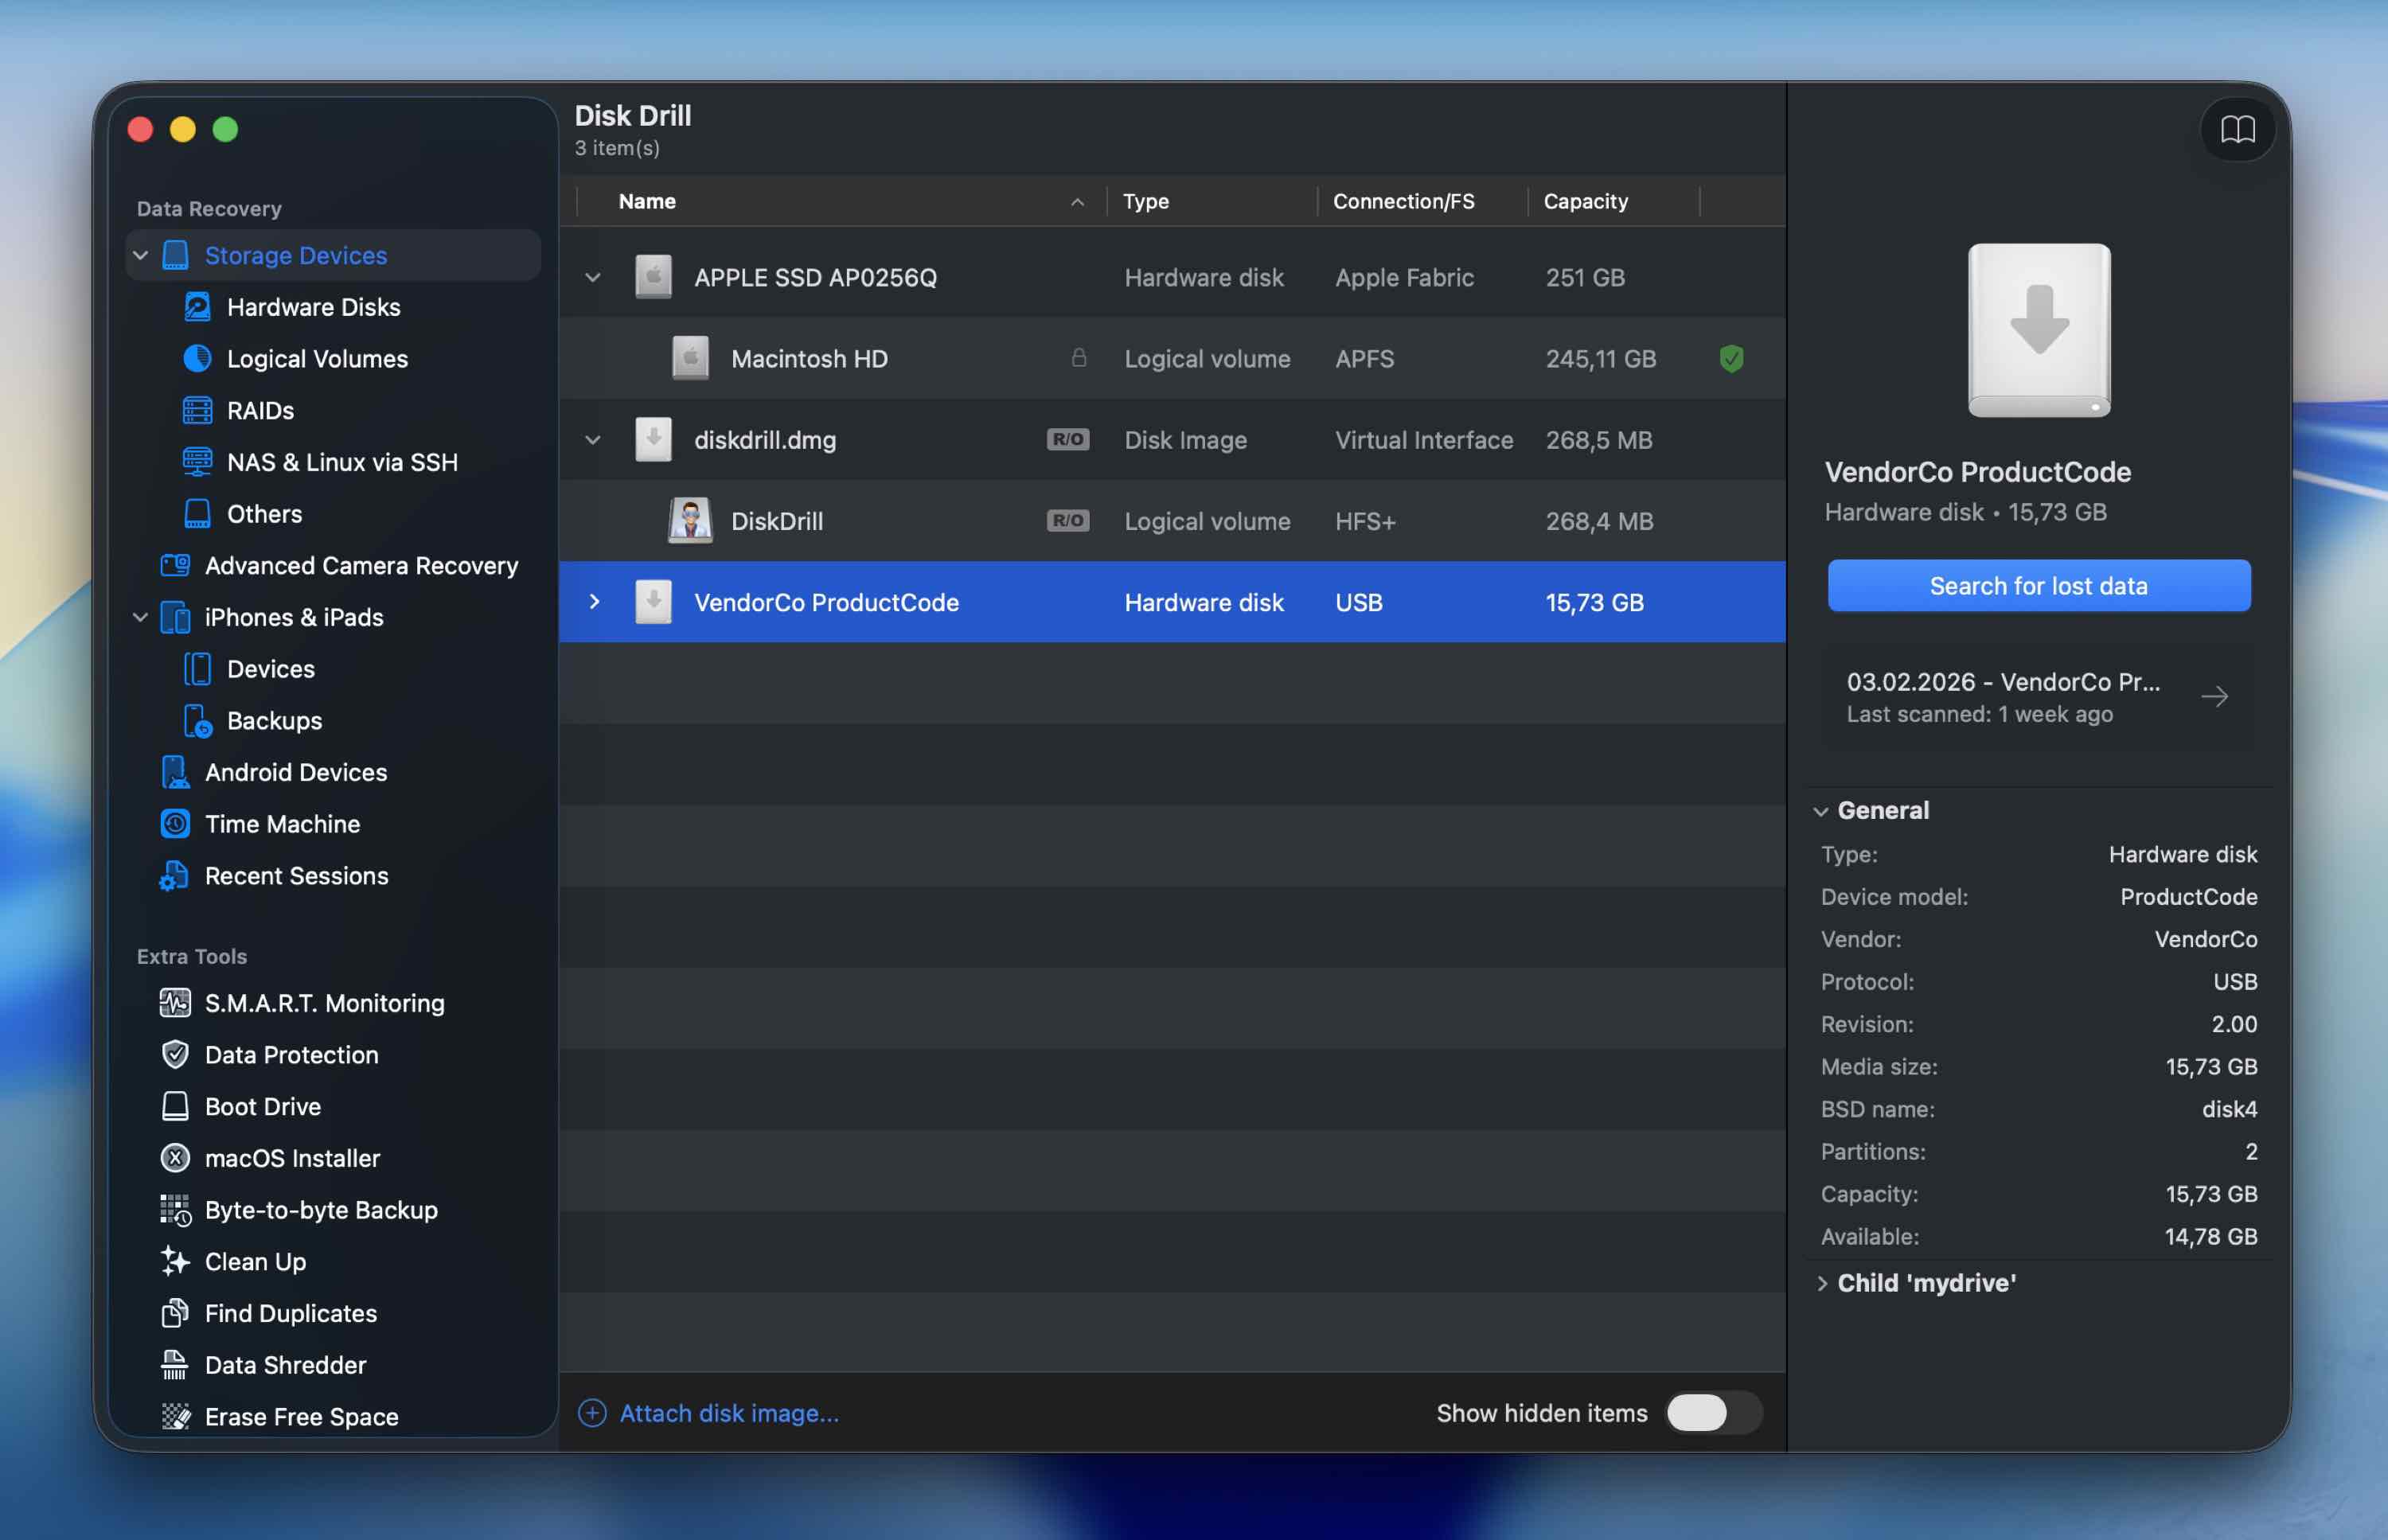 所有可用于扫描的驱动器都会显示在 Disk Drill 首页,因此请确保您的 SD 卡已插入 Mac 以便被检测到。
 - 点击您要扫描以恢复丢失数据的 SD 卡,然后点击 搜索丢失数据。
- 之后,选择一种扫描模式。
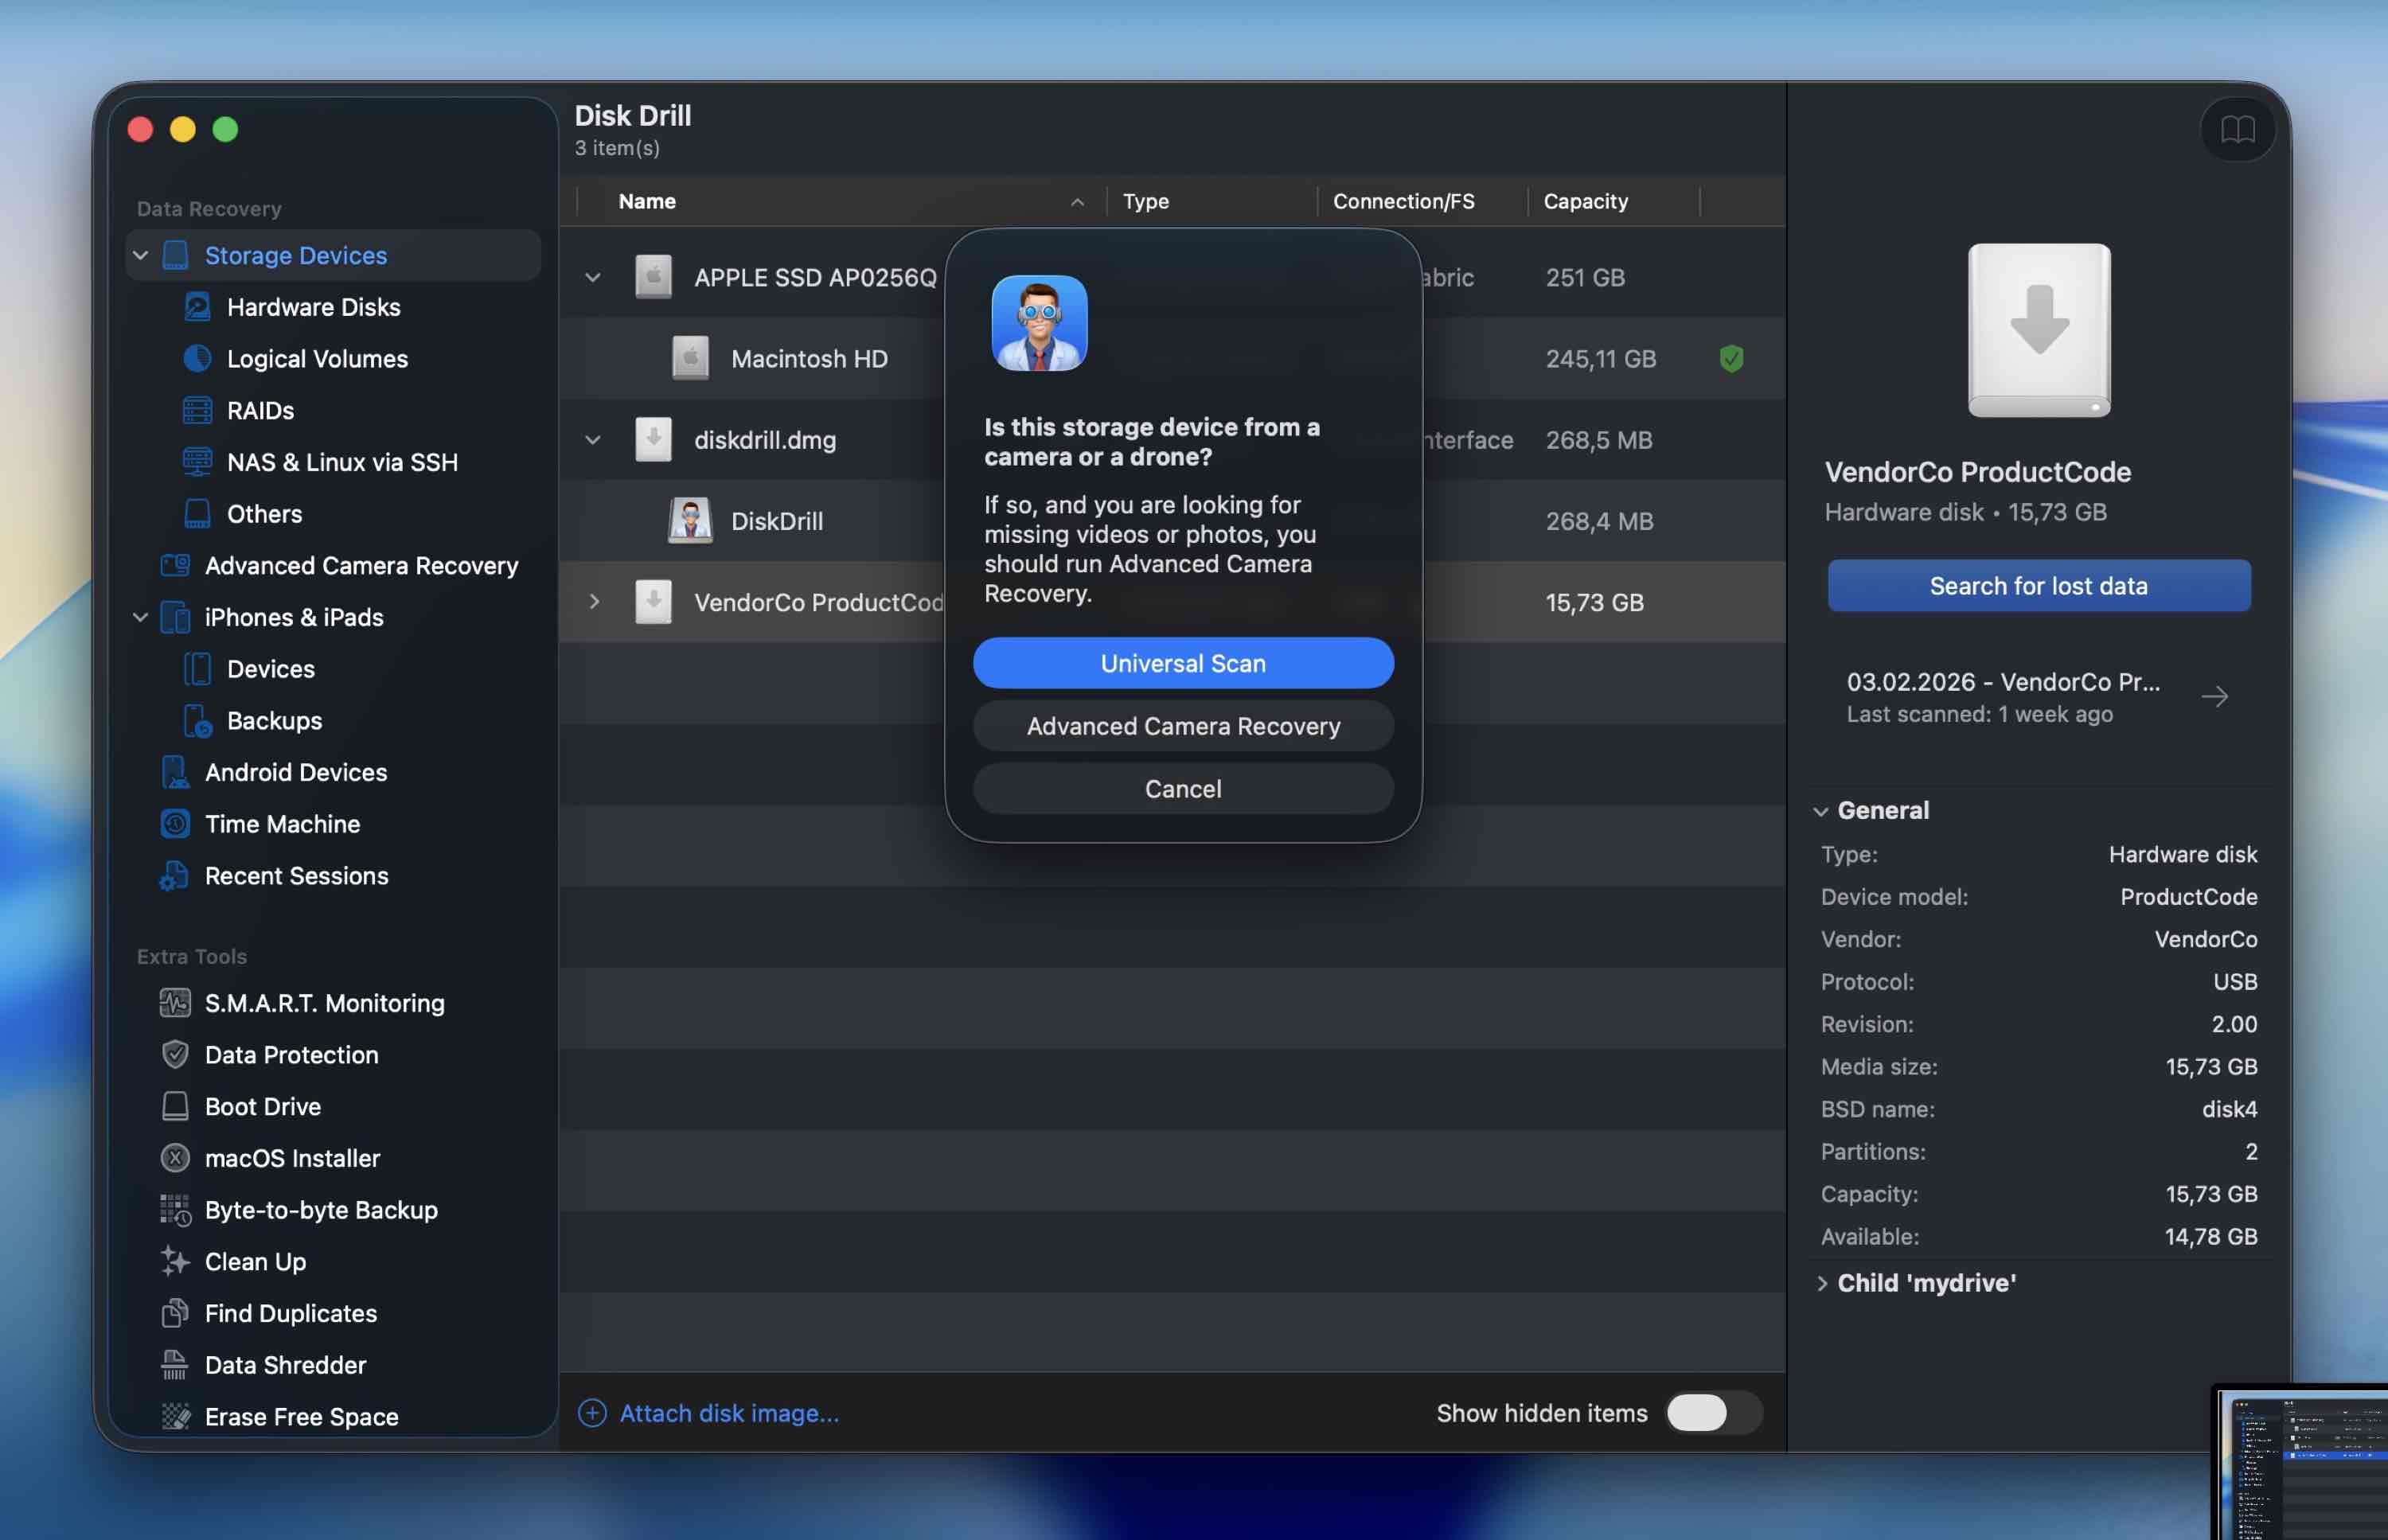 在大多数情况下,通用扫描完全适用。如果您处理的是来自相机或无人机的视频素材,我们建议首先选择 高级相机恢复。(如有需要,您也可以稍后使用其他模式再次扫描。)
 - 等待扫描完成。(文件开始出现时您可以立即开始浏览结果,但我们通常建议让扫描过程完成,这样结果会更准确。)根据所扫描驱动器的大小,这一过程可能会花费一些时间。
- 扫描结束后,Disk Drill 会显示可以恢复的项目,并按文件类型分类。
- 假设您要查找的文件为 从您的SD卡恢复照片.
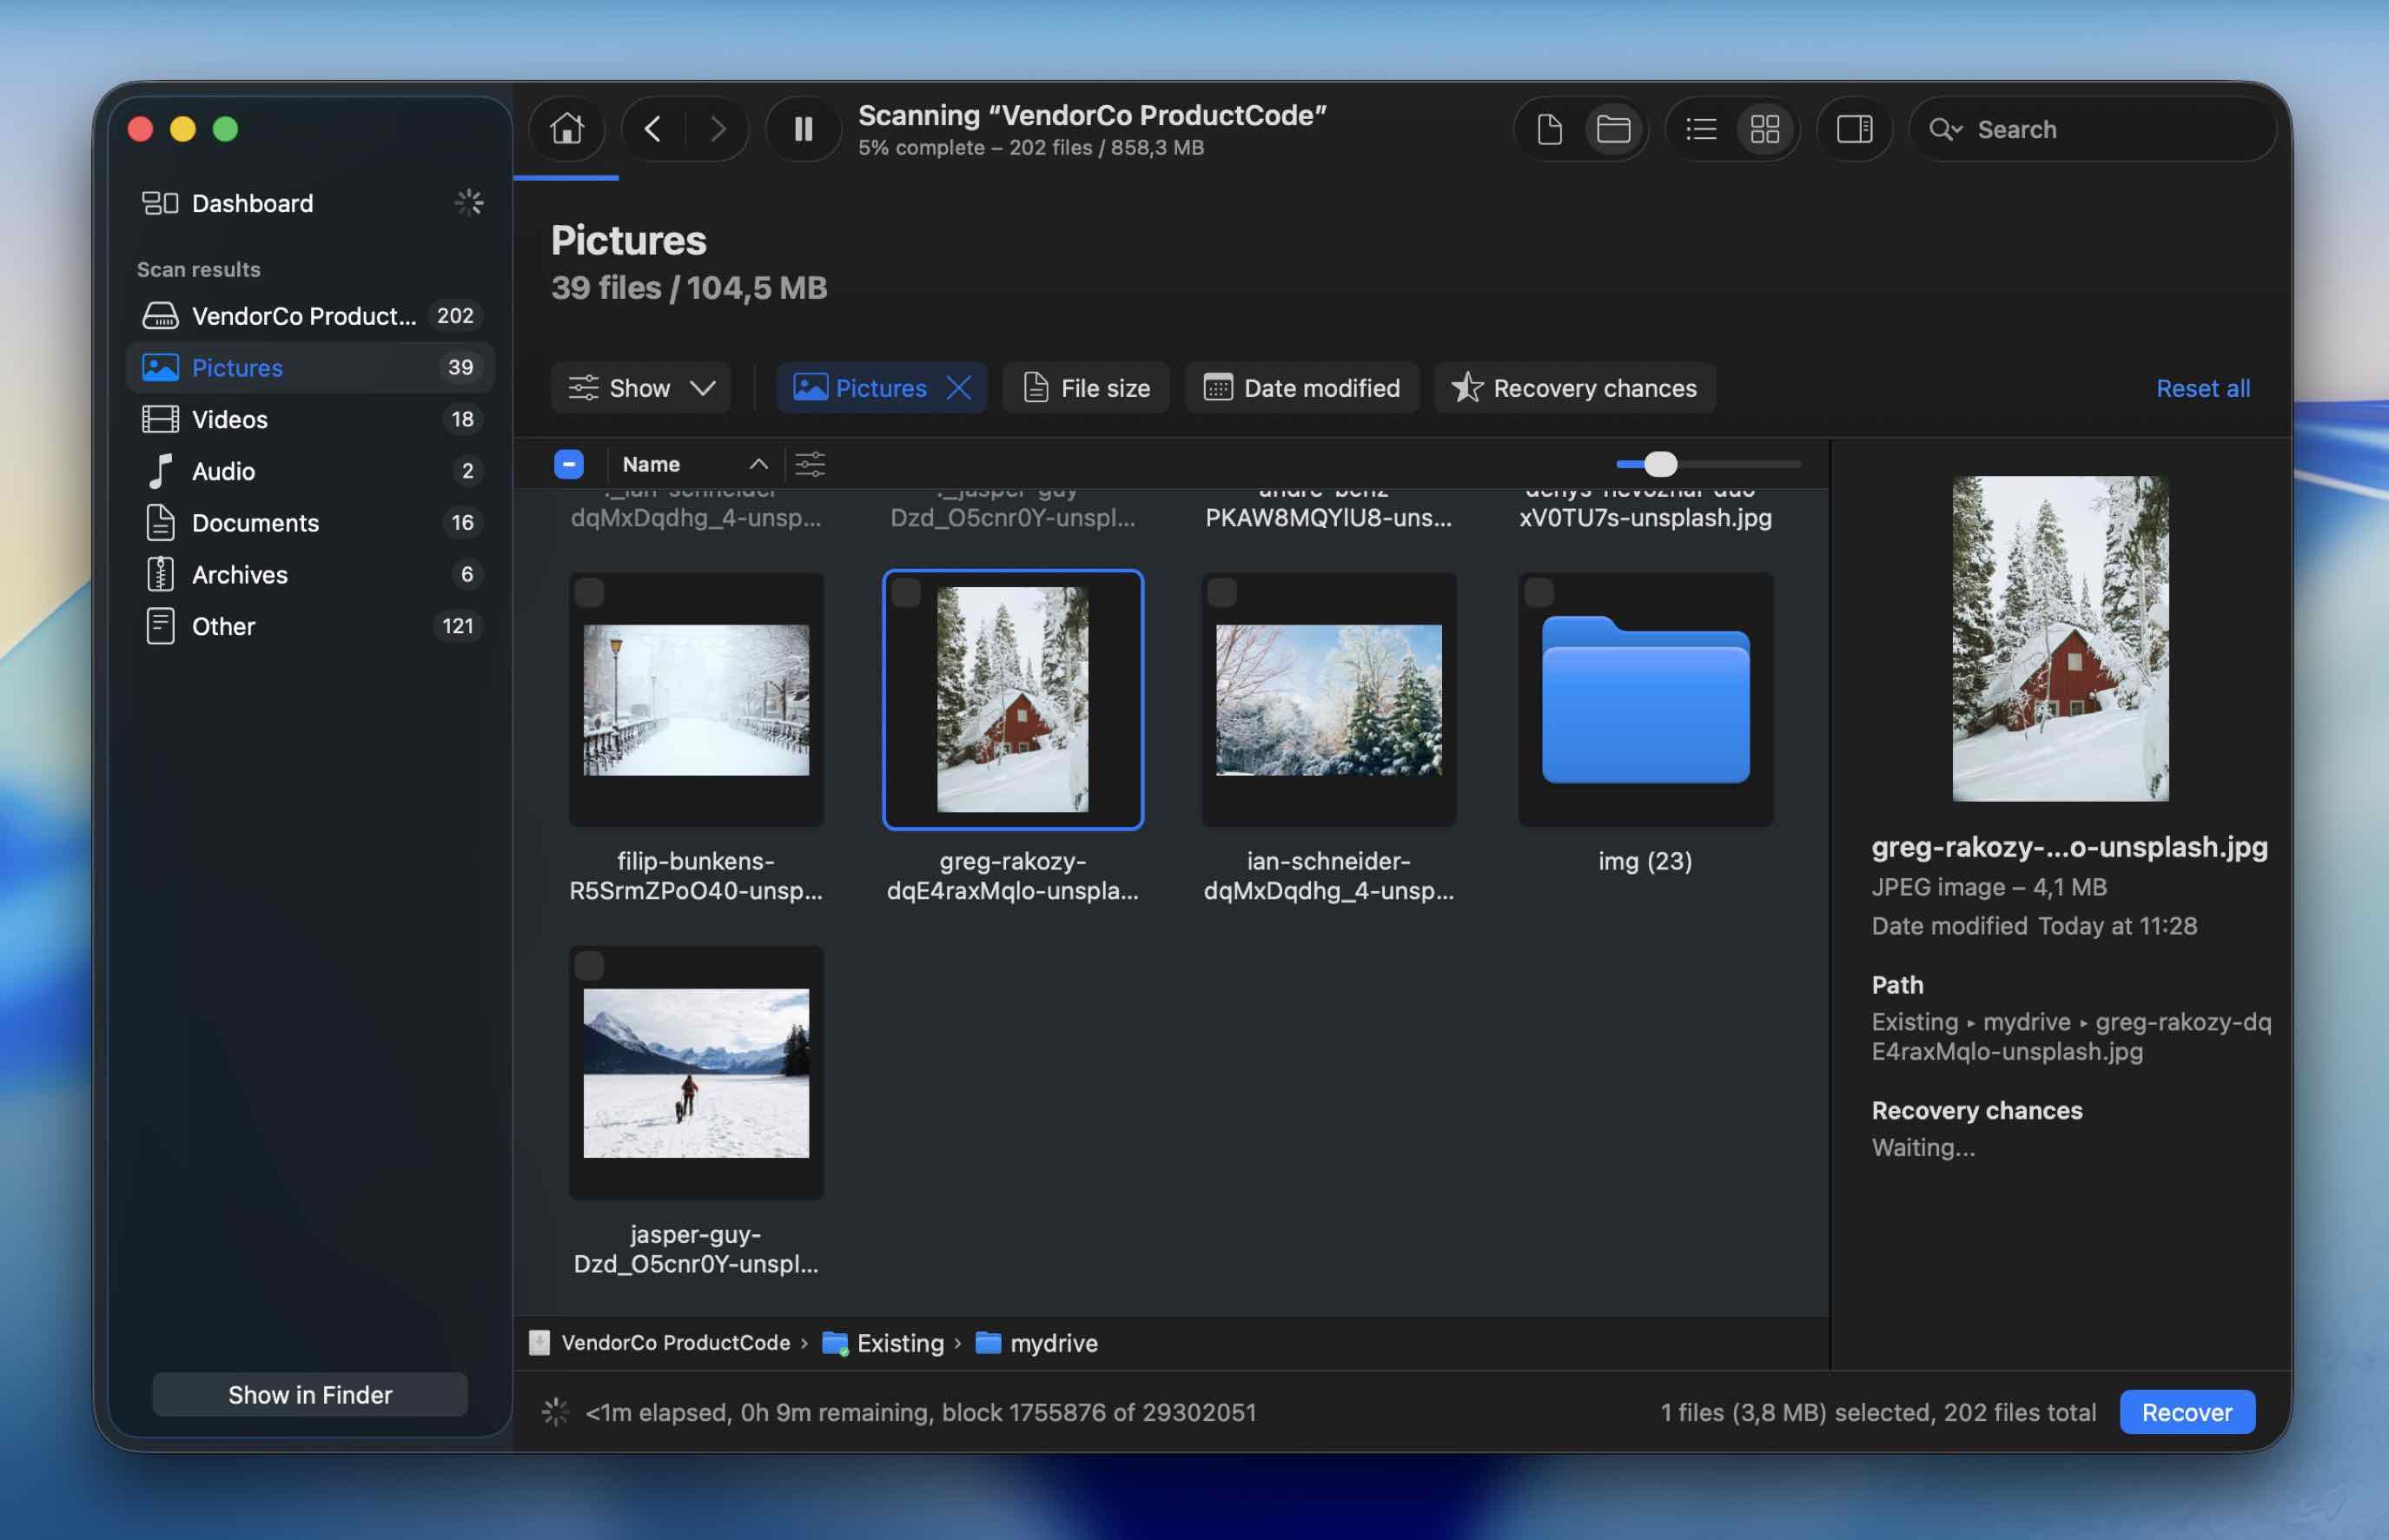 请点击 图片 类别。下面会有子文件夹,可按文件大小、修改日期进行筛选,或直接搜索文件名。
 - 找到文件后,点击它即可预览图片。如果预览加载正常,这通常是文件完好且可顺利恢复的明确标志。(每个文件旁边还会显示恢复概率的指示器。)
- 最后,点击位于屏幕右下角的 恢复 按钮。如果您使用的是免费版本,保存恢复的文件需要许可证。不过扫描/预览功能不限量,因此可以先确认文件是否还在,然后再决定是否升级。
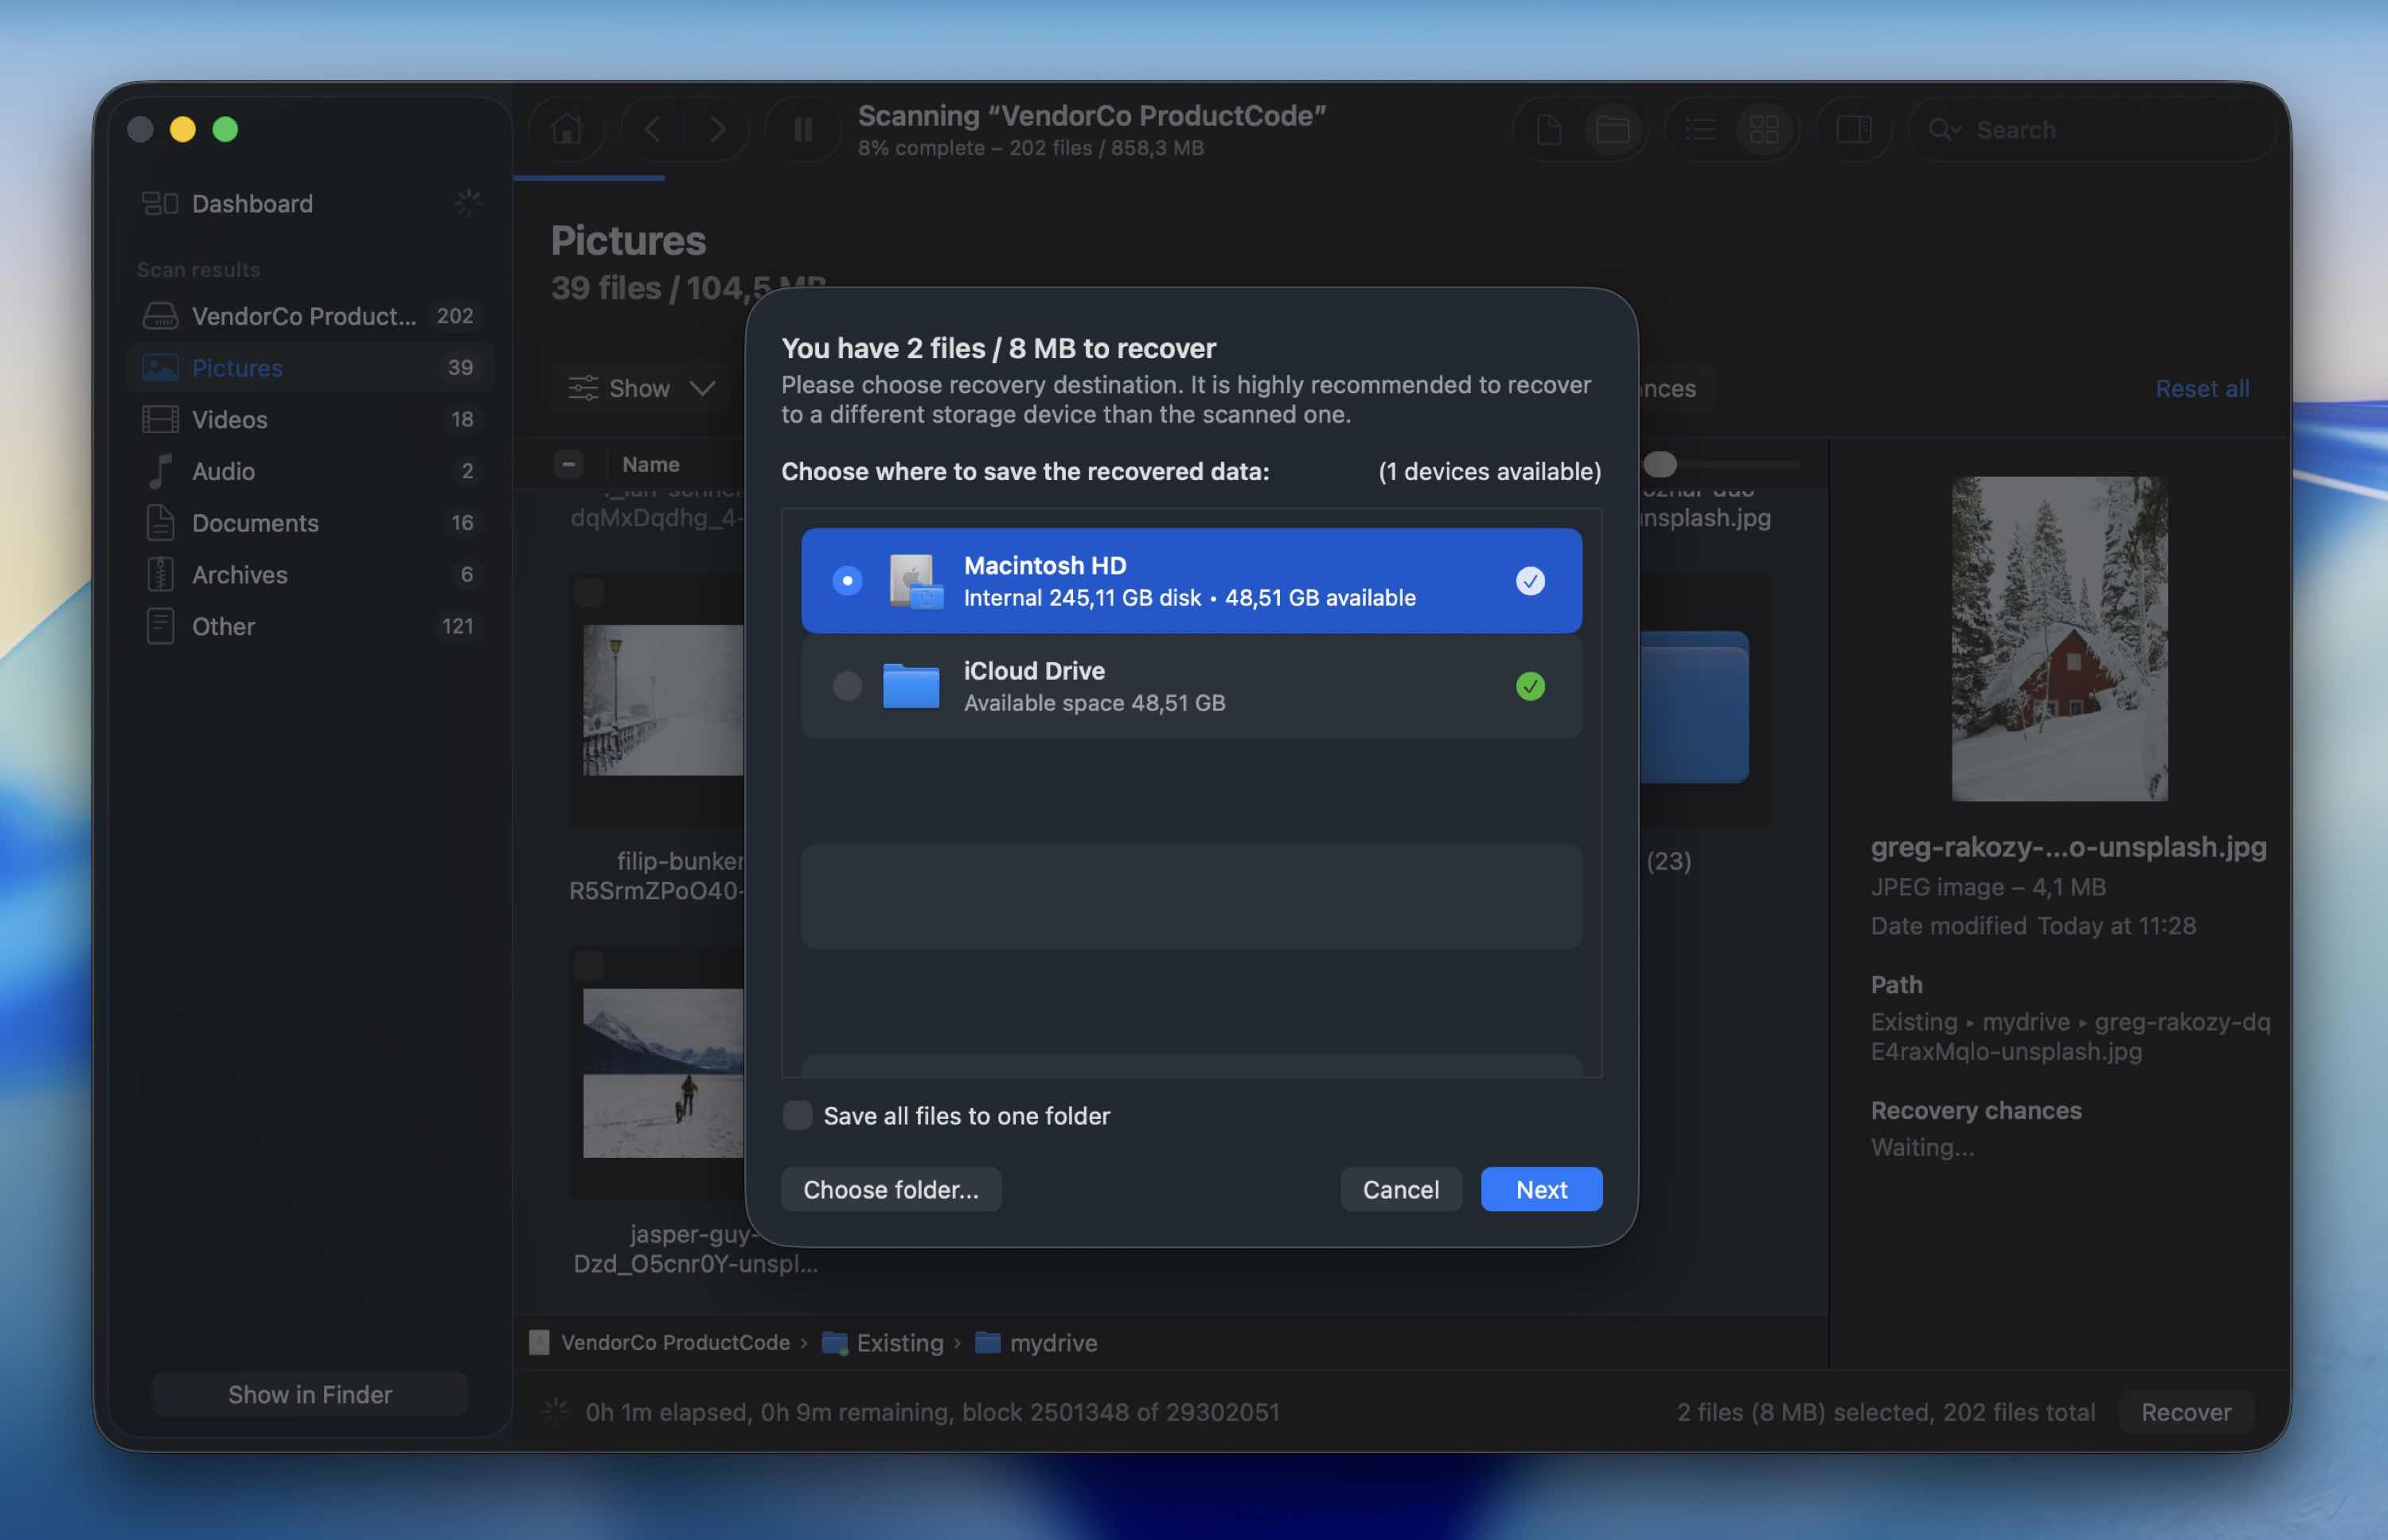
- 选择一个新的目标位置来恢复您想要的文件,可以选择任意位置——只是不能选择同一个 SD 卡。(不建议恢复到原 SD 卡,因为这样可能会覆盖尚可恢复的其他数据。)
- 屏幕上会弹出一条消息,确认文件已被恢复。
方法 2: 使用 PhotoRec 从您的 SD 卡恢复数据
另一个可以帮助您从SD卡恢复已删除文件的工具是PhotoRec。它是一款完全免费、开源的数据恢复软件,在恢复已删除的图片、视频和其他文件方面表现出色。
不过,它并不是最适合初学者的工具。界面是基于文本的,你需要用键盘进行操作。它还依赖于基于签名的扫描(文件碎片恢复)。因此,它通常无法恢复原始文件名或文件夹结构。恢复的文件通常会用通用名称命名,之后你需要手动整理它们。
按照以下步骤使用 PhotoRec 从您的 SD 卡中恢复已删除的文件:
- 下载 在你的 Mac 上使用 PhotoRec(你需要下载 TestDisk 和 PhotoRec,因为这两个工具是一起提供的)。
- 要安装该工具,请启动 Terminal(前往 Launchpad > Terminal)并复制粘贴以下命令:sudo photorec。
- 按回车键,如果需要,输入你的管理员密码。
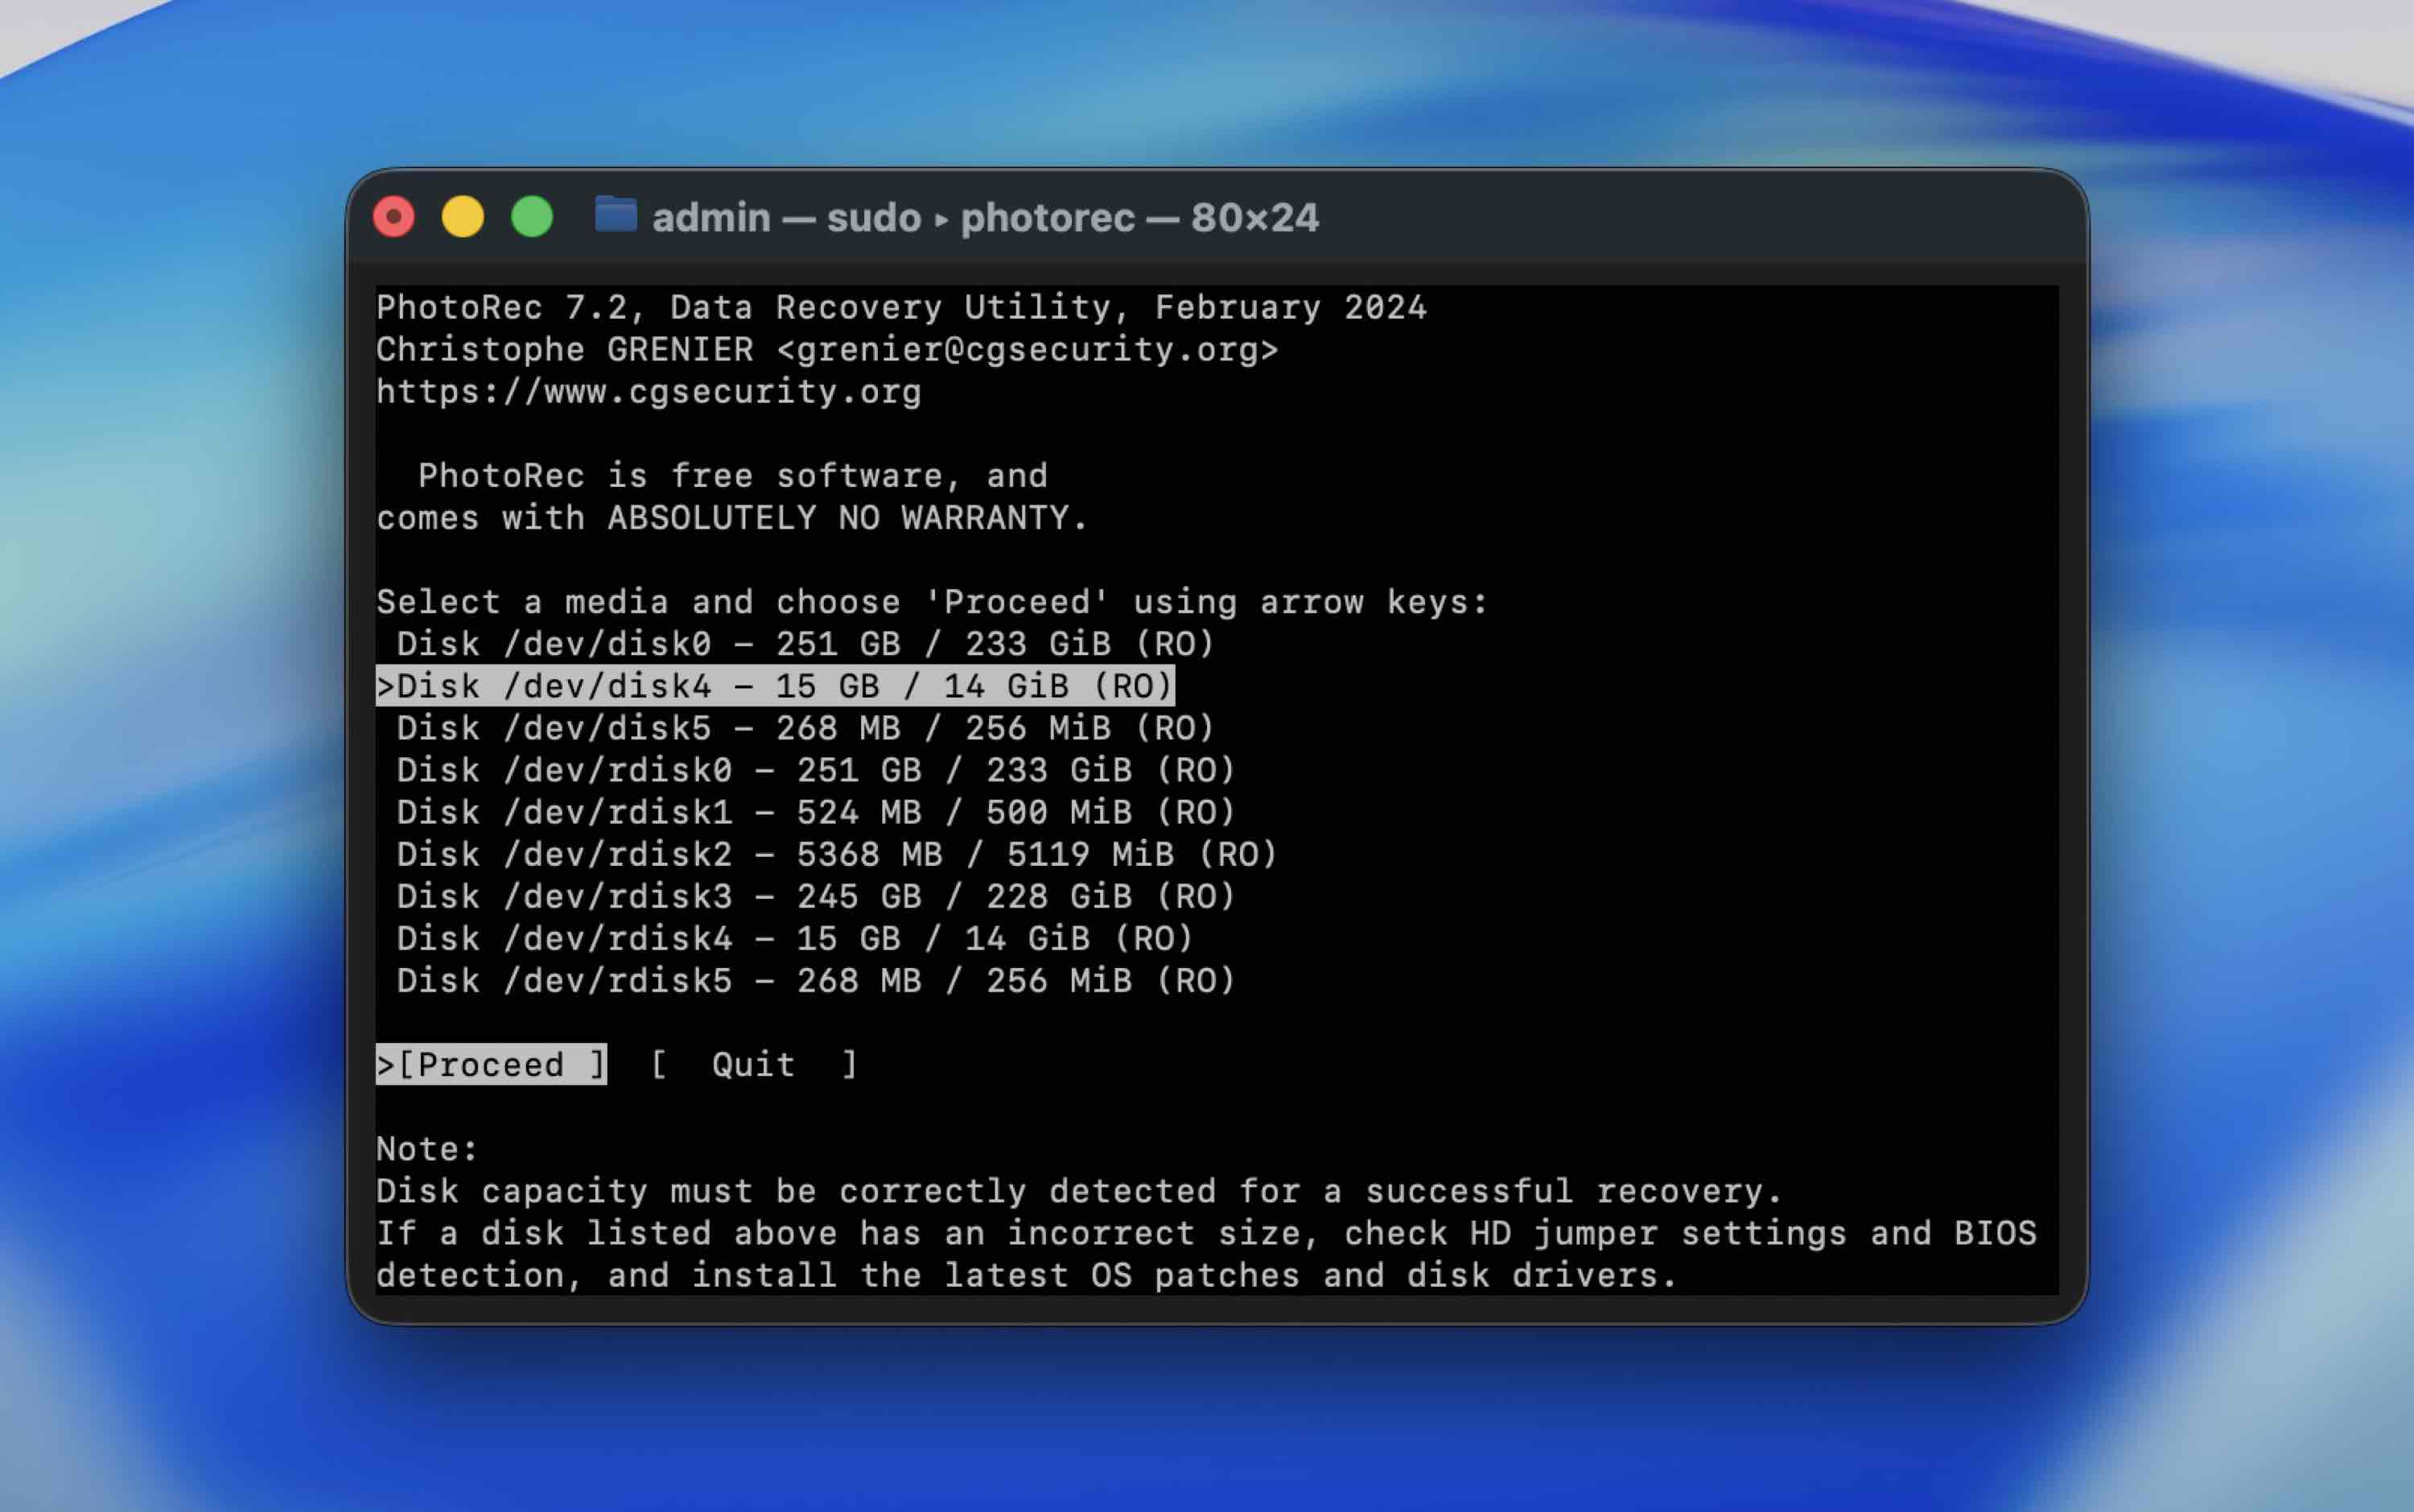
- 使用箭头键从设备列表中选择你的 SD 卡,并按回车确认你的选择。
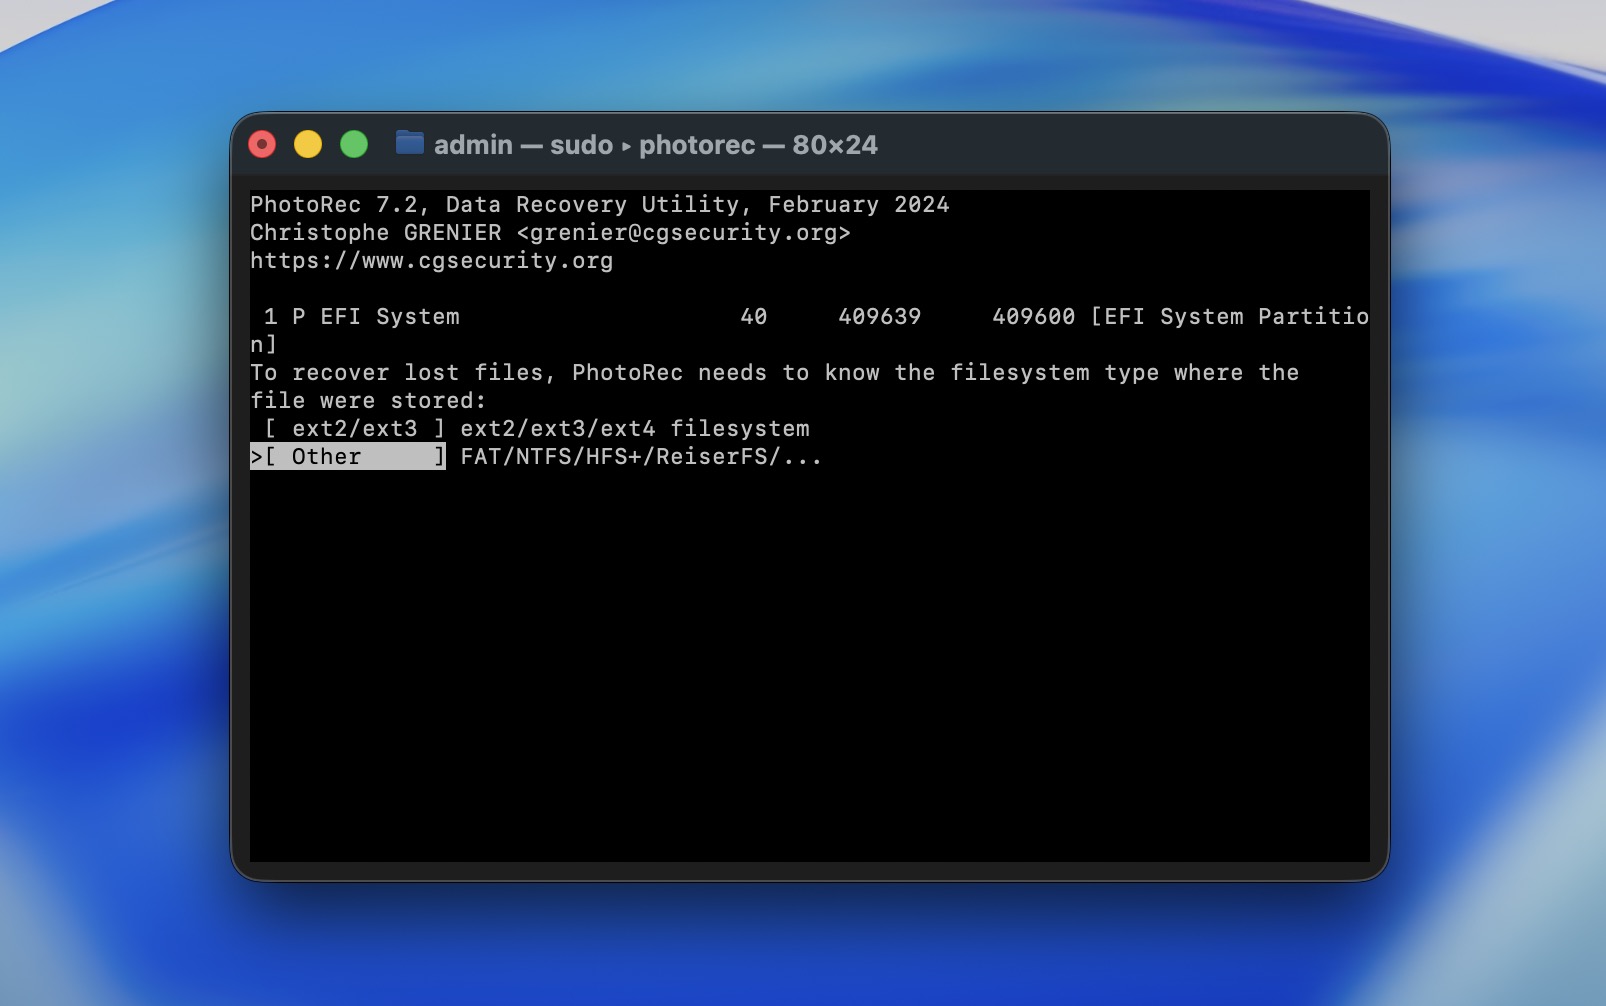
- 选择含有你数据的 SD 卡分区,然后按回车键开始搜索。请确保你选择了 Other 并按下回车键。
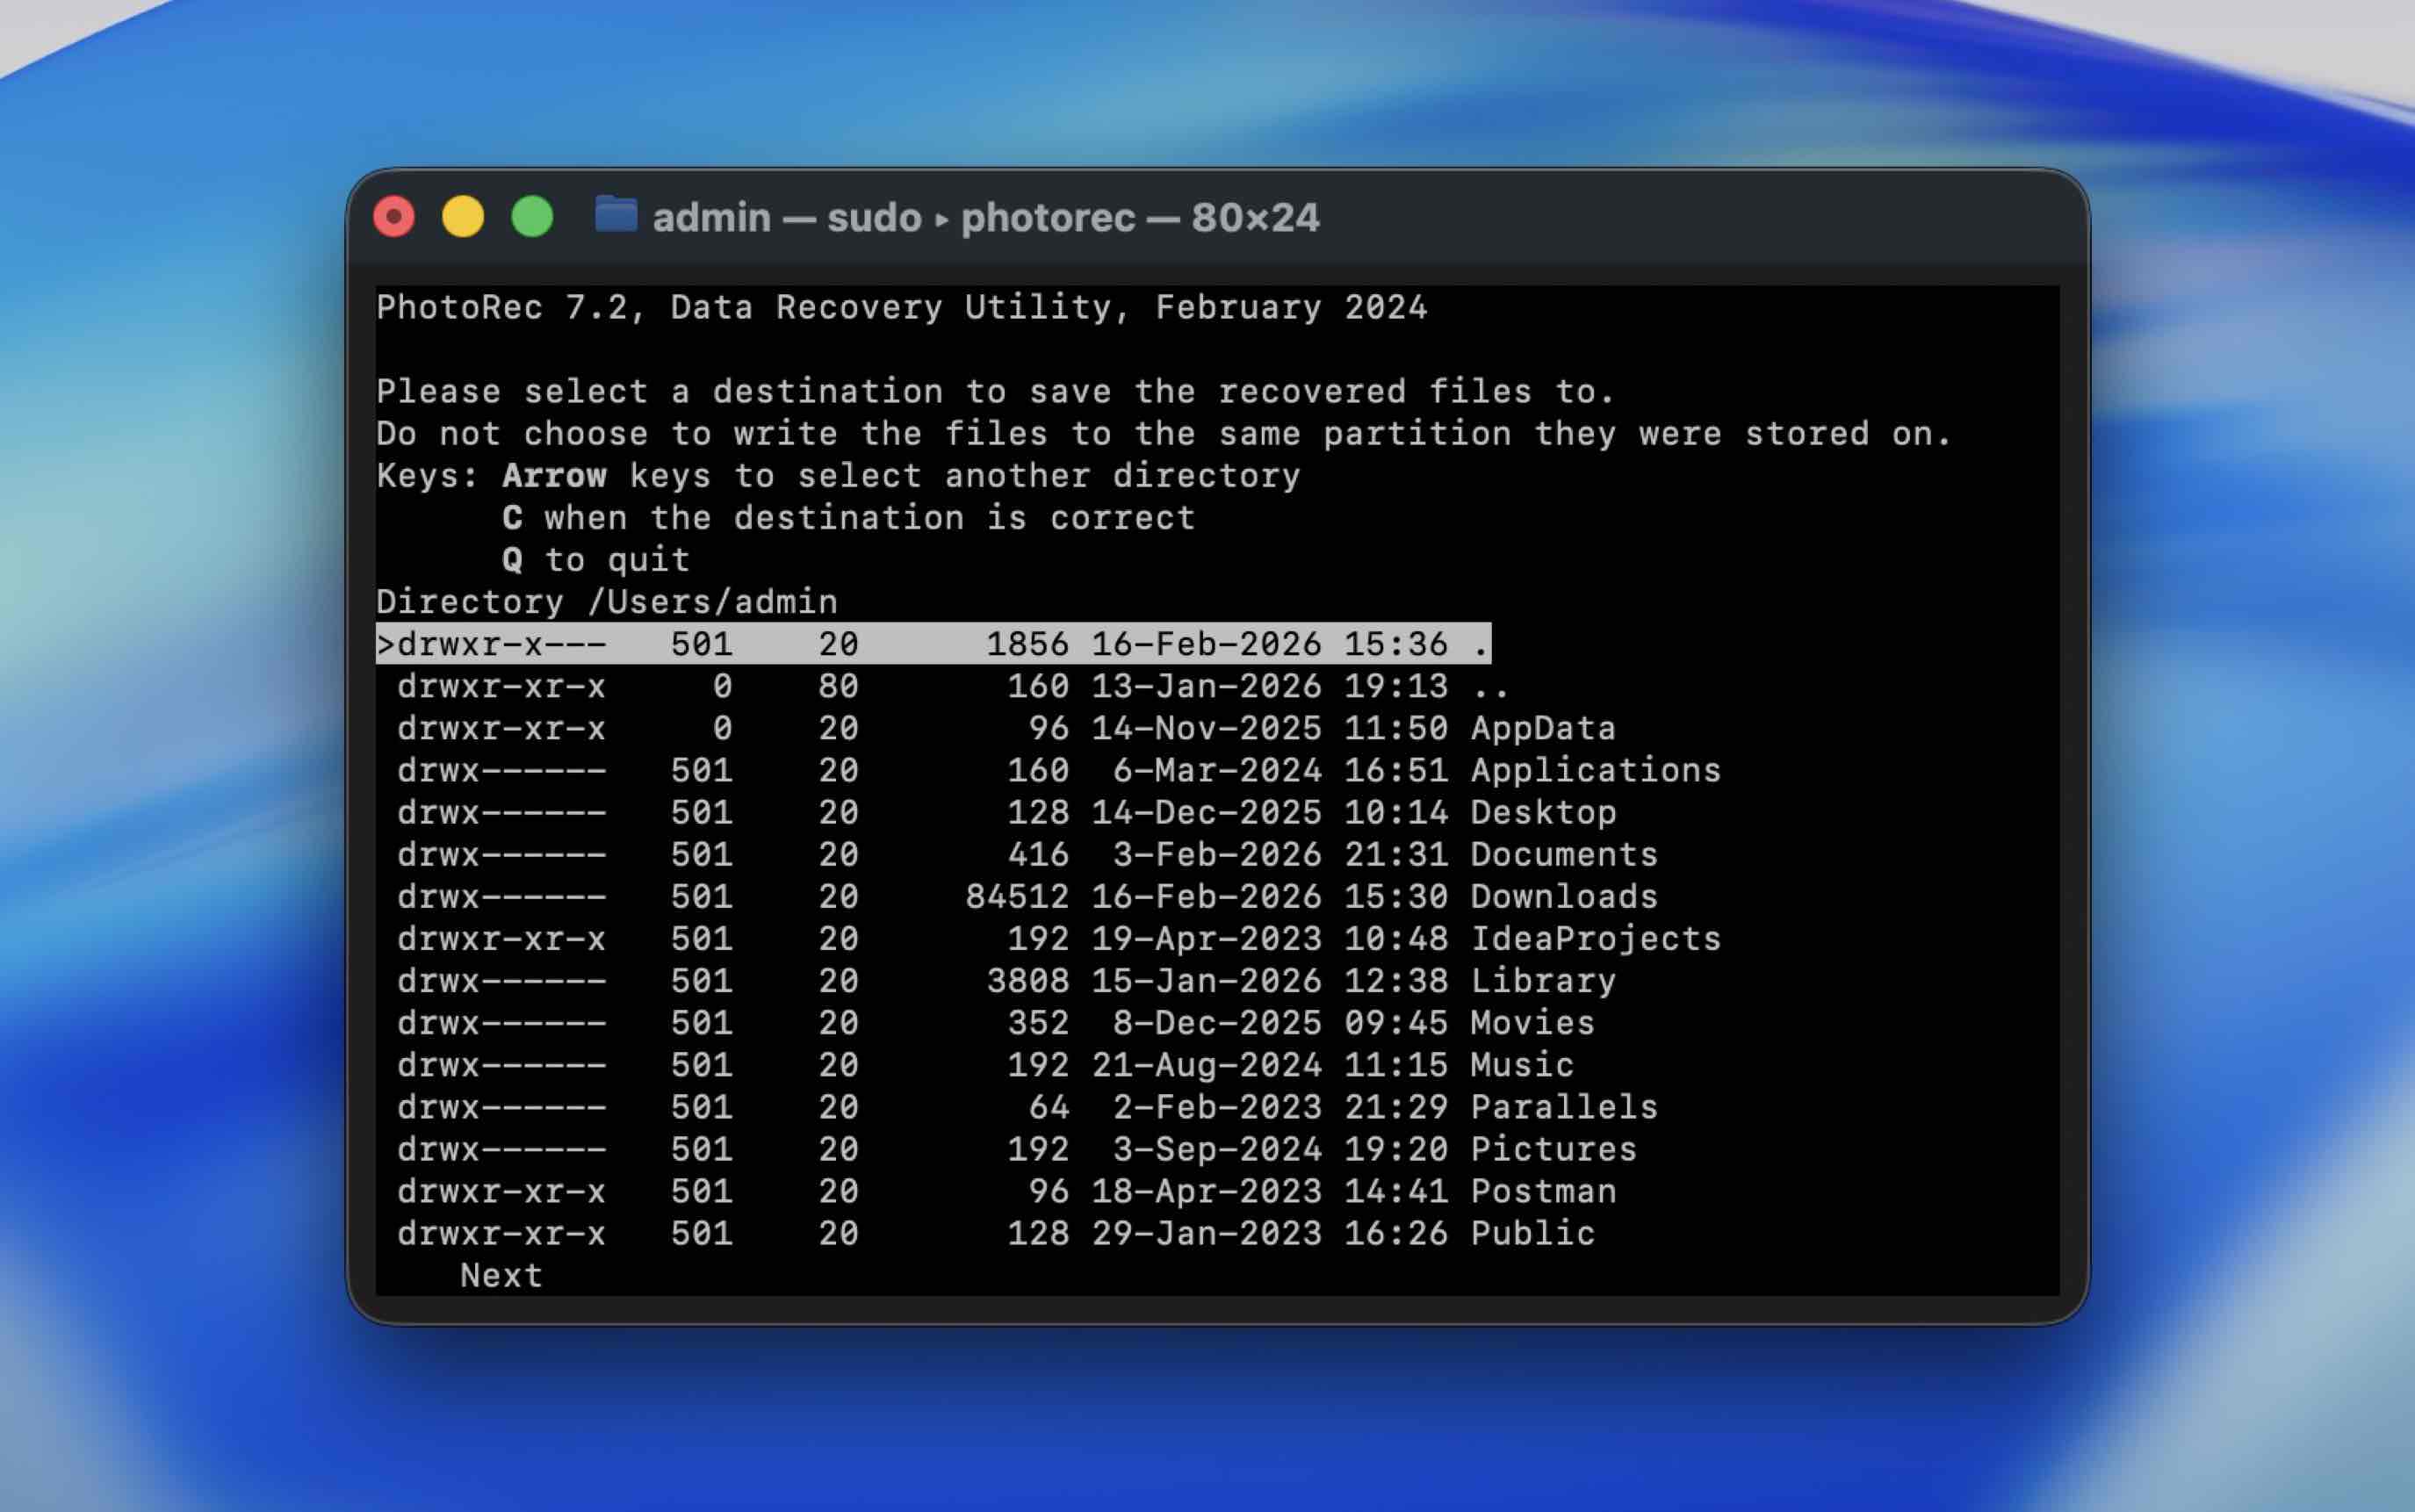
- 选择恢复数据的保存位置(确保不是同一个 SD 卡),然后在键盘上按 C 键以确认。
一旦实用工具完成恢复过程,退出终端并前往先前选择的目标位置,查找包含已恢复数据的文件夹。
我可以使用 Mac 的垃圾桶恢复 SD 卡上已删除的数据吗?
是的,这是一种恢复文件的方式,但它只适用于特定情况。
如果您在SD卡连接到Mac时删除了文件,并且还没有清空废纸篓,这将非常有用。在这种情况下,macOS会将它们移动到与该外部卷关联的废纸篓文件夹中。
请按照以下步骤在您的 Mac 上从回收站中恢复 SD 卡中已删除的文件:
- 将SD卡连接到您的Mac。
- 启动废纸篓(点击Dock上最后一个图标)。

- 在其中浏览文件,找到您需要的文件。
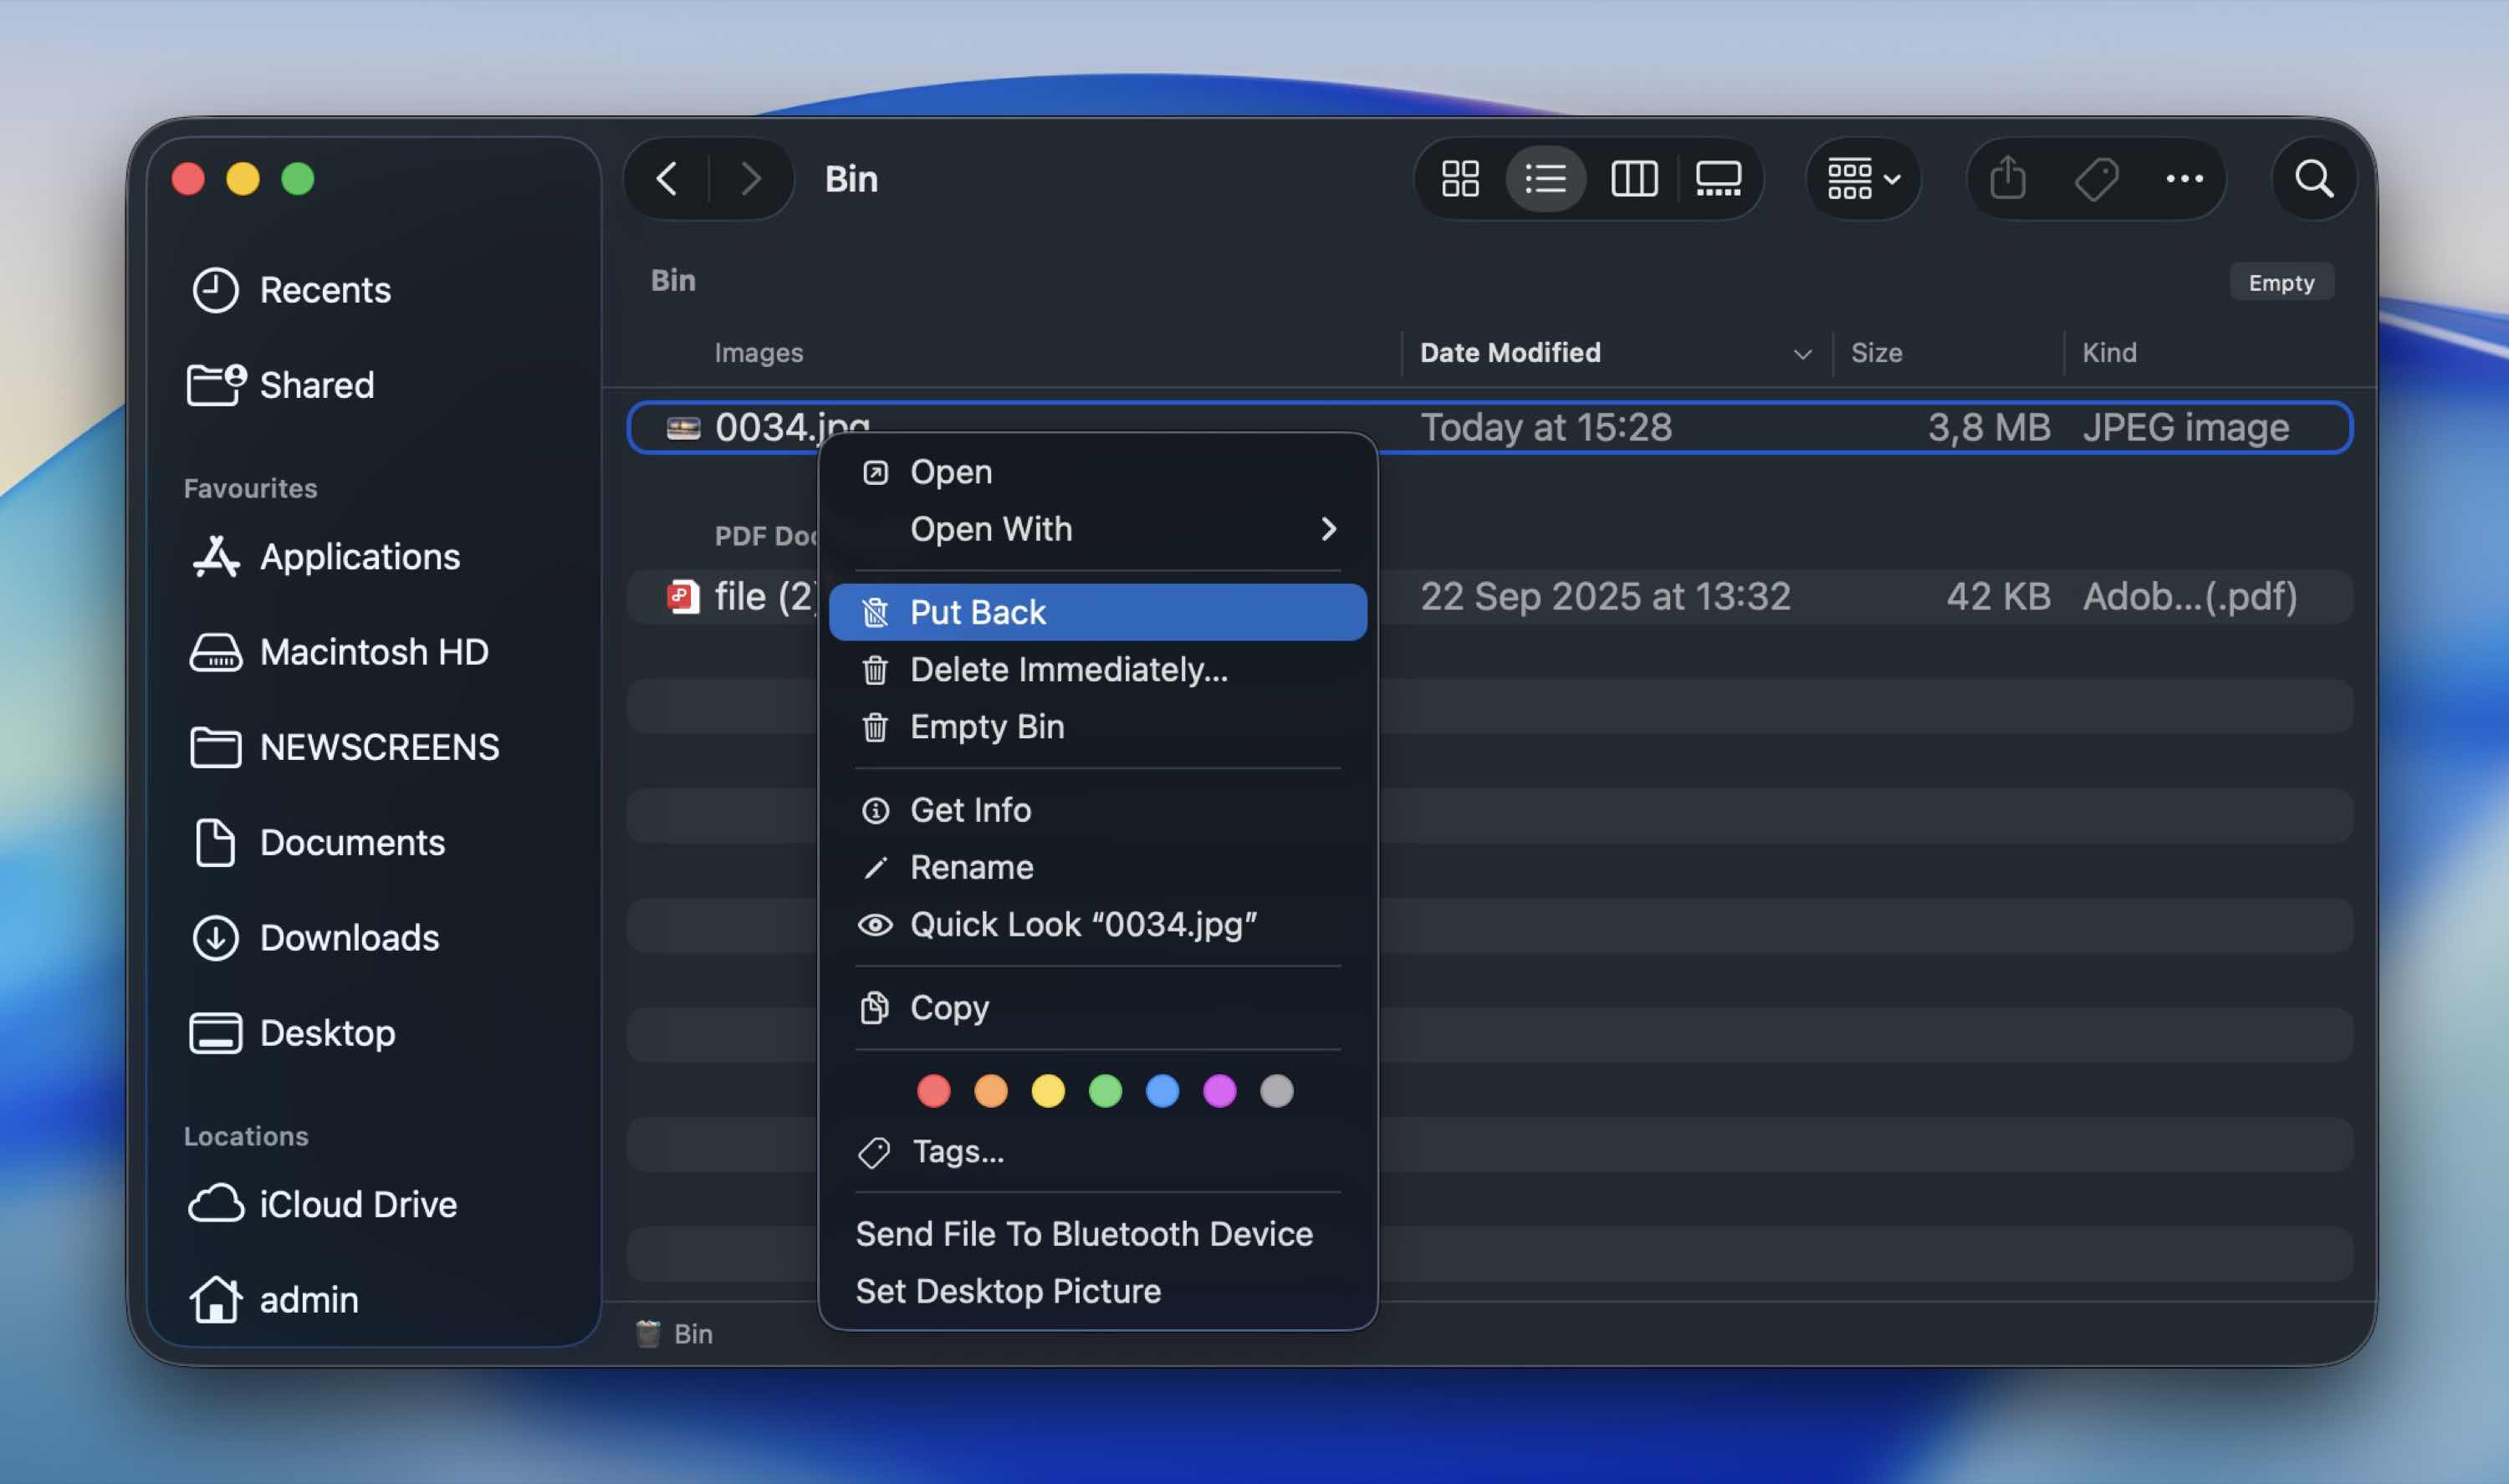
- 将文件拖放到其他文件夹,或右键点击并从下拉菜单中选择放回原处,将其恢复到原始位置。
常见问题
- 第一个也是最常见的问题是意外删除。 这个原因每次都排在首位。
- 接下来是格式化(无论是有意还是无意)。 快速格式化通常只会移除文件引用,而不是实际数据,这就是为什么通常可以恢复的原因。
- 另一个常见的问题是未正确弹出。 正如你可能已经猜到的,在文件传输过程中或未经安全弹出的情况下拔出SD卡,可能会导致文件系统损坏。
- 然后是文件系统损坏。 断电、设备崩溃或固件故障都可能损坏存储卡的结构。
- 物理损坏或长期磨损是另一个因素。 SD卡的写入次数是有限的。随着时间的推移,存储单元会退化。暴露在高温、潮湿或粗暴操作下会加速这一过程。
- 病毒或恶意软件感染。 如果存储卡连接到受感染的计算机,恶意软件可能会隐藏、加密或损坏文件。有时候文件并没有被删除——它们只是被隐藏了。
- 最后,在多台设备间交替使用同一张卡也会导致问题。 在相机、无人机、手机和计算机之间切换,尤其是在设备格式化方式不同的情况下,会增加结构不一致的风险。这不一定总是会引发问题,但在实际恢复案例中我们经常遇到。
- 首先,如果文件是在 SD 卡连接时被删除的,请检查你 Mac 的“废纸篓”。这不需要任何费用,只需一分钟。
- 对于更深层的恢复,像 PhotoRec 这样的免费工具可以扫描 SD 卡并恢复文件,无需付费。
- 一些付费工具(Disk Drill 或 UFS Explorer)也允许你无限次扫描和预览文件,这样你可以先确认文件是否还在,再决定是否购买许可证。
- 将 SD 卡连接到 Mac。
- 安装并启动支持 Mac SD 卡恢复的数据恢复应用程序。
- 从可用驱动器列表中选择 SD 卡。
- 运行完整扫描。
- 扫描完成后,预览照片以确认它们能正确打开(如有可能)。
- 最后,将所选文件恢复到 Mac 的内部驱动器或其他外部磁盘。切勿将它们恢复到同一个 SD 卡上。
- 始终正确弹出SD卡(虽然听起来很基础,但这样可以防止许多损坏案例)。
- 不要中断读写操作。如果你的相机还在写入照片,或者你的Mac还在拷贝文件,请耐心等待。
- 定期备份你的文件。你现在可能已经意识到,数据恢复从来没有百分百的保证。尽快将重要文件复制到你的Mac、外部硬盘或云存储中。
- 避免在不同设备间频繁使用同一张卡(经常在不同相机、无人机和电脑间切换,会增加文件结构不一致的风险)。如果可能的话,为每个设备分配专用的SD卡。
- 在所使用的设备内格式化SD卡。如果是相机卡,请在相机里格式化。这样文件系统会和设备的预期行为保持一致。
- 保护SD卡免受物理损坏:避免SD卡接触高温、潮湿和弯折。请将其存放在防护盒中。


