
Formatting goes hand-in-hand with using any storage device with a limited capacity, such as a USB flash drive. In most cases, it’s much quicker and more convenient to simply erase everything in one go than it is to delete files one by one. But what if you make a mistake and accidentally format the wrong drive? Is it possible to recover files from a formatted flash drive? Yes, it is!
What To Do Before Recovering Data From Formatted USB Drive
First let’s talk about a few important steps before you attempt data recovery. The actions you take immediately after formatting can strongly affect the chances of getting your files back. In many cases, the data may still exist on the USB drive, but new activity can overwrite it.
- Stop using the USB drive immediately. Do not copy files to it, install programs on it, or save anything new. New data can overwrite the old files you want to recover.
- Disconnect the drive if you don’t need it right away. This helps prevent accidental writes or background system activity.
- Prepare another storage location for recovered files. Save recovered data to your computer’s internal drive or another external device.
These precautions help preserve the remaining data on the USB drive and improve the chances of successful recovery.
How to Recover Formatted Data from USB Flash Drive
Several approaches can help retrieve files from a formatted USB flash drive. The right option depends on what actually happened to the device and whether any copies of the files still exist elsewhere.
Method 1: Use Data Recovery Software
If you don’t have a backup, data recovery software is usually the most reliable way to retrieve files from a formatted USB flash drive. They scan the drive directly and search for traces of deleted data that still exist on the storage memory cells.
There are plenty of data recovery programs. Some handle simple deletions well but struggle after formatting. After a format, most file system metadata is no longer available, so recovery relies mainly on signature-based scanning. Because of this, it’s important to use software that supports a wide range of file signatures.
In our experience, Disk Drill handles these situations well. It supports common file systems used on USB drives and can recognize nearly 400 file types, from standard documents to RAW photo and video formats. It also runs a deep scan across the entire device and lets you preview files before recovery. That preview step helps confirm the files are still intact before you restore anything.
Here is how to recover formatted USB drive using Disk Drill:
- Go to the Cleverfiles website and download and install Disk Drill for your OS.
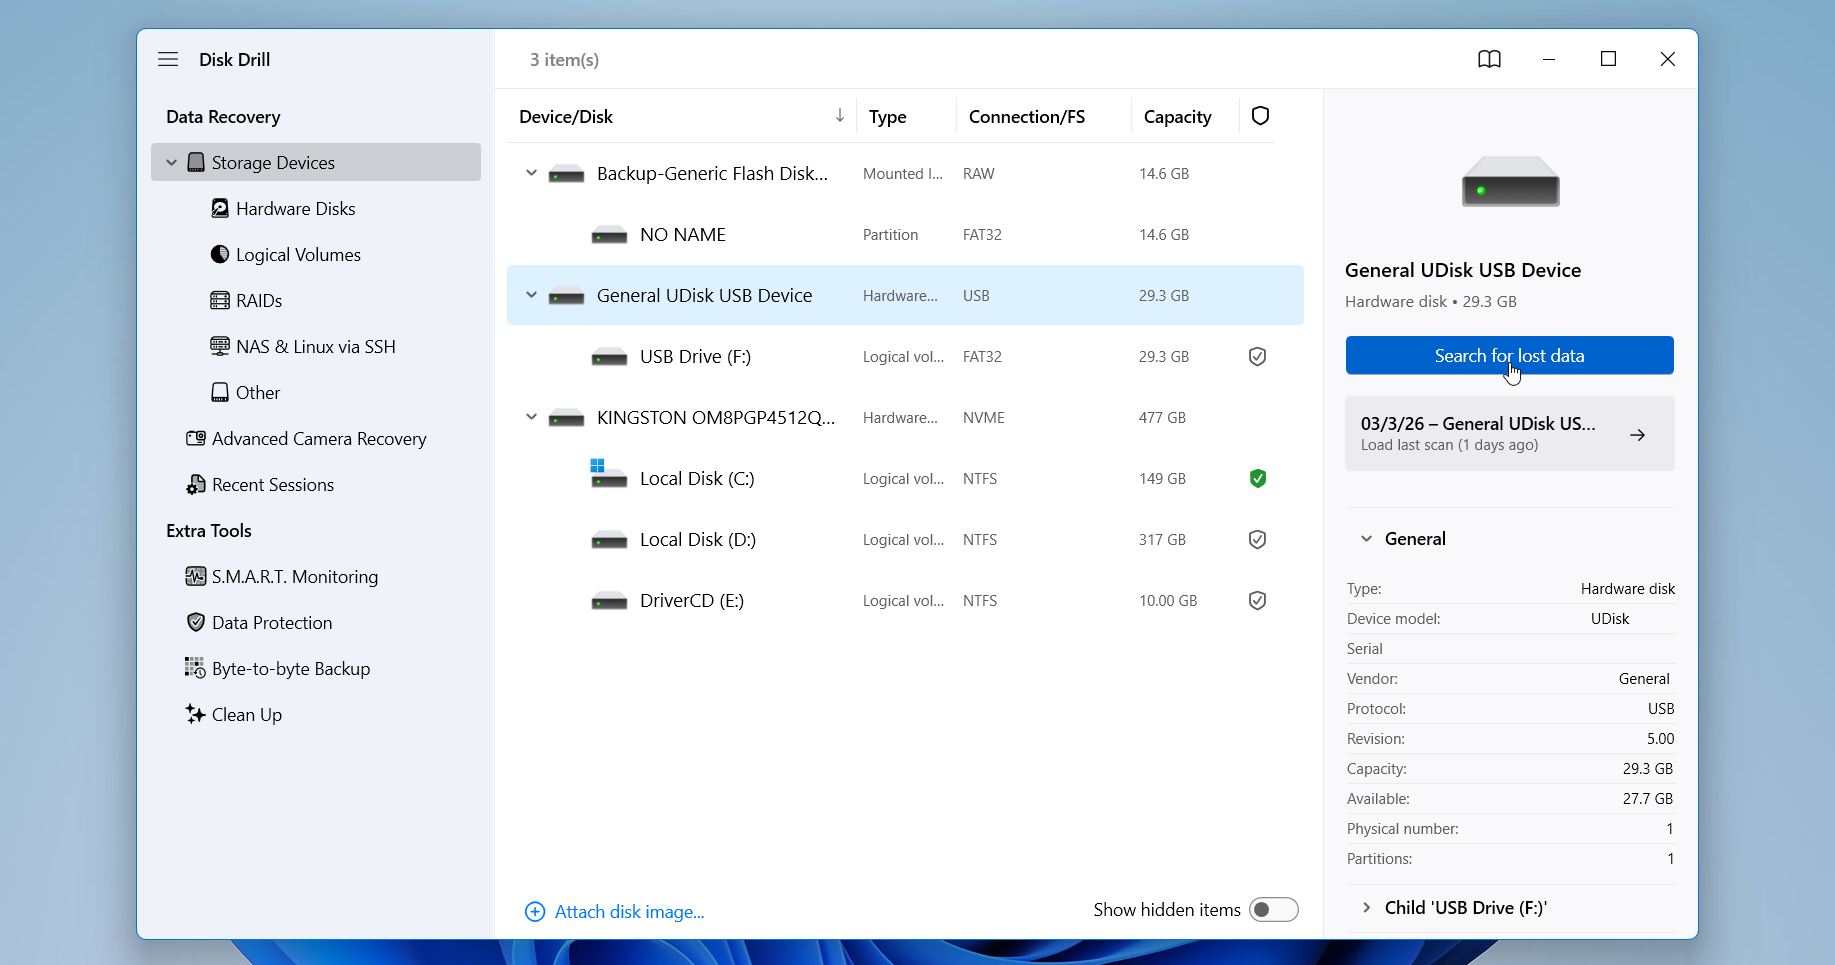
- Next, insert your USB flash drive into your computer, launch Disk Drill, and select it from the main window. Simply click the Search for lost data button to begin.
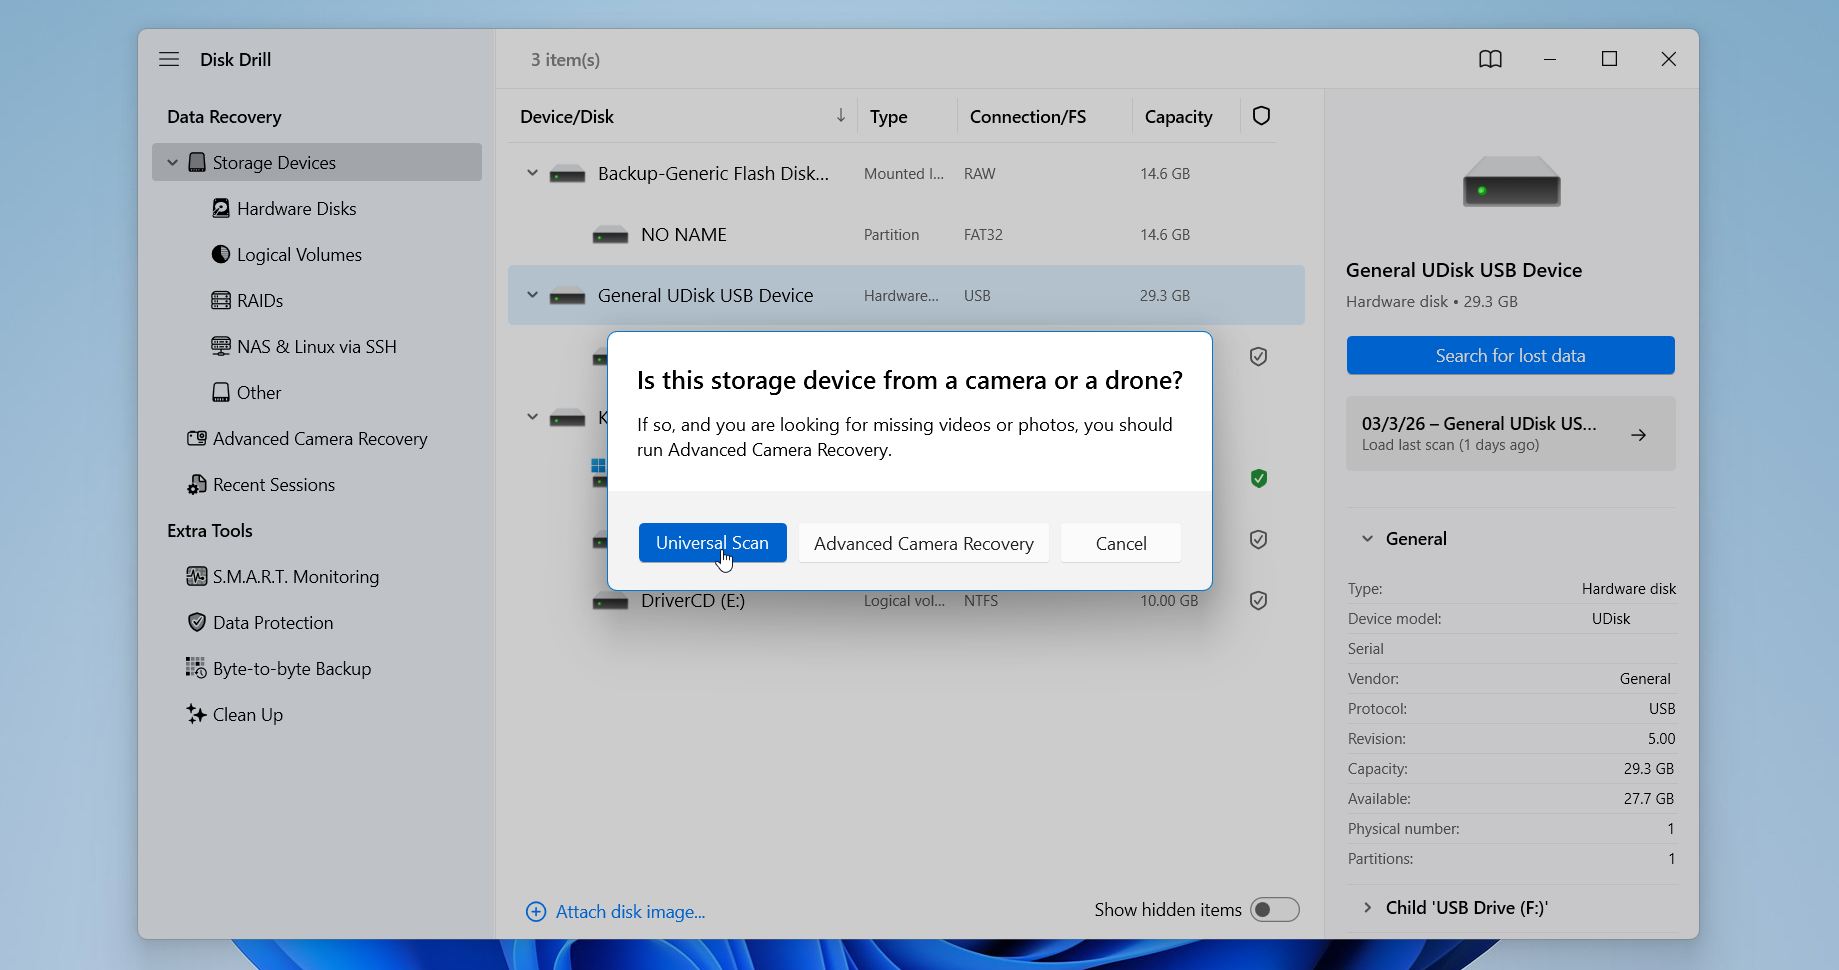
- You’ll be prompted to choose between two recovery modes. For a USB flash drive, Universal Scan is the better choice. Advanced Camera Recovery targets fragmented video files created by cameras and drones, so it’s not usually necessary for typical USB data recovery.
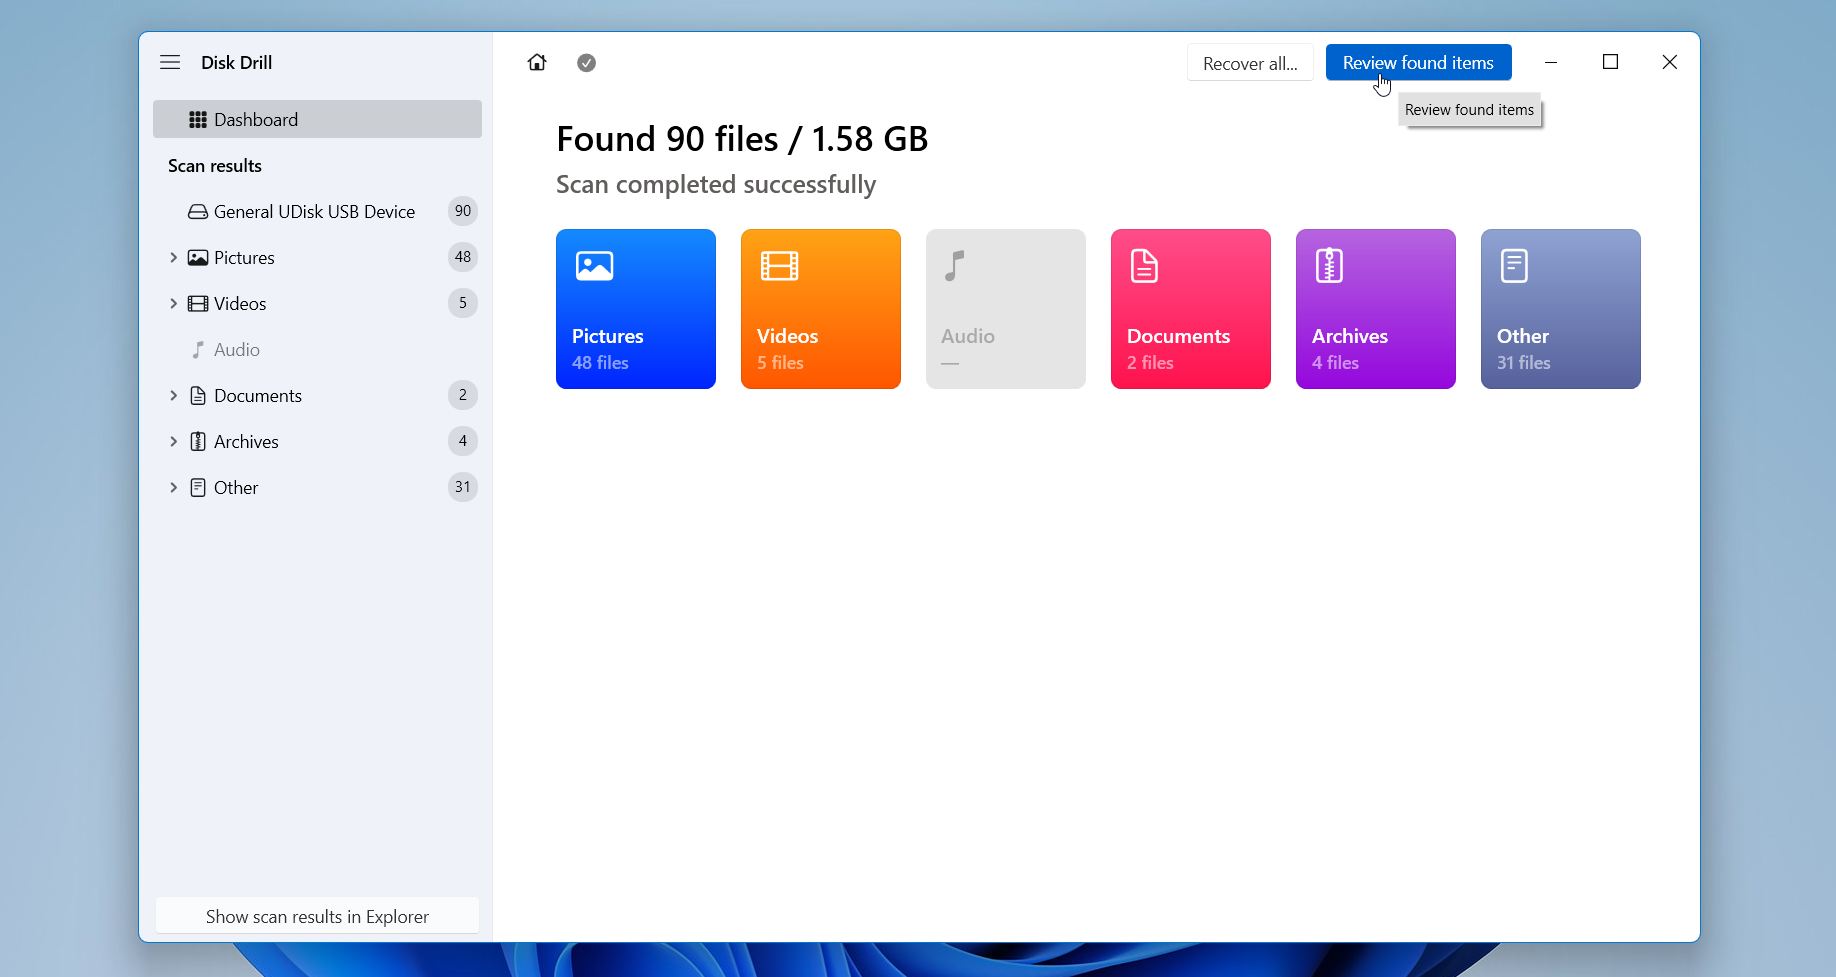
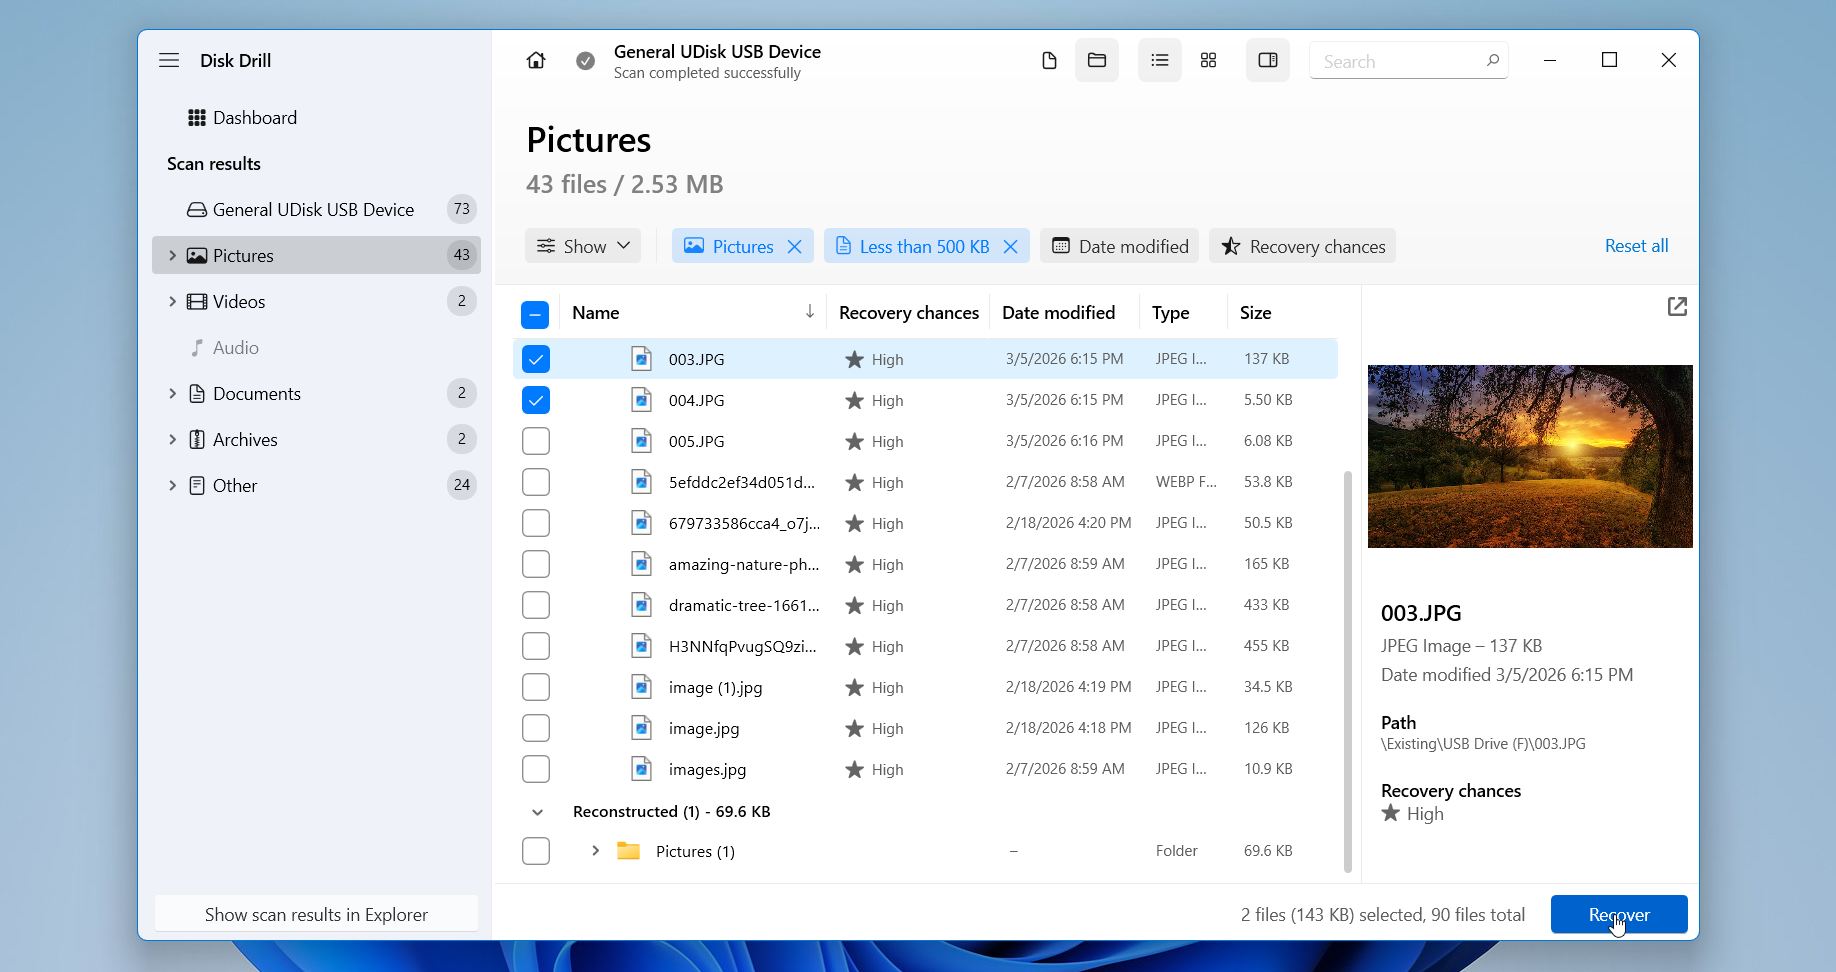
- Wait for the scan to finish. At the top, Disk Drill will show the progress and the total amount of data it has already detected. Once the scan finishes, you can click Review found items or just go with Recover all, if you need to get back everything.
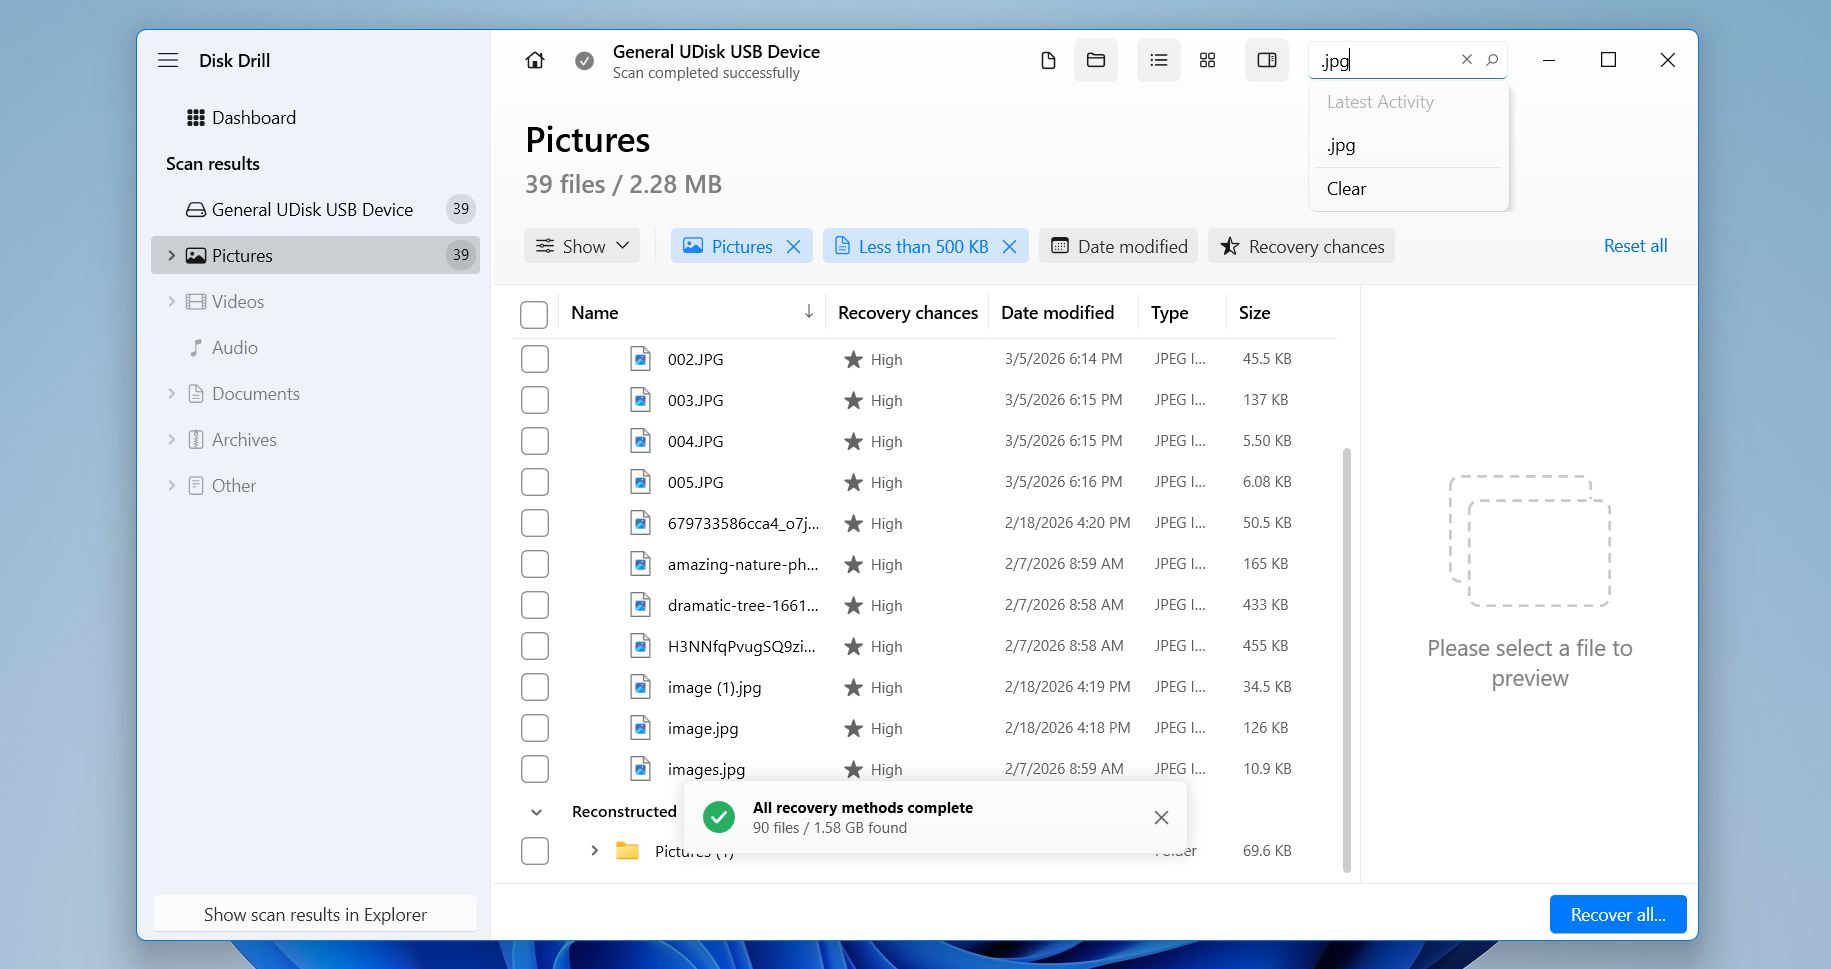
- Once the results appear, you can narrow them down using filters and search. As shown in the screenshot, Disk Drill groups files into categories like Pictures, Videos, Documents, and others. You can also filter by file size, date, or recovery chances. The search box in the upper-right corner helps locate specific files by name or extension, for example typing .jpg.
- Once you click a file in the list, Disk Drill displays a preview panel on the right side. Check the boxes next to the files you want to recover. You can select a few specific items or entire folders if needed. When you’re ready, click the Recover button in the bottom-right corner.
- Disk Drill will then ask where you want to save the restored files. Choose a different drive or folder, not the same USB device, to avoid overwriting other recoverable data. Click Next.
Disk Drill also lets you recover up to 100 MB for free on Windows, which is often enough to restore a few photos or test whether the files are still recoverable. If you decide to recover more data, the paid license unlocks unlimited recovery. And one license works on both Windows and macOS, which is convenient if you use more than one system.
Method 2: Recover Files Using a Backup
We placed this method a little lower in the guide for a simple reason. Many people don’t actually have a backup of their USB drive. Flash drives are often used for quick transfers: copy a few files, move them somewhere else, unplug the device, and move on. In those situations, backups rarely exist.
Still, it’s worth checking. Sometimes Windows creates copies automatically through File History, and people forget it’s even enabled. Still, it’s worth checking. File History doesn’t usually back up USB drives directly, but it may include copies of those files if you moved or saved them to locations like the Desktop or Documents and then deleted them later. If File History is enabled, those versions may still be available and can be restored in just a minute.
Here’s how to check and restore files with File History:
- Open the Start menu and type File History.
- Select Restore your files with File History.
- A window will appear showing folders and previous versions of files. Use the arrows at the bottom to move through older backups.
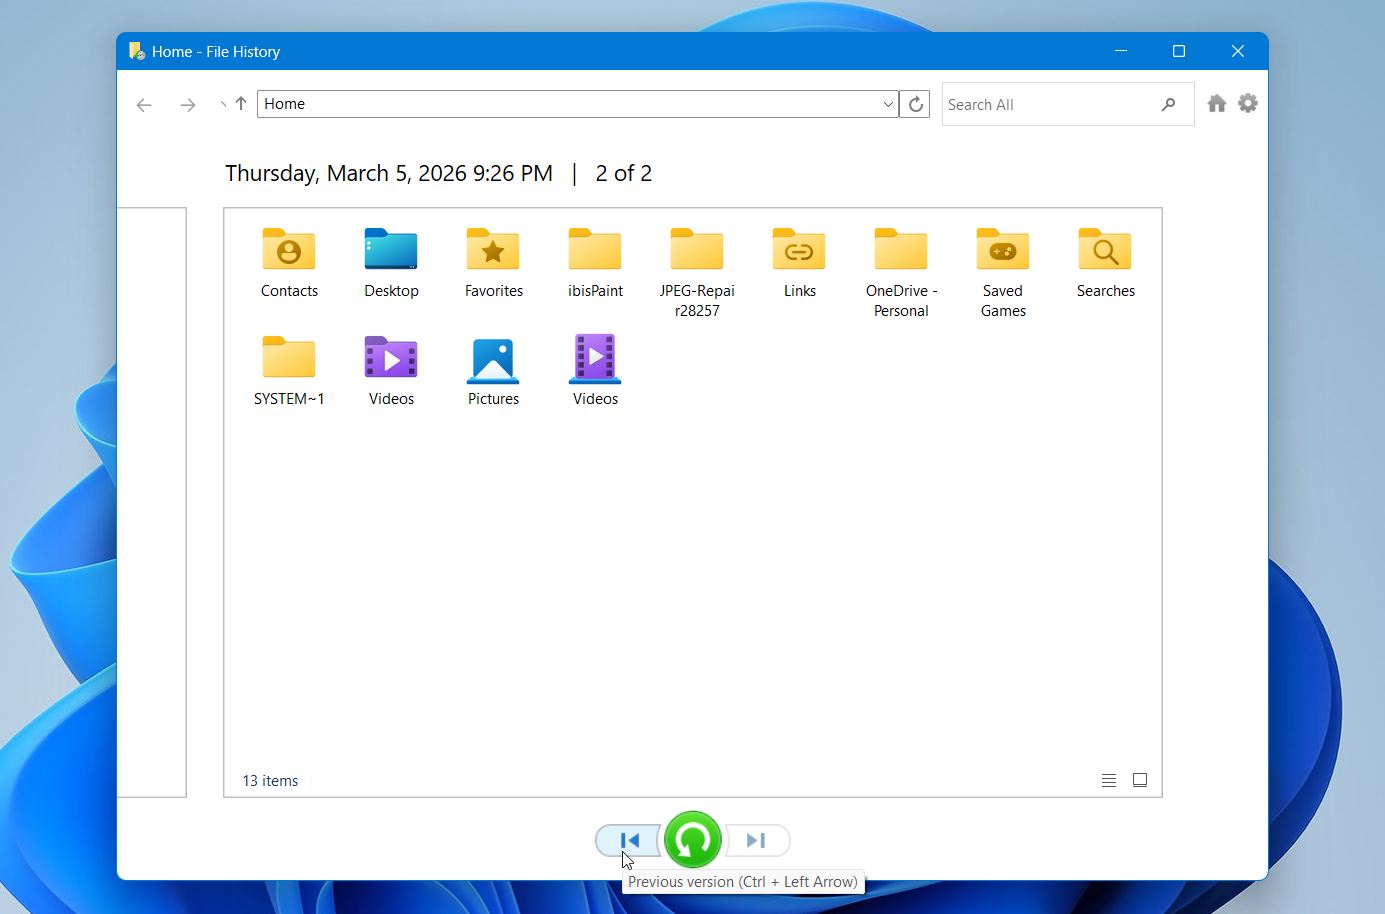
- Browse to the location where your files were stored.If you don’t remember the exact folder, you can also use the search field in File History to find files by name or part of the name
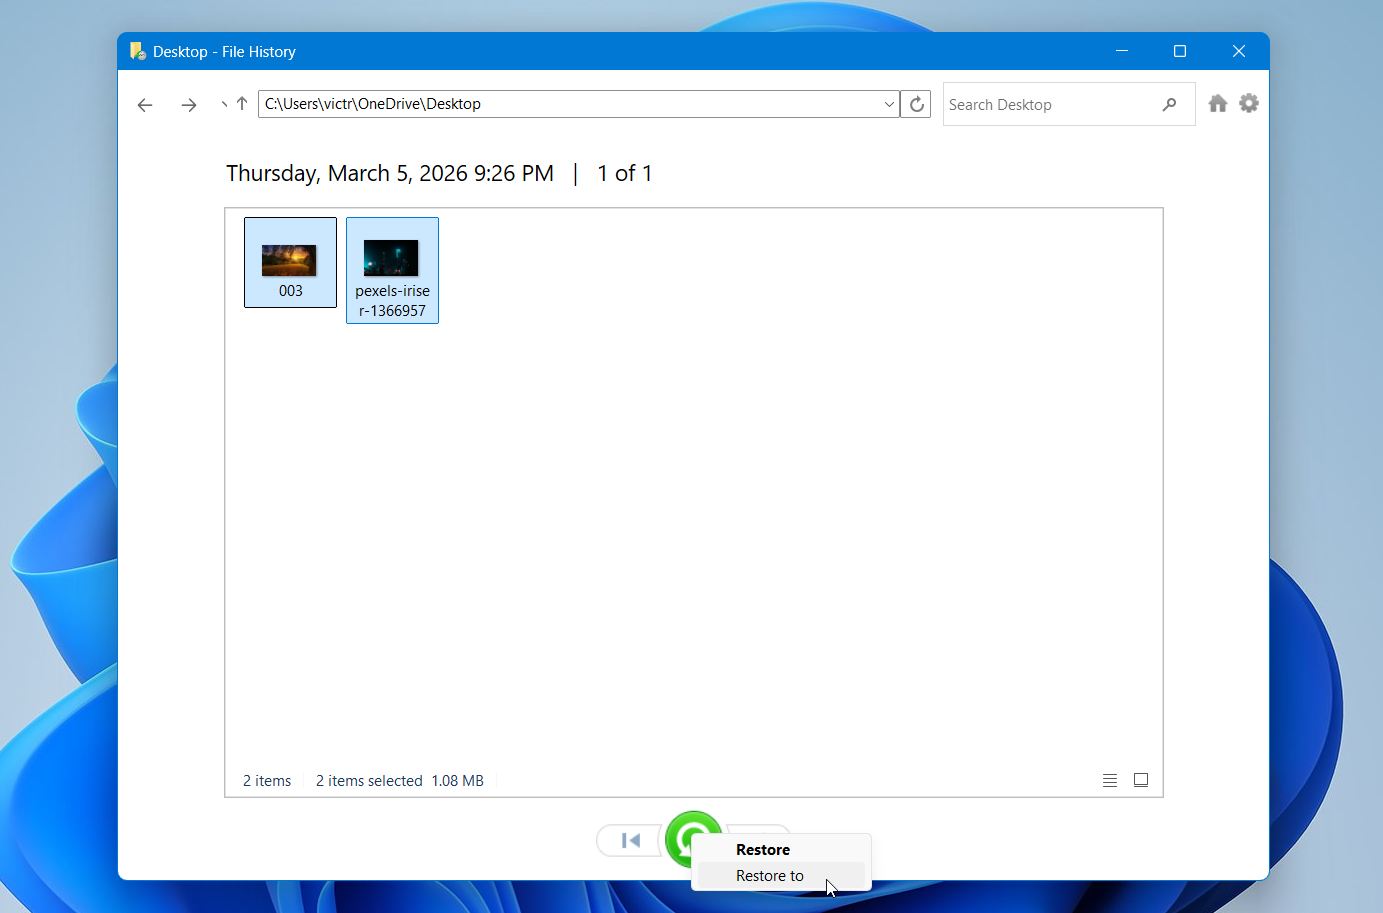
- Select the files you want and click the green Restore button. Windows will place the files back in their original location. If you want to place them somewhere else, right-click the green button and choose Restore to, then select a different folder.
When it works, this method is the easiest one in the guide. No scans. No waiting. The files simply come back. If File History doesn’t show anything, the backup probably wasn’t enabled before the files were lost. In that case, recovery software remains the best option.
One final note. USB drives fail, get formatted by accident, or disappear surprisingly often. A simple backup habit can save hours of recovery attempts later. Manual backups do the job in a pinch, but there are many excellent free backup software applications that can automatically protect files and folders on your USB drives.
Method 3: Data Recovery Services
This is our last method and, in most cases, a last resort. Fortunately, the majority of people can solve the problem with recovery software alone. But sometimes the situation is different.
For example, Windows asks to format a USB drive to fix a file system error. After the format, all files disappear. At first, it still looks like a standard recovery case, and DIY tools may help. But then new symptoms appear. The flash drive may start to disconnect randomly, freeze during scans, show read errors, or work extremely slowly.
These signs usually point to deeper problems, such as controller issues or memory degradation. In this state, further attempts may make things worse, so it makes more sense to turn to professionals instead of pushing the drive further.
Data recovery labs specialize in extracting data from damaged storage devices. Technicians use dedicated hardware tools to access the memory directly or repair internal components of the drive. The downside is cost. Professional recovery can range from a few hundred to well over a thousand dollars depending on the damage and the amount of work involved. Fortunately, many labs follow a “no recovery, no fee” policy. In other words, you usually don’t pay if they can’t recover your data.
Because of the cost, this option usually makes sense when the files are truly important, such as business documents, research data, or irreplaceable personal files.
Can I Recover Files Through Command Prompt?
No. Command Prompt itself cannot recover files from a formatted USB drive. You may see other articles suggest running commands like chkdsk or attrib to “restore” formatted data. That advice is misleading. These commands serve completely different purposes.
- chkdsk checks a drive for file system errors and may repair them.
- attrib removes hidden or system attributes from files.
Neither command can recover files that were removed by formatting. In fact, running repair commands on a damaged or formatted drive can modify the file system structure and sometimes make later recovery attempts harder.
Well, there is one thing you can try, if you don’t want to download a third-party tool. Windows File Recovery (winfr) is Microsoft’s official recovery utility that runs through a command-line interface. However, it is not included with Windows by default. You have to download it separately from the Microsoft Store.
Windows File Recovery can sometimes restore deleted or formatted files, but its main focus is NTFS-based Windows drives. Results on USB flash drives, especially those formatted as FAT32 or exFAT, are often limited.
Final Thoughts
Files from a formatted USB flash drive can often be restored after a quick format where the file system structure is removed but the actual data may still remain on the device. In situations without a backup, recovery software is usually the best option. After recovery, check your files for corruption and damage, part of their data might have been lost due to overwriting already. And if you’re planning to format your USB flash drives again, make sure to know the differences between full format and quick format before proceeding.
💡 Pro Tip: To reduce the risk of similar data loss in the future, keep regular backups of important files and avoid storing the only copy of valuable data on a USB drive. It also helps to safely eject flash drives before removing them and confirm the formatting option you choose, especially the difference between quick format and full format.


