

 A RAW hard drive doesn’t necessarily mean your files are lost. The data often remains on the drive, but Windows can no longer access it because the file system has become damaged, corrupted, or unsupported. If your files are important, recover them before attempting any repairs or formatting. Your chances of success are generally high unless the drive has physical damage. We will explain how to recover data from a RAW hard drive, fix the underlying problem, and answer the most common questions about RAW drives.
What Is a RAW Drive?
A RAW drive is a storage device whose file system Windows can no longer recognize. Instead of detecting a valid file system such as NTFS, exFAT, or ReFS, Windows reports the partition as RAW, making your files inaccessible. If your drive has become RAW, you’ll typically notice one or more of these symptoms:
- Windows displays “You need to format the disk before you can use it.”
- Disk Management shows the file system as RAW instead of NTFS or exFAT.
- The drive appears in File Explorer without a partition size, and Windows can’t open it.
Is It Possible to Perform RAW Drive Recovery Without Data Loss?
Yes. A RAW drive usually indicates file system corruption rather than missing data, so you can often recover your files successfully. The key is to identify what caused the problem and avoid actions that could overwrite recoverable data. Not every RAW drive requires the same solution. Use the table below to identify the most likely cause, understand what it means, and jump to the most appropriate recovery or repair method.
| Cause | What it means | Do | Don’t | Jump to |
| Damaged boot sector | The boot sector that describes the file system has become corrupted, so Windows can no longer mount the partition correctly. | Recover your files first. If the drive was previously NTFS, you can try CHKDSK after recovery. | Don’t run CHKDSK before recovering important data. | → How to Recover Data from a RAW Drive |
| File system structure corruption | File system metadata has been damaged, preventing Windows from recognizing the partition. Your files may still be recoverable. | Recover your files before attempting repairs. | Don’t format the drive or use repair tools first. | → How to Recover Data from a RAW Drive |
| Damaged partition table | Windows can detect the physical drive but can’t identify the partition correctly because the partition table is corrupted or missing. | Recover your files or rebuild the partition table only after your data is safe. | Don’t create a new partition or initialize the drive. | → How to Recover Data from a RAW Drive |
| Drive formatted for another operating system (for example, Linux ext4) | Windows doesn’t support the file system. | Open the drive on its native operating system or use a compatible file system reader. | Don’t format the drive if you need the data. | → Fix 1: Check If the Drive Was Formatted for Another Operating System |
| Interrupted formatting | The formatting process was interrupted before the new file system was created correctly, which can leave the drive appearing as RAW. | Recover your files (if they are important) before attempting another format. | Don’t copy new files to the drive. | → How to Recover Data from a RAW Drive |
| Bad sectors or hardware failure | If bad sectors develop in areas that store the file system’s metadata, Windows may no longer recognize the file system, and the drive can appear as RAW. | Create a disk image or consider a professional recovery service. | Don’t keep rescanning a failing drive. | → How to Recover Data from a RAW Drive |
How to Recover Data from a RAW Drive?
As we mentioned earlier, you should recover your files before you try to fix a RAW drive if the data is important. Repair tools, CHKDSK, or formatting can make recovery more difficult or even impossible in some cases. If you already have a recent backup, you can skip the recovery step, repair or format the drive, and restore your files afterward. However, if you don’t have a backup, data recovery software is usually your best option.
We’ve tested many recovery tools over the years, and for RAW drive recovery, we recommend Disk Drill. It consistently delivered some of the best results in our tests, handled RAW drives reliably, and combines an easy-to-use interface with powerful recovery features, making it a good choice for both beginners and experienced users.
It combines file system analysis with signature-based recovery, supports most modern file formats, preserves original folder structure and file names whenever possible, includes file previews, checks S.M.A.R.T. health, and can create a disk image if the drive is unstable.
Important: If the drive disconnects, becomes very slow, S.M.A.R.T. monitoring reports bad sectors, or it makes unusual noises, stop the scan. These are common signs of hardware failure. Instead, create a disk image in Disk Drill and scan the image instead of the original drive, or consider a professional data recovery service if the drive appears to be failing.
Here’s how to recover data from a RAW drive with Disk Drill:
- Download and install Disk Drill from the official site.
- If Windows displays a message asking you to format the RAW drive, close it. Do not format the drive. Run Disk Drill as an administrator so it has full access to the storage device.
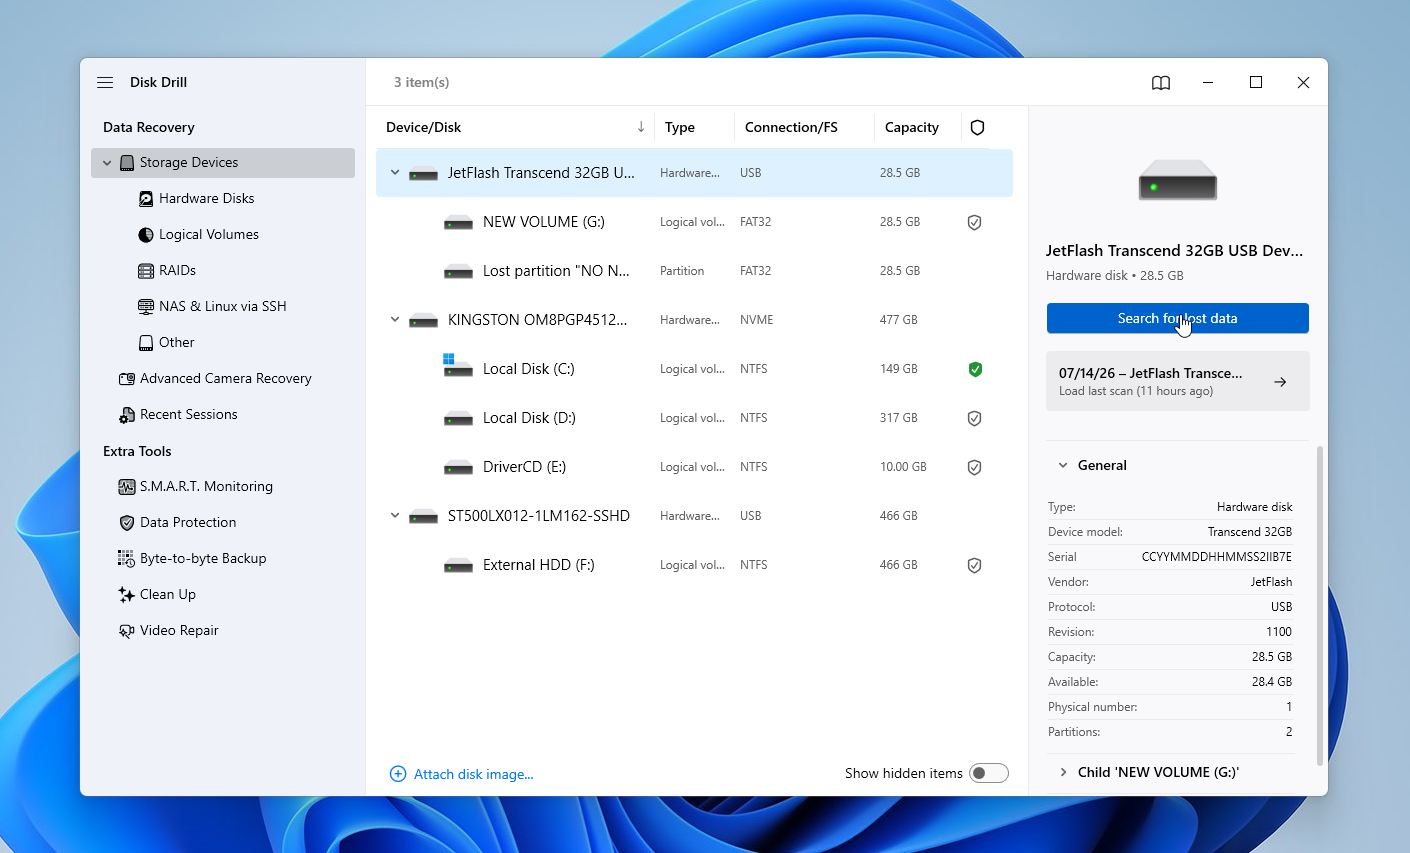
- Disk Drill lists all connected storage devices. If you see both the physical drive and a RAW partition, select the entire drive. This gives Disk Drill access to all available file system information and usually produces better results. Click Search for Lost Data.
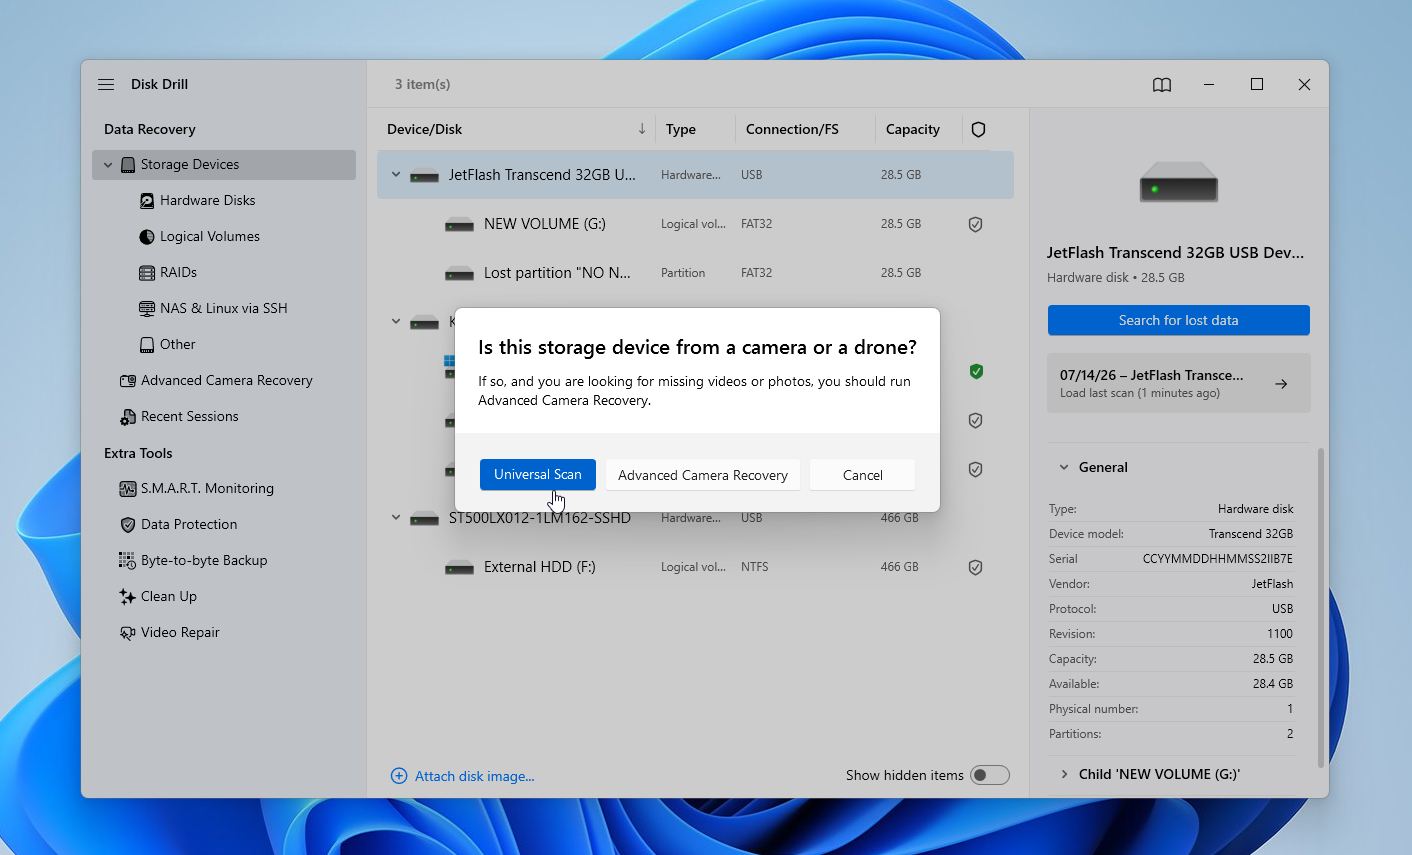
- If Disk Drill asks which scan type to use, choose Universal Scan. It’s a better option for RAW hard drives because Advanced Camera Recovery works best for deleted videos from cameras or drones.
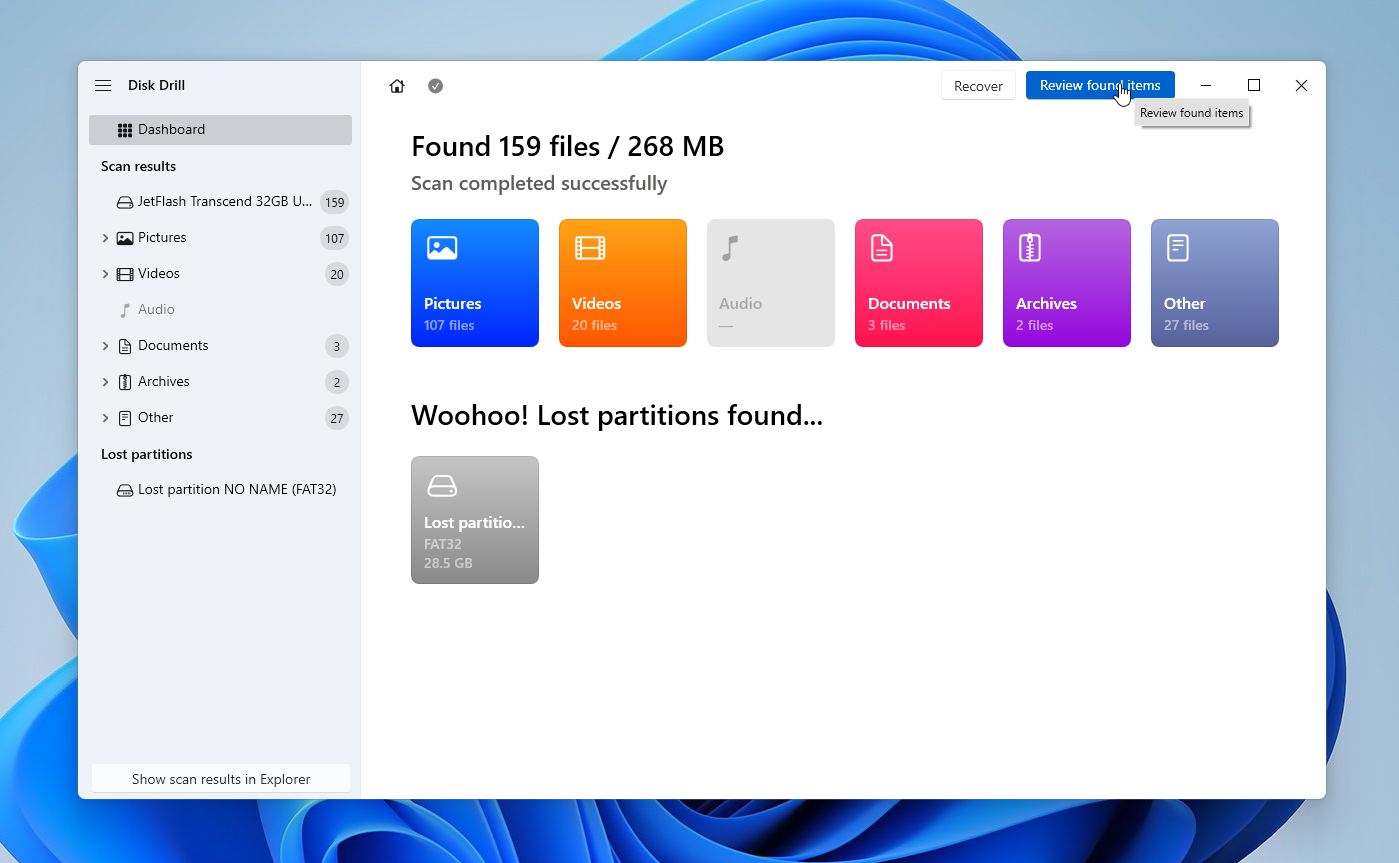
- Wait for the scan to complete. Depending on the drive’s size and condition, this may take anywhere from several minutes to several hours. You don’t have to wait until the end to see results. Click Review Found Items at any time while the scan continues in the background.
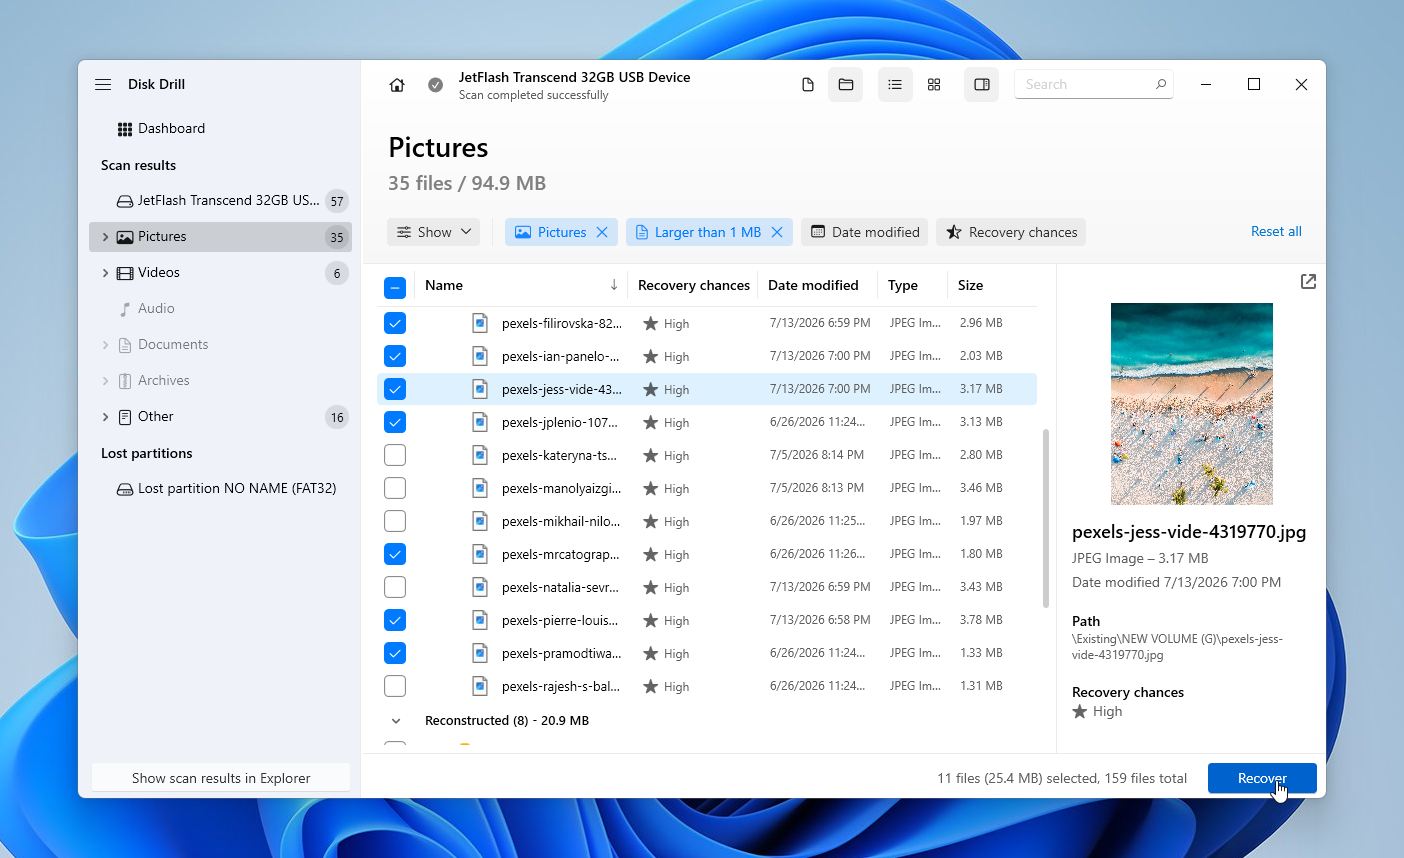
- Use the filters on the left to display only photos, videos, documents, or other file types. You can also search by file name or sort the results by date or size. If Disk Drill recognizes the previous file system, you’ll often see the original folder structure, file names, and timestamps. Select a file to open its preview. If it displays correctly, there’s a very good chance it will recover successfully. Select everything you want to restore and click Recover.
- Choose a location on a different drive or storage device.
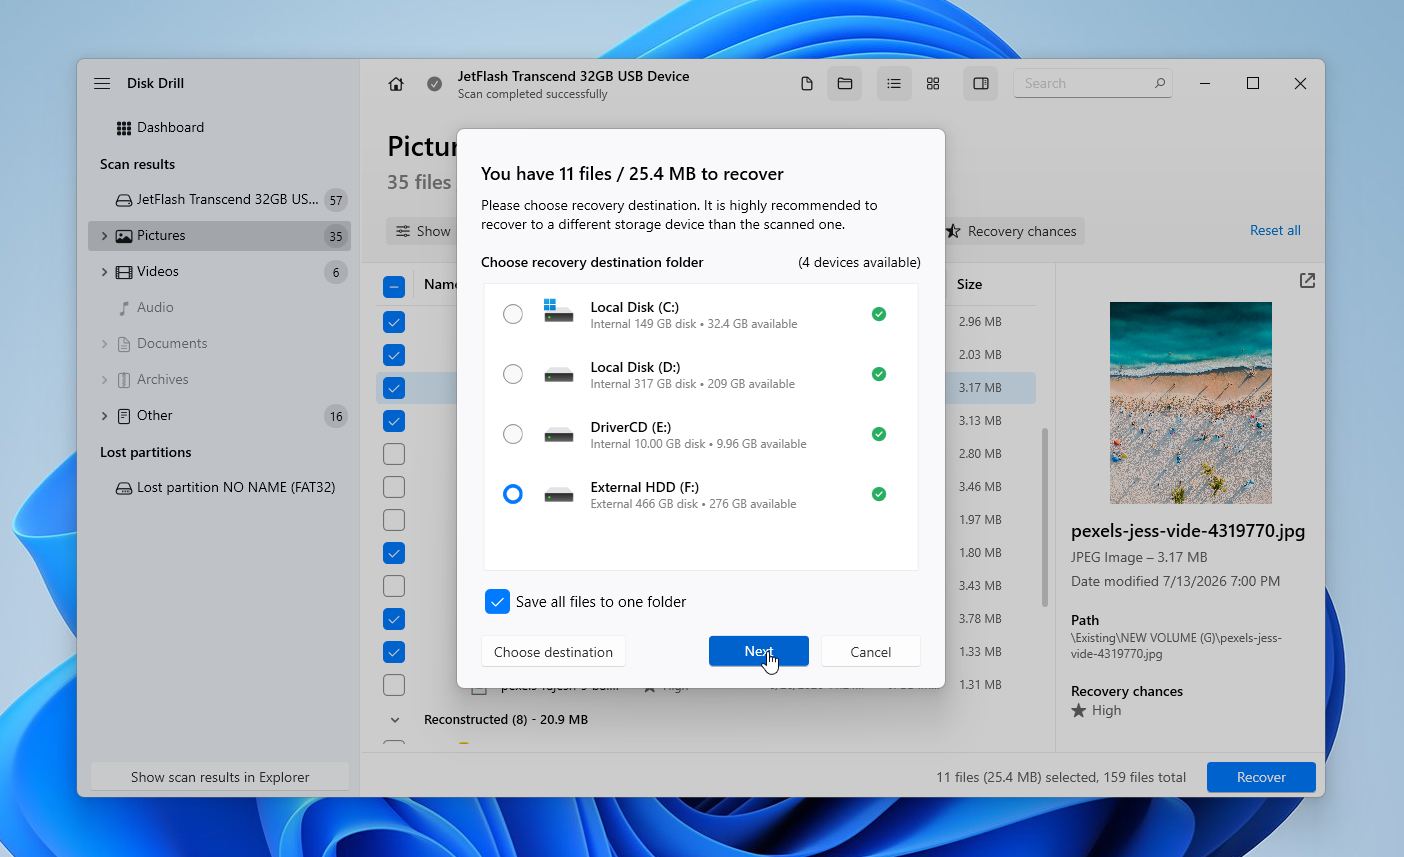
Disk Drill lets you scan and preview files for free, and Windows users can recover up to 100 MB of data at no cost. This gives you a chance to confirm that your files are recoverable before purchasing a license.
What to do if you suspect the drive is failing: If software recovery doesn’t work, or your drive shows signs of hardware failure, a professional data recovery service is your next option. Common warning signs include clicking or grinding noises, repeated disconnects, extremely slow performance, bad sector warnings, or a drive that is no longer detected consistently. If the files are important, it’s usually safer to stop DIY recovery and let professionals handle the drive.
Here’s what the process typically looks like:
- Request an evaluation. Most recovery labs offer a free or low-cost assessment to determine whether your data can be recovered.
- Receive a quote. The lab explains the problem, estimates the chances of recovery, and provides a price before any work begins.
- Approve or decline the recovery. You’re usually under no obligation to continue.
- Recovery begins. If you approve the quote, technicians recover the data using specialized equipment and copy the recovered files to a new storage device.
- Receive your files. Most labs return your recovered data on a new external drive or another storage device rather than repairing the original drive.
Many reputable companies follow a “no data, no fee” policy, so you only pay if they successfully recover your files. The cost depends on the type of failure. Logical recoveries typically cost $300 to $700, while drives with physical damage often range from $700 to $2,000 or more. Most recoveries take a few days to two weeks, though many labs also offer expedited service for an additional fee.
How to Fix a RAW Partition?
Data recovery solves only half the problem, you still need to address the underlying issue that caused the RAW state in the first place. The methods below will help you restore your storage device to proper working condition so you can return to normal use. Again, start with the first method and continue from there unless you have a good reason to try them in a different order (maybe you’ve already tried some).
Fix 1: Check If the Drive Was Formatted for Another Operating System
Sometimes a drive appears as RAW in Windows even though nothing is actually wrong with it. This often happens when the drive uses a file system that Windows doesn’t support, such Linux or Apple file systems.
Before you attempt any repairs or formatting:
- Think about where the drive was last used. If it came from a Linux computer, NAS device, Raspberry Pi, or another non-Windows system, the file system may simply be incompatible with Windows.
- Connect the drive to a computer running its original operating system. If the drive opens normally there, your data is still intact.
- If you only have access to a Windows PC, use a utility such as Linux Reader to browse and copy files from Linux-formatted partitions without modifying the drive.
If the drive works correctly on its native operating system, there’s no need to repair or format it. Windows simply can’t read that particular file system.
Fix 2: Restore the Partition Table with TestDisk
If Windows suddenly reports a previously working NTFS or exFAT partition as RAW, either the partition table or the file system’s boot sector may have become damaged. In many of these cases, TestDisk can rebuild the partition information without formatting the drive.
Here’s how to use it:
- Download TestDisk from its official website and extract the archive.
- Launch testdisk_win.exe.
- Select Create to generate a new log file.
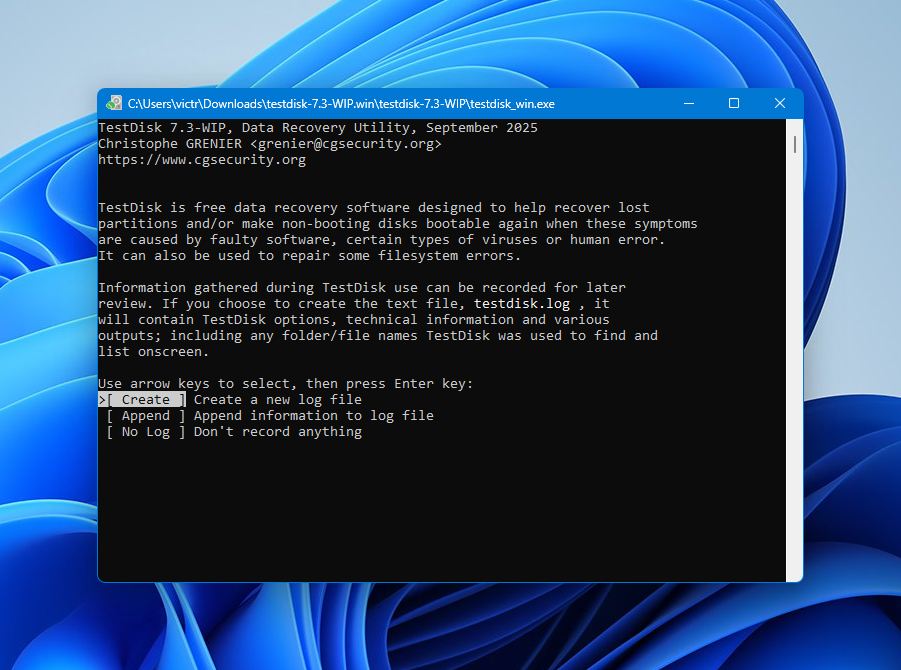
- Select the physical drive that contains the RAW partition and press Enter.
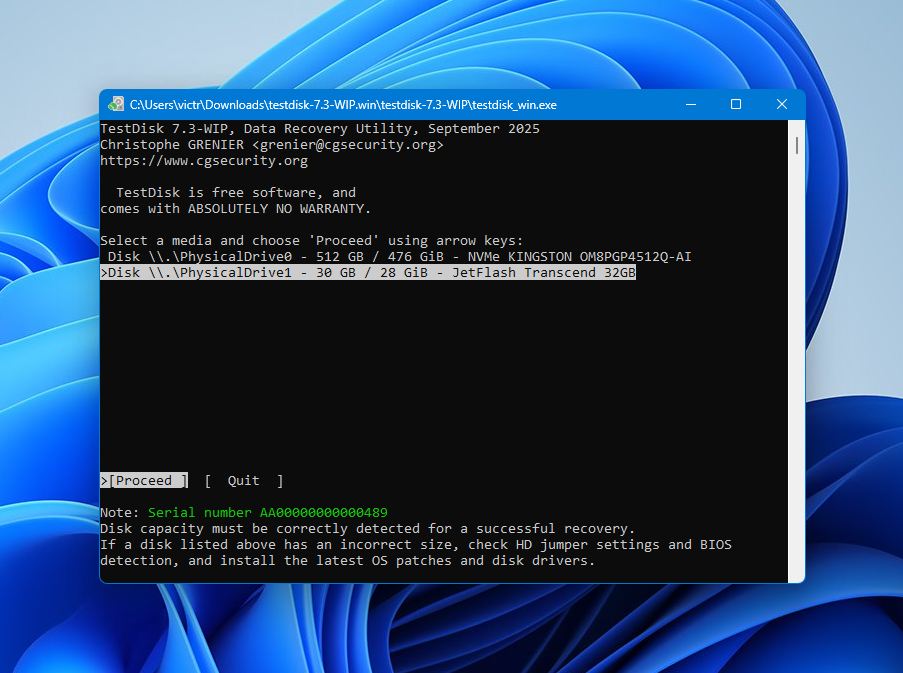
- Choose the detected partition table type. In most cases, TestDisk automatically selects the correct one.
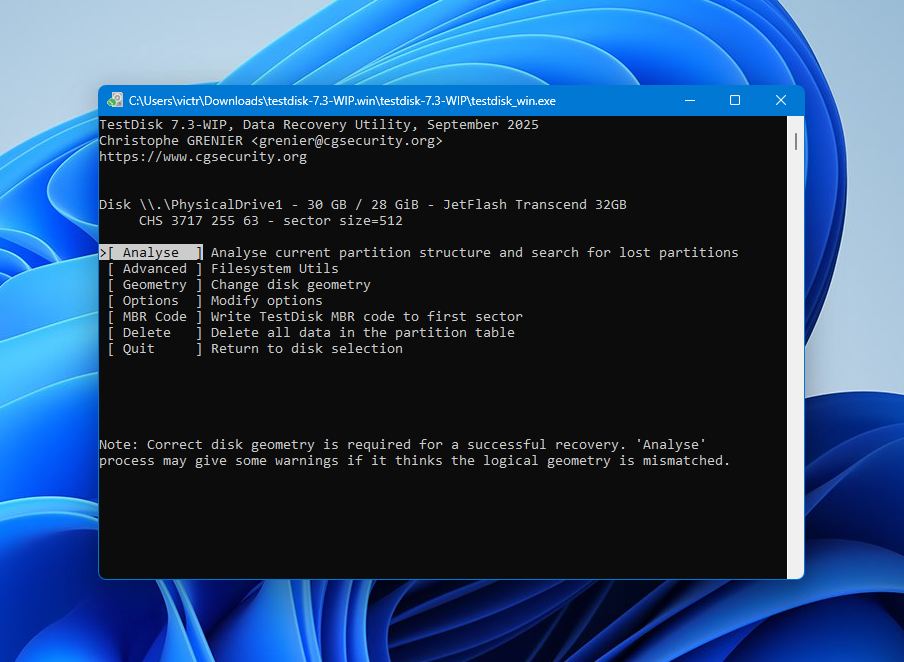
- Select Analyze to examine the current partition structure.
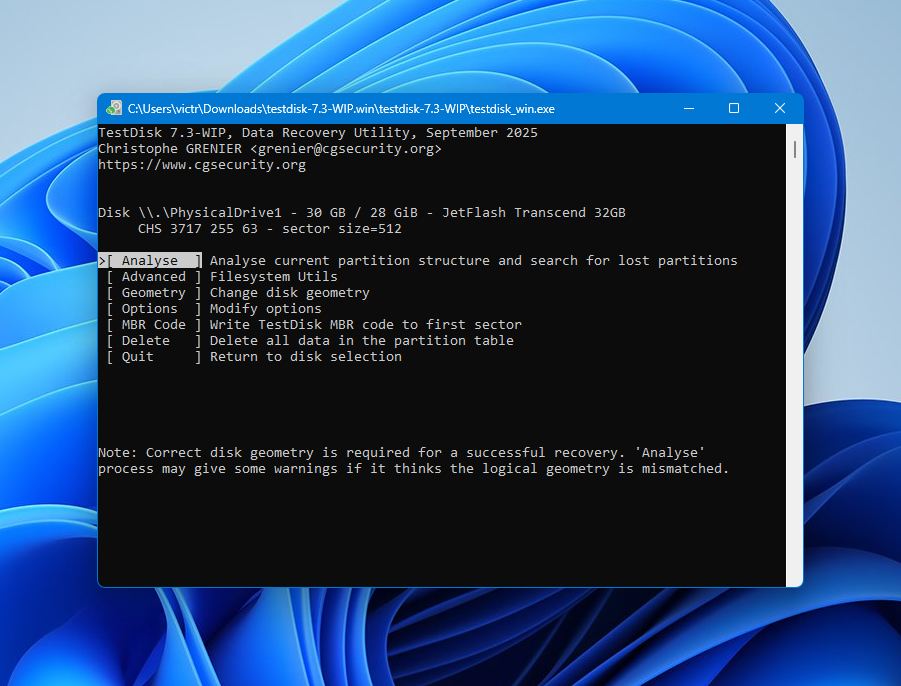
- Run Quick Search and wait for the scan to complete.
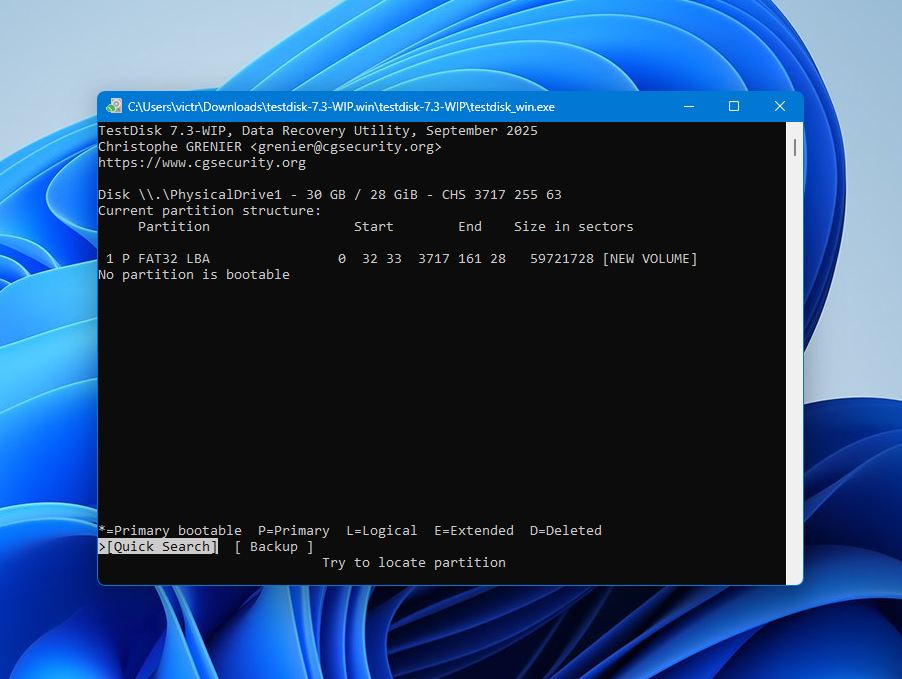
- If the missing partition doesn’t appear, choose Deeper Search. This scan takes longer but often finds partitions that Quick Search misses.
- When the correct partition appears, highlight it and press Enter to verify it.
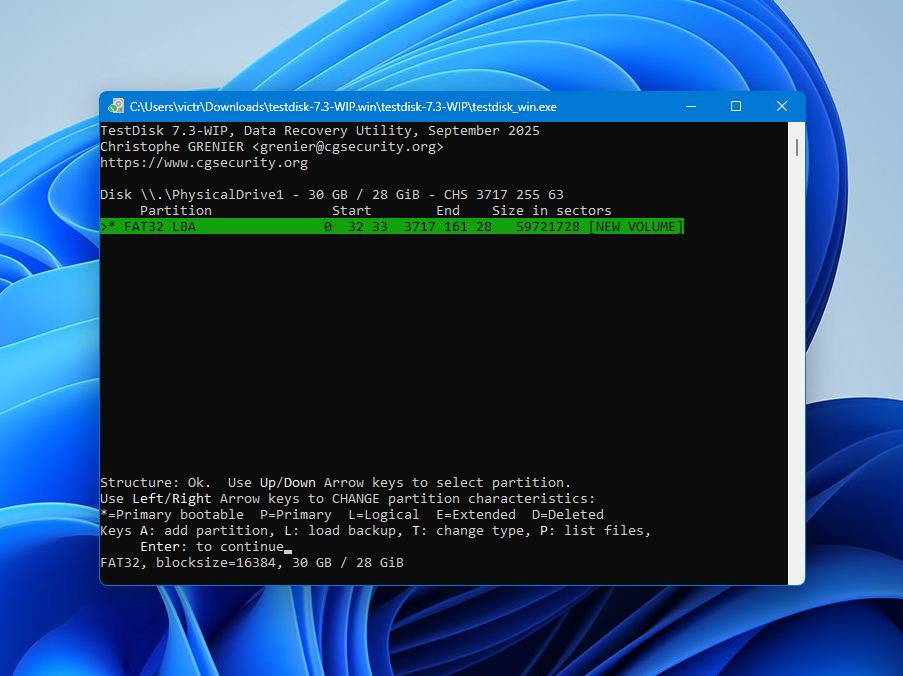
- Select Write to save the recovered partition table.
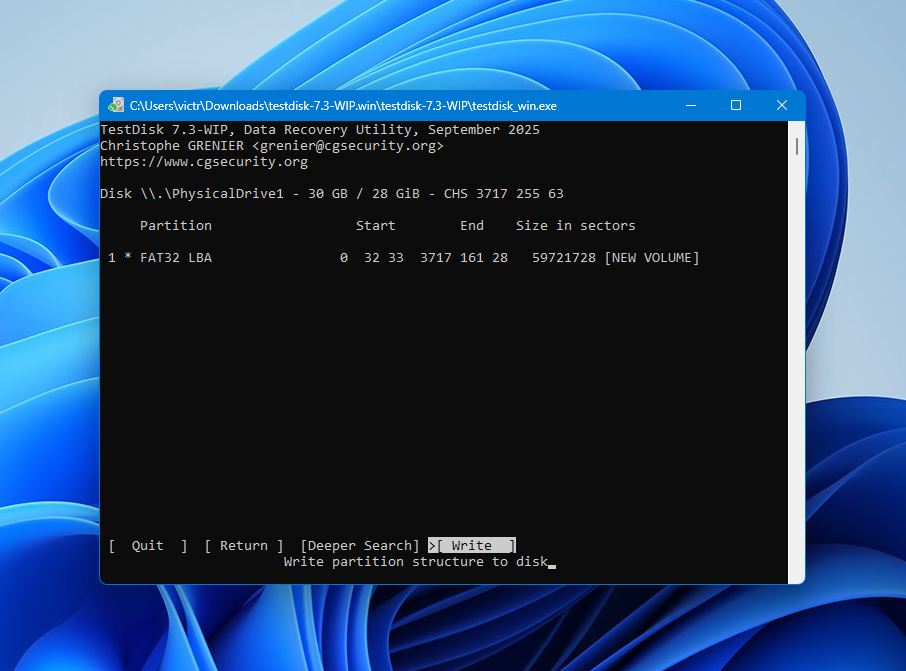
- Restart your computer and check whether Windows recognizes the drive again.
TestDisk works best when the partition table is damaged but the underlying file system is still intact. It won’t repair physical damage or severe file system corruption.
Fix 3: Format the RAW Partition
If you’ve already recovered your files or have a reliable backup, formatting is usually the quickest way to restore a RAW partition.
The easiest method is through Disk Management:
- Press Win + X and open Disk Management.
- Locate the RAW partition in the lower pane.
- Right-click the partition.
- Select Format.
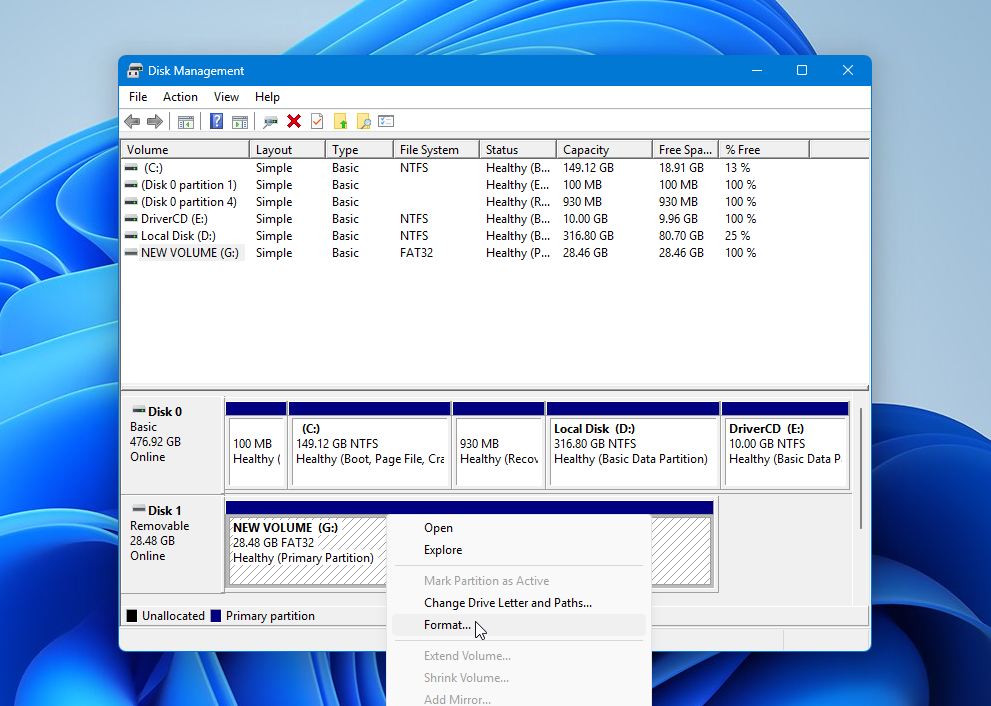
- Follow the wizard and choose an appropriate file system: NTFS for most Windows-only drives or exFAT if you plan to use the drive on both Windows and macOS.
- Leave Quick Format enabled unless you specifically want Windows to perform a full format.
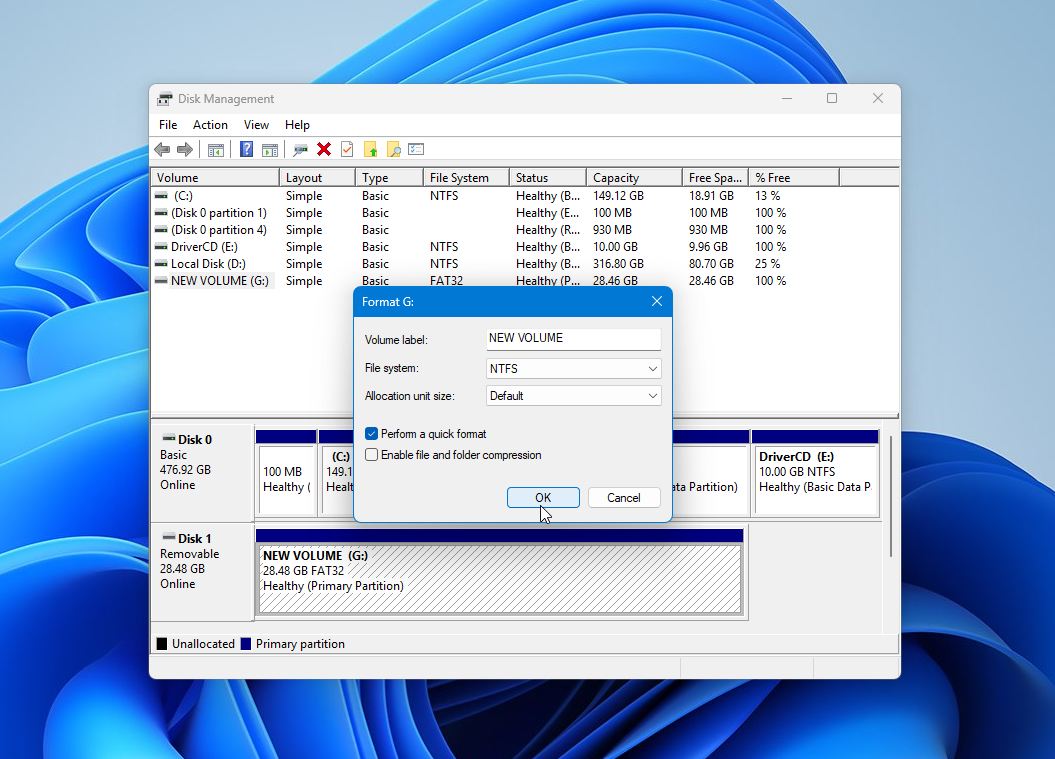
- Click Finish and wait for the process to complete.
Once formatting finishes, the partition should appear normally in File Explorer.
If the drive becomes RAW again after formatting, repeatedly disappears from Windows, or continues to report disk errors, the problem is likely hardware-related rather than a damaged file system. At that point, replace the drive instead of attempting additional repairs.
Can I Run CHKDSK on a Raw Drive?
Usually, no. In most cases, CHKDSK can’t repair a RAW drive because Windows no longer recognizes its file system. If you try to run it, you’ll typically see the message: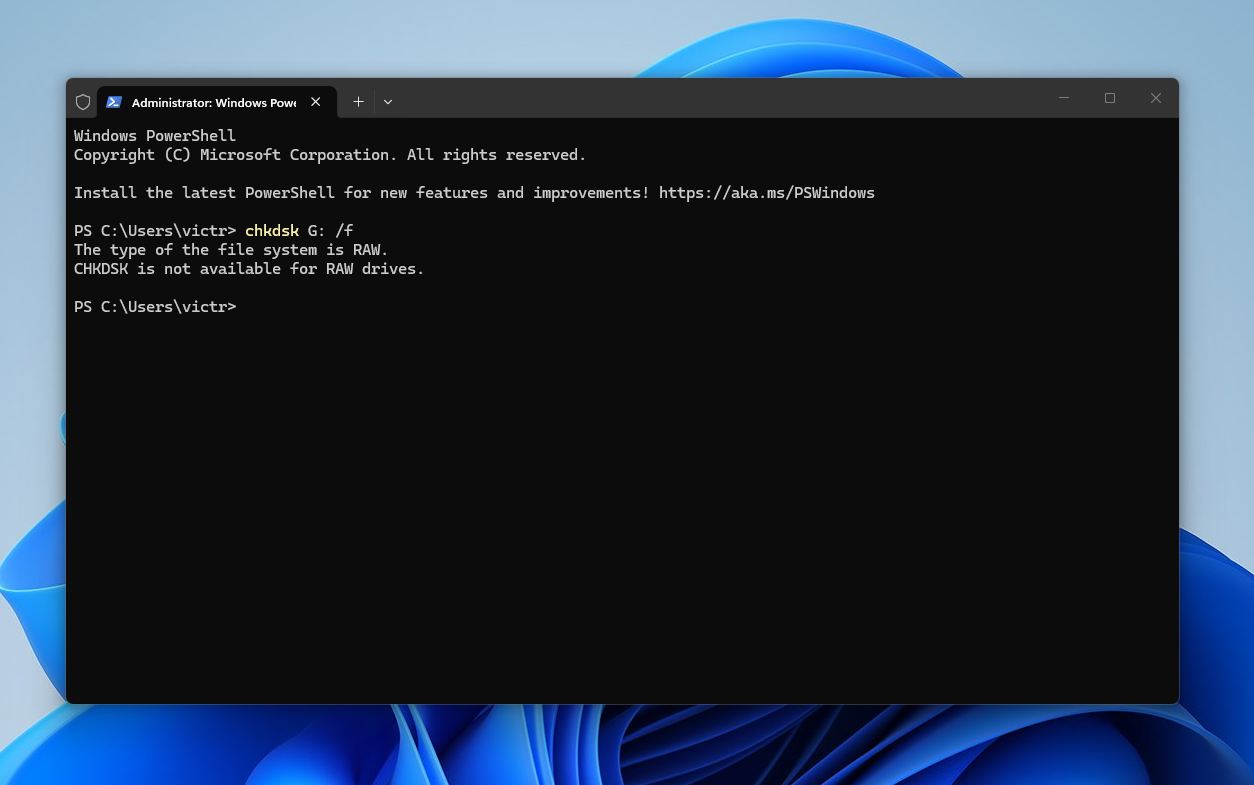
There is one exception. If the drive was originally formatted as NTFS and only the boot sector became damaged, CHKDSK may occasionally recognize the underlying file system and restore the boot sector from its backup copy. If that happens, the drive can become accessible again without formatting. However, this only works in a small number of cases, so it shouldn’t be your primary recovery strategy.
Important: Never run CHKDSK before recovering important files. If it makes changes to the file system, it may overwrite information that data recovery software could otherwise use. The safest order is always the same: recover your data first, repair the drive second.
If you’ve already recovered your files and want to see if CHKDSK can help, here’s how to try it:
- Press Win + X and select Terminal (Admin) or Command Prompt (Admin).
- Type chkdsk X: /f, replacing X with your drive letter.
- Press Enter and wait for the process to finish.
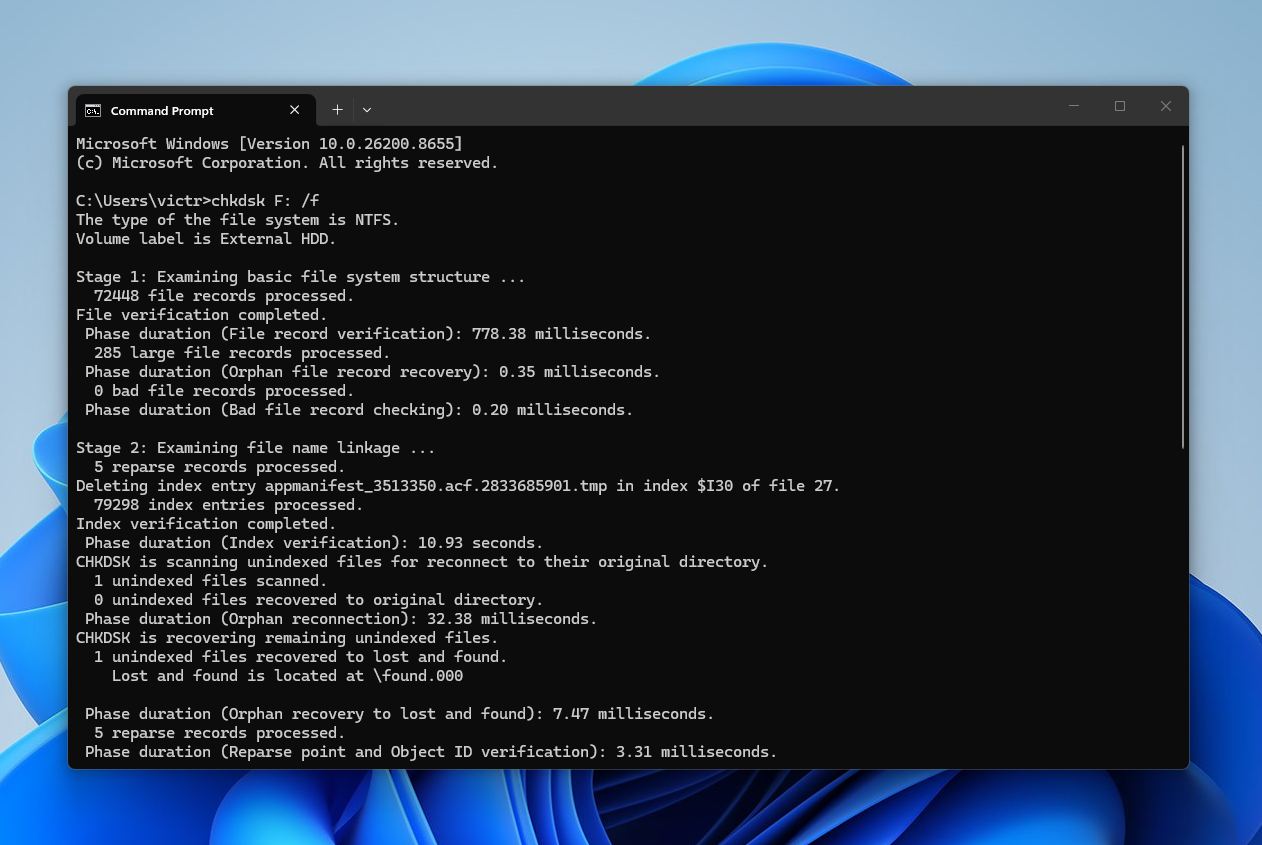
If Windows reports that CHKDSK is not available for RAW drives, the file system damage is beyond what CHKDSK can repair. In that case, use the recovery and repair methods covered earlier in this guide.
Final Thoughts
A RAW drive doesn’t always mean your files are gone. In many cases, the problem is limited to file system corruption, and recovery is still possible if you take the right steps.
Keep these points in mind:
- Recover your files first. This is the most important rule. Use a recovery tool like Disk Drill before you try any repairs.
- Format or repair the drive only after recovery. Whether you plan to use TestDisk, Diskpart, a quick format, or, in some cases, CHKDSK, always recover your important files first. Reversing this order can reduce your chances of getting them back.
- Avoid writing new data to the RAW drive. The less you use the drive before recovery, the better your chances of success.
- Act sooner rather than later. Delays increase the risk of additional corruption or accidental overwrites.
- Replace the drive if it keeps becoming RAW or shows signs of hardware failure. A recurring RAW file system often points to an underlying hardware problem.
- Consider a professional data recovery service if software recovery doesn’t work or the drive has physical damage.
In short, data first, fixes second. Following that order gives you the best realistic chance of recovering your files while still allowing you to repair or replace the drive afterward.
FAQ:
- Sudden power loss or an improper shutdown while the drive is in use.
- Disconnecting an external drive without safely ejecting it.
- File system corruption caused by software errors or interrupted file transfers.
- Bad sectors or other signs of physical drive failure.
- Malware or viruses that damage the file system.
- Corrupted partition information.