


If you need to recover data from a flash drive on Mac, there are a few ways to do it. You can check the Trash, use data recovery software, or, if the USB drive is physically damaged, turn to a professional data recovery service. But what if the files disappeared even though you didn’t delete anything? In that case, they may simply be hidden, or the USB drive itself may be corrupted. In this article, we’ll cover all of these scenarios and show you how to recover files from a USB on a Mac in each case.
Warning: USB flash drives are better suited for temporary storage, such as moving files from one computer to another or sharing them with someone else. If you have files that you want to keep long-term, don’t leave the only copy on a USB drive. An HDD or SSD is a better choice for long-term storage, preferably with an additional backup of important files.
Is it Possible to Recover Lost Files from USB Drive on Mac?
In most cases, yes. Thanks to modern data recovery solutions, you’ll be able to recover most, if not all, deleted files from your USB drive in a few simple settings. This applies to data loss scenarios like minor corruption, an interrupted move operation, or an accidentally formatted pen drive. But, it’s imperative to act quickly and avoid writing new files to the drive before recovering your data.
However, the final result depends on what caused the files to disappear from your USB drive and what you did with the drive afterward. The table below should help you roughly estimate your recovery chances based on your specific situation.
| Data Loss Scenario | Recovery Chances | Why |
| Files were recently deleted and the USB drive is still connected | High | Files deleted from an external drive on Mac may still be available in the Trash folder on the USB drive. |
| Files were deleted some time ago, but the USB drive hasn’t been used since | High | Even if the files are no longer in Trash, their data may still remain on the drive as long as it hasn’t been overwritten. Data recovery software can scan for it. |
| Files were deleted and the USB drive has been used since | Low | New files written to the drive may have overwritten some or all of the deleted data. The more the drive was used, the lower the chances of recovery. |
| USB drive was formatted, but hasn’t been used since | Medium to High | A quick format usually removes file system records rather than immediately overwriting all file data. Recovery software may still find the files. |
| USB drive was formatted and new files were written to it | Low | Formatting followed by continued use increases the chance that the old data has been overwritten. Files that have already been overwritten cannot be recovered. |
| Data has been overwritten | Impossible | Once the sectors containing the deleted file have been overwritten with new data, recovery software cannot restore the original contents. |
| Files disappeared, but you didn’t delete them | High | The files may still be on the USB drive but hidden from Finder. Check for hidden files before attempting recovery. |
| Files disappeared and the USB drive behaves strangely | Medium | File system corruption can make existing files inaccessible even though their data is still on the drive. Recover the files before attempting repairs. |
| USB drive isn’t recognized by Mac and doesn’t appear in Disk Utility | Very Low for DIY recovery | Data recovery software cannot scan a drive that macOS cannot detect. Try another port or computer first; if the drive remains undetected, professional recovery may be required. |
| USB drive is physically damaged | Very Low for DIY recovery | Software cannot repair broken connectors, failed memory chips, or other physical damage. A professional data recovery service is the safest option. |
If the USB drive is physically damaged or severely corrupted, DIY data recovery is usually not possible. In these cases, stop using the drive immediately, and contact a professional data recovery service to get back your data.
How to Recover Deleted Files From Flash Drive on Mac
The first thing that you should do is stop using the USB drive. Just keep it disconnected from your computer until you are ready to start the flash drive data recovery on Mac. It’s impossible to stress enough the importance of doing this since it’ll prevent the possibility of data overwriting and, therefore, will help with recovering your files.
Method 1: Recover Recently Deleted Files from Trash
When this method will help: If you’ve just deleted the files from your USB drive and haven’t disconnected the drive from your Mac yet.
When you delete a file from your USB drive, it doesn’t disappear for good right away – it gets moved into the Trash folder first. So if not much time has passed since you’ve manually deleted a file from your flash drive, the chances are it can still be found in Trash on your Mac and easily recovered.
Important: If you’ve already emptied Trash after deleting the file from your flash drive, then this method won’t work in your situation. The only solution will be to use a Mac USB recovery tool to restore the file.
Here’s how to recover files from a USB on Mac via Trash (if you’ve just recently deleted them):
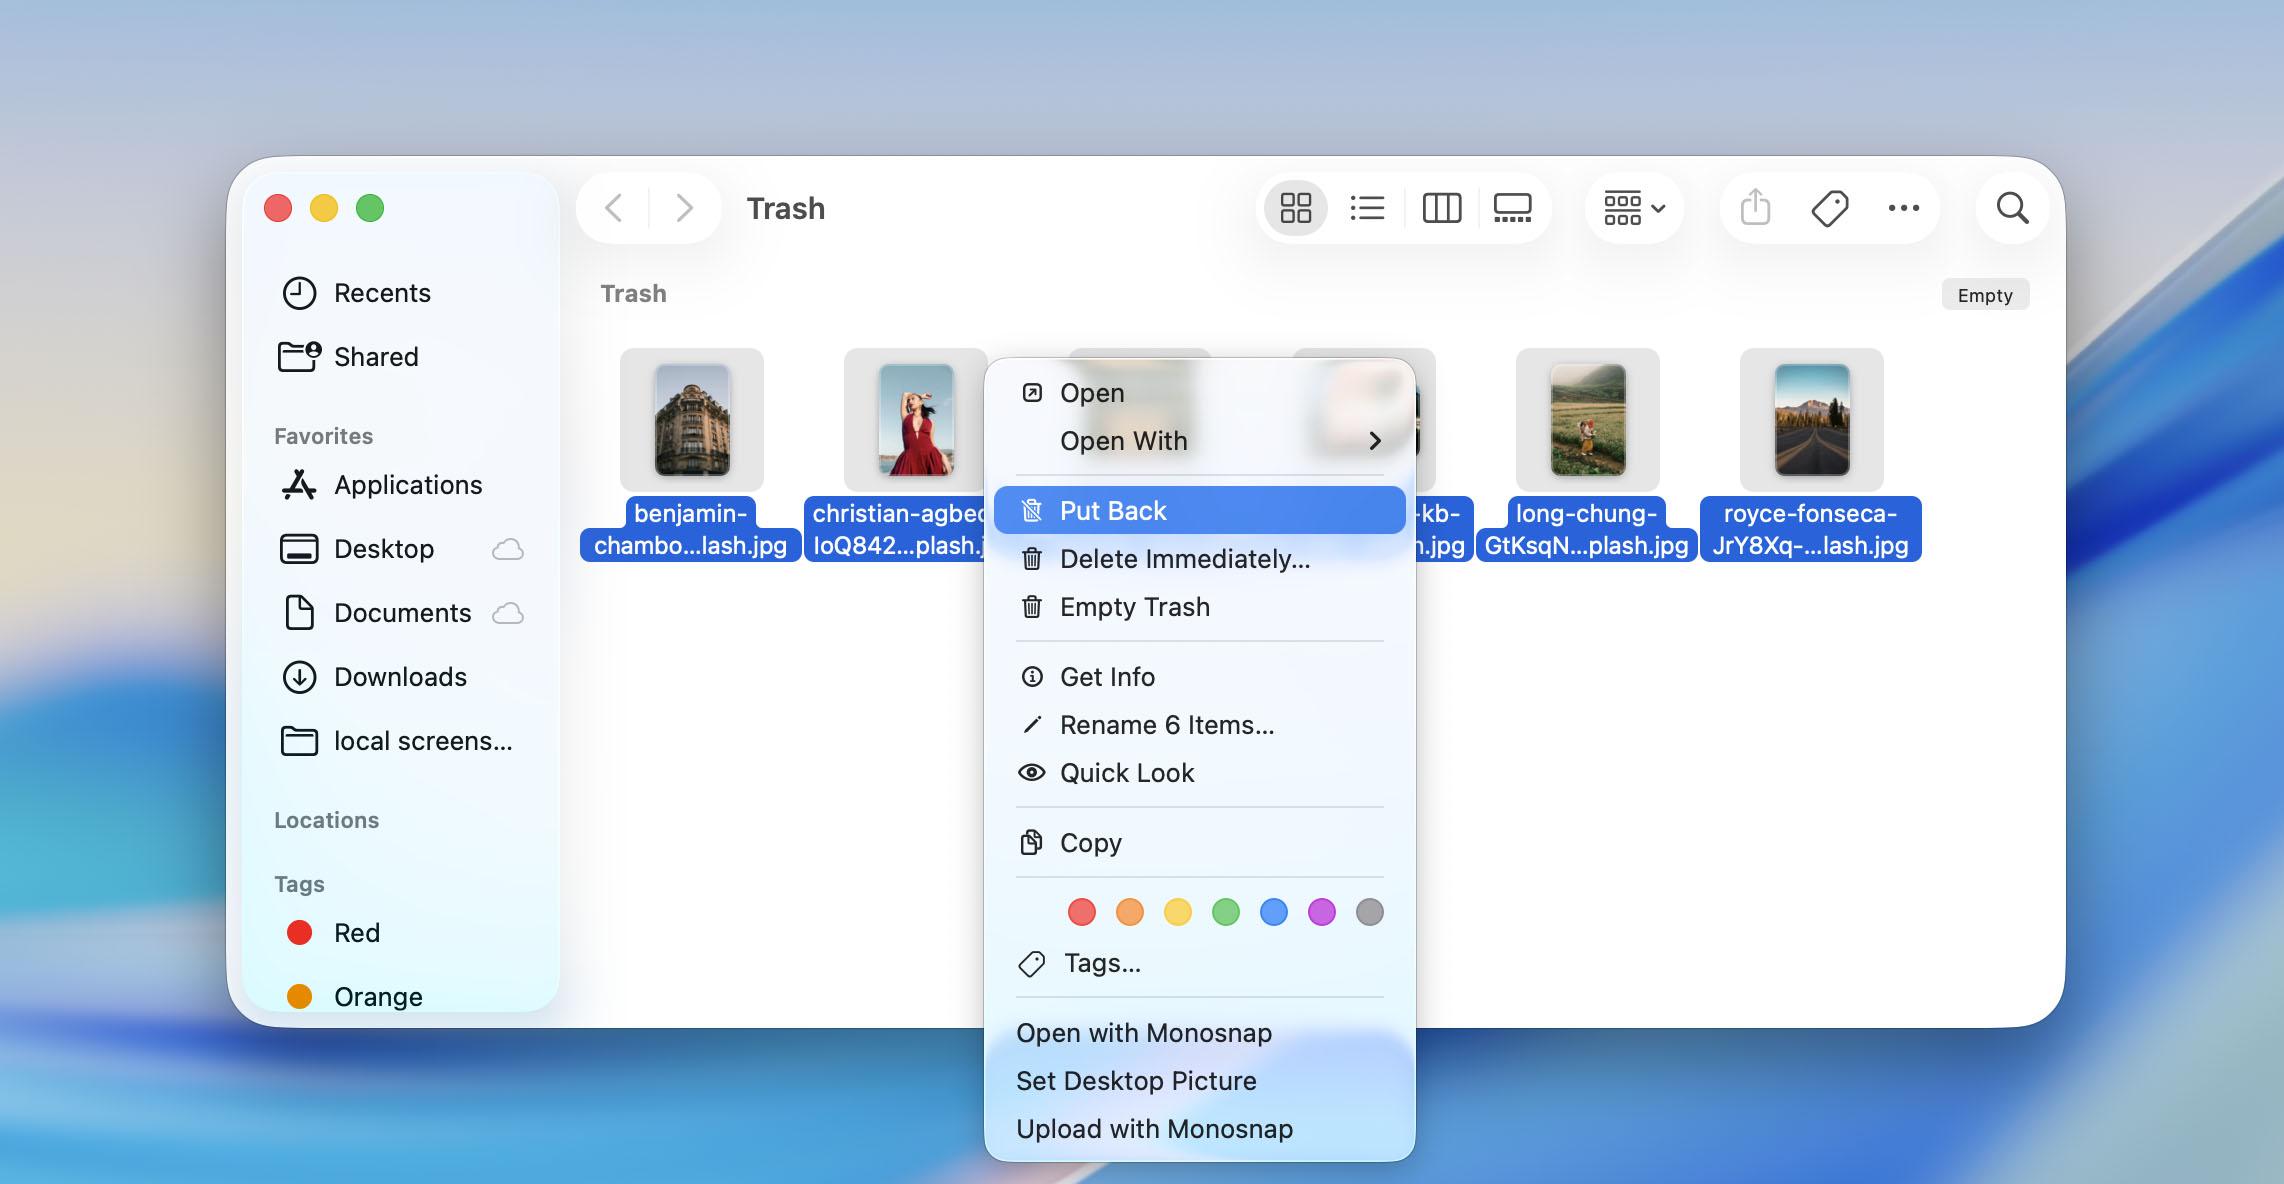
- Launch Trash on your Mac. It is usually located on the right side of the Dock.
- Look through the files located there.
- Once you find the lost file from your flash drive, drag and drop it into a different folder or back into the USB drive.
Method 2: Use Data Recovery Software
When this method will help: If the files were deleted and are no longer in Trash, the USB drive was formatted but the lost data hasn’t been overwritten, or the files became inaccessible because of USB drive corruption.
To recover USB drive data on Mac that is no longer available in Trash, you’ll need a data recovery tool. These applications can scan the USB drive itself for files that were deleted, lost after formatting, or are still on the drive but no longer accessible through Finder.
The first thing that you should do is stop using the USB drive. Don’t copy new files to it, format it, or make any other changes until you recover the missing data. Continued use may overwrite deleted files and reduce your recovery chances.
We’ve tested many data recovery programs for Mac over the years and even put together a list of the best USB recovery software, where Disk Drill took first place. During our testing, it scanned a 32 GB USB drive with just over 4 GB of test data in under two minutes and detected all of our test files. That’s the tool we’ll use in this article as well. It combines a simple interface with capable recovery algorithms, supports all types of USB storage devices and hundreds of file formats, including images, videos, documents, archives, and more. On Mac, Disk Drill also supports Intel and T2-equipped Macs, as well as Apple silicon models with M1–M5 chips.
If you suspect that your USB drive is corrupted, Disk Drill also lets you create a byte-to-byte image and scan it instead of putting additional load on the original drive. To do this, open Byte-to-byte Backup from the left sidebar, select your USB drive, and click Create backup. Once the image is ready, add it to Disk Drill’s list of storage devices and continue with Step 3 below.
Here’s how to recover a USB drive on Mac using Disk Drill:
- Download and install Disk Drill if you haven’t already. Click the file and follow the onscreen instructions to finish the installation.
- Connect your USB drive to your Mac and launch Disk Drill. From the list of storage devices, choose the connected flash drive.
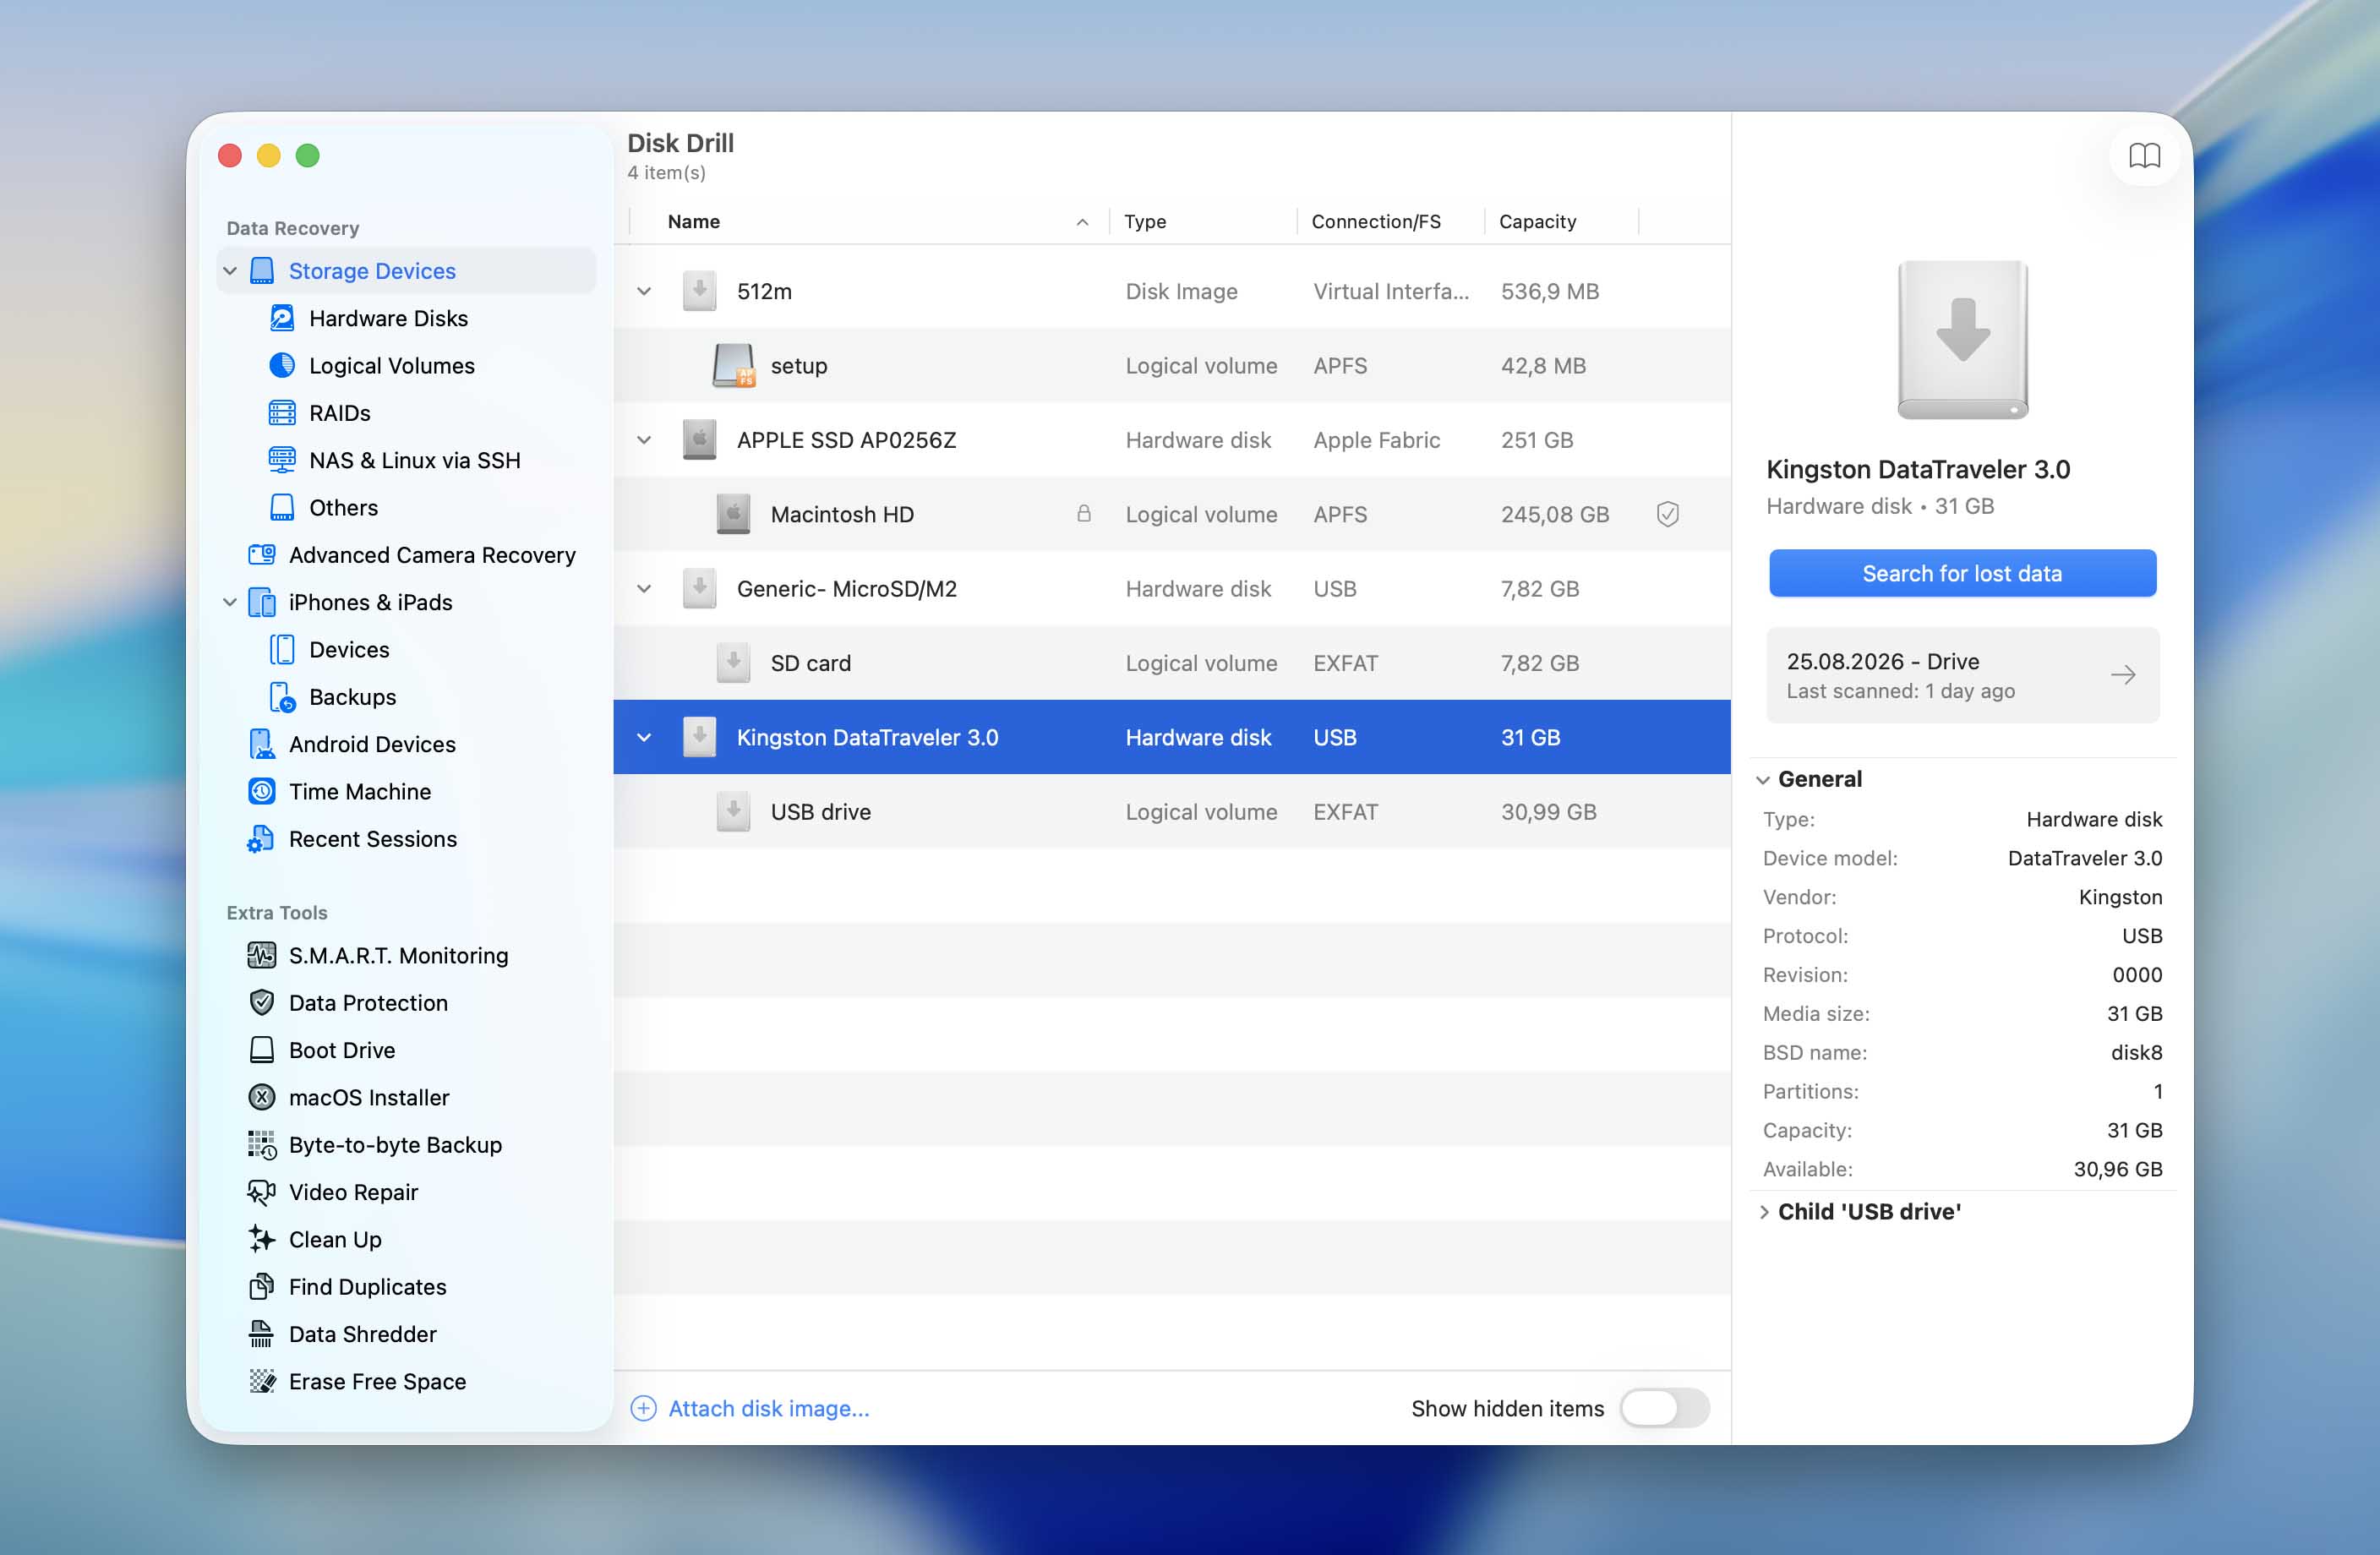
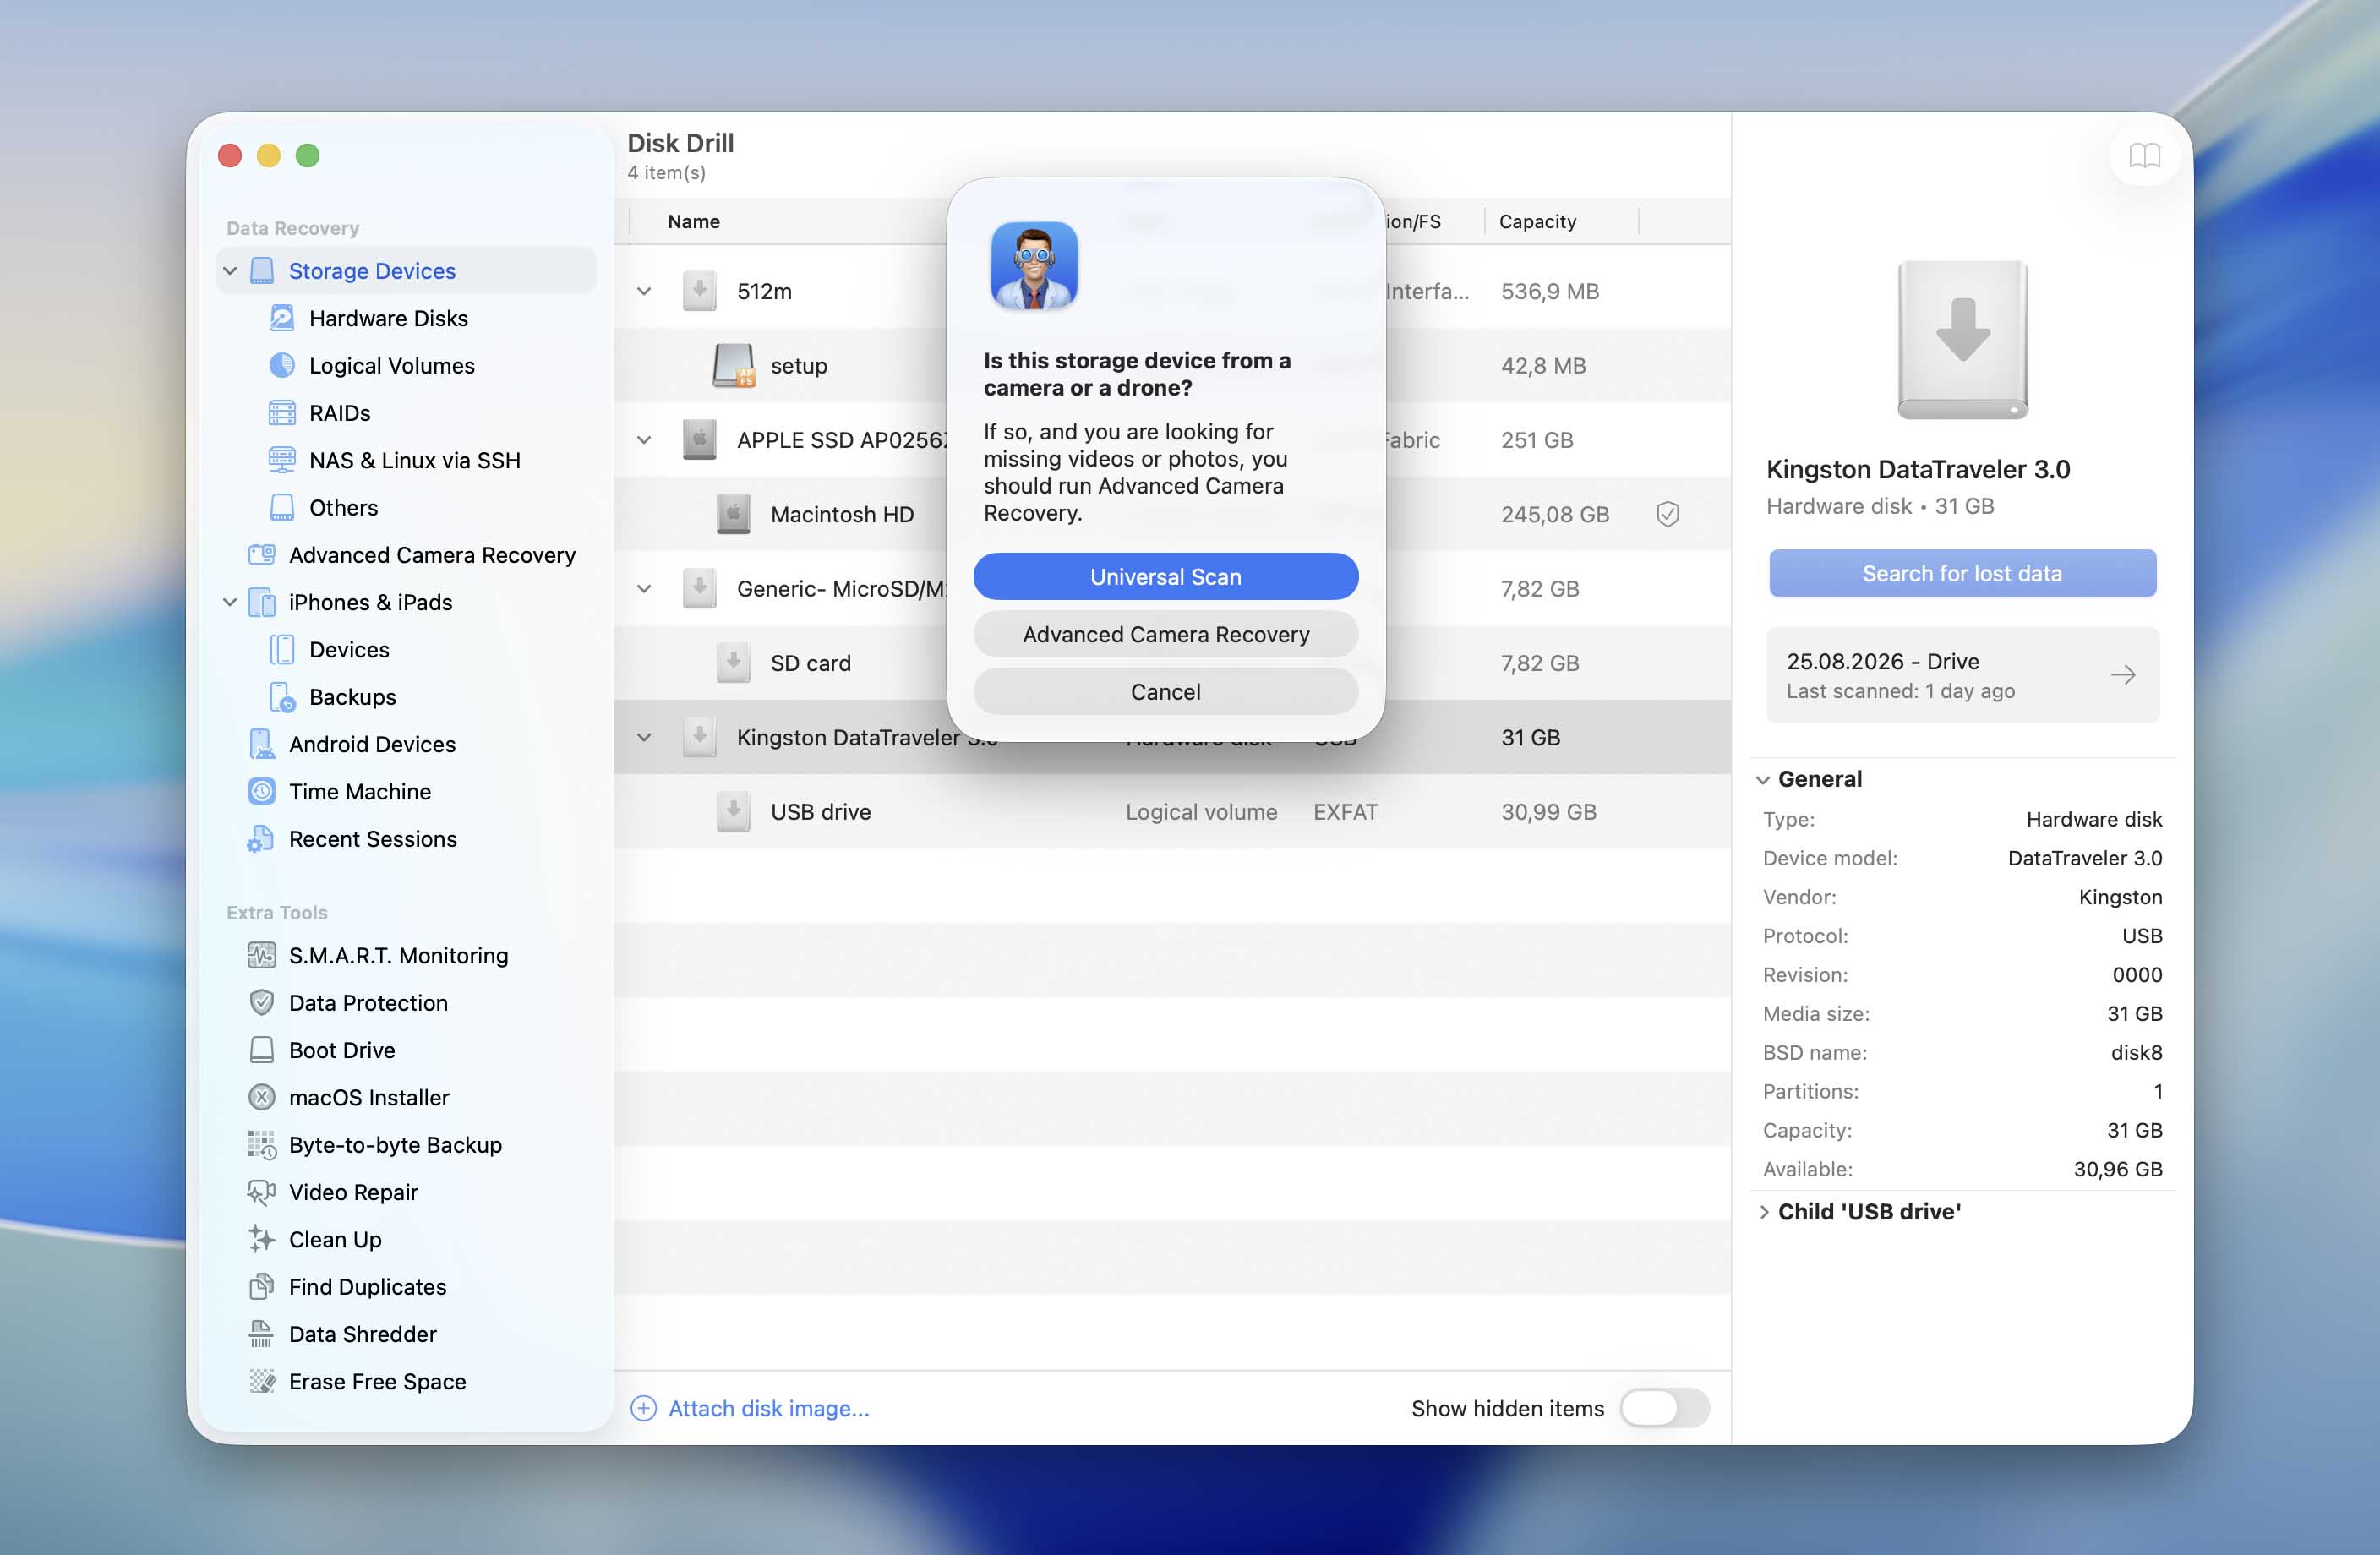
- Click the Search for lost data button to start scanning your USB drive. Disk Drill will give you a choice between Universal Scan and Advanced Camera Recovery. Choose Universal Scan for now. We’ll explain when Advanced Camera Recovery may be a better option a little later.
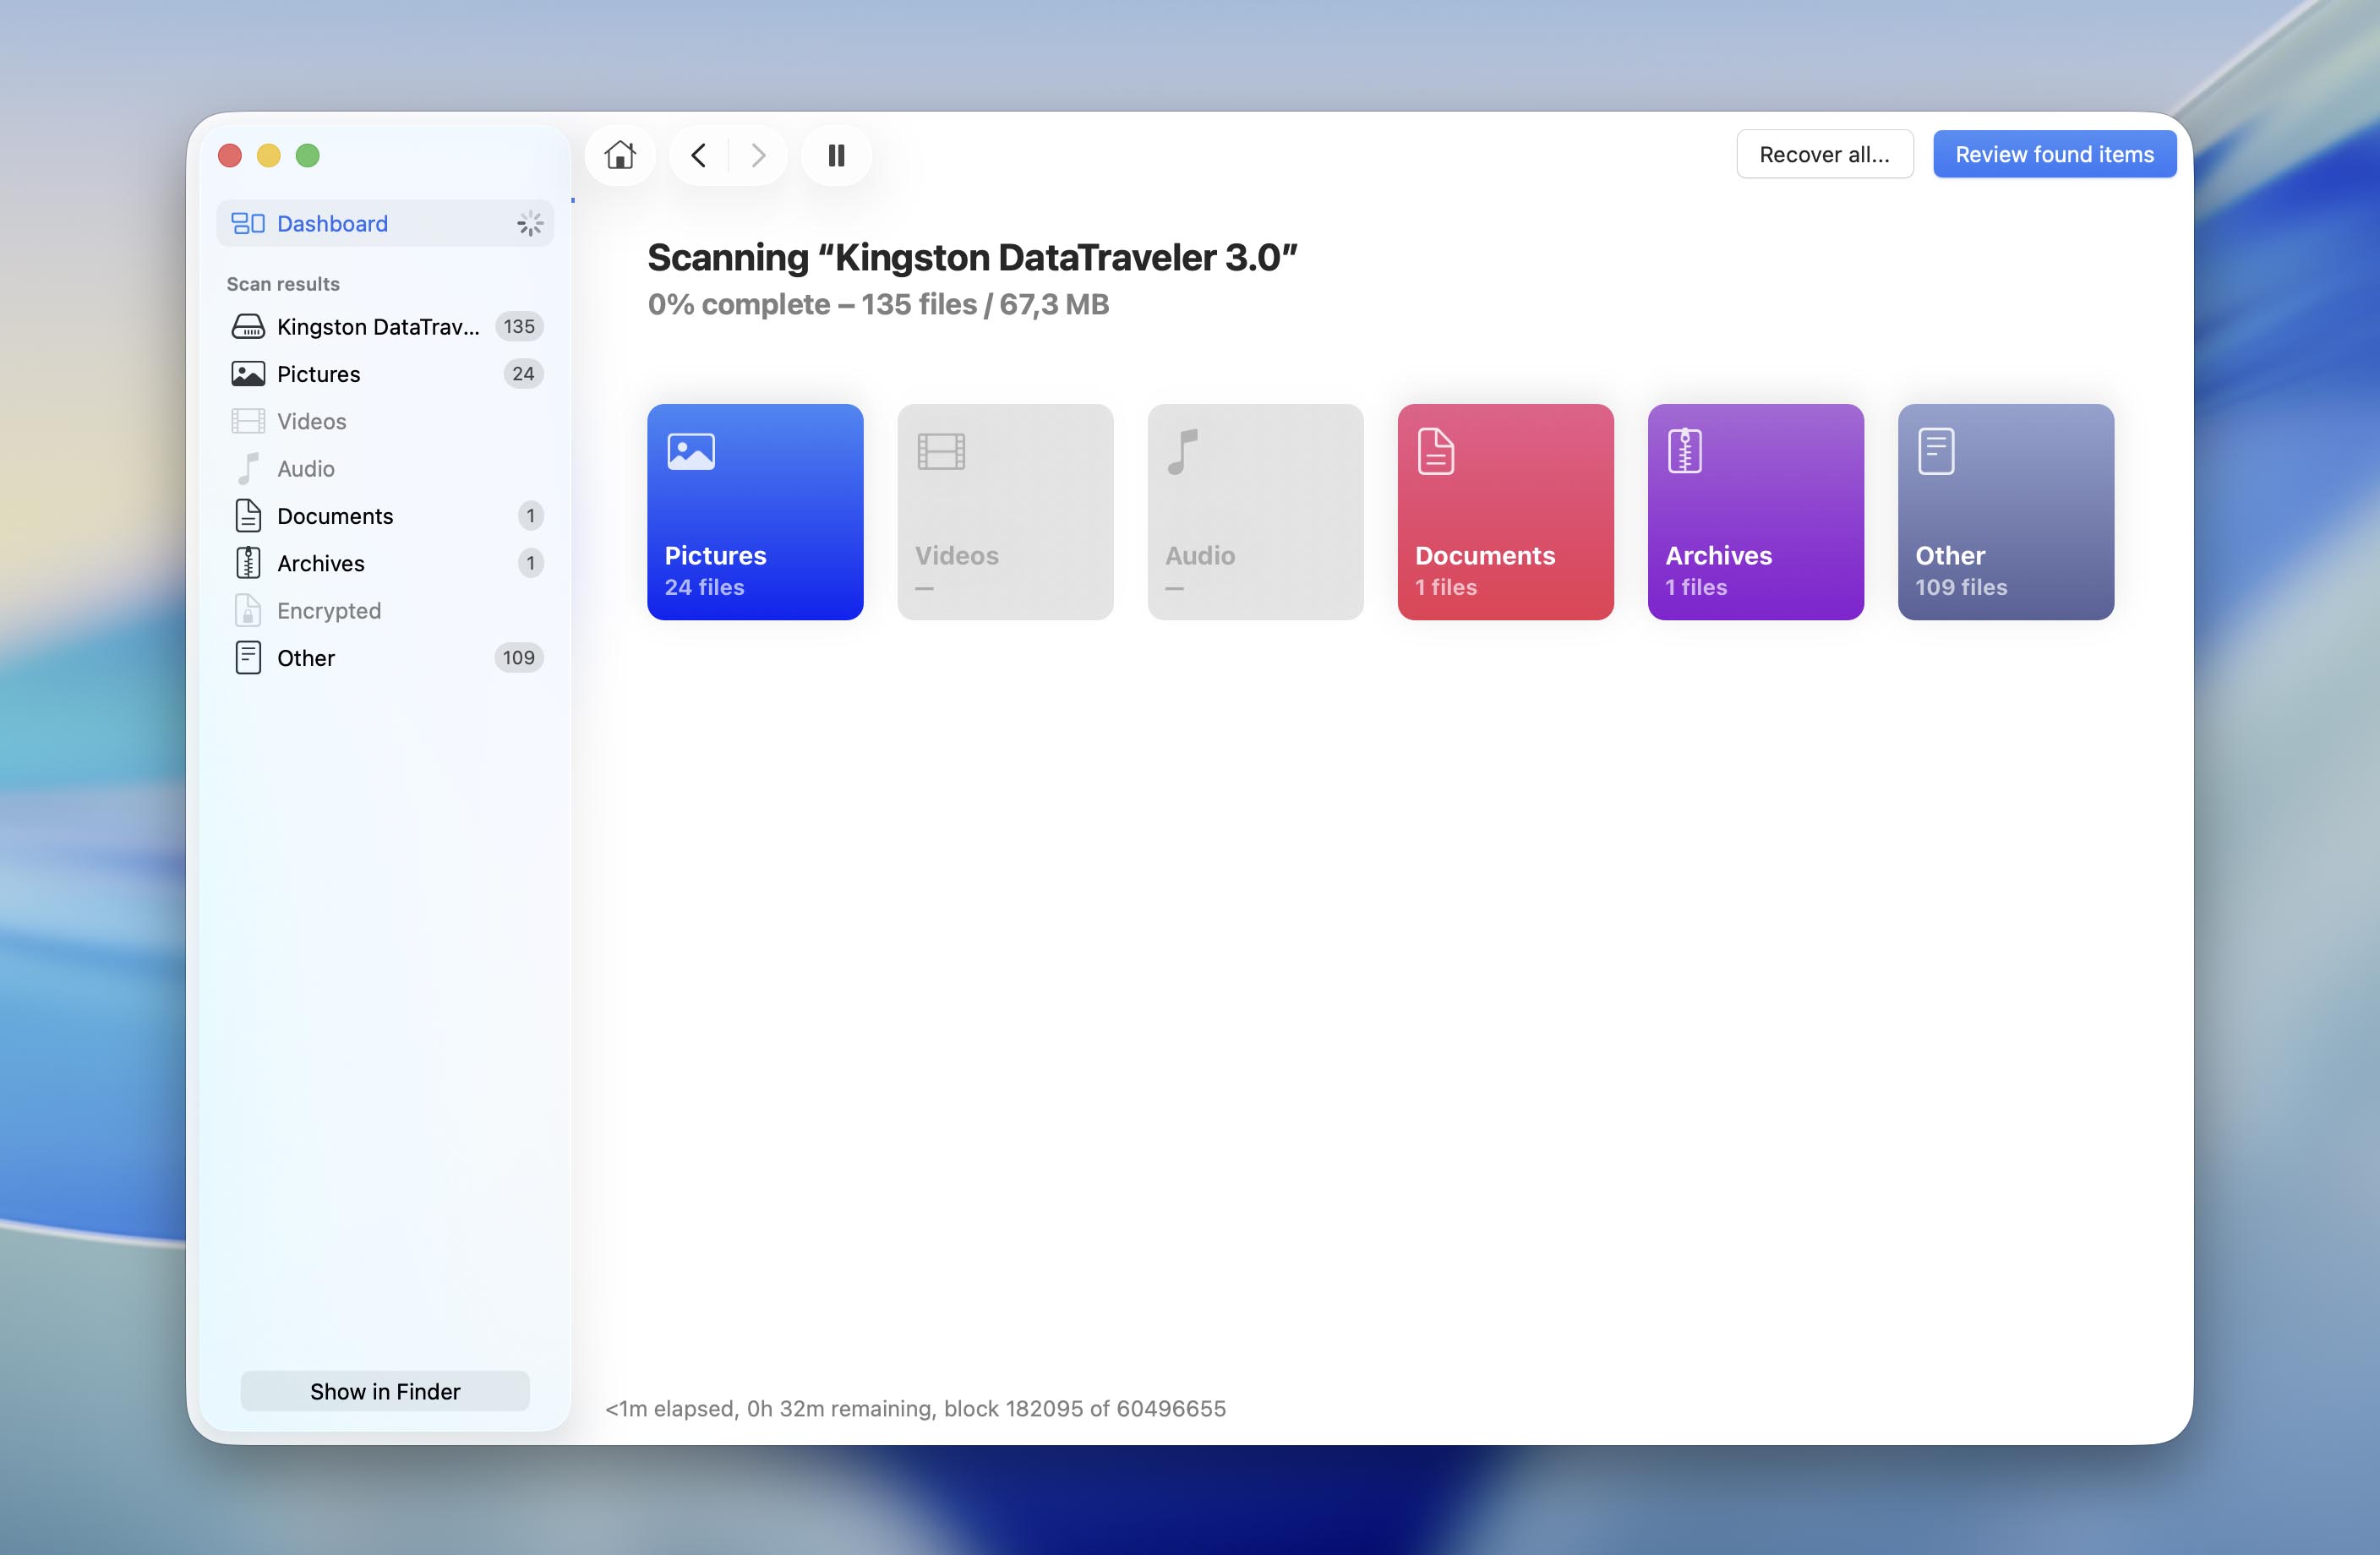
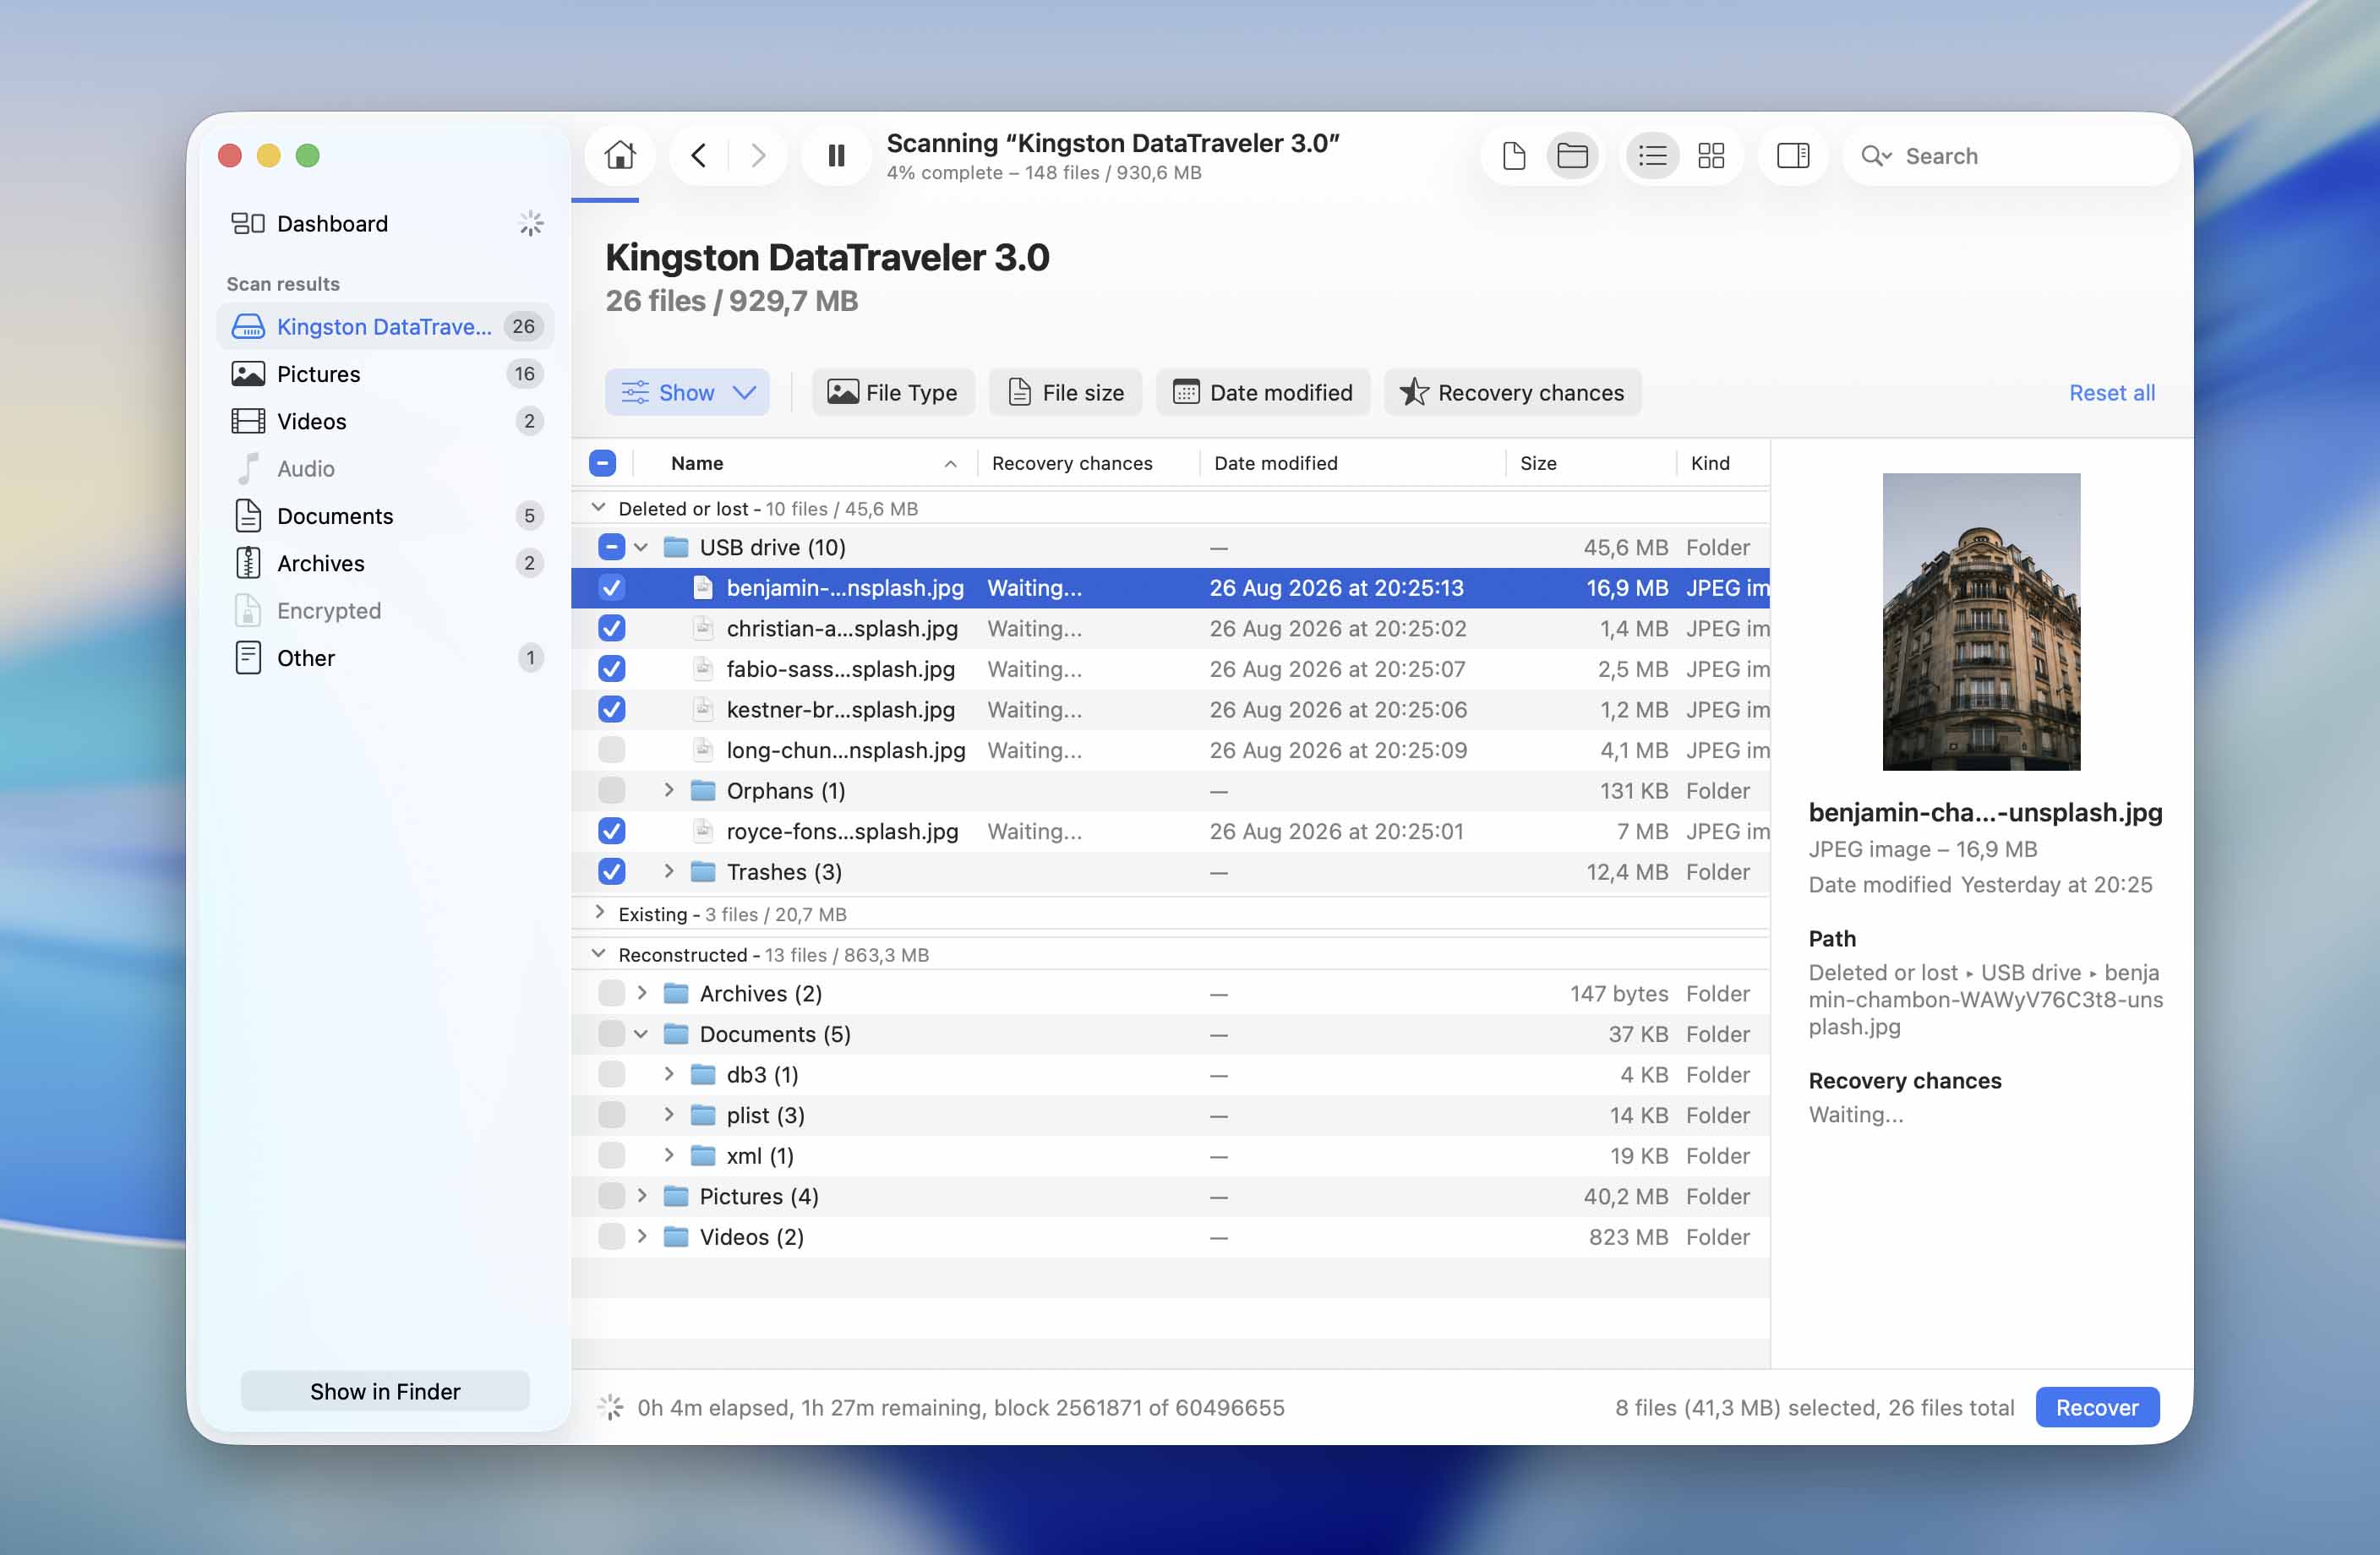
- Wait for the scan to finish. This gives Disk Drill a chance to find as many recoverable files as possible. Once the scan is complete, you’ll also see the estimated recovery chances for individual files, rated as High, Average, or Low.
- Click Review found items to browse the scan results. You can narrow them down by file type or even a specific file extension. Preview the files you want to recover whenever possible to check that they open correctly.
- Once you’ve found the needed files, check the box next to each one to select it. If you want to recover everything Disk Drill found, select all files instead. When ready, click Recover.
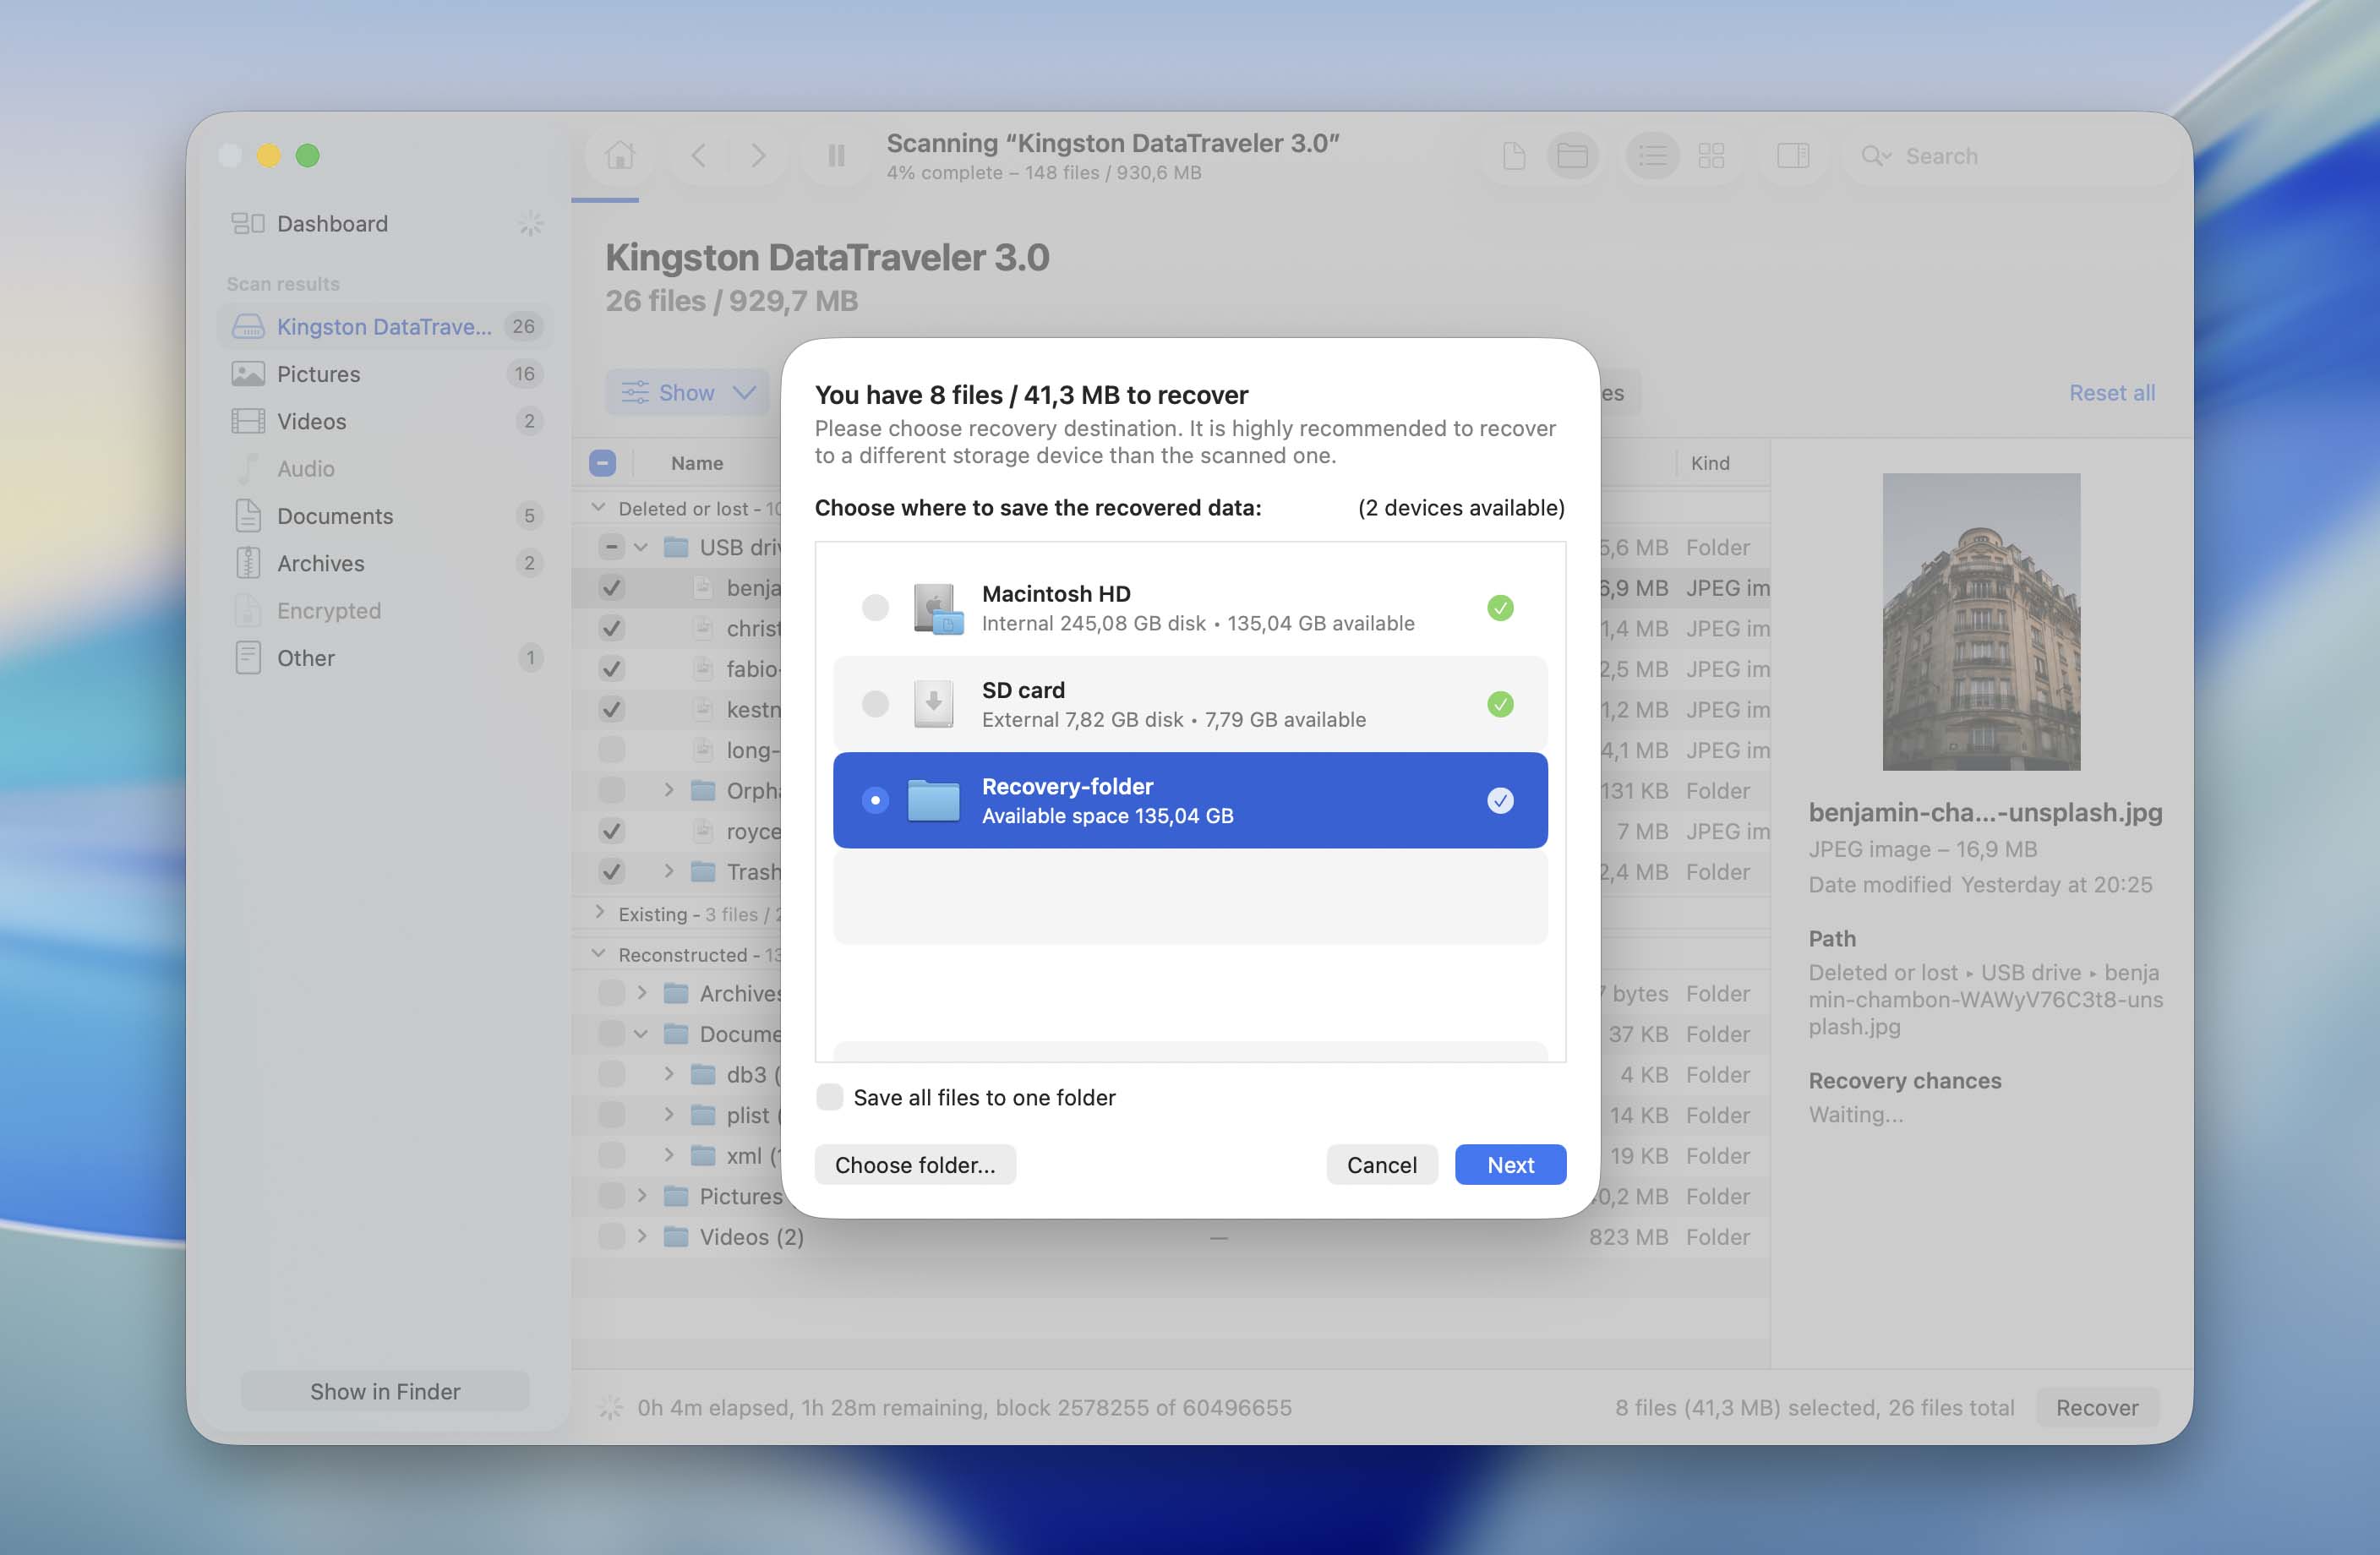
- A pop-up window will ask you to choose where to save the recovered files. Select a folder on a different storage device rather than the USB drive you’re recovering data from, and click Next.
As promised, let’s get back to Advanced Camera Recovery. This is one of Disk Drill’s notable features, designed specifically to recover video files from SD cards used in cameras and drones and reconstruct them into a playable state. Disk Drill also has several other useful recovery and drive management features, which we cover in more detail in our full Disk Drill review.
Note: The free Disk Drill for Mac version doesn’t allow you to recover the files from a USB drive but only to preview them. So if the scan has revealed the needed file and you want to proceed with the recovery, you should get the pro version.
Method 3: Recover Files From a Time Machine Backup
When this method will help: If the files were lost while being transferred from your Mac to the USB drive, deleted from the USB, or lost after formatting, but copies of those files previously existed on your Mac and were included in a Time Machine backup.
If you use Time Machine to back up your Mac, there’s a chance that you don’t need to recover anything from the USB drive itself. Time Machine keeps previous copies of files stored on your Mac, so if the missing files were there when one of your backups was created, you can simply restore those copies. Keep in mind that this method only works if the files were backed up before they disappeared.
Here’s how to recover the files using Time Machine:
- Connect the drive that contains your Time Machine backup to your Mac. If you use a network location for Time Machine, make sure your Mac is connected to it.
- Open Finder and navigate to the folder where the missing files were originally stored on your Mac.
- Click the Time Machine icon in the menu bar and select Browse Time Machine Backups.

- Browse through the available backups and go back to a date when the files were still present.
- Select the files you want to recover and click Restore.
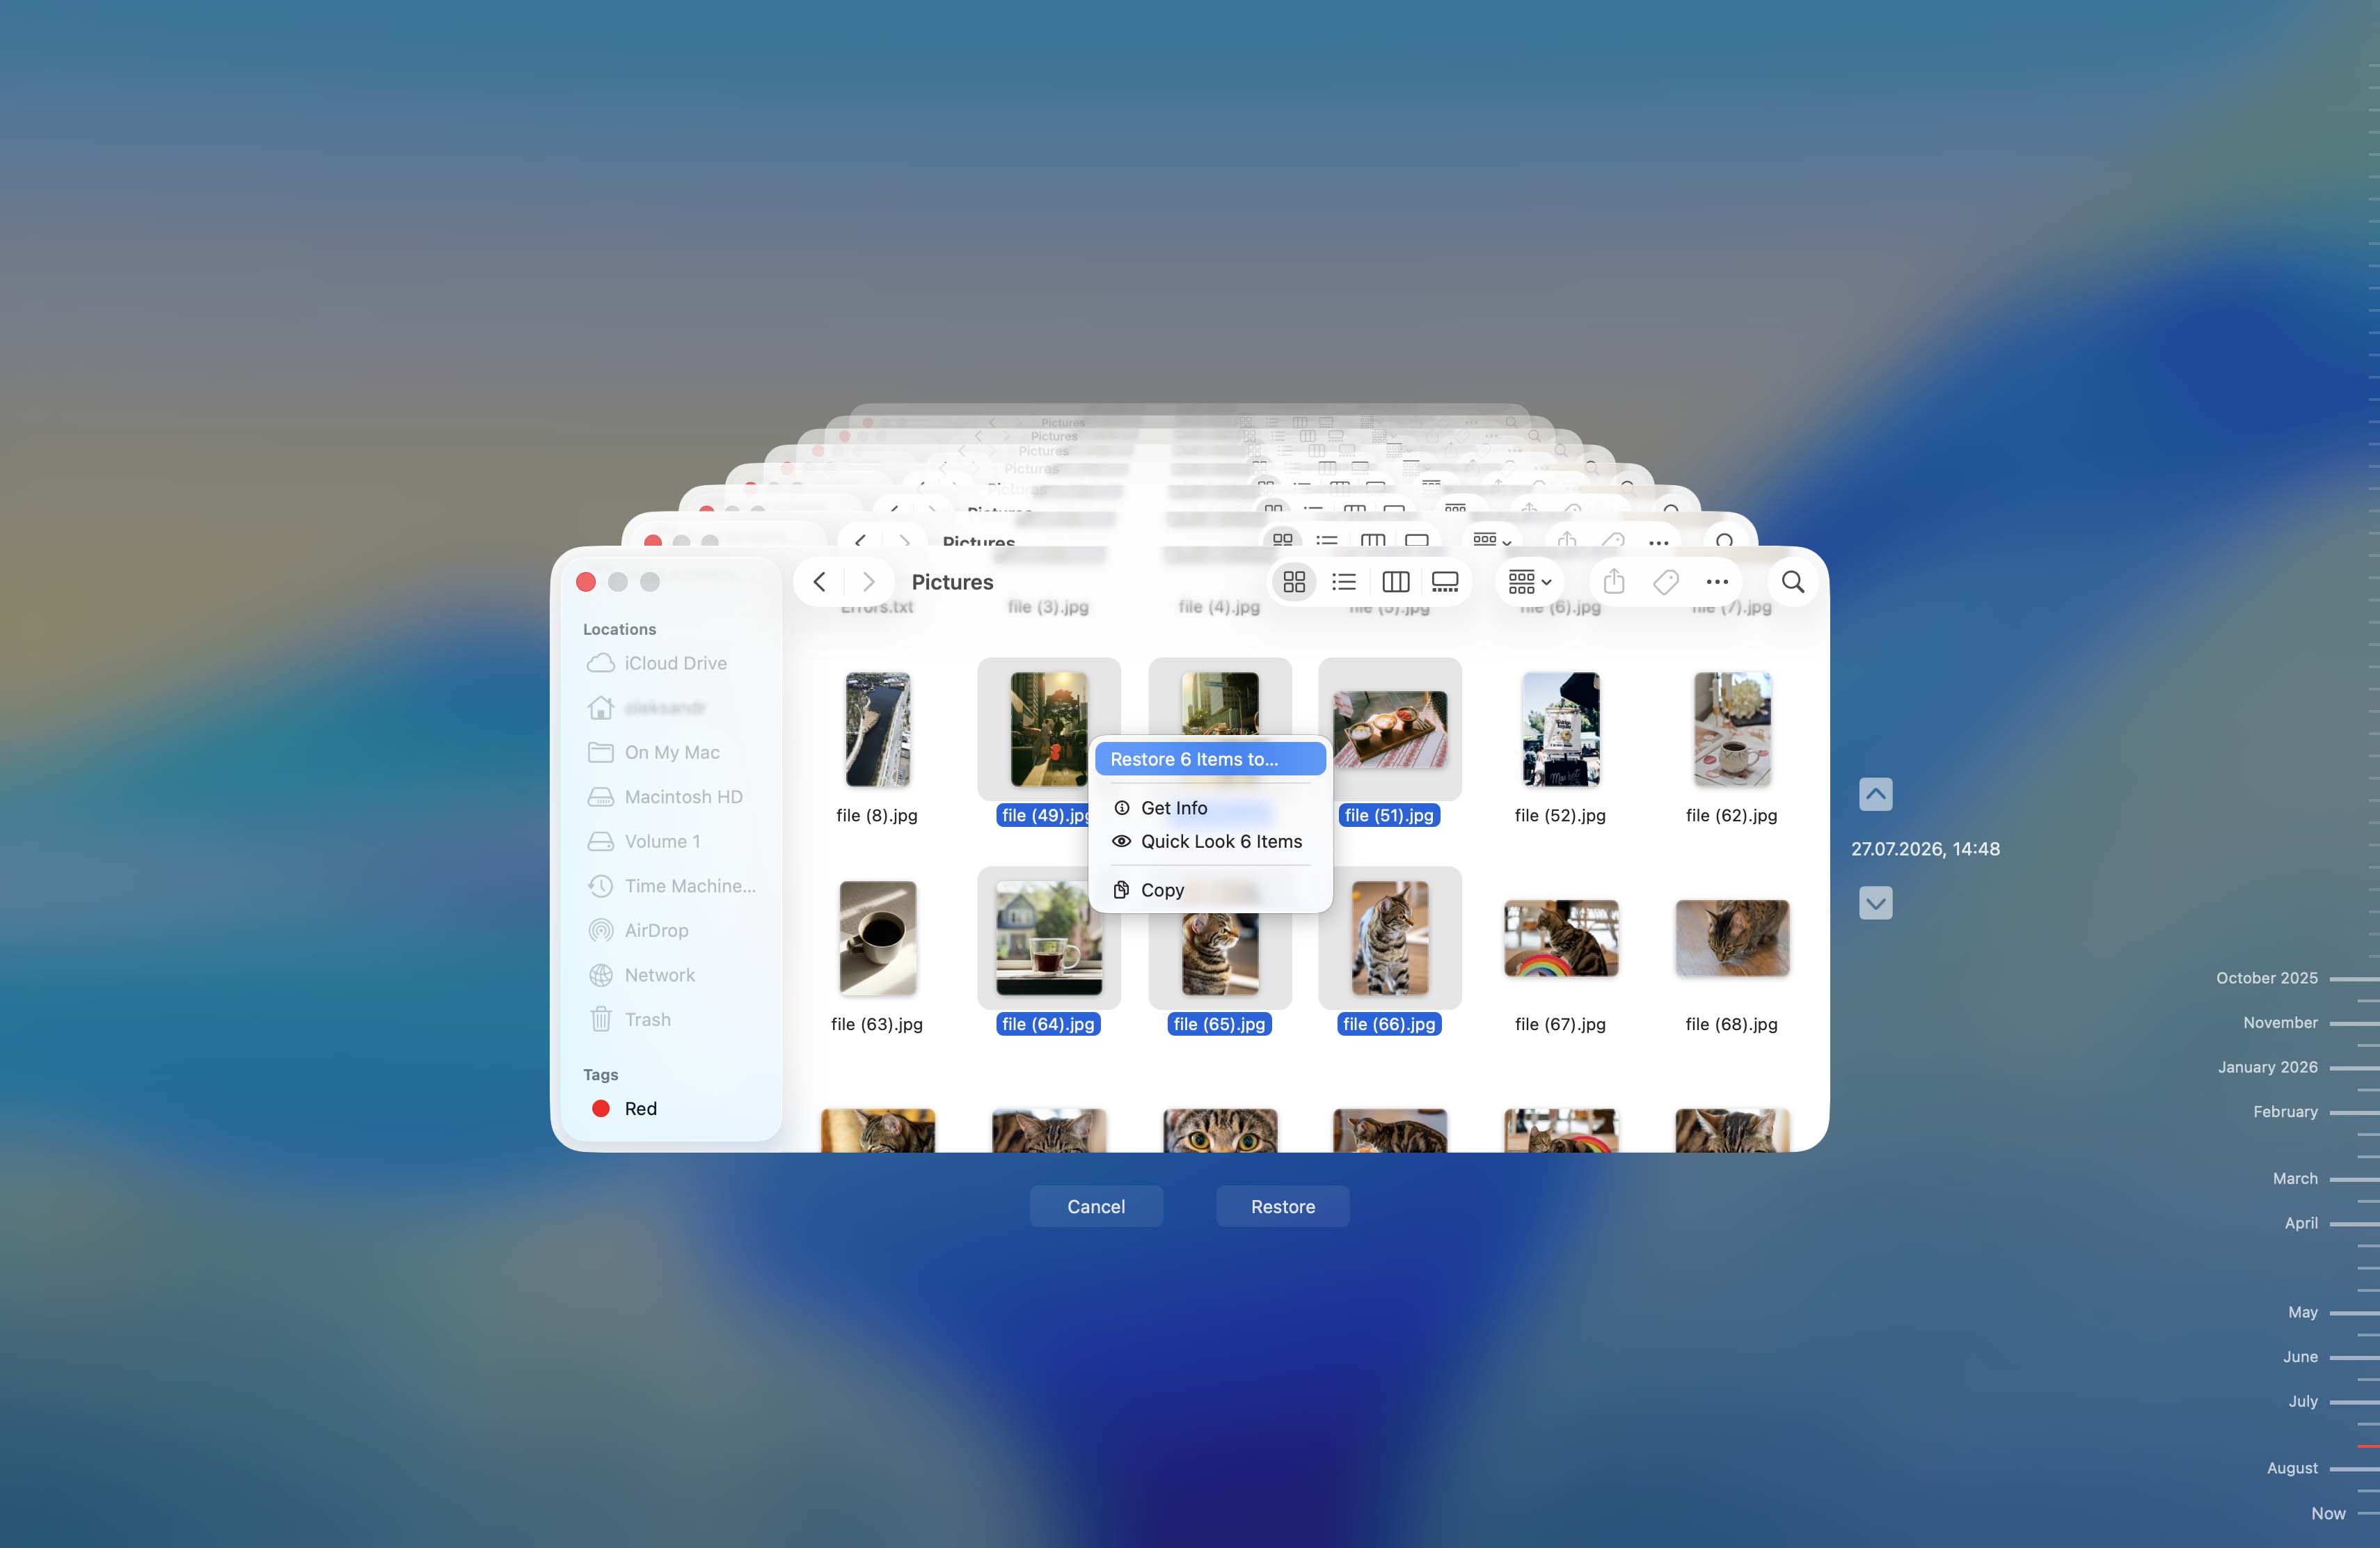
- Time Machine will restore the selected files to their original location on your Mac. Once they’re back, you can copy them to the USB drive again if needed.
Note: If copies of the missing files are still available on your Mac, there’s no need to recover them from a backup. Simply copy them to the USB drive again.
How to Unhide Files That Disappeared From Flash Drive on Mac
In order to avert unintended changes and deletions, macOS can hide certain folders on the USB drive. Typically, these folders contain app settings, deleted files, and other data. It’s possible that the files you’re looking to recover have simply been hidden by macOS. Here’s how to unhide these files:
- Connect the USB drive to your Mac.
- Navigate to the USB drive in Finder.
- Press Command + Shift + . (dot) to show hidden files. Hidden files usually appear slightly faded compared with regular files.
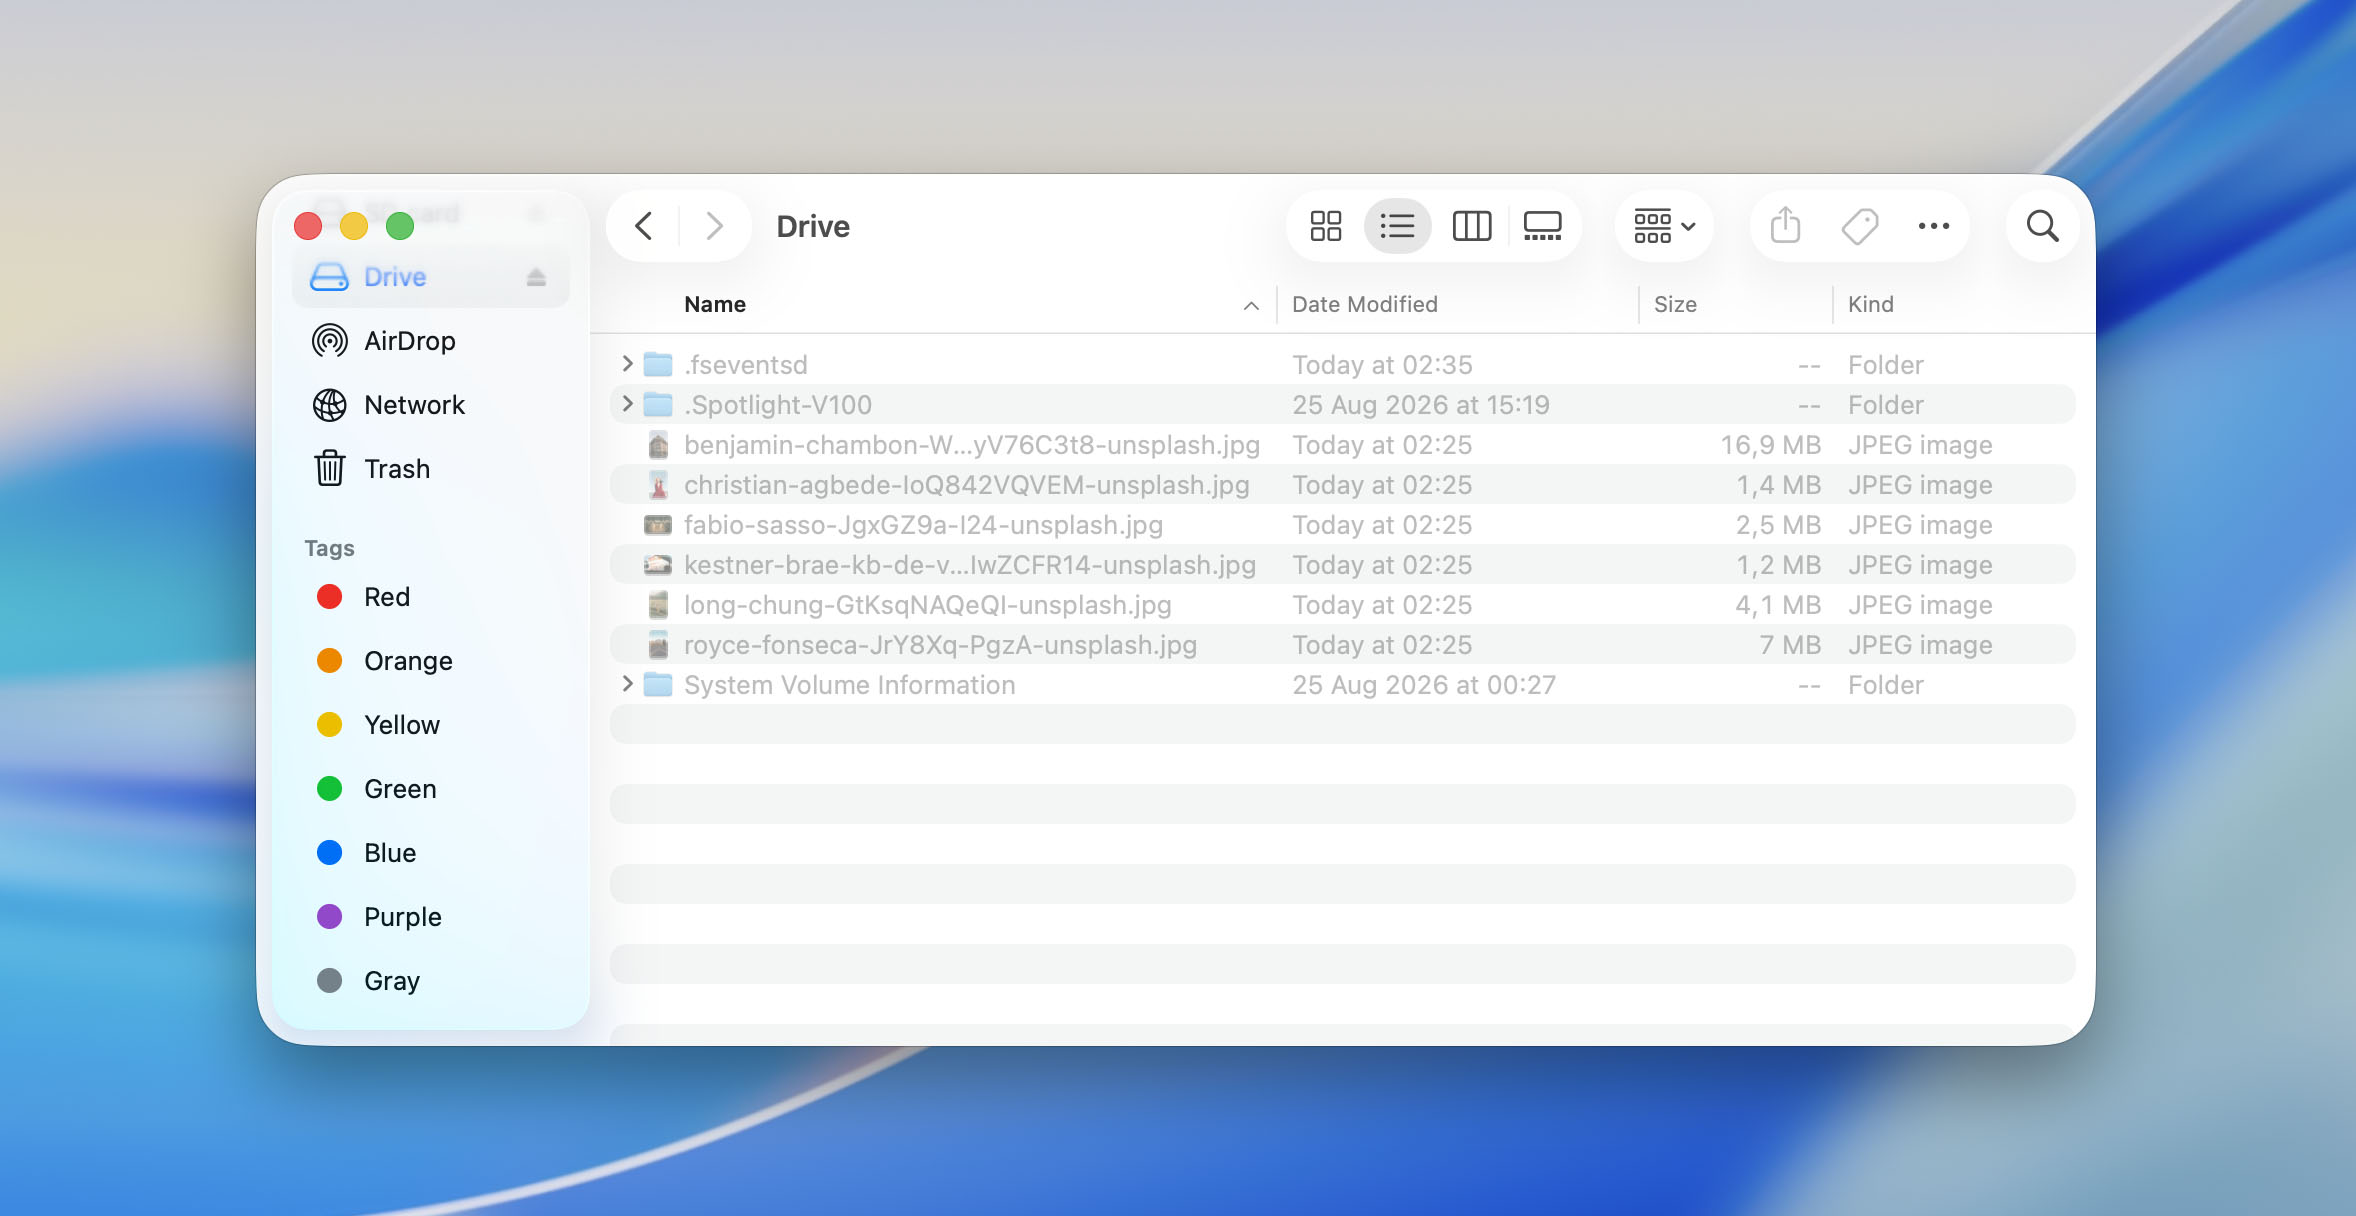
- If you find the missing files, open Terminal and type chflags nohidden(including the space at the end).
- Drag the hidden file or folder from Finder into the Terminal window. This will automatically add its full path to the command.
- Press Enter to remove the hidden flag from the selected file or folder.
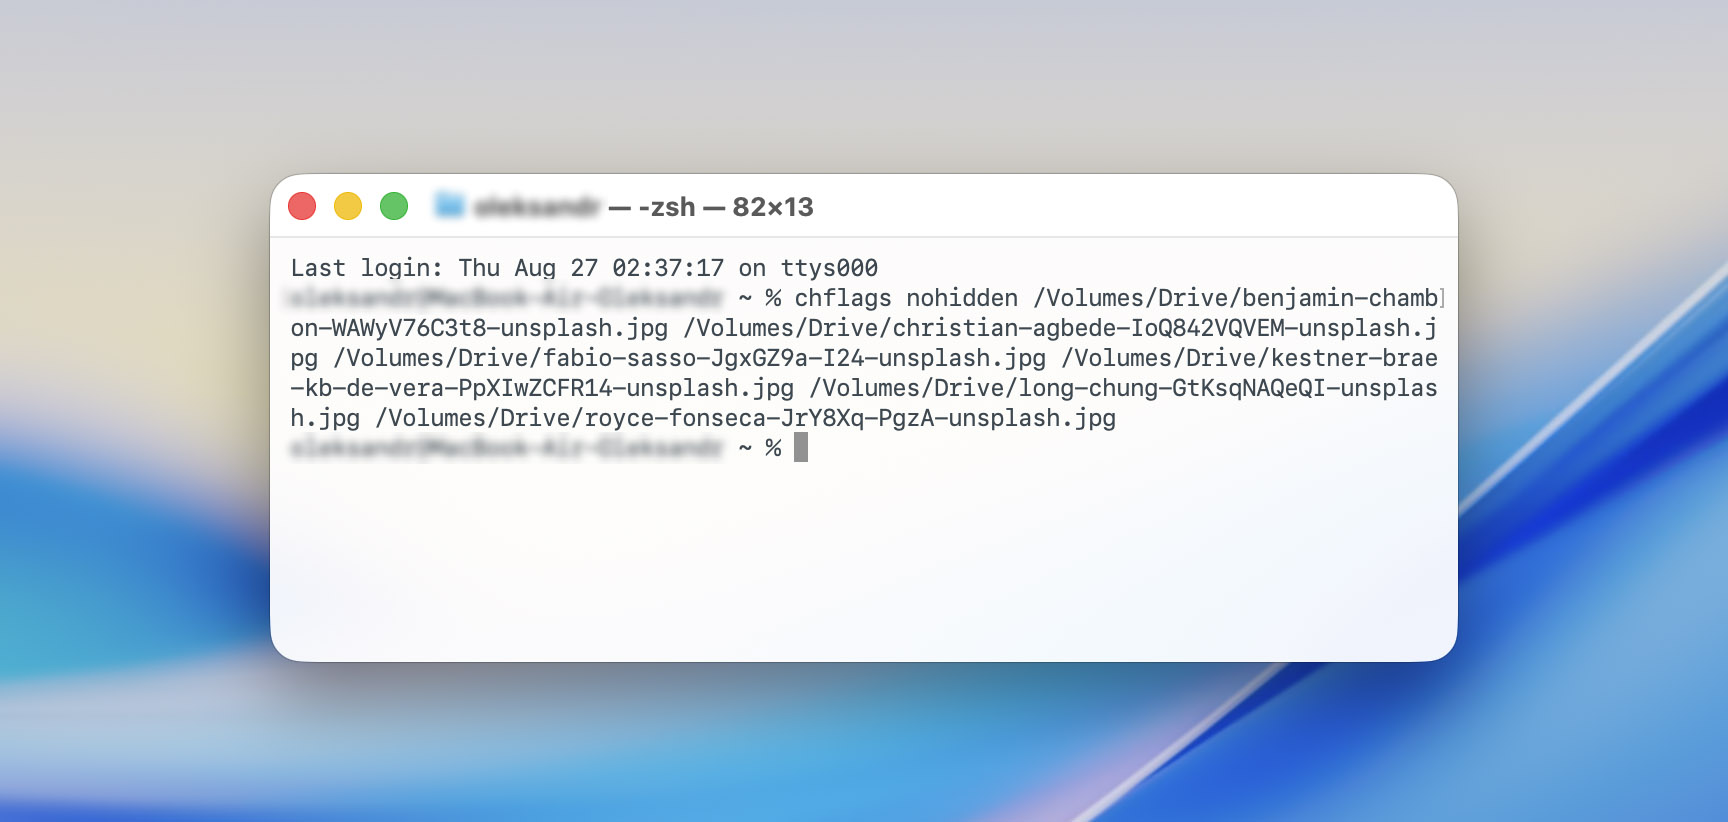
- Return to Finder and press Command + Shift + . (dot) again to hide system and other hidden files. The files you unhid with chflags nohidden should remain visible.
How to Fix a Corrupted USB Drive
If data disappeared from your flash drive without your interference, it’s possible that the USB drive is corrupted. In such a case, before you start using it again, it is best to fix the issue.
Although the methods below can help you recover a USB drive on Mac and get it working again, some of them may also affect or erase the data that is still stored on it. If those files are important, don’t proceed with any of the solutions below before recovering them. Return to the previous section and choose the recovery method that best fits your situation first.
Solution 1: Run First Aid
Disk Utility has a feature called First Aid that can fix errors of any storage device on Mac. So if your USB drive isn’t working properly, you should try to fix it with First Aid. If this doesn’t help, then the last option that you have left is to format the device. Here’s how to fix a corrupted flash drive on your Mac via Disk Utility:
- Open Disk Utility. You can find it using Spotlight Search (Command + Space) or in Finder > Applications > Utilities > Disk Utility.
- Look through the list of devices on the sidebar. Click your USB drive to select it.
- Click First Aid at the top.
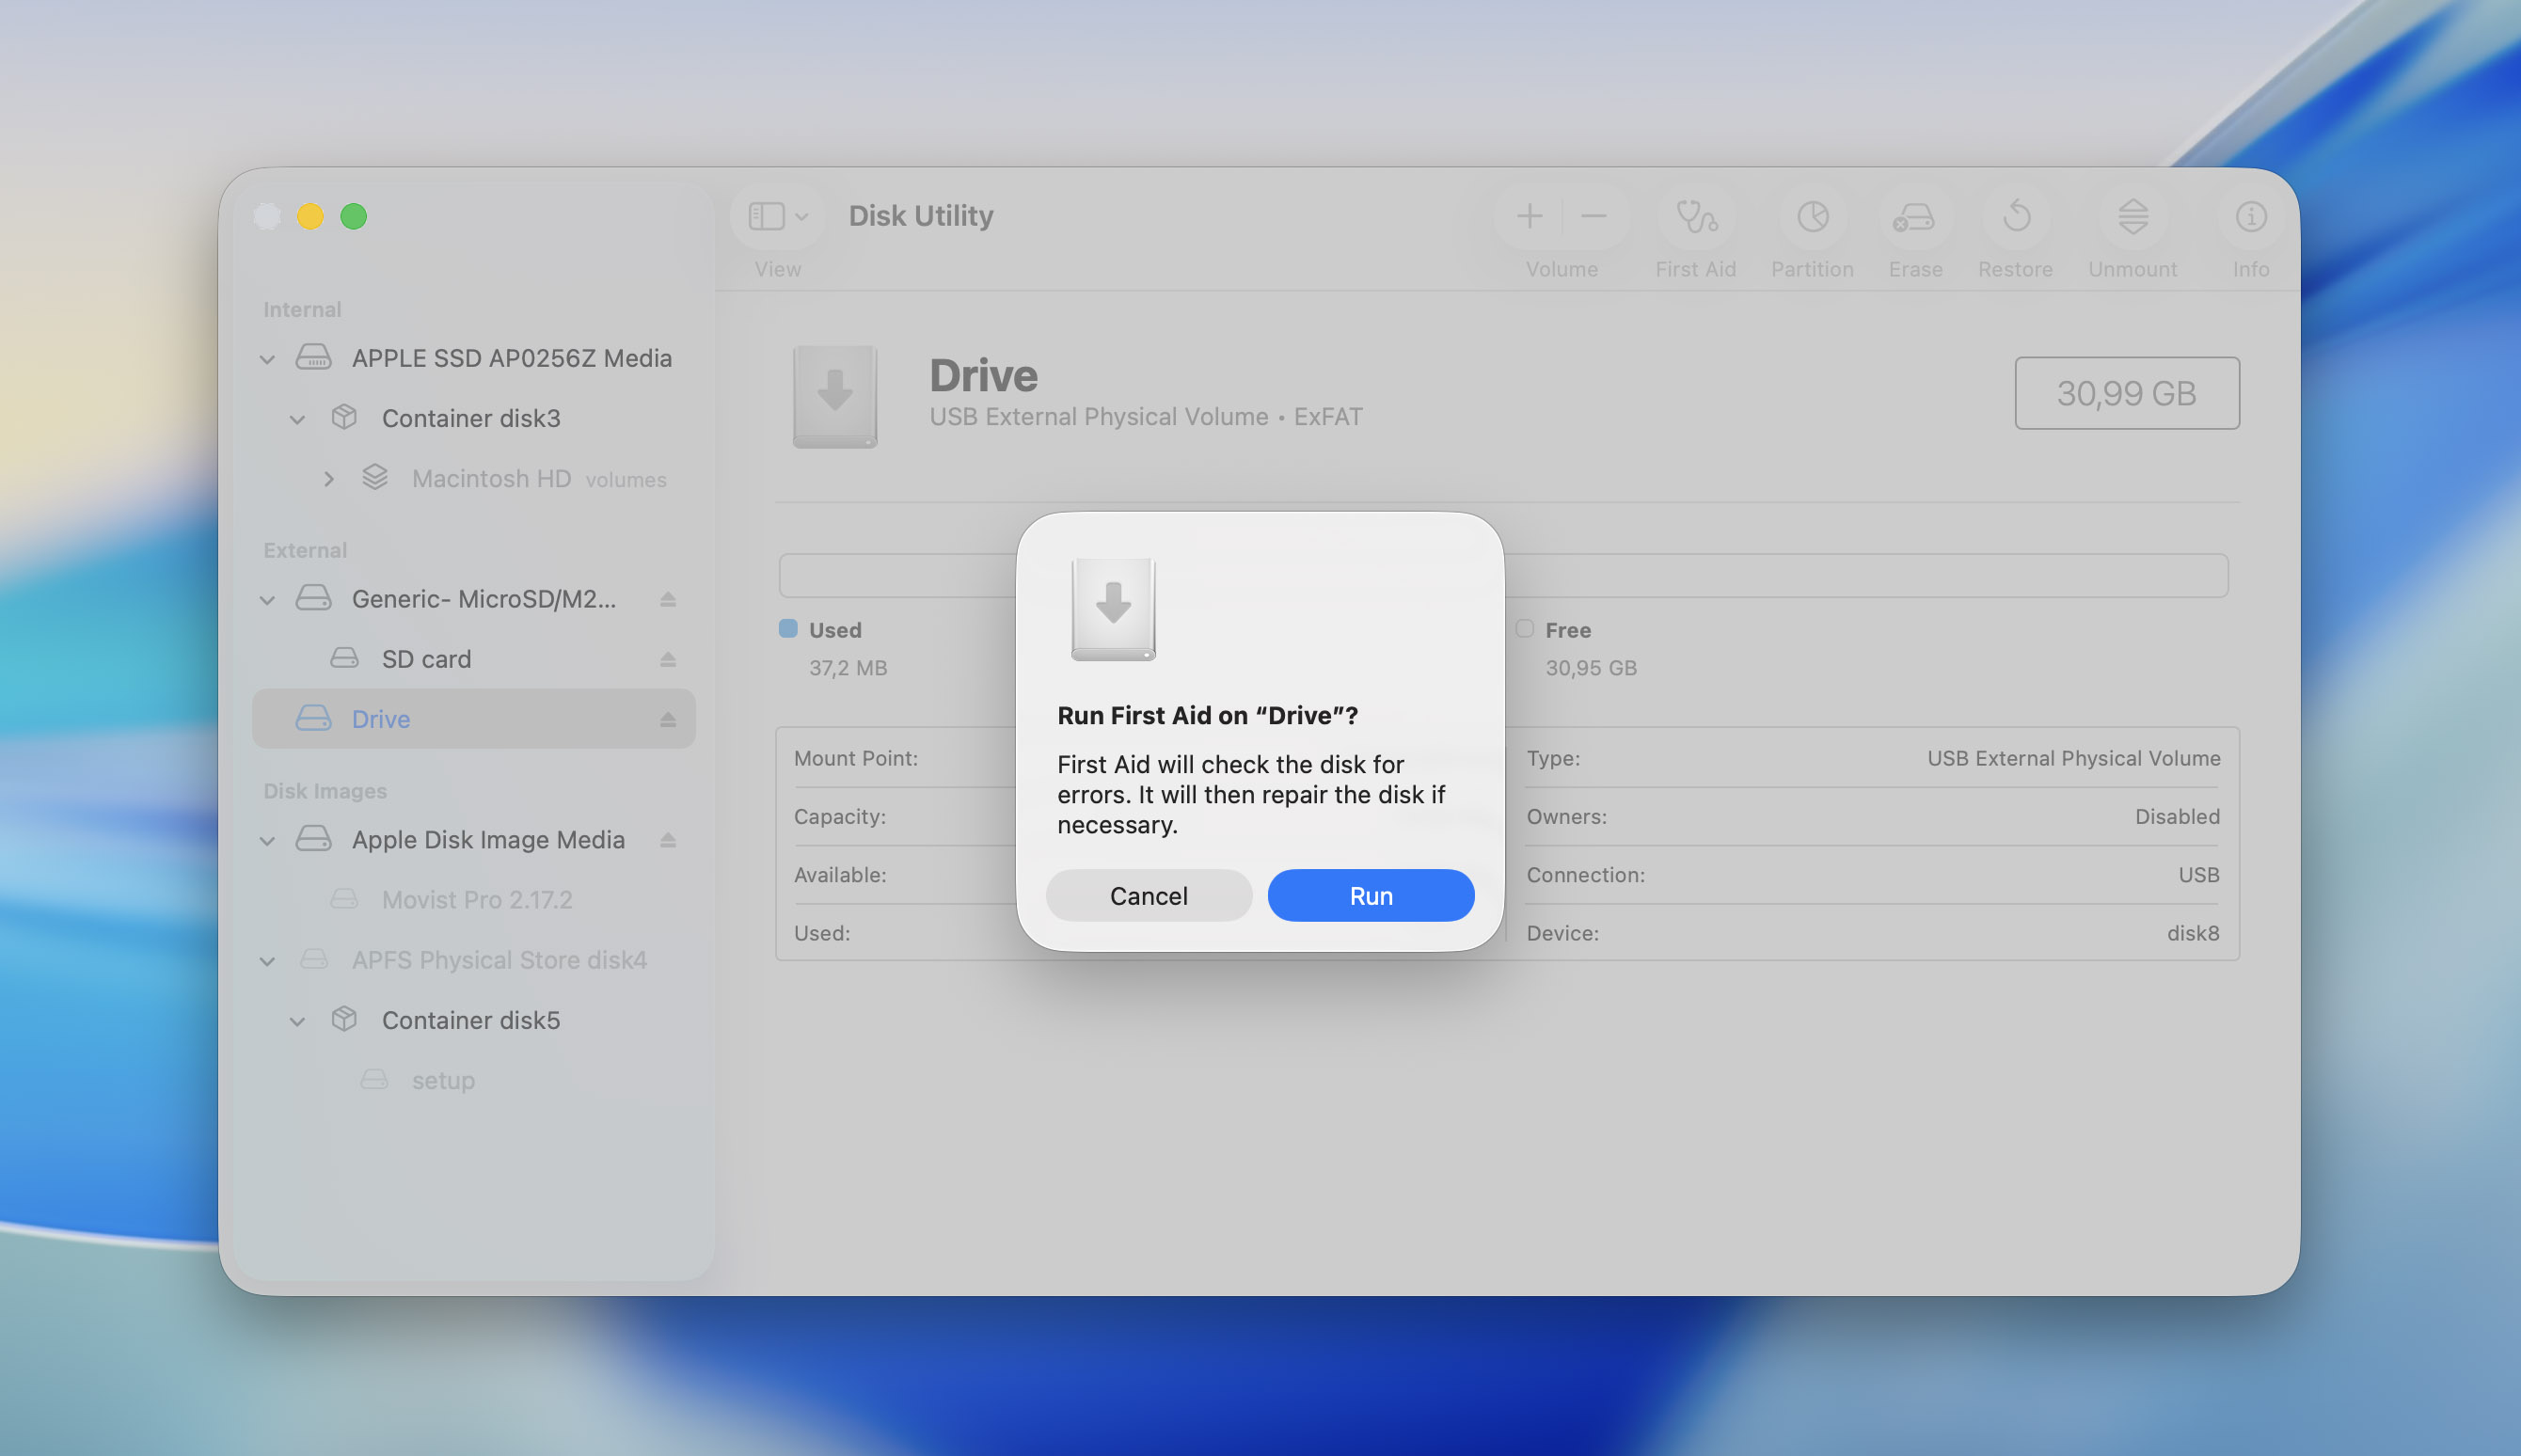
- Click Run to confirm.
- Wait for the First Aid process to finish. Click Done.
You can also run First Aid using macOS’ Terminal. Here’s how:
- Search for Terminal in Spotlight Search (Command + Space), and open the Terminal app.
- Type diskutil list and press Enter. This command lists all the drives connected to your Mac. Look for your USB drive in the list.
- Type diskutil repairDisk /YOUR USB DRIVE and press Enter. Replace “YOUR USB DRIVE,” with the disk number of your USB drive. In my case, the command was diskutil repairDisk /dev/disk4.
- First Aid will scan and repair any errors on the USB drive.
Solution 2: Fix Corrupted USB Drive Using TestDisk
TestDisk is an excellent partition repair tool that can recover corrupt and lost partitions from your USB drive. In most cases, TestDisk recovers partitions with the existing data intact. The program’s lack of a GUI makes using it cumbersome for novice users. You can only navigate the program using a keyboard – use the Arrow keys to highlight an option, and press Enter to select it. Here’s a step-by-step guide on how to fix a corrupt USB drive using TestDisk for Mac:
- Download TestDisk and extract the archive.
- Launch TestDisk from the extracted folder.
- Choose whether you wish to create a log file or not. A log file will store the events of the partition recovery process. It does not impact the actual repair/recovery process whatsoever.
- Select your USB drive from the list and press Enter.
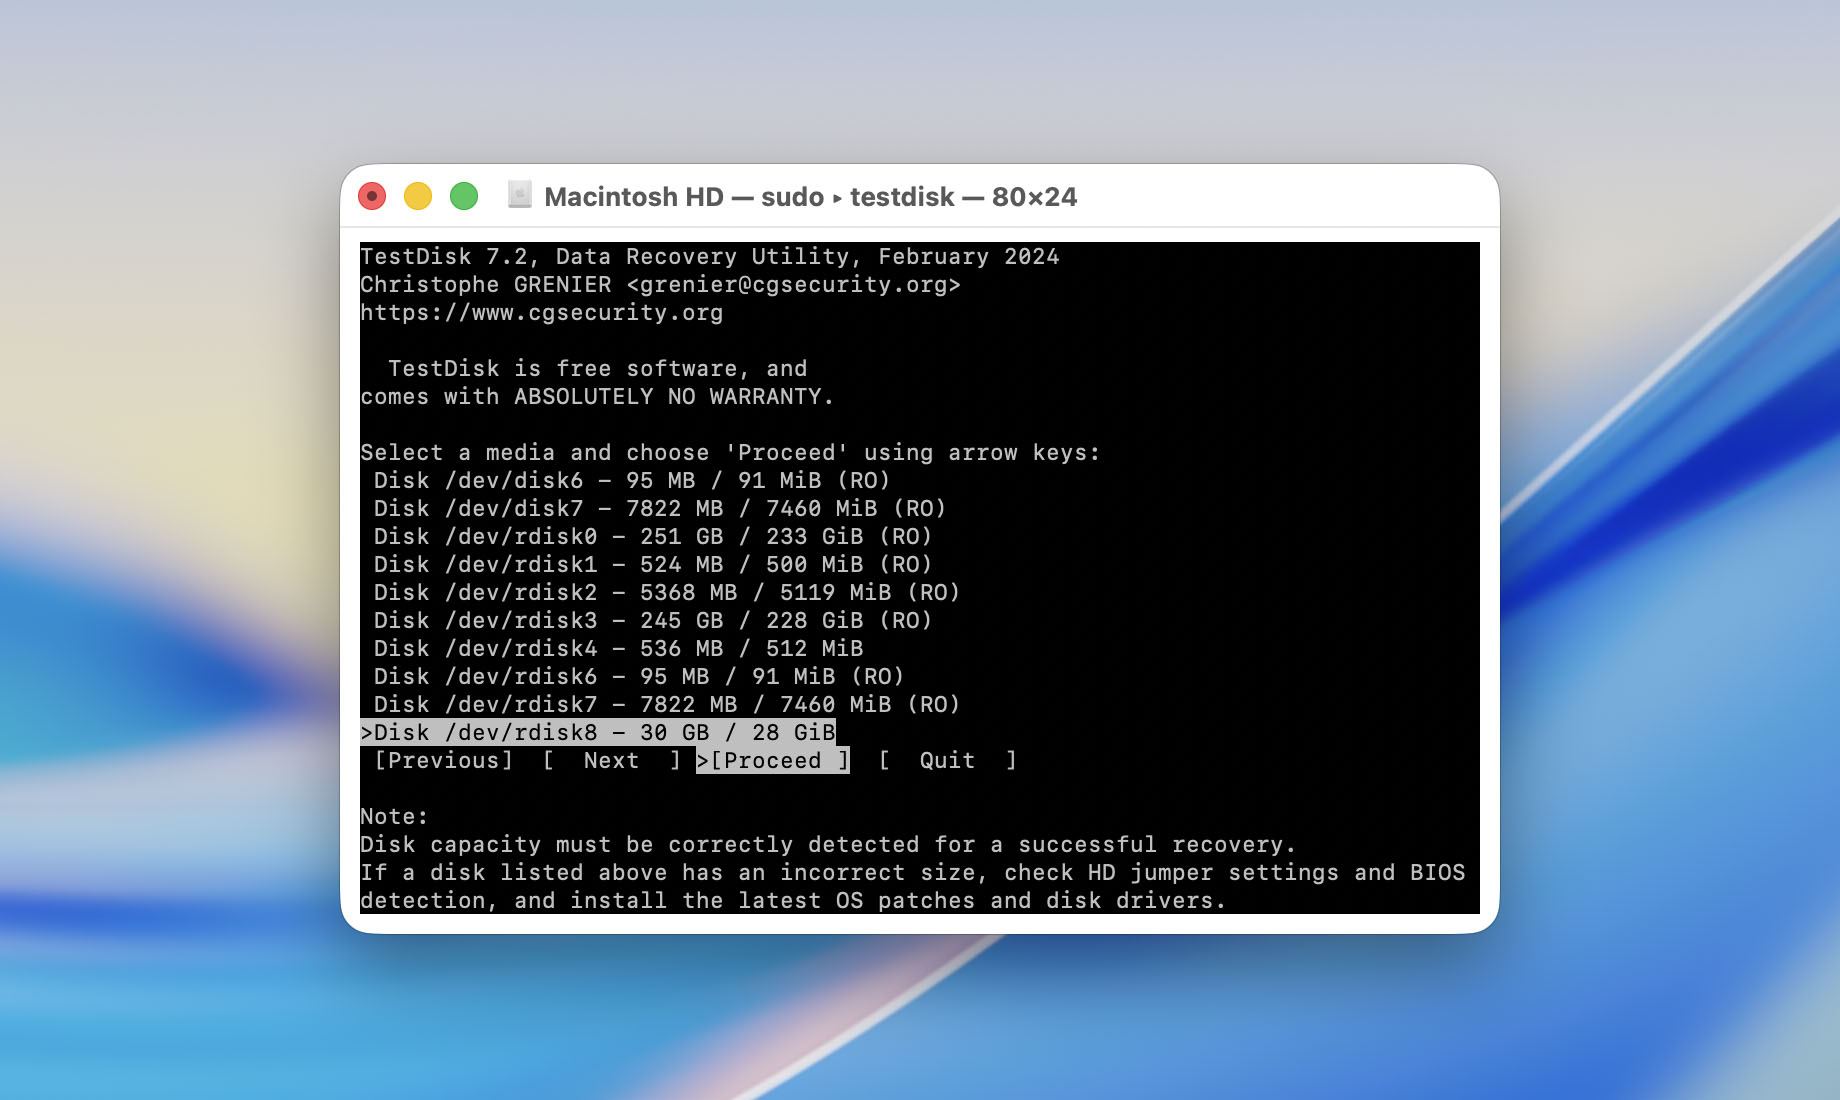
- Select the partition table type. TestDisk auto-detects this, so simply press Enter on this screen, unless you’re sure your USB drive has a different partition table.
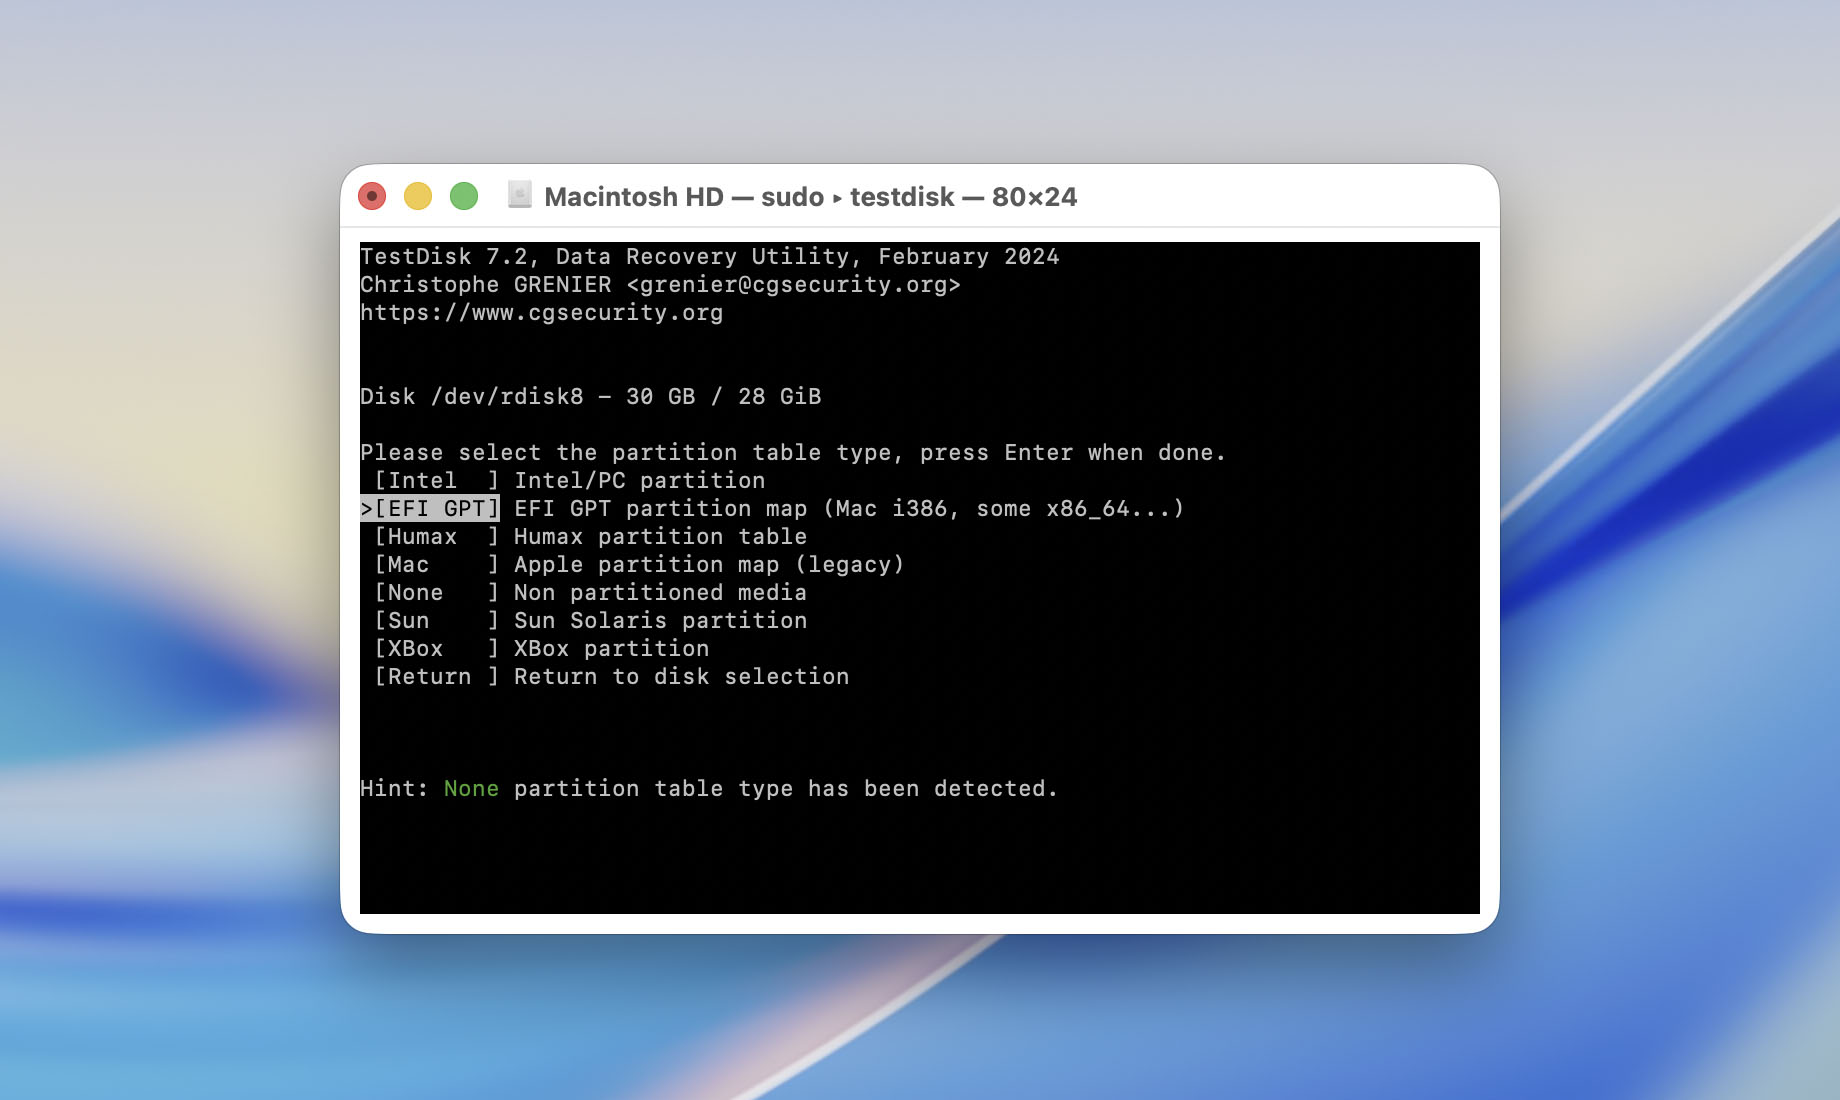
- Select Analyse and press Enter. Press Enter on the confirmation screen as well.
- Select Quick Search and press Enter. TestDisk will list all the partitions it discovers.
- Each partition will have a prefix next to it – D(eleted), *(Bootable), P(rimary), L(ogical). A partition listed as Deleted will remain deleted if you don’t change the prefix. To change the prefix, highlight the selected partition, and use the arrow keys to cycle through the prefixes. To recover a partition, ensure it has the P prefix before it. Once you’ve changed the prefix, press Enter.
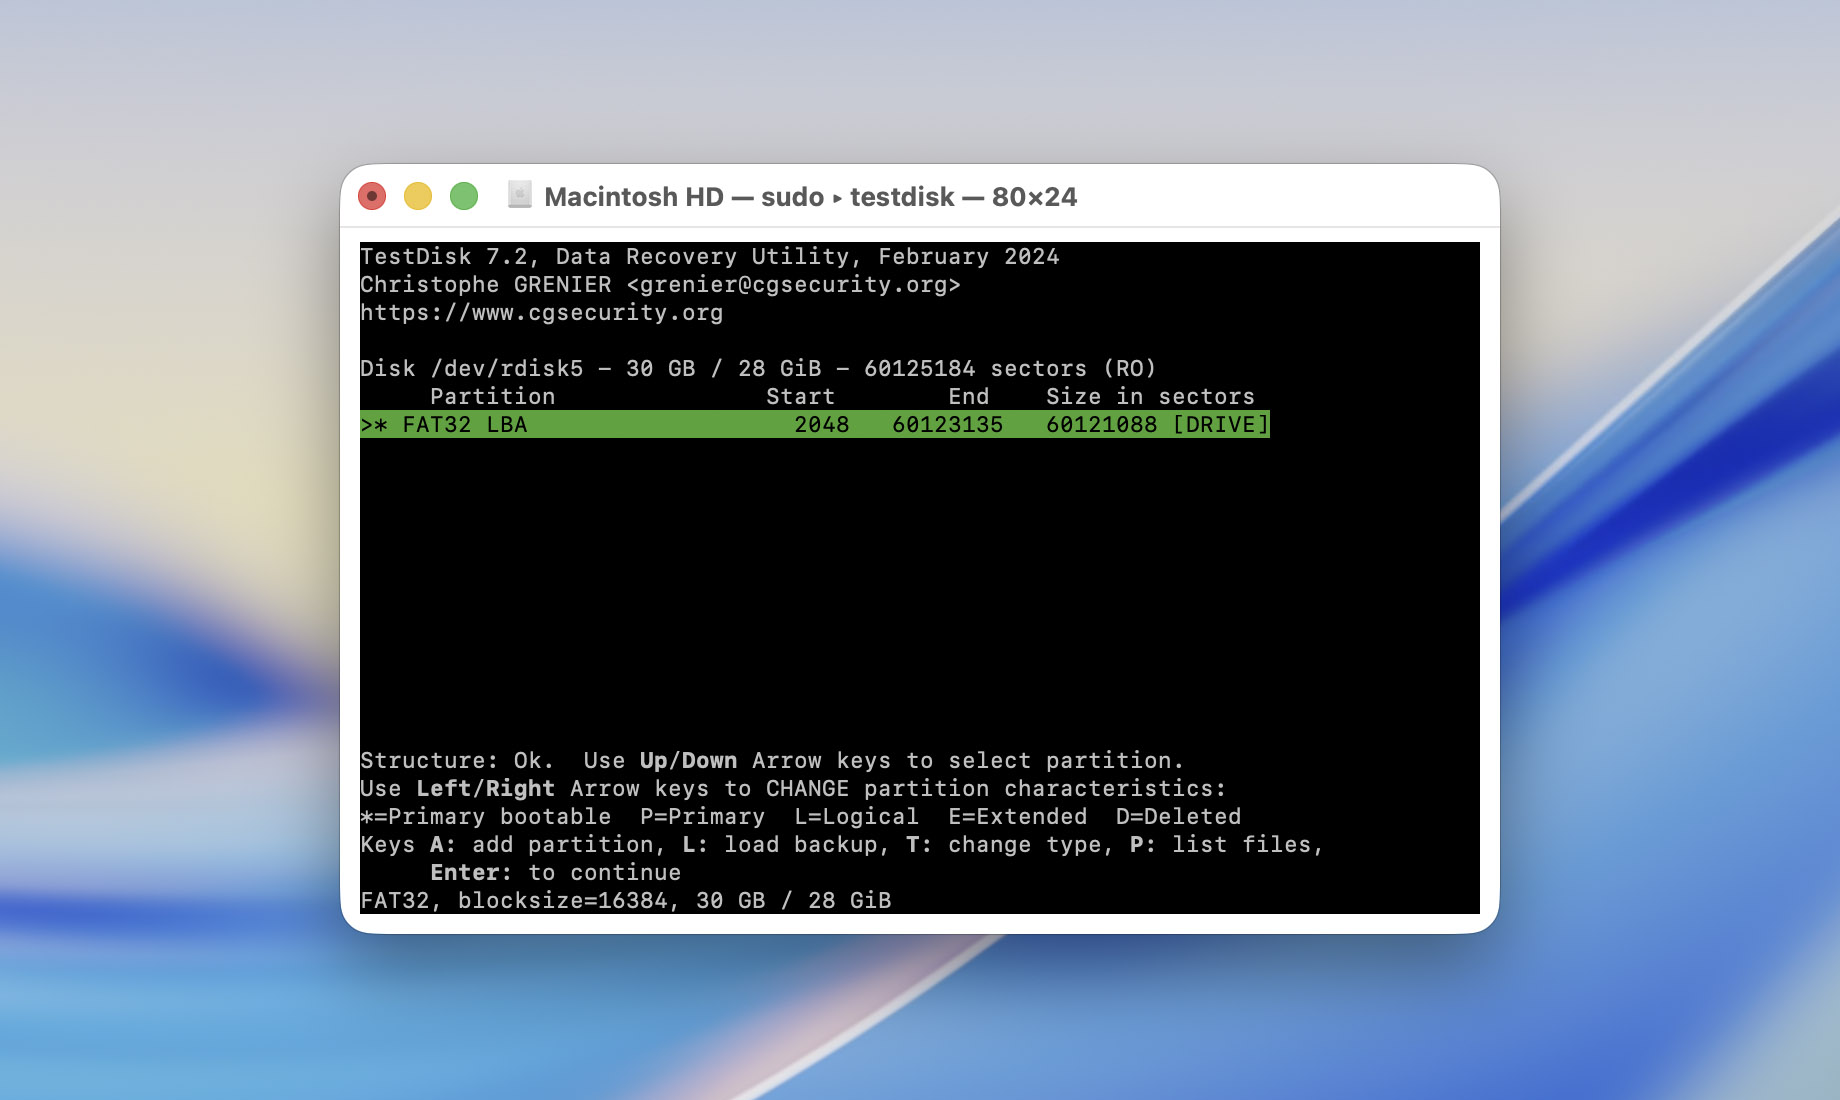
- Highlight a partition and press P to list its files. Press Q to go back to the previous screen. If the required partition isn’t listed, select the Deeper Search option – this will take a long time.
- Once you’ve confirmed the required partitions and files are there, select Write, and press Enter.
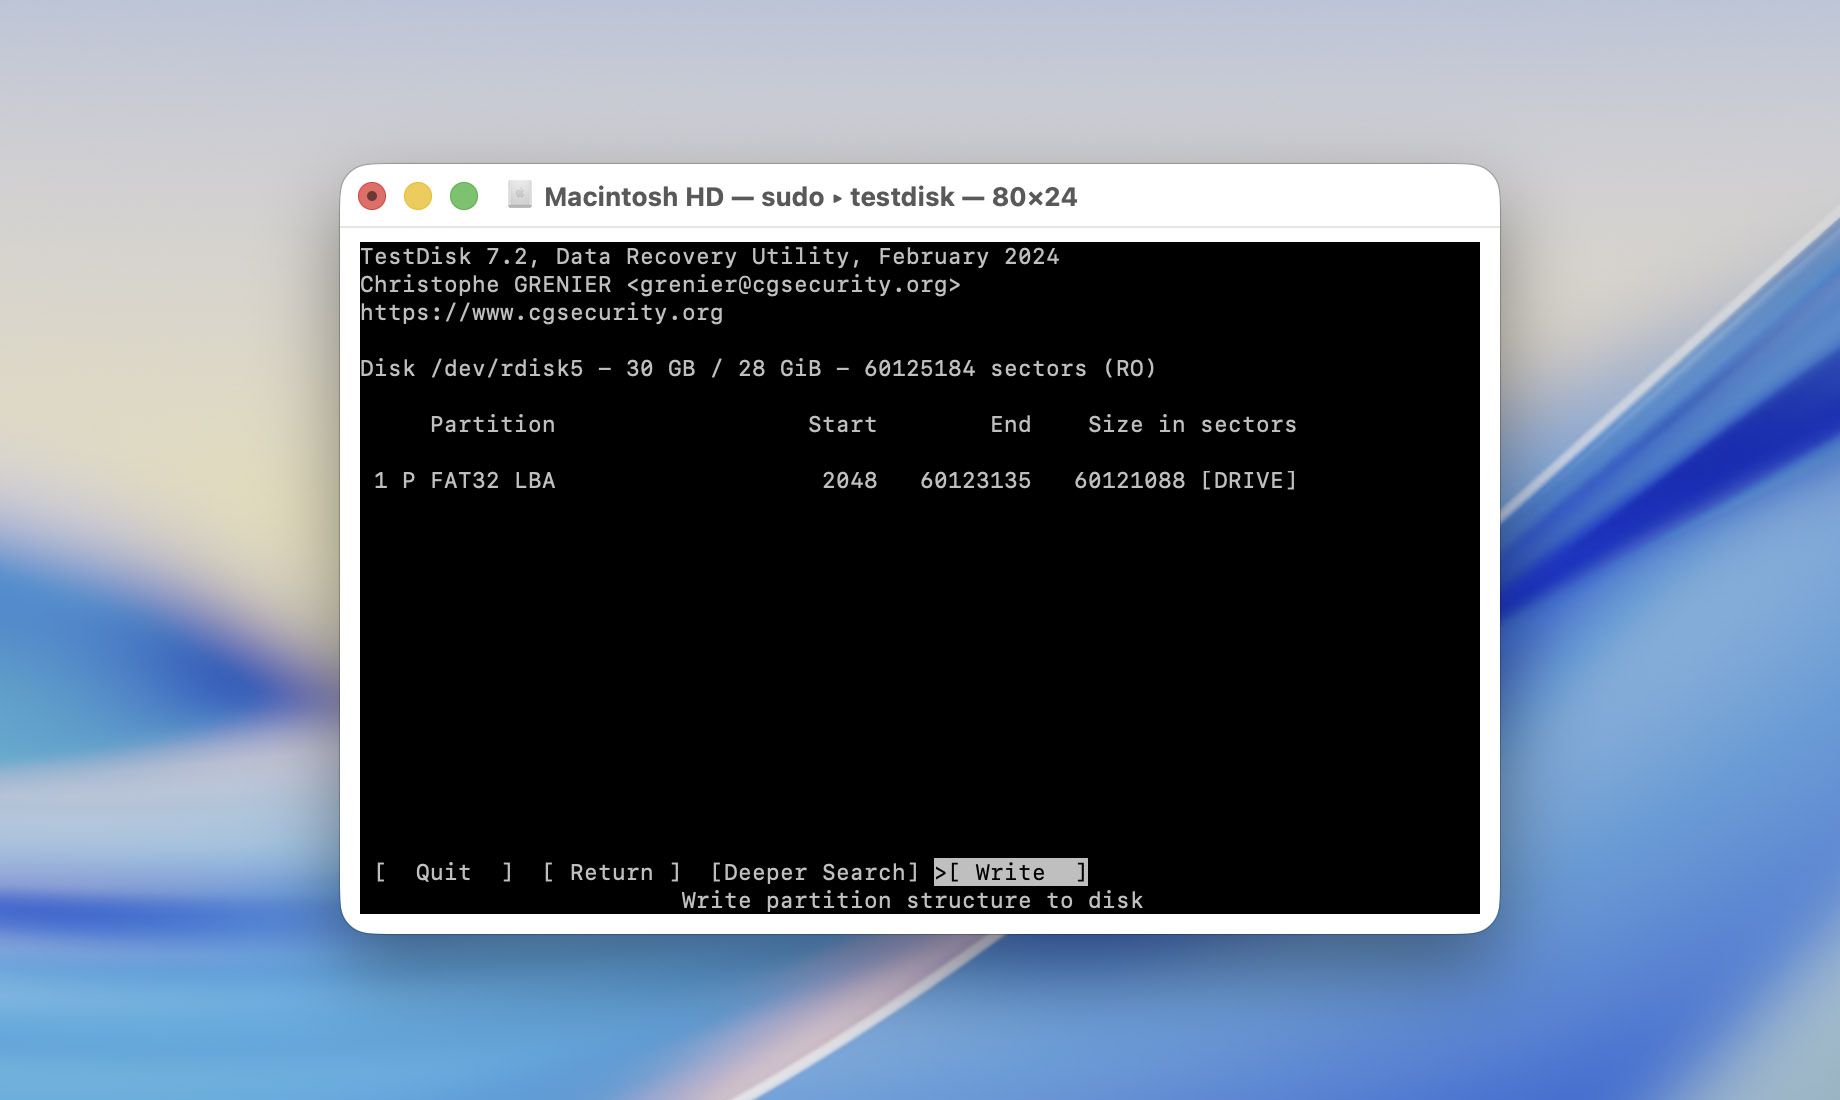
- Press Y on the confirmation prompt.
- TestDisk will repair the USB drive.
If you want to learn more about the program and what else it can do when working with USB drives, check out our full TestDisk review.
Solution 3: Format the USB Drive
You should also use Disk Utility to format your flash drive on Mac. Make sure that there are no files located on the device before formatting it since after the process is finished, all of the data will get erased from the USB drive. If you haven’t recovered your files yet, return to the recovery section above and do that first.
Here’s how to format a USB flash drive on your Mac via Disk Utility:
- Open Disk Utility.
- Click your USB drive from the list of devices on the left side of your screen. Click the Erase button at the top.
- Type in a name for your flash drive in the Name field.
- If you plan to use the USB drive only with Macs, you can choose Mac OS Extended (Journaled). If you regularly move the drive between macOS, Windows, and other operating systems, choose exFAT for broader compatibility.
- Click Erase.
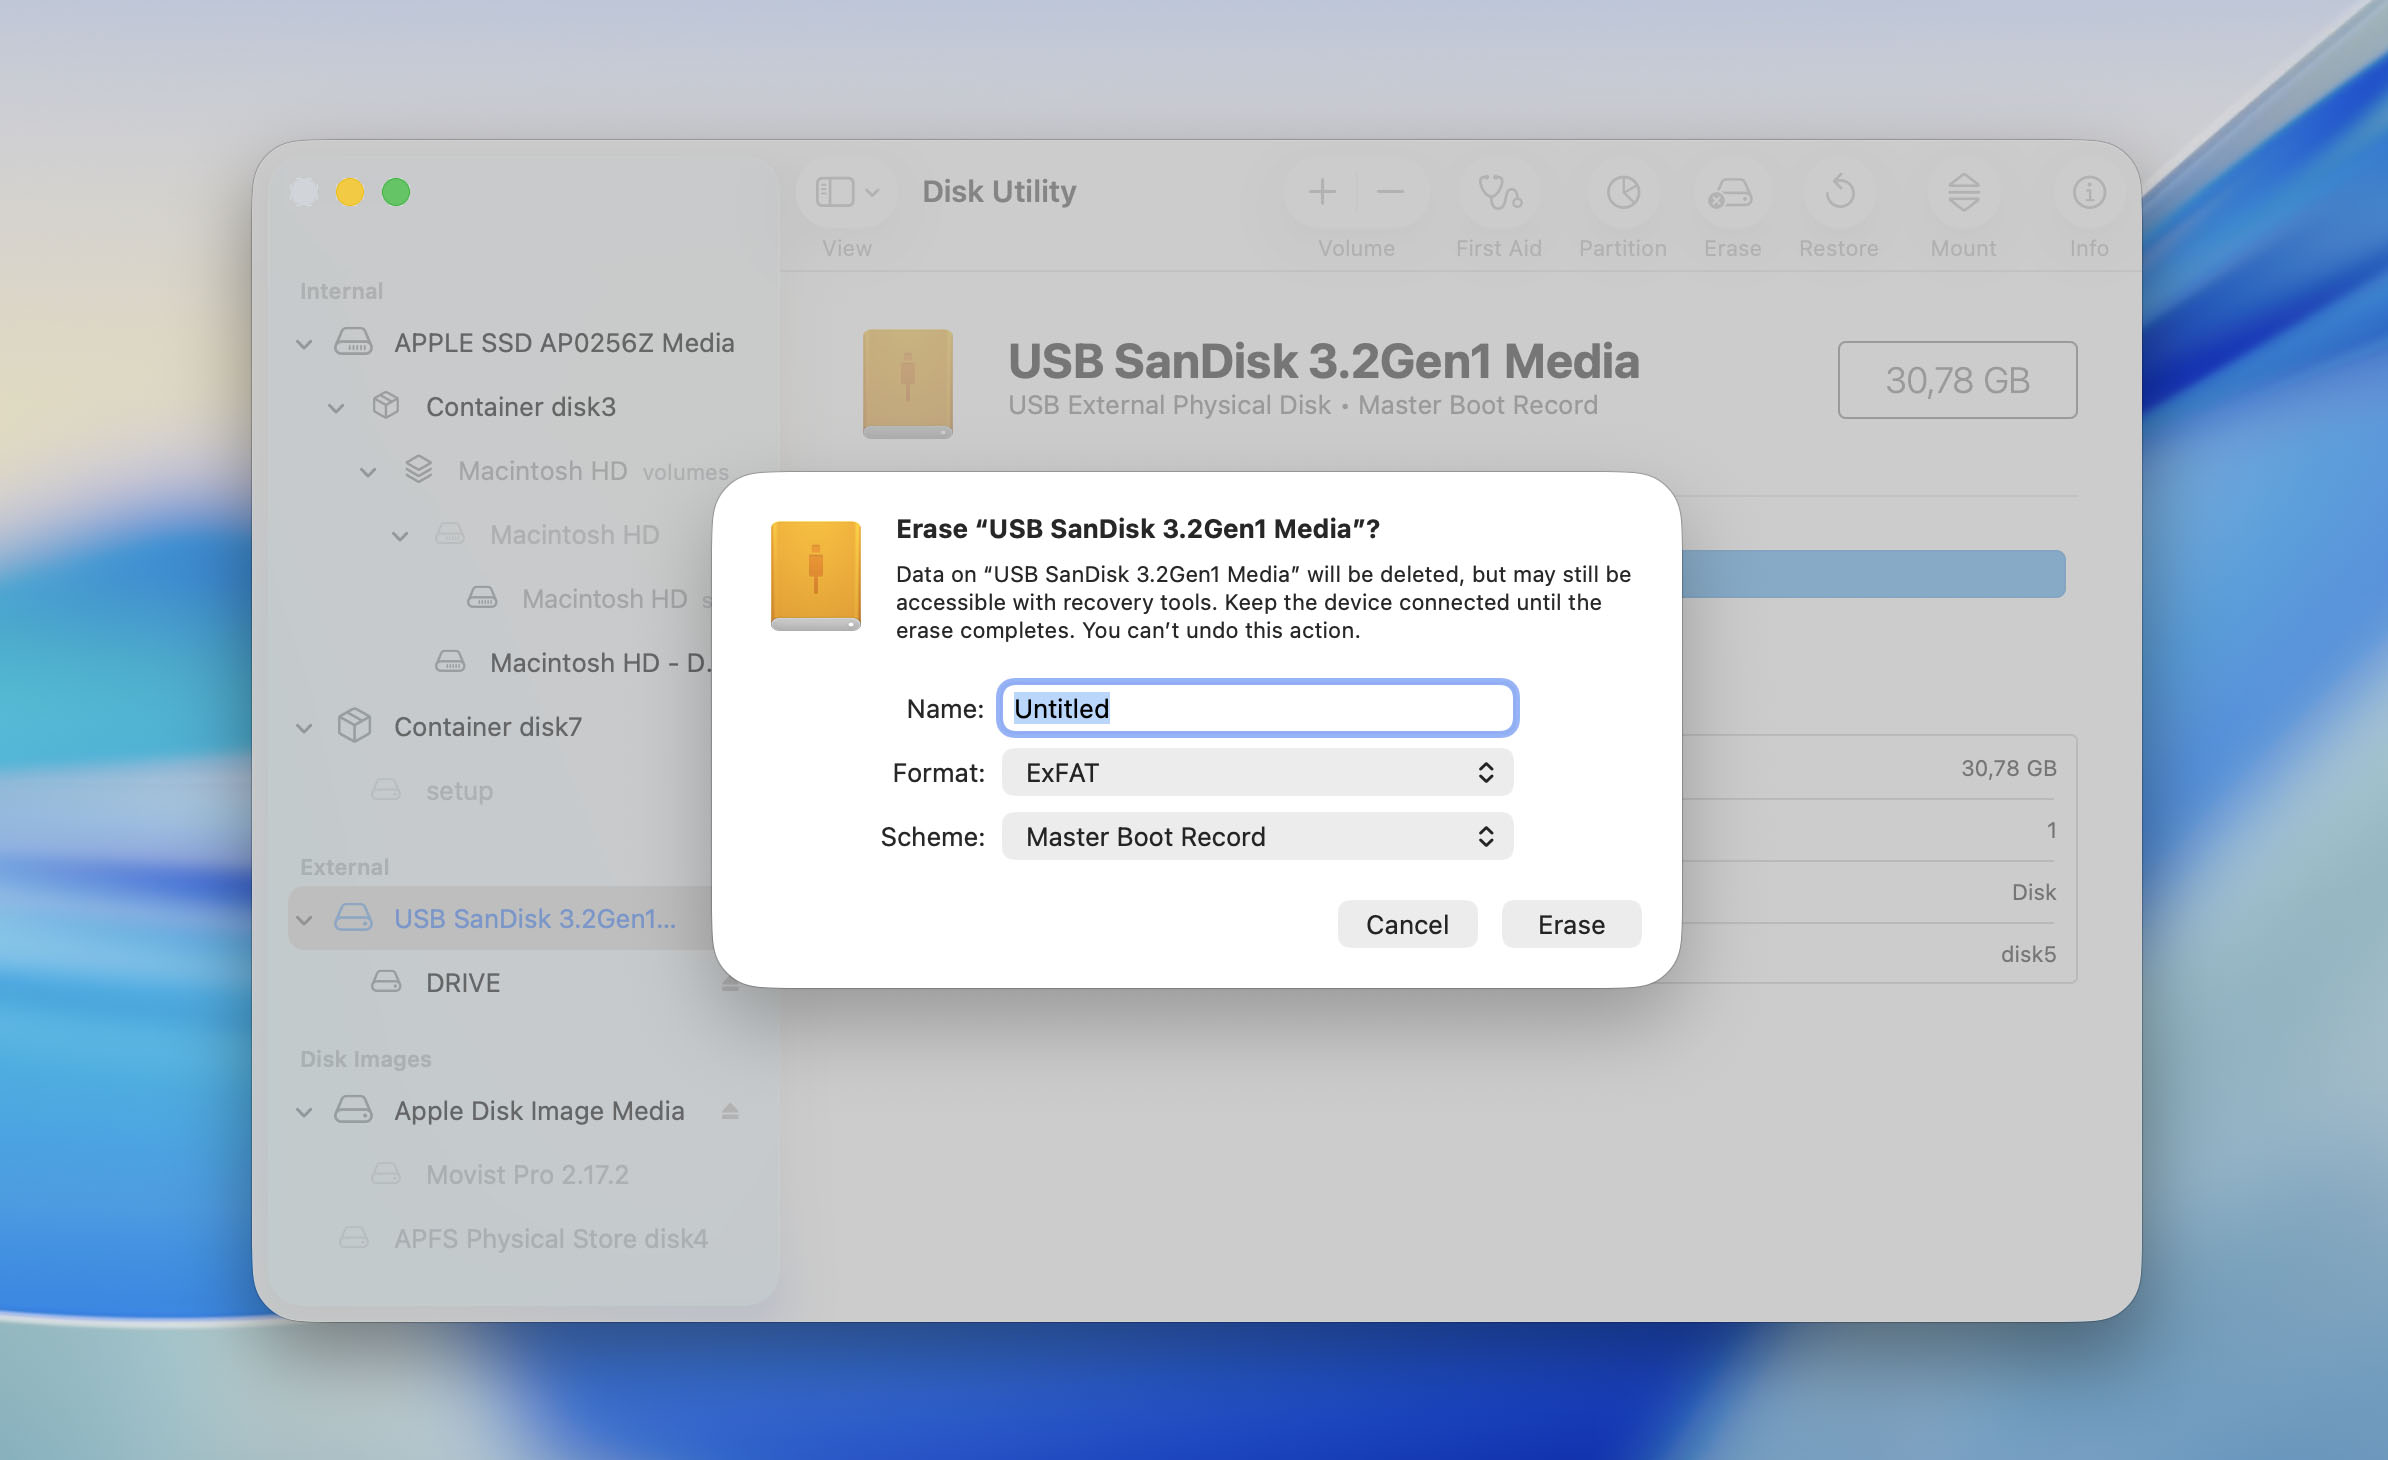
- Once the USB Drive is formatted, click Done and eject your device.
Now you’ll get a fresh start with your flash drive. You can start uploading files to it and using the USB drive as desired.
However, if files start disappearing from the USB drive again after some time, it’s better to replace the drive rather than continue using it. Get a new USB drive and retire the old one, especially if you plan to store or transfer important files.
Why Files Disappear From USB Drives on Mac
Let’s go through the main reasons why data can get lost on a USB drive:
- Physical damage can cause the USB drive to stop mounting or being recognized by your Mac, making its files inaccessible.
- Formatting erases the files, although recovery may still be possible if you stop using the drive before the data is overwritten.
- Interrupting a transfer can result in files never being fully copied to the USB drive.
- File system corruption can make files disappear or become inaccessible, especially when the drive is used between different operating systems.
- You accidentally deleted the files.
- The USB drive has been infected with malware.
To prevent similar problems in the future, always eject the USB drive properly and wait until file transfers are complete before disconnecting it. Don’t use a flash drive as the only place to keep important files; keep another copy on your Mac, an HDD or SSD, or in a backup. If the USB starts behaving strangely or files disappear from it again, move your data elsewhere and replace the drive.
Final Thoughts
As you can see, it’s quite possible to recover data from a USB drive on Mac. Hopefully, you won’t have to go through this process again, but just in case, here’s a quick roadmap you can come back to:
- Did you delete the files from the USB drive? If yes, check Trash folder first.
- You didn’t delete anything, but the files disappeared? Check whether the files are simply hidden.
- The deleted files aren’t in Trash anymore? If copies still exist on your Mac, simply copy them back to the USB drive. If they’re gone from the Mac as well but were included in a Time Machine backup, restore them from there. Otherwise, scan the USB drive with data recovery software.
- Was the USB drive formatted? Stop using it and scan it with data recovery software before writing anything new to it.
- Is the USB drive corrupted or behaving strangely? Recover any important data first. After that, try First Aid, TestDisk, or, as a last option, format the drive.
- The USB drive isn’t detected in Disk Utility or is physically damaged? DIY recovery software won’t be much help in this case. Consider contacting a professional data recovery service instead.
If you still have questions or run into problems while trying to recover USB drive data on Mac, visit our 7 Data Recovery Forum. There are already discussions about USB drive recovery and related issues there. If you can’t find one that matches your case, create a new topic, describe what happened to your USB drive, and wait for a reply from the community.
FAQ:
- Download Disk Drill and install it.
- Open Disk Drill, select the USB drive, and click Search for lost data.
- Click on Review found items.
- Select the files you wish to restore, and click on Recover.
- Pick a recovery destination for the files and click Next.
- Open Trash from the Dock.
- Look for the deleted files, right-click on them, and choose Put Back.
- If the files aren’t in Trash but previously existed on your Mac, check your Time Machine backups. Open the folder where the files were originally stored, select Browse Time Machine Backups, find a backup from before the files were lost, and restore them.