


 Wondering how to recover permanently deleted files on Windows? In many cases, you can get them back, but the right method depends on whether you have a backup, the type of storage device, and what happened after the files were deleted. If you don’t have a backup, use data recovery software such as Disk Drill to scan the drive and recover files before they get overwritten. If you do have a backup, check File History, Backup and Restore, or your cloud storage first, since those methods let you restore files without scanning the drive.
In this guide, we’ll cover each recovery method step by step and help you choose the best option for your specific situation.
Is it Possible to Recover Permanently Deleted Files on Windows?
Yes, often it is possible to recover permanently deleted files. When you permanently delete a file, Windows usually removes its reference from the file system and marks the occupied space as available for new data. Until that space is overwritten, the original file often remains on the storage device and can still be recovered.
If you just emptied the Recycle Bin or deleted files with Shift + Delete, you’re probably wondering if they’re gone forever. You’re definitely not the only one. It’s one of the most common questions that comes up in tech support forums after someone realizes they don’t have a backup.
There are several ways to recover permanently deleted files:
| Method | Best for | Backup required | Difficulty | Success Rate |
| Method 1. Data Recovery Software | Permanently deleted files, emptied Recycle Bin, Shift + Delete | No | Easy | High, if the files haven’t been overwritten (lower on TRIM-enabled SSDs) |
| Method 2. File History Backup | Files backed up with File History | Yes | Easy | Very High, if a backup exists |
| Method 3. Backup and Restore | Files included in a Windows backup | Yes | Easy | Very High, if a backup exists |
| Method 4. Cloud Backup | Files stored in OneDrive, Google Drive, Dropbox, and similar services | Yes | Easy | Very High, if the files are available in the cloud or Recently Deleted |
| Method 5. Professional Data Recovery Lab | Physical drive failure or cases where software can’t recover the files | No | No DIY required | Moderate to Very High, depending on the type and extent of the damage |
We recommend that you follow these steps:
- Stop using the affected drive as much as possible to reduce the risk of overwriting the deleted data.
- Confirm that the files are actually gone. Check the Recycle Bin, search your PC, review Recent in File Explorer, and make sure the files aren’t hidden.
- Scan the drive with data recovery software if you don’t have a backup.
- Check your backups, including File History, Backup and Restore, cloud storage, or any other backup solution you use.
- Contact a professional data recovery service if the drive has physical damage or the files are too valuable to risk with additional recovery attempts.
It’s also worth considering the type of drive from which you deleted the files. If it’s an HDD, the process works as described above. However, if you use an internal SSD, the principle is different. After deleting files, the TRIM command is triggered, which reorganizes the blocks where the files were stored, making recovery impossible. The only chance to recover such files without a backup using recovery software is to act before TRIM is executed. You can read more about this in our guide on how to recover deleted files from an SSD.
Make Sure the Files Are Permanently Deleted
Before we jump into methods to recover permanently deleted files on Windows, it’s a good practice to check that the files are actually lost. There are situations where users lose files in a pile of others and mistakenly believe they are deleted, when in fact, they are still in a different folder. The check will only take a few minutes, and it won’t reduce your chances of recovery. But if the files are still on the computer, it will save time by avoiding unnecessary recovery methods.
Here are a few quick things to check:
- Open the Recycle Bin and see if the files are still there. If they are, right-click them and select Restore.
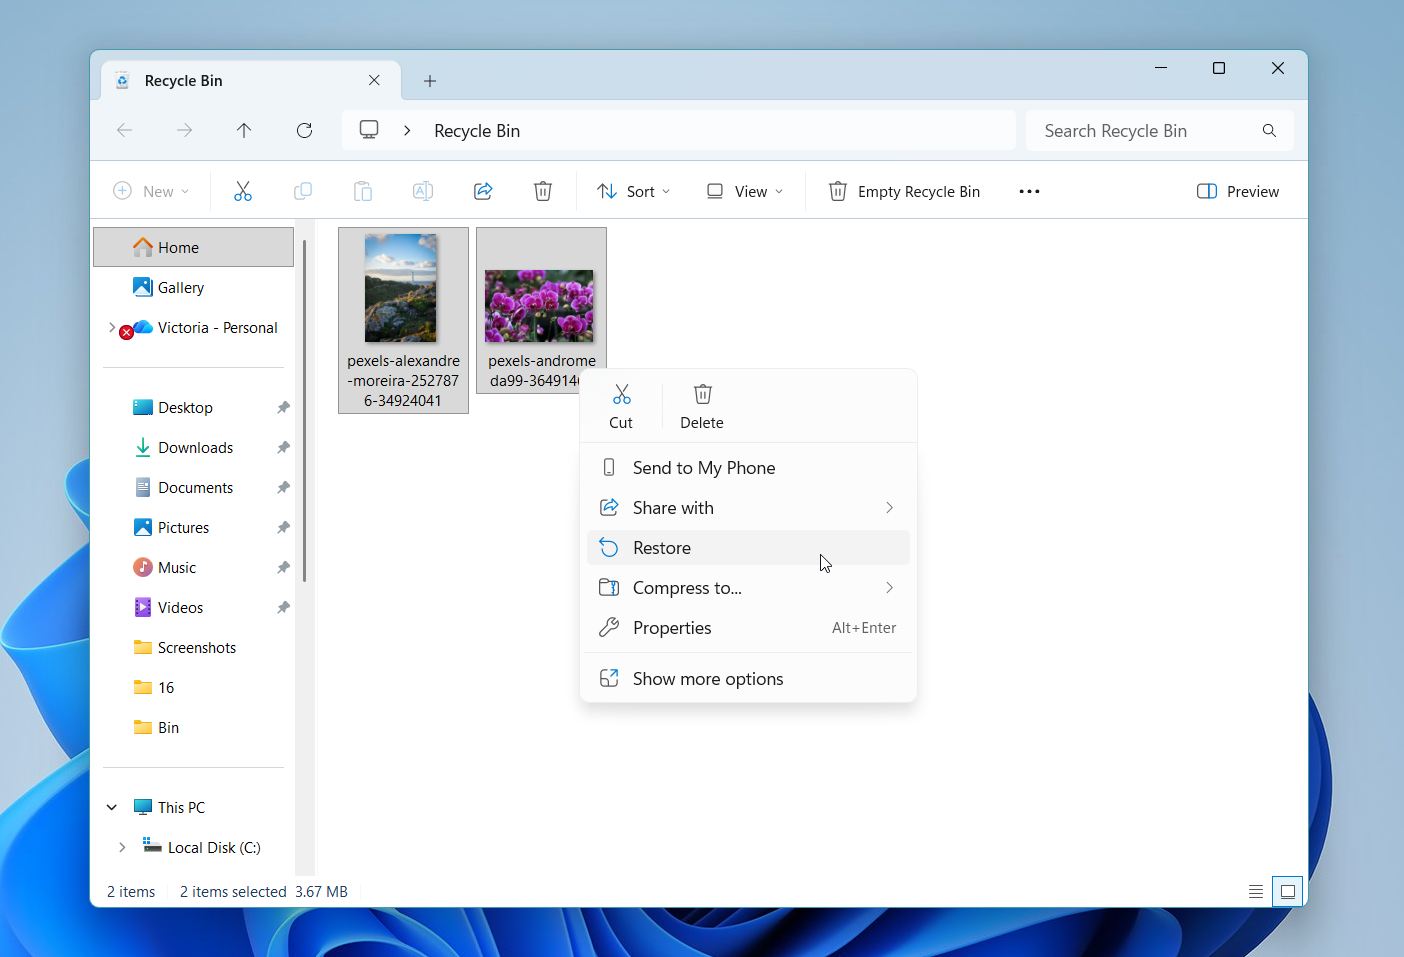
- Open File Explorer and go to Home to check the Recent section. If the file appears there, right-click it and select Open file location to see where it’s stored.
- Search your PC. Use Windows Search or File Explorer to search for the file by name, extension, or part of its name.
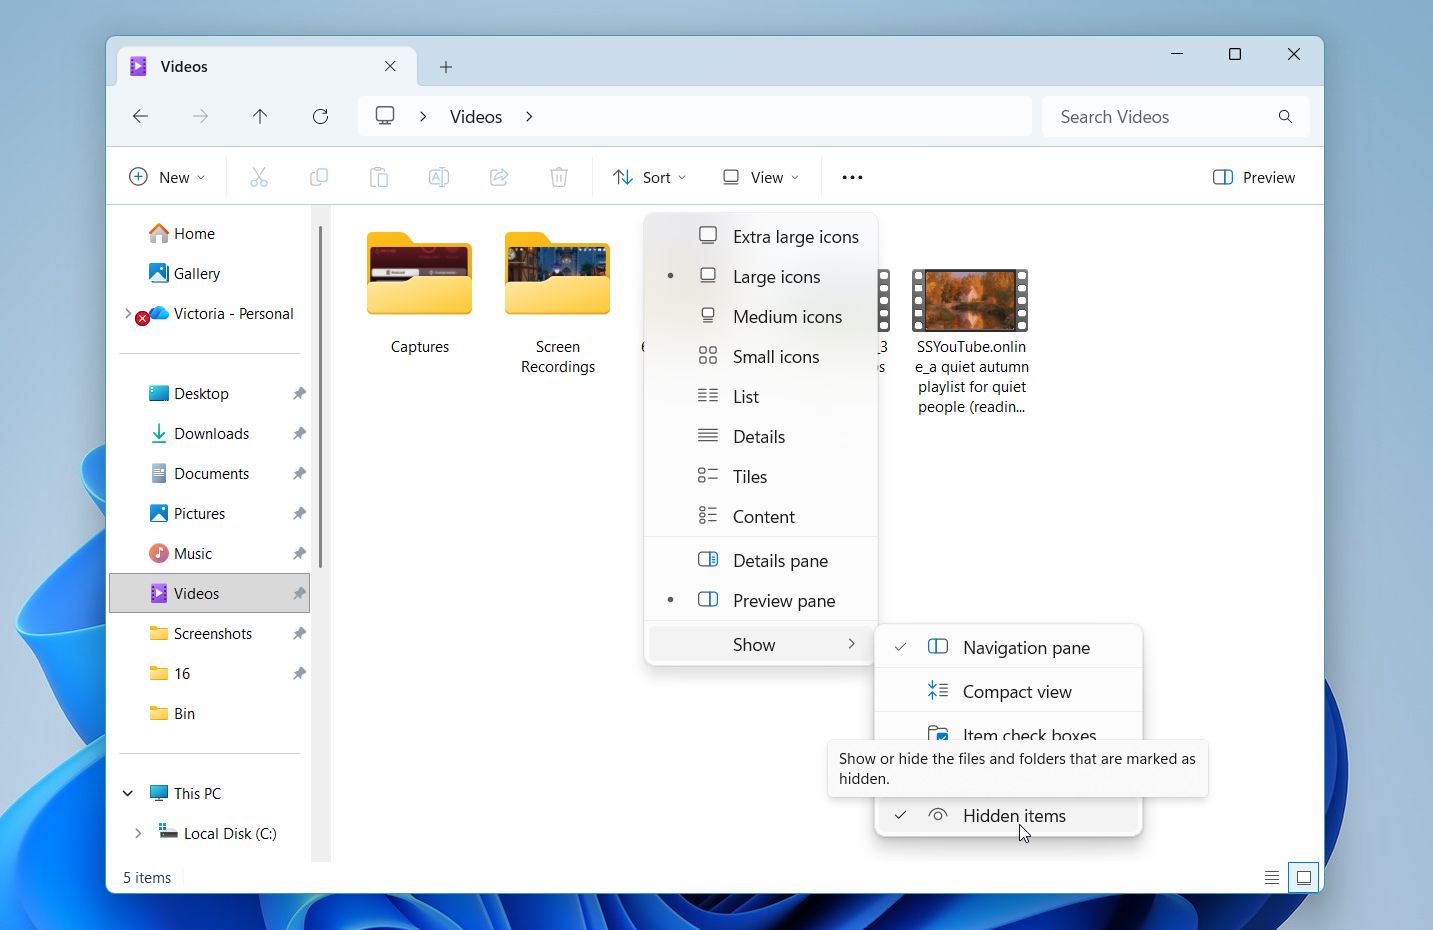
- Hidden files. Open File Explorer > View > Show and enable Hidden items to make sure the file isn’t simply hidden.
Files that exceed the capacity of the Bin will be permanently deleted instead of stored for potential recovery. You will not find these files in the Recycle Bin. You can adjust the size of the Recycle Bin and how long it retains files by modifying its settings. If your lost files are not in the Recycle Bin, you will need to use another method for recovery. Read on to see what other options you have to recover lost or deleted files.
How to Recover Permanently Deleted Files on Windows
Now let’s move on to the recovery methods themselves. We start with data recovery software because many people don’t have a backup available when they realize they’ve permanently deleted a file. After that, we’ll cover the built-in Windows recovery options, cloud backups, and the situations where a professional data recovery service is the better choice.
The screenshots in this guide were taken on Windows 11, but all of the methods also work on Windows 10. The steps are nearly identical, although some menus, icons, and window layouts may look slightly different depending on your version of Windows.
Method 1:Use Data Recovery Software
If the files aren’t available in the Recycle Bin and you don’t have a backup, data recovery software is usually your best option.
There are many excellent data recovery tools available, but for this guide we’ll use Disk Drill. We chose it because it consistently performs well in our tests, supports all major Windows file systems, and works with virtually any storage device, including internal and external HDDs, SSDs, USB flash drives, memory cards, and more. It also includes useful features such as file preview, scan filters, recovery chance indicators, S.M.A.R.T. monitoring, and disk imaging for unstable drives.
Here is how to use Disk Drill to recover permanently deleted files:
- Download Disk Drill from the official website. If possible, install it on a different drive than the one that contained your deleted files. This helps reduce the risk of overwriting the deleted data.
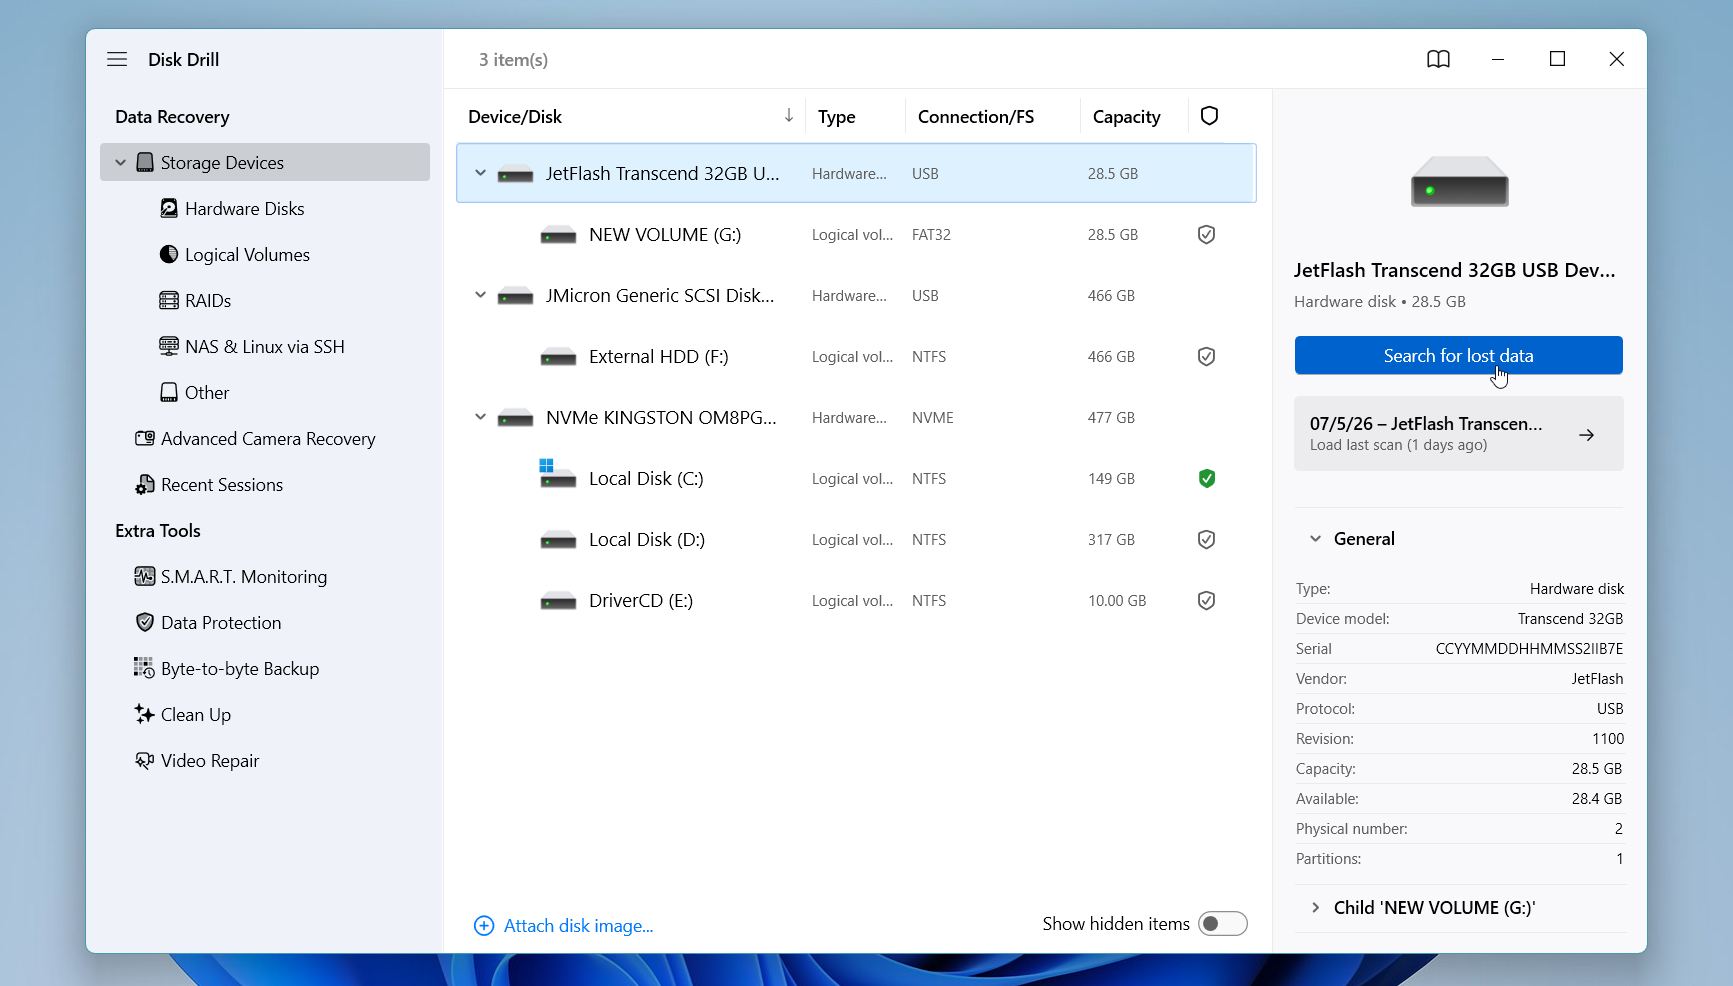
- Launch Disk Drill and select the drive where the deleted files were originally stored. Click Search for Lost Data to begin the scan.
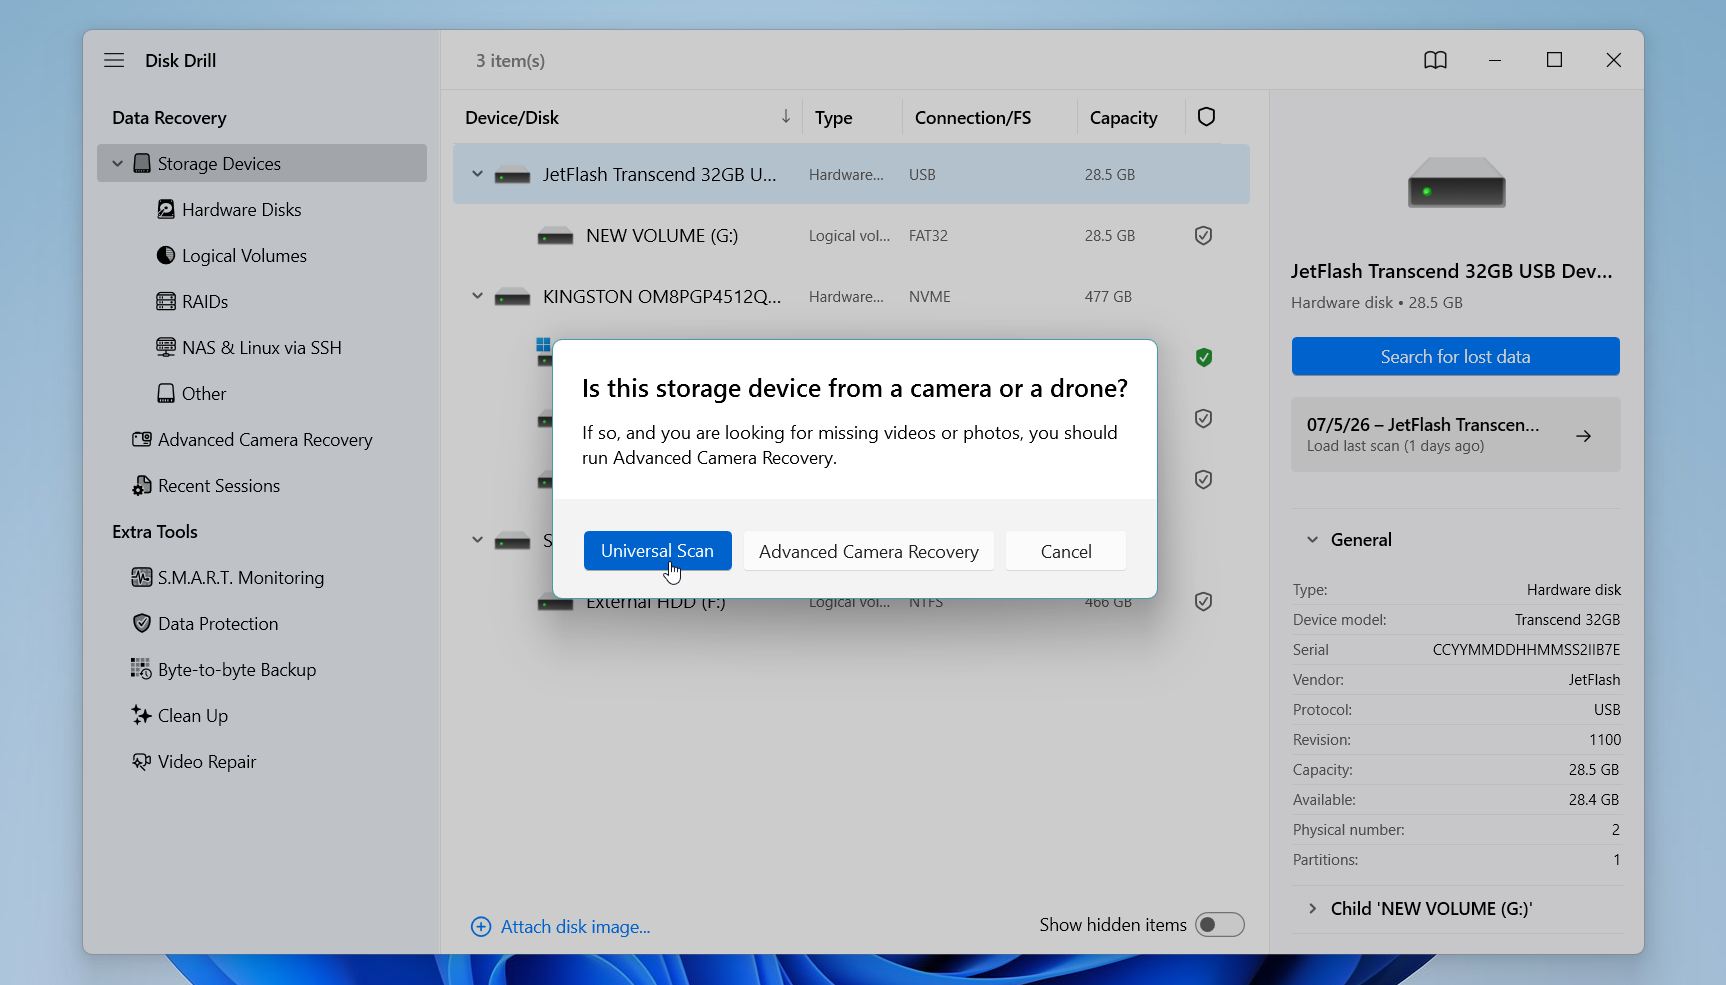
- Disk Drill may ask you to choose a scan method. For most situations, select Universal Scan, which combines all available recovery algorithms. If you’re recovering deleted videos from a camera or drone, run Advanced Camera Recovery instead.
- Wait for the scan to finish. Although you can review files while the scan is still in progress, we recommend waiting until it completes so Disk Drill can display the full list of recoverable files.
- Click Review Found Items.
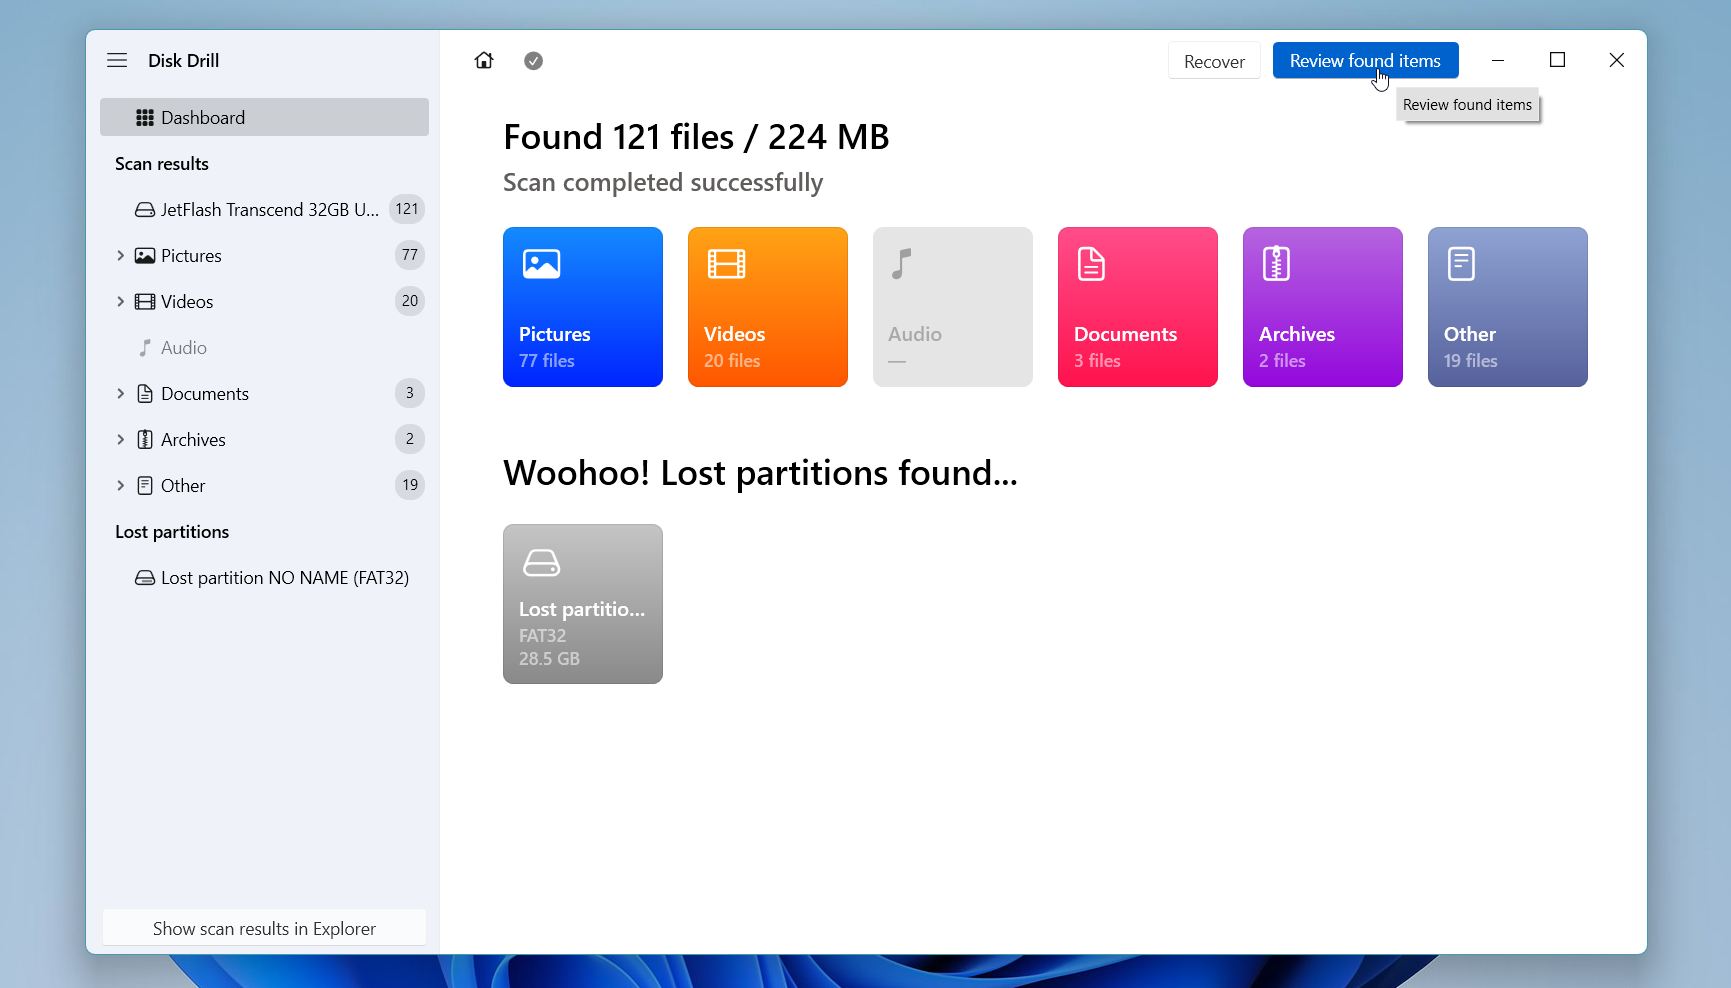
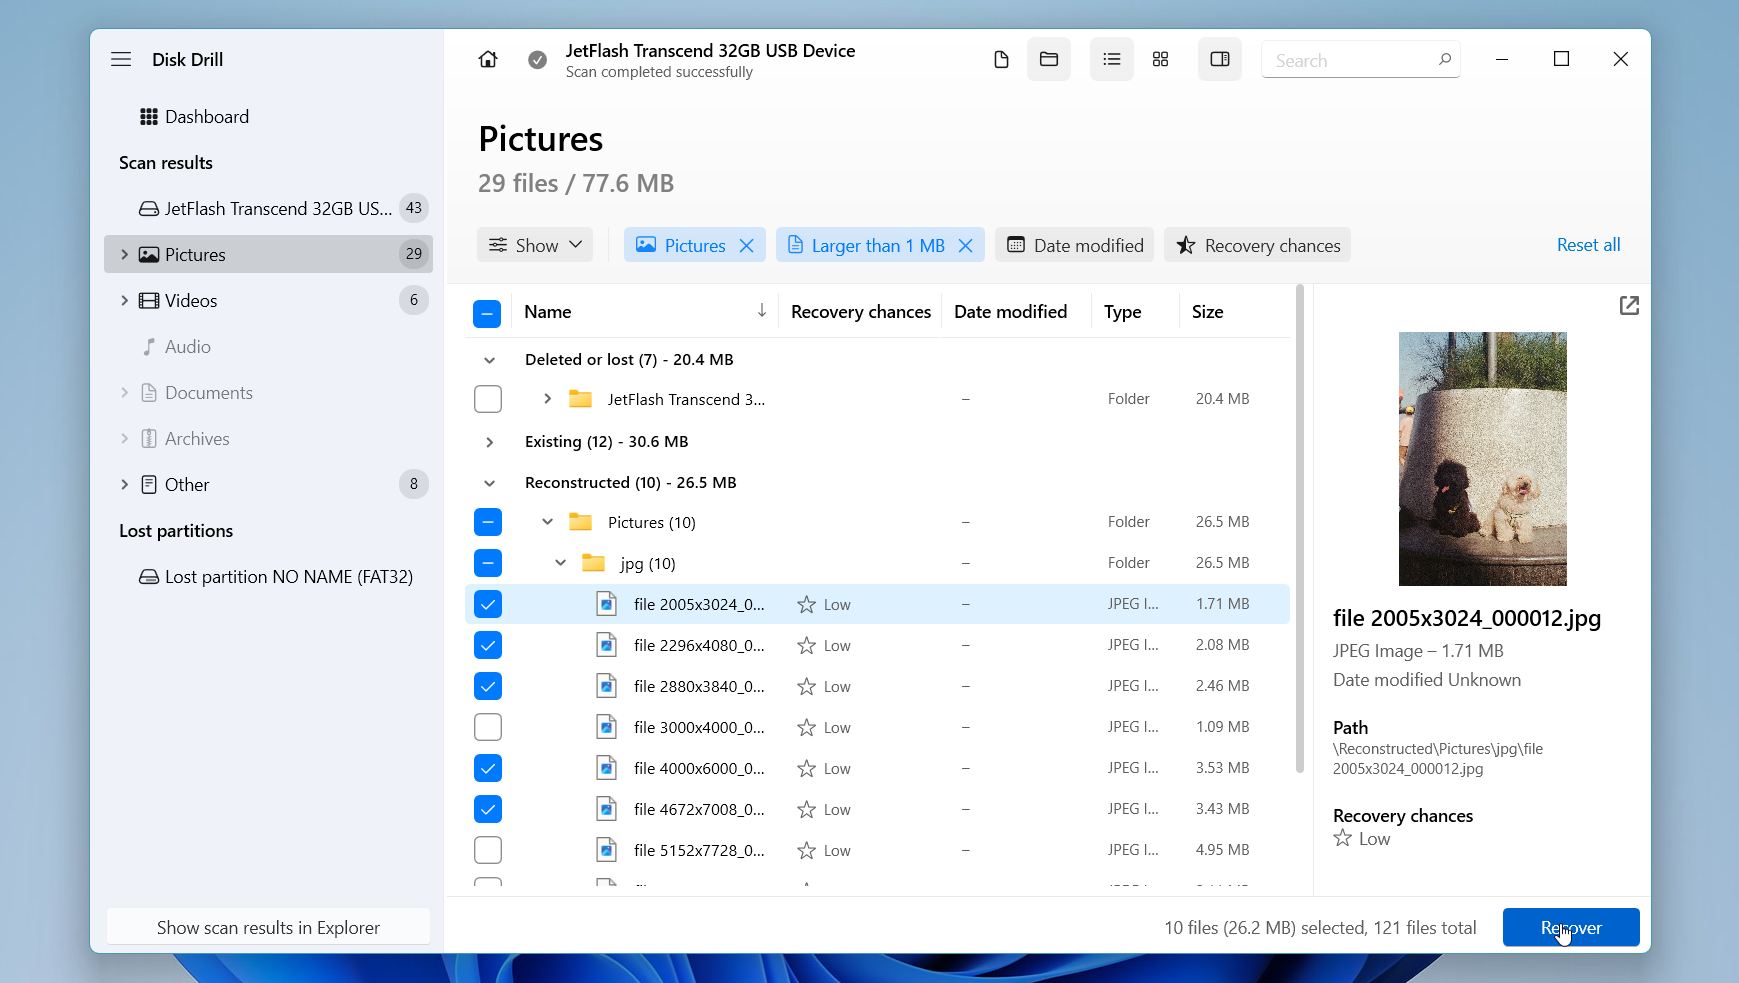
- Browse the results by category, such as Pictures, Videos, Documents, or Archives, or use the search bar and filters to locate specific files more quickly. Preview the files before recovery whenever possible. If a file opens correctly in the preview window, it usually indicates that the recovered version will also open successfully. Select the files or folders you want to recover and click Recover.
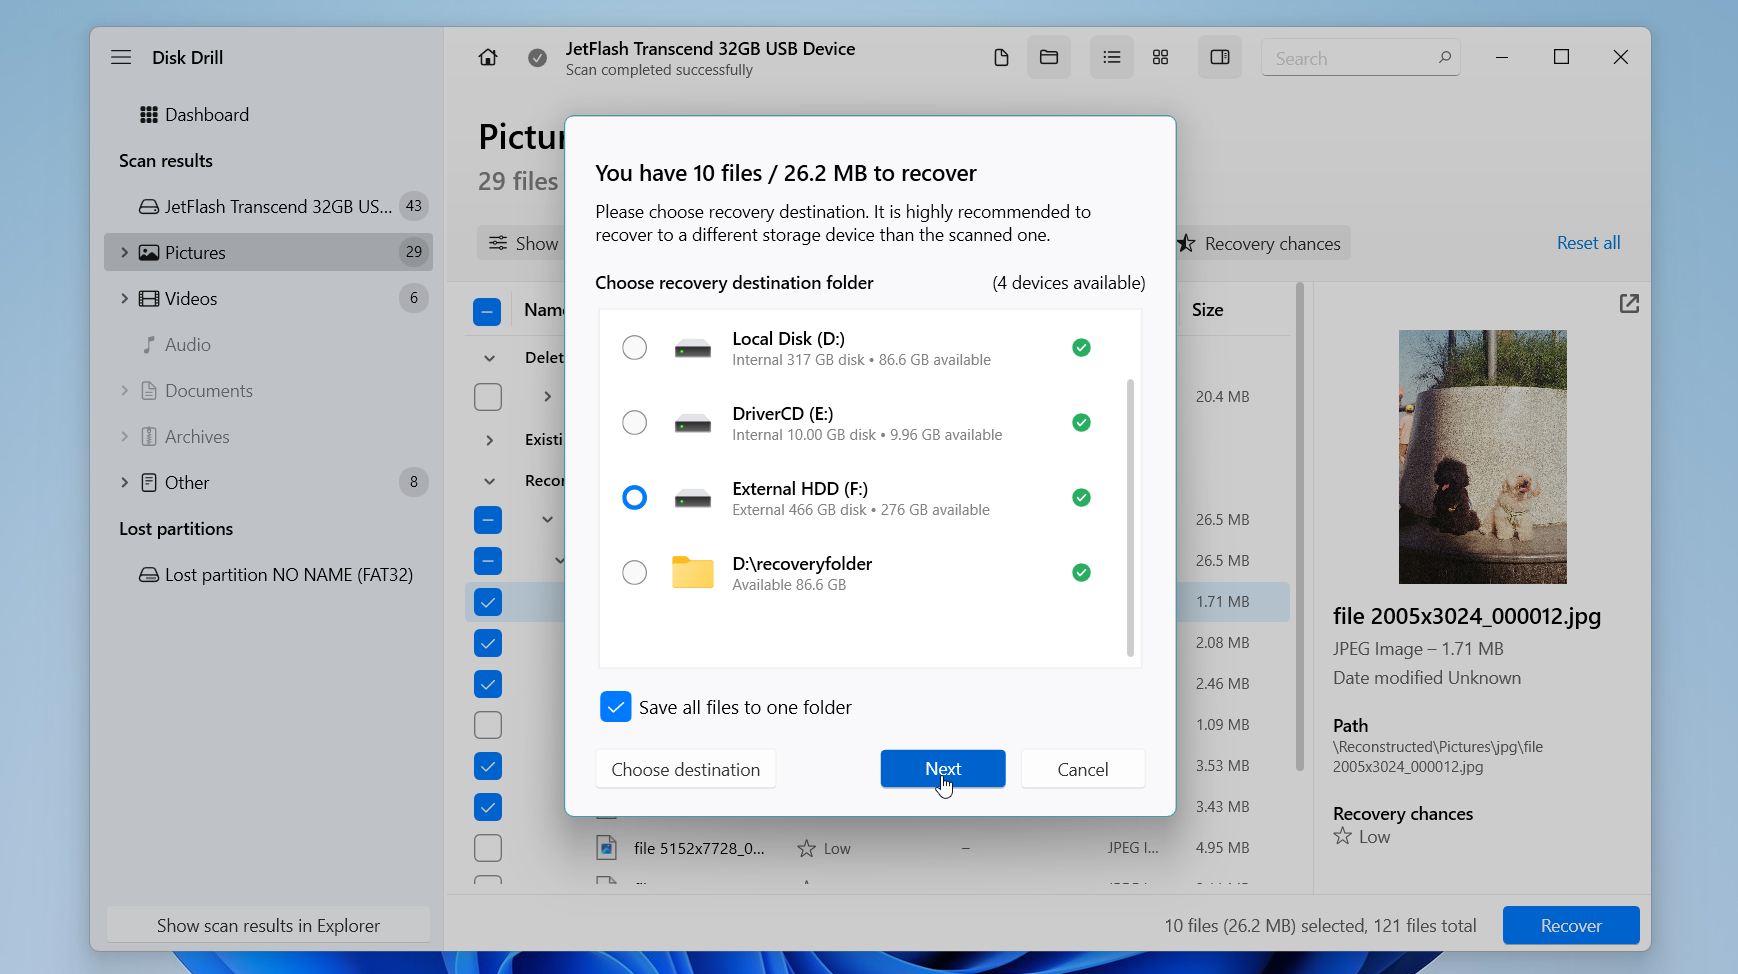
- Choose a recovery location on a different drive. Avoid saving the recovered files back to the same drive where they were deleted, as this can overwrite other recoverable data.
- After the recovery finishes, open the destination folder and verify that the restored files are complete and open normally.
The free version of Disk Drill for Windows lets you scan your drive, preview recoverable files, and recover up to 100 MB of data. This is often enough to confirm that your files are recoverable before you decide whether you need the Pro version.
We tested Disk Drill extensively as part of our review process. If you’d like a closer look at its features, recovery performance, pricing, and limitations before you use it, check out our full Disk Drill review. You can also visit one of our forum discussions to see how it helped users recover permanently deleted files after emptying the Recycle Bin.
Method 2:Recover Permanently Deleted Files From a File History Backup
If you enabled File History before deleting the files, Windows may already have a backup you can restore. File History automatically saves copies of files in your user folders, including Documents, Pictures, Music, Videos, and Desktop, as well as any other folders you added to the Library.
Here are the steps to recover deleted files from a File History backup:
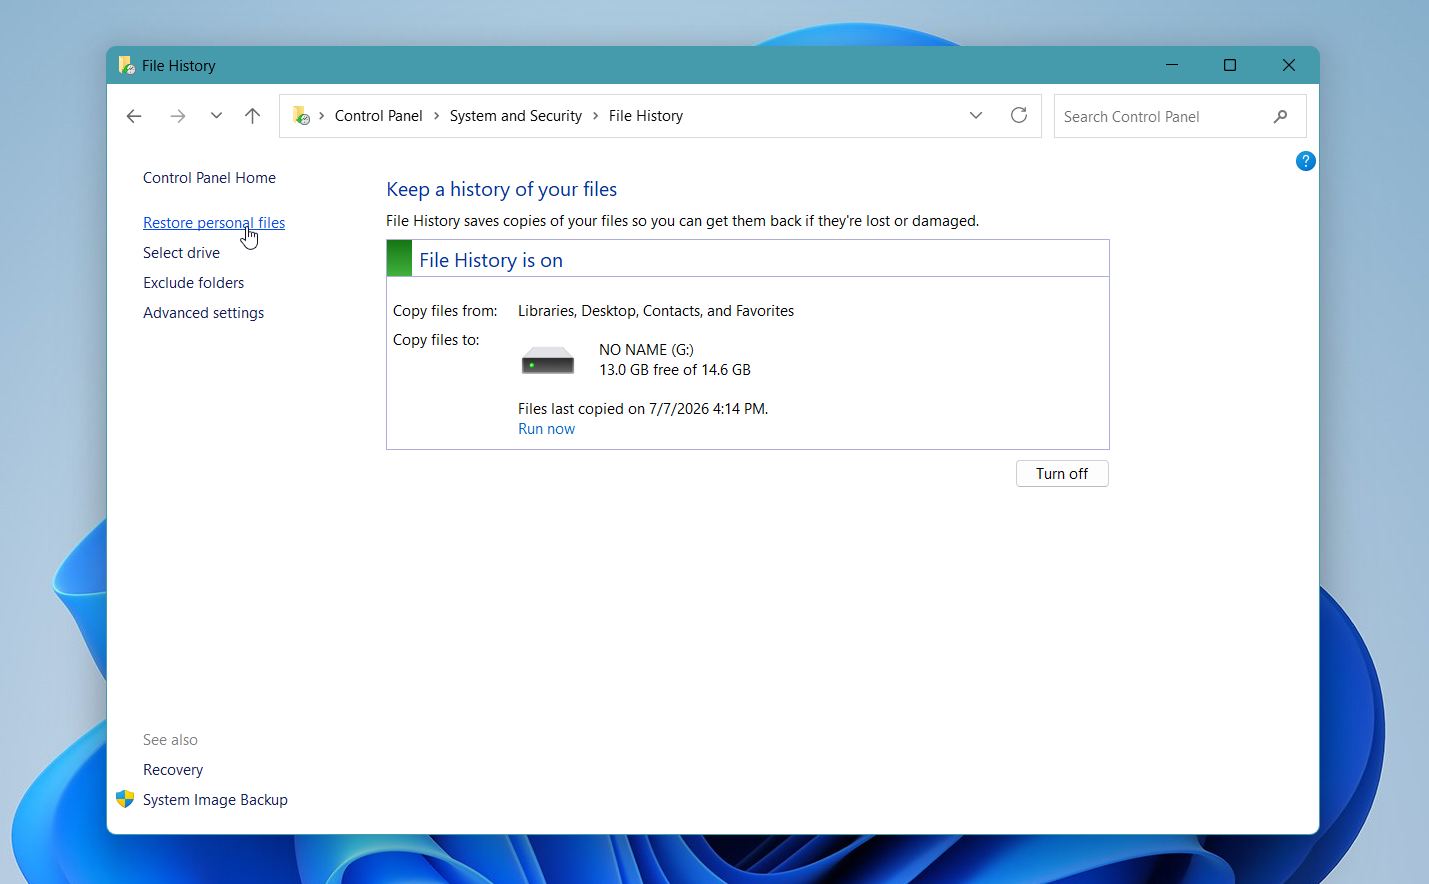
- Open the Control Panel and go to System and Security > File History.
- Click Restore personal files in the left pane.
- Browse through the available backup versions until you find the folder that originally contained your deleted file.
- Select the file or folder you want to restore.
- Click the green Restore button to return it to its original location. If a file with the same name already exists, Windows will let you replace it, skip it, or keep both copies. You can also right-click the Restore button and select Restore to if you want to save the recovered files to a different location.
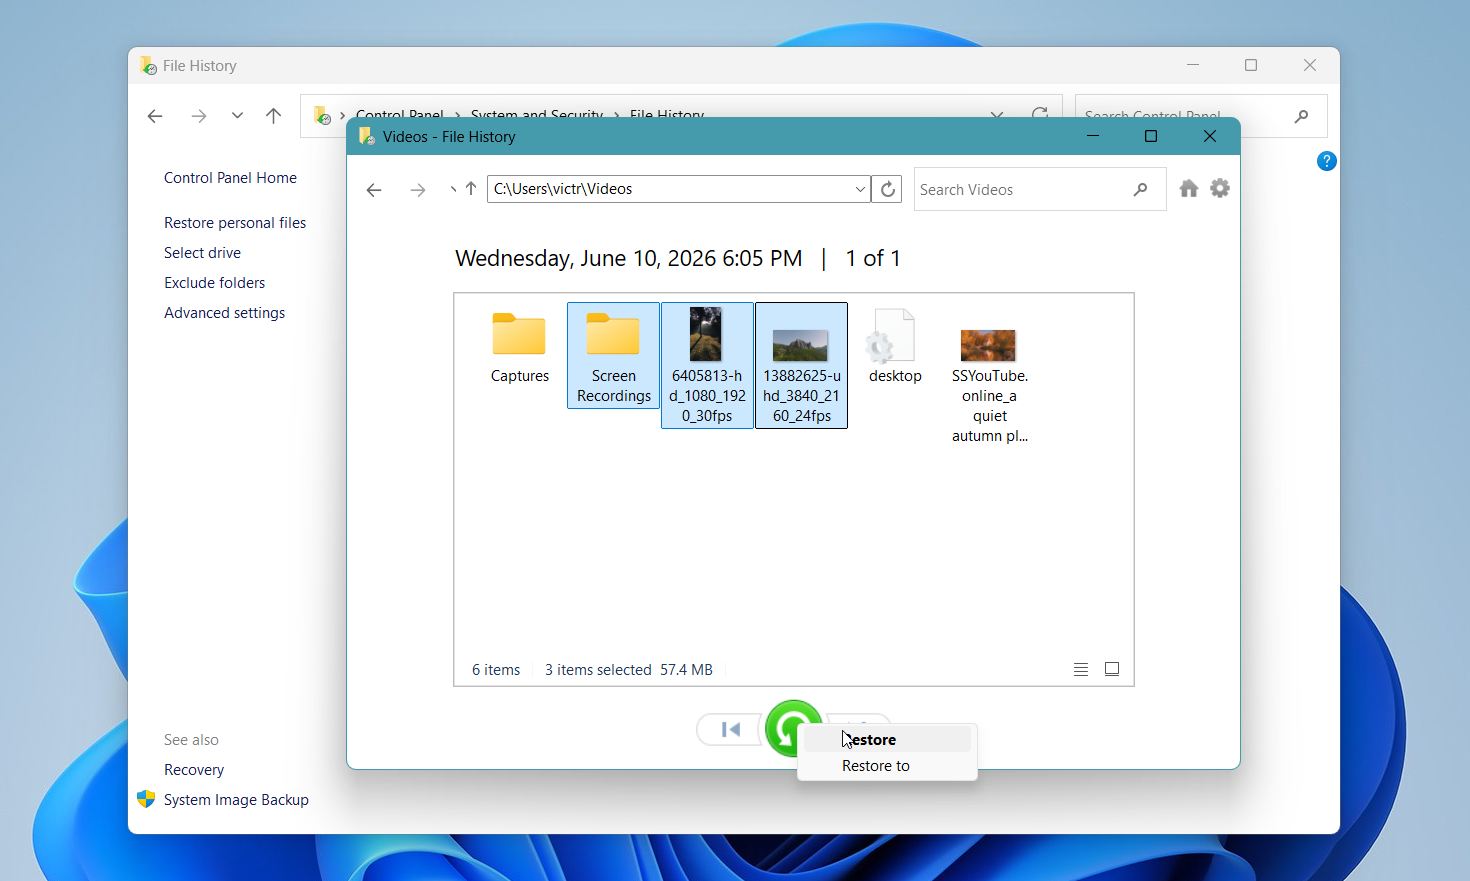
You can also access File History through the Previous Versions tab. Right-click the original folder, select Properties, and open Previous Versions. If Windows lists one or more earlier versions, open them to copy specific files or click Restore to recover the entire folder.
Method 3: Use Backup and Restore
Backup and Restore (Windows 7) is another built-in option for restoring permanently deleted files in Windows 10 and later. Despite the name, it remains available in current versions of Windows. Unlike File History, it can create full system backups, including system images, which you can use to recover files and even the operating system.
If you previously enabled Backup and Restore (Windows 7), you may be able to recover permanently deleted files from one of your backups.
To restore files with Backup and Restore:
- Open the Control Panel and go to System and Security > Backup and Restore (Windows 7).
- Click Restore my files.
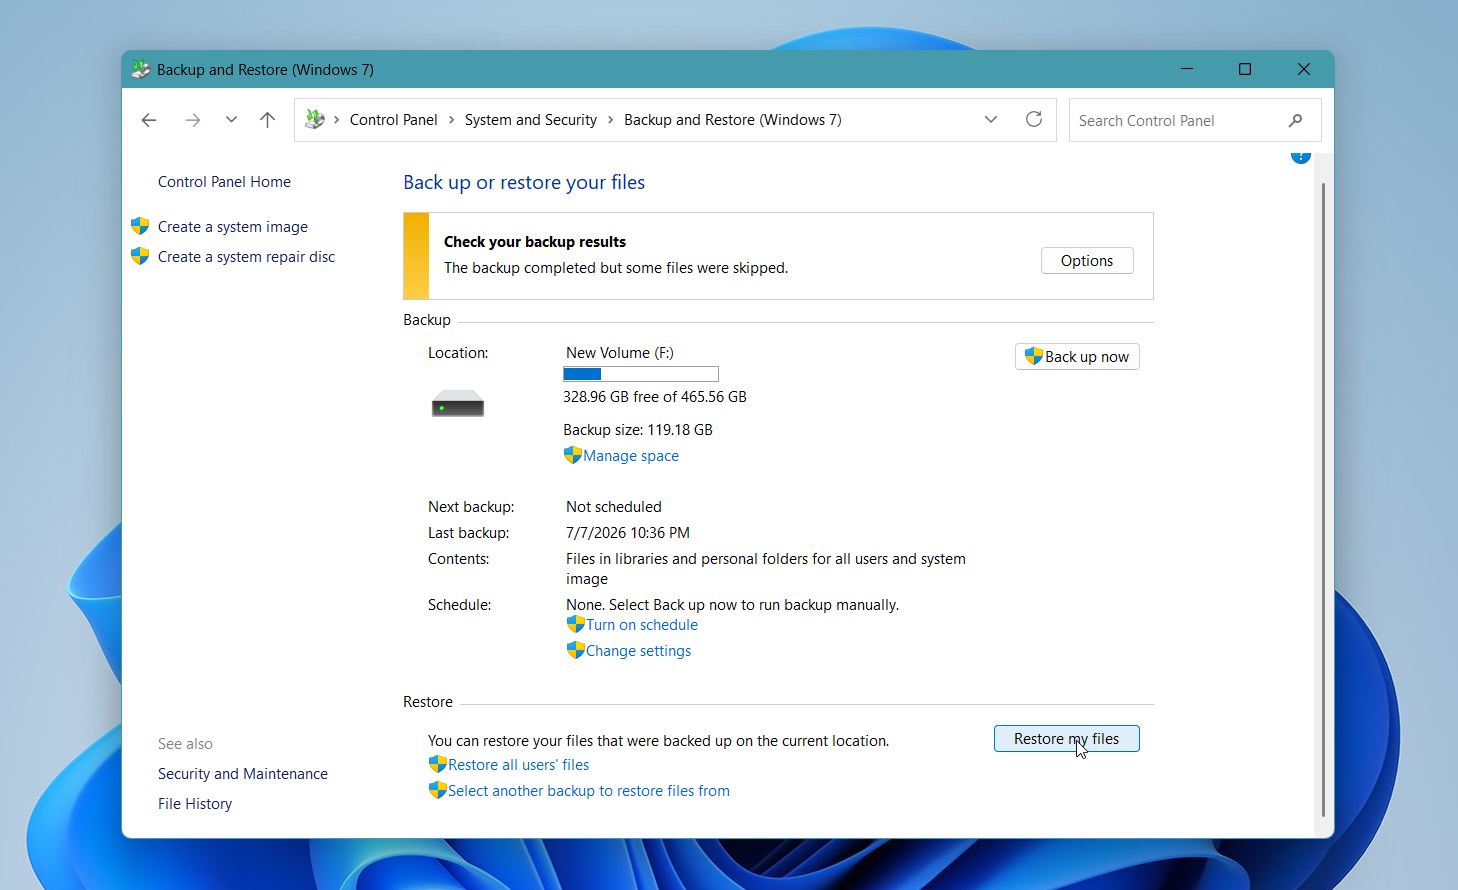
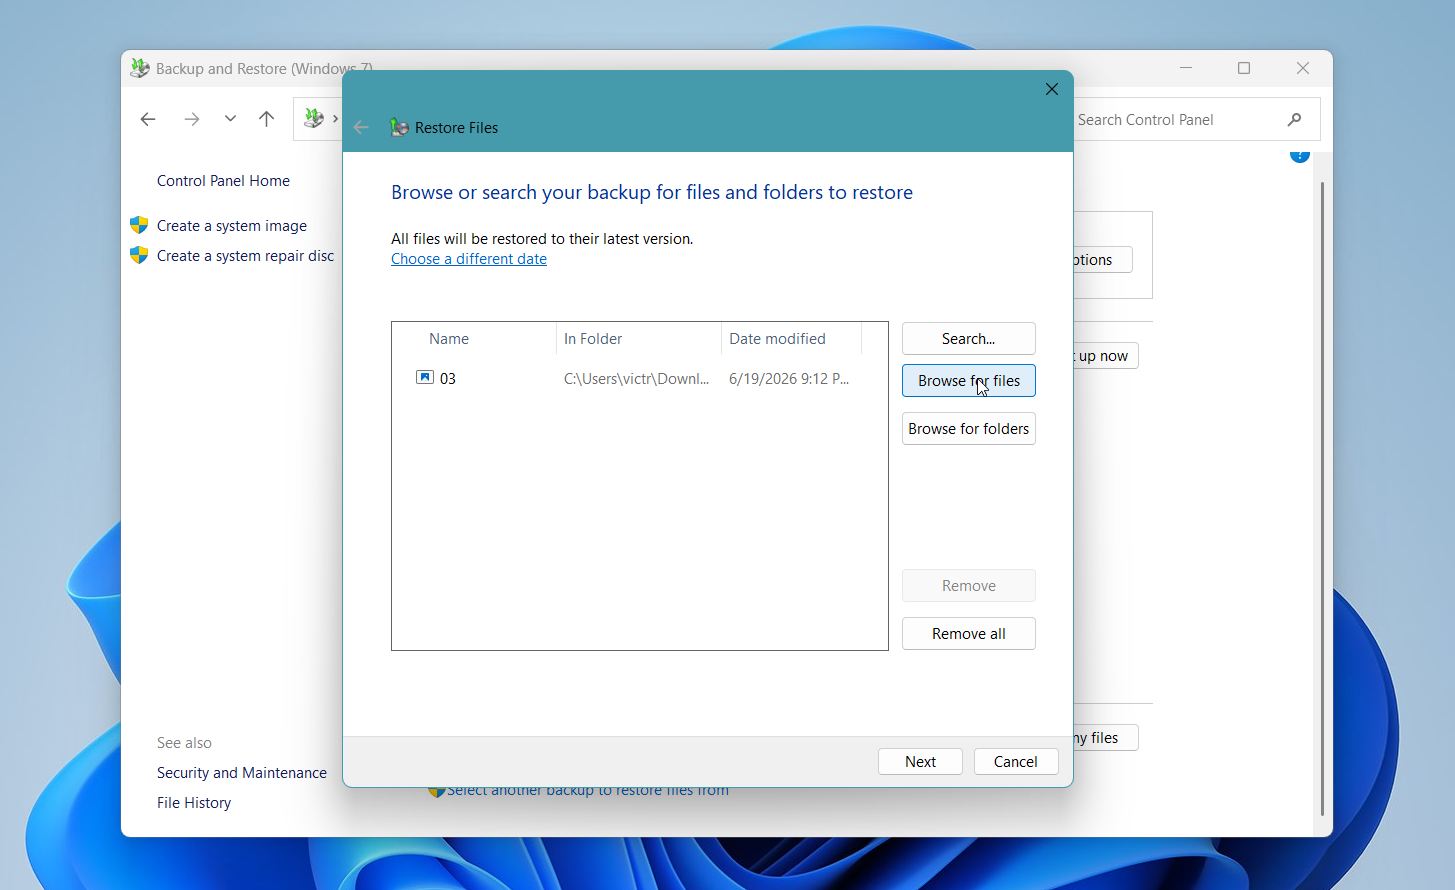
- Use Search, Browse for files, or Browse for folders to find the items you want to recover.
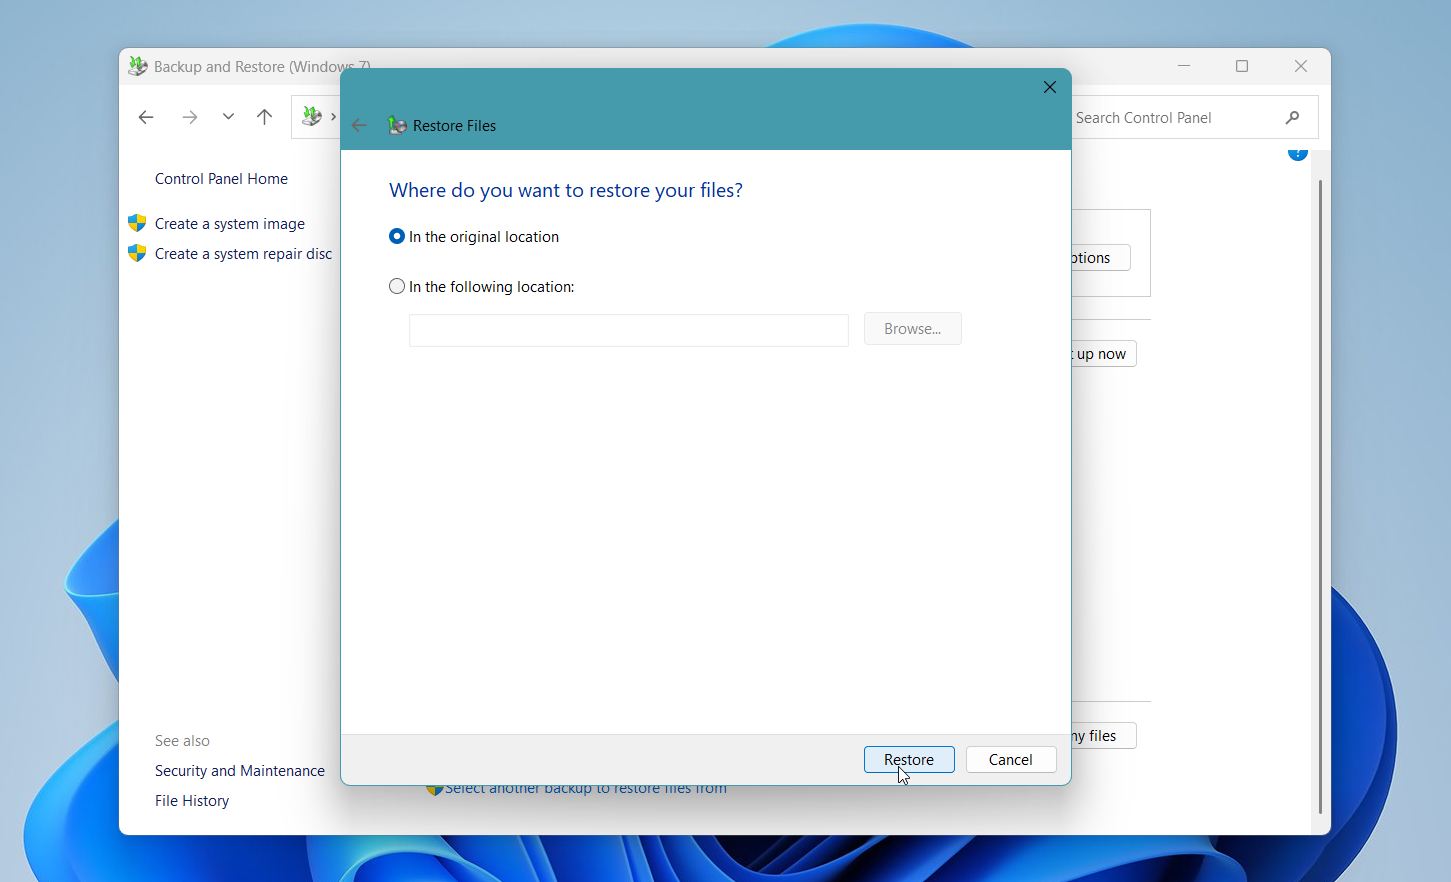
- Choose whether to restore the files to their original location or a different folder.
- Click Restore and wait for the process to finish.
If you don’t see the Restore my files option or no backups are available, this feature wasn’t set up before the files were deleted.
Method 4: Recover Permanently Deleted Files From Cloud Backup
If you use a cloud storage service such as OneDrive, Google Drive, or Dropbox, your files may still be available even if you permanently deleted them from your PC. Many cloud services keep deleted files in their recycle bin for a limited time and may also store older file versions.
Google Drive will automatically delete files in the Trash after 30 days. Other cloud-based solutions have similar policies. Of course, the duration will depend on the type of plan you have. Until you delete the data from the bin, it remains a reliable way to recover permanently deleted files from a PC easily and safely.
Here is how to recover files from cloud backup with Google Drive as an example:
- Open Google Drive in your web browser and sign in to your account.
- Click Trash in the left sidebar.
- Find the file you want to recover, right-click it, and select Restore.
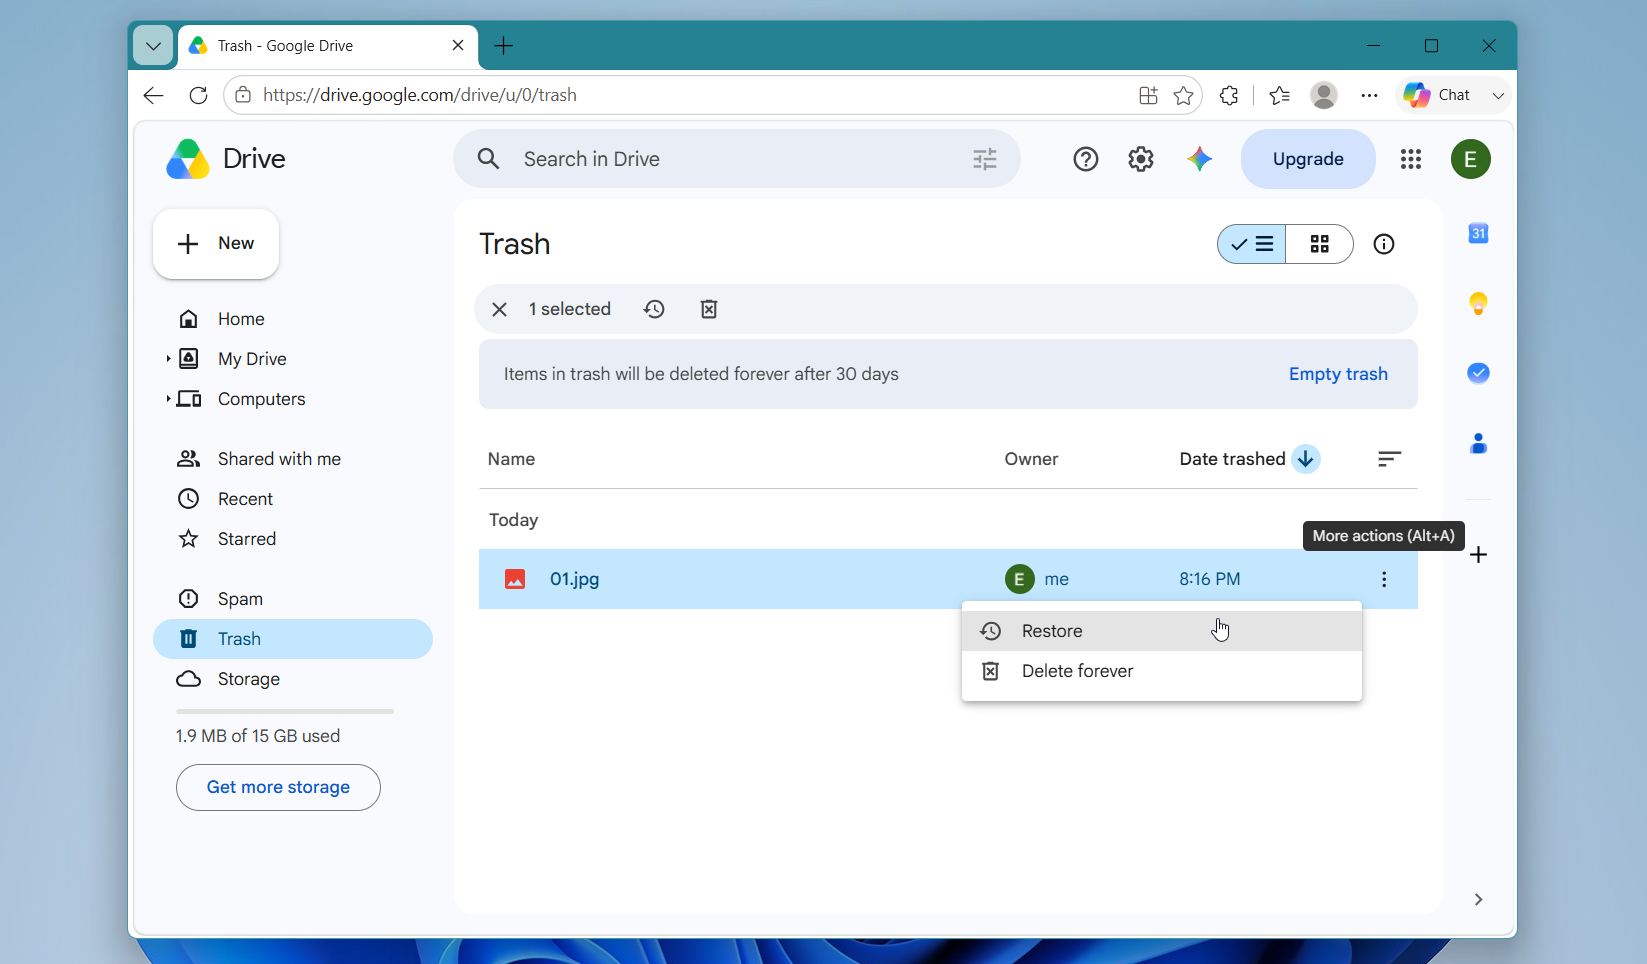
Google Drive returns the file to its original location in your cloud storage. Other cloud services follow a similar process, although the names of the folders and options may differ. After you recover the file, consider creating a local backup if it’s important, since files don’t stay in the Trash forever.
When to Stop and Contact a Data Recovery Lab
Data recovery software works well in many situations, but it can’t solve every problem. If the deleted files are especially valuable or the storage device shows signs of hardware failure, it’s best to stop and contact a professional data recovery lab.
Consider professional recovery if:
- The drive makes clicking, grinding, or beeping noises.
- The drive doesn’t appear in BIOS, Disk Management, or File Explorer.
- The SSD, HDD, USB drive, or memory card has physical damage or water damage.
- The drive disconnects repeatedly or becomes unreadable during a scan.
- Recovery software can’t detect the device or find the files you need.
- The files are too important to risk with additional recovery attempts.
Professional recovery can be much pricier than recovery software because it often requires specialized equipment and manual work. Most labs offer a free evaluation and provide a quote before they begin work.
| Recovery scenario | Typical cost |
| Deleted files or logical file system damage | $300–$700 |
| Formatted or corrupted drive | $500–$1,000 |
| Physical HDD failure | $800–$2,500+ |
| SSD with hardware failure | $1,000–$3,000+ |
| Severe damage (fire, water, multiple failures) | $2,000–$5,000+ |
Before you send the device to a recovery lab, avoid formatting it, running repair utilities, or opening the drive yourself. Leave the storage device in its current state to give the specialists the best possible chance to recover your files.
Final Thoughts
Permanent file deletion doesn’t always mean the data is gone. The best recovery method depends on your situation, whether that’s data recovery software, a backup, cloud storage, or a professional data recovery service. The most important step is to avoid writing new data to the affected drive until you’ve tried to recover your files.
Regular backups remain the most reliable way to protect your data. Windows includes tools such as File History and Backup and Restore, and cloud services like OneDrive, Google Drive, and Dropbox can keep additional copies of important files. The best way to protect your files against future data loss is to follow the 3-2-1 backup rule:
- Keep three copies of your data. This includes the original files and two backup copies.
- Store the copies on two different types of media. For example, keep one copy on your computer and another on an external drive or NAS.
- Keep one copy off-site. Store it in the cloud or at another physical location. This keeps your data safe if someone damages, loses, or steals your computer or backup drive.
Following the 3-2-1 backup rule greatly reduces the risk of permanent data loss, even if a drive fails or your computer becomes unusable.
If you’d like to learn more, visit our forum to browse real recovery cases, see how other users solved similar problems, and find additional tips for different data loss scenarios.
FAQ:
- Check the Trash and restore the files if they're still there.
- Restore from a Time Machine backup if you have one.
- Check iCloud Drive or another cloud service, including the Recently Deleted folder.
- Use data recovery software such as Disk Drill if you don't have a backup. Scan the drive, preview the recoverable files, and save them to a different storage device.
- Contact a professional recovery service if the drive is physically damaged or software can't recover your files.




this was usefull
thank you
this was usefull
think you fore him
best
nice
i want this saptweyar
thank you