
Does macOS ask you to initialize a disk? That’s perfectly normal if it’s a brand-new drive straight out of the box that has never been used before. It’s far less normal when the same message appears for a drive you’ve already been using. In most cases, this indicates that macOS is having trouble reading the disk because of file system corruption, partition issues, connection problems, or even hardware failure.
So, what should you do? First, don’t do anything (don’t click Initialize, Erase, or any other option that could modify the drive before you understand what’s happening and secure your data), and read this guide, where we’ll explain what causes a previously working disk to appear as uninitialized and how to initialize a disk on Mac without losing data.
We performed all the steps in this guide on macOS Tahoe, the latest macOS release available at the time of writing. If your Mac is still running Sequoia, Sonoma, Ventura, or another earlier version, you can still follow along. The tools and repair methods described here remain applicable, though some menus and on-screen options may appear slightly different.
What Does an Uninitialized Disk Mean on Mac
An uninitialized disk doesn’t have any partition table, partitions, or a formatting scheme on it. Essentially, the disk is completely blank and is unfit for storing data until it is initialized and formatted.
There are two reasons why a disk shows up as “uninitialized” on your Mac:
- The disk is brand new. It hasn’t been connected to any other Mac, formatted, and partitioned before. In this case, there’s nothing to worry about, as most disks need to be initialized manually before being used.
- If the disk has been used before. If a previously working drive suddenly appears as uninitialized, it’s usually a sign that macOS can no longer read it correctly. This can happen because of file system corruption, partition table damage, bad sectors, connection problems, an unsupported file system, interference from third-party disk management software, malware, or physical damage to the drive itself. In some cases, it may also indicate that the drive is beginning to fail and your data is at risk.
One more possible cause of an uninitialized disk on Mac is physical damage. Take a moment to inspect the drive itself. Do you notice visible cracks, dents, burn marks, or signs of water exposure? Does the drive make unusual clicking, grinding, buzzing, or rattling noises when connected? If the answer is yes, stop here. Physical damage cannot be fixed using the methods in this guide, and continued use may make data recovery more difficult or even impossible. If the files on the drive are important, your best option is to contact a professional data recovery service.
How to Recover Data From an Uninitialized Disk
When it comes to fixing an uninitialized disk, you should prioritize data recovery. The disk could be on a swift path to failure, or the only fix could be to format it. Luckily, modern data recovery programs can recover data from an uninitialized disk.
But, data recovery scans are quite stressful to your drive. And performing them on an uninitialized disk that’s already corrupt, may be a recipe for disaster. To prevent further damage to your drive, you need to create a disk image (soft copy) of it and then scan the disk image for recoverable data.
However, to ensure that the data recovery software can scan and recover data from an uninitialized disk, check its reported capacity in Disk Utility. It should match the drive’s actual capacity.
For our tutorial, we opted to use Disk Drill because it lets you create a disk image as well as scan it, within a single interface. The program is compatible with all major file systems, and it’ll also work with disks that have no file system at all (RAW). It even saves your scans in case you’re unable to recover all the data in one go.
Here’s how to recover data from an uninitialized disk on a Mac:
Step 1: Create a Byte-to-Byte Backup (Disk Image) of the Uninitialized Disk
- Download Disk Drill on a working Mac and install it.
- Connect the uninitialized disk to the computer.
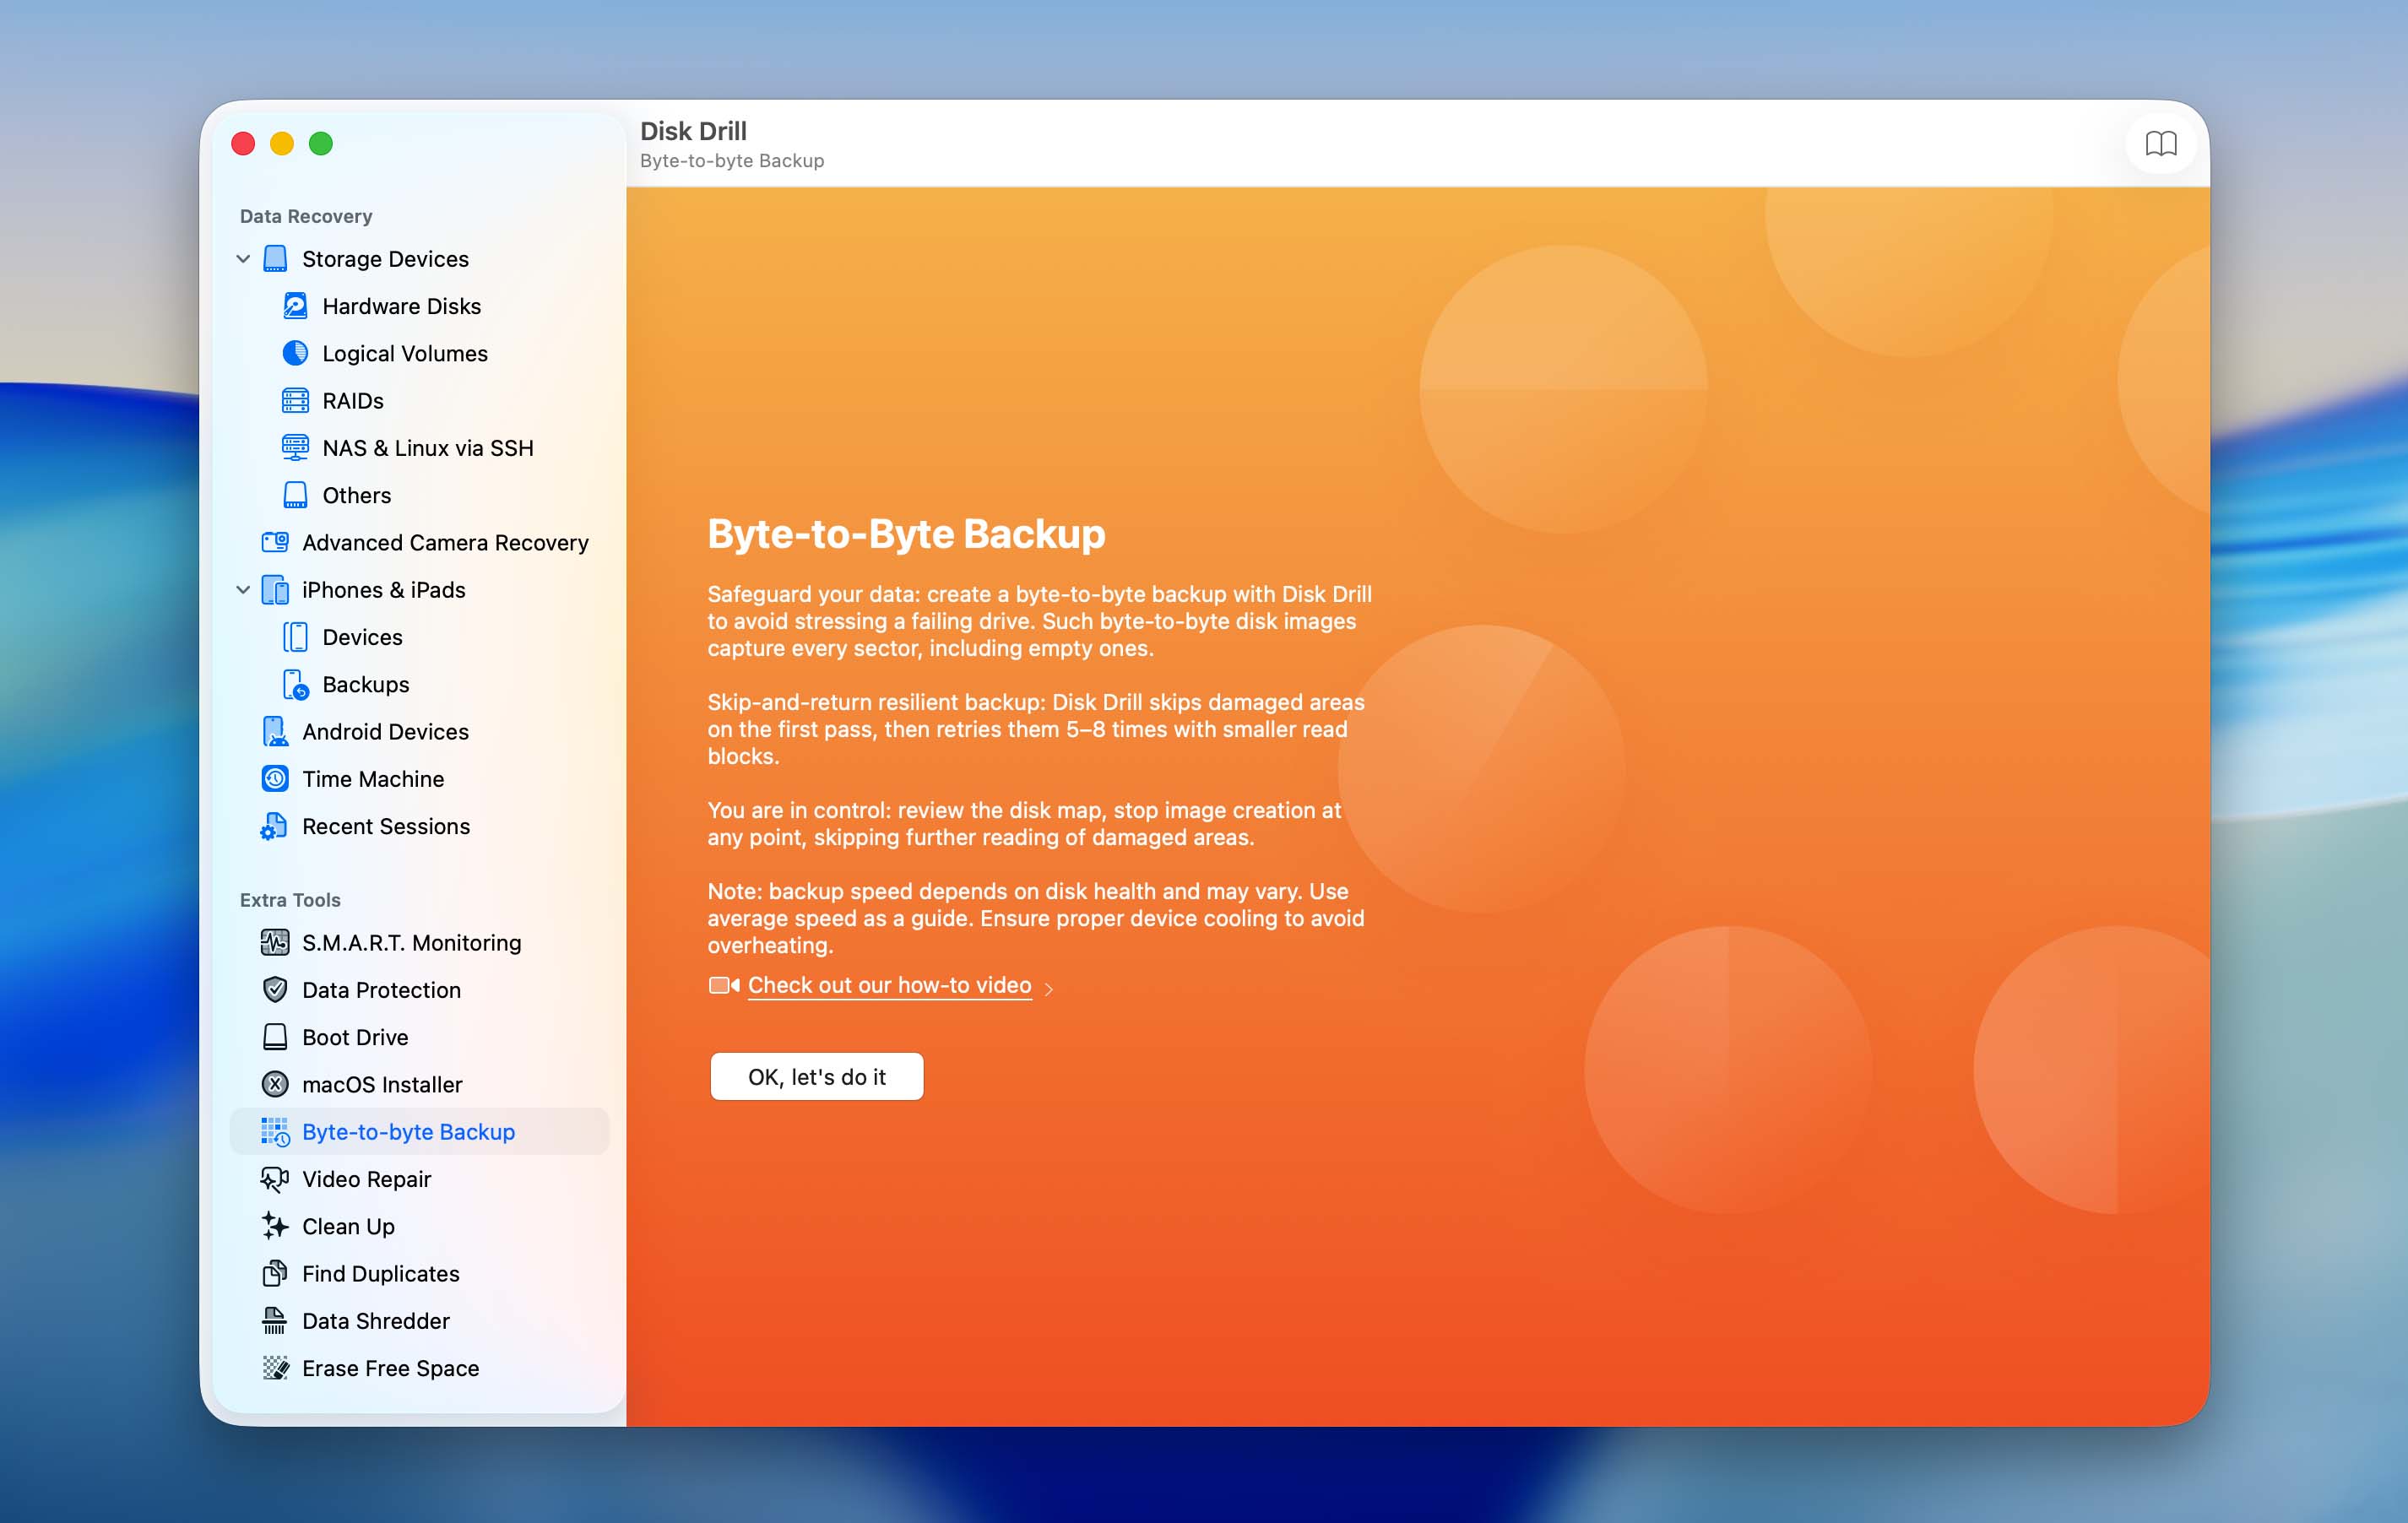
- Open Disk Drill and click on Byte-to-byte Backup, under Extra Tools.
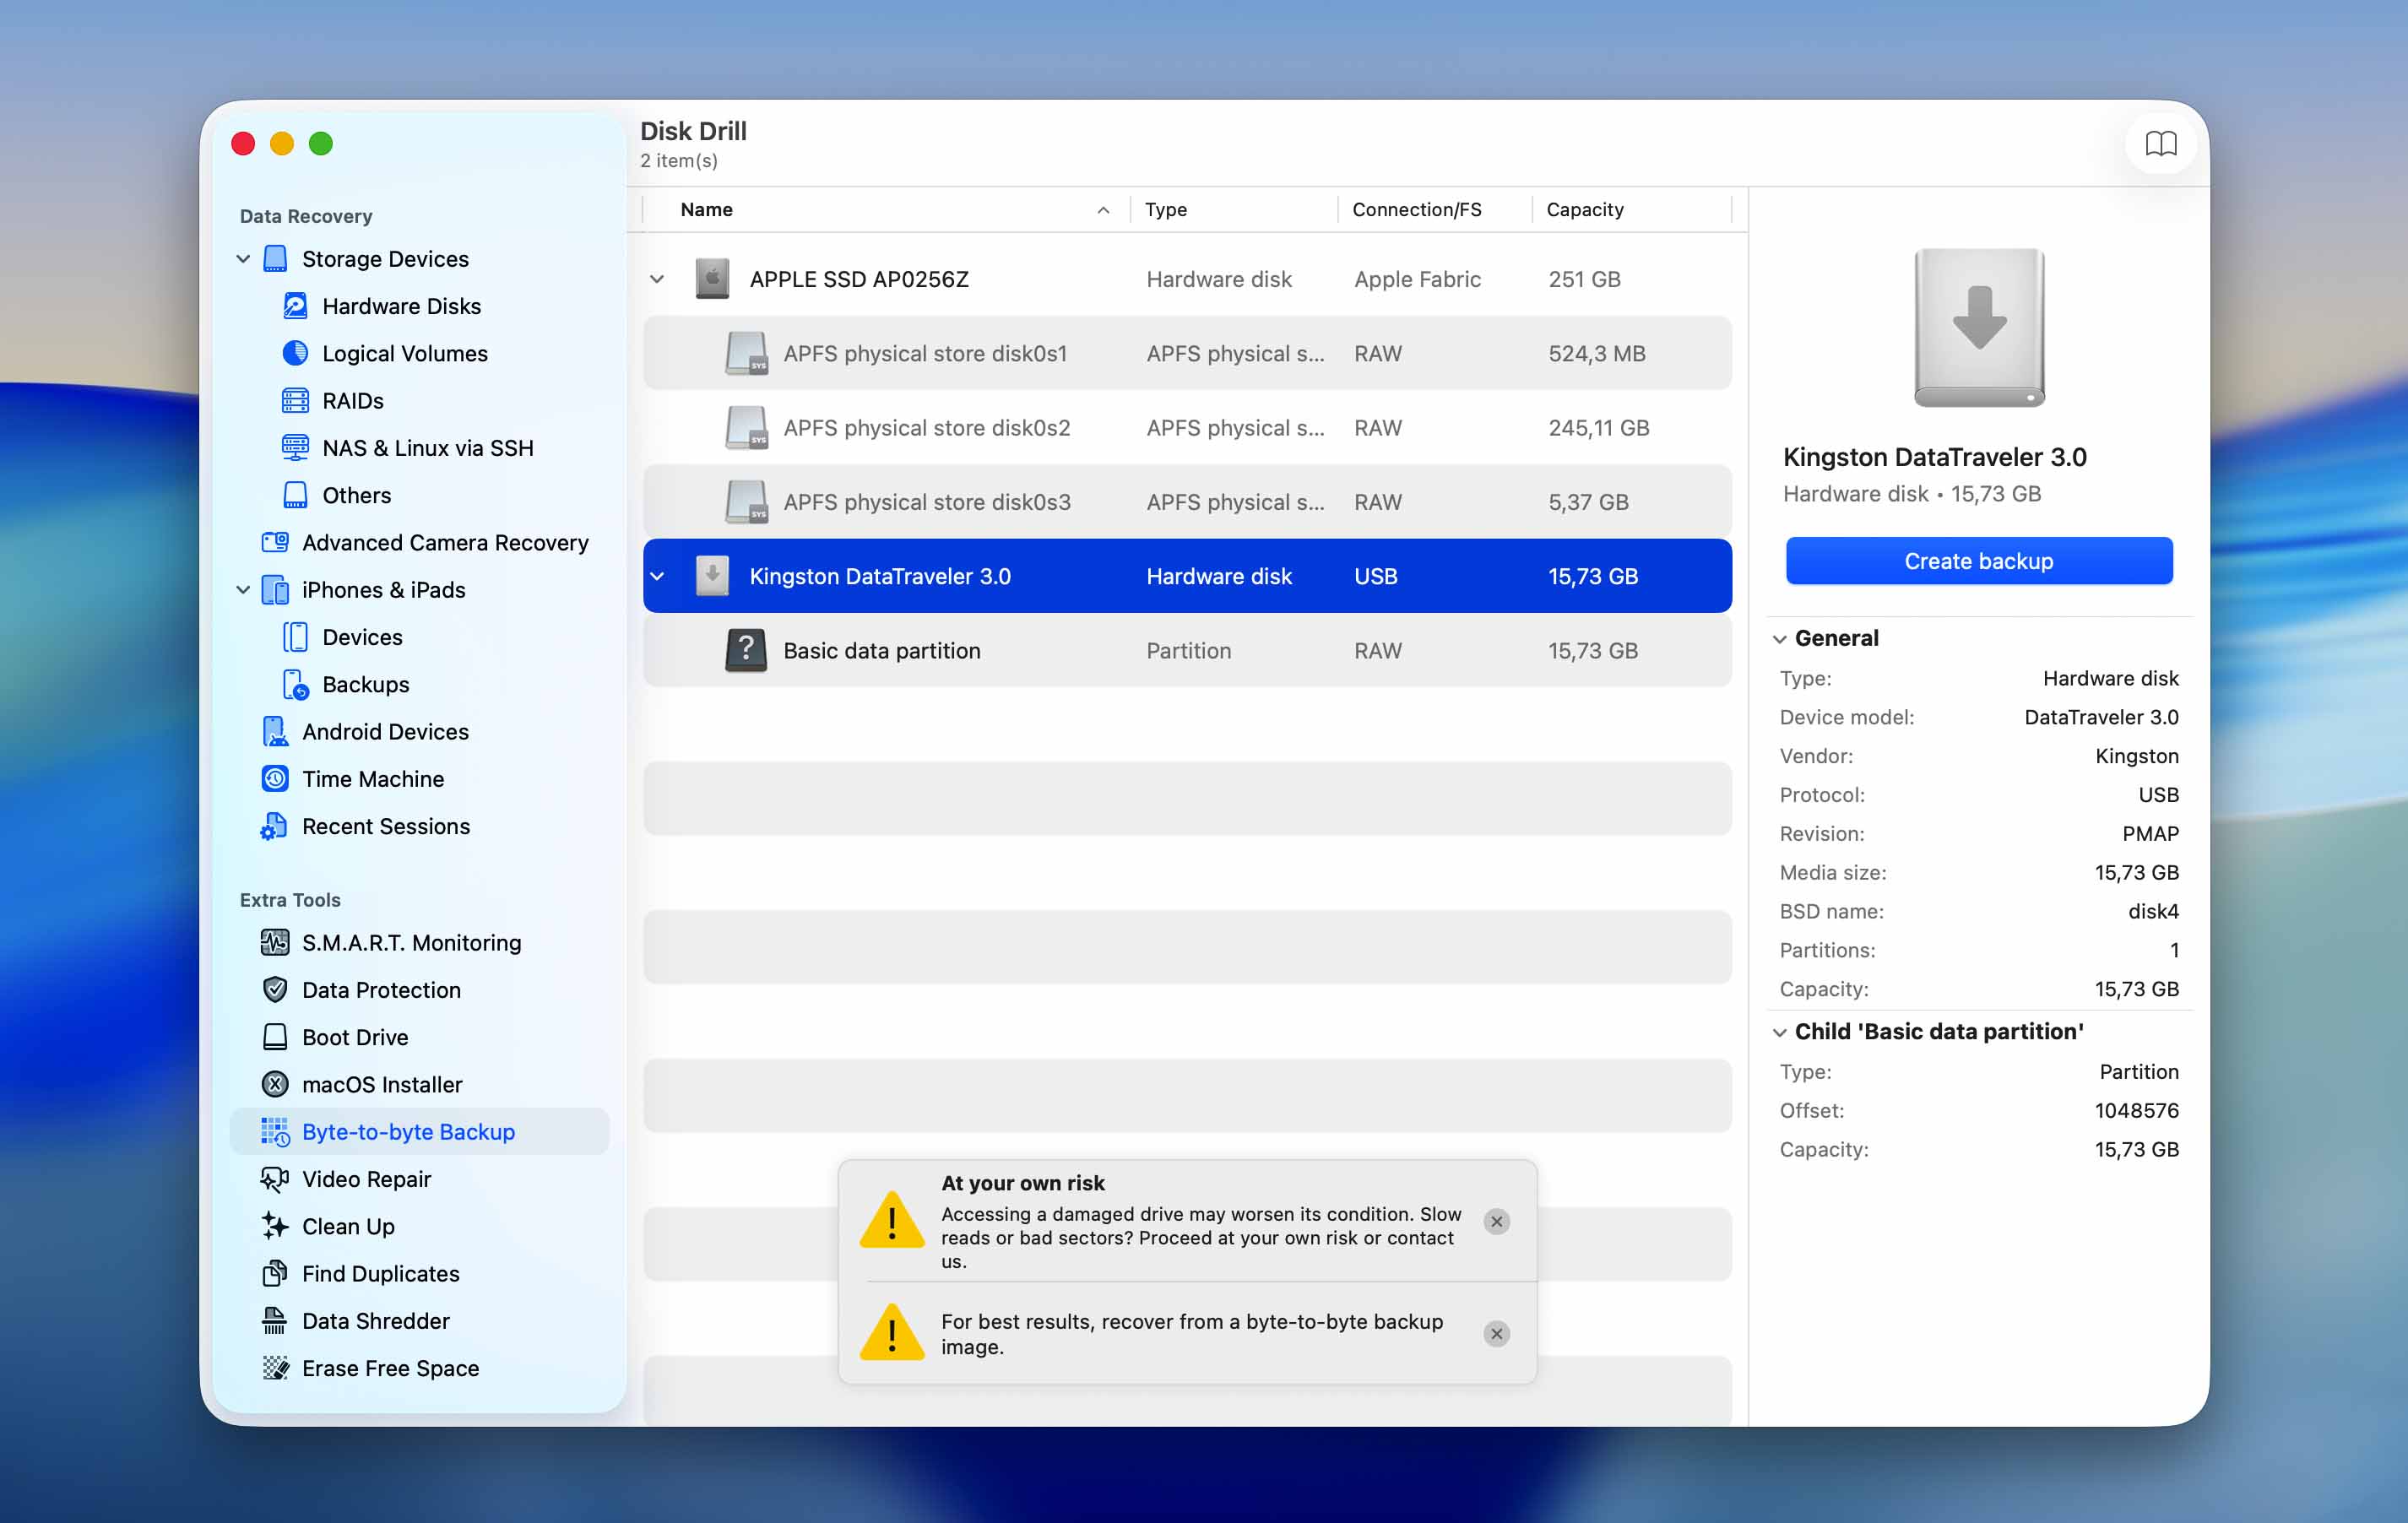
- Select the uninitialized disk and click on Create Backup.
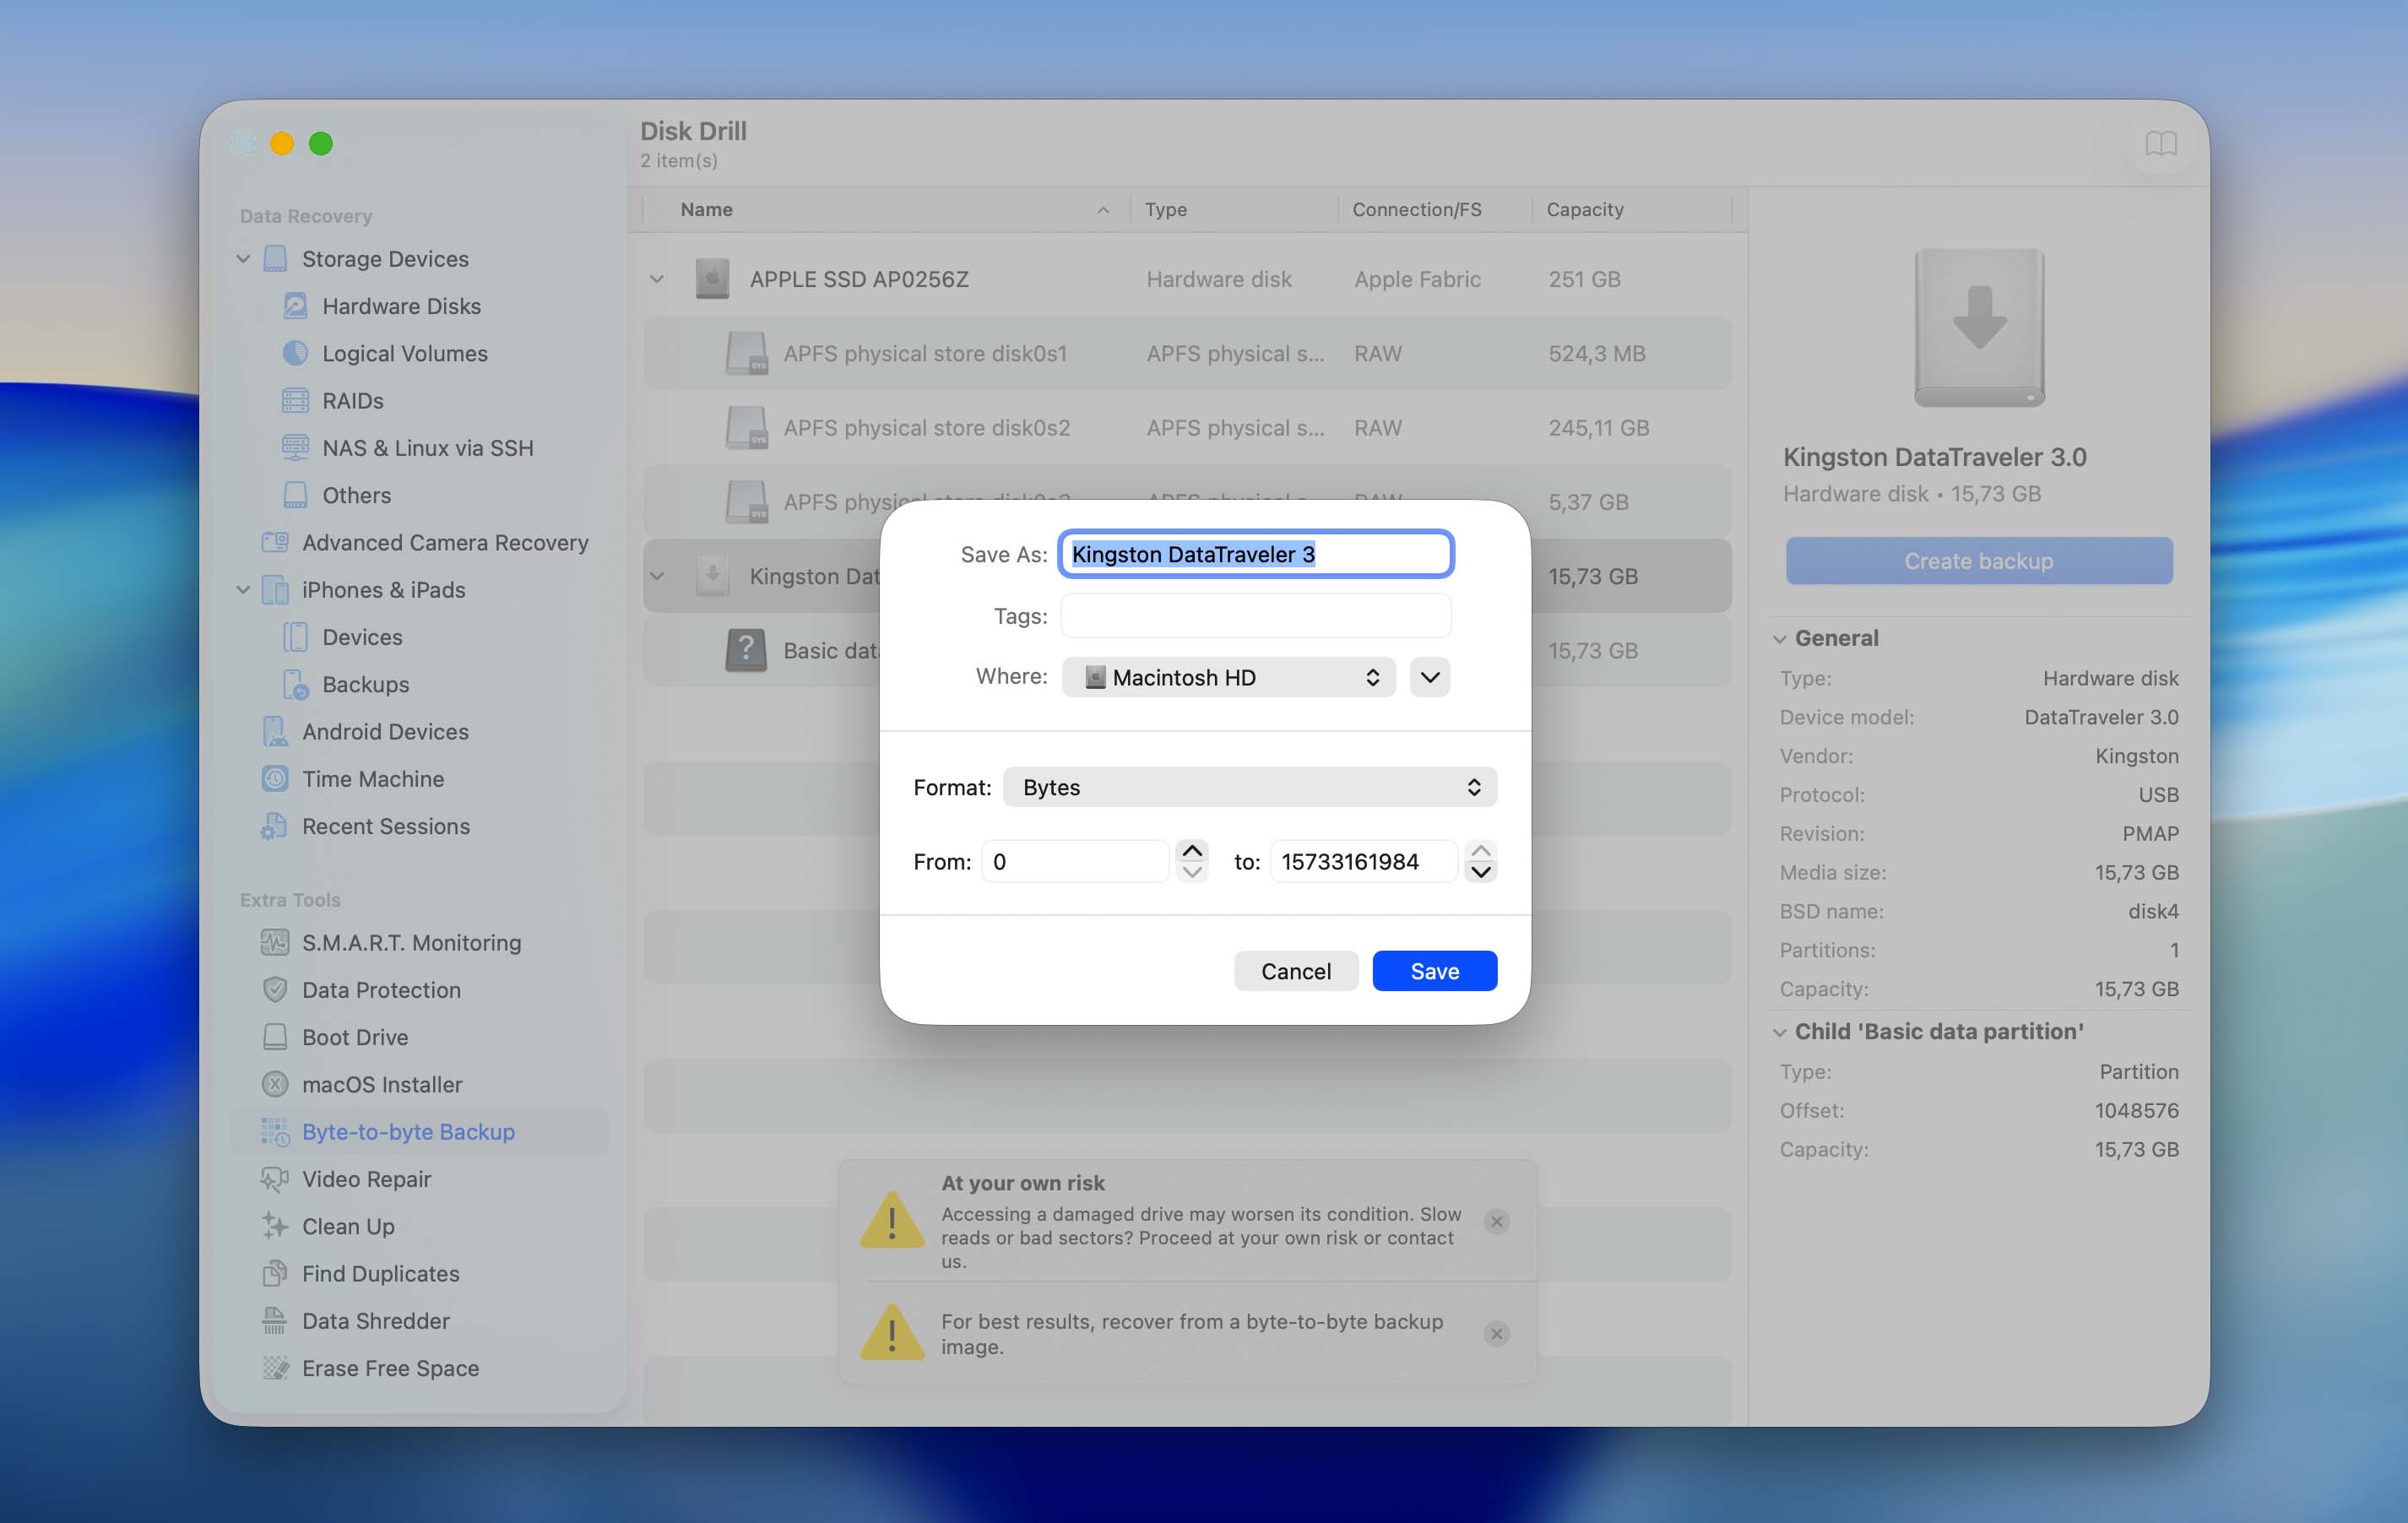
- Choose the disk image’s save location. It should have free space that is equal to or more than the uninitialized disk’s total storage size. Click on Save.
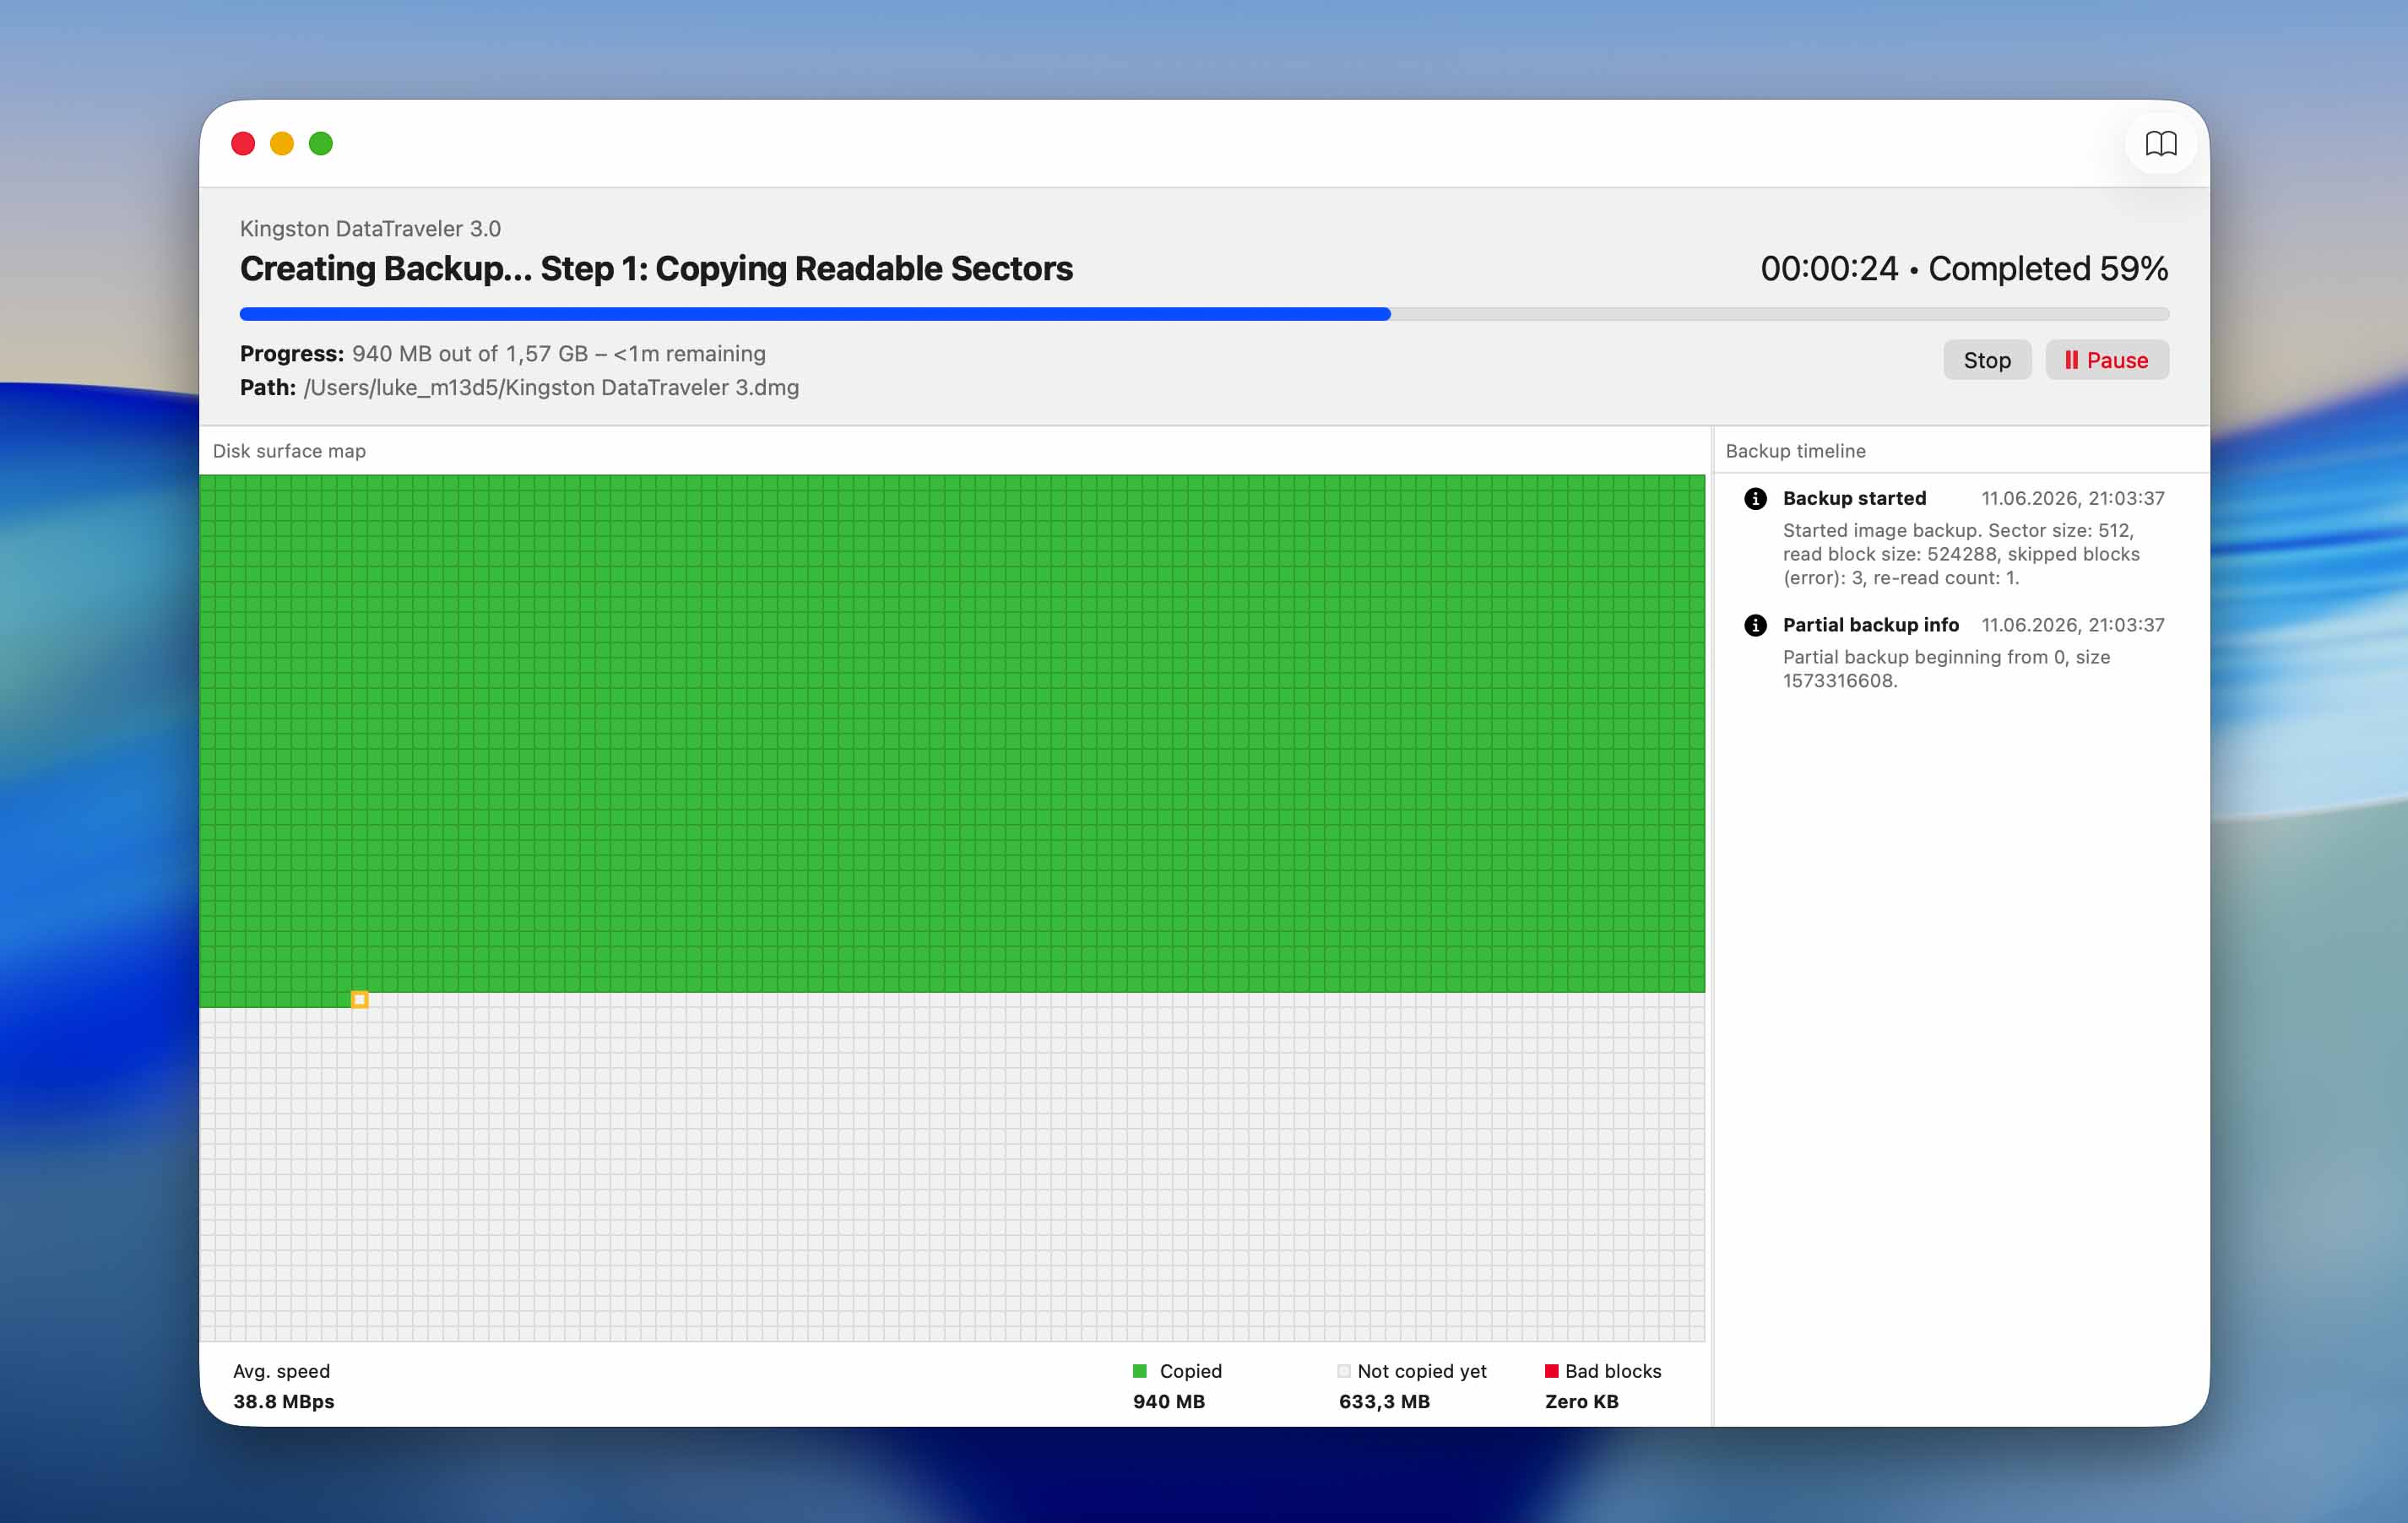
- Disk Drill will create the disk image.
Step 2: Recover Data from the Disk Image
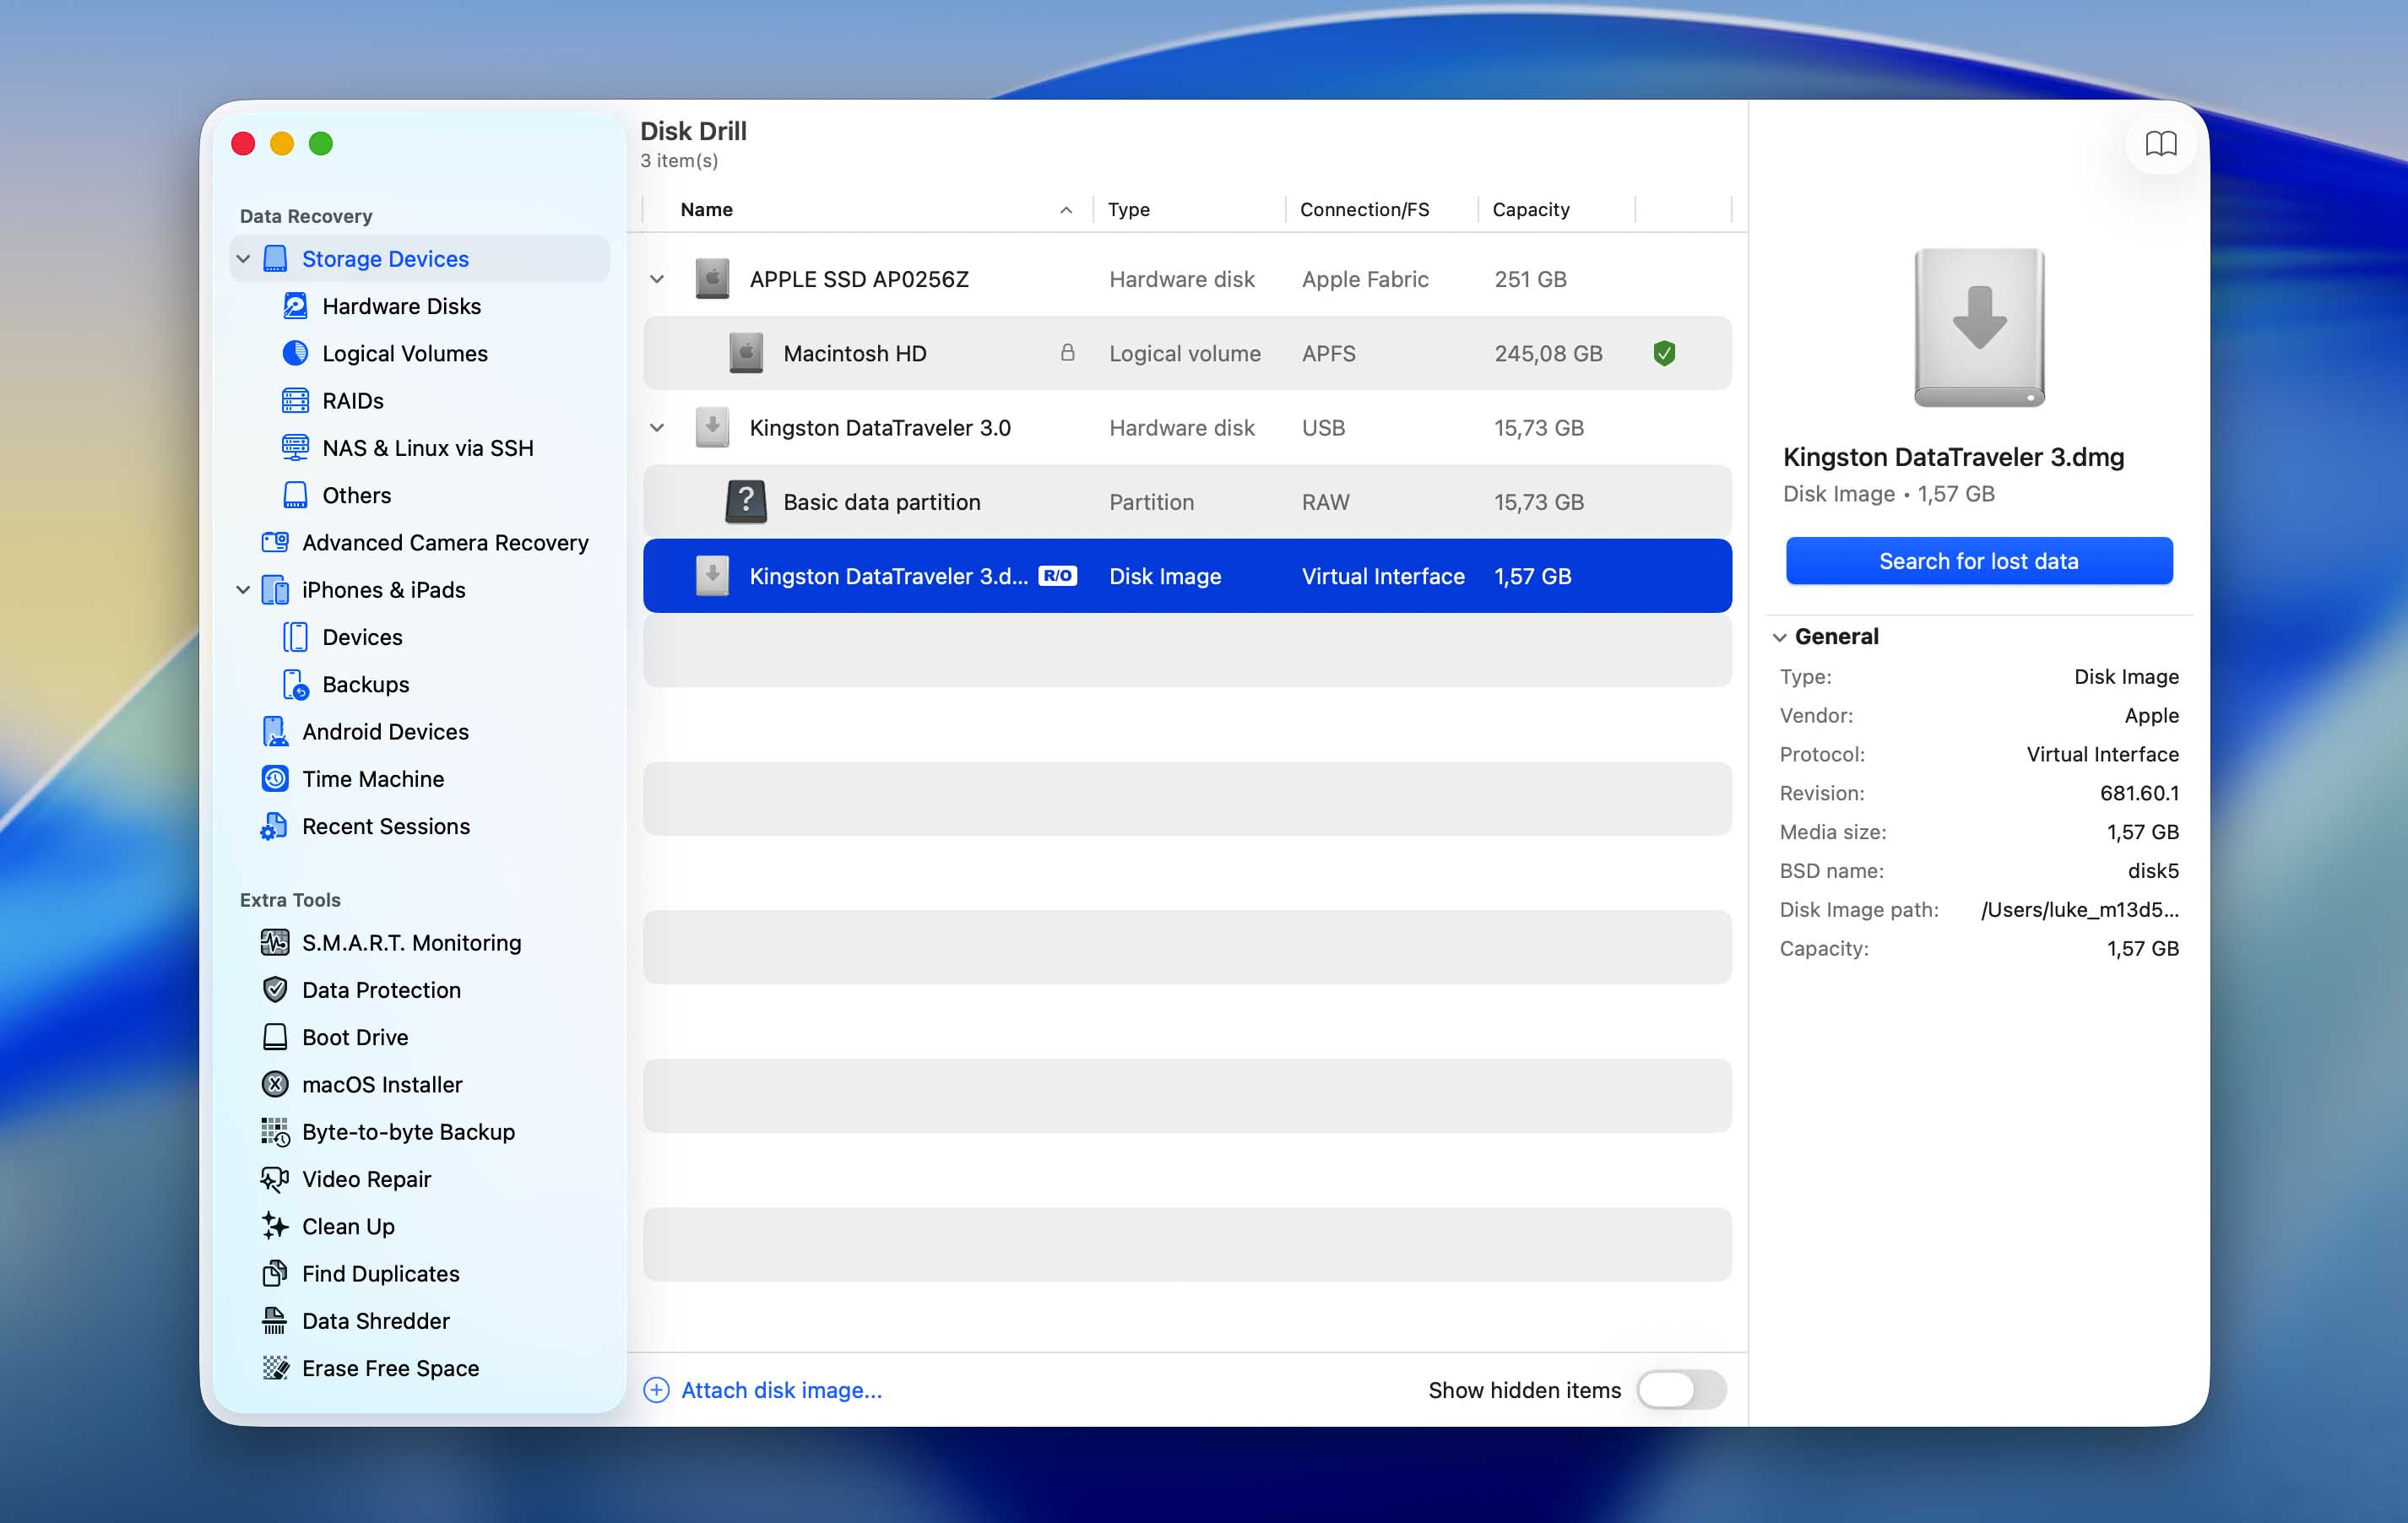
- Open Disk Drill and ensure you’re on the Storage Devices screen.
- Click on Attach disk image, browse for the disk image you’d created previously, and double-click on it. It’ll be added as a mounted disk image in the Storage Devices screen.
- Select the disk image and click on Search for lost data.
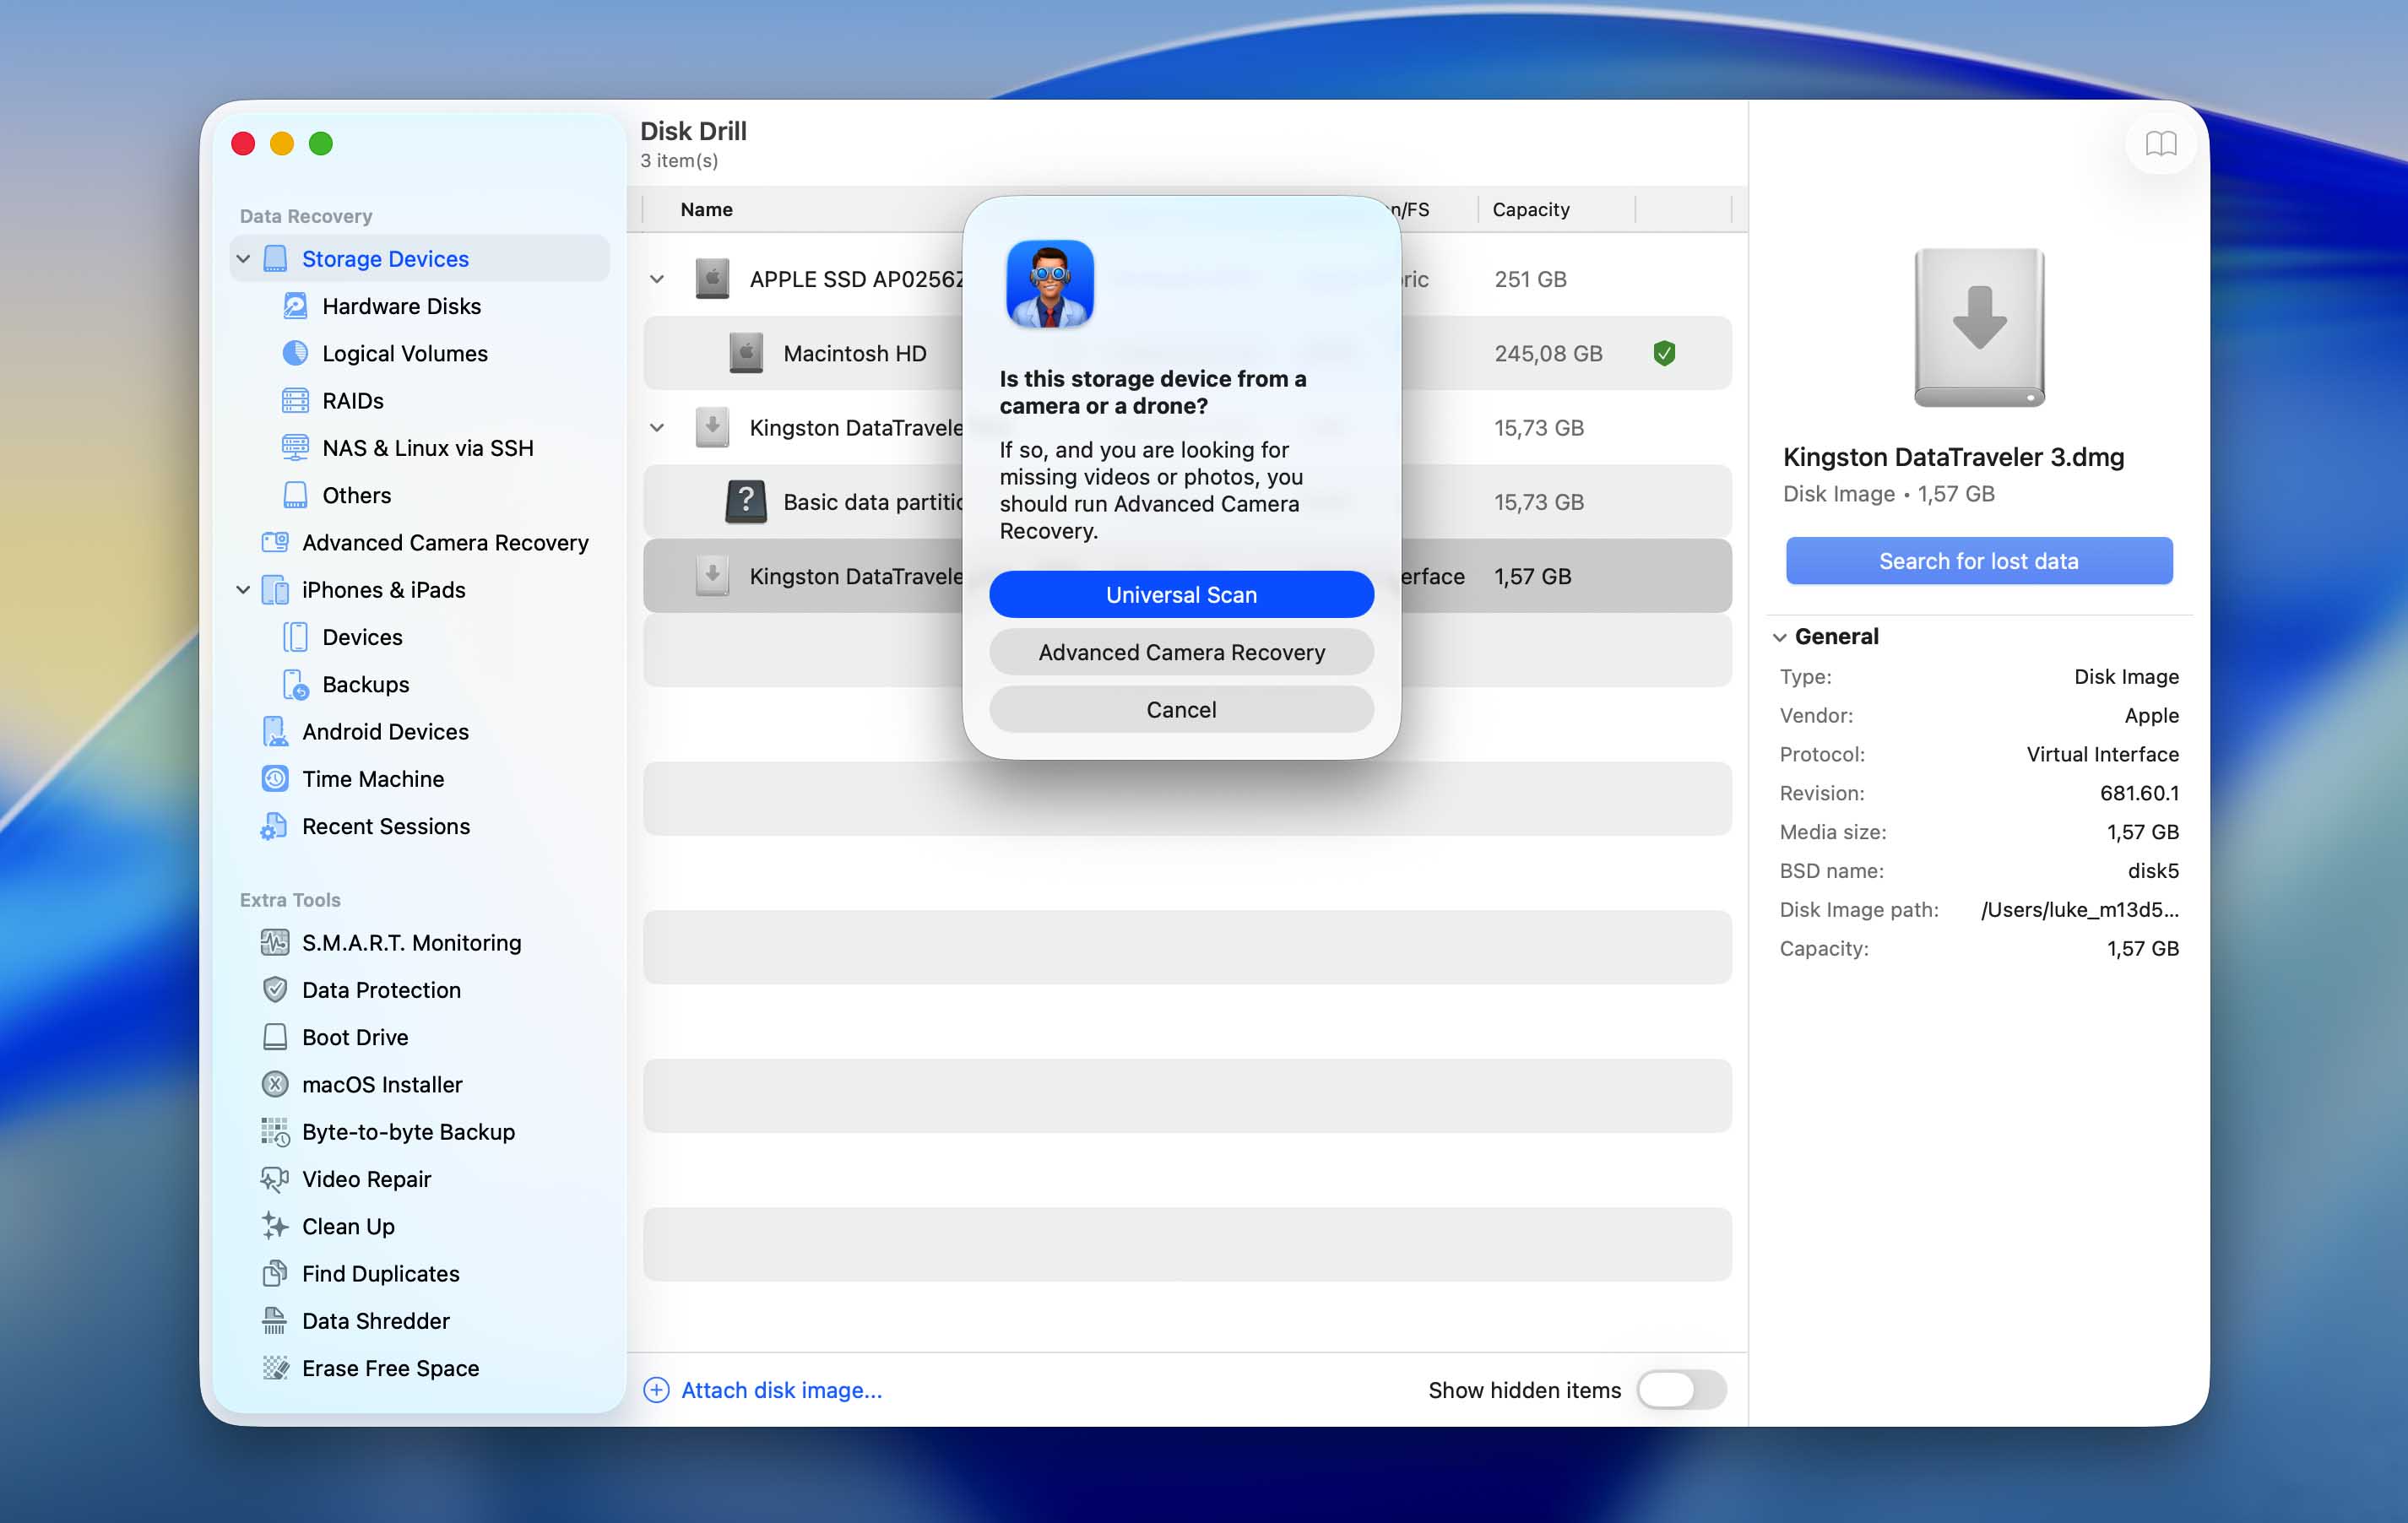
- Disk Drill may prompt you to choose a scan type. Select Universal Scan. The Advanced Camera Recovery option is designed to recover fragmented videos from camera and drone memory cards, so it isn’t necessary in this case.
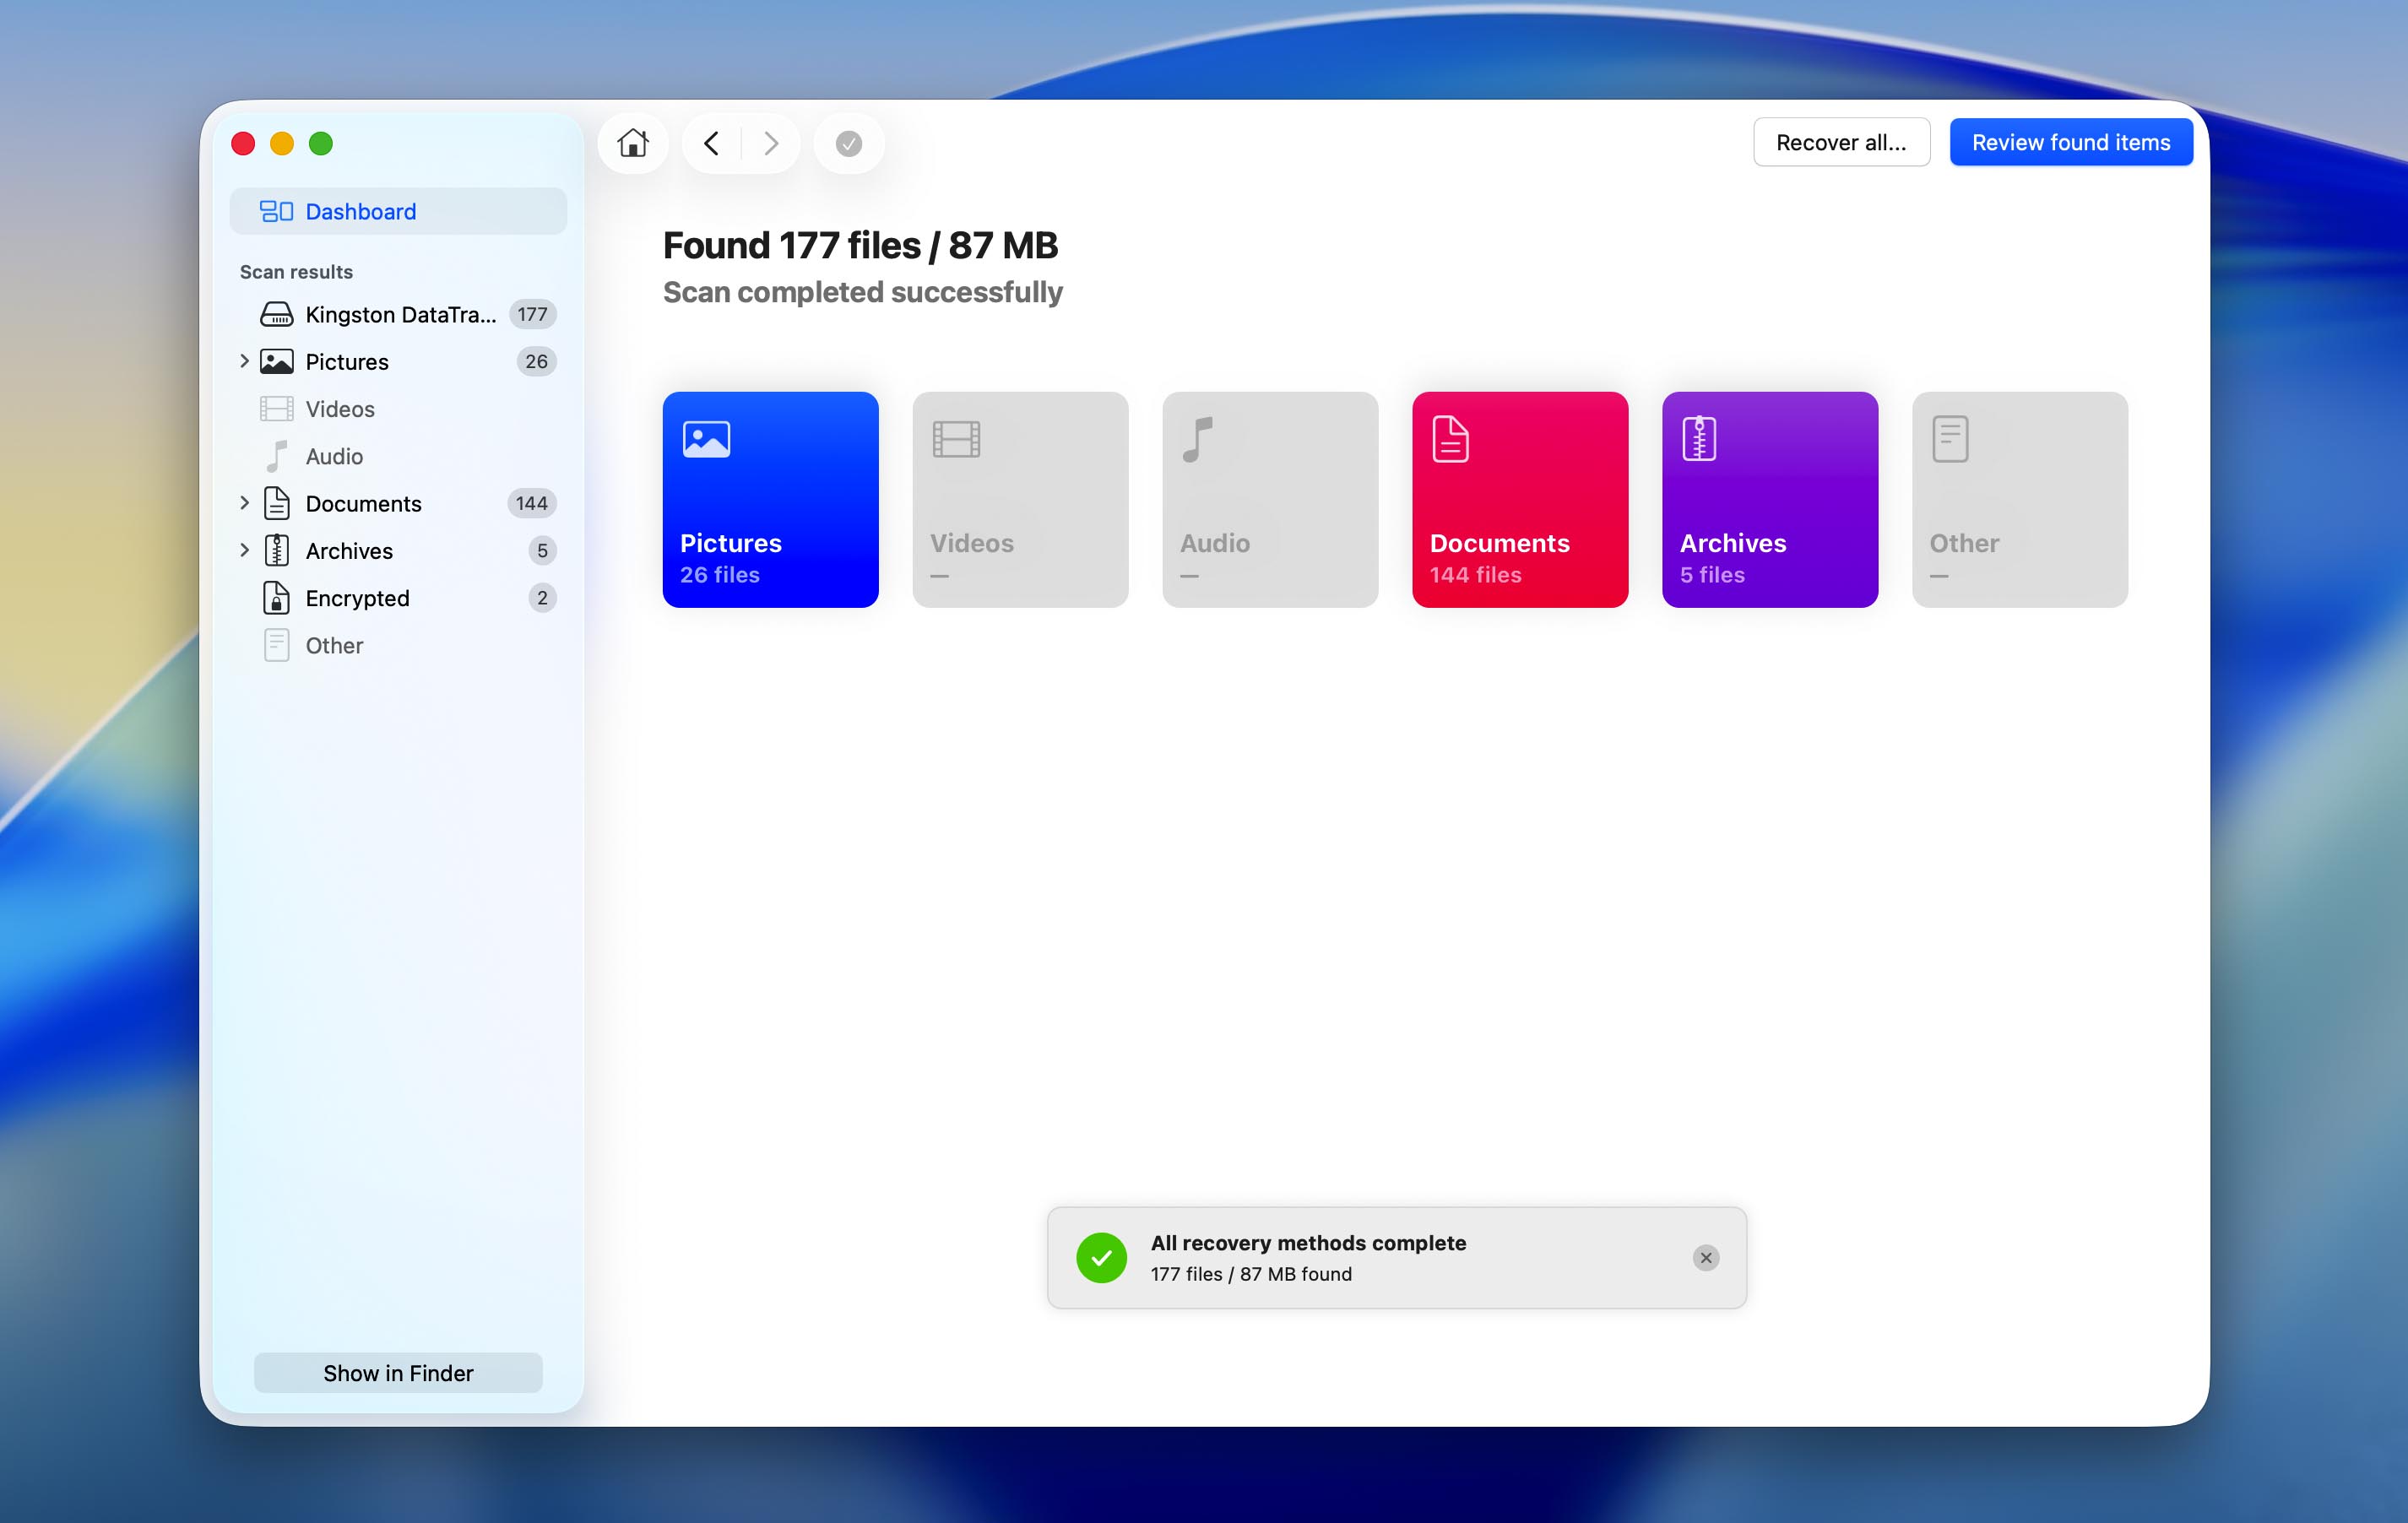
- Wait for the scan to finish and for Disk Drill to display the completion message. Then click Review found items. If you’re only interested in certain types of files, you can choose one of the categories instead (Pictures, Videos, Audio, Documents, Archives, or Other). Alternatively, if you want to recover all files from the uninitialized drive, click Recover All (but this may also recover files that were deleted during the drive’s normal use but have not yet been overwritten).
- Disk Drill organizes the scan results into three categories: Deleted or Lost, Existing, and Reconstructed. Open the categories that are relevant to your situation and review the recovered files.
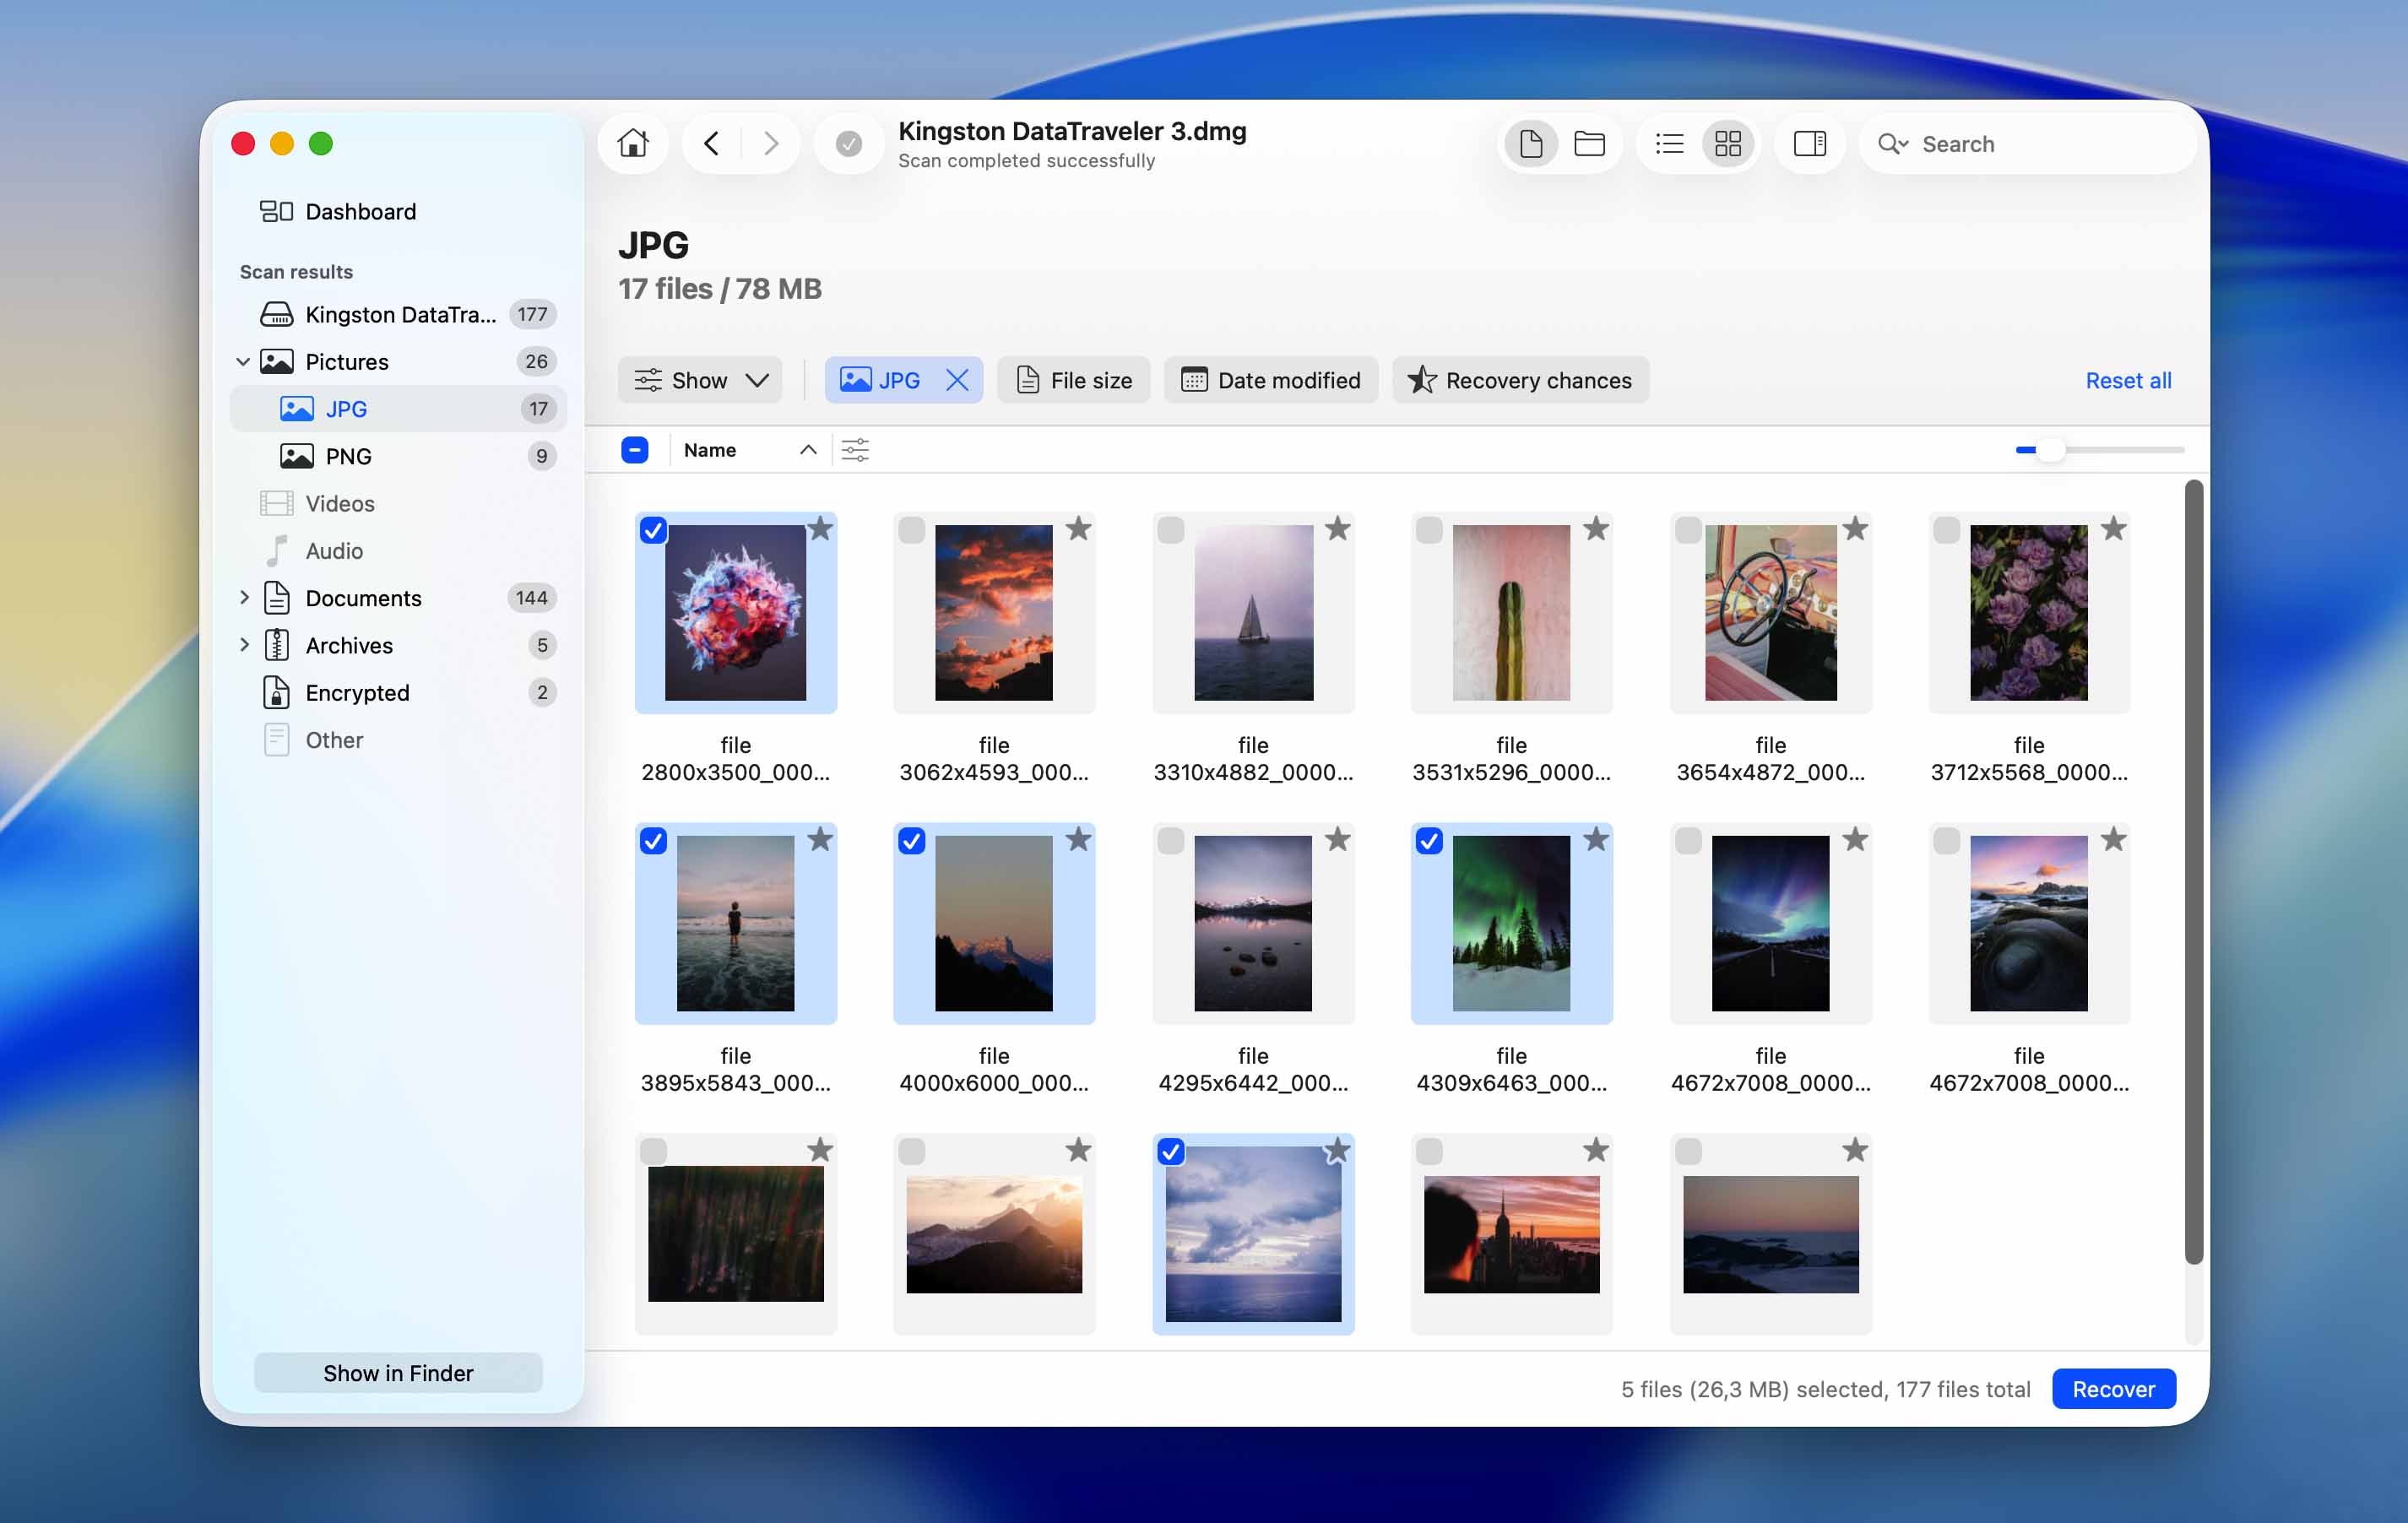
- Select the files you want to recover. Disk Drill lets you preview most file types, which makes it easier to verify that the files are intact. Once you’ve confirmed your selection, click Recover.
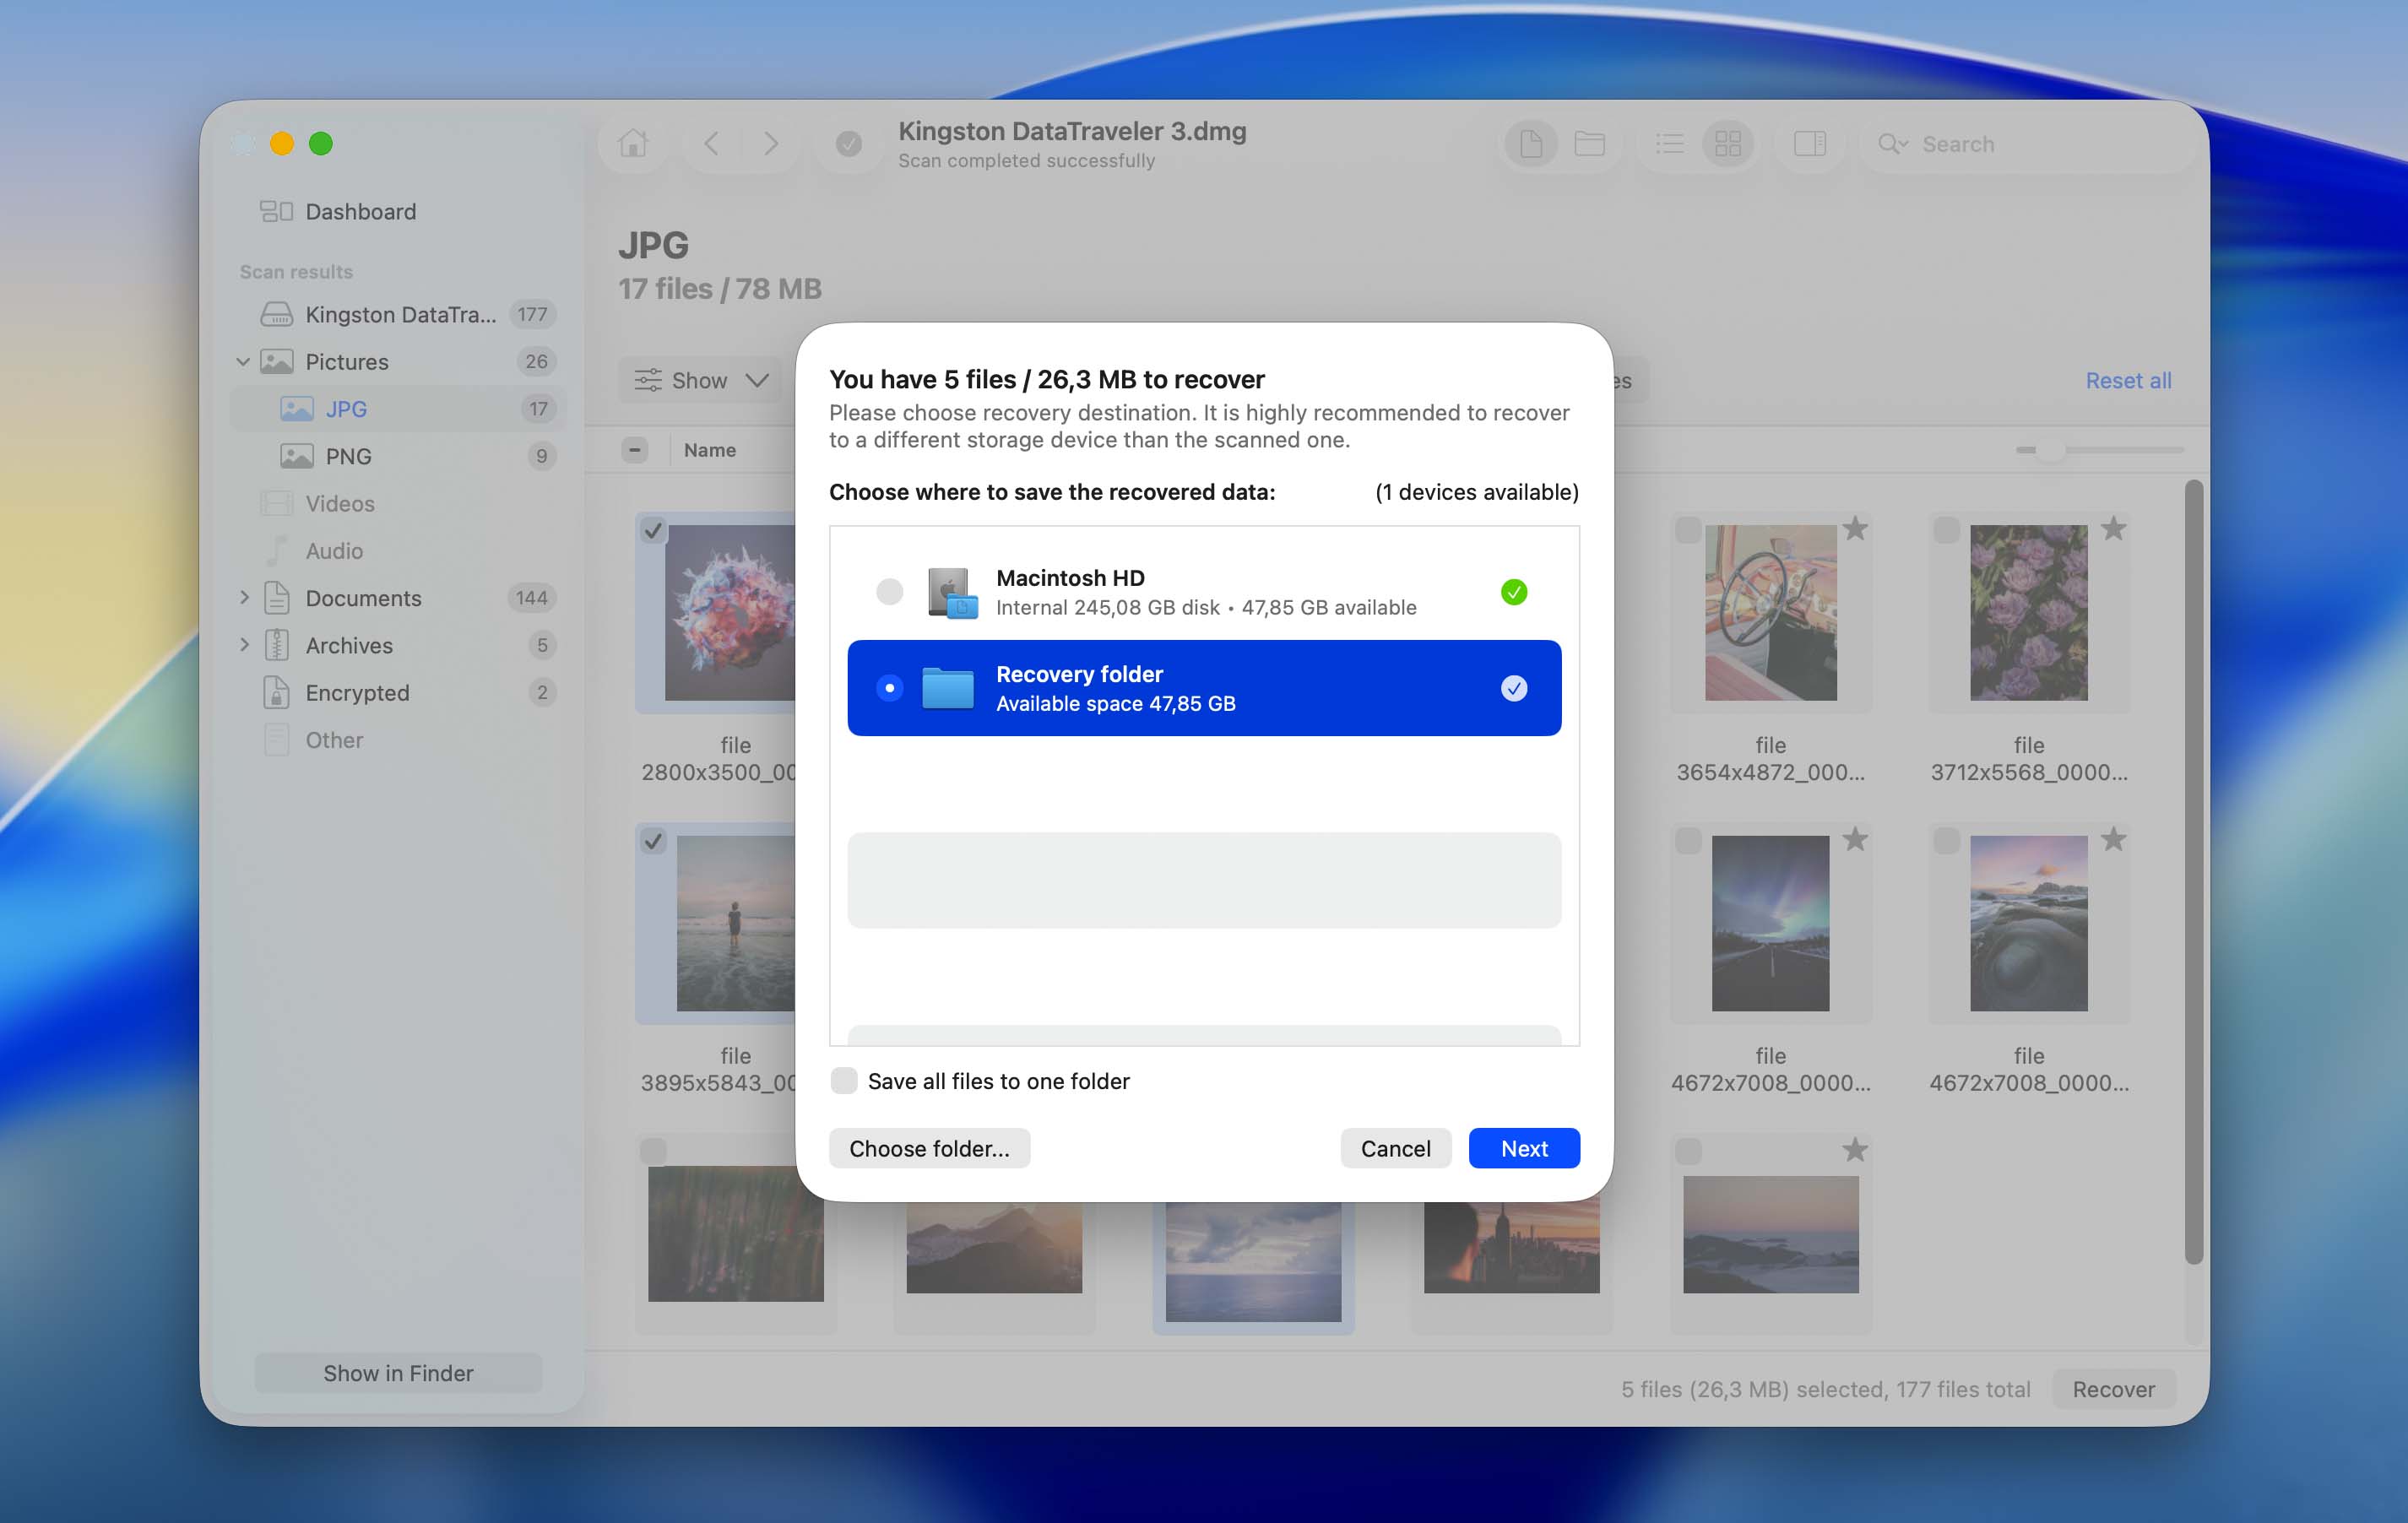
- Choose a recovery destination and click Next. Make sure you save the recovered files to a different drive, not the uninitialized disk you’re recovering from.
You can see the recoverable files using Disk Drill’s free version, but to recover them, you’ll need to upgrade to Disk Drill Pro.
How to Initialize a Disk on Mac
Unlike Windows, macOS doesn’t have a clearly labeled Initialize Disk option that you can access at any time. You’ll typically only see the Initialize button when your Mac displays the “This disk is not readable by this computer” message after you connect the drive.
If you’ve already closed that message and recovered any data that remained on the uninitialized disk, don’t worry. On a Mac, disk initialization is effectively the same as formatting the drive using Disk Utility’s Erase feature.
Before you continue, double-check that all important files have already been copied or recovered to another storage device. The steps below will erase the disk and prepare it for use again.
Here’s how you can initialize a disk on macOS:
- Go to Finder > Applications > Utilities, and click on Disk Utility. You can simply search for it in Spotlight (Command + Space) as well.
- Select your drive in the left pane, and click on Erase towards the top of the window.
- In the Erase parameters window, choose a Name, File System, and Partition Scheme. You can also leave the options as they are. Click on Erase.
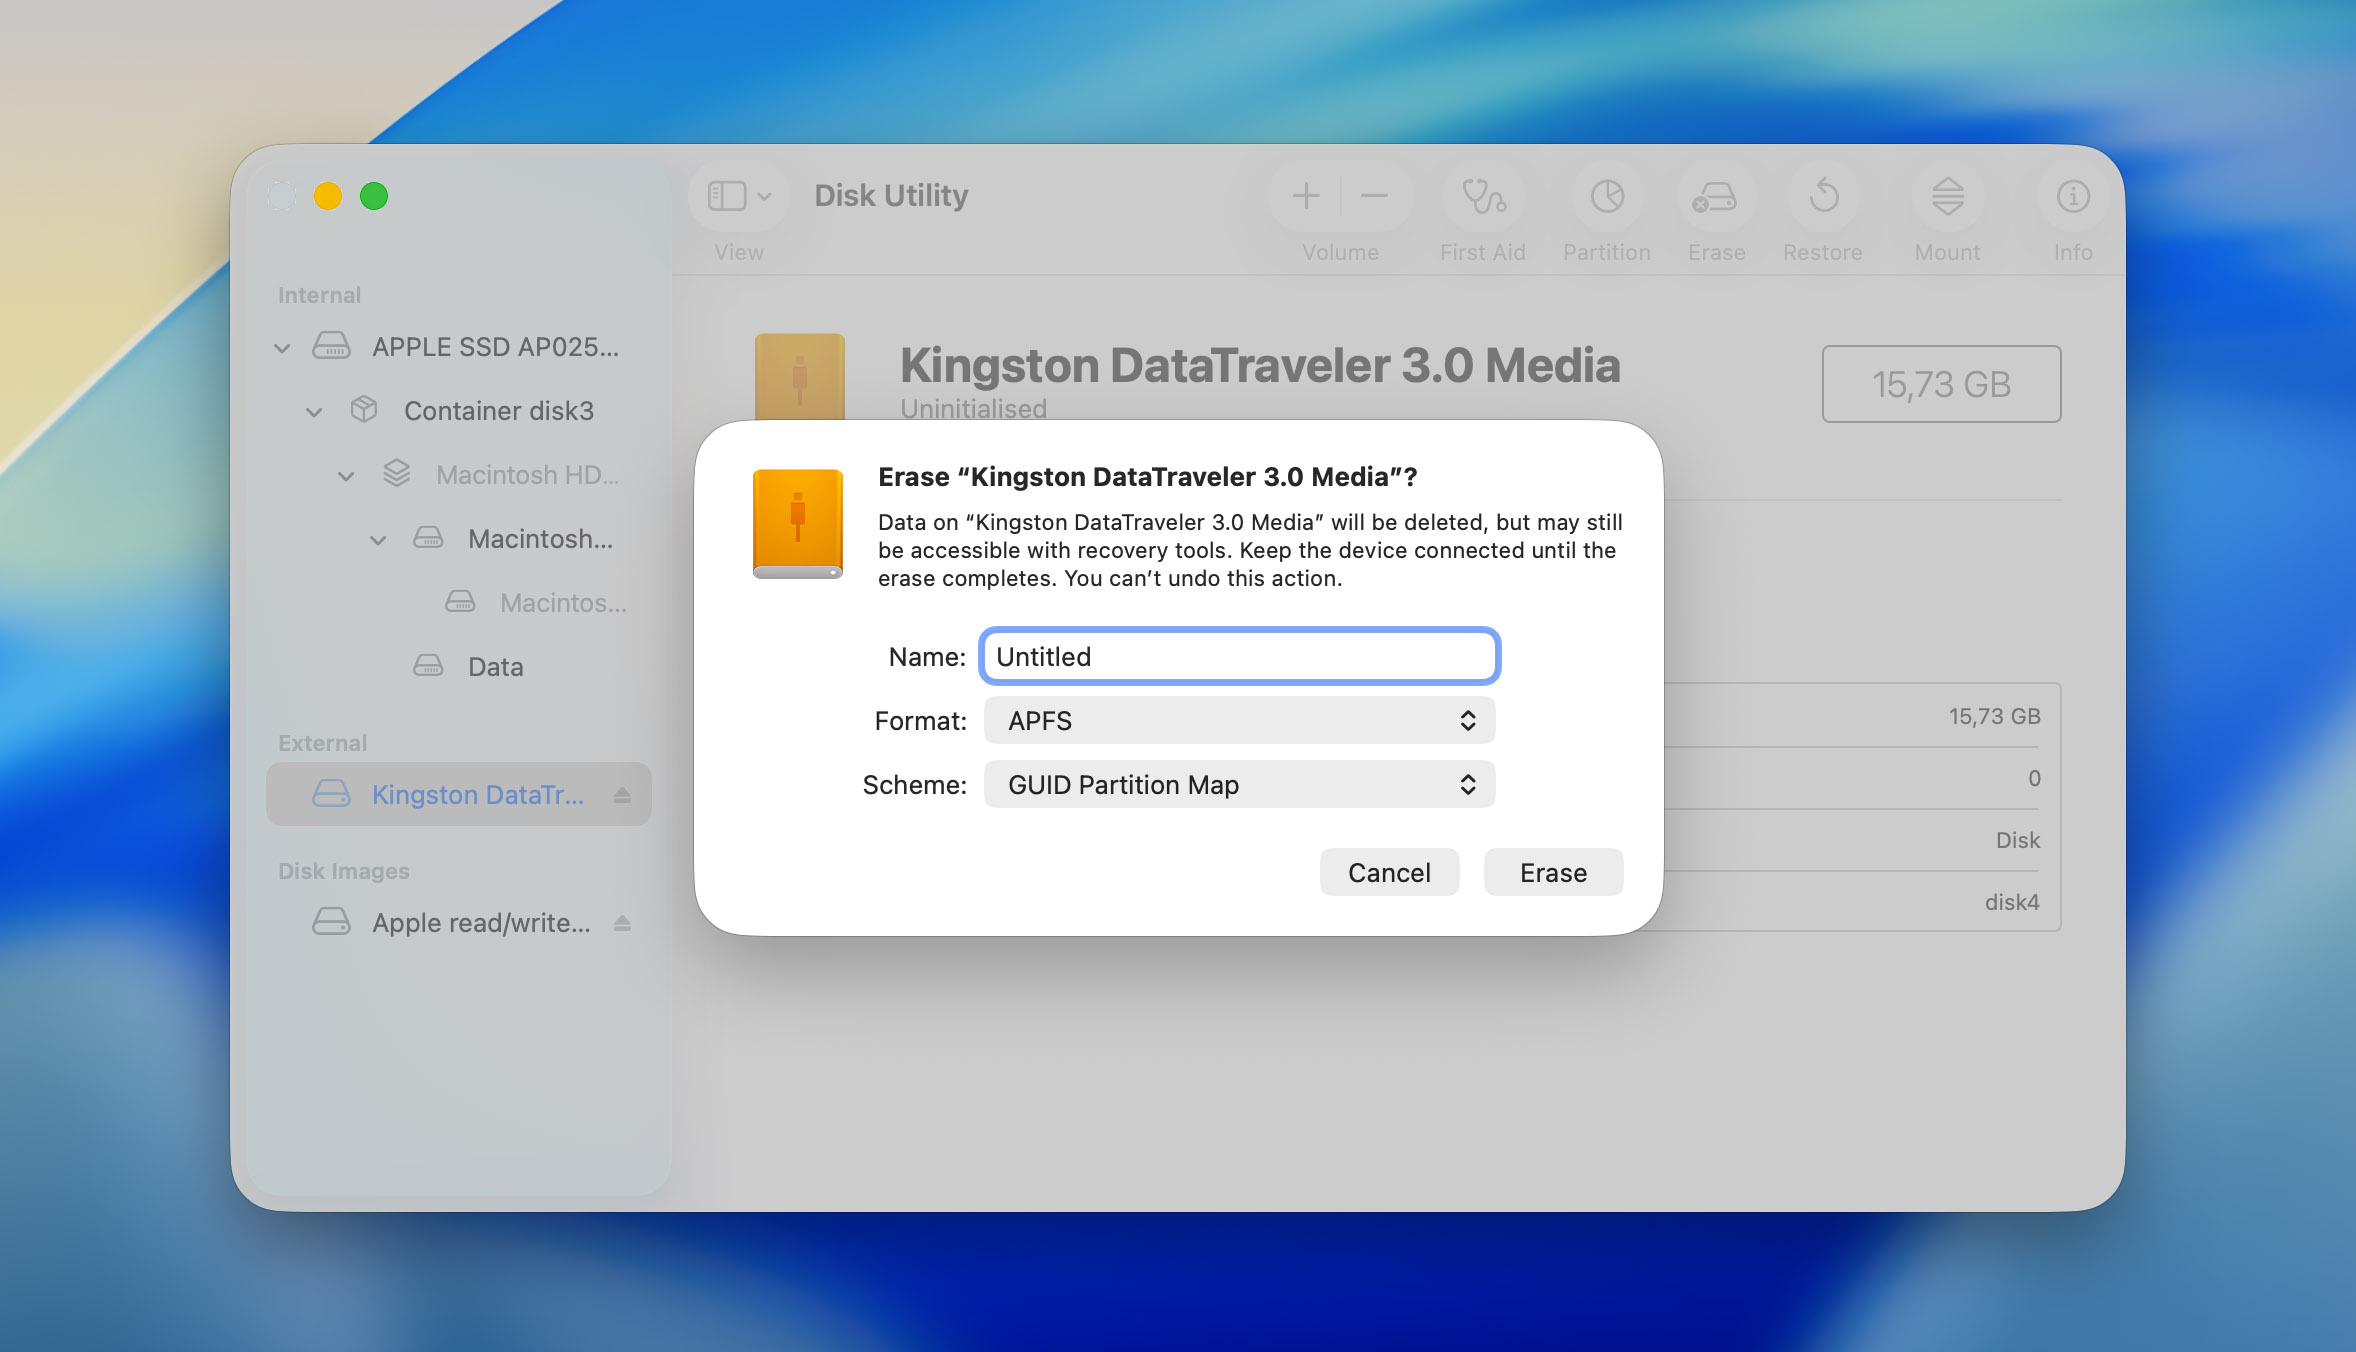
- Your drive will be initialized and formatted.
Other Ways to Fix an Uninitialized Disk on Mac
If you’re not ready to format the drive to initialize it just yet, there are several other methods worth trying first. In some cases, connection problems, minor file system errors, or macOS issues can cause a previously working drive to appear uninitialized. The methods below may help restore normal access to the disk without formatting it.
Method 1: Check the Connections
A loose or damaged cable will prevent your PC and the drive from communicating properly. In such cases, macOS won’t be able to initialize the disk, since it cannot detect it properly in the first place. It’s also advisable to check the cables, and ports for signs of damage. External hard drive USB cables are particularly susceptible to damage.
Try connecting the drive to another Mac computer and see if the error persists. It’s best to use new cables to connect the drive, just to ensure that the issue is with the disk and not a faulty cable or an issue with macOS itself.
Method 2: Reboot Your Mac
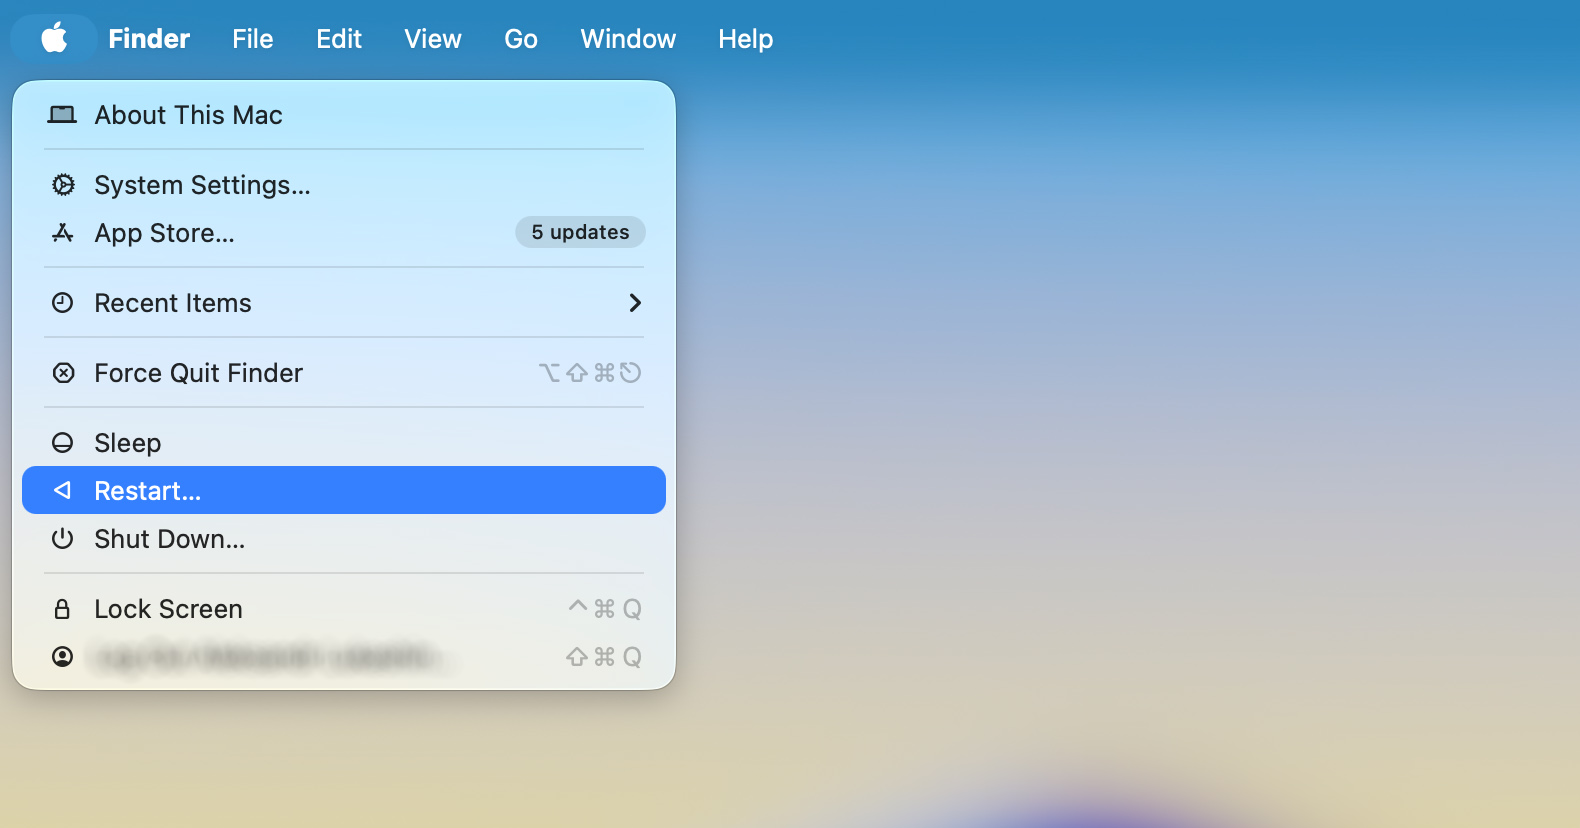
The humble Restart option is used to remedy all kinds of problems on a Mac. In this case, too, perform a reboot and attempt to initialize the disk again. A reboot option prompts your PC to load up all system files and the drivers again. It also refreshes the Disk Utility.
To reboot your Mac, go to the Apple menu and choose Restart.
Method 3: Use the First Aid Feature in Disk Utility
The First Aid feature on macOS can automatically detect and fix a variety of disk errors. It’s a good idea to run this tool when dealing with an uninitialized disk on a Mac. First Aid can be found in the macOS Disk Utility. If your Mac is not starting up, you can use First Aid in macOS Recovery.
To use the First Aid feature on a Mac, follow these steps:
- Open Disk Utility by going to Finder > Applications > Utilities >Disk Utility. You can search for it in Spotlight (Command + Space) as well.
- Click on View > Show All Devices.
- Select the disk which doesn’t initialize and click on the First Aid option.
- Click on Run in the next window.
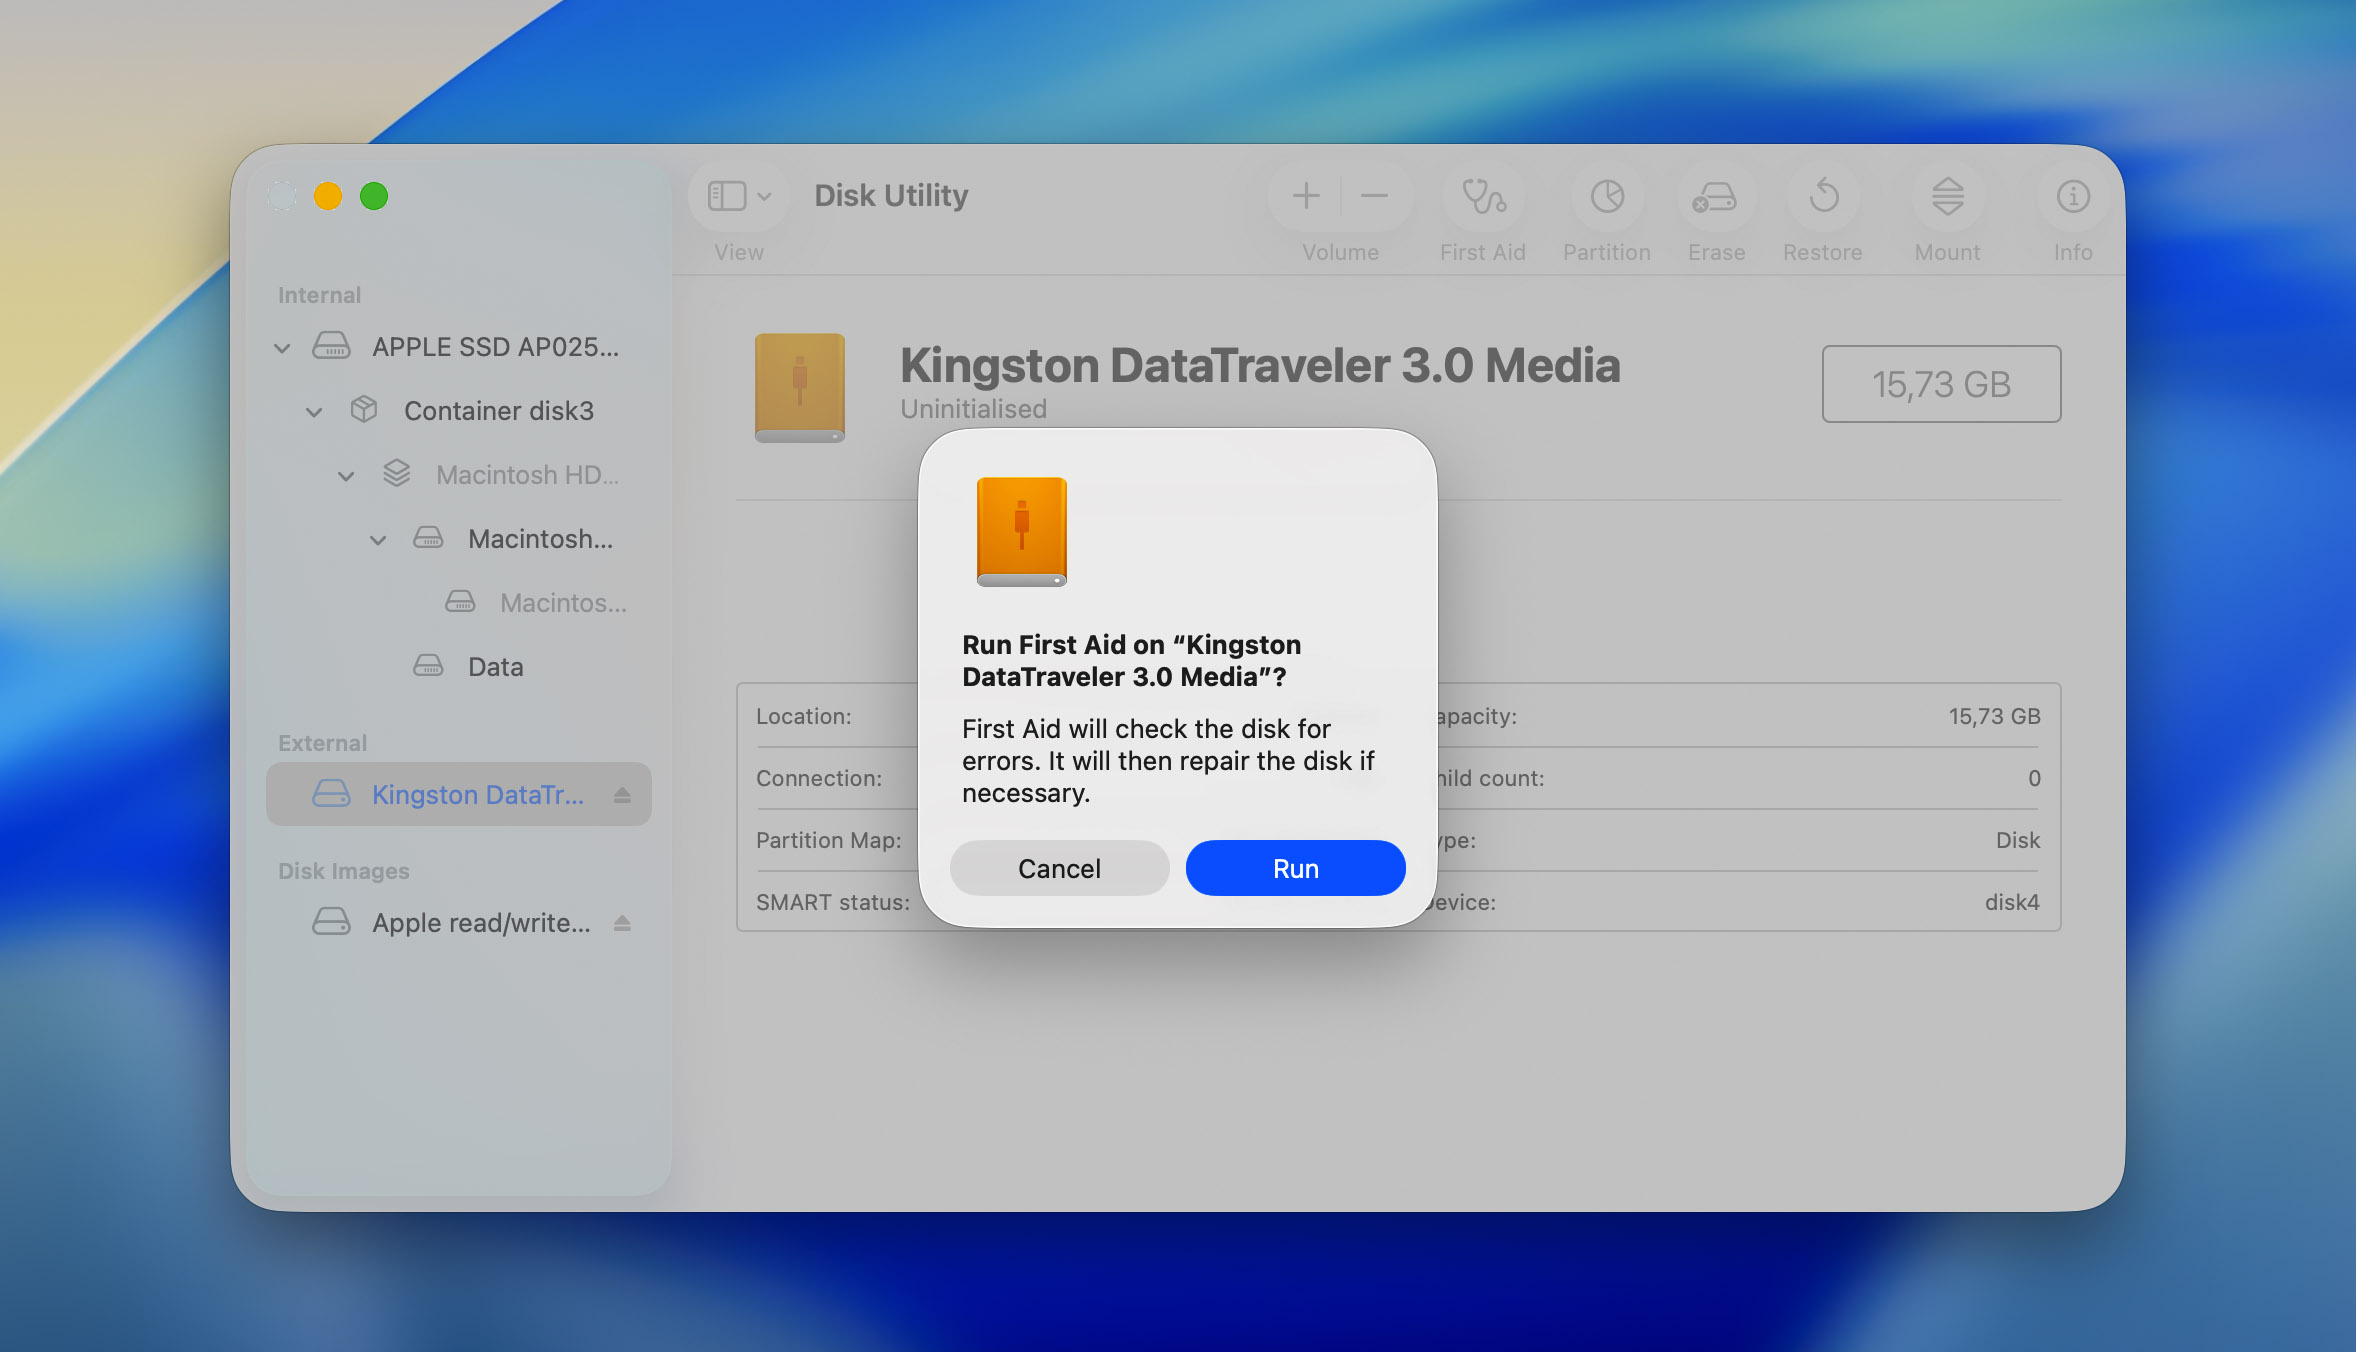
- Wait for First Aid to complete, then review the report. If Disk Utility reports that the file system was repaired successfully, disconnect the drive, reconnect it, and check whether macOS can access it normally. If First Aid reports errors that it can’t repair, continue to the next method.
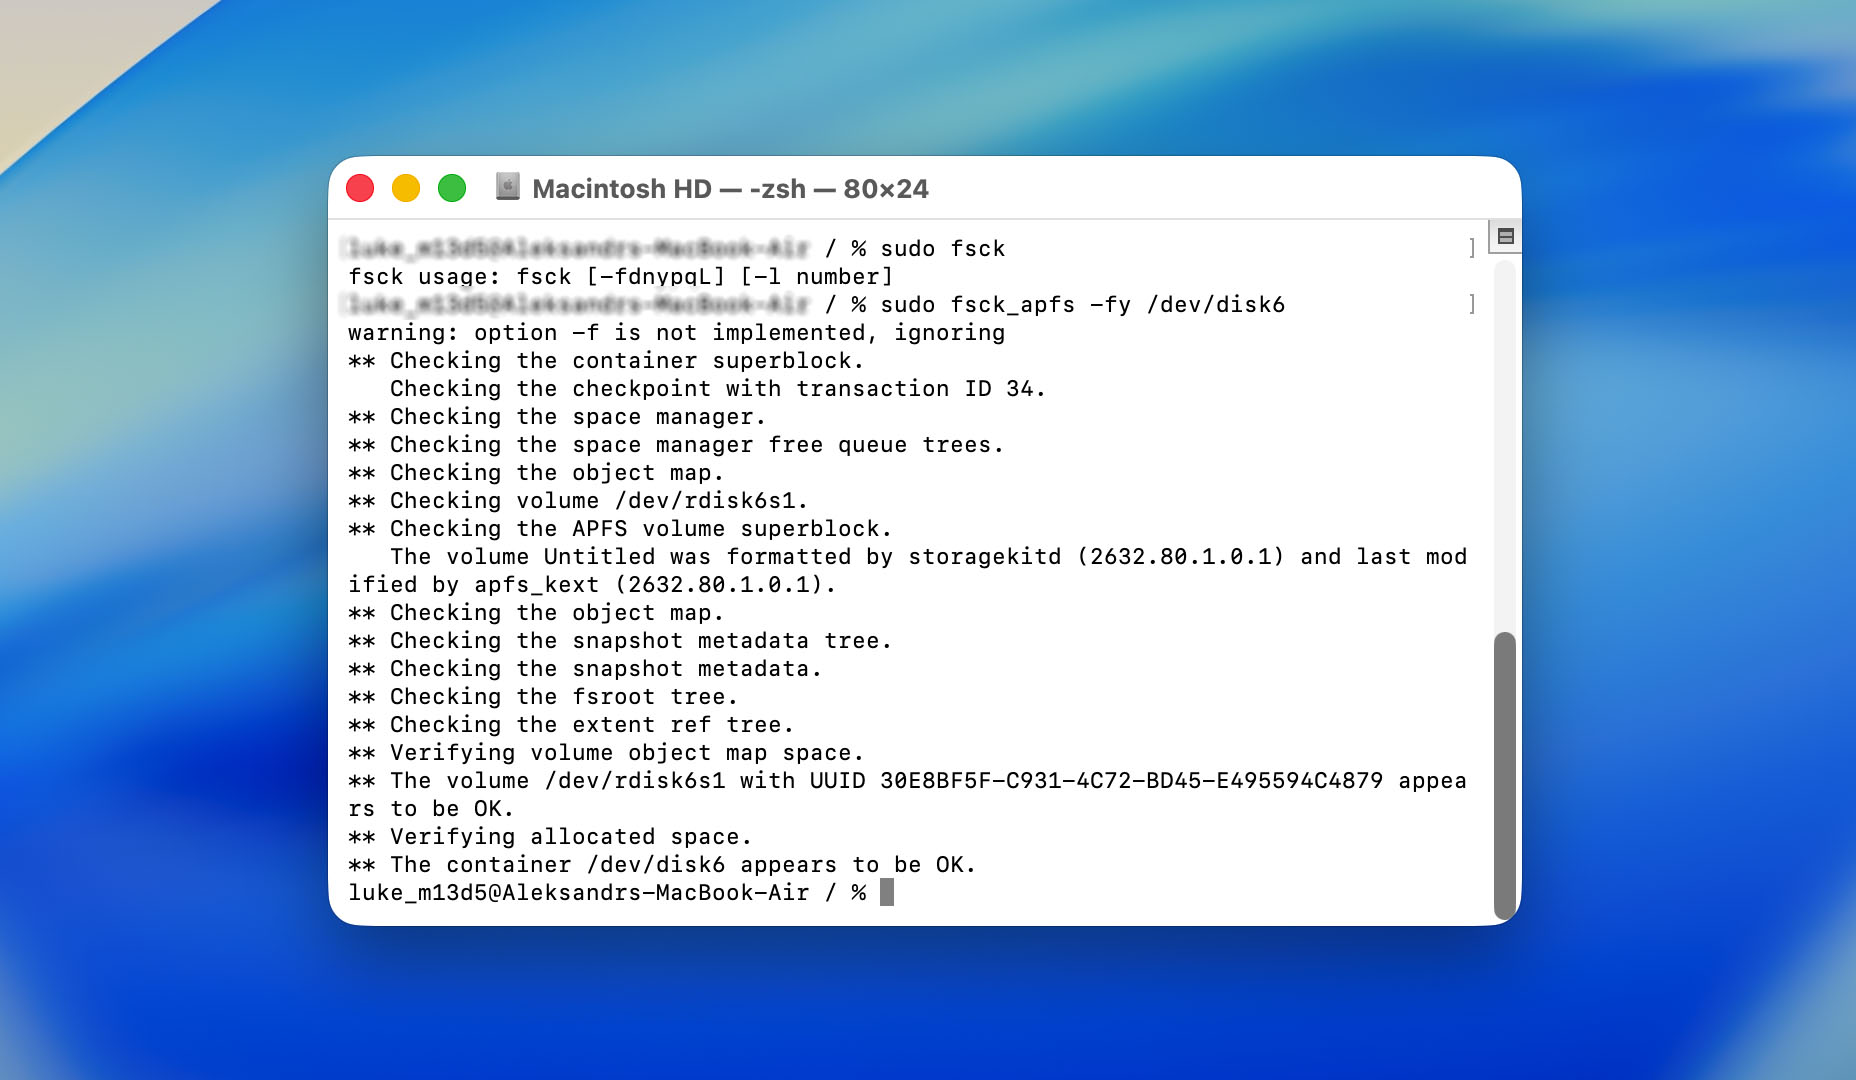
Method 4: Run the FSCK Command
If Disk Utility’s First Aid tool wasn’t able to fix the problem, you can try FSCK (File System Consistency Check). This is a built-in macOS command-line utility that checks a disk’s file system for errors and attempts to repair them. In many cases, FSCK can fix file system corruption that prevents a drive from mounting correctly or causes it to appear as uninitialized.
Here’s how to run FSCK on macOS:
- Open Disk Utility and locate the affected drive.
- Note the disk identifier shown in Disk Utility (for example, disk2).
- Open Terminal and type diskutil unmountDisk /dev/diskX command and press Return. You need replace diskX with your drive’s identifier.
- Next, run sudo fsck -fy /dev/diskX. Again, replace diskX with the correct disk identifier.
- Enter your administrator password when prompted and wait for the scan to complete.
- Review the results. If FSCK reports that the file system was modified or repaired, run the command again until you see a message indicating that the file system appears to be OK.
- Disconnect and reconnect the drive, then check whether macOS can access it normally.
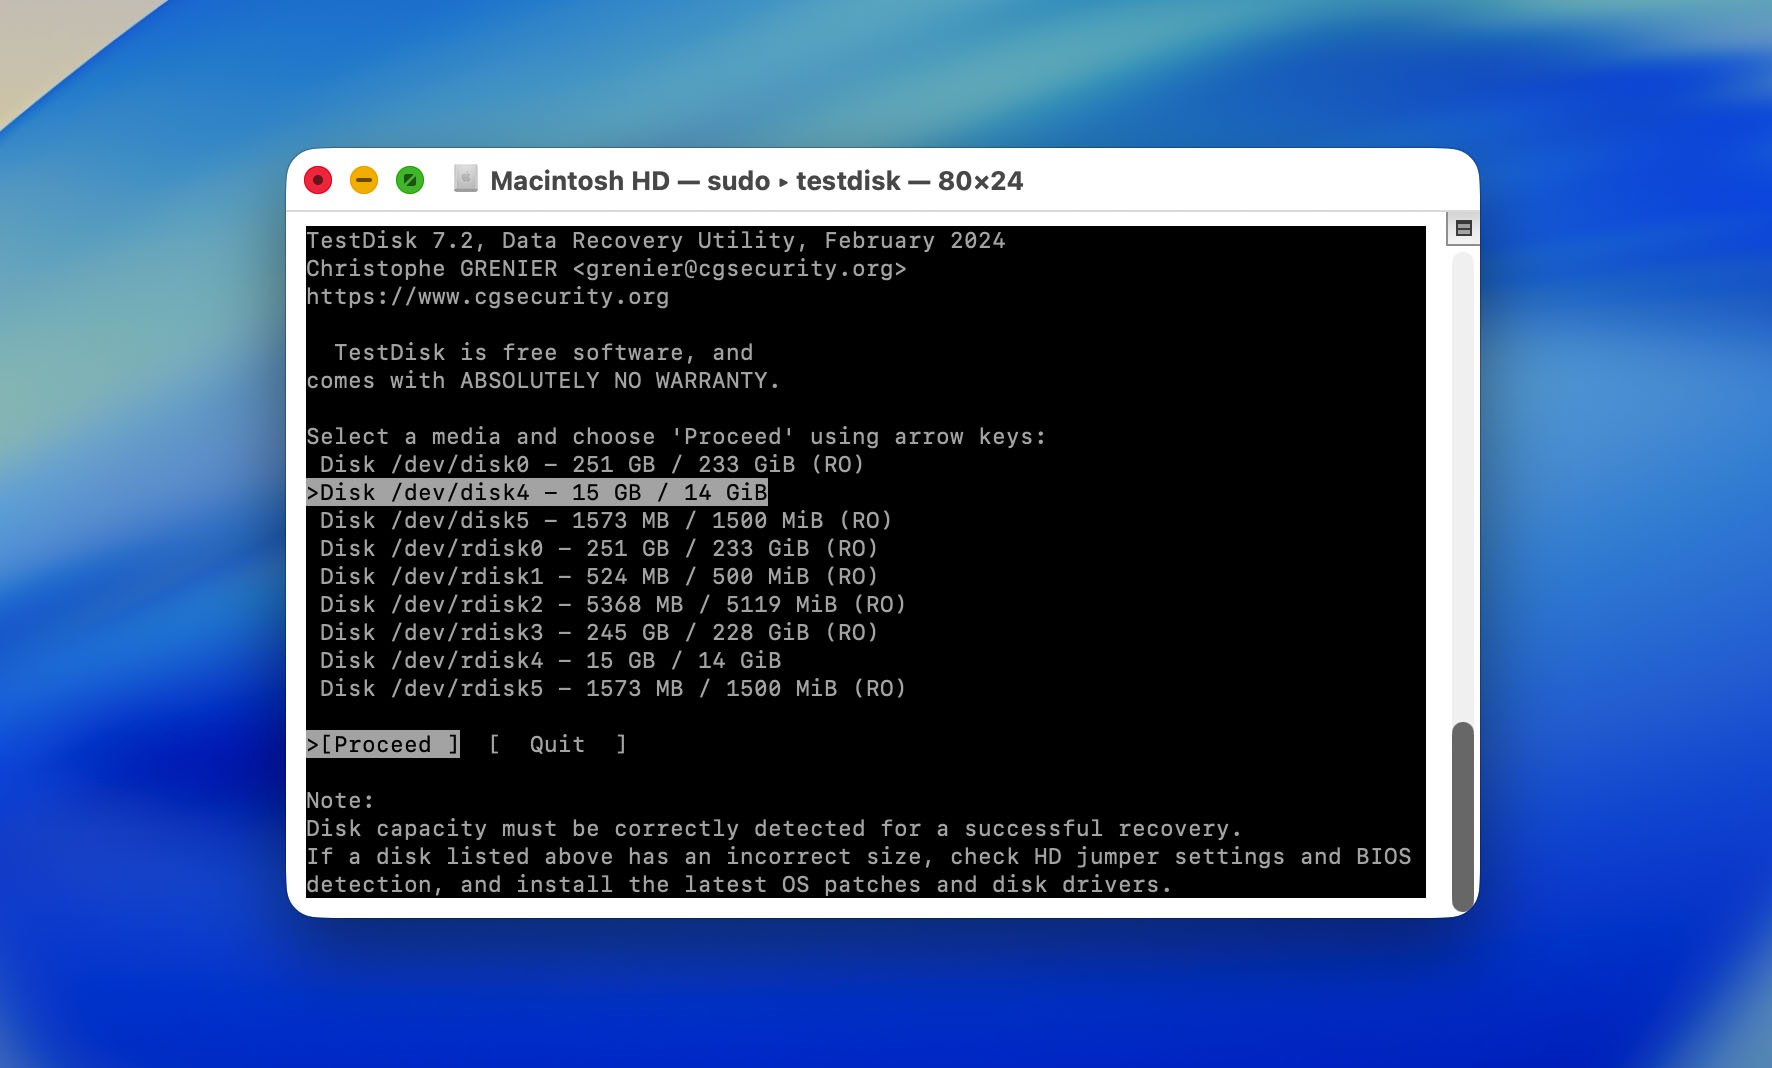
Method 5: Use TestDisk
TestDisk is a free, open-source data recovery utility that can search for lost partitions and rewrite a damaged partition table. This makes it useful when a previously working drive appears as uninitialized because macOS can no longer read its partition structure. If TestDisk finds the missing partition, it may be able to restore access to the disk without formatting it.
- Open Terminal.
- If you don’t already have Homebrew installed, install it first with /bin/bash -c “$(curl -fsSL https://raw.githubusercontent.com/Homebrew/install/HEAD/install.sh)” command.
- Install TestDisk using brew install testdisk command.
- Then use sudo testdisk command to run TestDisk with administrator privileges.
- Select Create to create a new log file.
- Select the uninitialized disk from the list and press Return.
- Choose the partition table type. In most cases, TestDisk will detect it automatically, so you can use the selected option.

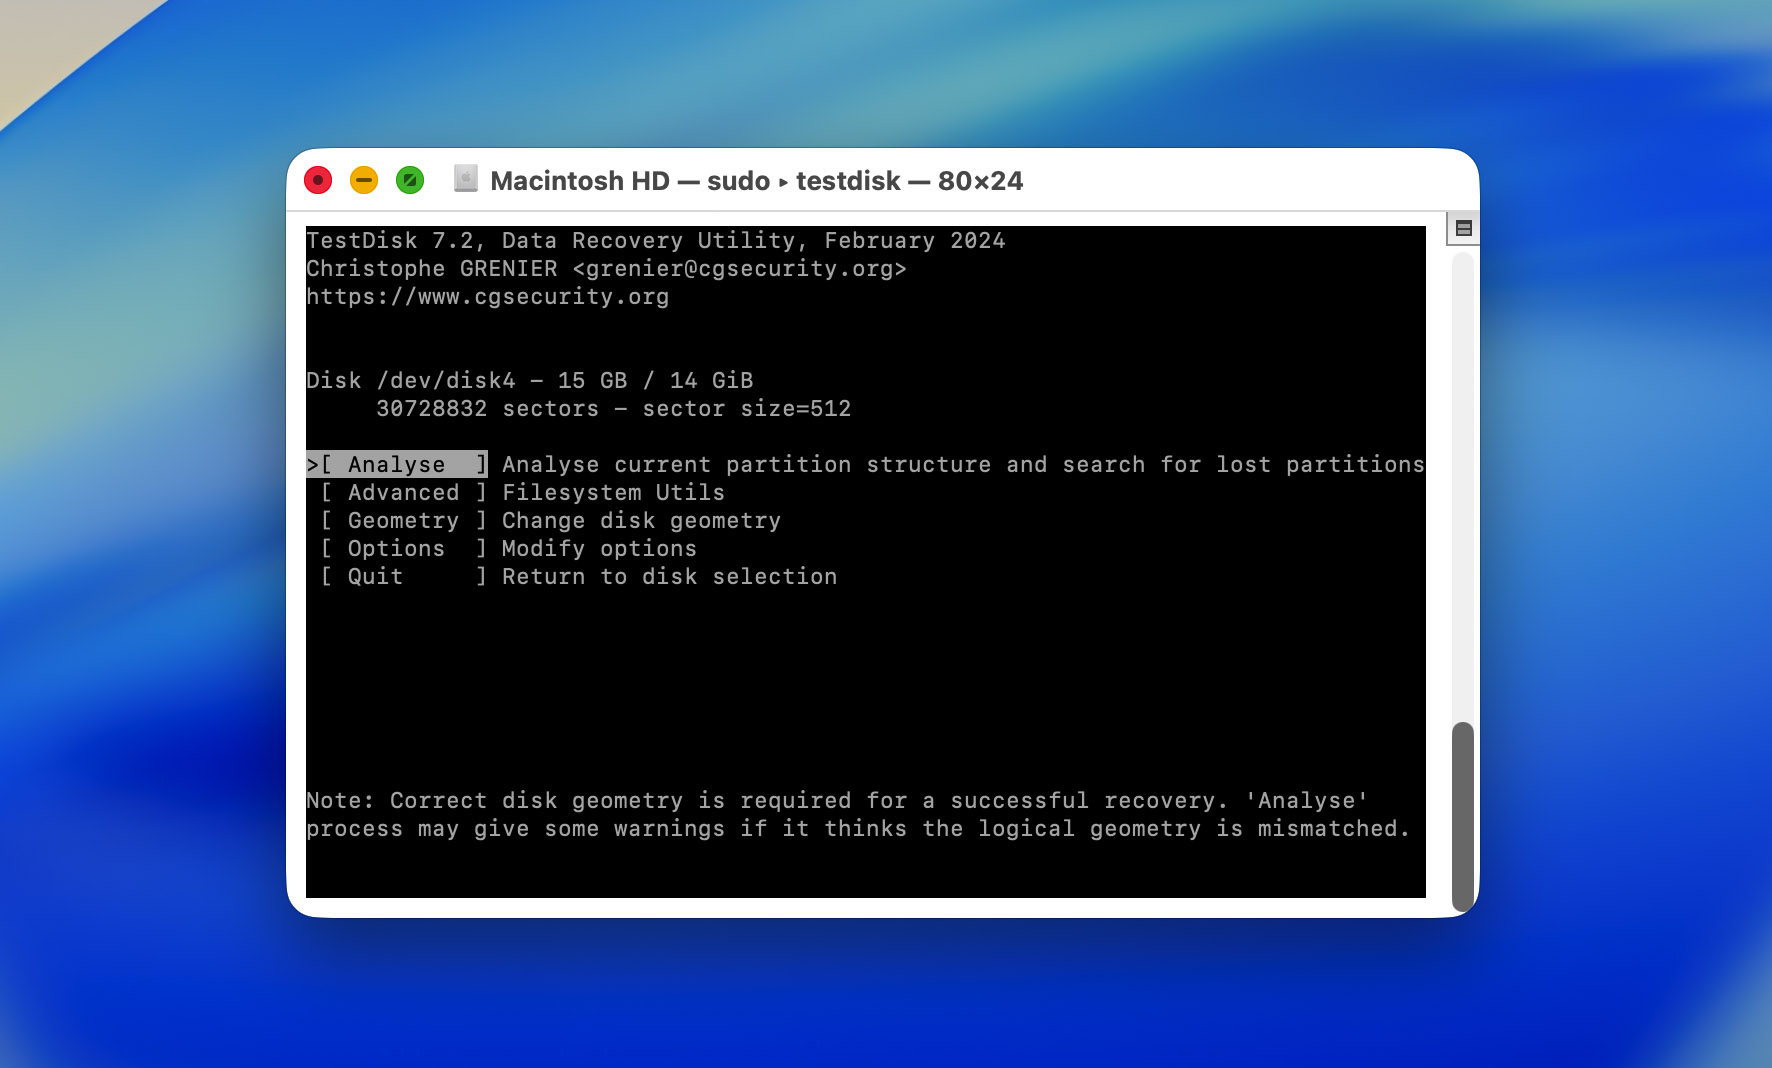
- Select Analyse and press Return.
- Choose Quick Search and wait for TestDisk to look for lost partitions.
- If TestDisk finds the missing partition, select it and press P to list files. If you can see your files, press Q to return to the previous screen.
- Select Write to save the recovered partition structure to the disk.
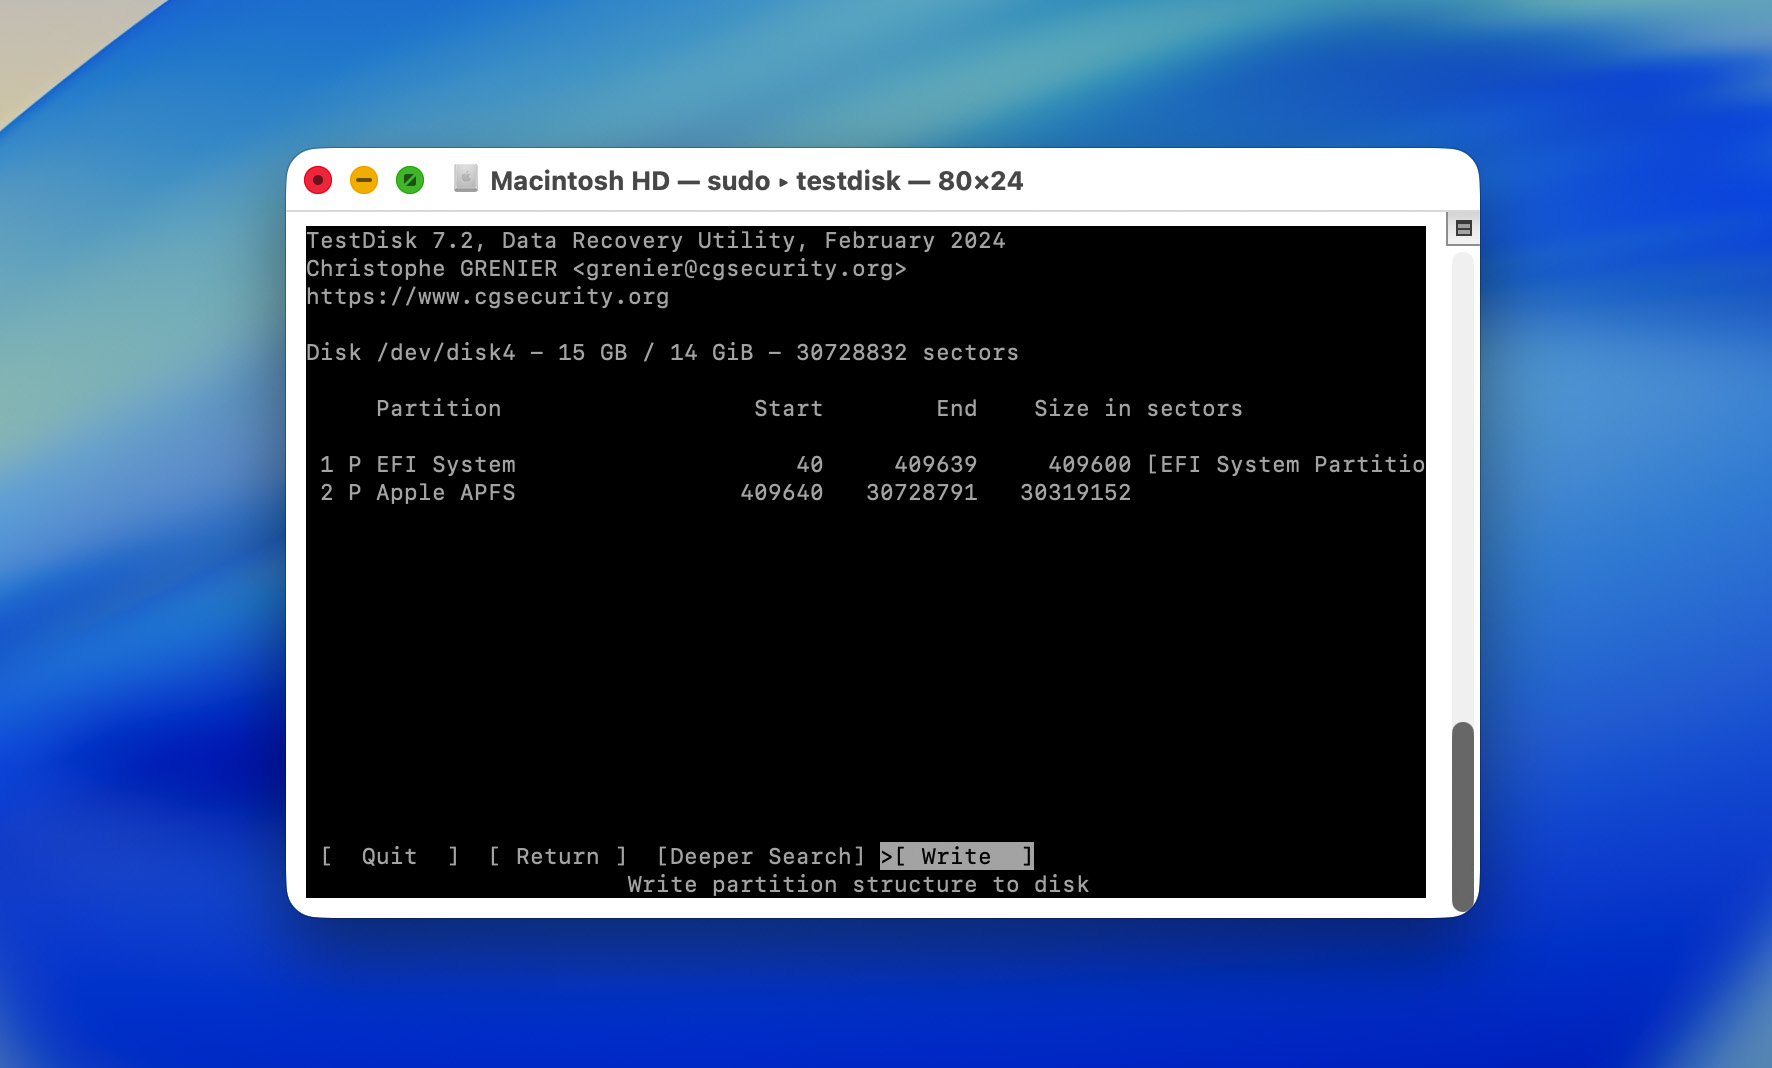
- Confirm the action, then quit TestDisk. Restart your Mac and reconnect the drive. Check whether the disk now appears normally in Finder or Disk Utility.
If Quick Search doesn’t find the correct partition, run Deeper Search instead. It takes longer, but it performs a more thorough scan for lost partitions. If TestDisk still can’t find a valid partition or can’t list your files, don’t write any changes to the disk. At that point, return to the data recovery software and the part of the article that shows how to initialize a hard drive on Mac.
How to Prevent an Uninitialized Disk in the Future
While some drive failures happen without warning, many cases of disk corruption and initialization errors can be avoided with a few simple precautions:
- Always eject drives properly. Disconnecting an external drive without using the Eject option can interrupt write operations and damage the file system or partition table.
- Check your drive’s health regularly. Periodically review the drive in Disk Utility or use SMART monitoring tools to look for signs of bad sectors, read errors, or other hardware issues before they become serious.
- Keep backups of important files. Even a healthy drive can fail unexpectedly. Maintaining backups with Time Machine, cloud storage, or another external drive can prevent data loss if the disk becomes unreadable.
- Protect drives from physical damage. Avoid dropping external drives, exposing them to moisture, extreme temperatures, or unstable power sources. Physical damage is one of the most common causes of severe disk problems.
- Use file systems that macOS supports. Drives formatted with unsupported or improperly configured file systems may not mount correctly and can sometimes appear as uninitialized.
- Run First Aid when you notice unusual behavior. If a drive starts disconnecting unexpectedly, becomes slow, or displays file access errors, use Disk Utility’s First Aid feature as soon as possible to check for file system issues.
Conclusion
To summarize:
- If macOS asks you to initialize a brand-new disk, that’s perfectly normal. The drive simply hasn’t been prepared for use yet.
- If macOS asks you to initialize a disk that was previously working, treat it as a warning sign. Something has prevented your Mac from reading the drive properly.
- Before you initialize the disk, create a disk image, scan it, and recover any important files. This protects your data in case the drive fails completely or the repair process doesn’t go as planned.
- Once your data is safe, you can initialize the disk by formatting it or try one of the alternative repair methods covered in this guide.
- After the drive starts working again, keep an eye on it. If the same disk becomes uninitialized again in the future, it’s usually a sign of an underlying hardware problem, and replacing the drive is often the safest long-term solution.
If you run into additional problems or have questions that weren’t covered in this guide, feel free to visit our 7 Data Recovery Forum. You’ll find discussions from users who have dealt with similar uninitialized disk issues, or you can create a new topic and ask for help directly.
FAQ
- Open Disk Utility.
- Select the disk and click Erase.
- Choose the format parameters and click Erase.
- Open the Terminal app.
- Type diskutil list and press Enter.
- Note down the disk number of the drive you wish to format (e.g. /dev/disk1).
- Type diskutil eraseDisk format name /dev/diskx and press Enter. Replace format with the file system, you want the disk to use, replace name with the label you want the disk to have, and replace x after disk with the disk number.
- Open Disk Utility.
- Select the disk and click Erase.
- Choose the required parameters and click Erase.
- Hard drive is disabled in Finder Preferences.
- Damaged cables and ports.
- The disk uses a file system that macOS doesn’t recognize.
")
")


