



If your permanently deleted photos are gone from the Recently Deleted album, the first thing to try is an iCloud or Finder/iTunes backup made before the deletion. If you don’t have one, data recovery software like Disk Drill is one of the few remaining options worth trying. However, you should set realistic expectations. Unlike external hard drives and other storage devices, modern iPhones use encryption that makes direct recovery of deleted files extremely difficult, so without a backup, there is no guarantee that your photos can be recovered.
That doesn’t mean you should give up right away. Go through the recovery methods below anyway. Depending on how your photos were lost, one of them may still work in your situation.
| What happened? | How to solve? |
| You deleted your photos and realized the mistake right away (or within the last 30 days). | Check the Recently Deleted album first. This is the fastest and easiest recovery method. |
| You have an iCloud Backup that was created before the photos were deleted. | Restore the iCloud Backup to get your photos back. |
| You have a Finder or iTunes backup on your computer. | You can restore the backup to your iPhone, or scan the backup with Disk Drill to recover only the deleted photos without restoring the entire backup. |
| You don’t have a usable backup, but you still have the iPhone. | Scan the iPhone with Disk Drill. It may still find photos that haven’t been permanently removed and are still available through Apple’s backup API. |
| You backed up or synced your photos to another cloud service, such as Google Drive, Dropbox, or OneDrive. | Check your cloud storage and restore the photos from there if they’re available. |
| You remember sending the missing photos through Messenger or another messaging app. | Check the conversation attachments. The photos may still be available there even if they were deleted from your Photos library. |
How to Recover Deleted Photos from iPhone
Let’s get started with deleted photo recovery from an iPhone. We’ve compiled seven recovery methods, and suggest attempting them in the order in which they’re listed:
Option 1: Check the Recently Deleted Folder
Before anything else, look for the deleted photos in the Recently Deleted folder of your iPhone. There’s a solid chance your photos are still there, considering the folder stores deleted photos for 30 days by default.
Here’s how to access the Recently Deleted folder and recover your deleted photos:
- Open the Photos app on your iPhone and switch to the Collections tab.
- Scroll down to Recently Deleted under Utilities. Open it, then use Face ID or your passcode to unlock the album.
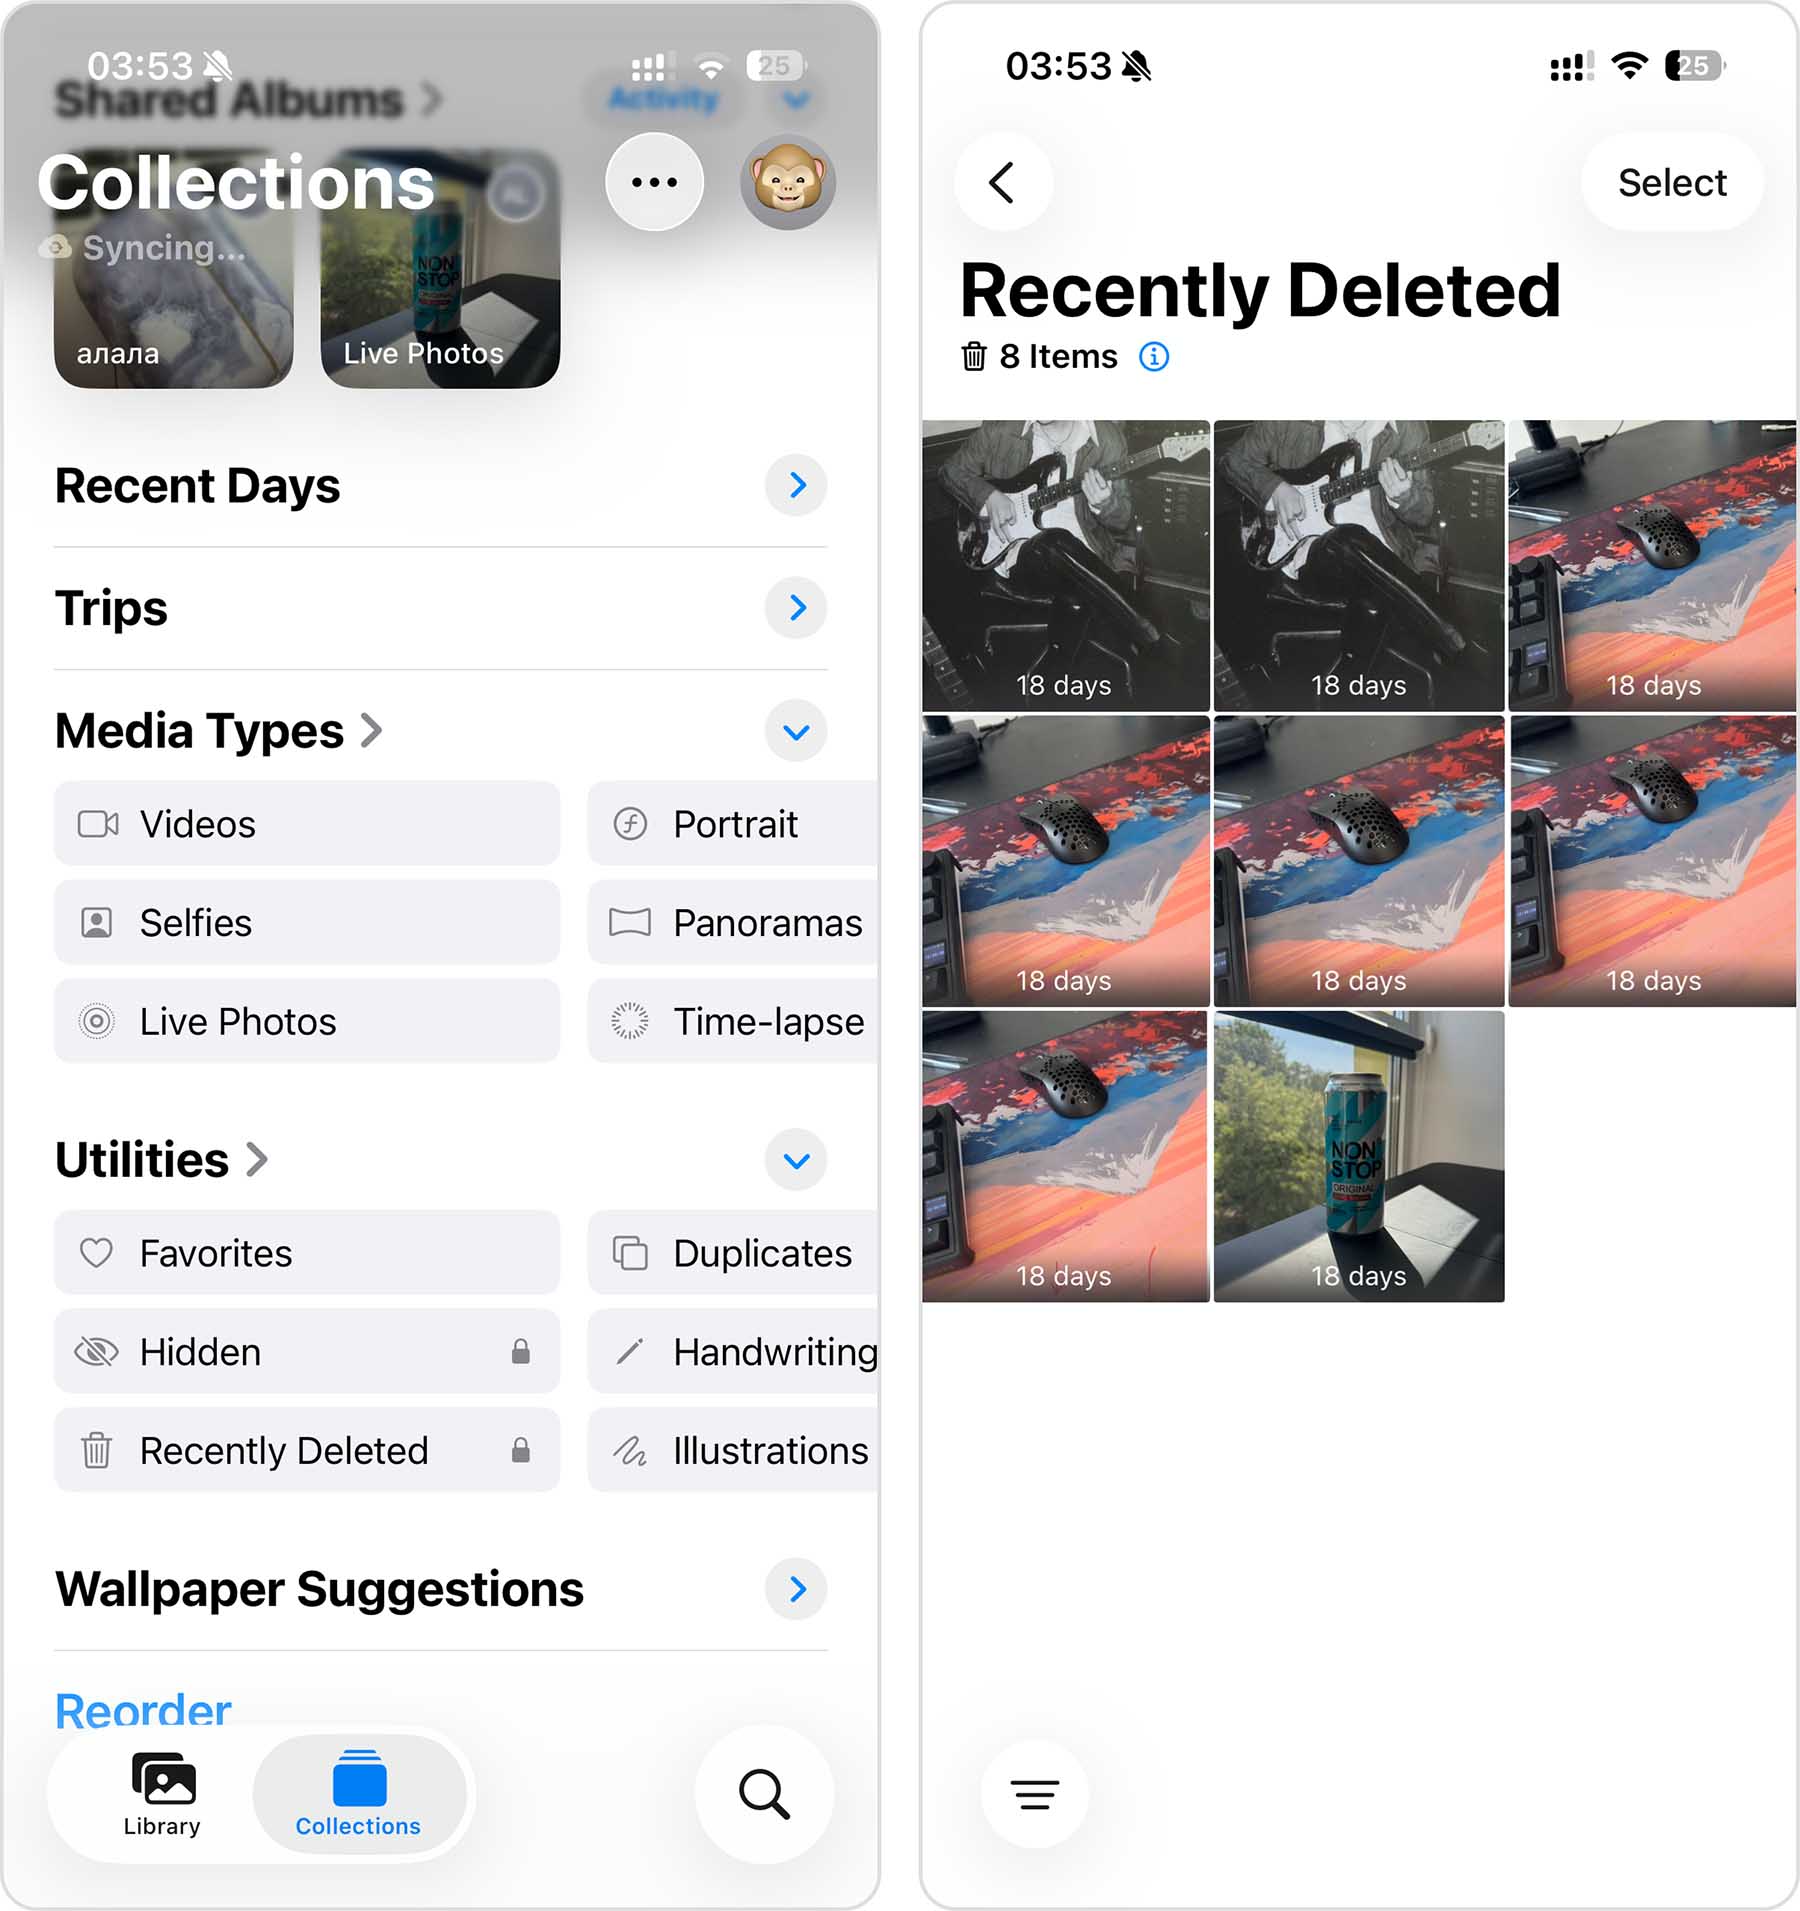
- Tap Select in the top-right corner.
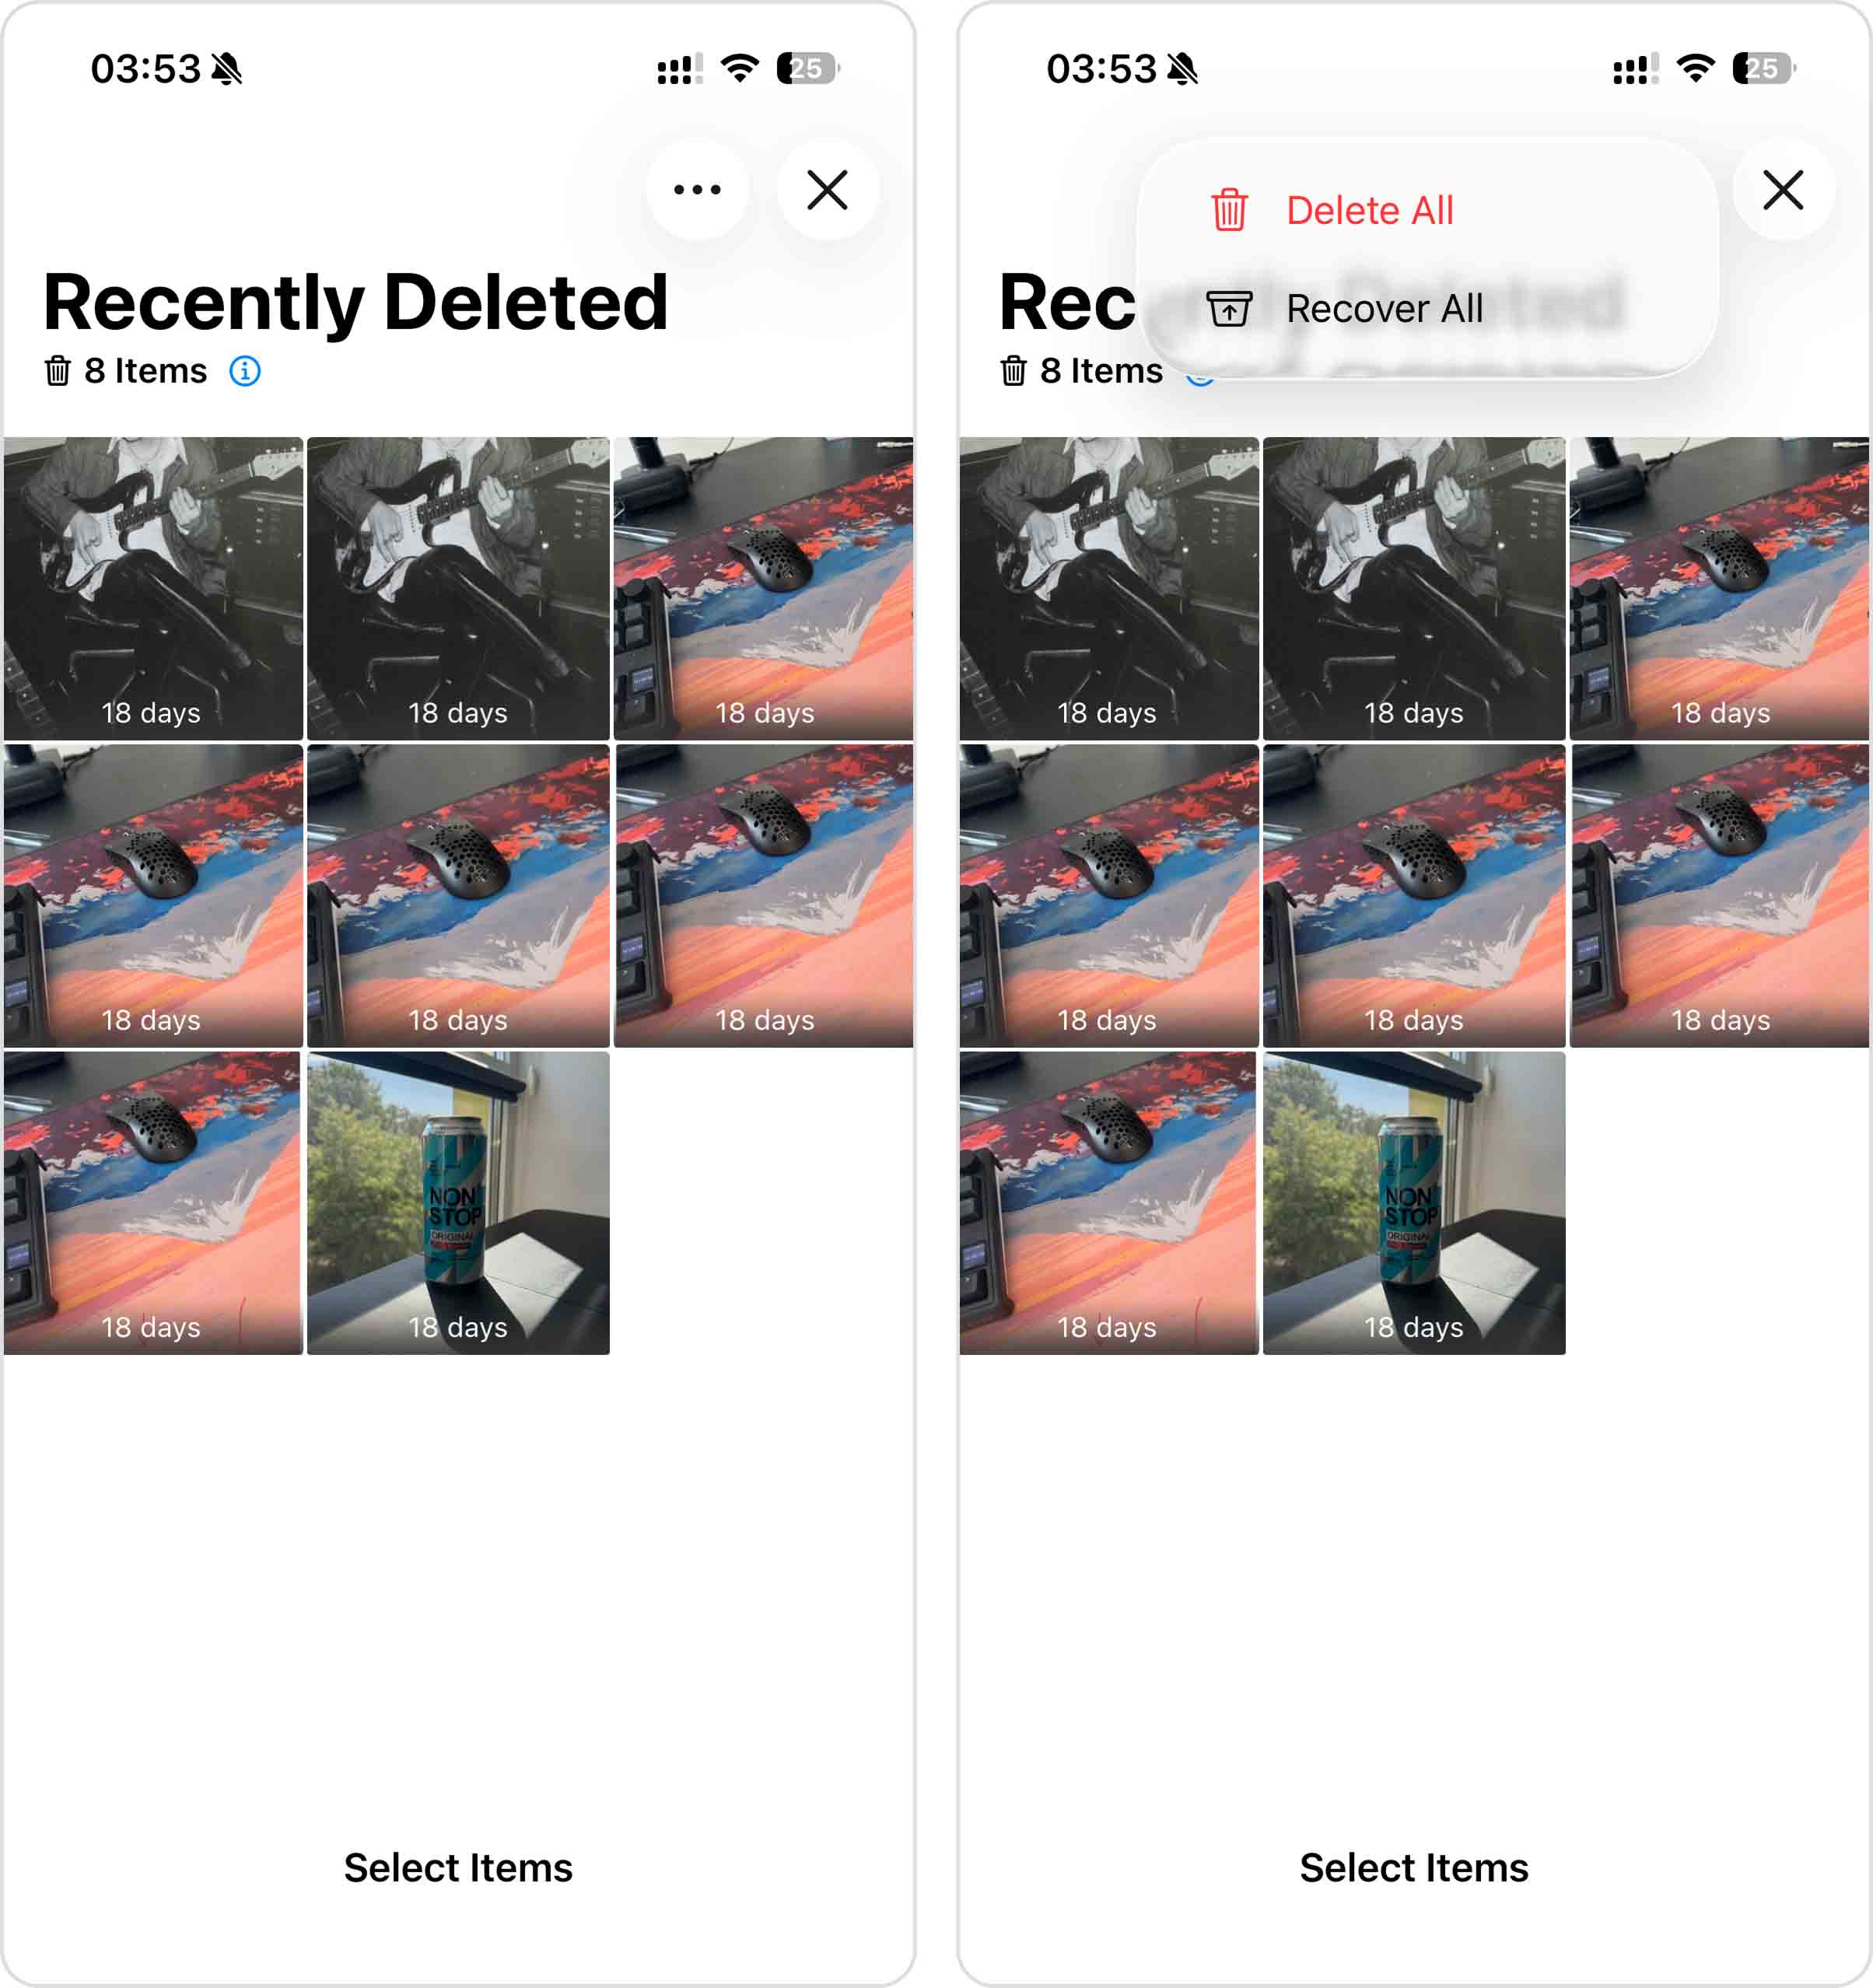
- Select the photos you want to recover, then tap the three-dot button in the top-right corner.
- Tap Recover, then confirm your choice. The selected photos will be restored to their original place in your photo library.
Option 2: Restore From an iCloud Backup
If you have iCloud Backups enabled, you can potentially recover deleted photos by restoring the iCloud backup.
However, there are two caveats. First, if you have iCloud Photos enabled, your photos aren’t backed up as part of the iCloud Backup – you can only recover these photos from the Recently Deleted folder. Second, iCloud backups capture the current contents of your iPhone, so for this method to work the latest iCloud backup should’ve been created before the photos were deleted.
Note: Restoring an iCloud Backup replaces the current contents of your iPhone with the contents of the backup. Be sure to copy any important data from your iPhone to your Mac before proceeding forward.
- Open the Settings app on your iPhone and tap your name at the top.
- Go to iCloud > iCloud Backup and check when the last successful backup was created. If it was made after your photos were deleted, this method won’t help, so move on to the next one.
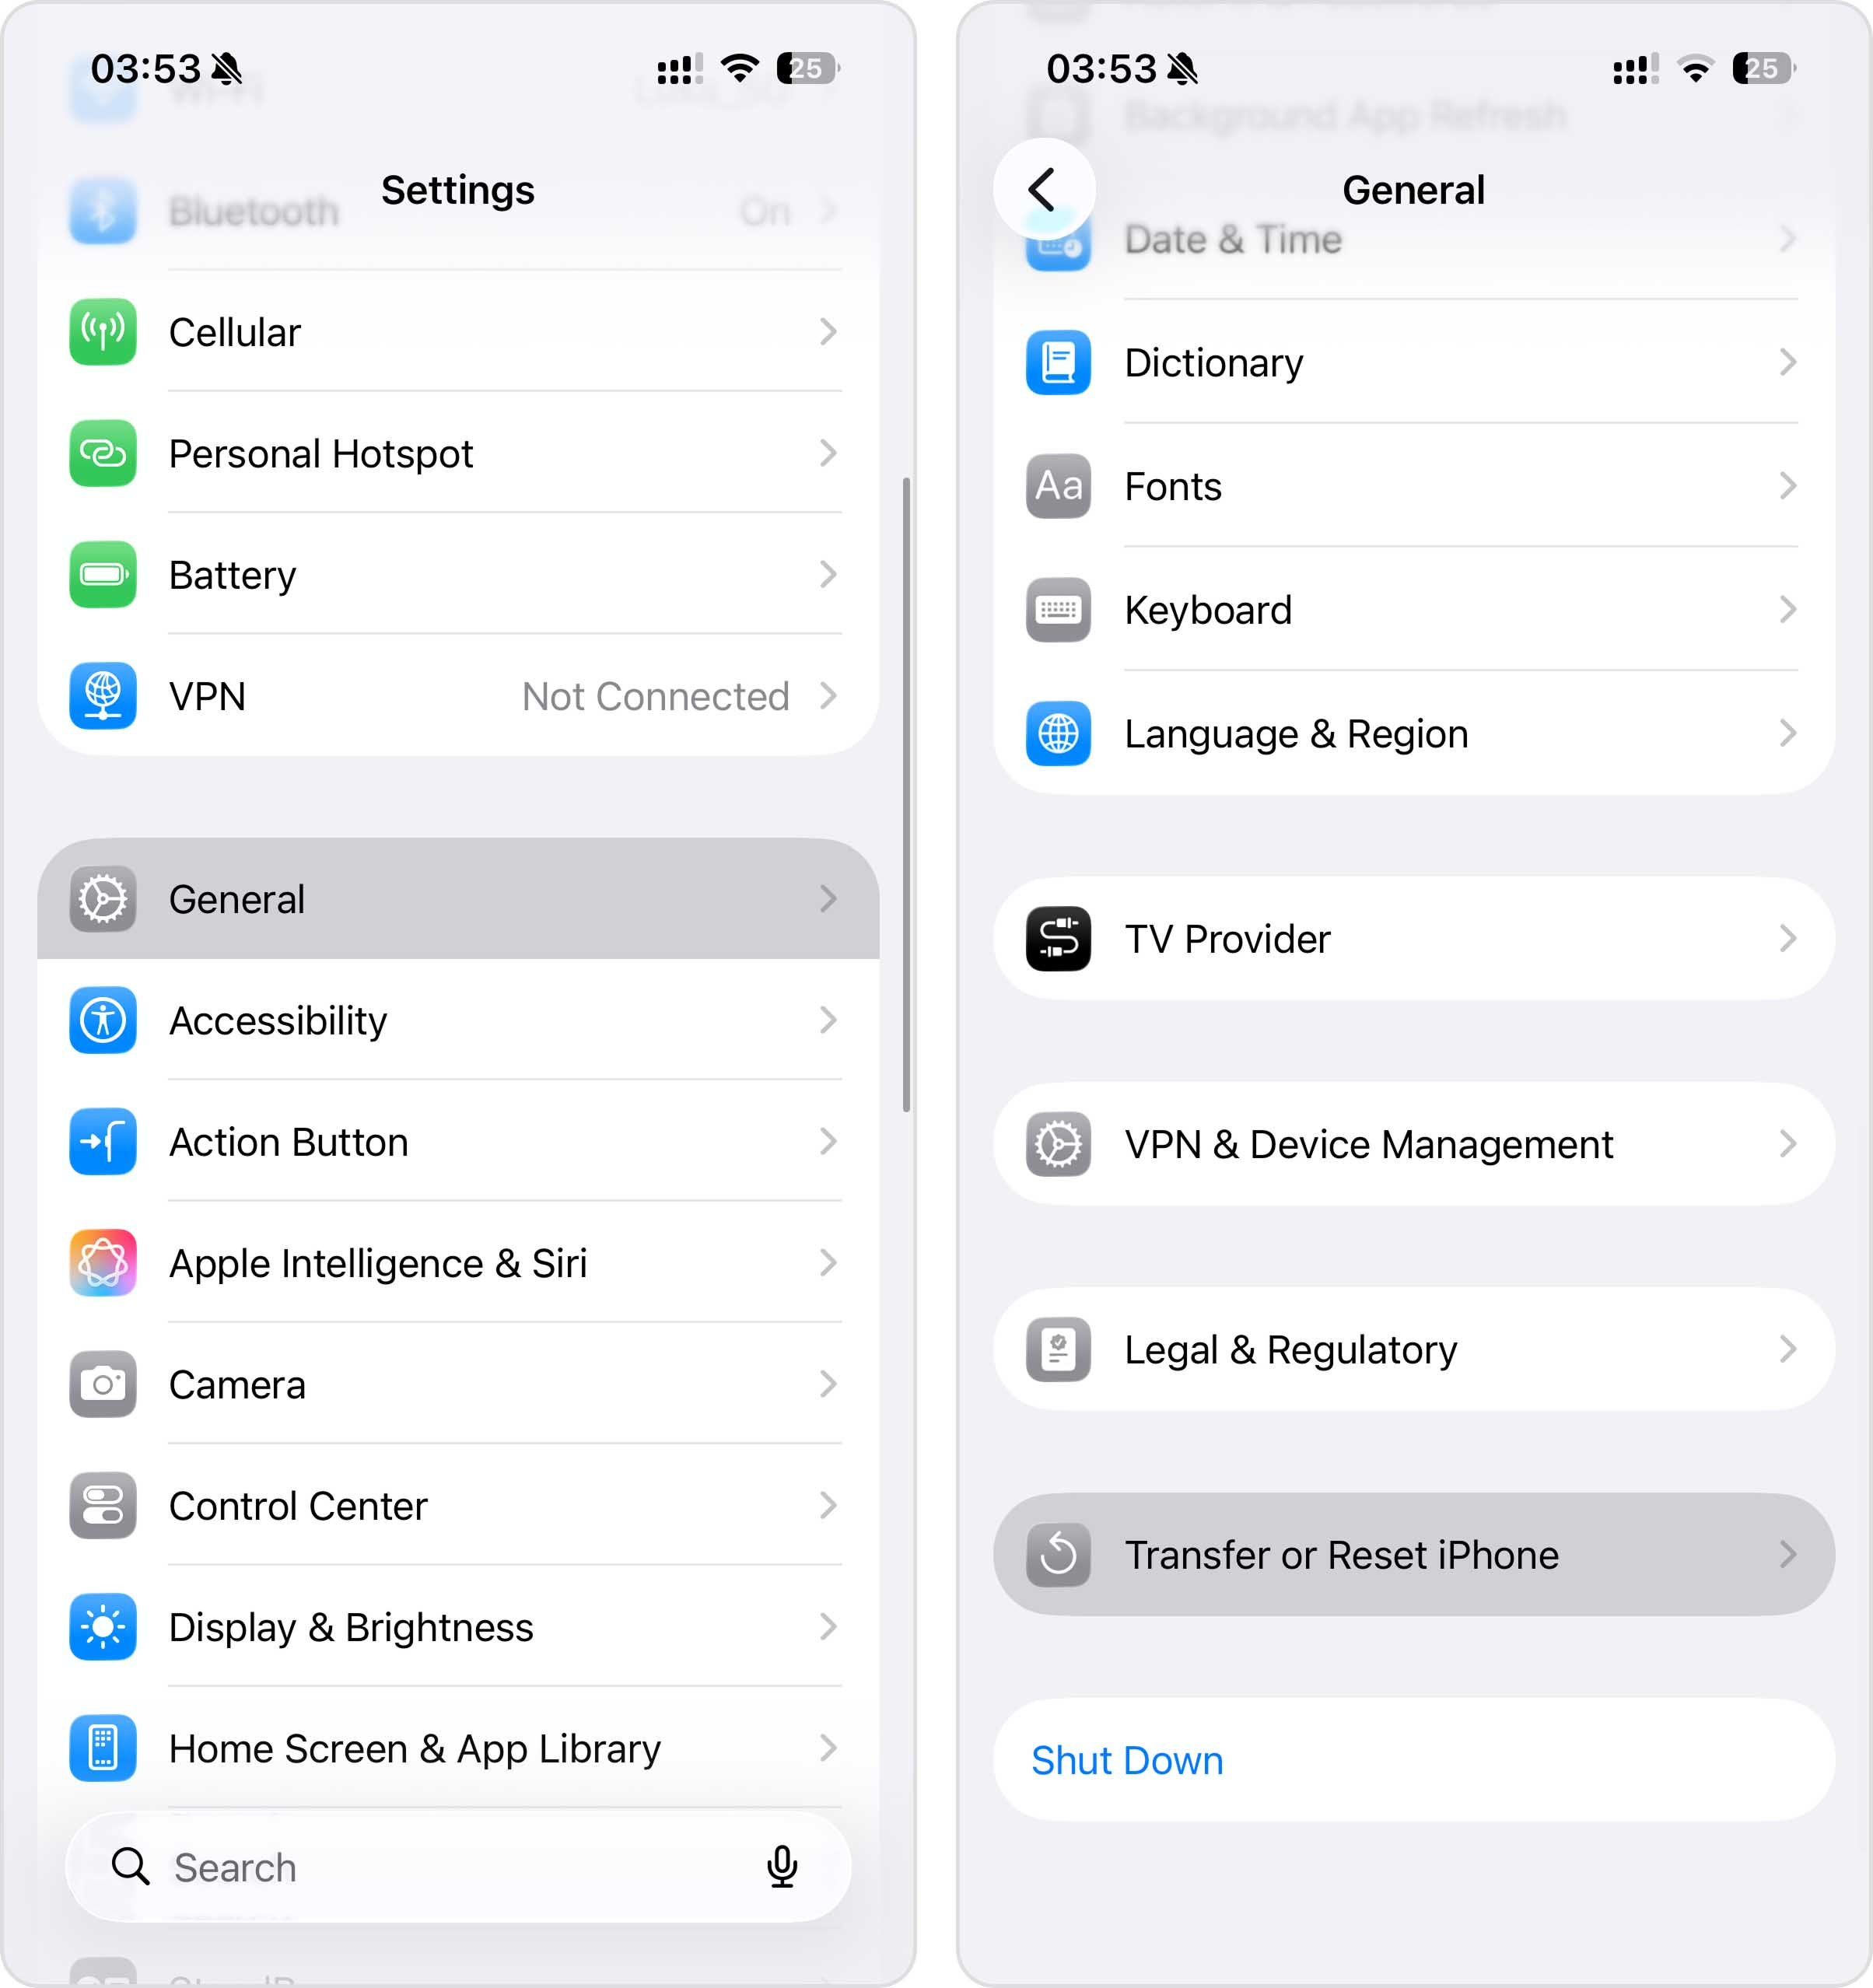
- If the backup is old enough, return to Settings and go to General > Transfer or Reset iPhone.
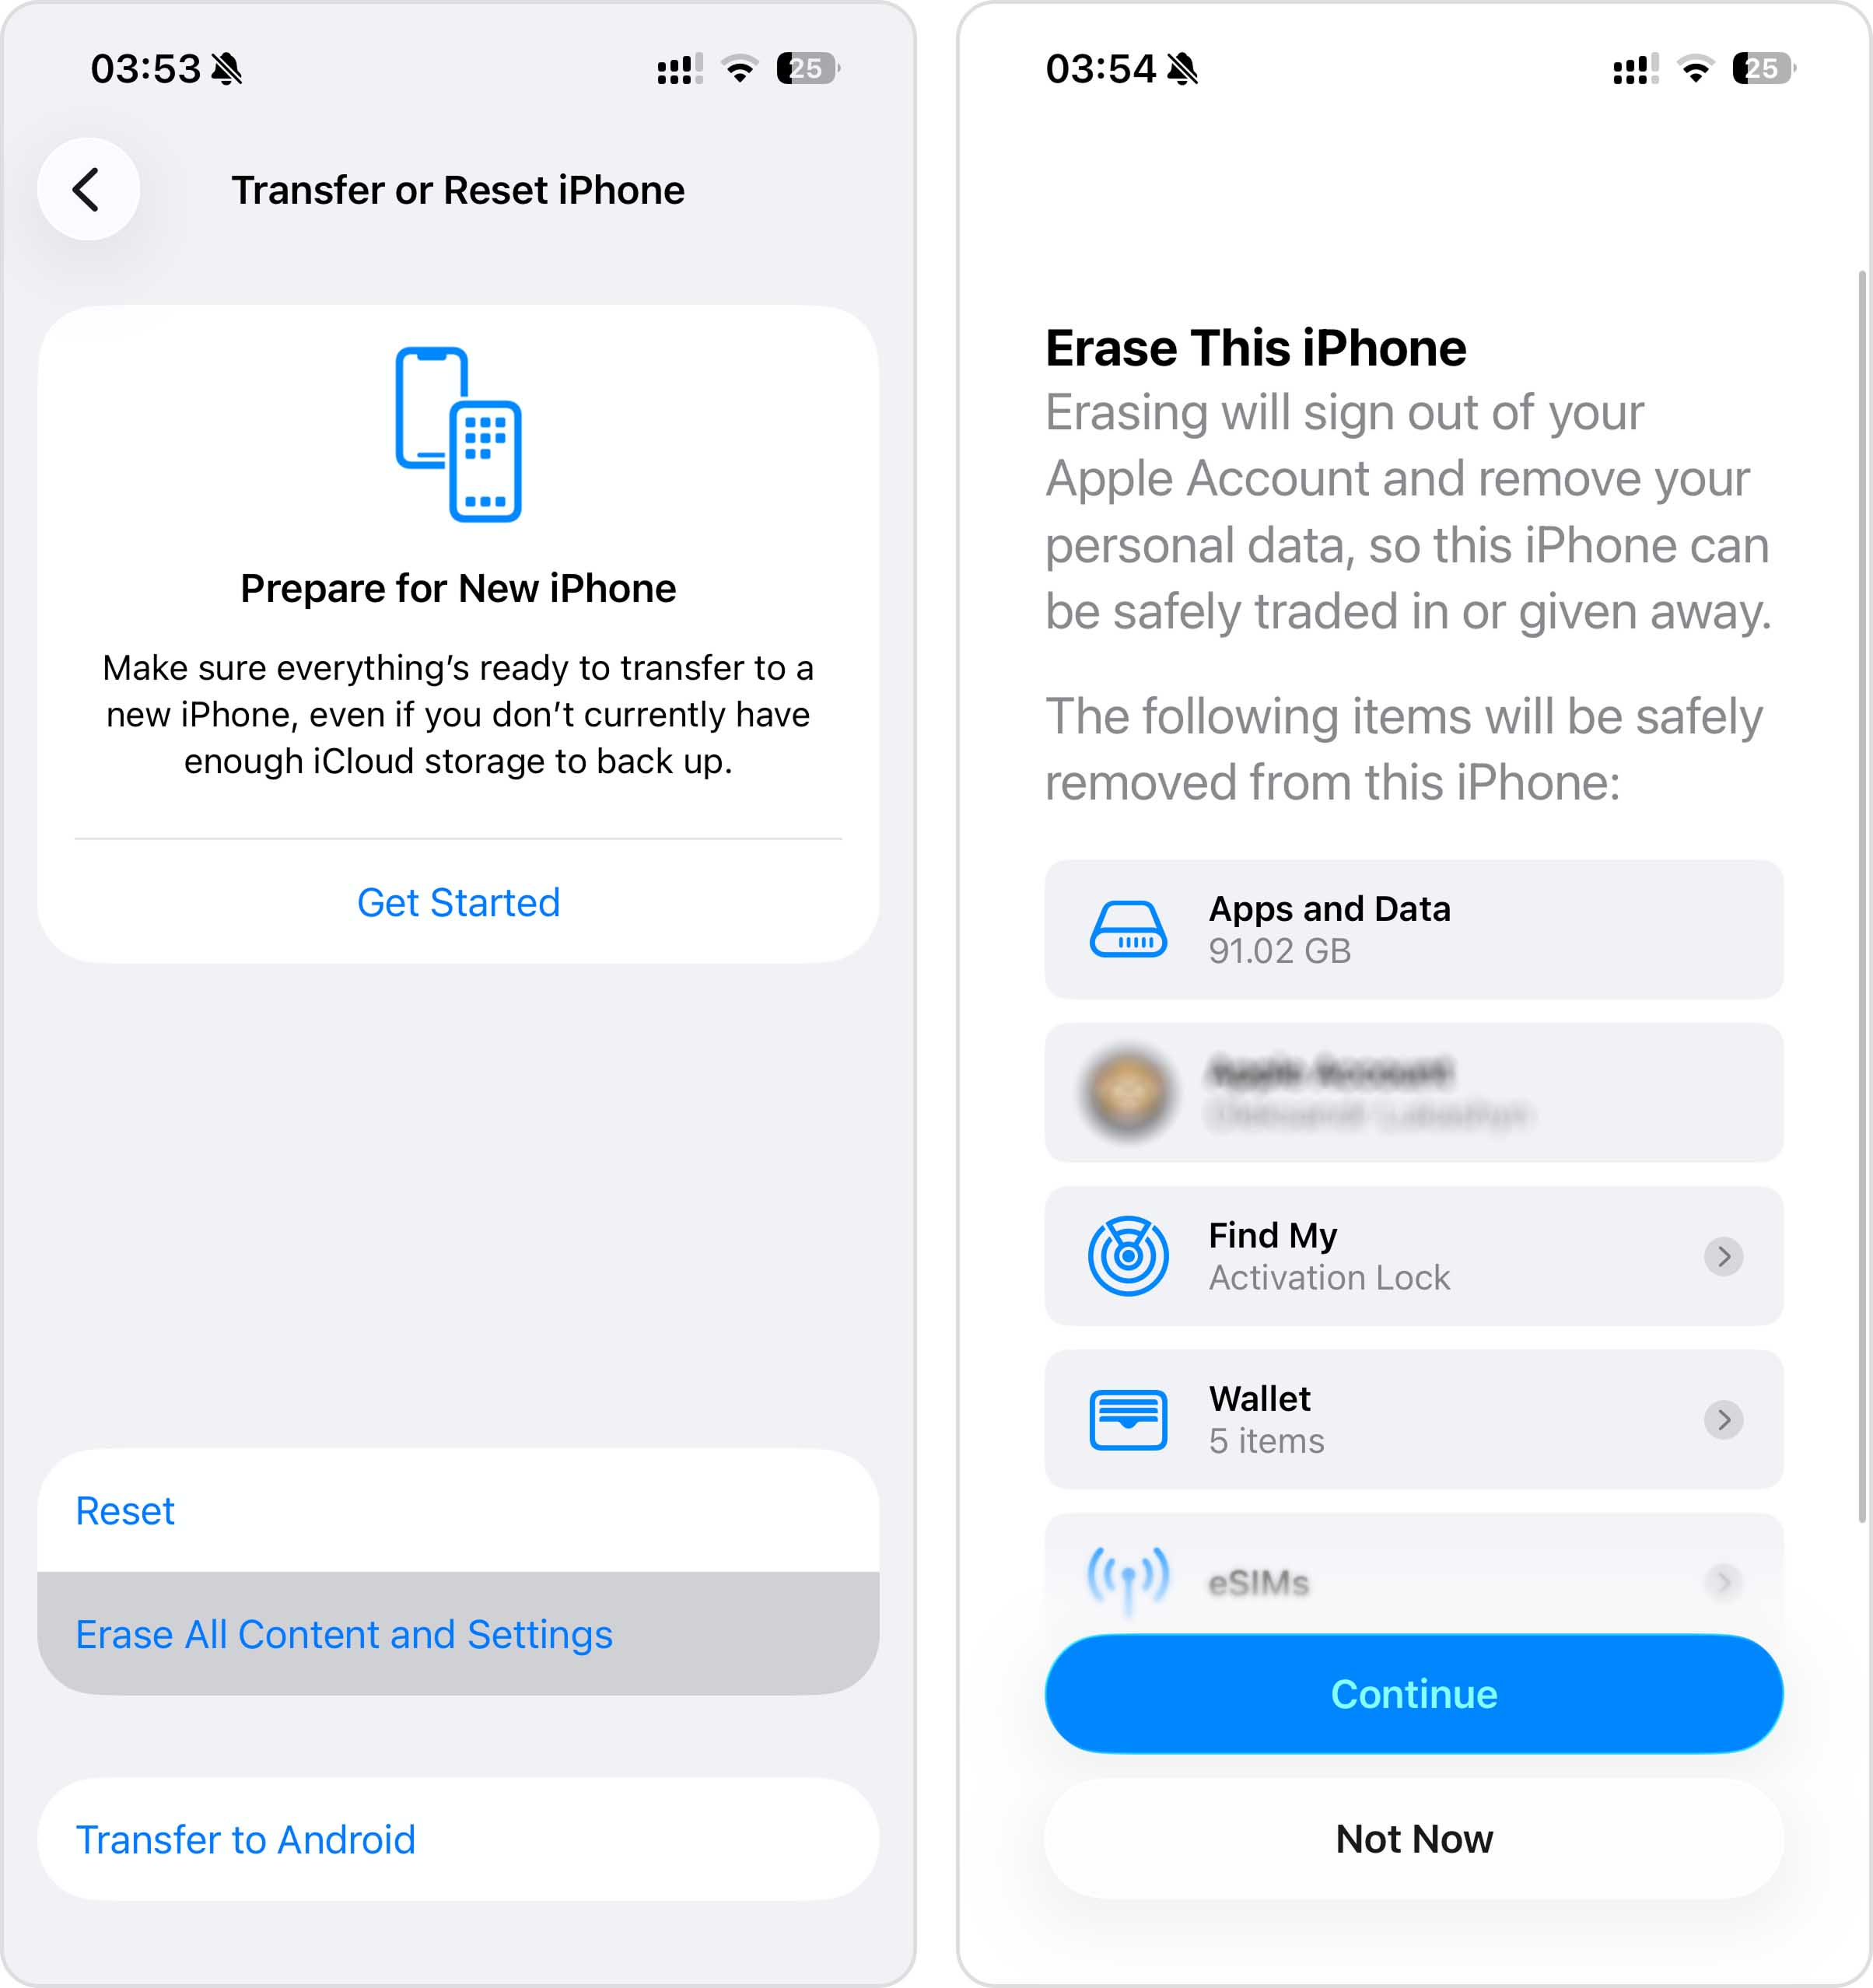
- Tap Erase All Content and Settings and follow the on-screen instructions until you reach the Apps & Data screen.
- Choose Restore from iCloud Backup, sign in to your Apple Account, and select the backup you checked earlier.
- Wait for the restoration to finish. Your iPhone will return to the state it was in when that backup was created, including your photos if they were part of the backup.
Option 3: Restore From a Finder/iTunes Backup
If you’re not a fan of iCloud backups, you may have created local backups instead. Unlike iCloud, these backups are stored on your computer and can be used to restore your iPhone to an earlier state, including photos that existed when the backup was created.
On Macs running macOS Catalina or later, local iPhone backups are managed in Finder. If your backup was created before the photos were deleted, you can use it to restore your iPhone. All you need is your iPhone, a USB cable, and the Mac that contains the backup.
Restoring a Finder backup replaces all current data on your iPhone with the contents of the selected backup. If you’ve added new photos, messages, or other important data since that backup was created, make sure to save them elsewhere before proceeding. Also, keep in mind that if iCloud Photos is enabled, your local Finder backup doesn’t include your photo library because your photos are stored and synced through iCloud instead.
If you’re using an older Mac (macOS Mojave or earlier) or a Windows PC, local iPhone backups are managed through iTunes. The recovery process is nearly identical, so you can follow the same steps using iTunes instead of Finder.
Follow these steps to recover your deleted photos on your iPhone from a Finder backup:
- Open Finder on your Mac (click the first icon on the Dock).
- Connect your iPhone to the computer using a USB cable.
- Click iPhone from the sidebar in Finder and choose Trust. Enter your phone’s passcode if prompted.
- Select your iPhone on the sidebar on the left in Finder.
- Click the Restore Backup button.
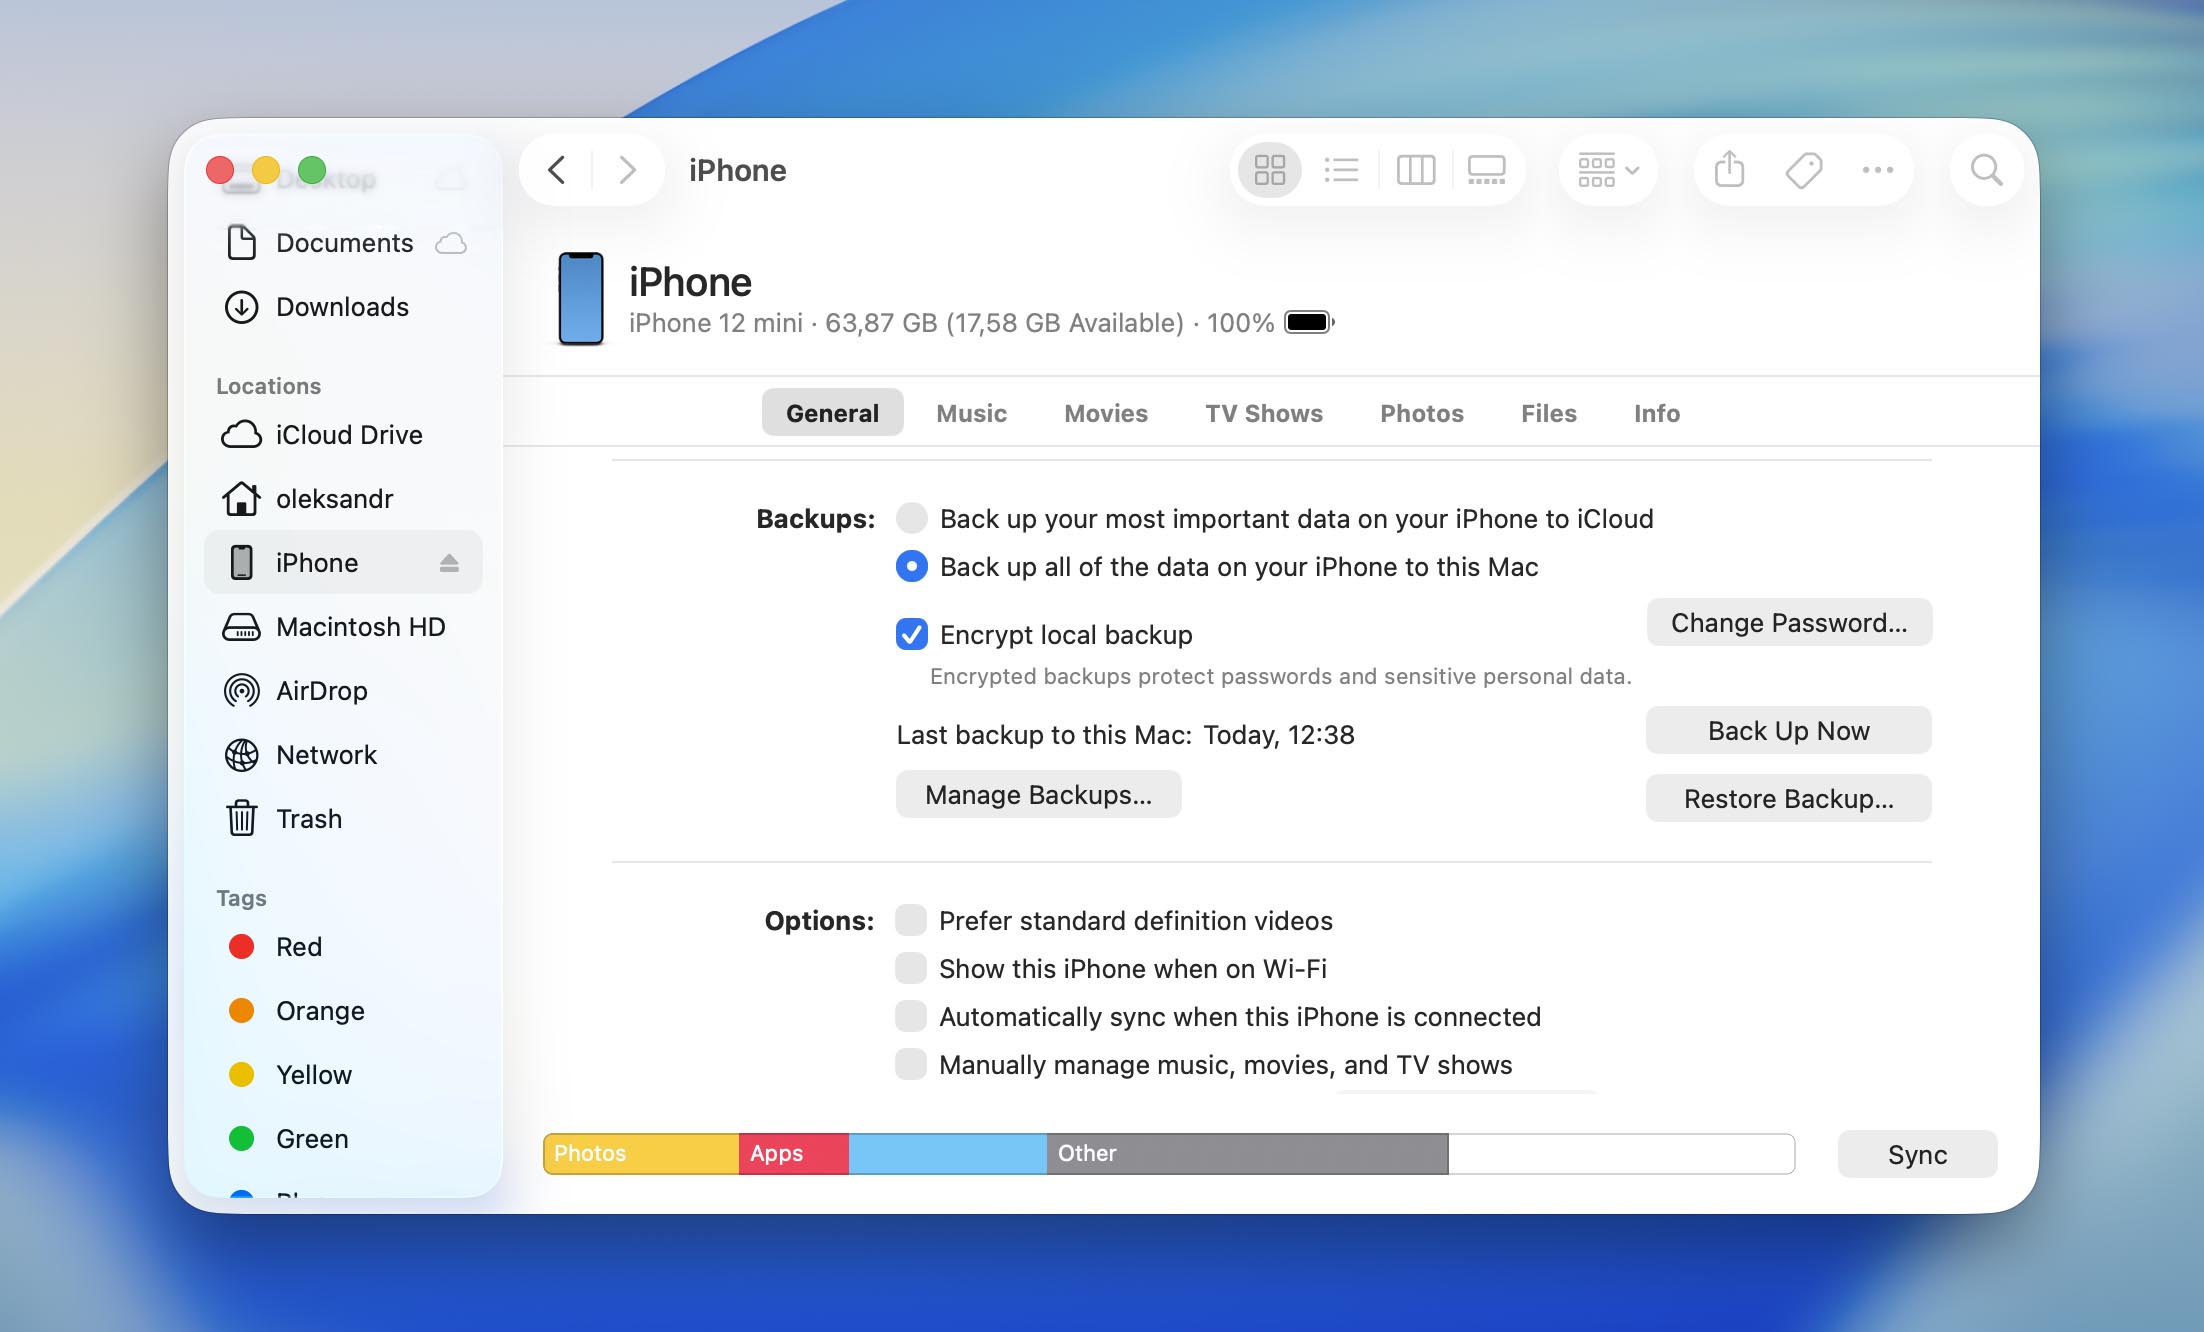
- Choose the suitable backup version.
- Enter your passcode if prompted and click Restore.
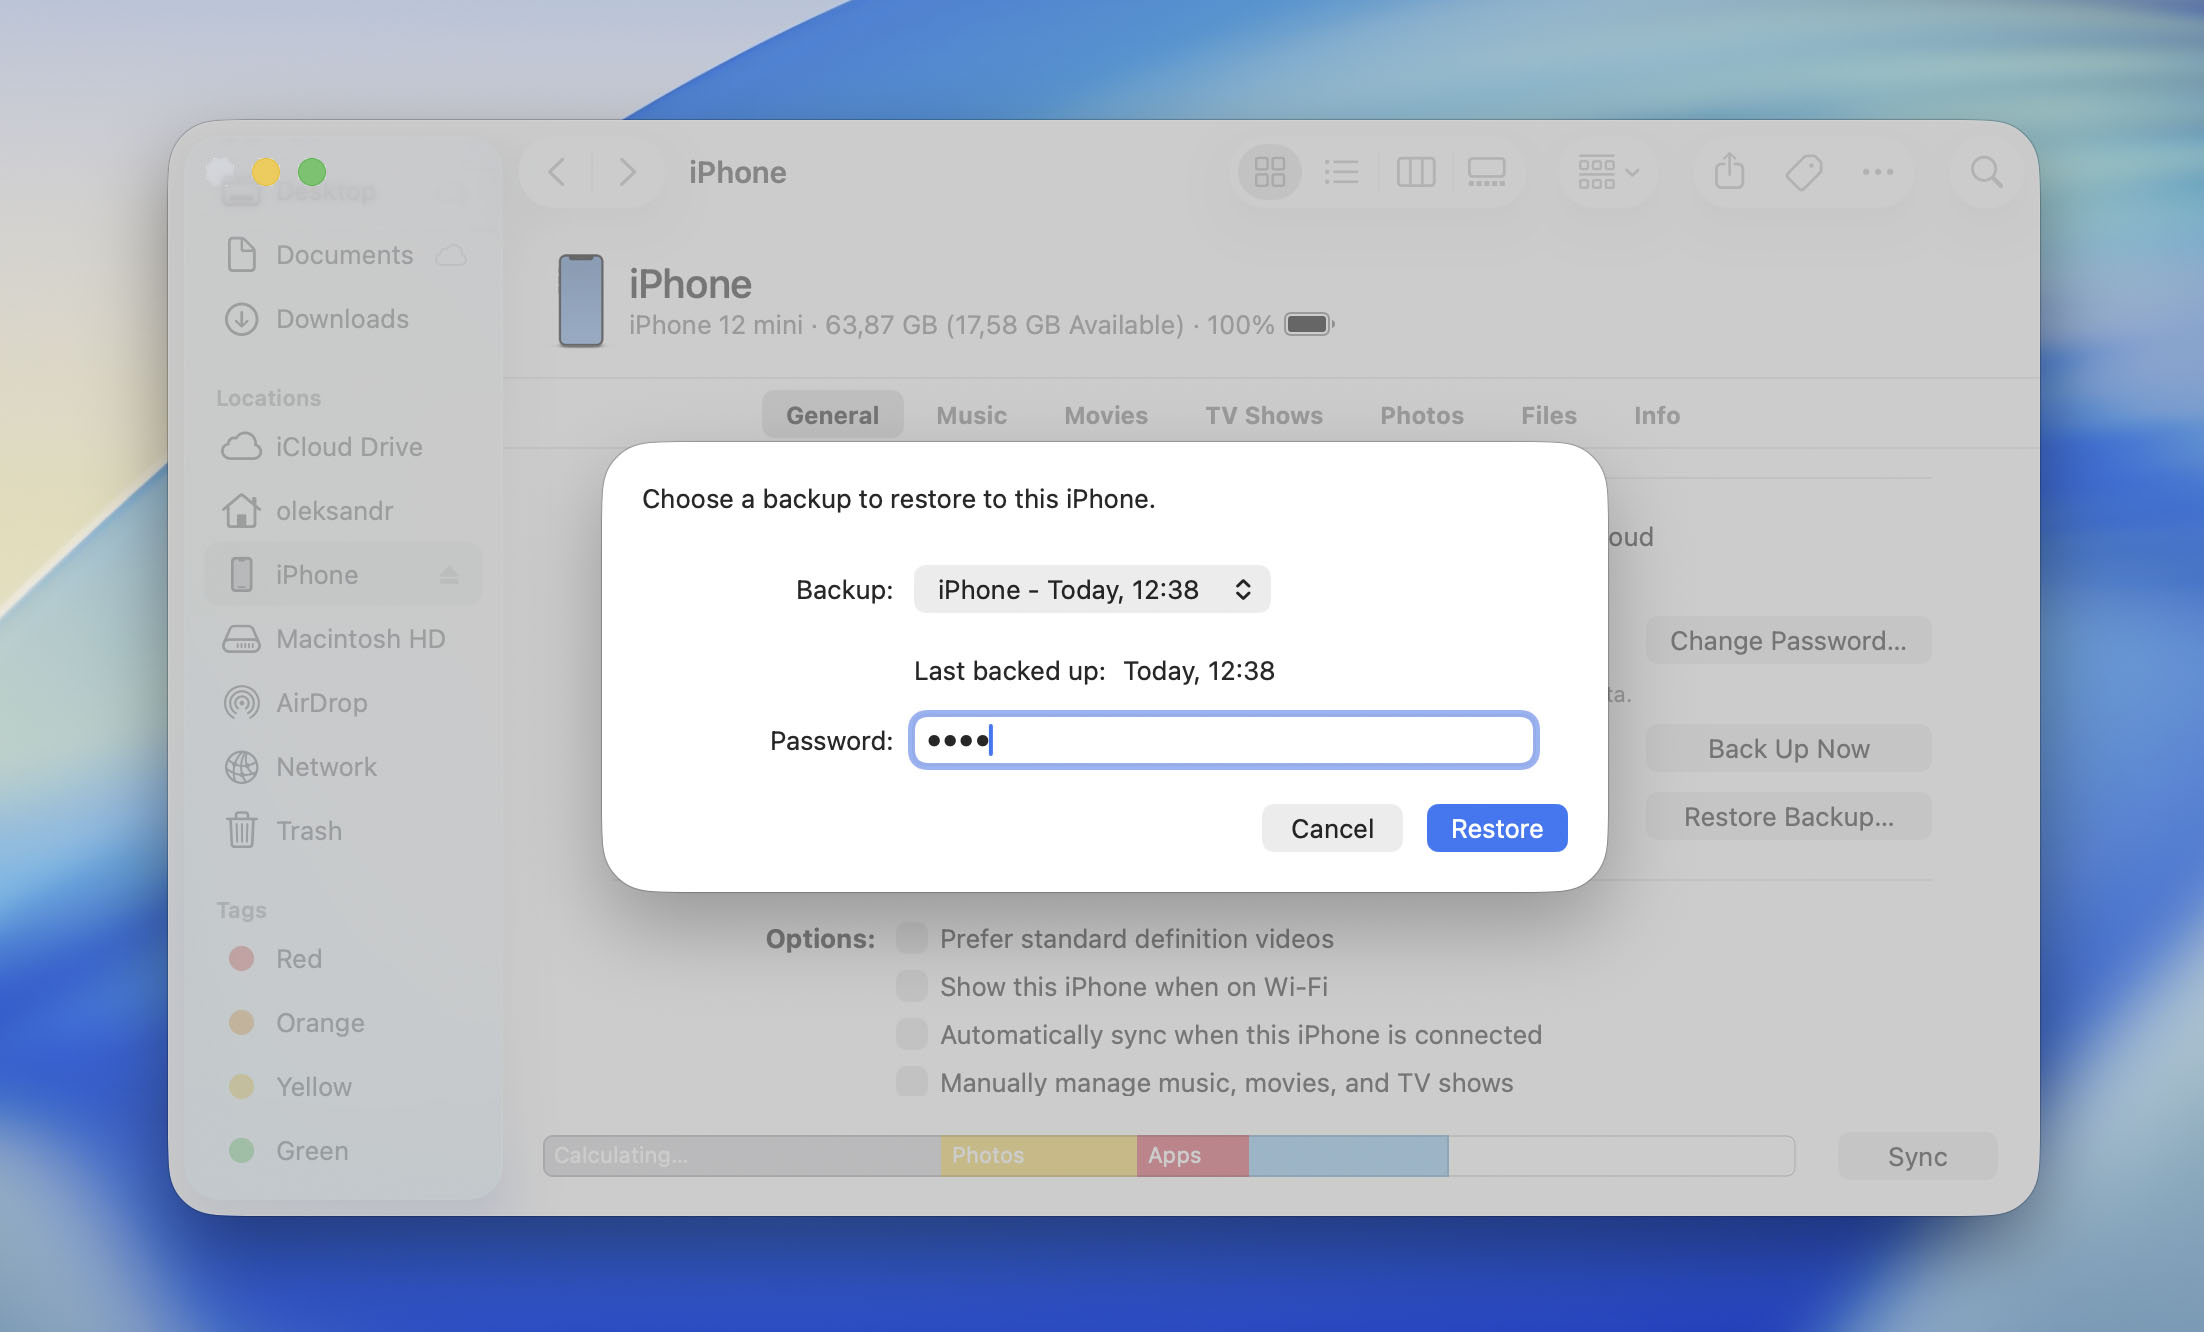
- Wait for the process to finish and then disconnect your phone from the computer.
Option 4: Recover Permanently Deleted Photos with Data Recovery Software (Mac Required)
Option 4.1: Scan Your Connected iPhone
If you want to try to recover permanently deleted photos from iPhone without a backup, a specialized data recovery tool is your option.
Among the many available solutions, we recommend Disk Drill because it’s reliable, fast, and easy to use. Just keep in mind that no data recovery software can bypass Apple’s encryption or gain direct access to your iPhone’s internal storage. Instead, Disk Drill creates a temporary backup of your iPhone through Apple’s backup API and scans it for deleted photos. If your photos haven’t been completely removed yet and are still present in the data available through this backup, there’s a chance they can be recovered.
That said, don’t set your expectations too high. iPhones use a storage system that regularly removes the information needed to locate deleted files. Once that process is complete, recovering permanently deleted photos is usually no longer possible.
Note: Disk Drill needs enough free space on your Mac to create a temporary backup of your iPhone. Ideally, you should have at least as much available storage as your iPhone’s capacity. For example, if you have a 512 GB iPhone but only a 256 GB SSD in your Mac, you’ll need an external drive with at least 512 GB of free space (1 TB is recommended).
Here’s how to recover deleted photos from your iPhone using Disk Drill:
- Download Disk Drill on your Mac, and install it. The iPhone data recovery feature is only available for Disk Drill’s macOS version.
- Connect your iPhone to your Mac, and click tap the Trust option when you see the “Trust This Device” alert on your iPhone.
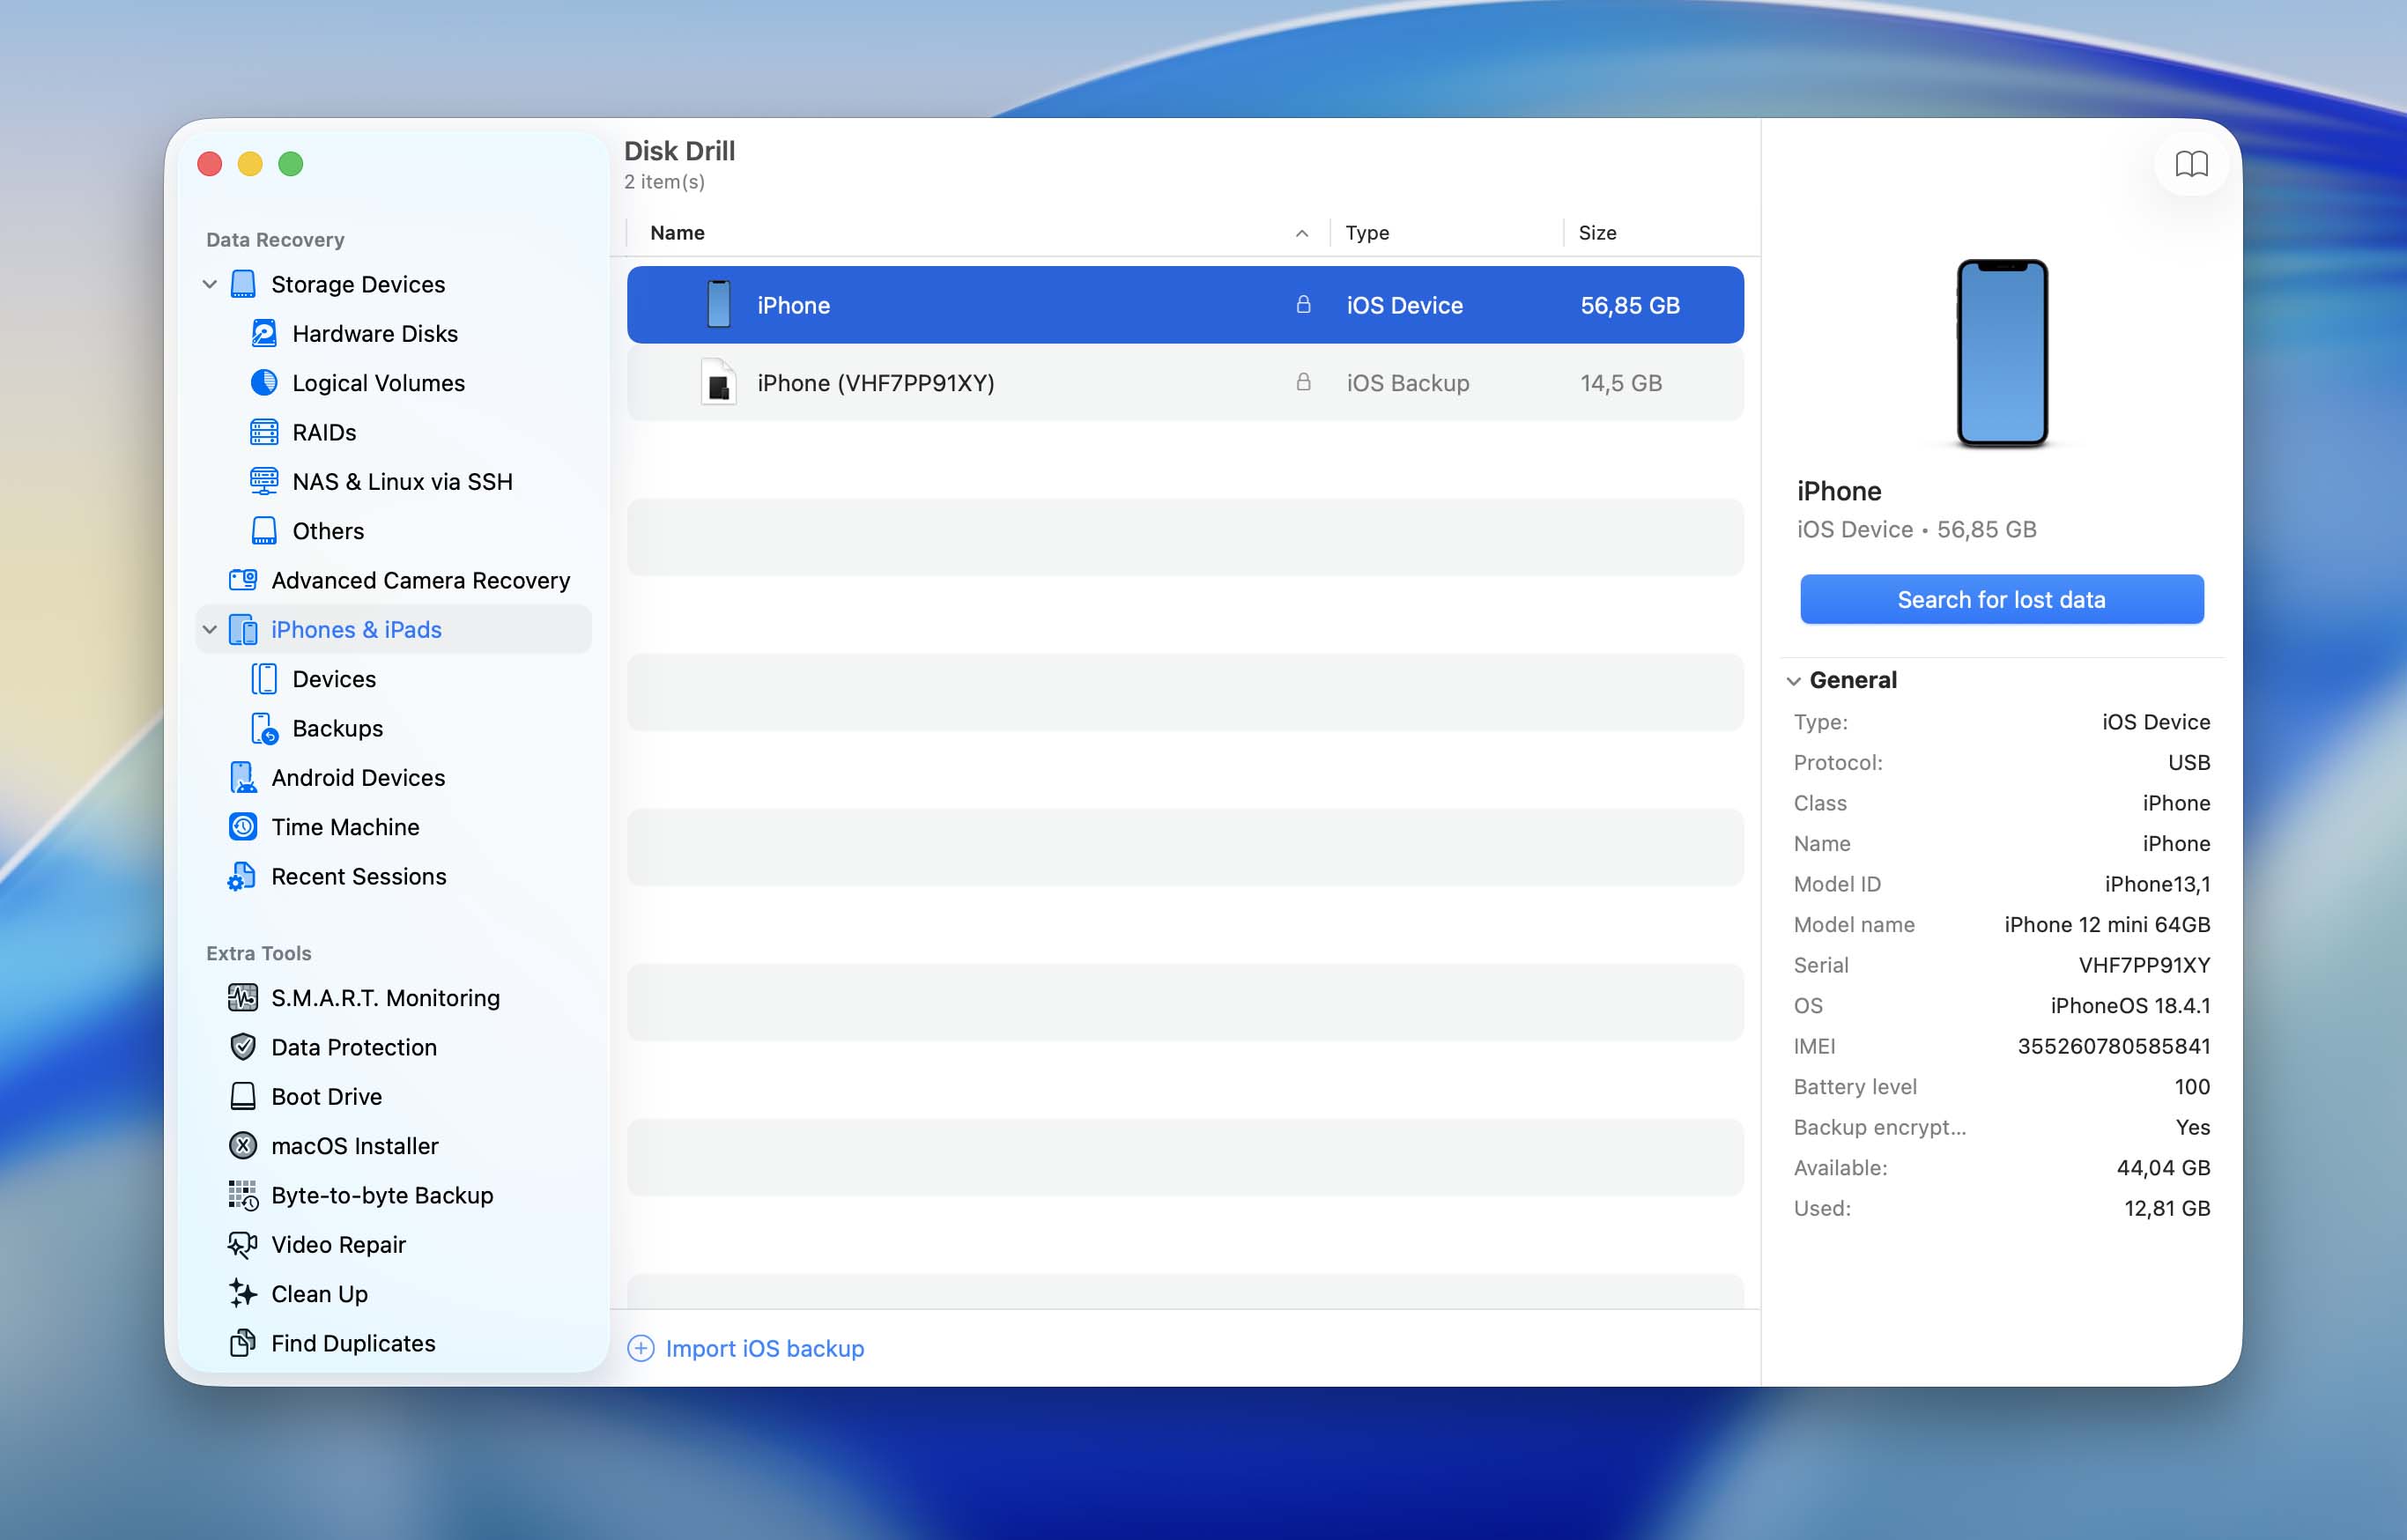
- Open Disk Drill, and click the iPhones & iPads option in the left navigation bar.
- Select your iPhone and click Search for lost data. You may be prompted to enter your device pass code.
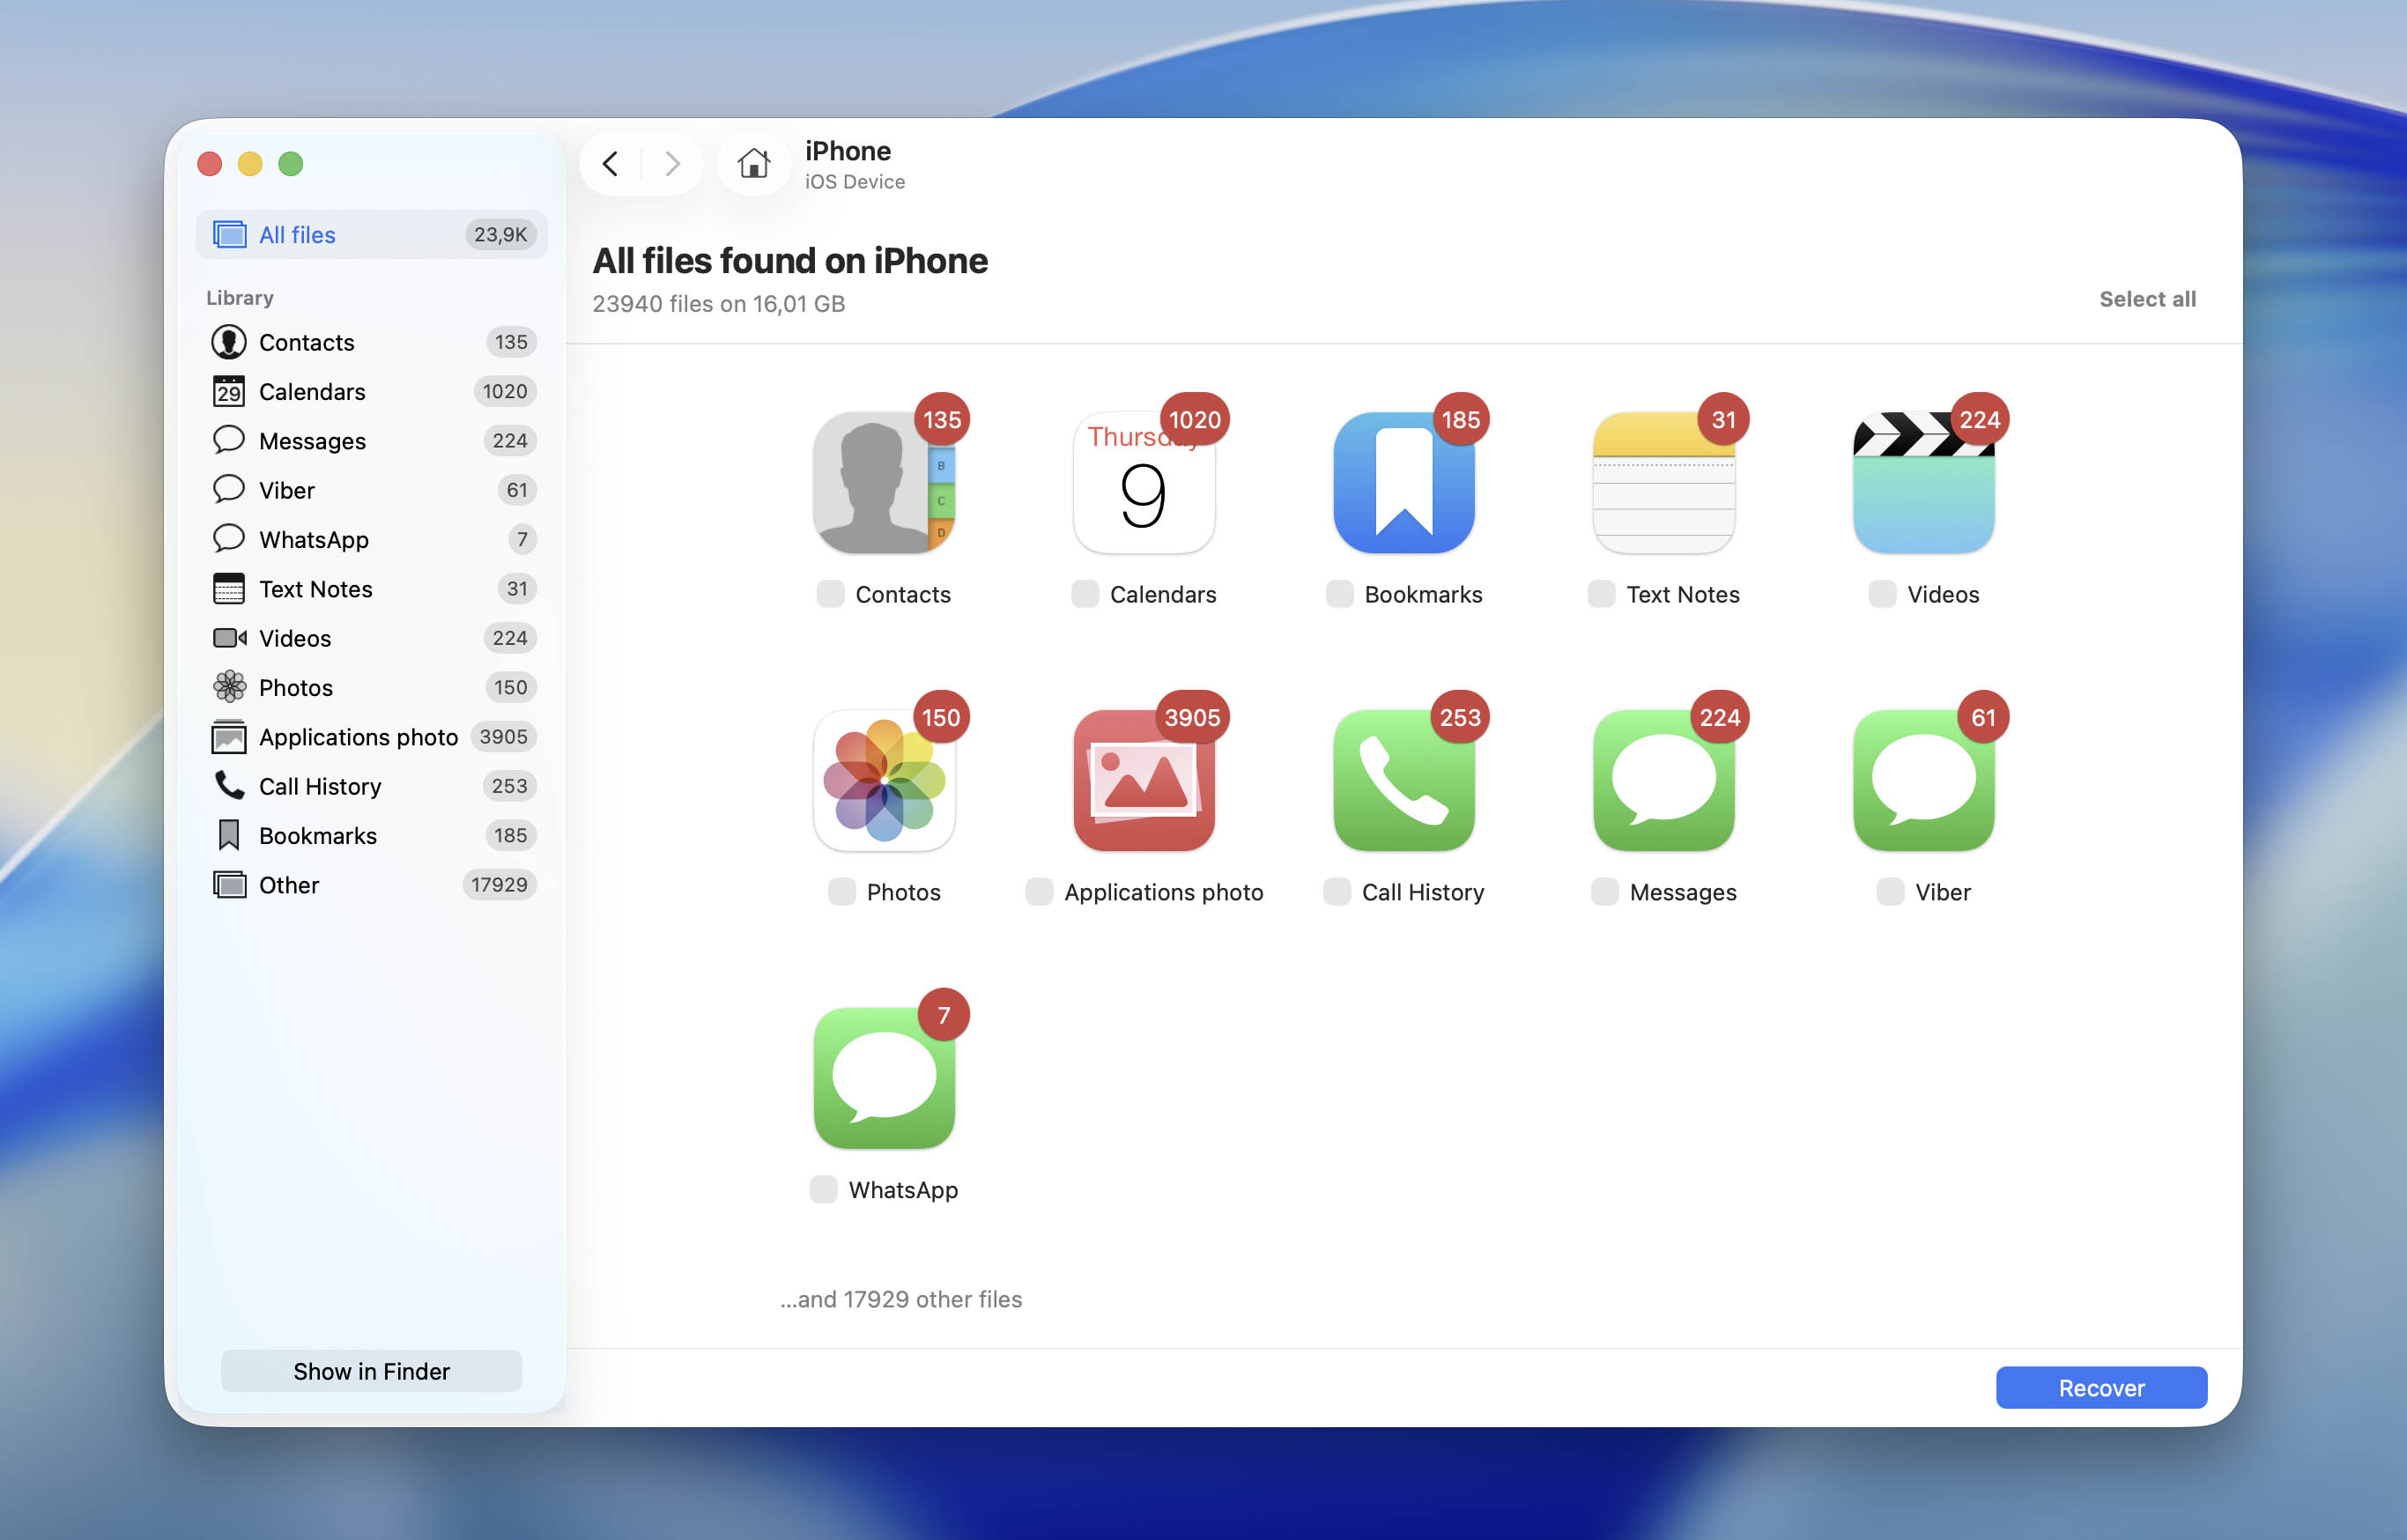
- Click on the Photos tile to filter the results to only view photos. To view other file types, click on the other apps like Messages, WhatsApp, Videos, etc.
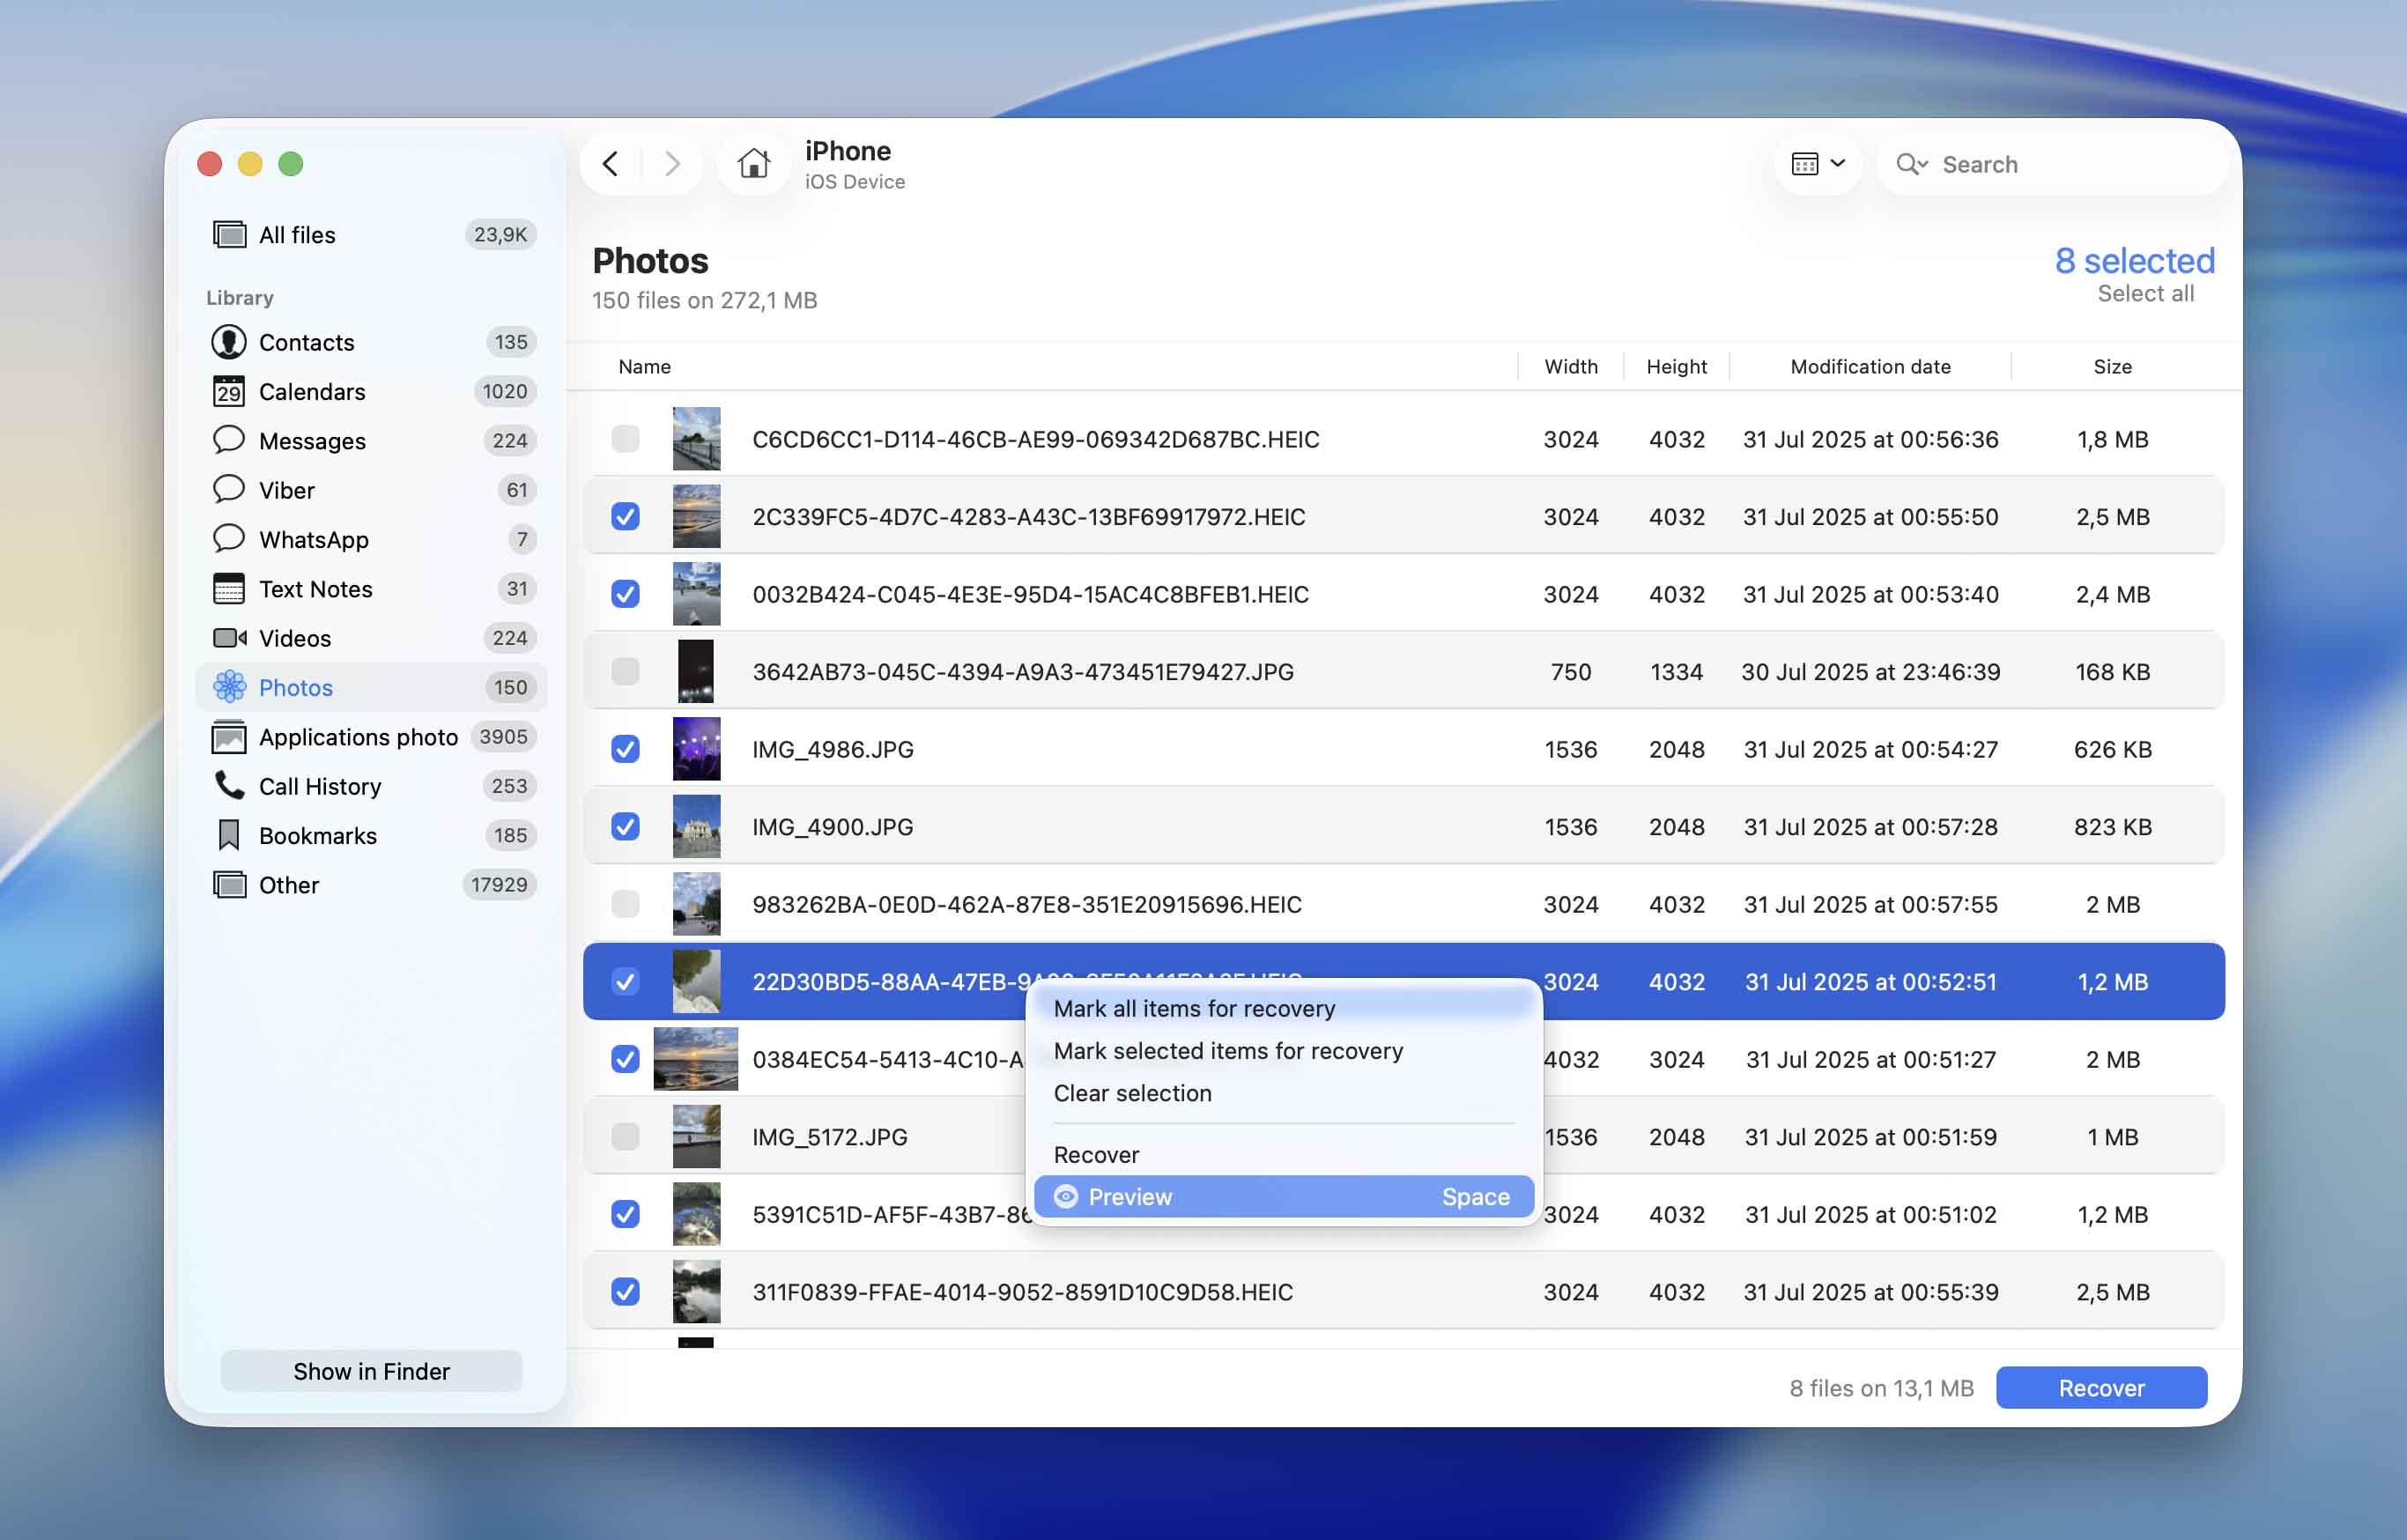
- Select the files you wish to recover and click Recover. To preview a file, right-click it and choose Preview.
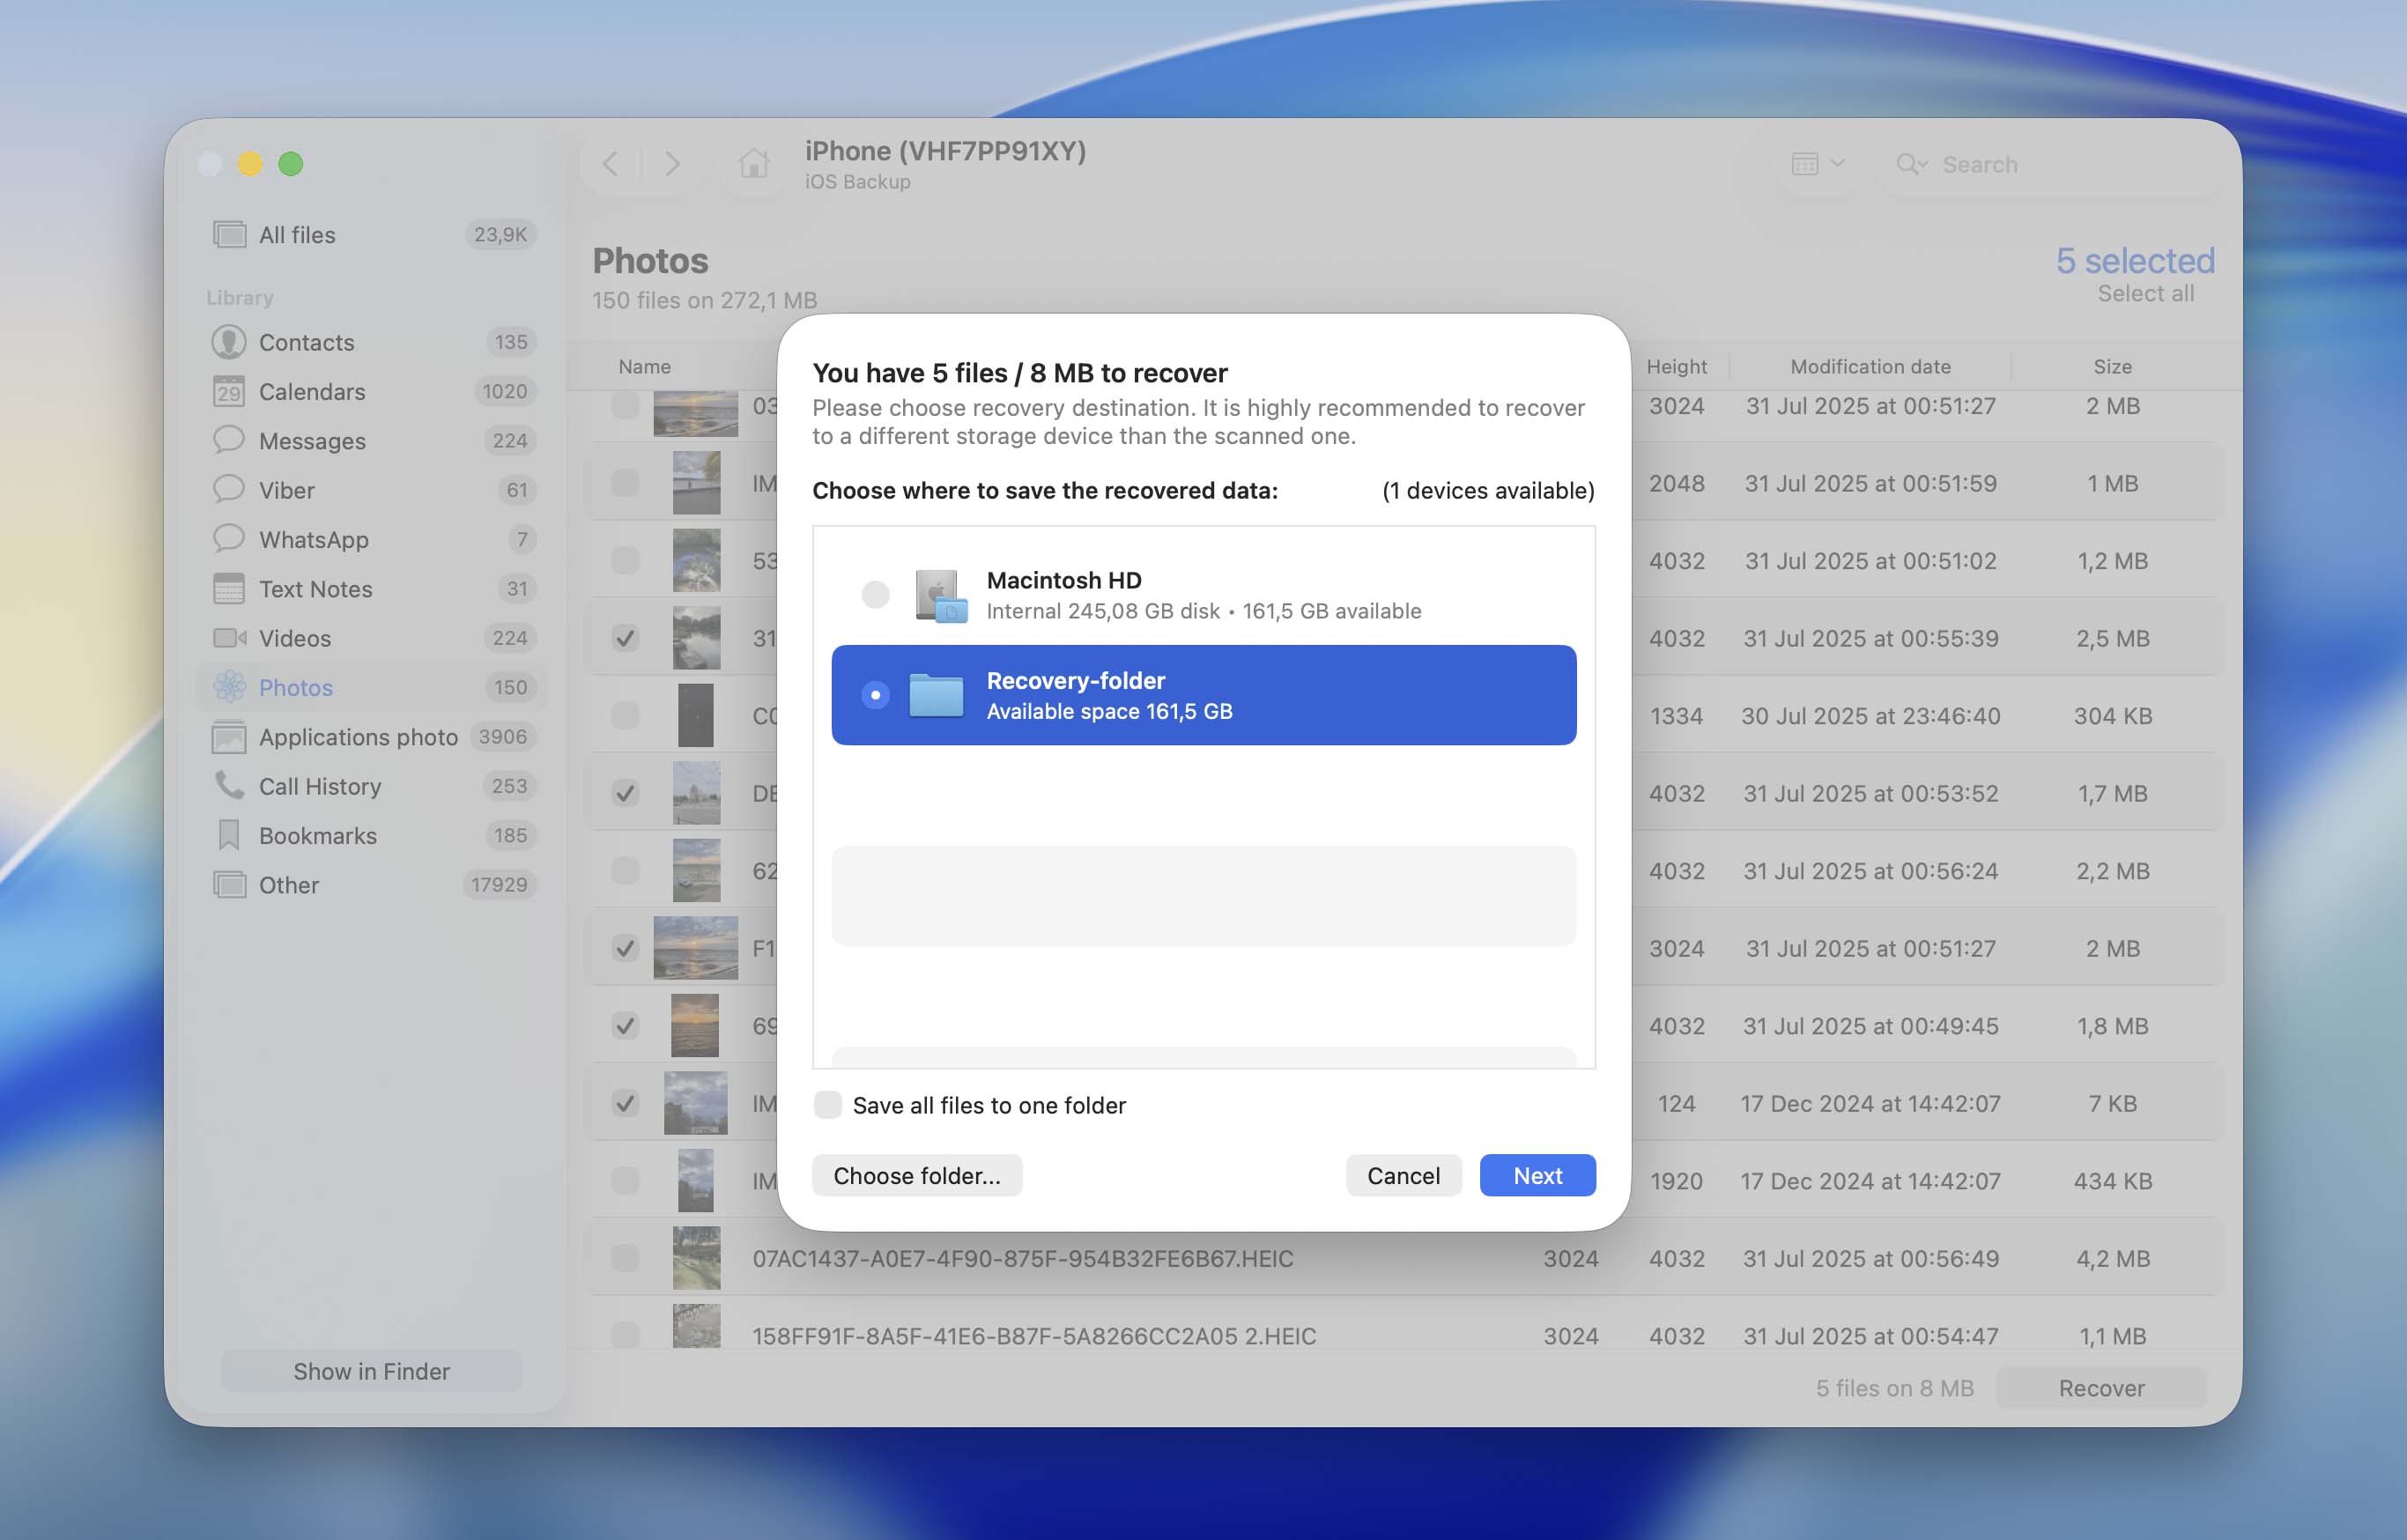
- Choose a recovery destination and click Next.
- Disk Drill will recover the selected photos.
Option 4.2: Scan a Finder Backup with Disk Drill
Given the way iPhones store and protect data, scanning an existing Finder backup is often a much more practical use of data recovery software than scanning the iPhone itself. Instead of restoring your entire iPhone to an older backup, you can extract only the photos you need. This means you won’t lose photos, messages, apps, or other data that were added after the backup was created, nor will you bring back content you’ve already removed from your device.
Fortunately, Disk Drill can scan Finder backups directly and recover individual files from them. In our test, it scanned a 256 GB Finder backup in about 15 minutes and successfully recovered all 10 deleted photos we were looking for.
- Download and install Disk Drill if you haven’t already.
- Launch the app and select iPhones & iPads from the left sidebar.
- Open the Backups section and click Import iOS Backup at the bottom of the window.
- Select your Finder backup and click Search for lost data.
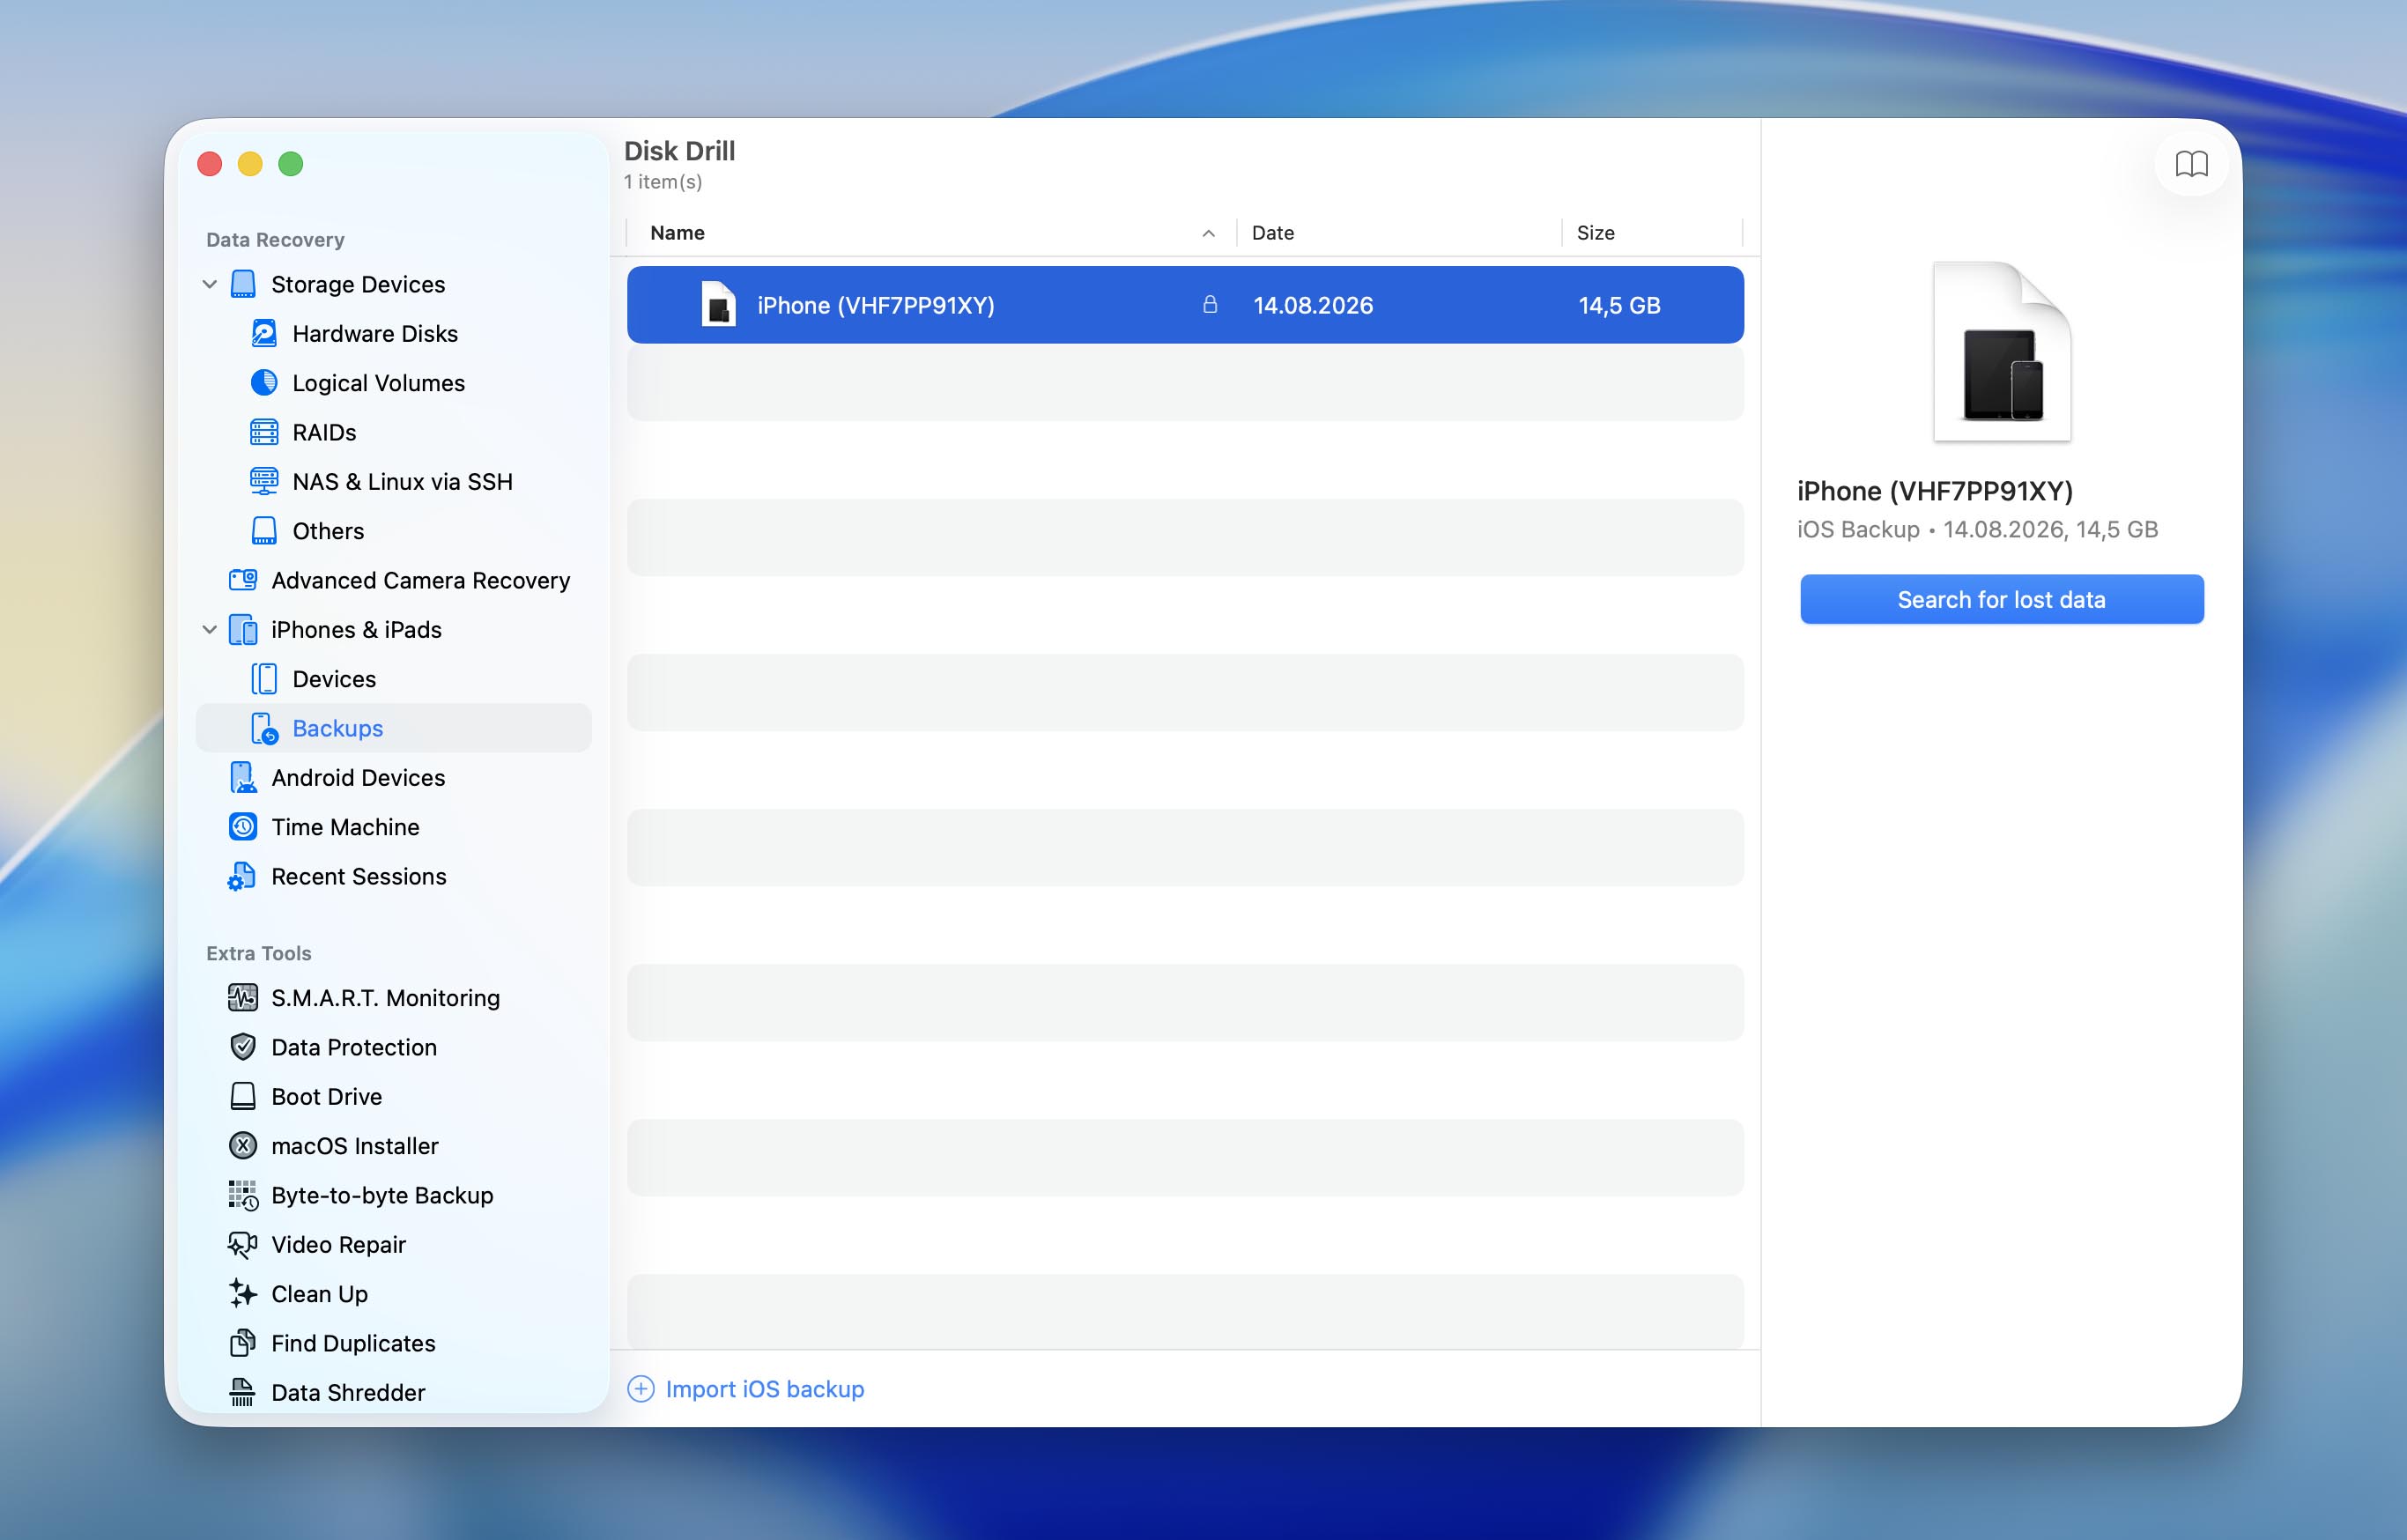
- Once the scan is complete, open the Pictures category and preview the recoverable photos.
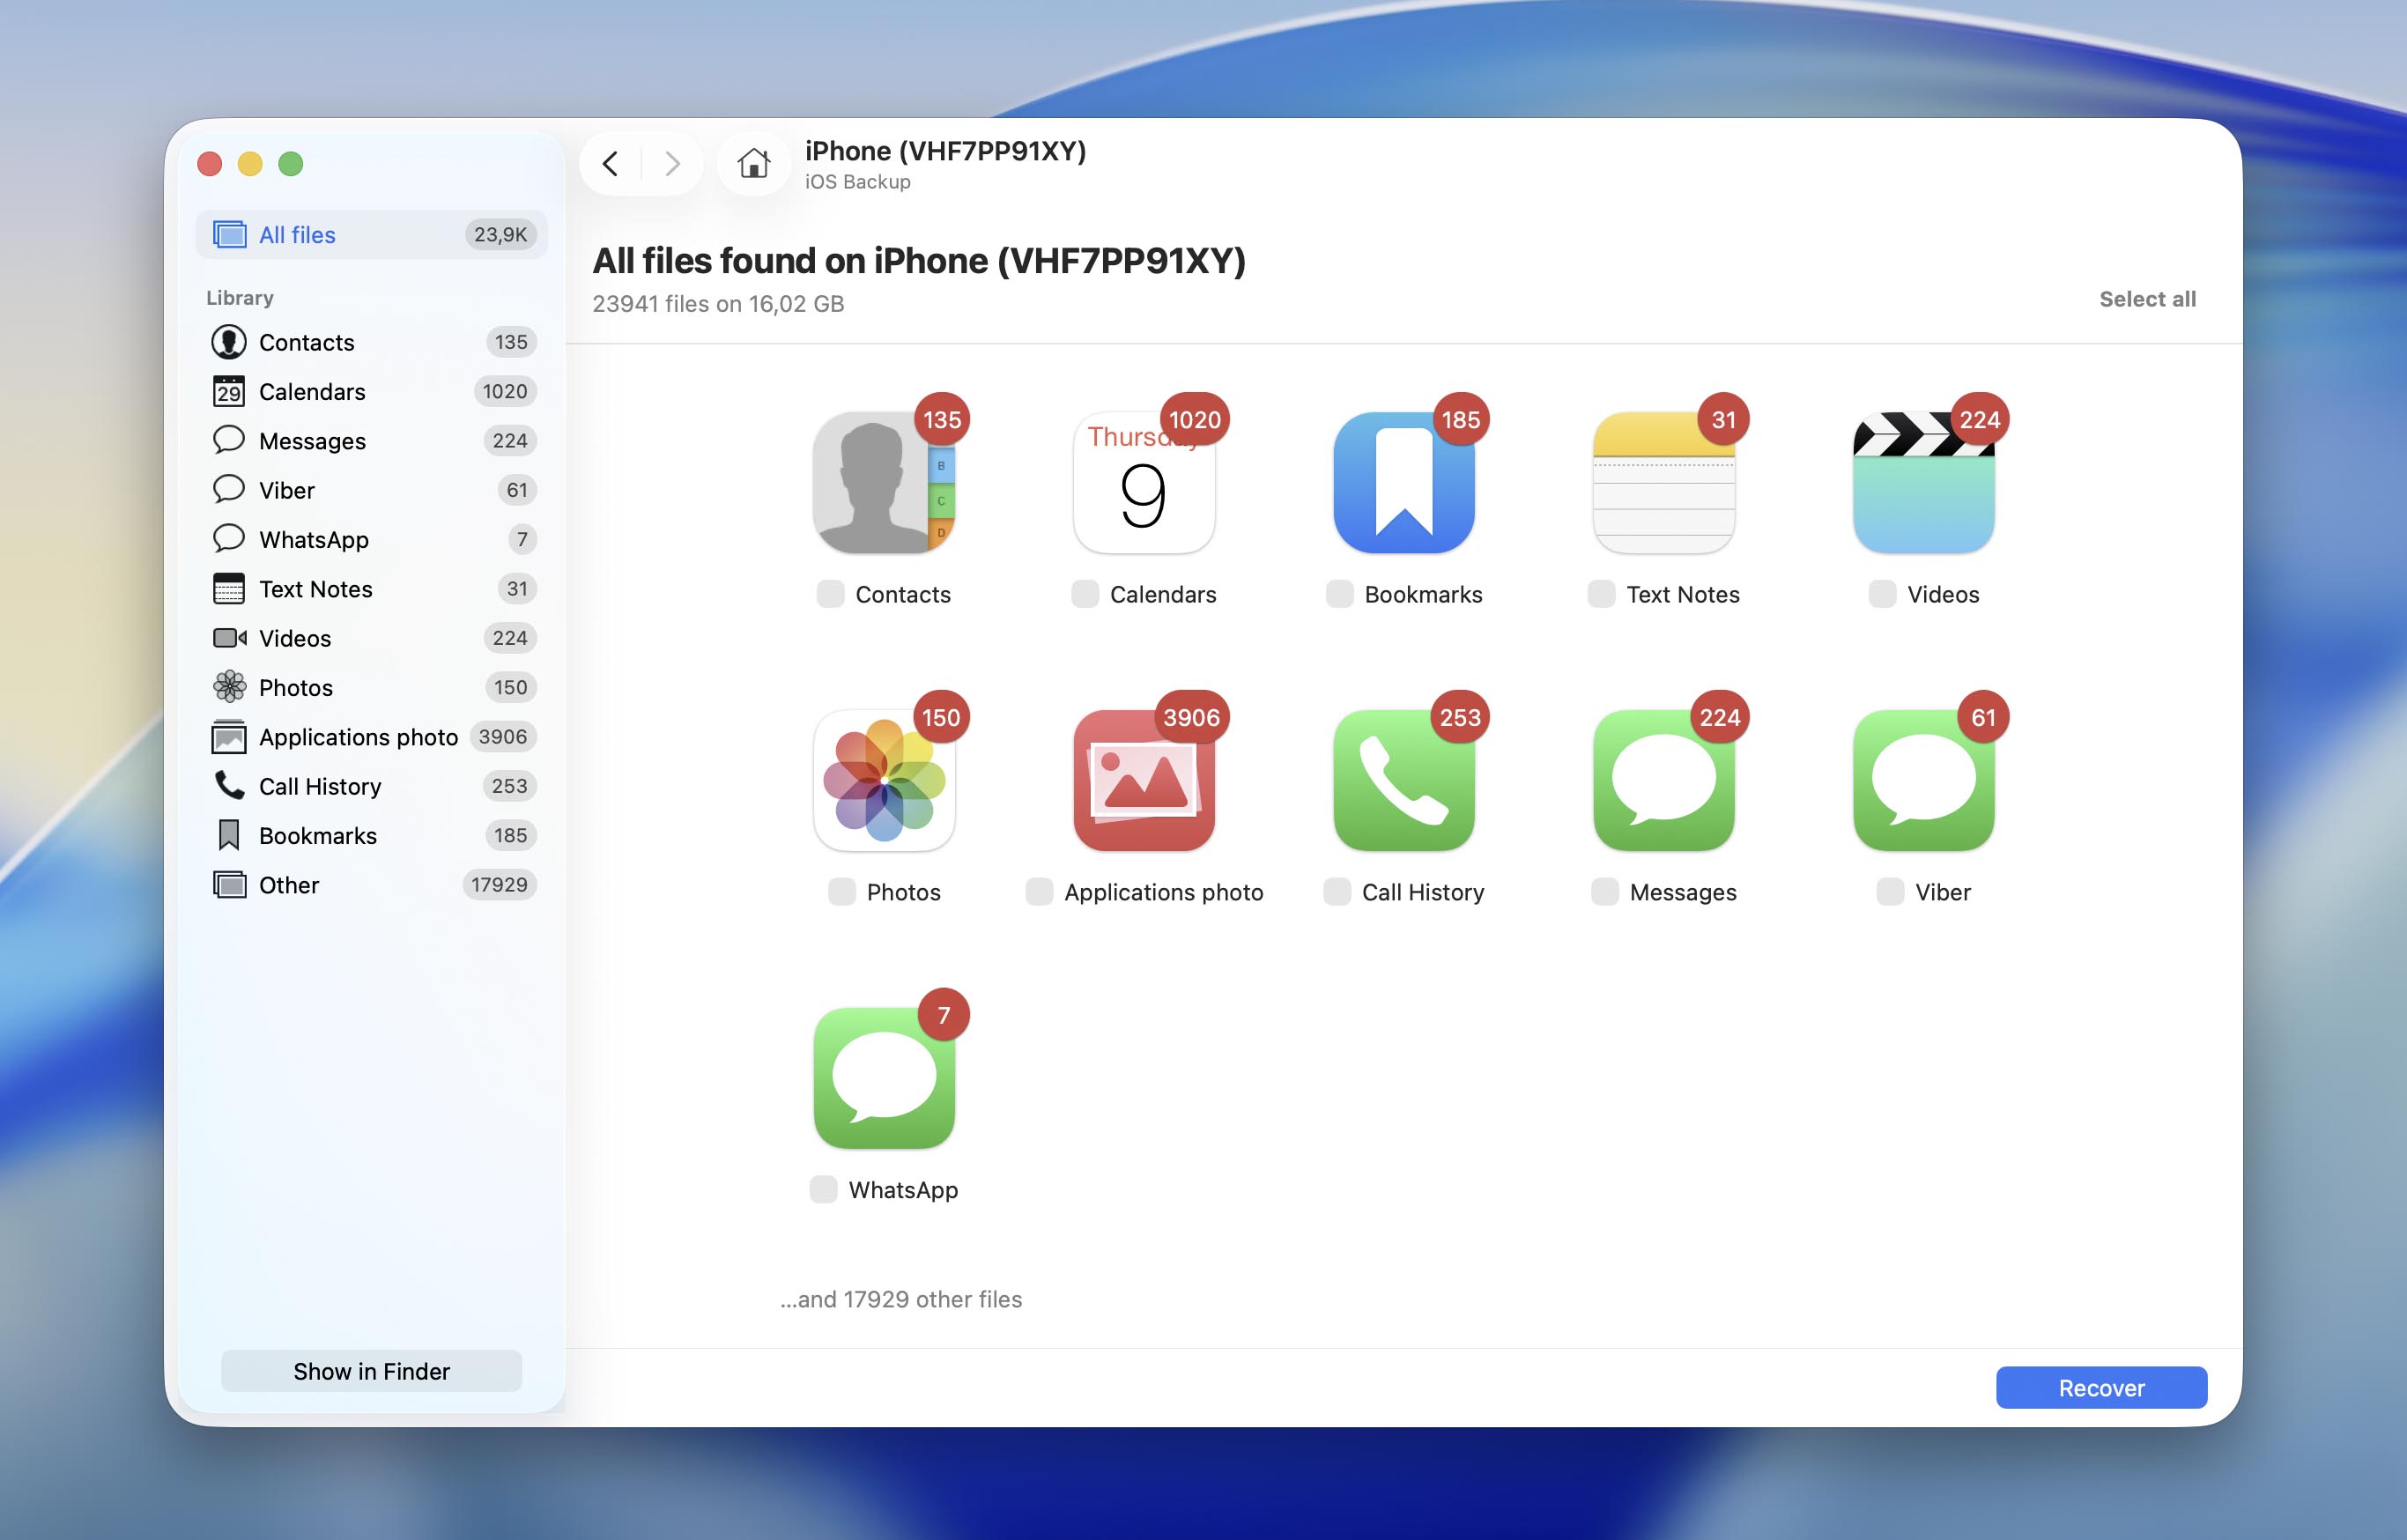
- Select the photos you want to recover and click Recover.
- Save the recovered photos to your Mac, then transfer them back to your iPhone using the method that’s most convenient for you, such as AirDrop, Finder, or iCloud Photos.
Disk Drill lets you scan your iPhone or Finder backup and preview all recoverable files for free. If the scan finds the photos you’re looking for, you can then decide whether upgrading is worth it. For a closer look at its pricing, supported recovery scenarios, and additional features, check out the full Disk Drill review.
Option 5: Restore From Other Online Cloud Storage
Many iPhone users choose to backup to the cloud only selected photos. For such a purpose, they usually use online cloud storage like Dropbox, Google Drive, Amazon Photos, OneDrive, etc. If you’ve also been doing that with the photos from your iPhone, you can easily restore a deleted photo by accessing your cloud storage account. As an example, here’s how to restore a photo from Google Drive:
- Either open the Google Drive app on your iPhone or using the browser go to drive.google.com
- Sign into your Google account.
- Either search for the needed photo using the search field at the top or manually scroll through the files to find the needed one.
- To save a photo to your iPhone, tap the three dots near the file and choose Open in (then select where you wish to save the photo).

That’s it! Now, simply go to the app or location to which the photo was saved to view it.
Option 6: Check Messenger Attachments
If you remember sharing the photo that you’re looking for with someone via text message on Messenger or through a social media app, it’s a good idea to check the attachments in that application. Even if you’ve deleted the photos from your iPhone, the media attachments may still be stored within those app caches and potentially recovered. Follow these steps to check the attachments in the Messenger app on your iPhone:
- Open the Messenger app on your phone.
- Choose the person you’ve sent the photo you’re looking for.
- Tap the sender’s name on the top of the screen.
- Open the Photos section, tap Edit in the top-right corner, then tap Select Photos. Select the images you want to recover.
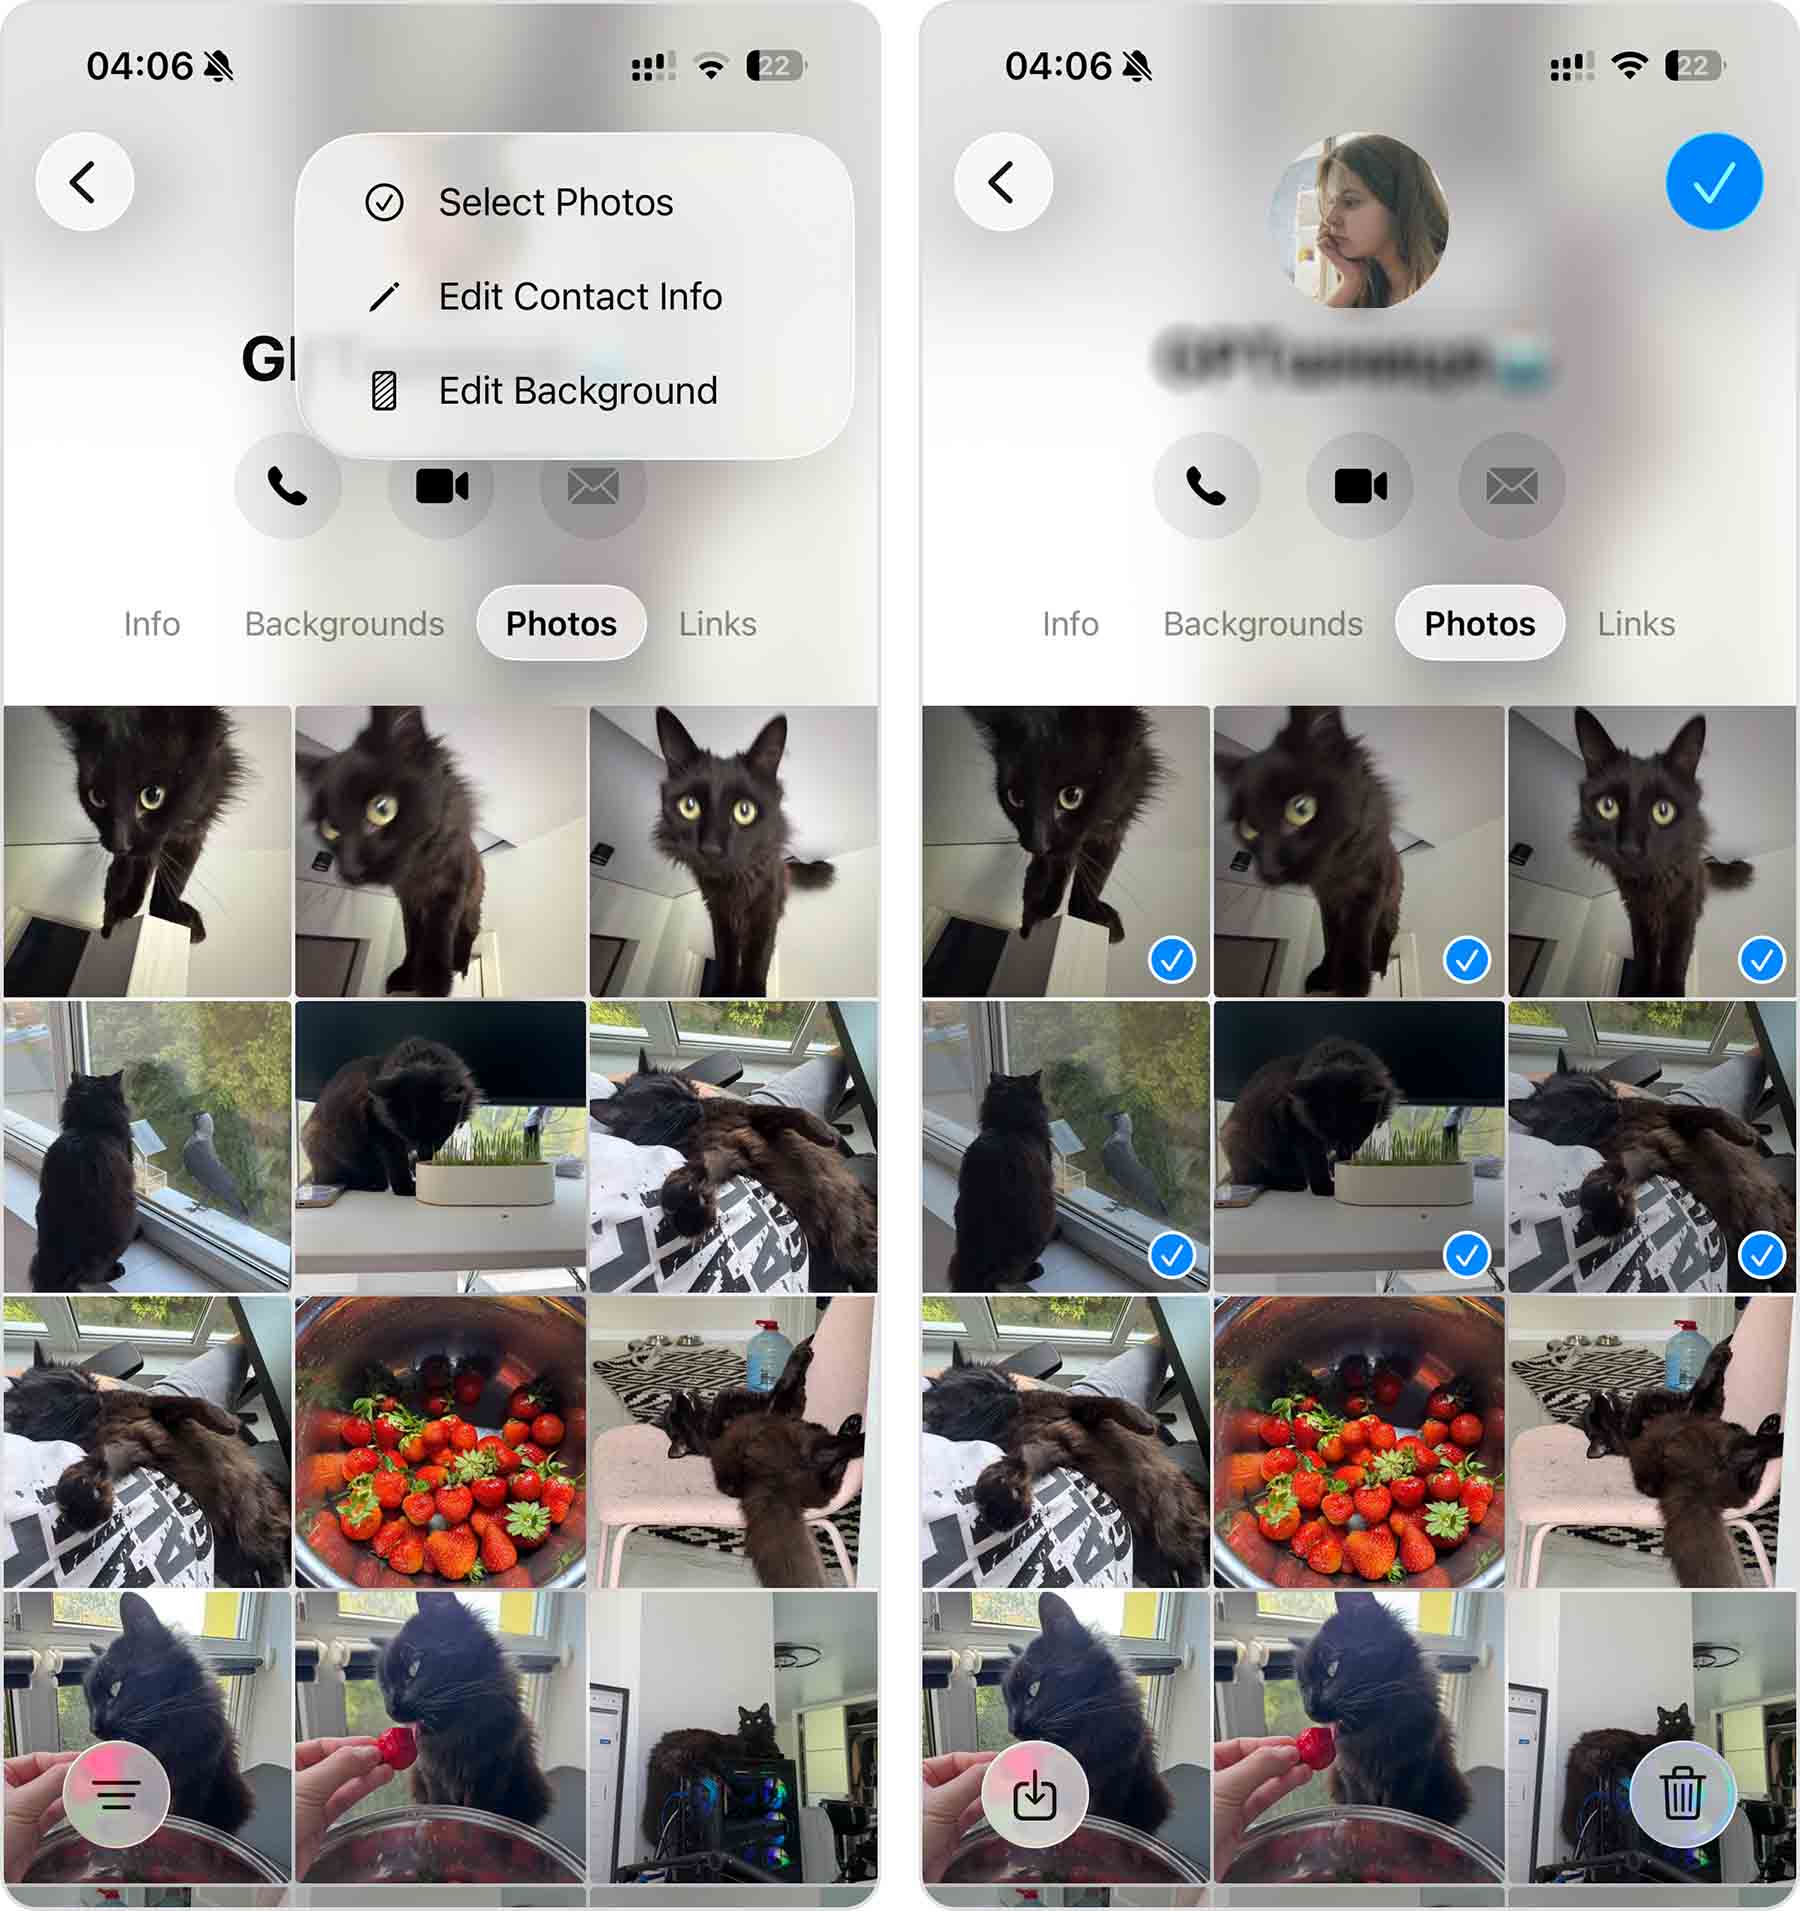
- Tap Save in the bottom-left corner. The selected images will be saved back to the Photos app. If you don’t see them in Recents, look for them on the date they were originally taken, as they’ll be restored to their original place in your library.
How to Backup Photos on iPhone
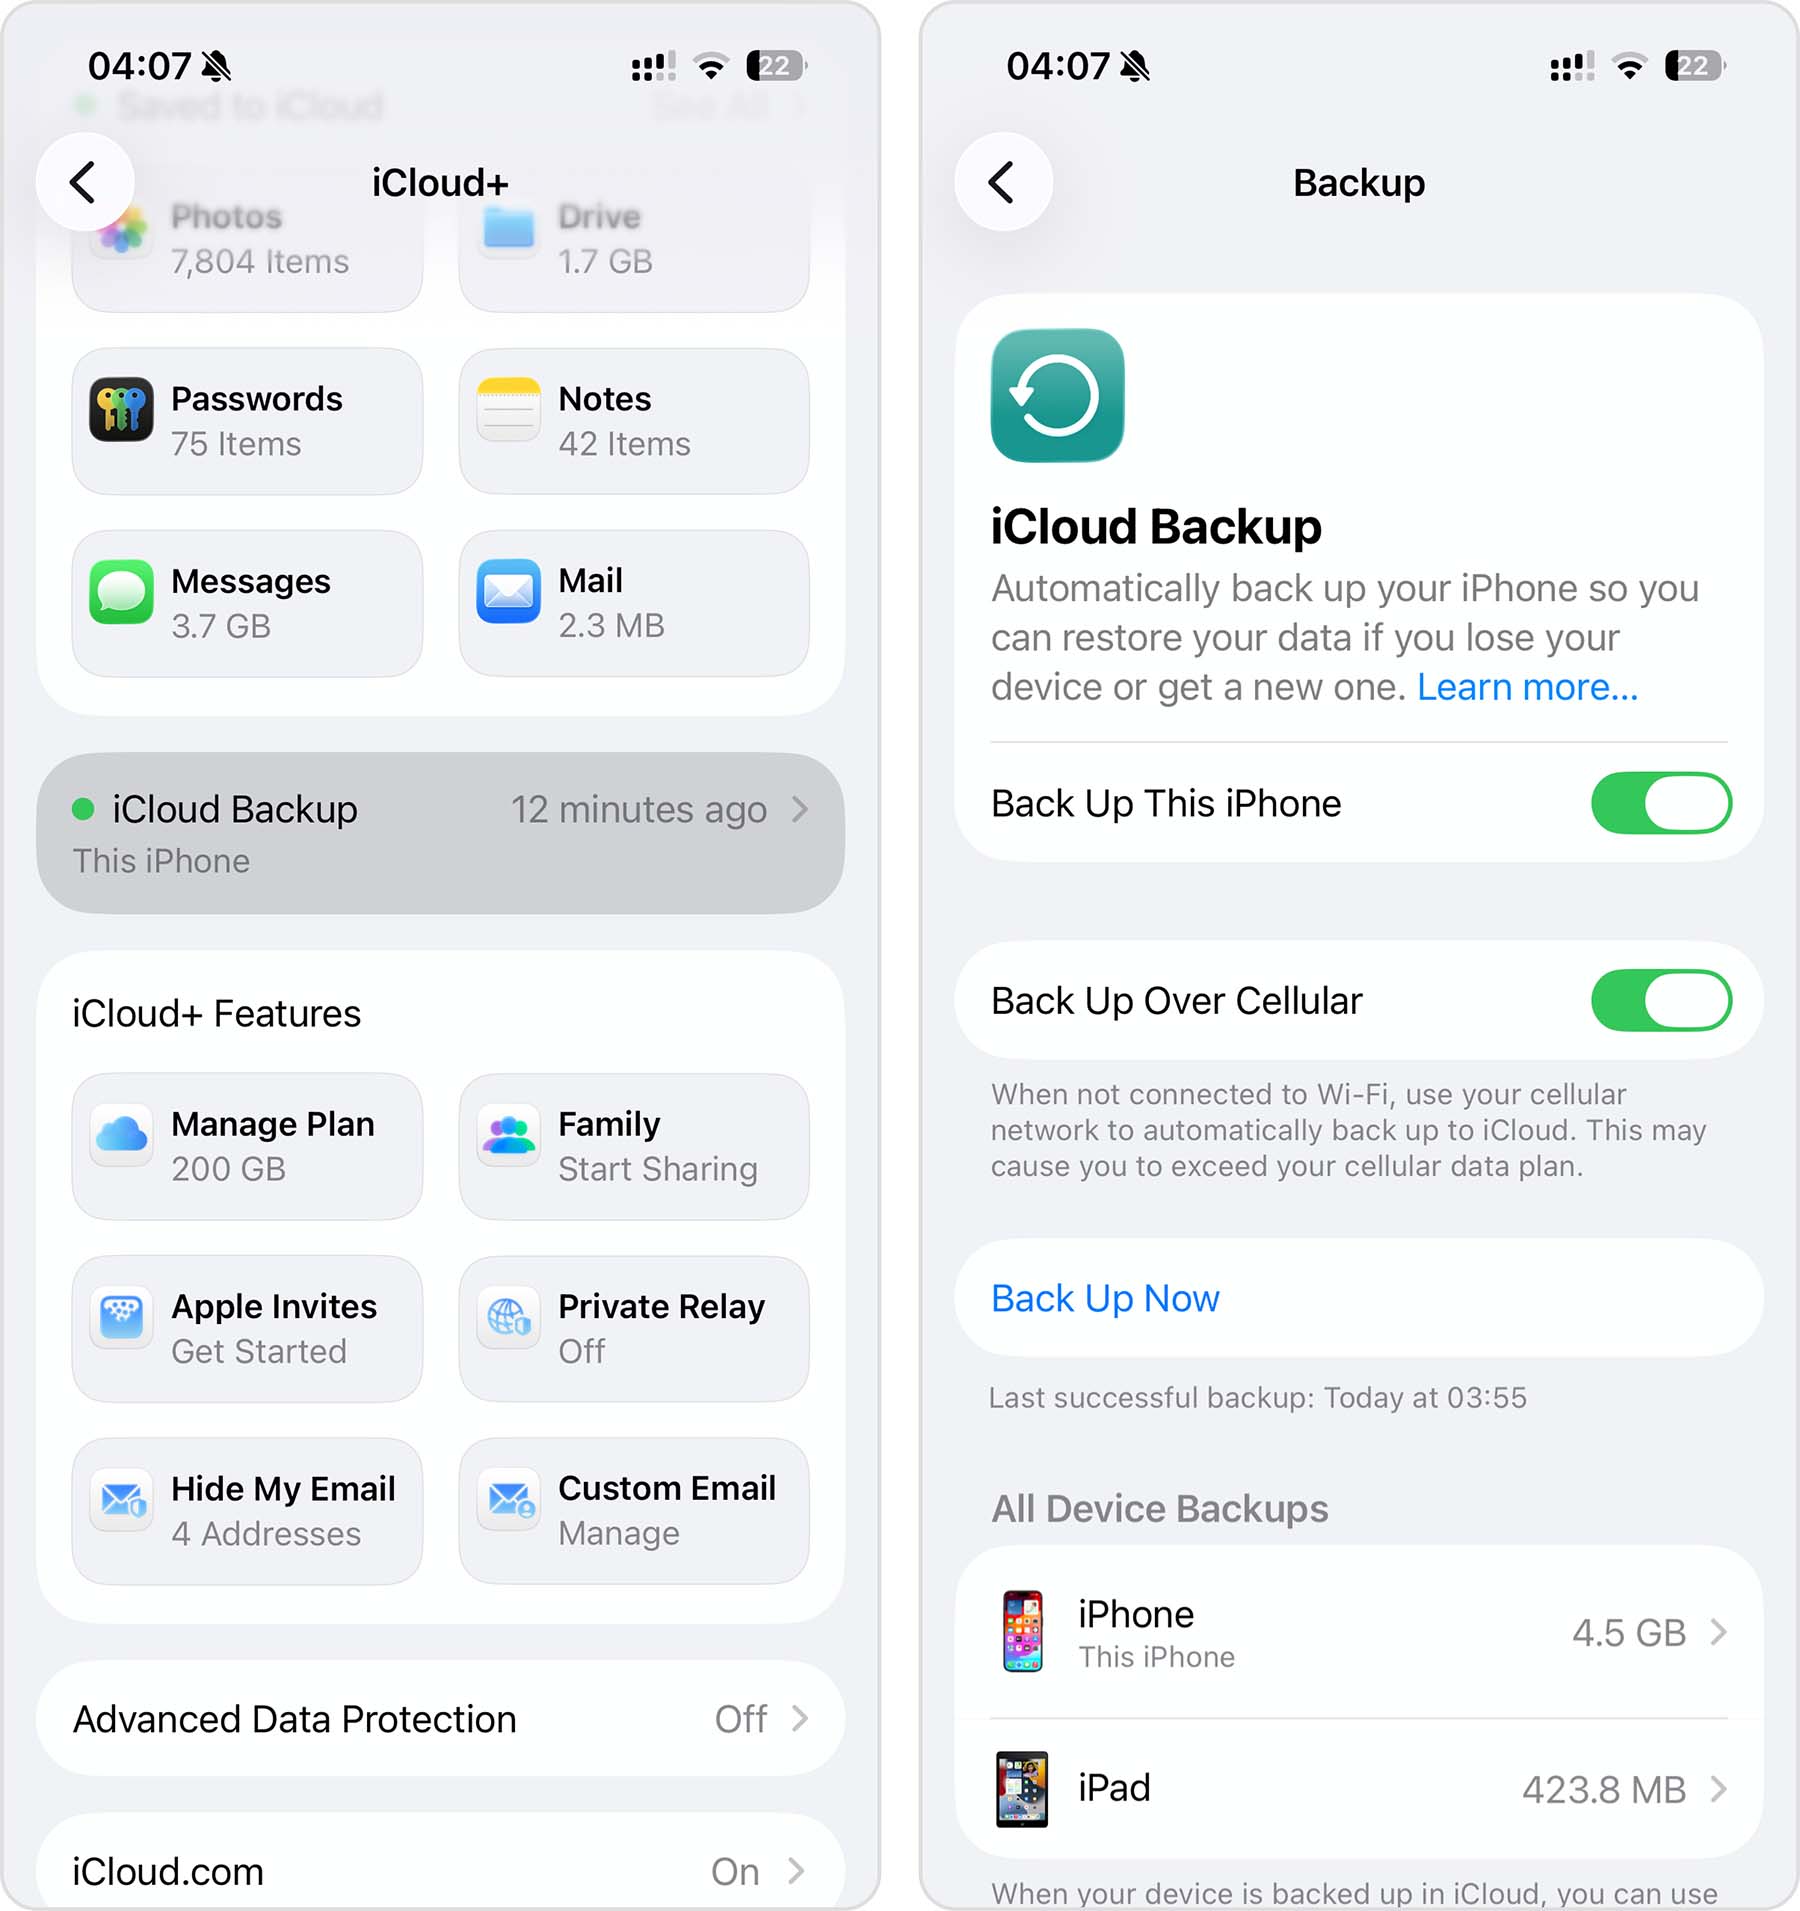
When it comes to recovering deleted photos from an iPhone, you have the most chances in succeeding in the process if you’ve been regularly backing up your phone before data loss occurred. Therefore, it’s a good idea to set up automatic backing up of your data to always have a quick and effective solution in case you ever delete the wrong photo or video on your iPhone. The safest way to backup your iPhone is with the help of iCloud. If that’s what you want to do, follow these steps to set up automatic iCloud backups on your iPhone:
- Open the Settings app on your iPhone.
- Tap your name at the top of the menu.
- Go to iCloud.
- Tap on iCloud Backup. Then, toggle on iCloud Backup to turn on automatic backups (to perform one manually right away, tap Back Up Now).
But unfortunately, iCloud is not completely free. If you’ve looking for a way to backup your iPhone data without having to pay anything, use Finder, or iTunes.
Final Thoughts
Are your photos really gone for good? Not necessarily. Even if they seem to be permanently deleted, there are still several recovery options worth trying.
Start with the simplest ones, such as Recently Deleted, then check your iCloud or Finder backups. If you don’t have a backup, you can still try to recover permanently deleted photos from your iPhone with a tool like Disk Drill, but because of the way Apple encrypts and manages storage, the chances are usually much lower than many people expect. If you already have a Finder backup, scanning it with Disk Drill is often a much more practical way since it lets you recover only the photos you need without restoring your entire iPhone.
To reduce the chances of losing important photos again, keep regular backups of your iPhone or photo library.
Still have questions? Check the FAQ section below. If you can’t find the answer there, head over to the 7 Data Recovery Forum and describe your recovery scenario – the community may be able to suggest the best next step.
FAQs
- Go to Photos > Collections > Recently Deleted.
- Choose Select and tap the photo you wish to recover.
- Tap Recover to place the photo back to the Photos app.



Delete photos