 Did your photos disappear from your SD card? It can happen due to accidental deletion, corruption, interrupted file transfers, hidden file settings, or any other reasons, but with data recovery software you can often restore your data. And in this guide, we’ll walk you through the SD card photo recovery process on both Windows and macOS.
Before you start: don’t do anything with the SD card yet. Don’t take new photos, don’t copy files to it, and don’t format it. Until you understand what happened and decide on a recovery approach, it’s best to remove the card from your device and set it aside.
Why Did Pictures Disappear from My SD Card?
Once you realize that some or all of your photos are missing, one of the first questions that may come to mind is why did my SD card delete my photos? That’s a perfectly reasonable question, but there are many possible reasons why photos disappear from an SD card, and the cause often determines which recovery method is most likely to work.
The table below covers the most common reasons why your photos disappeared from your SD card, explains what each one means, and points you toward the most appropriate solution. If one of the scenarios sounds like what happened to you, simply follow the recommended method and complete the steps. If you’re not sure what caused the photo loss, just work through all the recovery methods in this guide one by one. Since each method addresses a different cause of data loss, one of them will often help you get your photos back.
| Reason | Description | What to Do |
| 👁️ Hidden files | The photos may still be on the SD card but hidden from File Explorer, Finder, your camera, or another device. This can happen because of accidental changes, system settings, or malware. | Start with the hidden files checks described below. If the photos become visible, remove the hidden attribute to prevent the issue from happening again. |
| 🗑️ Accidental deletion or formatting | Photos may have been deleted manually, removed by another device, or erased during formatting. In many cases, the data remains on the card until new files overwrite it. | Stop using the SD card immediately. Do not take new photos or copy files to it. Then recover the photos with a data recovery program. |
| 🐞 Virus attack | Malware can delete files, hide them, damage the file system, or make photos inaccessible even though they still exist on the card. | Run an antivirus scan on your computer. Then check for hidden files. If the photos are still missing, use a data recovery tool as described in the next section. |
| 📋 Interrupted data transfer | File transfers typically work by copying files first and removing the originals only after the process finishes successfully. If the transfer was interrupted, the files may not appear on the destination device even though the SD card’s file system still contains traces of them. | Avoid writing any new data to the SD card and scan it with a data recovery program. |
| ⚠️ SD card corruption | Corruption can occur for many reasons, including unsafe removal, power loss, file system errors, or software crashes. As a result, photos may disappear even though the storage space is still occupied. | Use a data recovery tool to recover the missing photos before attempting any repairs or formatting. |
| 💾 Low-quality or counterfeit SD card | Some low-quality and counterfeit cards report a larger capacity than they actually have. Once the real storage limit is reached, older photos can disappear or become corrupted. | Try recovering the photos with a data recovery tool. If the photos are highly valuable or the card behaves erratically, consider contacting a professional recovery service. |
| 🔨 Physical damage | Bent contacts, water exposure, cracked components, and other physical damage can prevent the card from working correctly. The card may disconnect randomly or fail to appear on your computer altogether. | Avoid DIY fixes. If the photos are important, disconnect the card and contact a professional data recovery lab. Continued use may worsen the damage and reduce the chances of recovery. |
How to View Hidden Files That Seem to Have Disappeared from an SD Card
Often, the pictures on your SD card aren’t missing, but simply hidden. It’s possible you accidentally hid them, or they were hidden due to other reasons. Hidden photos will be invisible in macOS Finder and Windows Explorer, unless the hidden items option is enabled.
To regain access to these pictures, you need to enable the hidden items option in Finder and Windows Explorer. You can then remove the hidden attribute from these pictures to make them visible, even if the hidden items option is disabled.
On Windows
- Press Windows+E to launch Windows Explorer and navigate to the folder where you’ve saved the photos.
- Select View from the top of the Windows Explorer, and select Show > Hidden items.
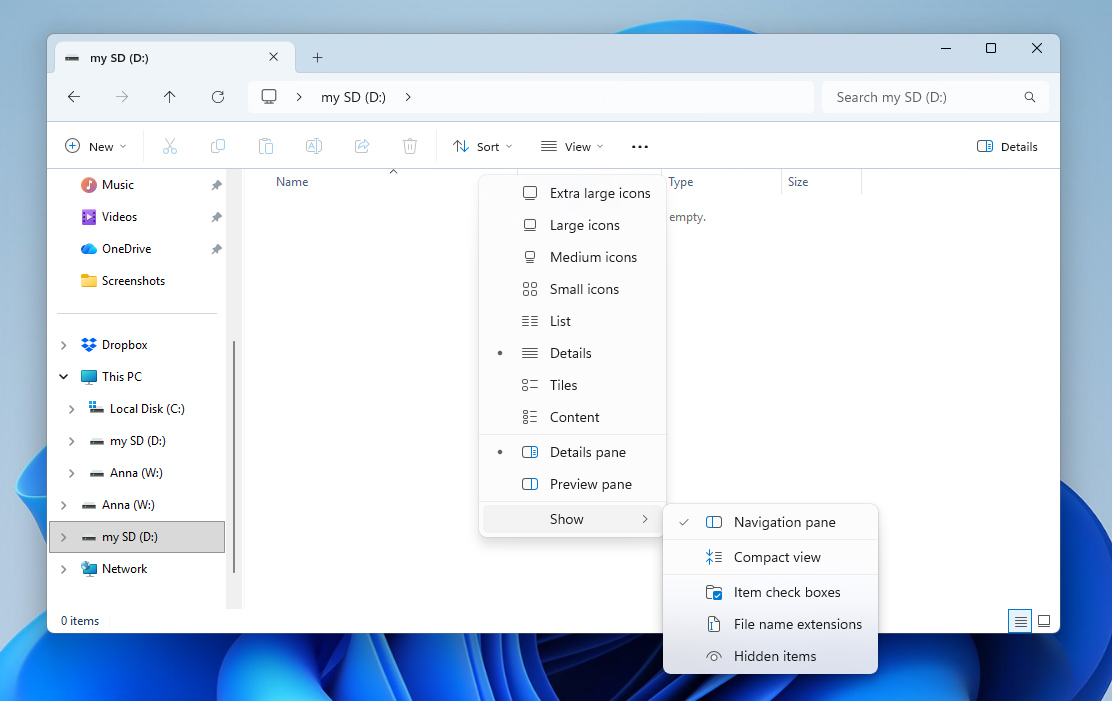
Once the hidden photos are visible, you can remove their hidden attribute if it’s no longer required. To achieve this, right-click the photos, choose Properties and uncheck the Hidden checkbox.
On Mac
If you’re running macOS, here’s how you can view hidden files on your device:
- Open Finder and navigate to the required folder.
- Press Command + Shift + .(period) to make hidden files visible. You can use the same shortcut to hide them again.
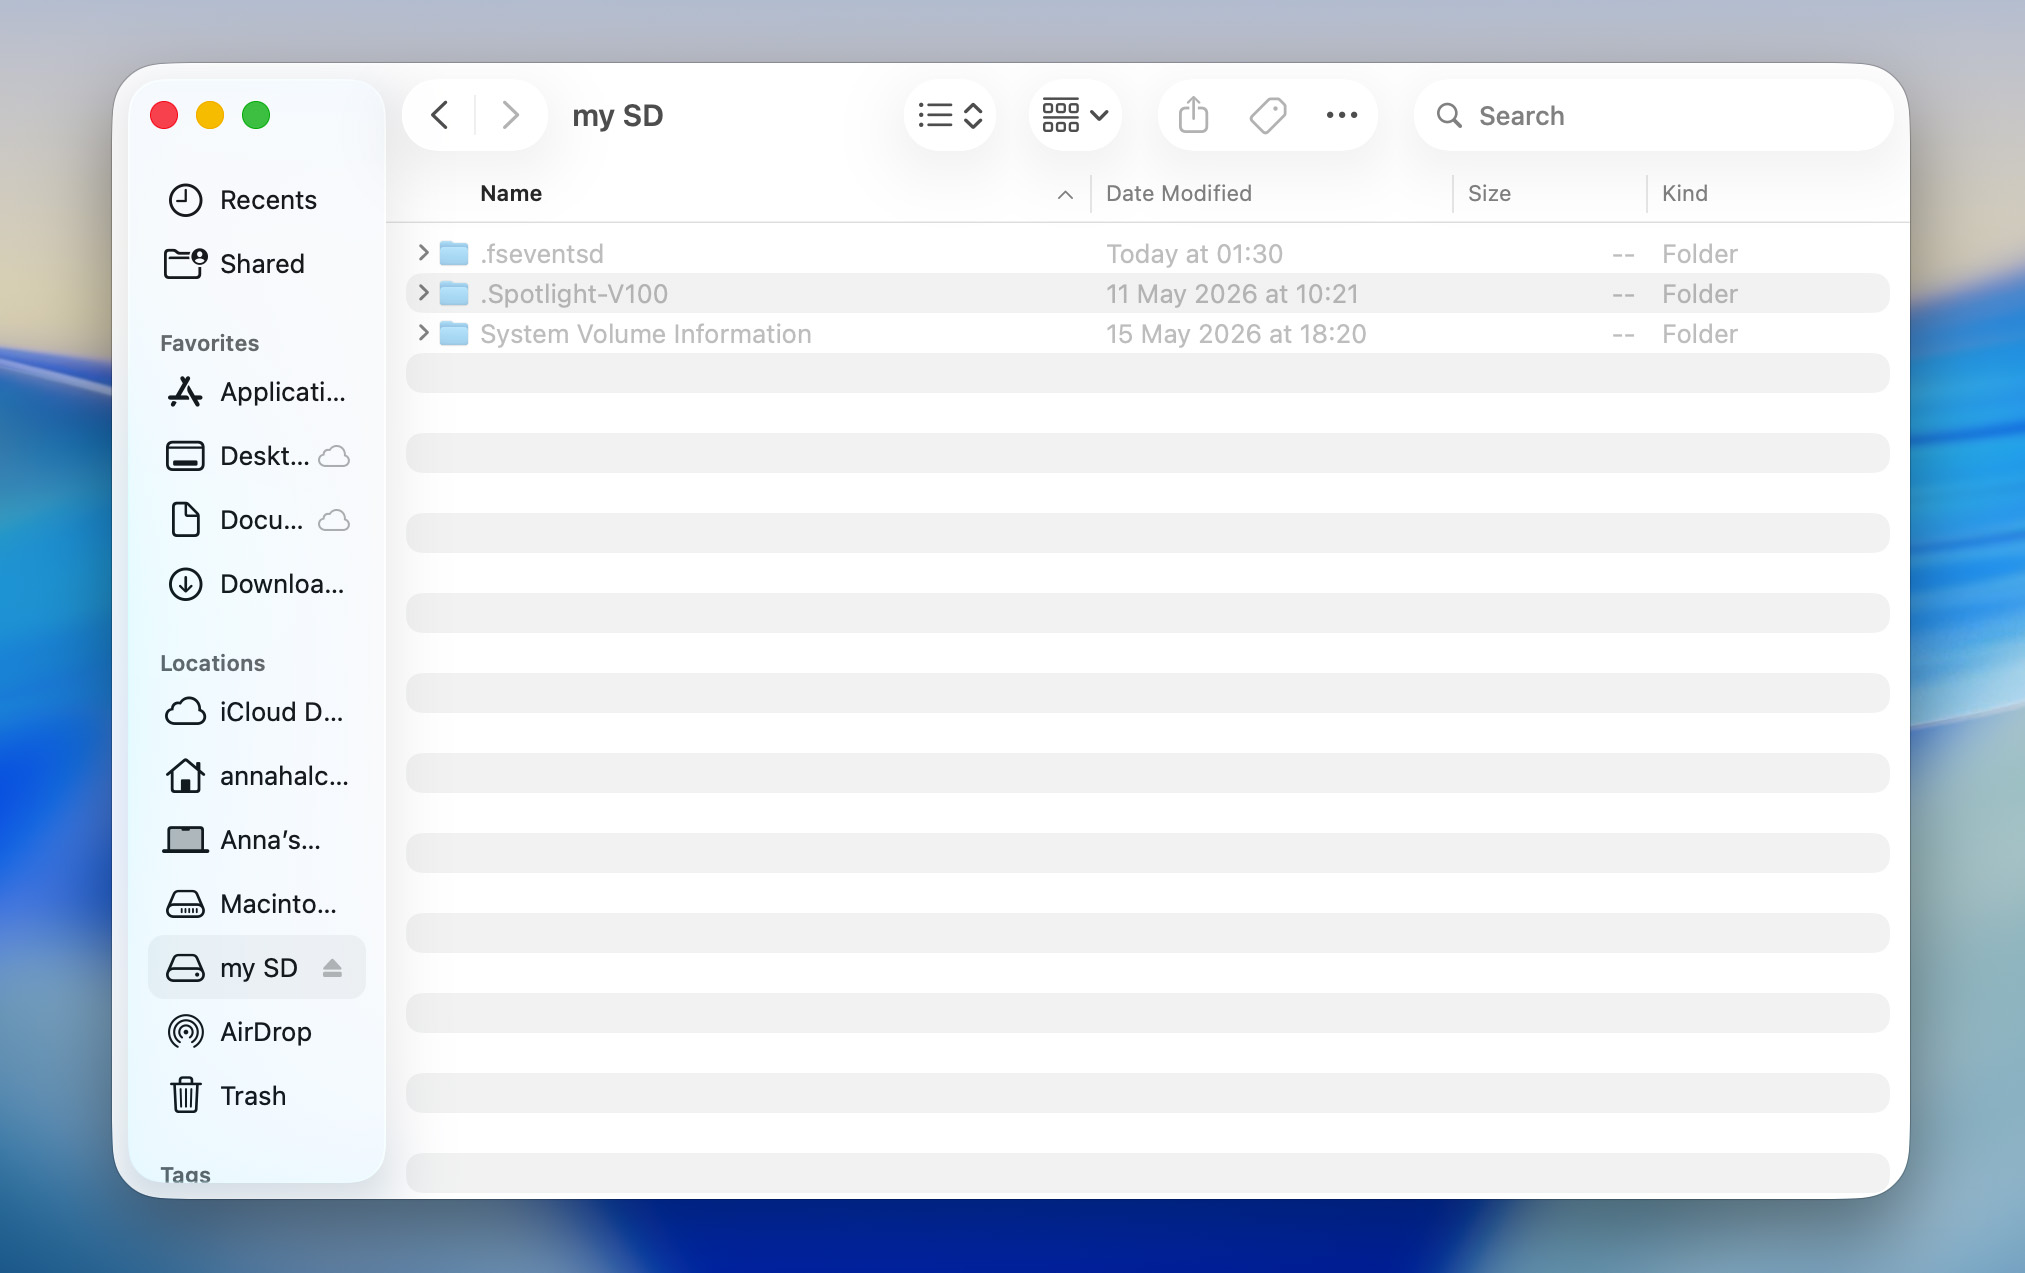
Hidden files in macOS will have a dot (.) before their filename. You can remove this dot to remove the hidden attribute from them.
How to Recover Photos Disappeared from an SD Card (Using Data Recovery Software)
If the hidden files check didn’t bring back your missing photos, the next step is data recovery. Despite the name, data recovery isn’t useful only when photos have been deleted. It can also help when photos disappear because of file system corruption, interrupted file transfers, formatting, RAW file systems, or other issues that make files inaccessible through File Explorer, Finder, your camera, or phone.
In many of these situations, the photos are still physically present on the SD card. When files are deleted or a card is formatted, the data typically remains intact until it is overwritten by new information. Likewise, corruption and file system issues often prevent devices from locating existing files rather than removing them entirely. Data recovery software can scan the SD card at a lower level than standard file browsing tools, allowing it to locate and recover photos that would otherwise appear lost.
If your photos disappeared from the SD card on Canon cameras such as the EOS R5 or R6 after shooting in burst mode, the issue may not be related to any of the reasons described above. Some photographers have reported cases where the camera appeared to capture images normally, but the files were never written to the memory card. If the missing photos are important, consider contacting a professional data recovery service. Recovery software may not help if the images were never saved to the card in the first place.
Among the many SD card recovery programs we tested, Disk Drill delivered the best results. It allows you to create and scan disk images (an important step in data recovery), preview photos before recovery, and supports virtually all major storage devices and file systems. It can also scan RAW drives, including SD cards with damaged or missing file systems. Also, Disk Drill is available for both Windows and macOS.
The steps below show the macOS version of the program. If you’re using Windows, don’t worry, the recovery process is identical:
- Download Disk Drill and install it on your PC.
- Connect the SD card to your computer using an SD card reader. Avoid connecting the camera or Android device directly, as this can limit access to the card and interfere with recovery.
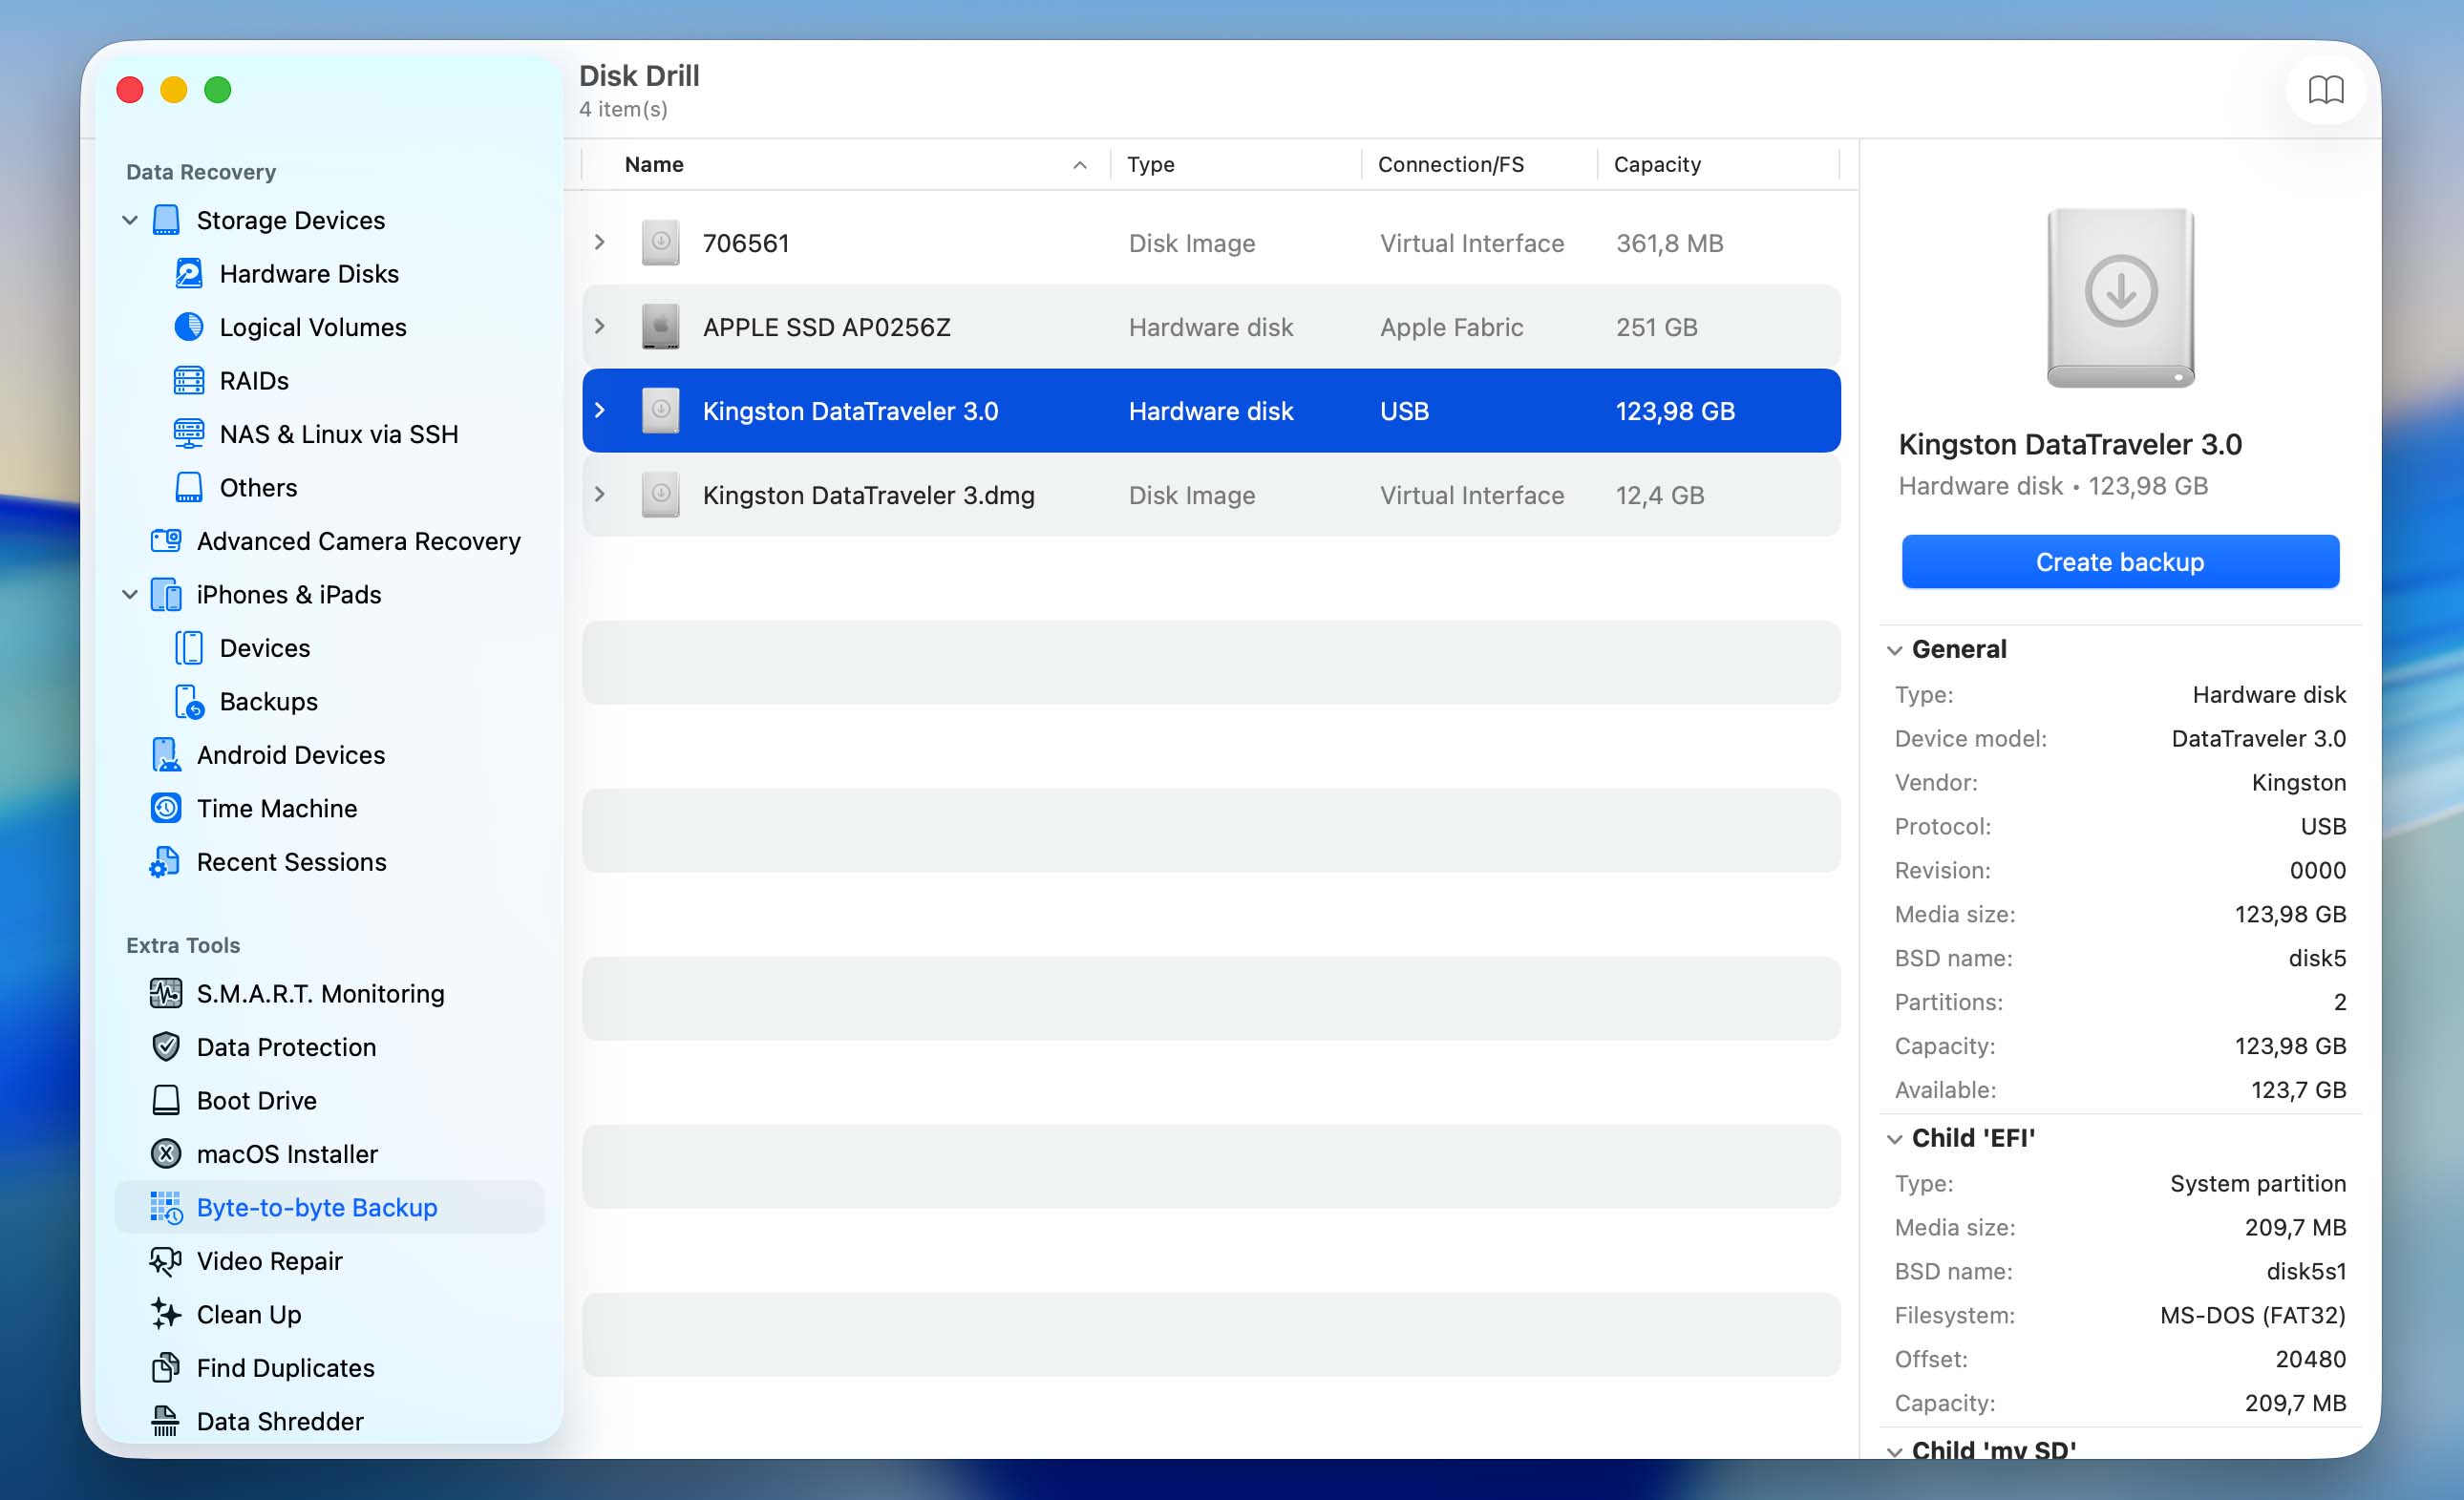
- Launch Disk Drill and select Byte-to-Byte Backup from the left sidebar. Click the Create Backup button in the top-right corner, choose a file name and location for the image, then click OK to start creating the backup image.
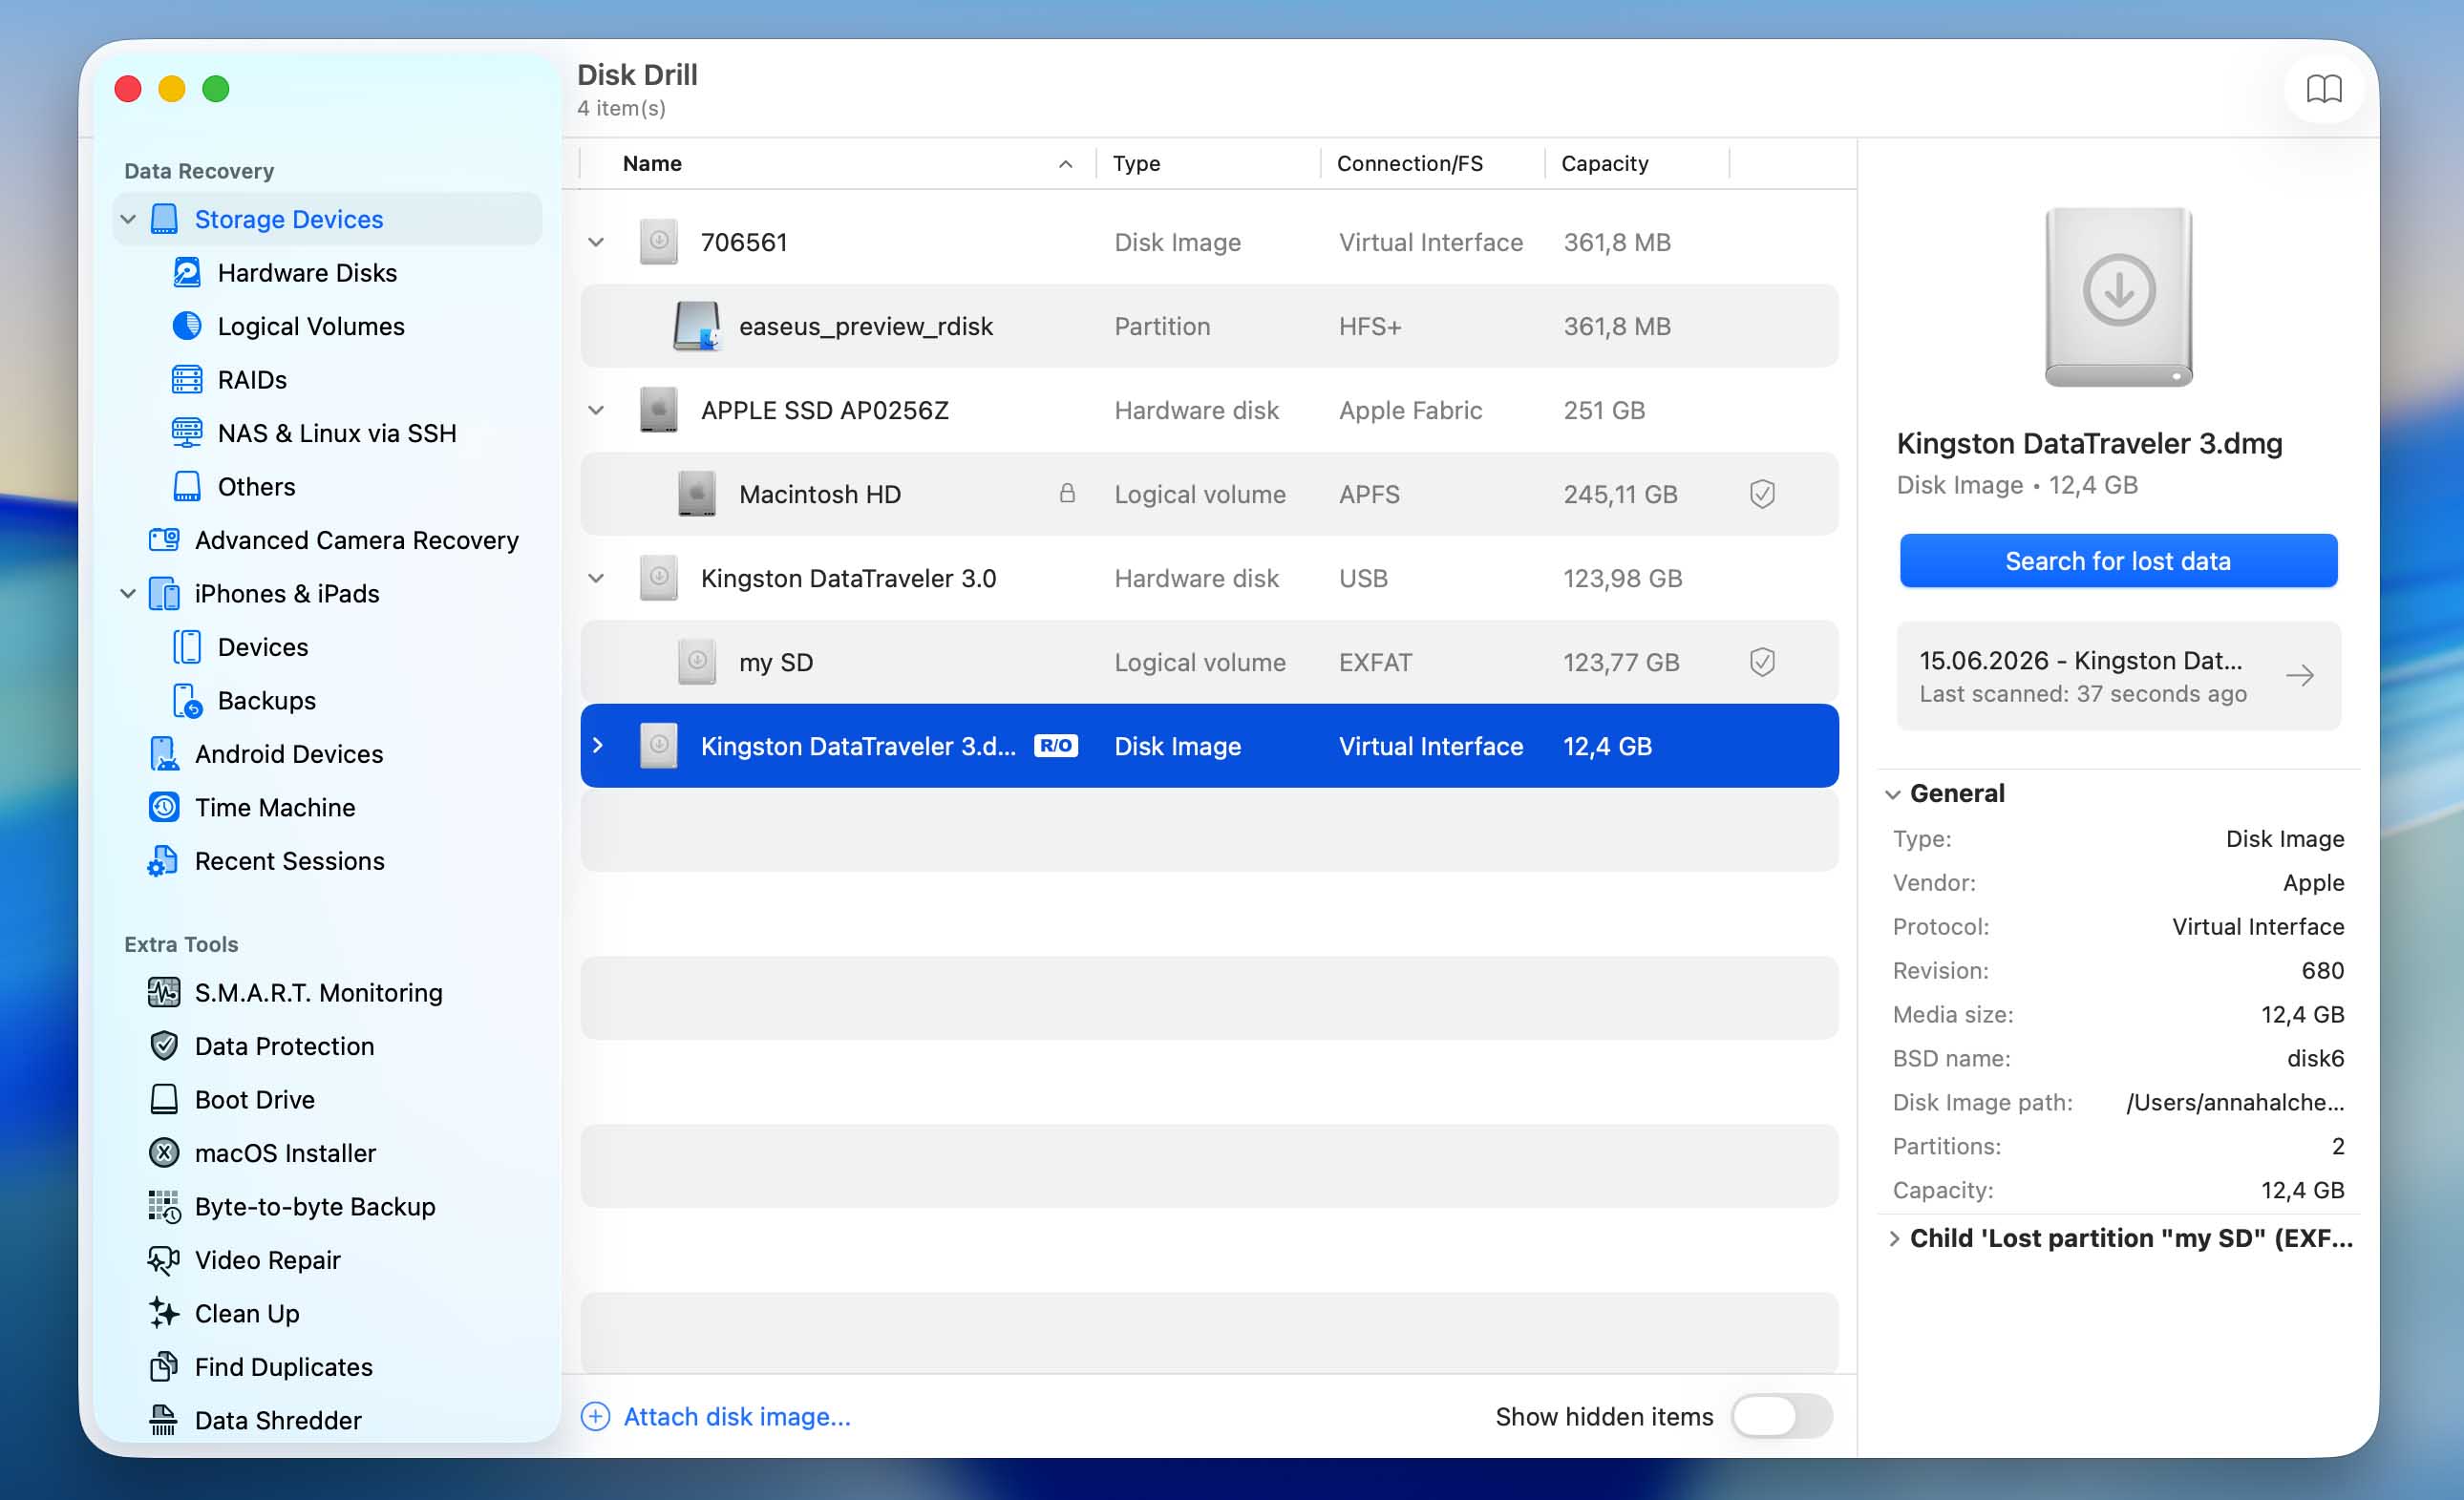
- Once Disk Drill finishes creating the image, return to the Data Recovery section and click Attach Disk Image. Select the image file you just created and click Open.
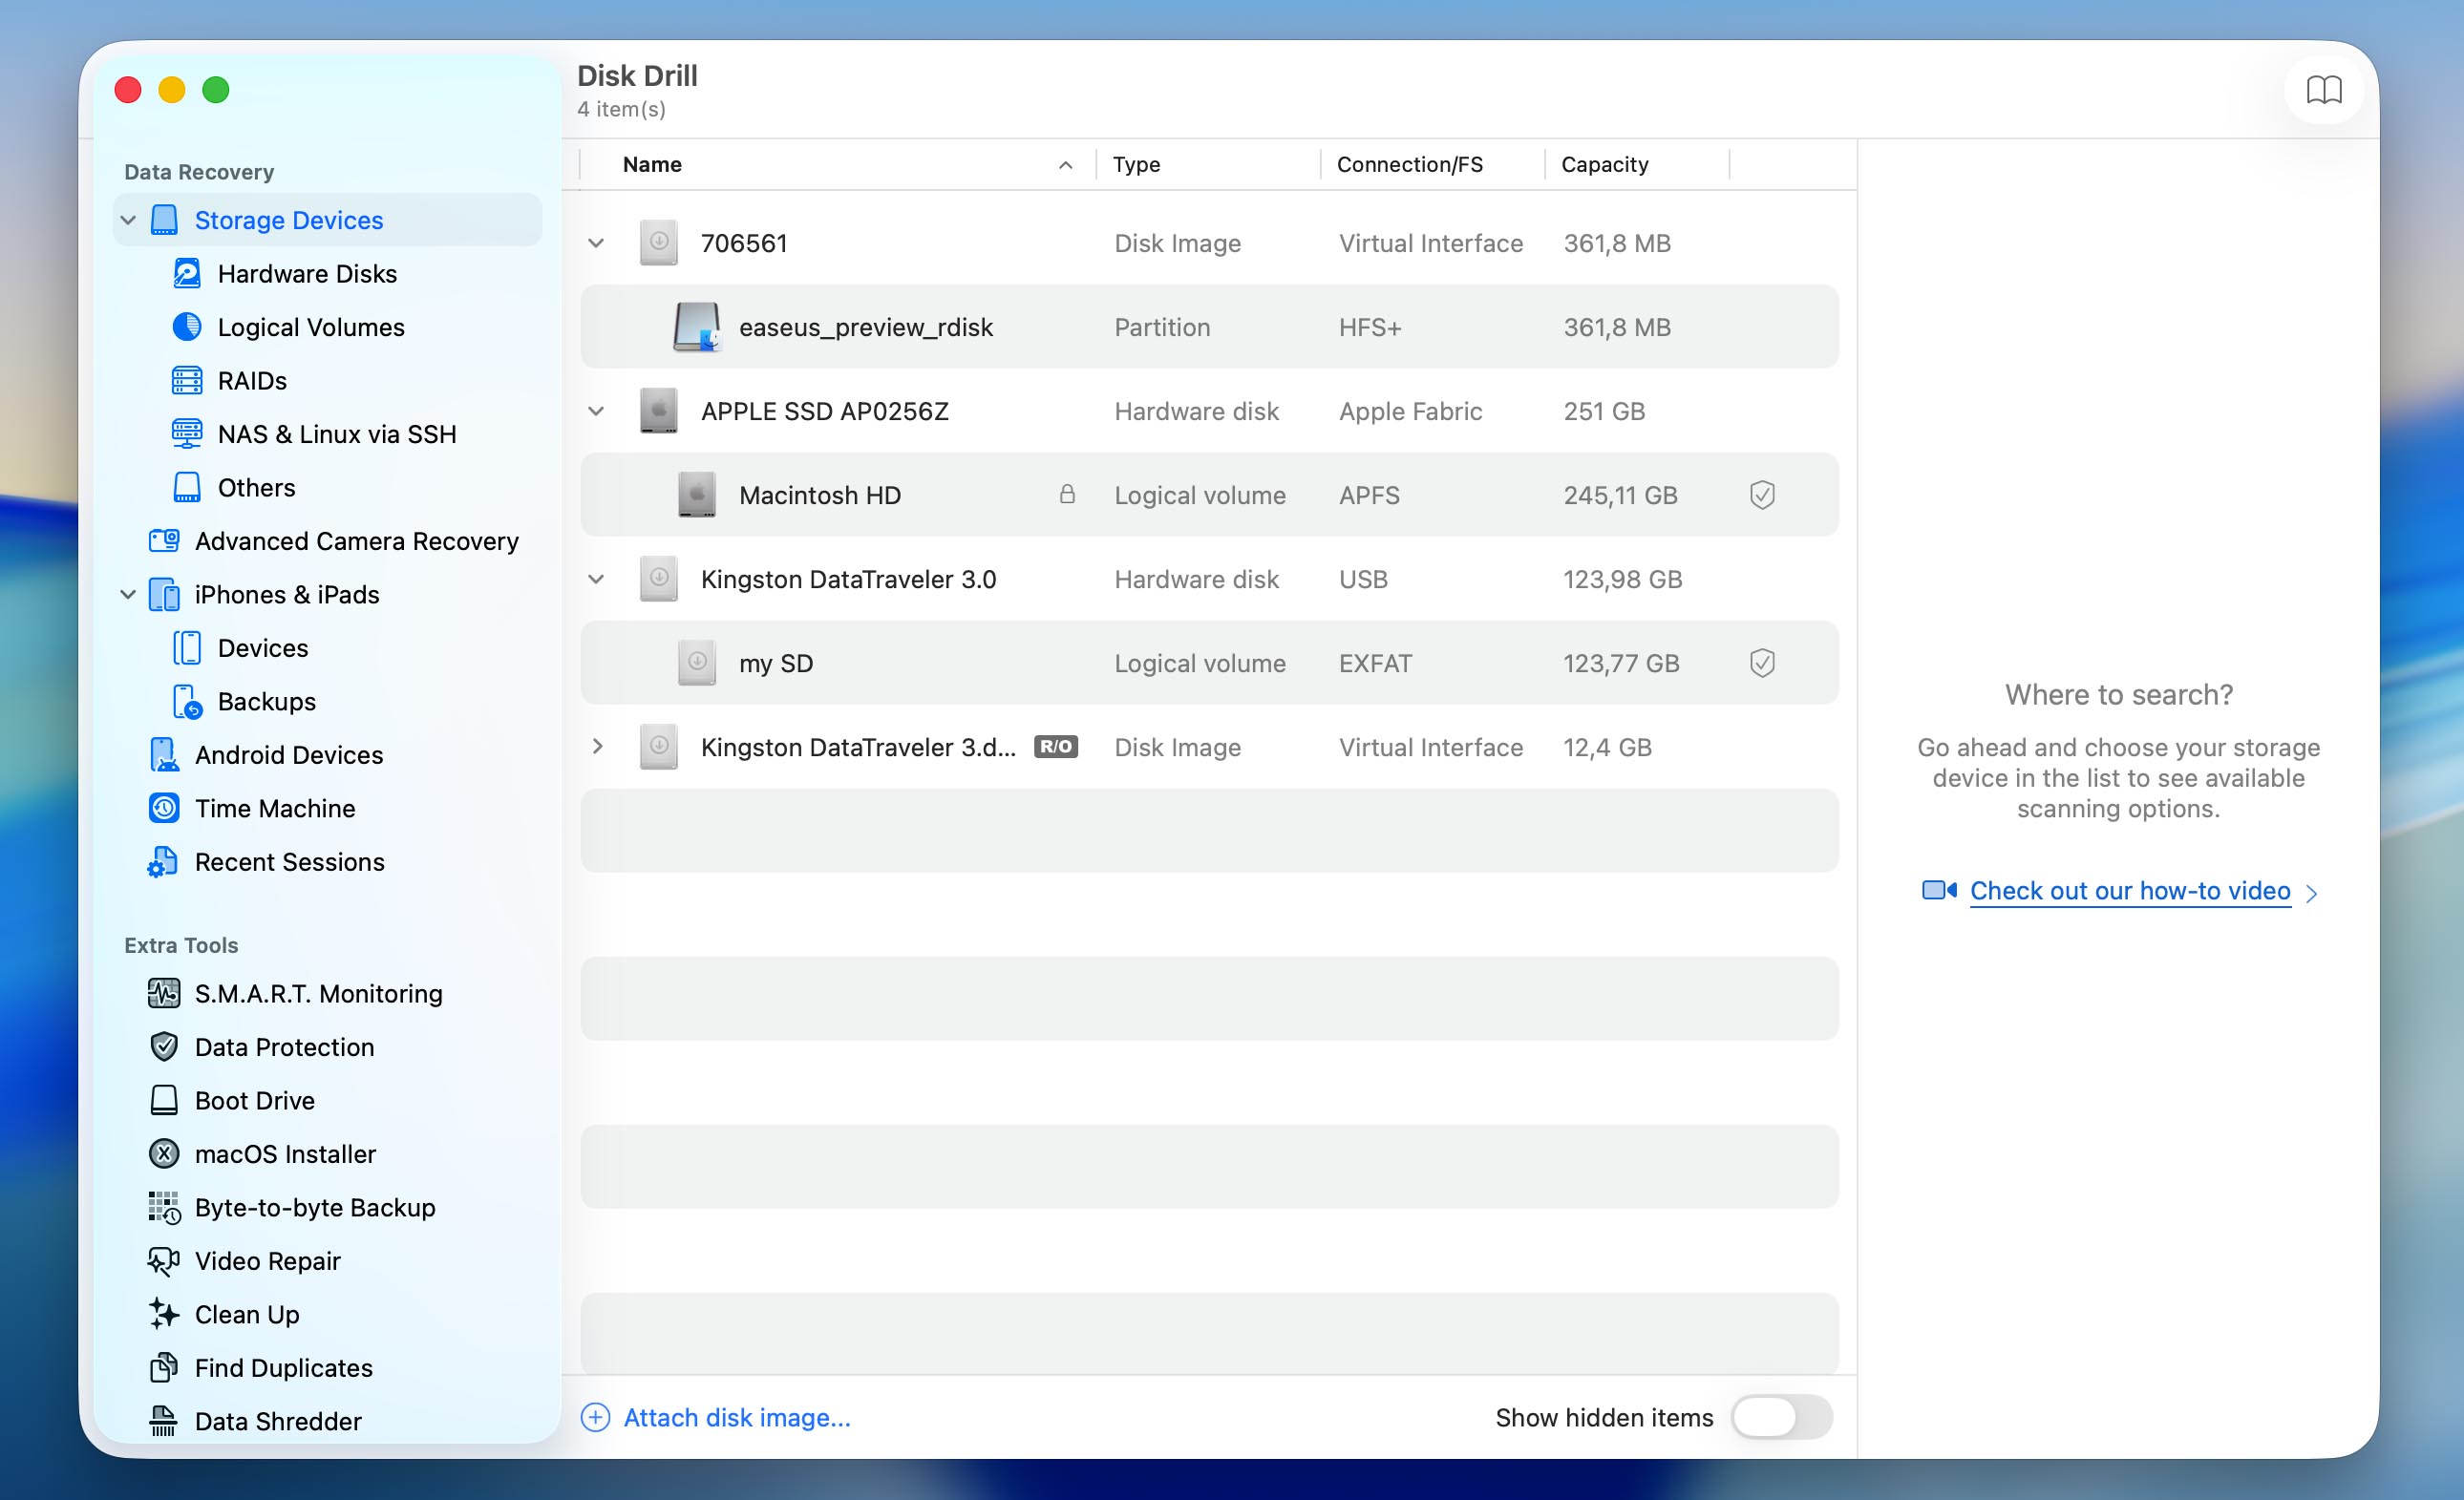
- Select the mounted image and click Search for Lost Data.
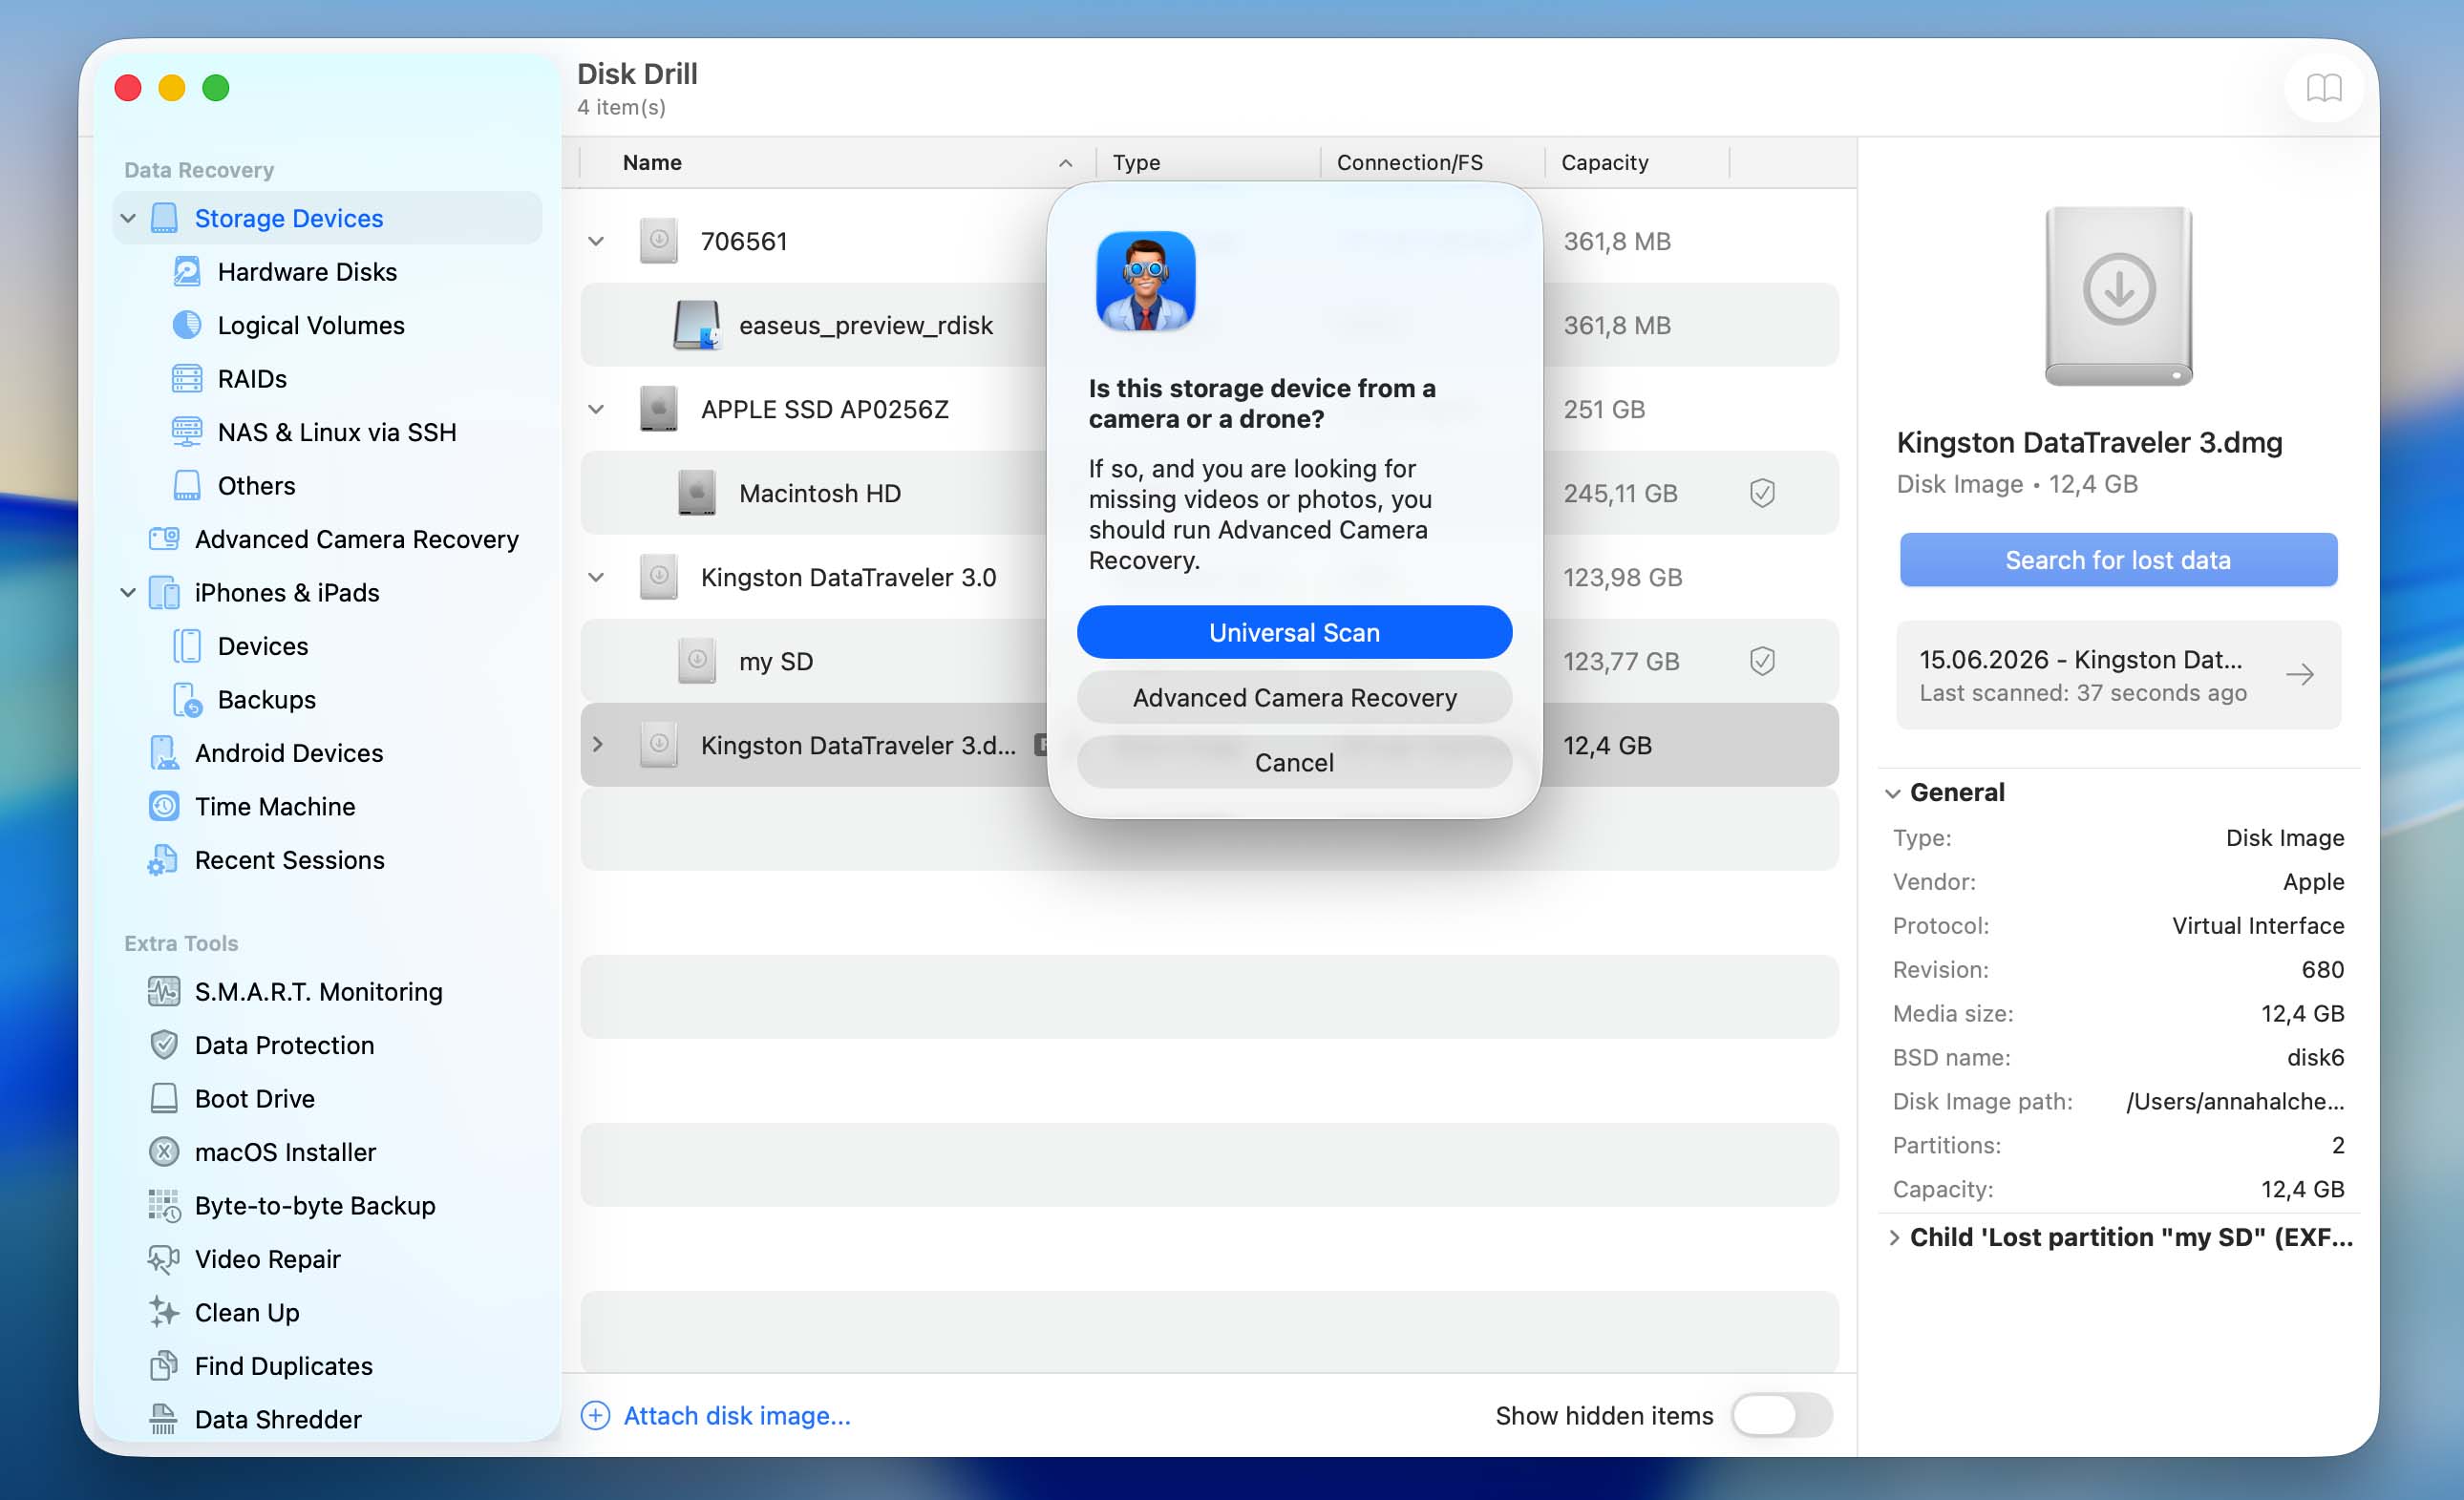
- Depending on the type of SD card and files it contains, Disk Drill may ask you to choose between Universal Scan and Advanced Camera Recovery. Start with Universal Scan. Advanced Camera Recovery is primarily designed for video recovery, so if you also need to recover videos and Universal Scan doesn’t produce the results you expect, run an Advanced Camera Recovery scan afterward.
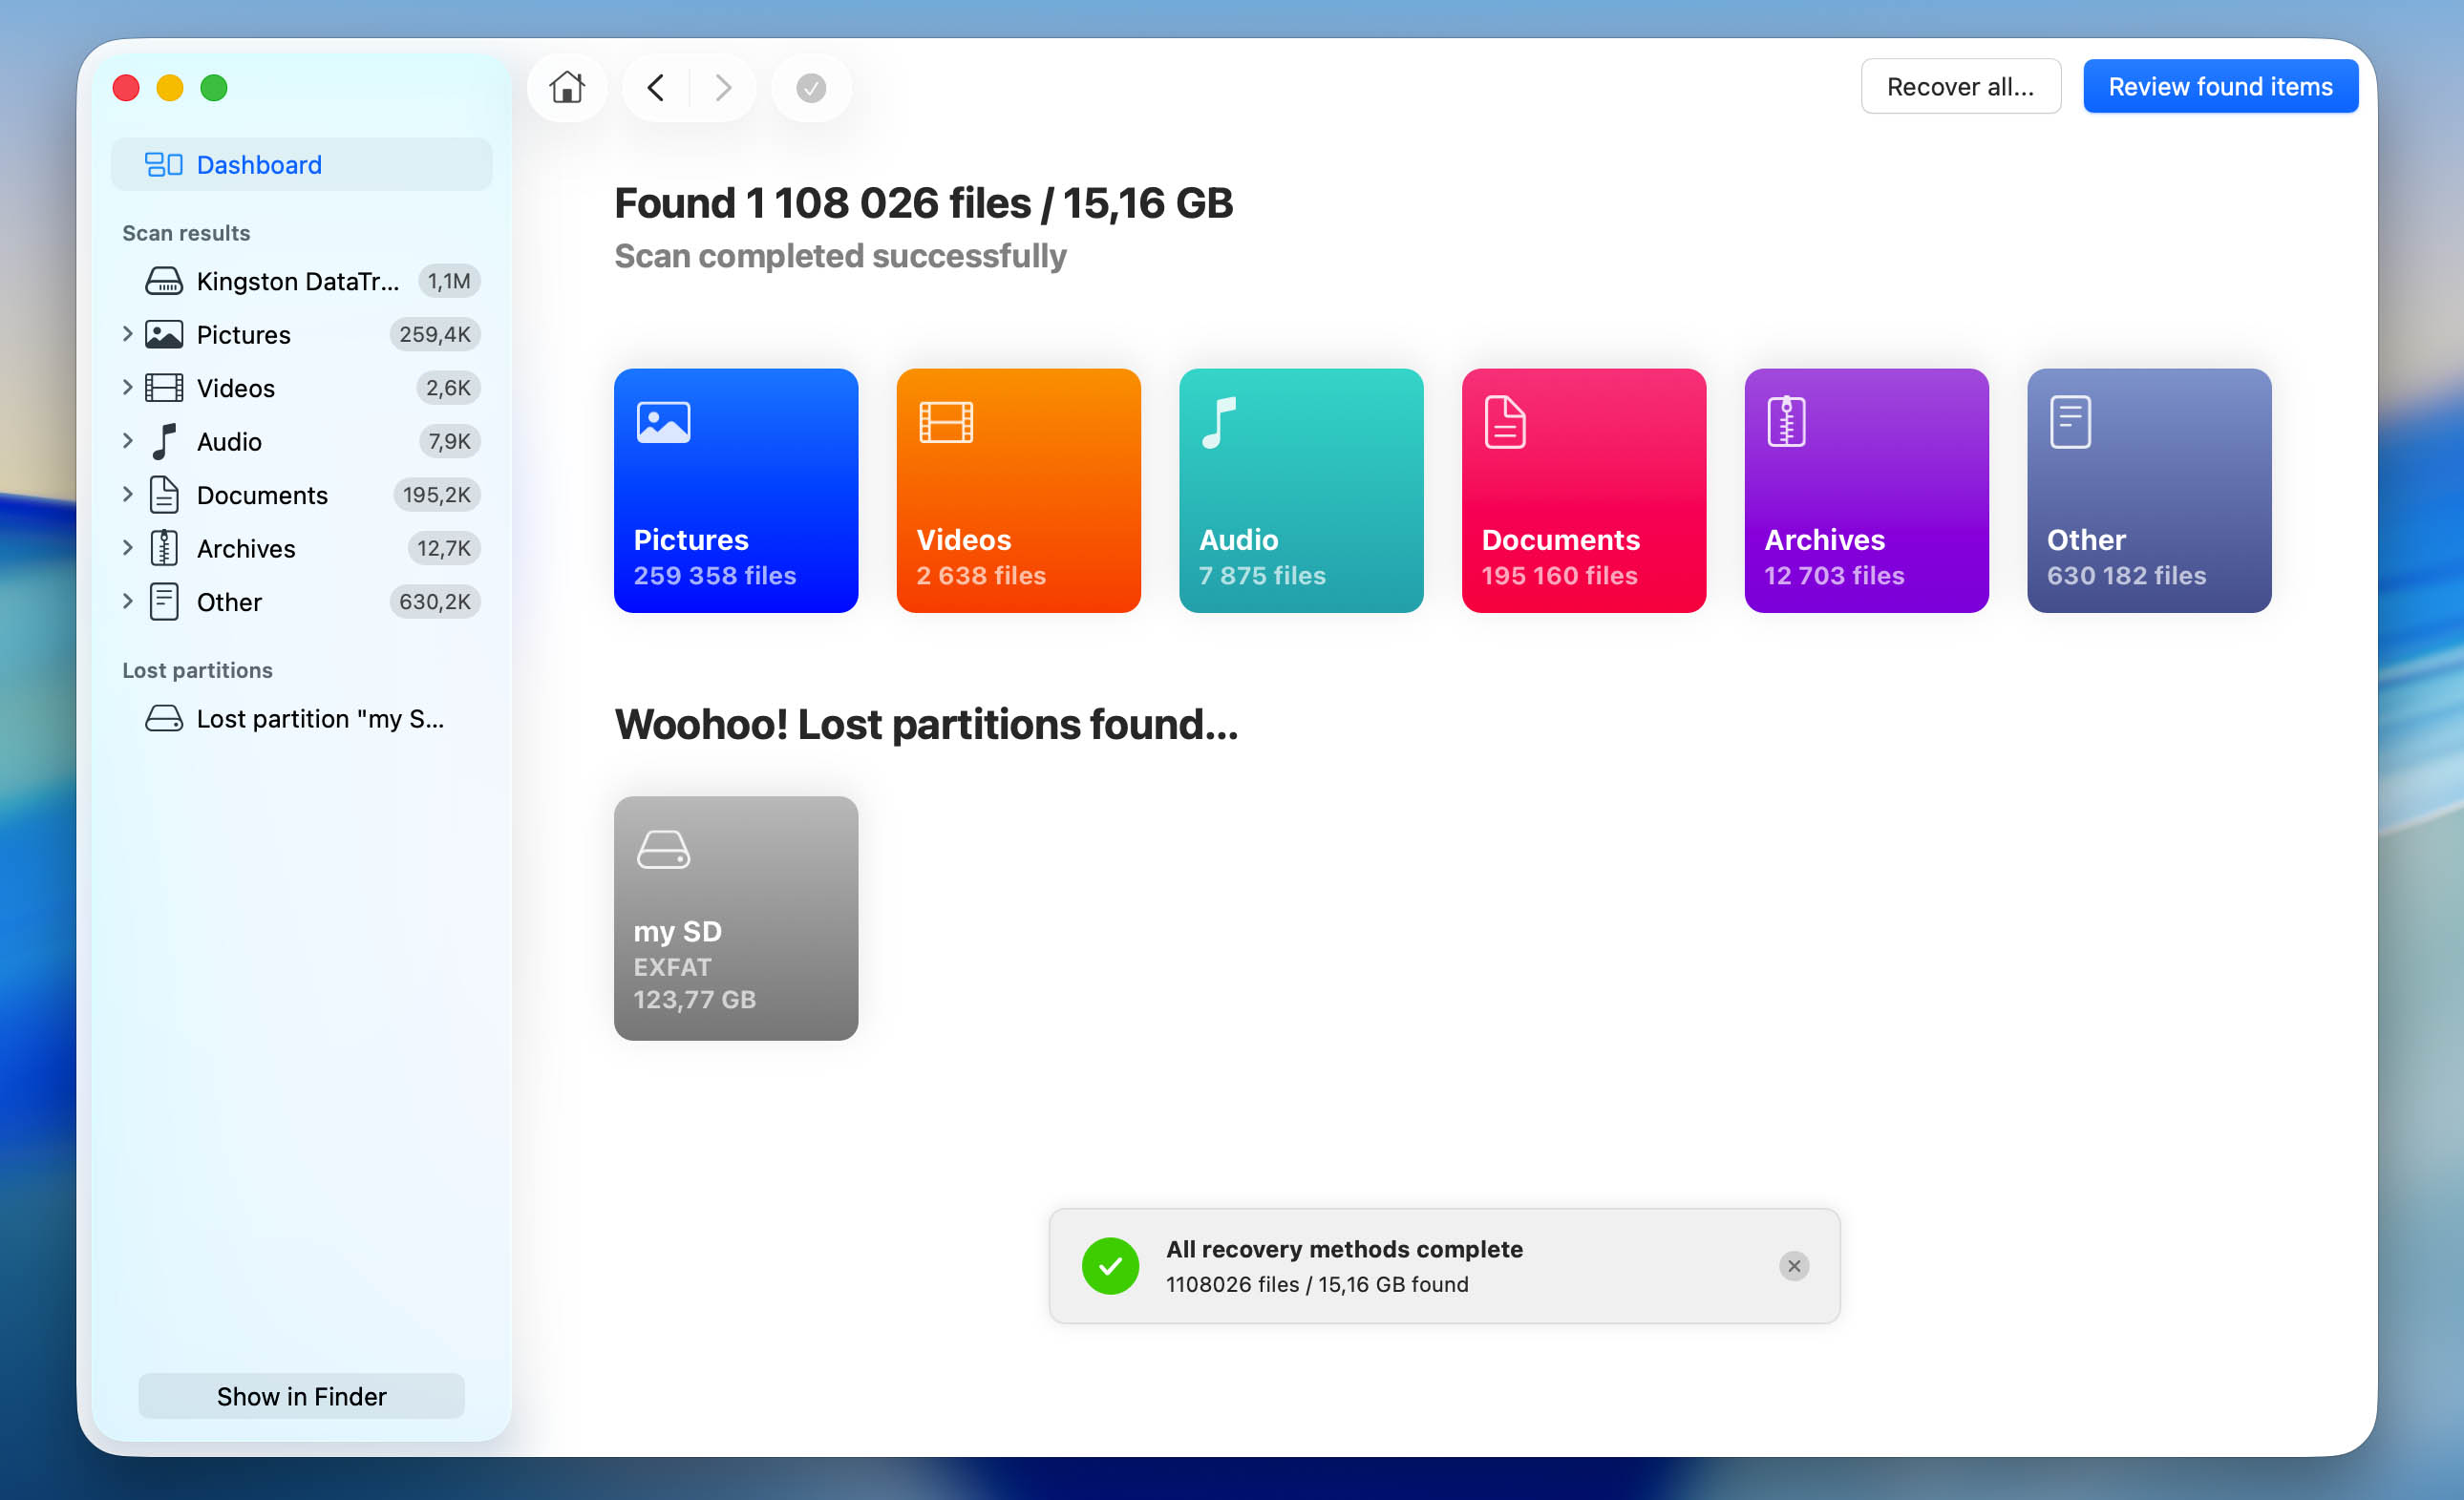
- Wait for the scan to finish. Then click Pictures to display only recoverable photos. If you want to see all recoverable files, click Review Found Items instead.
- Select the photos you want to recover. Disk Drill displays a preview of the currently selected file, and you can preview any other photo by clicking the eye icon next to its name. After confirming that the photos are intact, click Recover.

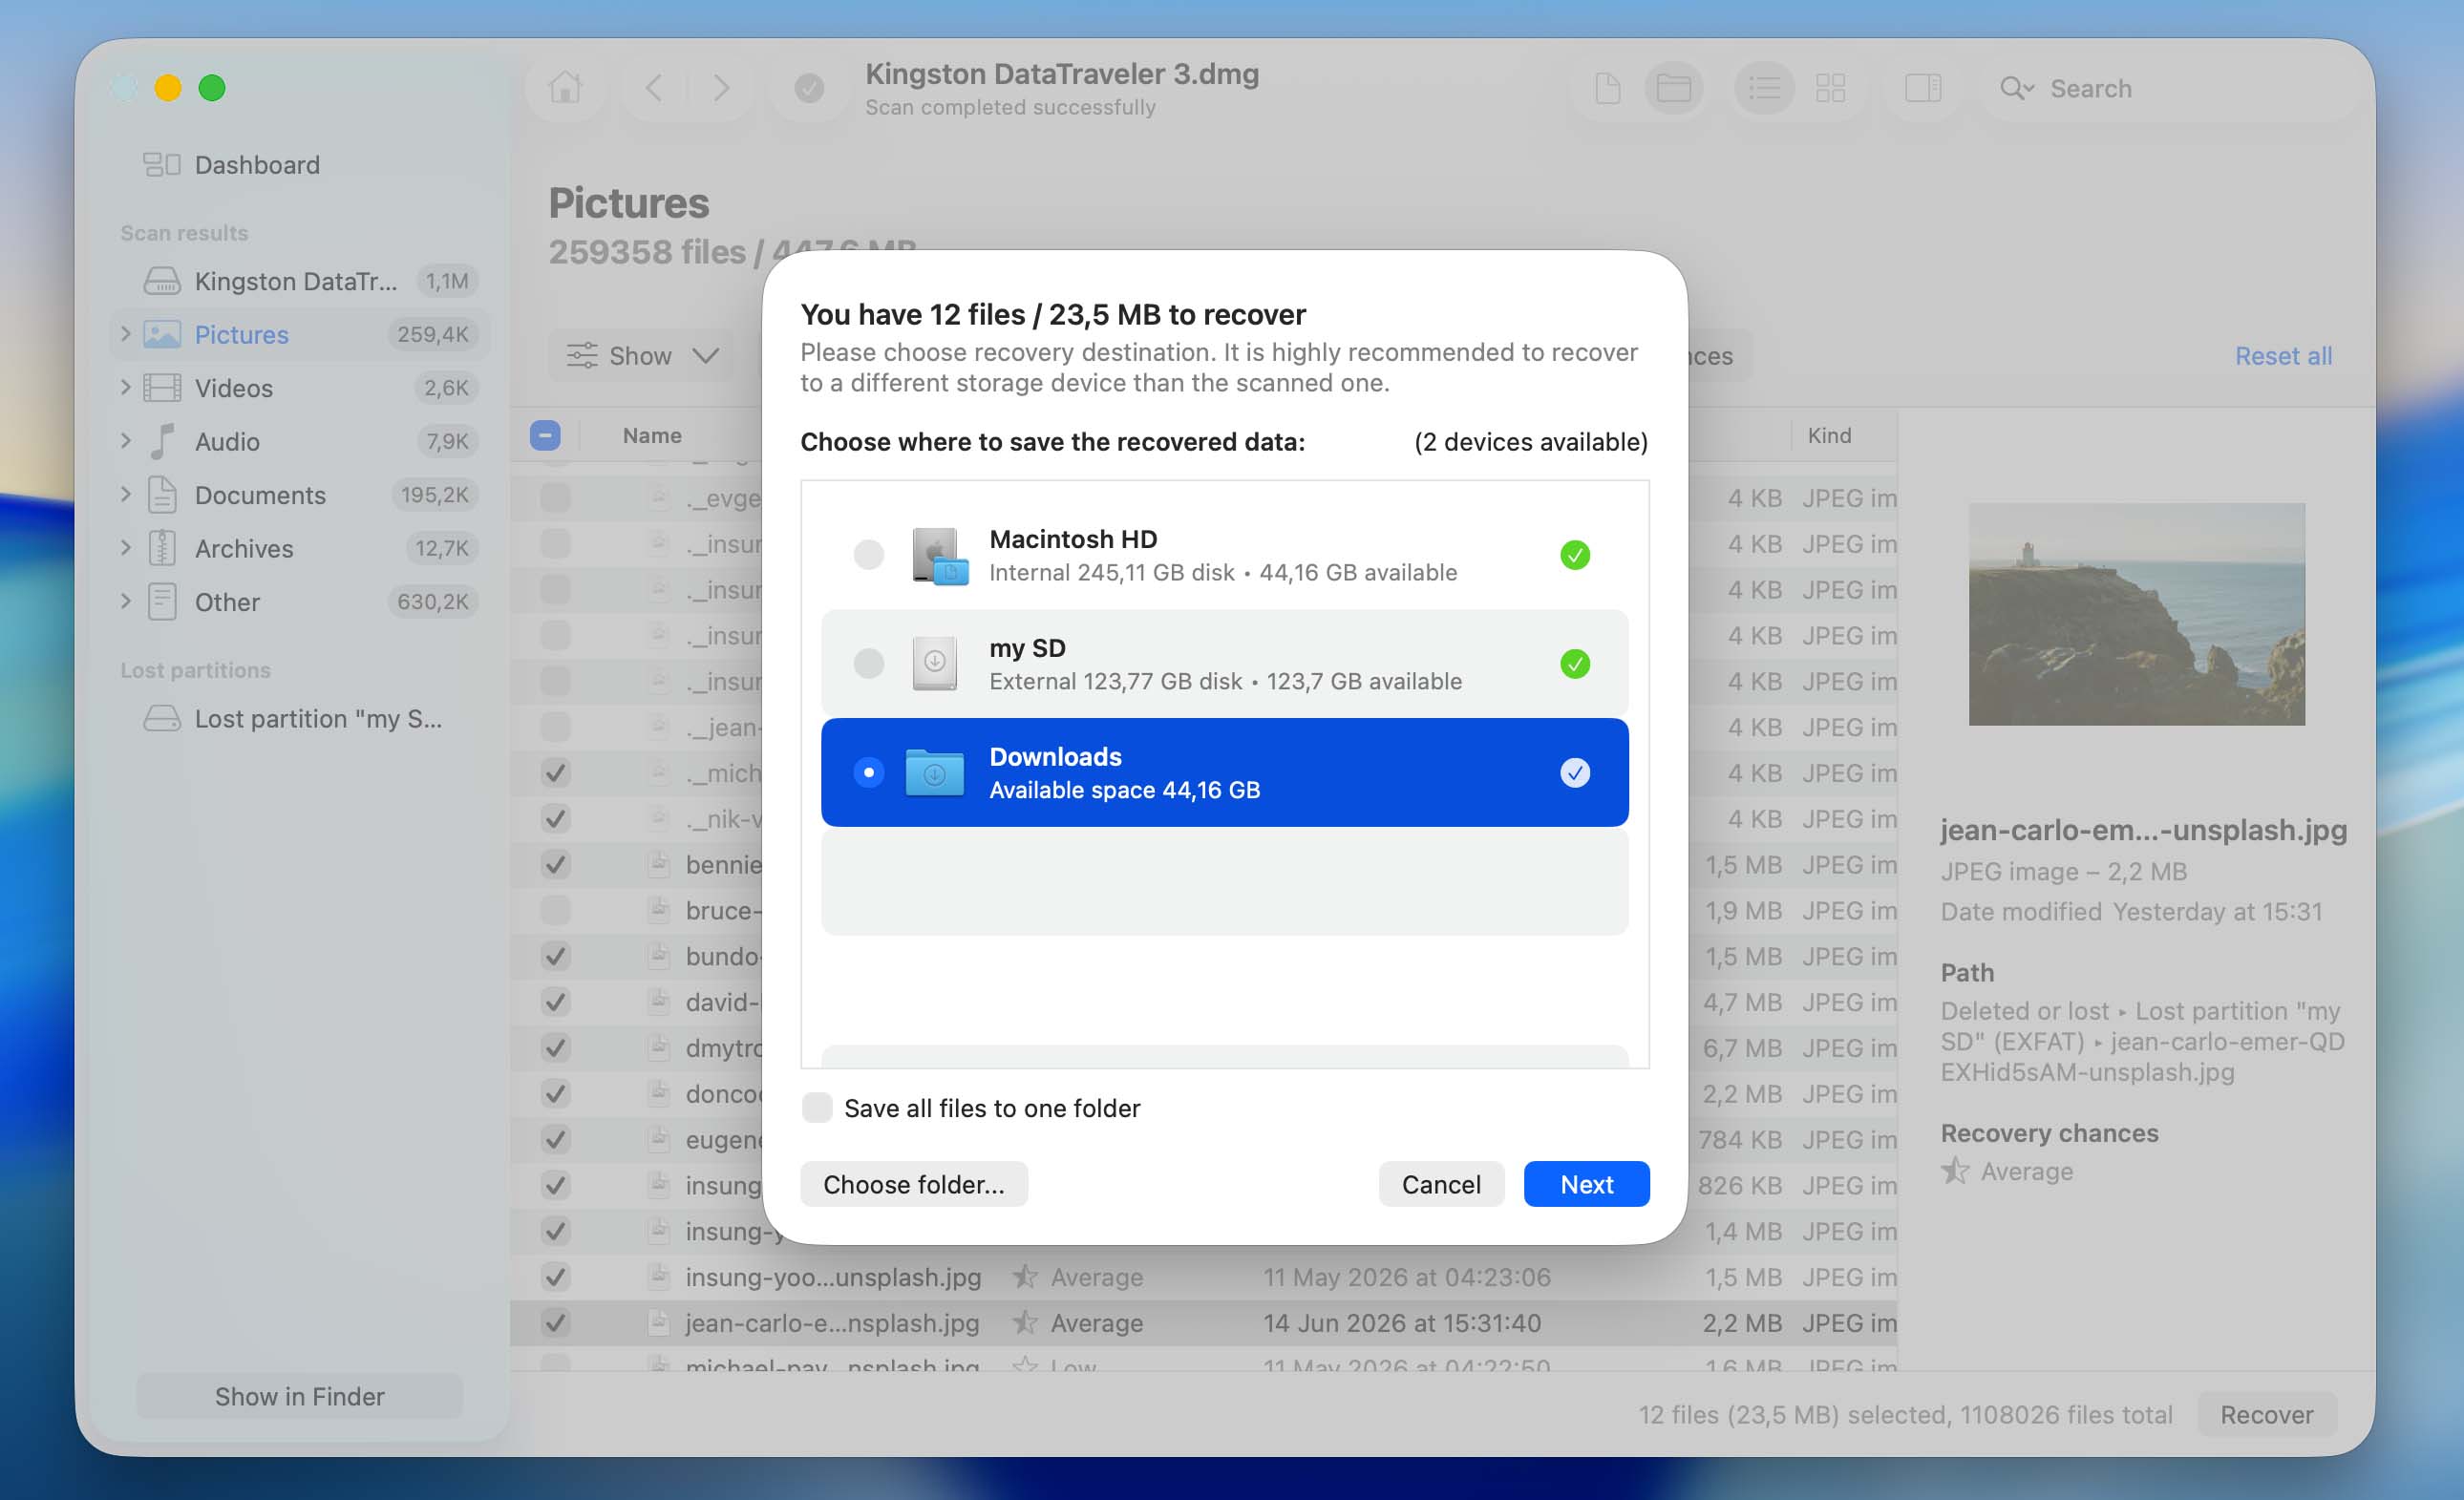
- Choose a recovery destination and click Next. Save the recovered photos to a location other than the SD card to avoid overwriting additional recoverable data.
- Wait for Disk Drill to complete the recovery process. Once finished, open the selected destination folder and verify that your recovered photos are accessible.
Keep in mind that Disk Drill’s free version has different limitations depending on your operating system. On Windows, you can recover up to 100 MB of data for free, which is often enough for at least a few photos. On macOS, the free version allows you to scan the SD card and preview recoverable files, but you’ll need Disk Drill Pro to actually recover them. Full recovery on both platforms requires a Disk Drill Pro license. If you’d like to learn more about its pricing and additional features, check the official Disk Drill website or our full Disk Drill review.
The recovery methods described above assume that the SD card is still readable by your computer. If the card is physically damaged or cannot be detected by any device, stop attempting DIY recovery and consider contacting a professional data recovery service instead. Continuing to work with a failing memory card may cause it to deteriorate further, potentially making some or all of the remaining data unrecoverable.
What to Do After Recovering Lost Photos From an SD Card
Recovering the missing photos is only half the job. If the photos disappeared because of accidental deletion, formatting, or an interrupted transfer, you can usually continue using the SD card as normal once the recovery is complete. However, if the photos disappeared because of corruption, malware, file system errors, or other SD card issues, the underlying problem still exists. Even if you successfully recovered the photos, there’s no guarantee that newly captured images won’t disappear again in the future.
For this reason, we recommend fixing the SD card before putting it back into regular use. There are several ways to do this, but formatting is usually the fastest, simplest, and most effective option ( it creates a fresh file system, removes file system corruption, clears problematic metadata, and gives your operating system or camera a clean storage structure to work with).
On Windows:
- Connect the SD card to your computer.
- Press Windows + X and select Disk Management.
- Locate your SD card in the list of drives, right-click the SD card’s partition and choose Format.
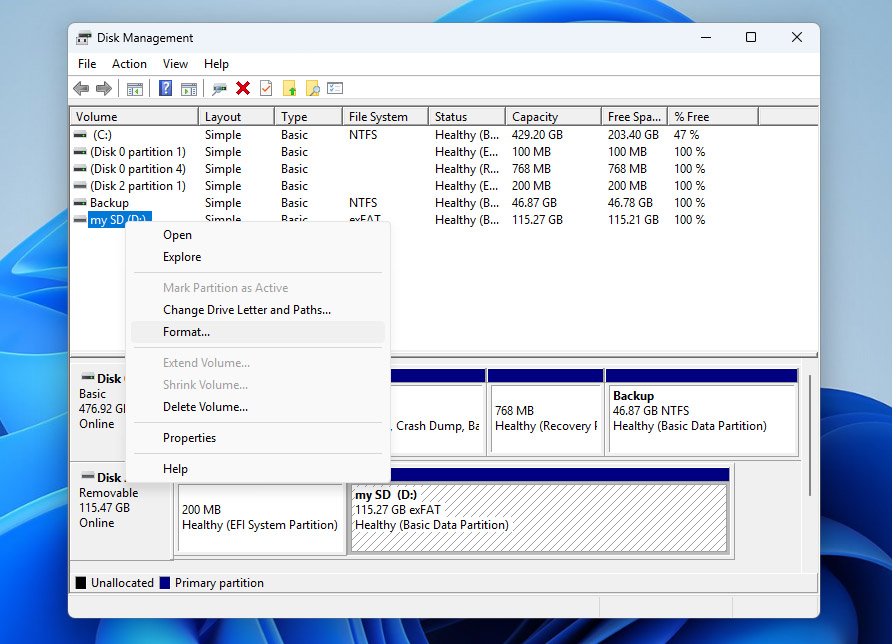
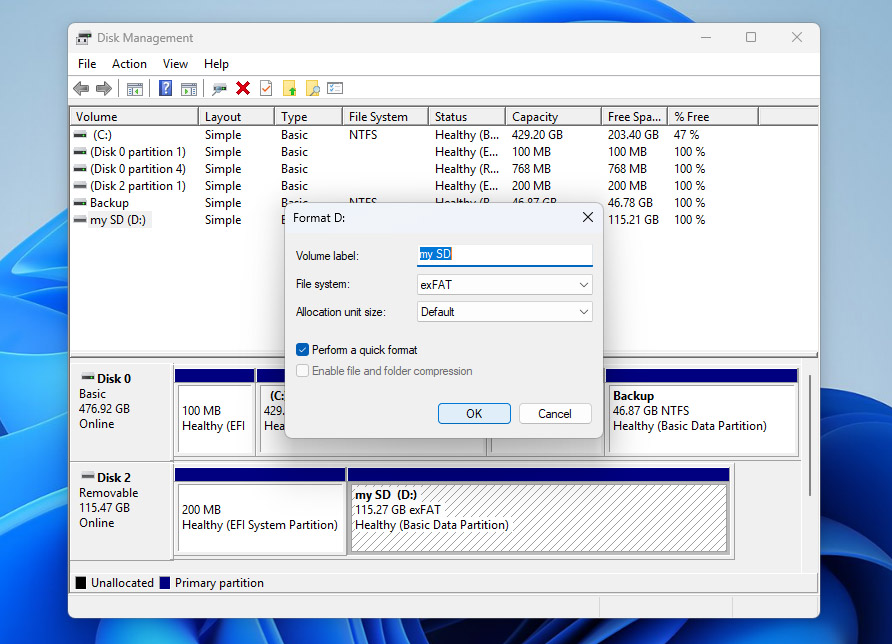
- Select exFAT (recommended for most SD cards larger than 32 GB) or FAT32 (for smaller cards and maximum compatibility), leave Quick Format enabled, click OK, and confirm the operation.
On Mac:
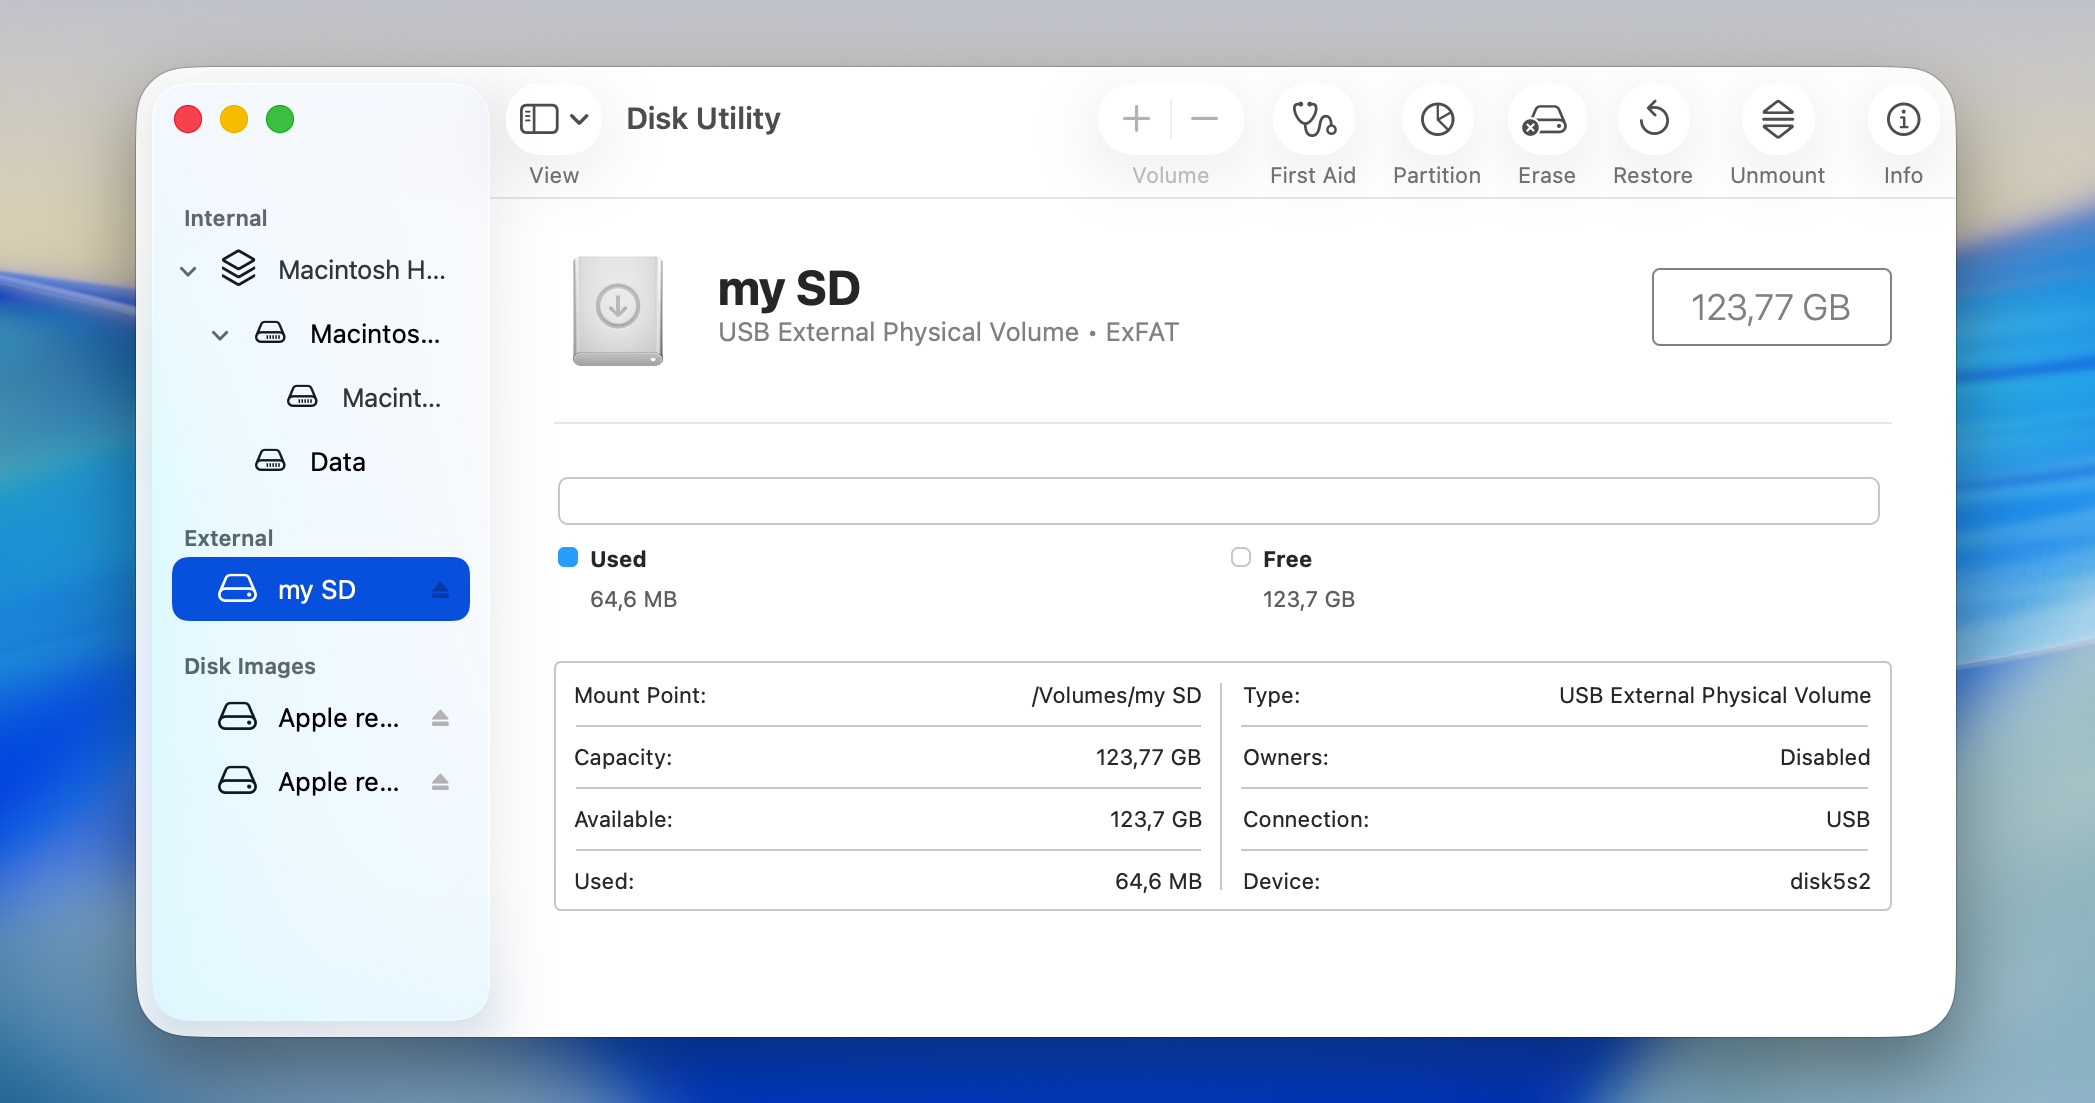
- Connect the SD card to your Mac.
- Open Disk Utility (Applications > Utilities > Disk Utility).
- Select the SD card from the sidebar and click Erase in the toolbar. Make sure you select the physical card, not just a volume beneath it.
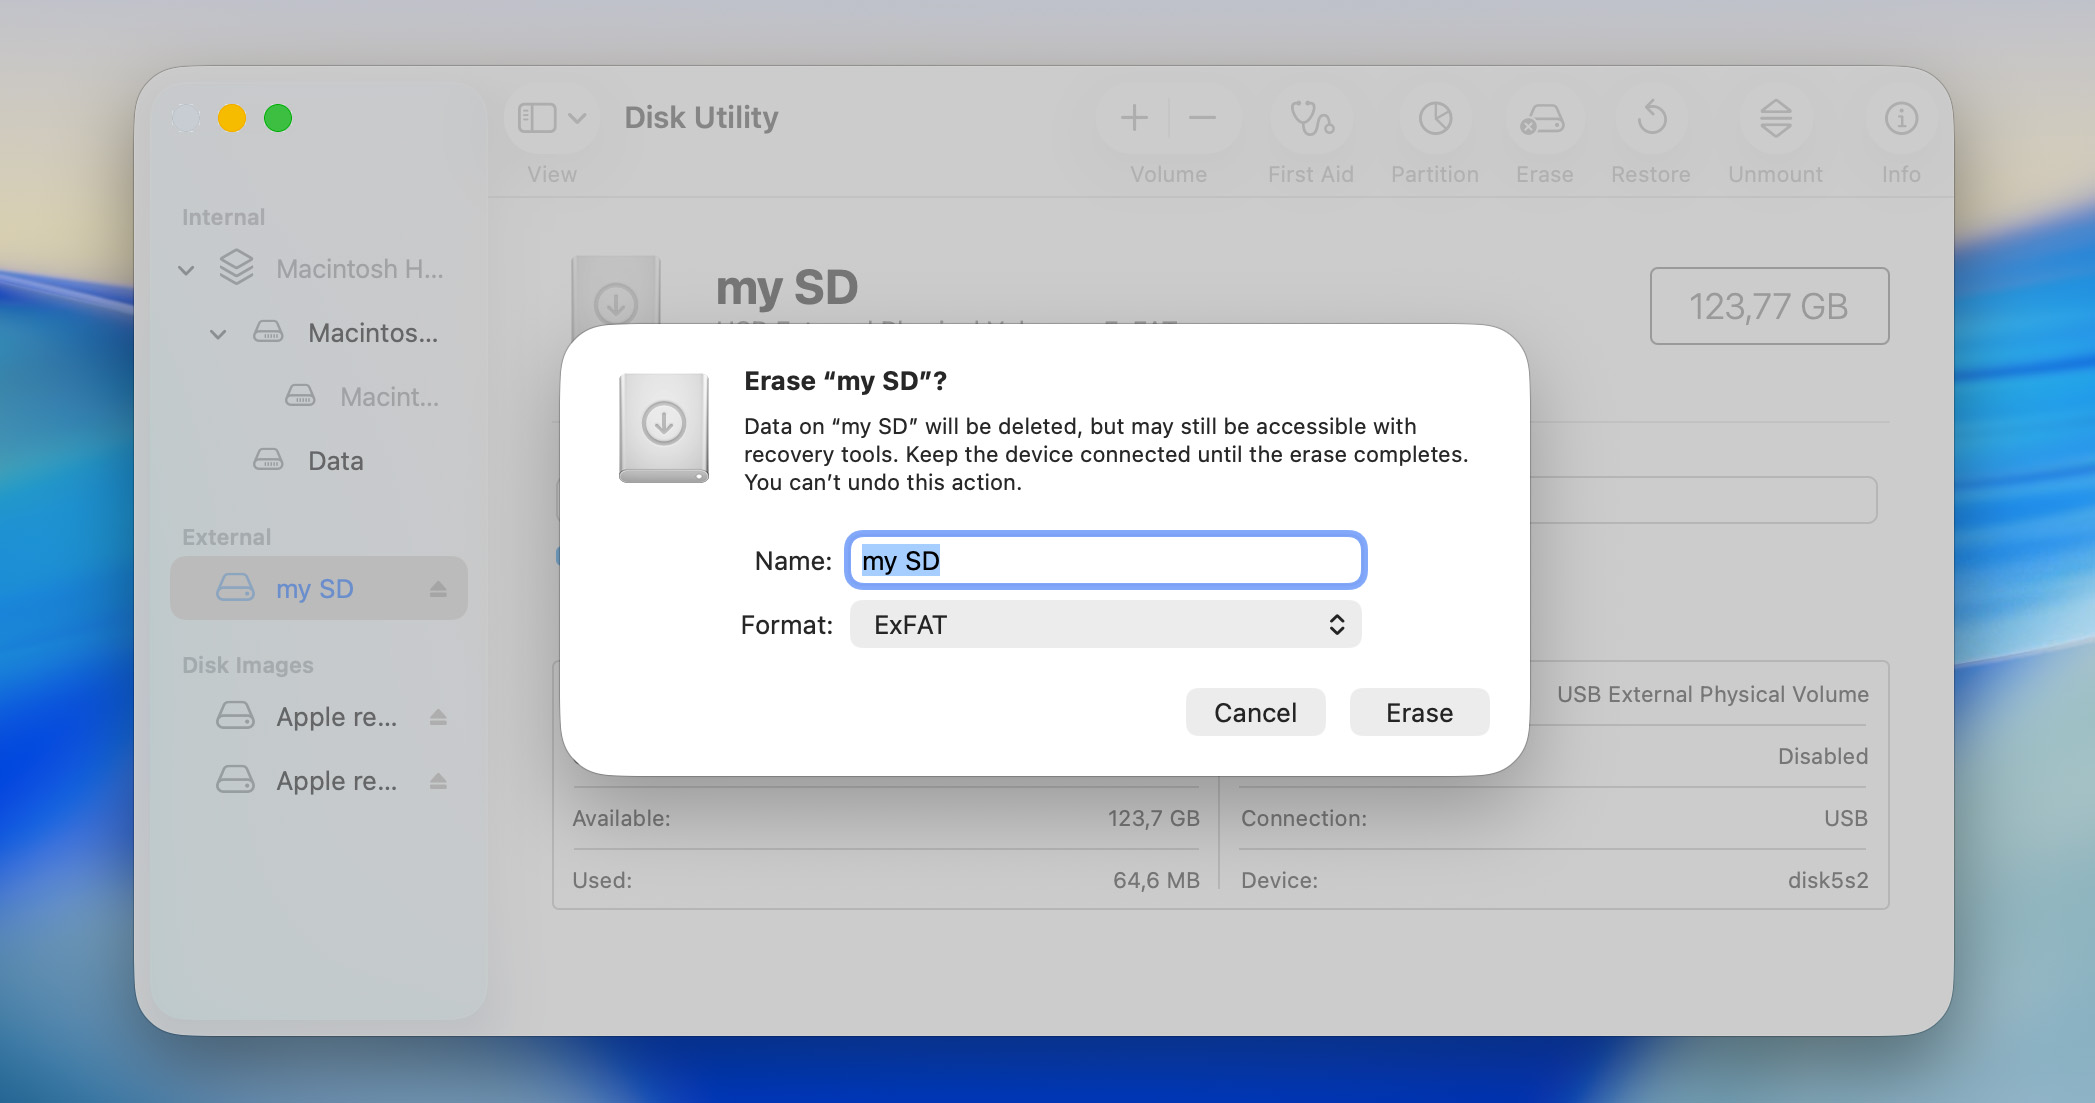
- Enter a name for the card, choose exFAT for most SD cards or MS-DOS (FAT) if you need FAT32 compatibility.
- Click Erase and wait for the process to complete.
After your OS finishes formatting the card, it will have a fresh file system and should be ready to store new photos and videos.
Conclusion
We tried to cover all the most common scenarios behind photos disappearing from an SD card and the solutions that can help in each case. Whether the missing files came from a camera, drone, Android phone, dashcam, or another device, the underlying principles remain largely the same. The causes of photo loss are similar, and so are the recovery methods.
If you still have questions, take a look at the FAQ section below. There’s a good chance we’ve already covered your specific scenario. If not, you’re always welcome to visit our forum. You can browse existing discussions, see how other users solved similar problems, or create a new topic and get advice from our community and data recovery specialists.


