Is your Mac having trouble recognizing your SD card? Or maybe the files on the memory card display an error when opened? Well, it’s possible that you’re experiencing such issues because of SD card corruption. If that’s the case and you’re unable to access the data stored on your card, we have a solution for you. We’ve covered everything that you should know about corrupted SD card recovery on Mac.
Main Reasons for SD Card Corruption
Corruption almost always falls into one of two categories: logical damage, where the file system or directory structure breaks down, and physical damage, where the storage medium itself degrades. Logical corruption is the more forgiving scenario, your data may still be there, just unreachable. Physical corruption is more serious. Let’s walk through the most common causes and what recovery realistically looks like in each case.
Below are the most common causes, along with recovery chances and what you can try:
| Cause | Description | Recovery Chances | Possible Fix |
| ✍🏽 Interrupted read/write process | Removing the card or stopping a transfer mid-process can corrupt file structures. | High | Use data recovery software, then reformat the card |
| 🔥 Physical damage (heat, water) | Environmental exposure can damage internal components. | Low to very low | Avoid further use; consider professional recovery services |
| 🔌 Power outage | Sudden power loss during file operations can break the file system. | High | Recover data if needed, run Disk Utility (First Aid) |
| ⏏️ Improper removal | Disconnecting the card without ejecting can corrupt the file system. | High | Repair with Disk Utility or recover files, then format |
| 💾 Aging (wear-out) | Flash memory degrades over time with repeated use. | Medium to low (declines over time) | Recover data as soon as possible, then replace the card |
| ❌ Bad sectors | Damaged memory blocks can make parts of the card unreadable. | Medium (depends on spread) | Create a disk image, recover data, then retire the card |
If you suspect that your SD card is corrupted, it’s important to stop using it immediately. Continuing to use a memory card with such an issue may worsen the situation and increase the risk of overwriting data and, therefore, make it unrecoverable.
What to Do if Corrupted SD Card is Unreadable
If your SD card is unreadable, it’s a good idea to try to troubleshoot it to see whether you might be able to access those files before without resorting to more complex data recovery methods.
Here’s what you can try:
- Connect the SD card to a different device. Maybe the issue isn’t connected with the card itself. To rule out this, try inserting the SD card into another computer or a different device like a camera or phone.
- Try to use another USB port (if you’re using an external card reader) or a card slot. It’s possible that the port you were using to connect the SD card is damaged, therefore you should try to use a different one.
- Reboot your computer. Sometimes a simple action like restarting your computer might help to make your SD card readable again. It’s possible that the applications that are running on the background of your Mac are interfering with the SD card and stopping you from reading it. Therefore, by restarting your computer, you’ll eliminate this issue and reestablish the connections between your Mac and the SD card.
- Get your software and firmware up-to-date. There is a chance that your SD card is incompatible with your computer because of outdated software.
- Reset PRAM/NVRAM and SMC (M1-based Macs and newer have these features reset after reboot automatically). So if that’s what making your SD card unreadable, resetting them might bring back the access to your files.
How to Recover Data from a Corrupted SD Card on Mac
If you need to recover your data and fix the SD card so you can use it again, always start with data recovery. Even a single repair attempt can overwrite existing data and make recovery impossible. Recovering files first gives you the best chance to get back your photos, videos, and other important data. After that, you can move on to fixing or formatting the card.
Below are two reliable ways to restore data from a corrupted SD card on a Mac. The first is a DIY method that uses data recovery software. The second involves a professional data recovery service. Both options can deliver strong results, depending on the condition of the card.
Method 1: Use Data Recovery Software
It’s possible to recover files from a corrupted SD card on a Mac using specialized data recovery software.However, this method will work only if your memory card is detected in Disk Utility with the correct size. You can also check this directly in recovery software, if the card is listed, it can usually be scanned. If it’s impossible to detect the card on your Mac, check out Method #2.
There are not many options when it comes to choosing a data recovery tool for restoring files from an SD card since not all applications support this type of device, and not all of them are compatible with the Mac operating system.
Our recommendation is Disk Drill since it’s one of the best SD card recovery tools for Mac. It’s user-friendly, reliable, and has a free trial version. Moreover, Disk Drill can restore around 400 file types, so it will be able not just to recover photos from a corrupted SD card on a Mac, but handle almost any type of file (whether it’s an image, video, audio file, etc.).
To minimize the chances of overwriting the lost data and preventing the corruption from worsening, it’s a good idea to clone your SD card by creating a DMG image of the data stored there and then using it to restore the files (once you scan the backup or the SD card itself, you’ll find not only the currently present files on the corrupted SD card but also deleted ones).
Here’s what you should do to recover a corrupted SD card on a Mac using Disk Drill:
- Download Disk Drill and follow the onscreen instructions to install it on your Mac.
- Connect the SD card to your computer and launch the app.
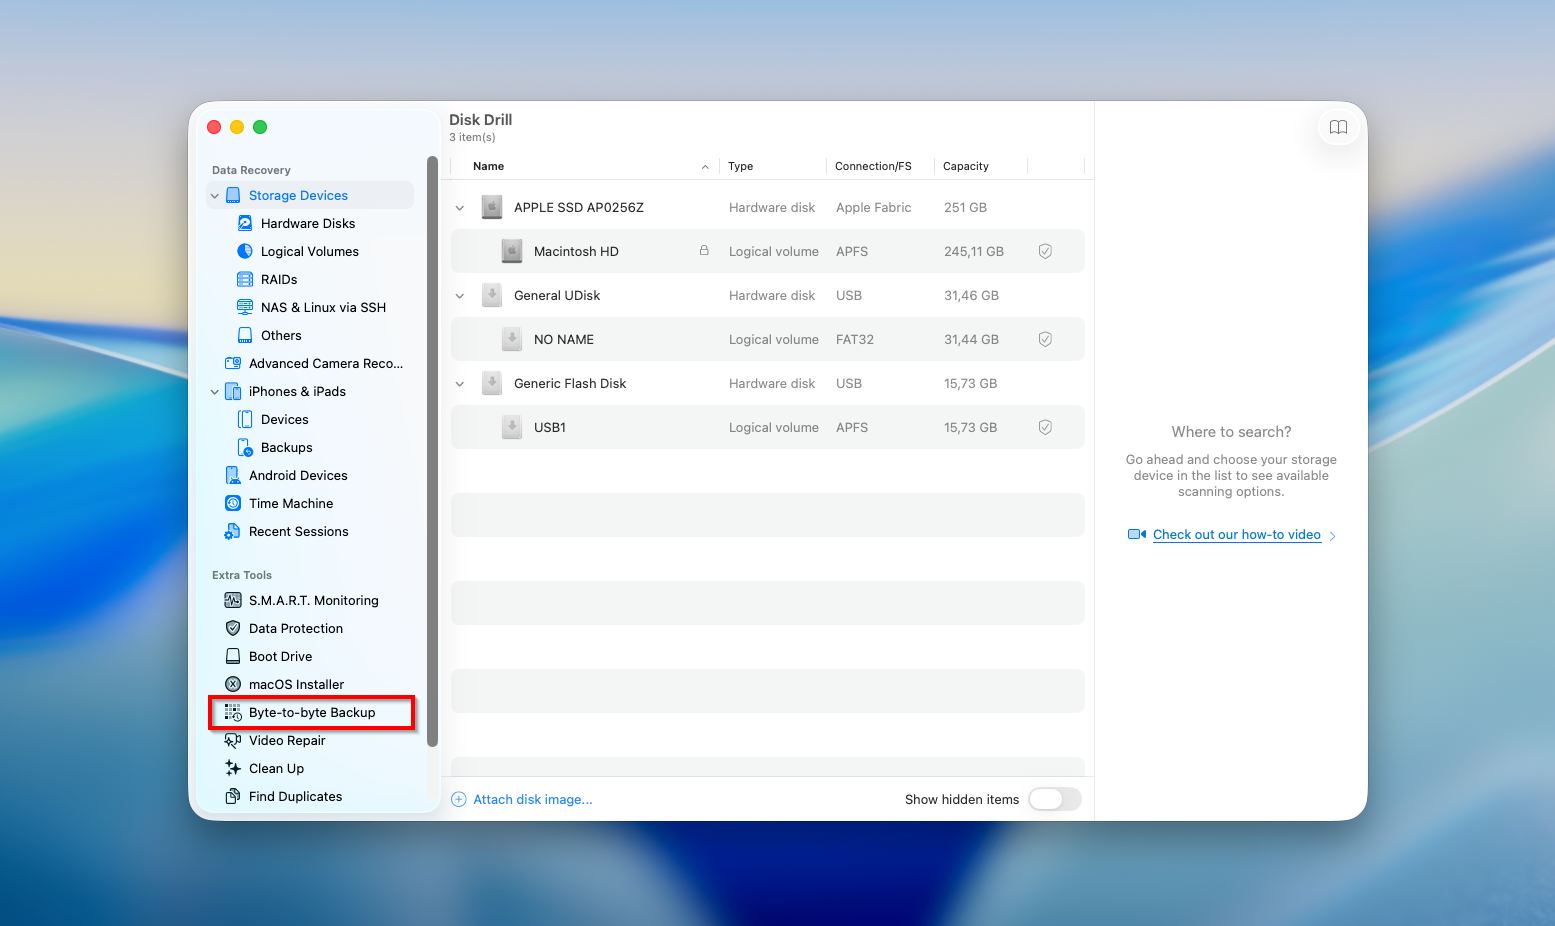
- Choose Byte-to-byte Backup from the sidebar on the left.
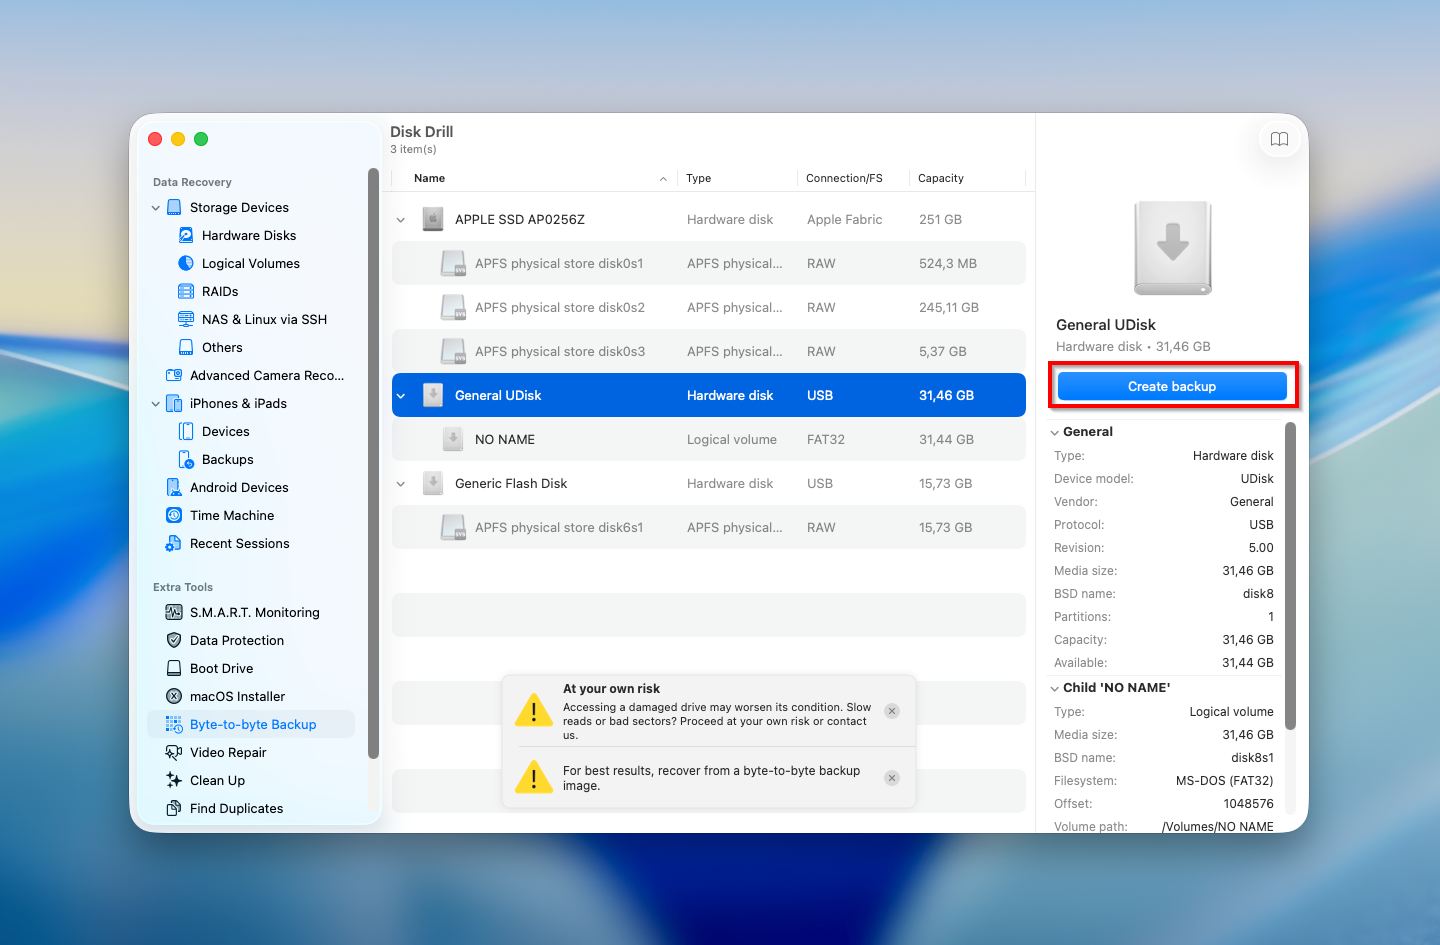
- Select the SD card from the list of available devices and click the Create backup button on the bottom right.
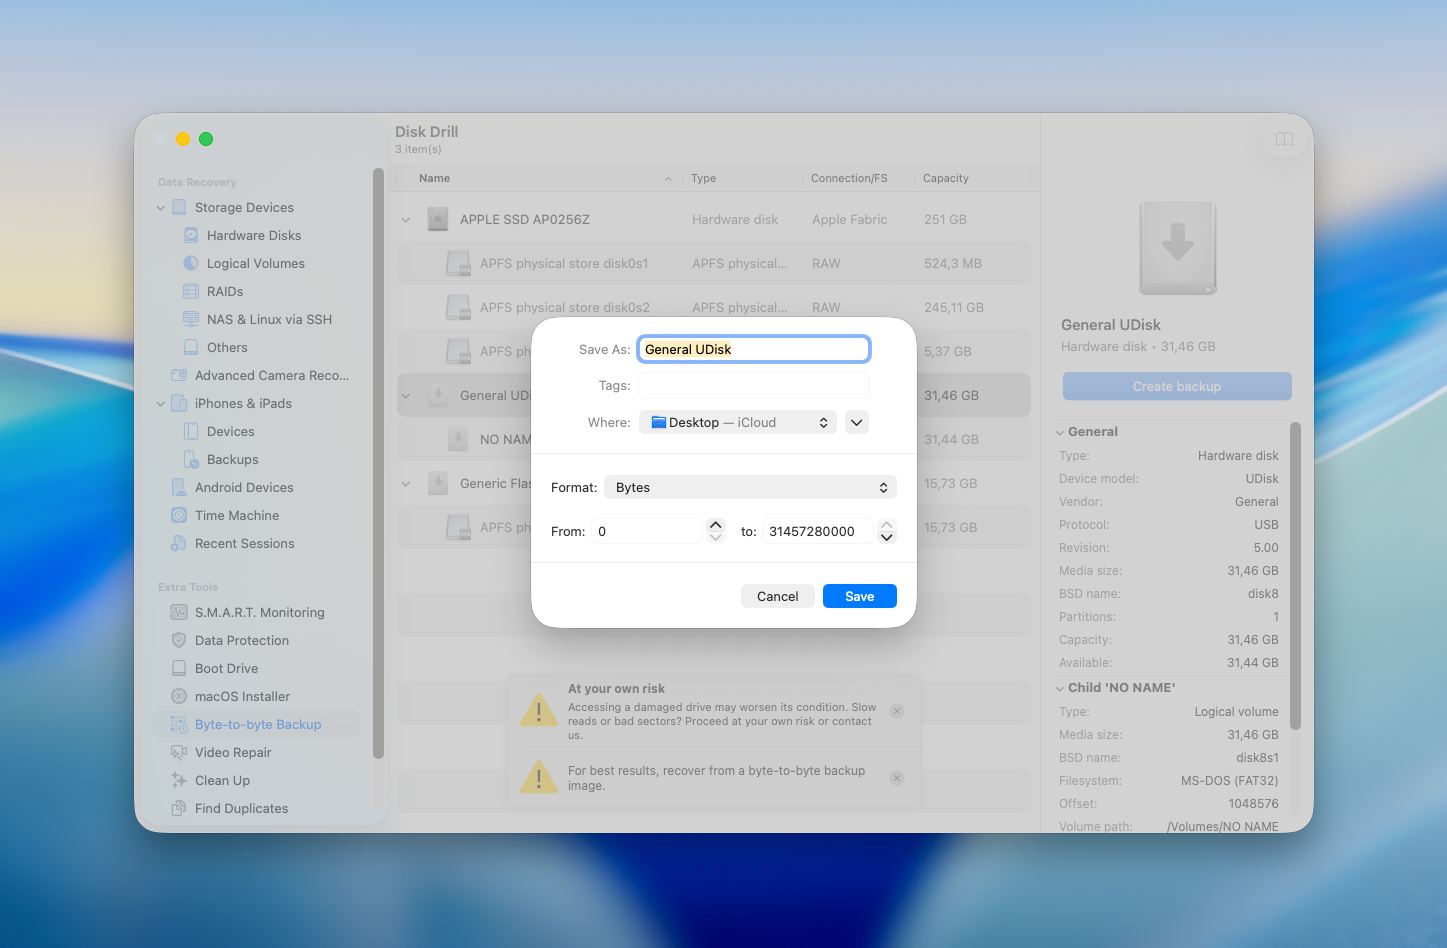
- Type in a name for the backup file near Save As and click the arrows near Where to select a preferred location. Click Save when ready.
- During the process, Disk Drill may highlight bad blocks on the card. This gives you a clearer idea of the SD card’s condition and helps you assess how severe the damage is before proceeding with recovery.
- Once the process is finished, eject your SD card.
Once the process is finished and the backup of your SD card is ready, you can scan it with the tool to reveal the data and recover the needed files. Here’s what you should do next:
- Choose the Storage devices tab from the menu on the left.
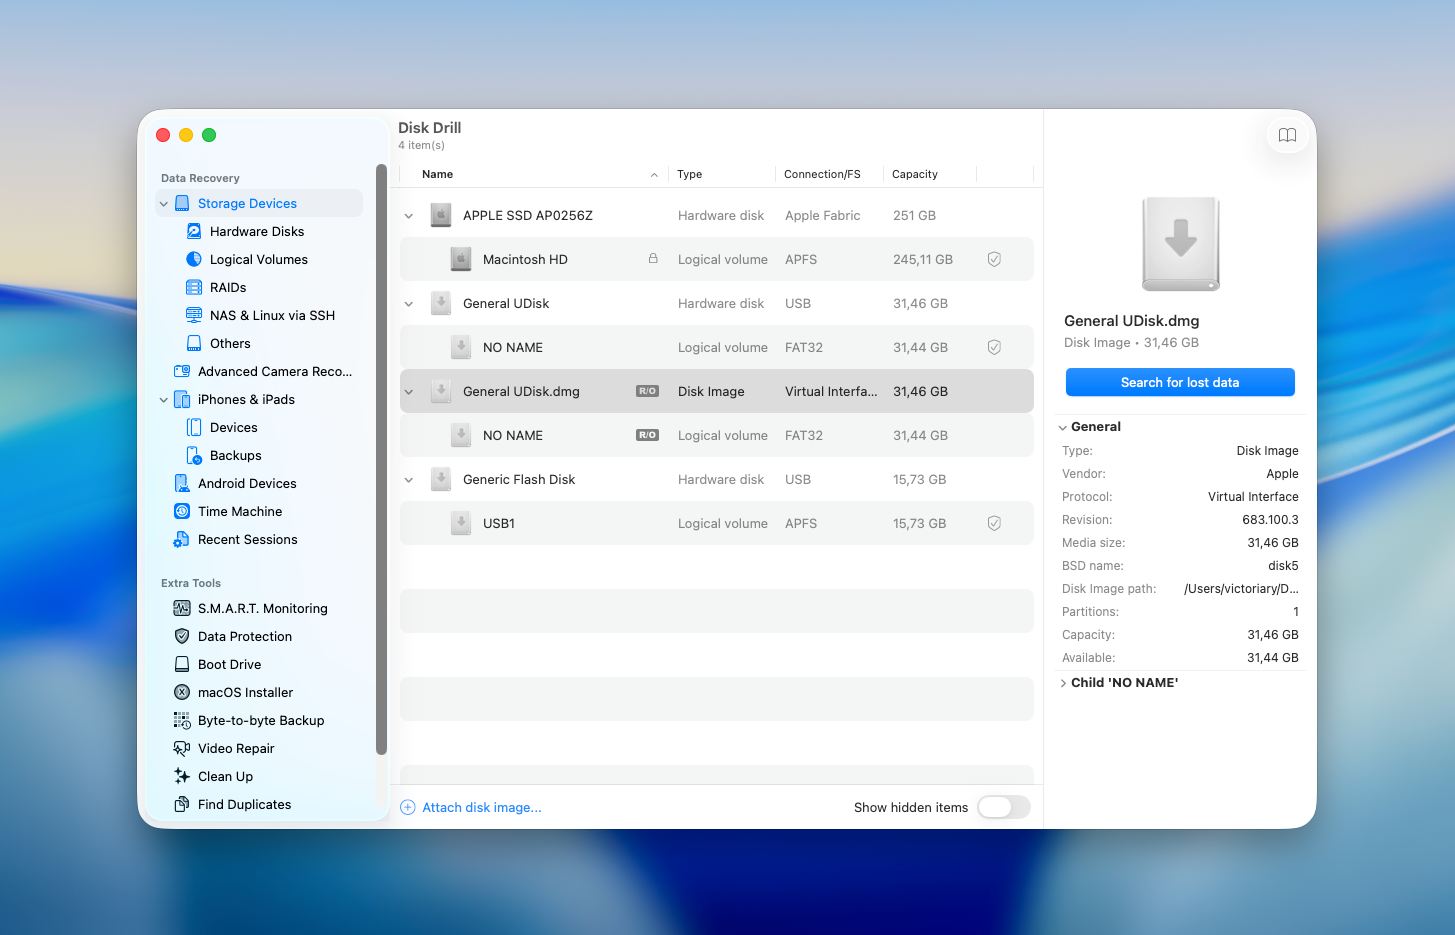
- Click Attach disk image on the bottom of the window.
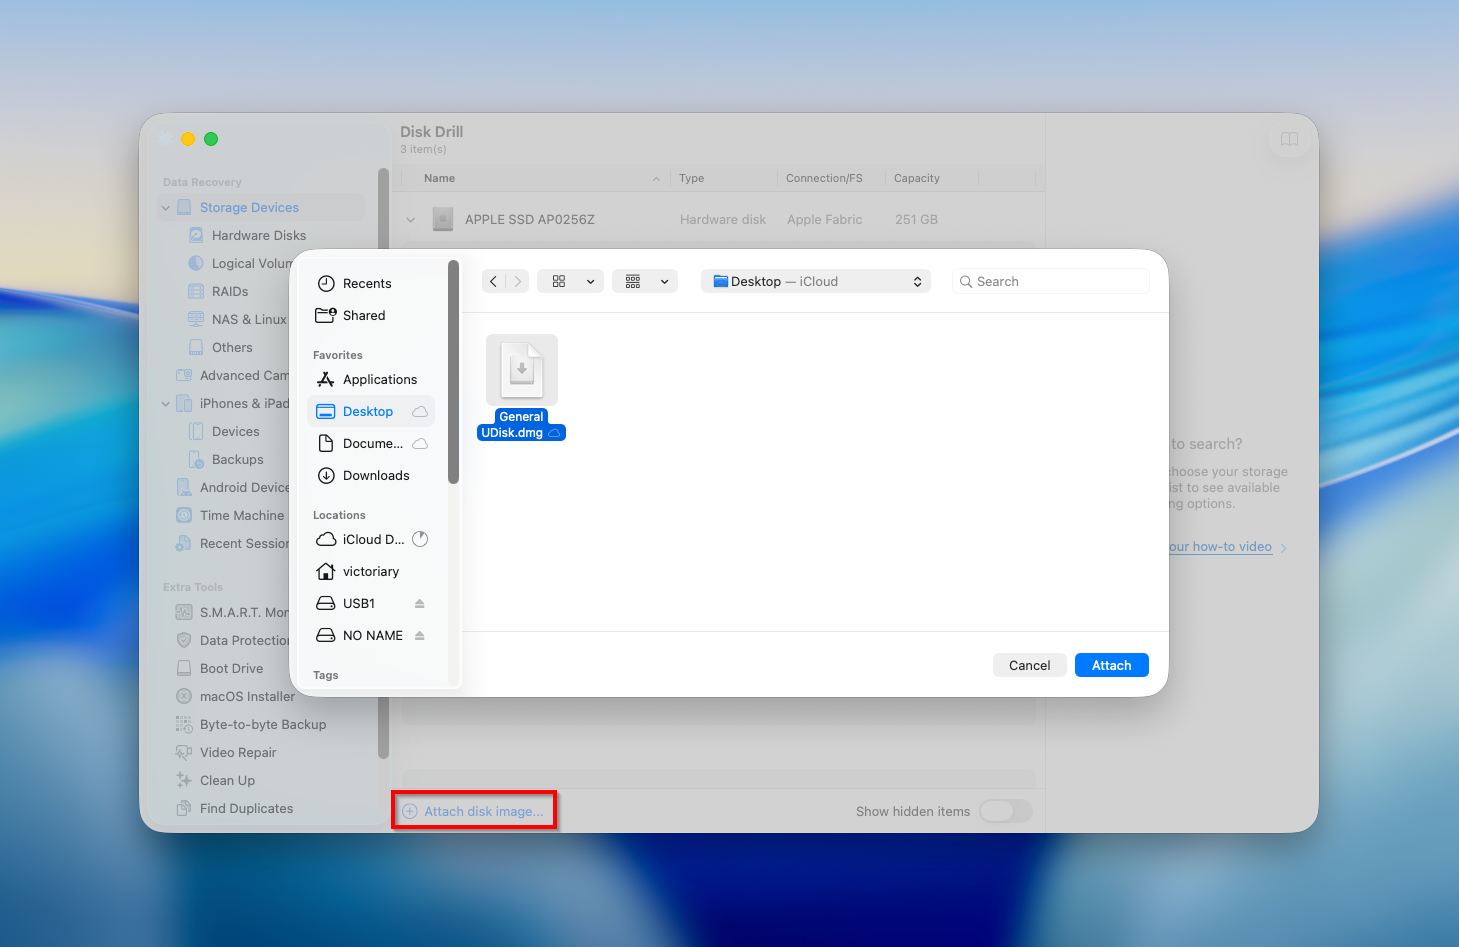
- Select the image that you’ve previously created and click Search for lost data to initiate the scan.
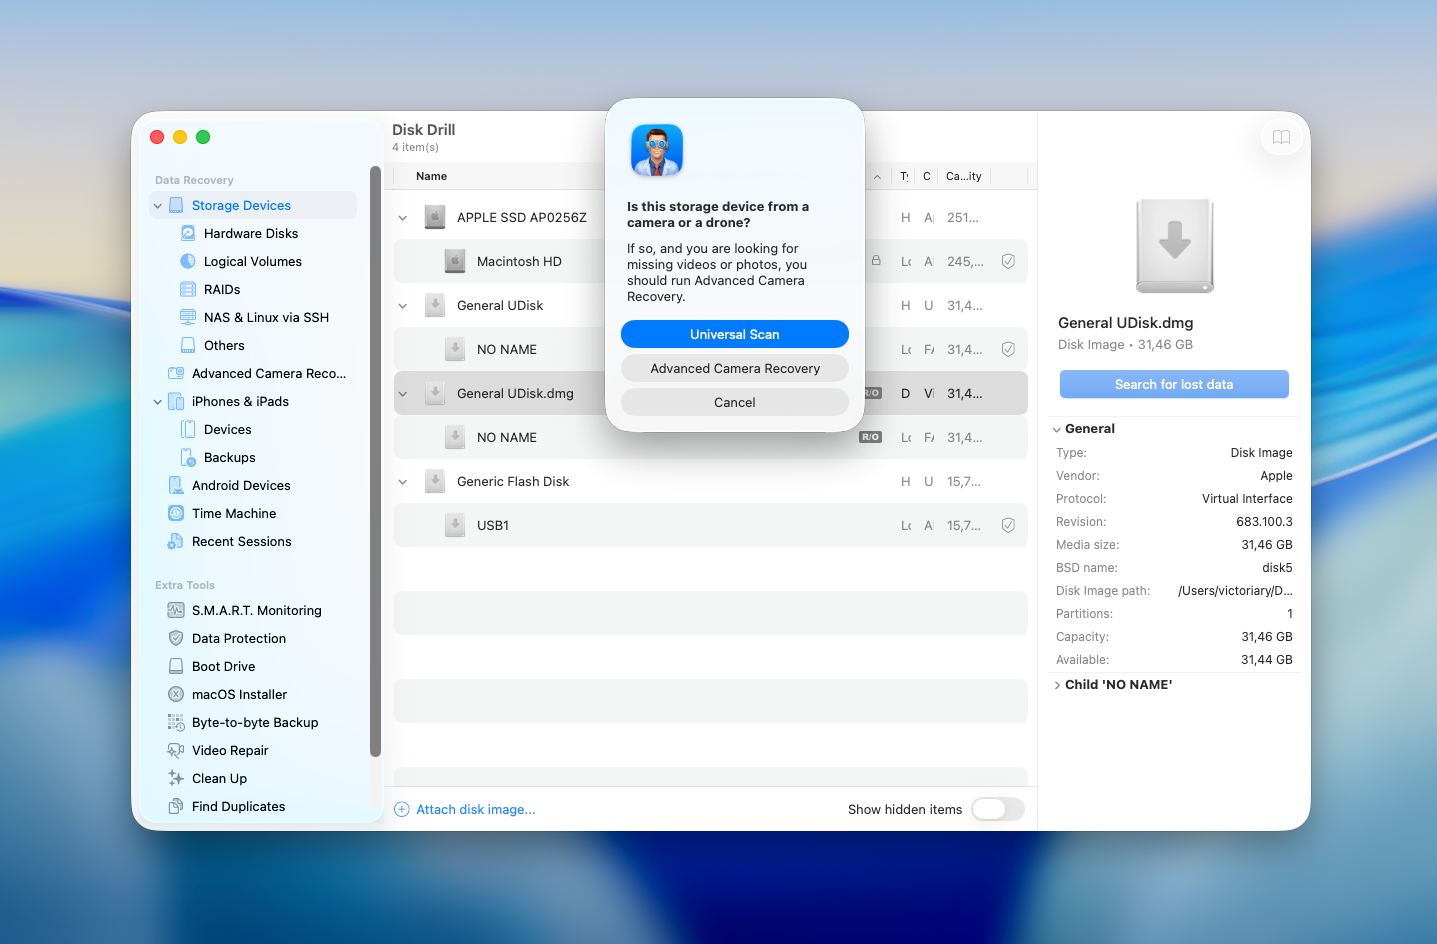
- Disk Drill will then prompt you to choose a scan type. In most cases, Universal Scan is the right option since it covers typical file systems and common data loss scenarios. However, if you’re dealing with camera or drone footage stored on a memory card, it’s better to use Advanced Camera Recovery, which is designed to handle fragmented video files in .mp4 and .mov formats.
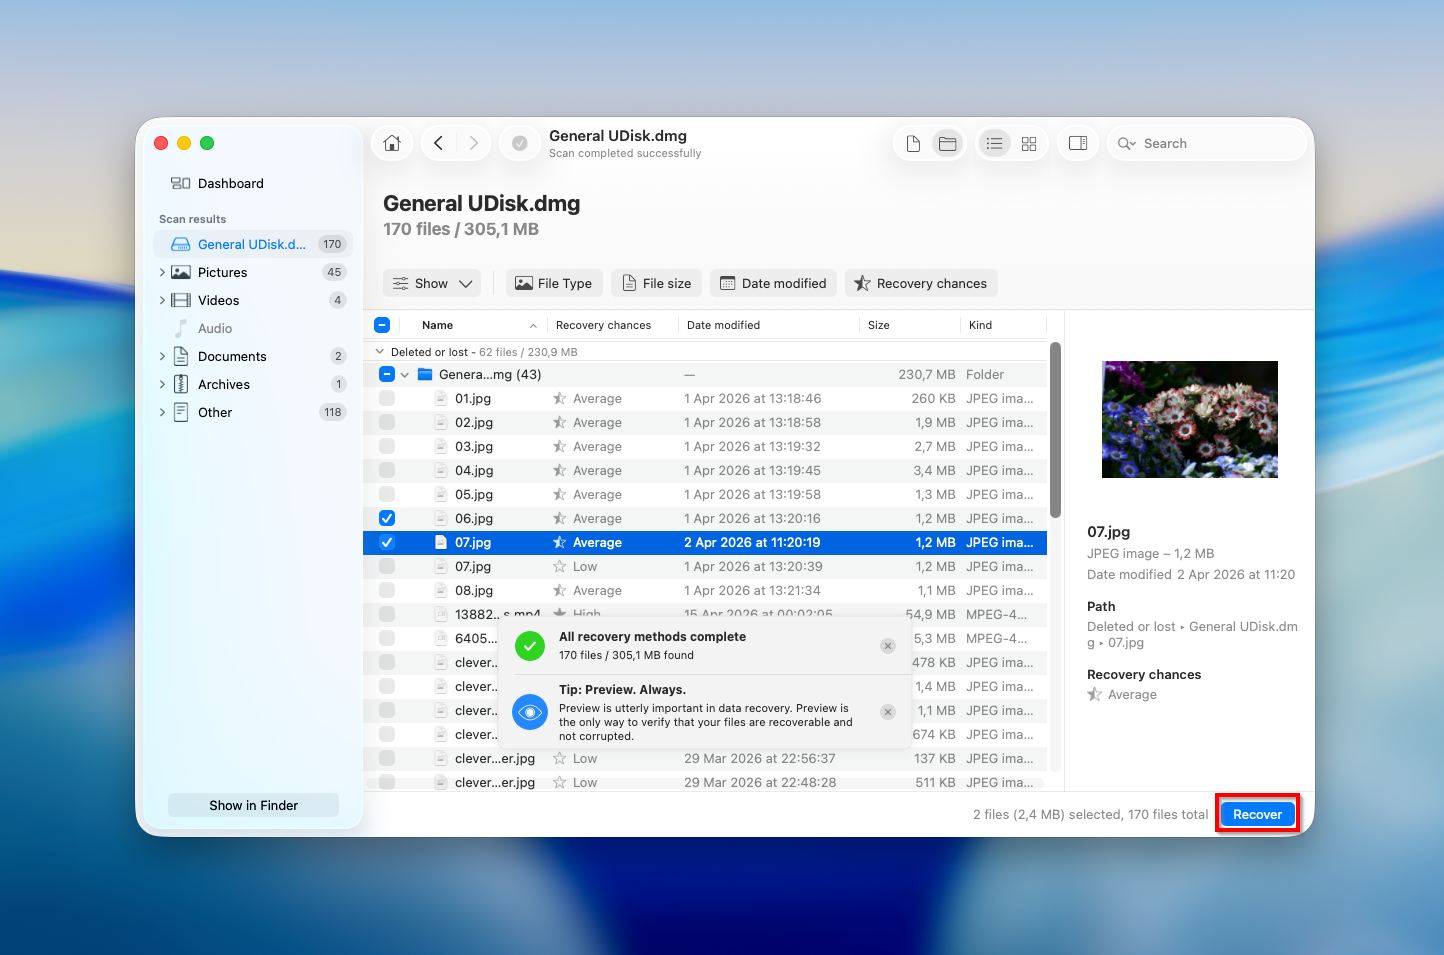
- Click Review found items to look through the files found by the application.
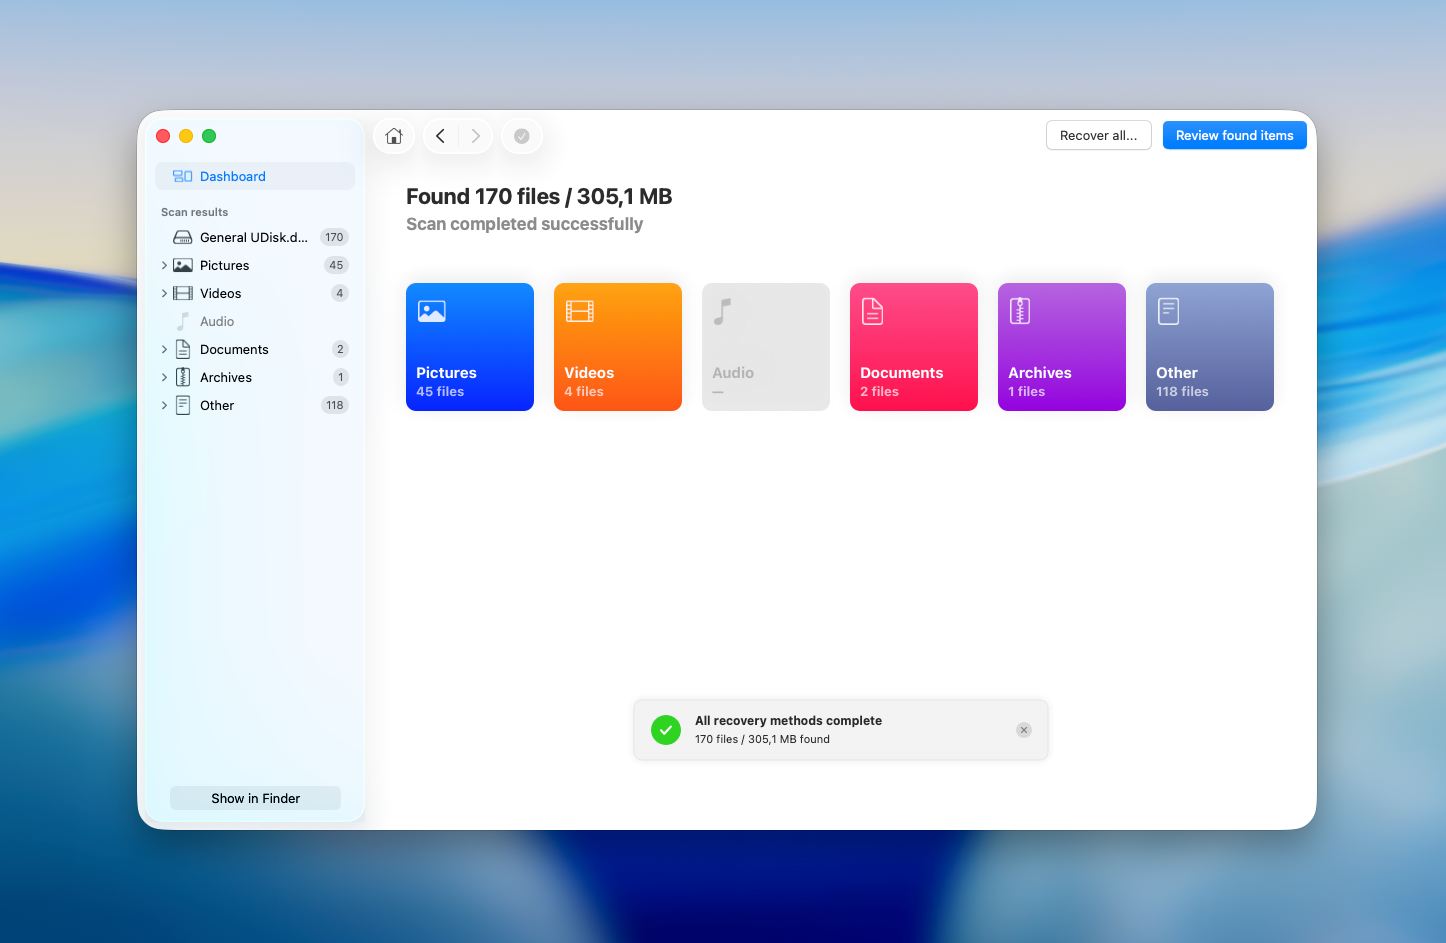
- Preview any file to see whether it is the one you’re looking for by simply clicking it. Choose the files you want to recover or, if you want to recover all of the data, click the box on the top left of the file list to select all of the files. When ready, click Recover.
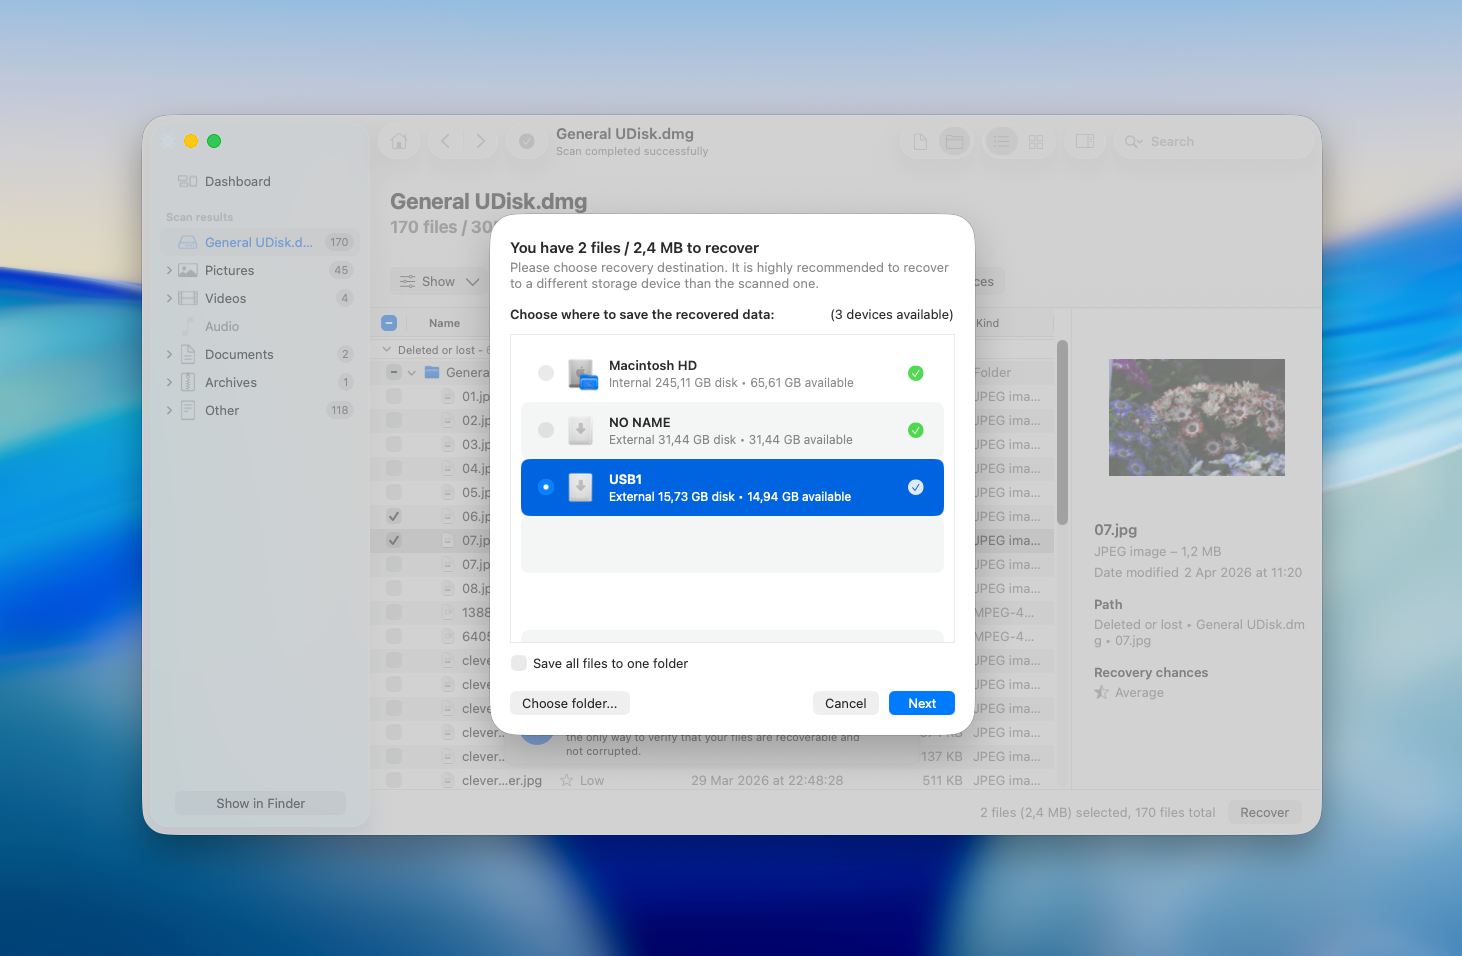
- Choose a destination for the recovered files and click Next to confirm (to avoid overwriting data, make sure to save the recovered files on a different drive).
Keep in mind that Disk Drill for Mac isn’t entirely free. The trial version will let you scan your SD card and preview files that were discovered by the tool. If a file can be previewed, it means that it can be potentially recovered with Disk Drill. This way, you’ll be making an informed decision about whether you should buy the software and upgrade to the Pro version.
Method 2:Contact a Data Recovery Service
If you aren’t able to make your SD card readable and it’s still not showing up on your Mac, or you are simply worried that you might mess up when trying to recover the data by yourself using the DIY method, you can let professionals handle this issue and let them take matters into their own hands. Data recovery experts know how to make an SD card mountable again and can use advanced techniques to access the data on it.
Cleverfiles Data Recovery Center is one of the most trusted options available. They’ve helped countless users recover data from corrupted and damaged storage media, and their process is straightforward and risk-free: they offer a free diagnostic evaluation of your device and operate on a strict “No Data – No Charge” policy, which means if they can’t recover your files, you pay nothing. There are no attempt fees, no hidden costs, and no surprises.
Here’s how the process works if you choose to go this route:
- Start a Work Order. Fill out, print, sign, and send a Work Order form along with your SD card. The more detail you provide about the issue, the more accurate the diagnostic evaluation will be.
- Pack and ship your SD card safely. Static electricity, physical shock, and vibration can cause further damage to storage media. Wrap your card in an anti-static bag or aluminum foil, then cushion it with at least 2 inches of foam or bubble wrap on all sides inside a box. Ship via certified mail or a carrier with tracking. Alternatively, you can drop it off at one of their locations nationwide.
- Receive a free failure report and price quote. Their experts will evaluate your device and get back to you with a guaranteed price.
- Approve the quote to begin recovery. Recovery only starts once you’ve given the green light.
- Get your data back. Once the recovery is complete, your files are returned to you on a DVD, flash drive, or external hard drive.
CleverFiles has spent over a decade providing data recovery solutions, and their center is partnered with one of the most reliable recovery labs in the US.
How to Fix Corrupted SD Card on Mac
Once you’ve retrieved the data from your corrupted SD card, you can try to repair it. It’s incredibly important to extract the files from the memory card before moving forward with the repair process to avoid losing all of the data stored there.
So how to fix a corrupted SD card on a Mac? Here are the methods that may help if the corruption of the SD card is logical by nature.
Method 1: Check Finder Settings
Sometimes an SD card is connected and readable, but macOS does not show it on the desktop or in Finder sidebar because of your current Finder settings. This can make it look like the card is missing or not working, even though the system has already detected it.
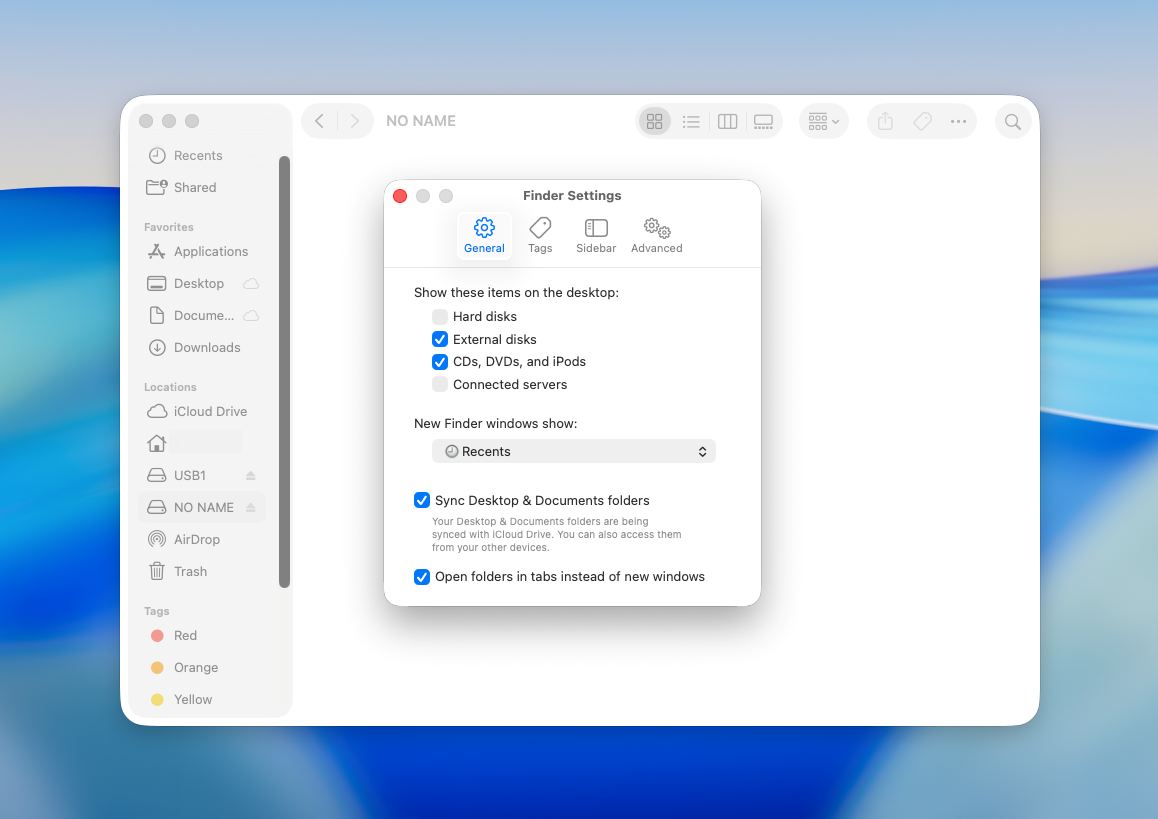
- Open Finder.
- Click Finder in the top menu bar and choose Settings (or Preferences on older macOS versions).
- In the General tab, make sure External disks is enabled if you want the card to appear on the desktop.
- Then open the Sidebar tab and make sure External disks is also enabled there if you want the card to appear in Finder’s left sidebar.
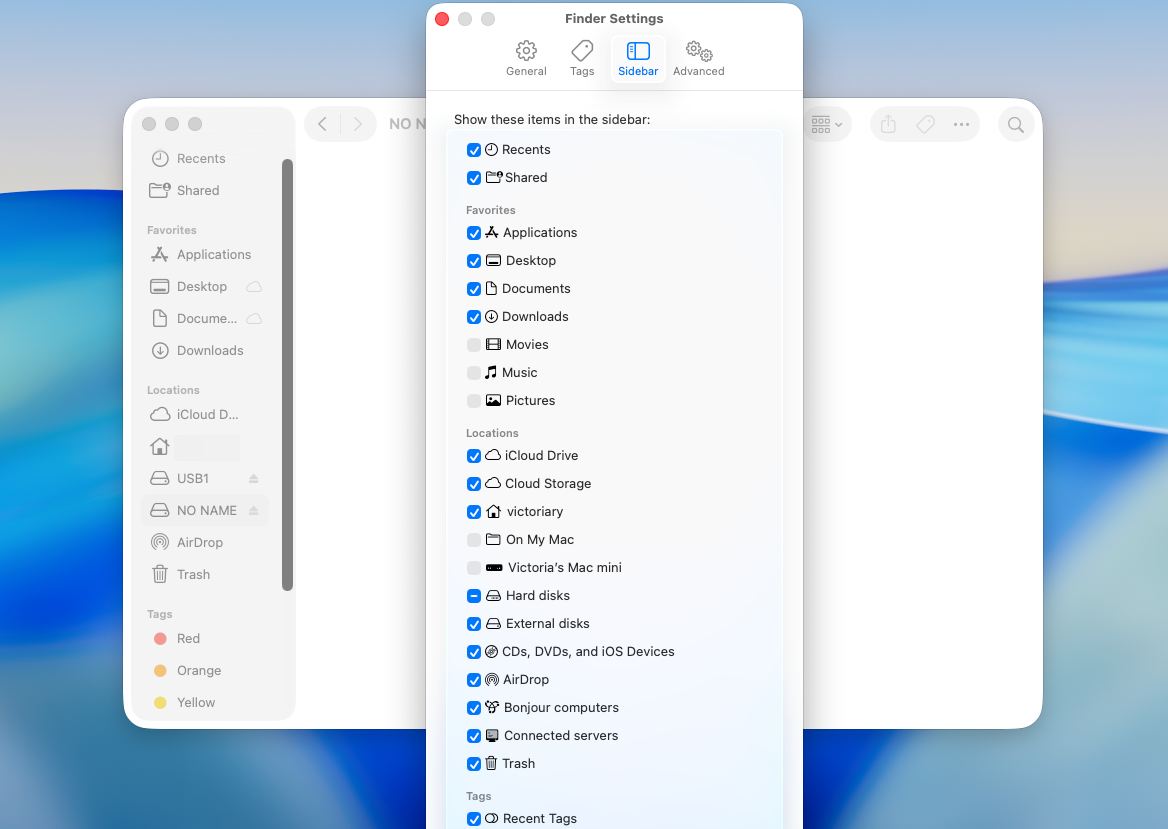
- Close the settings window and check whether the SD card now appears.
This step does not repair corruption and does not change anything on the card itself. It only makes sure macOS is allowed to display external storage in Finder. We recommend checking this first because it is simple, safe, and sometimes solves the problem immediately. If the card still does not show up after that, the issue is likely related to mounting, file system corruption, or hardware detection rather than just Finder display settings.
Method 2: Run First Aid in Disk Utility
Disk Utility’s feature called First Aid can check for corruption or errors and repair any device connected to a Mac, including an SD card. Follow these steps to repair a corrupted SD card on a Mac using First Aid:
- Connect the SD card to your Mac.
- Open the Disk Utility app (go to Launchpad and type Disk Utility in the search field).
- Select your SD card from the list of devices on the sidebar on the left.
- Click First Aid at the top of the window.
- Click Run to start the process.
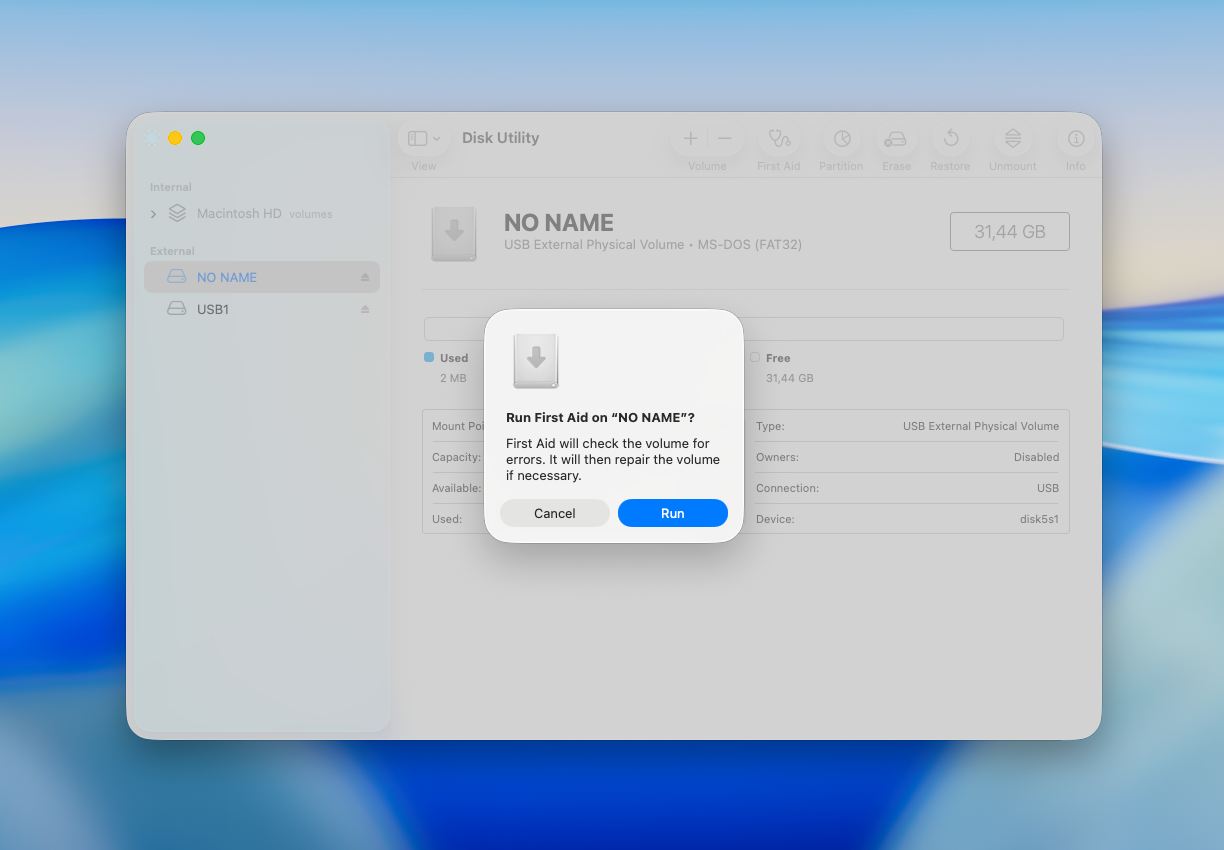
- When the process is complete, click Done and eject your SD card.
First Aid can resolve common logical problems, such as corrupted file structures or directory errors. However, it may not fix severe corruption, and in some cases, damaged files can be affected during the repair process.
Method 3: Format the SD Card
Formatting a corrupted SD card is a great way to repair it. But it should be done only when you’ve successfully retrieved the data from the device since after you format the memory card, all of the files stored on it will get erased.
- Connect the SD card to your Mac.
- Open the Disk Utility app (go to Launchpad and type Disk Utility in the search field).
Select your SD card from the list of devices on the sidebar on the left. - Click the Erase button at the top of the window.
- If you want, type in a new name for your SD card and choose a preferred format.
- Click Erase to format the SD card.
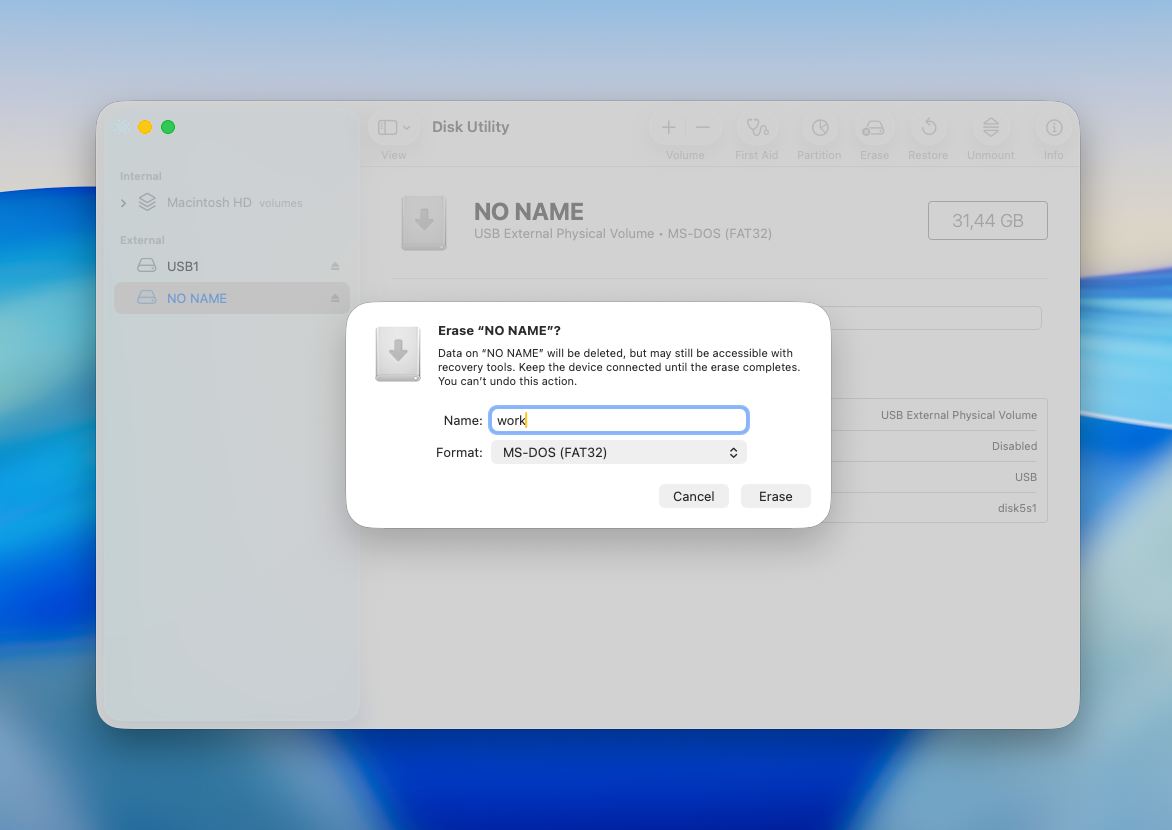
- Once the process is finished, click Done.
Closing Notes
SD card corruption doesn’t always mean your data is gone. In many cases, the issue is logical, not physical, which means your files are still there but simply not accessible through normal means. The key is to approach the situation carefully and in the right order.
We always recommend starting with data recovery before attempting any repairs. Tools like Disk Drill can help retrieve files even when the card appears unreadable. Even simple fixes can overwrite data and reduce recovery chances. Once your files are safe, you can move on to repairing the card using tools like First Aid or, if necessary, formatting it to restore usability.
FAQ
- Insert the SD card into your Mac
- Open Terminal (Cmd + Space → type “Terminal”)
- Run: diskutil list
- Find your SD card in the list (look for its size, e.g. /dev/disk2)
- Format the card (this will erase all data), for 32 GB cards or less use sudo diskutil eraseDisk FAT32 SDCARD MBRFormat /dev/disk2. For larger cards: sudo diskutil eraseDisk ExFAT SDCARD MBRFormat /dev/disk2.
- Enter your password if prompted and wait for the process to complete
- Insert the SD card into your Mac.
- Open Disk Utility (Applications → Utilities).
- Select your SD card in the sidebar (choose the main device if available)
- Click First Aid.
- Confirm and wait for the scan to complete.


