

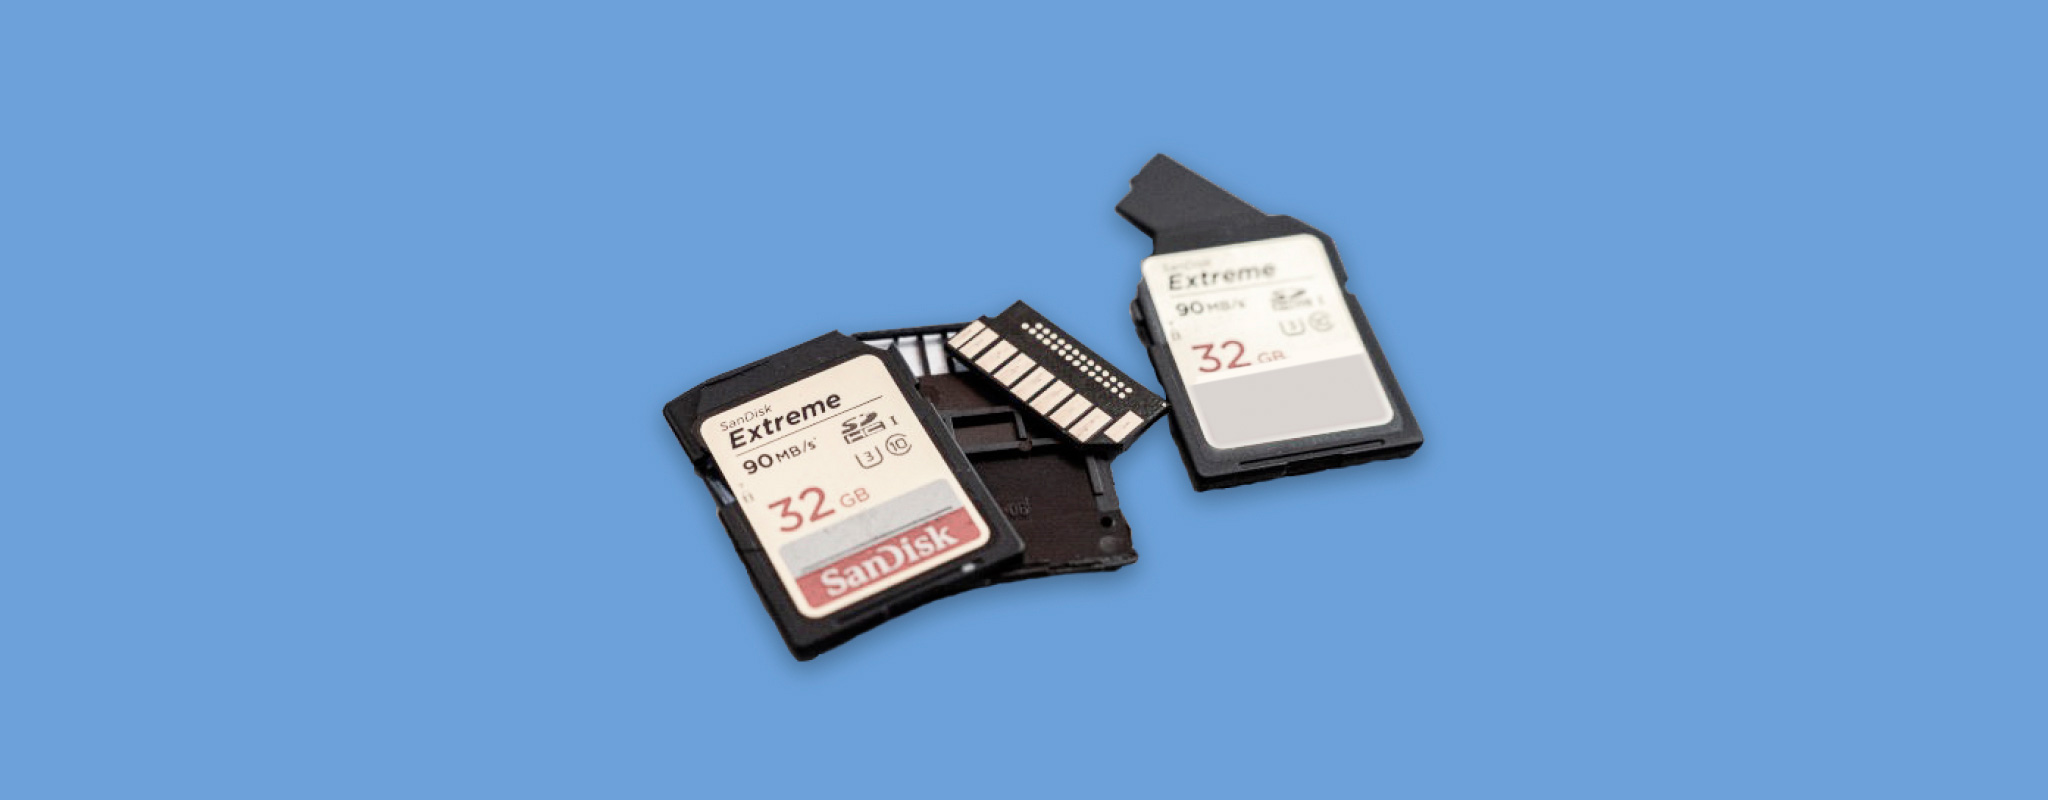
A corrupted SD card can often be repaired. If you’re asking, can a corrupted SD card be fixed, the answer depends on the cause of the corruption, but in many cases it can. If the card contains important files, your first priority should be recovering them before attempting any fixes. Repair methods such as formatting, repartitioning, or file system repair can permanently destroy existing data or make it unrecoverable. In this guide, we explain how to safely recover files from a corrupted SD card and walk through the most effective ways to repair the corruption itself.
📝 Note: This guide focuses specifically on how to repair SD card file system issues. If you’re looking to recover corrupted files that are already damaged (like unplayable videos or unopenable documents), that’s a different problem. We have a separate guide on recovering corrupted files that covers those scenarios.
Quick Overview of Your Data Recovery and Corrupted SD Card Repair Options
When an SD card becomes corrupted, there’s usually no point in trying to determine the exact cause before taking action – the problem could be anything from file system corruption to a damaged partition to simply an aging SD card reaching the end of its lifespan.
Use the table below to identify the symptoms that match your situation and jump to the appropriate method. If you’re unsure which scenario applies, follow the methods in order. Just remember the rule that if the SD card contains important files, recover them before attempting any repairs.
| Situation | Recommended Method | Why It Helps |
| Recover Your Files First | ||
| The SD card contains important files | PC Data Recovery Software | This should always be your first step before attempting repairs because many repair methods can permanently destroy recoverable data. |
| You only have an Android phone available | Android Data Recovery App | If you’re recovering files from an Android device, see our Android recovery guide or, if you already know the basics, browse our rankings of tested Android data recovery software. |
| The card has physical damage or stores critical data | Professional Recovery Service | The safest option when the SD card has physical damage or the data is too valuable to risk with DIY recovery methods. |
| Fix the Corruption | ||
| The card isn’t recognized or behaves differently on another computer | Try Another Card Reader or Device | Helps determine whether the problem is caused by the SD card itself or by your computer, USB adapter, or card reader. |
| The card is detected but doesn’t appear in File Explorer | Check Device Manager / Update Drivers | Resolves problems caused by missing, outdated, or corrupted storage drivers that prevent Windows from accessing the card. |
| The SD card appears empty but storage space is still used | Unhide Hidden Files | Restores files hidden by malware or incorrect file attributes without modifying the file system. |
| The card has no drive letter | Assign a New Drive Letter | Makes the SD card visible in File Explorer when Windows failed to assign a drive letter. |
| Windows reports file system errors | CHKDSK / Error Checking | Repairs common file system problems and can restore access when the corruption is relatively minor. |
| The partition is missing or damaged | TestDisk | Rebuilds the partition table and restores lost partitions without formatting the card. |
| The card shows as RAW | Create a New Partition | Recreates the partition structure after you’ve recovered your important data, allowing Windows to use the card again. |
| You suspect the card is counterfeit | FakeFlashTest | Verifies whether the SD card’s actual storage capacity matches its advertised capacity. |
| Nothing else fixes the corruption | Reformat the SD Card | Rebuilds the file system from scratch and should only be used after you’ve recovered any important data. |
Before you move on to recovering files from your corrupted SD card or trying to repair the card itself, take two minutes to check whether Windows can still detect it correctly. Open Disk Management and see if the SD card appears there with its correct capacity. This is one of the clearest signs that the methods below can still be applied.
If the SD card does not appear in Disk Management at all, or if it shows a completely wrong size instead of its real capacity, DIY recovery and repair methods are unlikely to help. In that case, send the card to a professional data recovery center if it contains important files, or replace it with a new card if the data does not matter.
How to Recover Data from a Corrupted SD Card
SD card corruption often prevents Windows from accessing the card and the files stored on it through normal means. In these situations, you’ll typically need data recovery software that can bypass file system issues and scan the card directly for recoverable data.
Our recommended solution is Disk Drill, and for good reason. In our independent testing, it achieved the highest recovery rate at 98% while also delivering one of the fastest scan times – we scanned a 64 GB SD card in under 10 minutes. You can see how it compares with other tools in our SD card recovery software rankings or read what other users recommend in this community discussion.
Disk Drill also includes several extra tools that are extremely useful when dealing with corrupted SD cards. We’ll focus on the two that matter most for this guide, but if you’d like to learn about its other features, check out our full Disk Drill review.
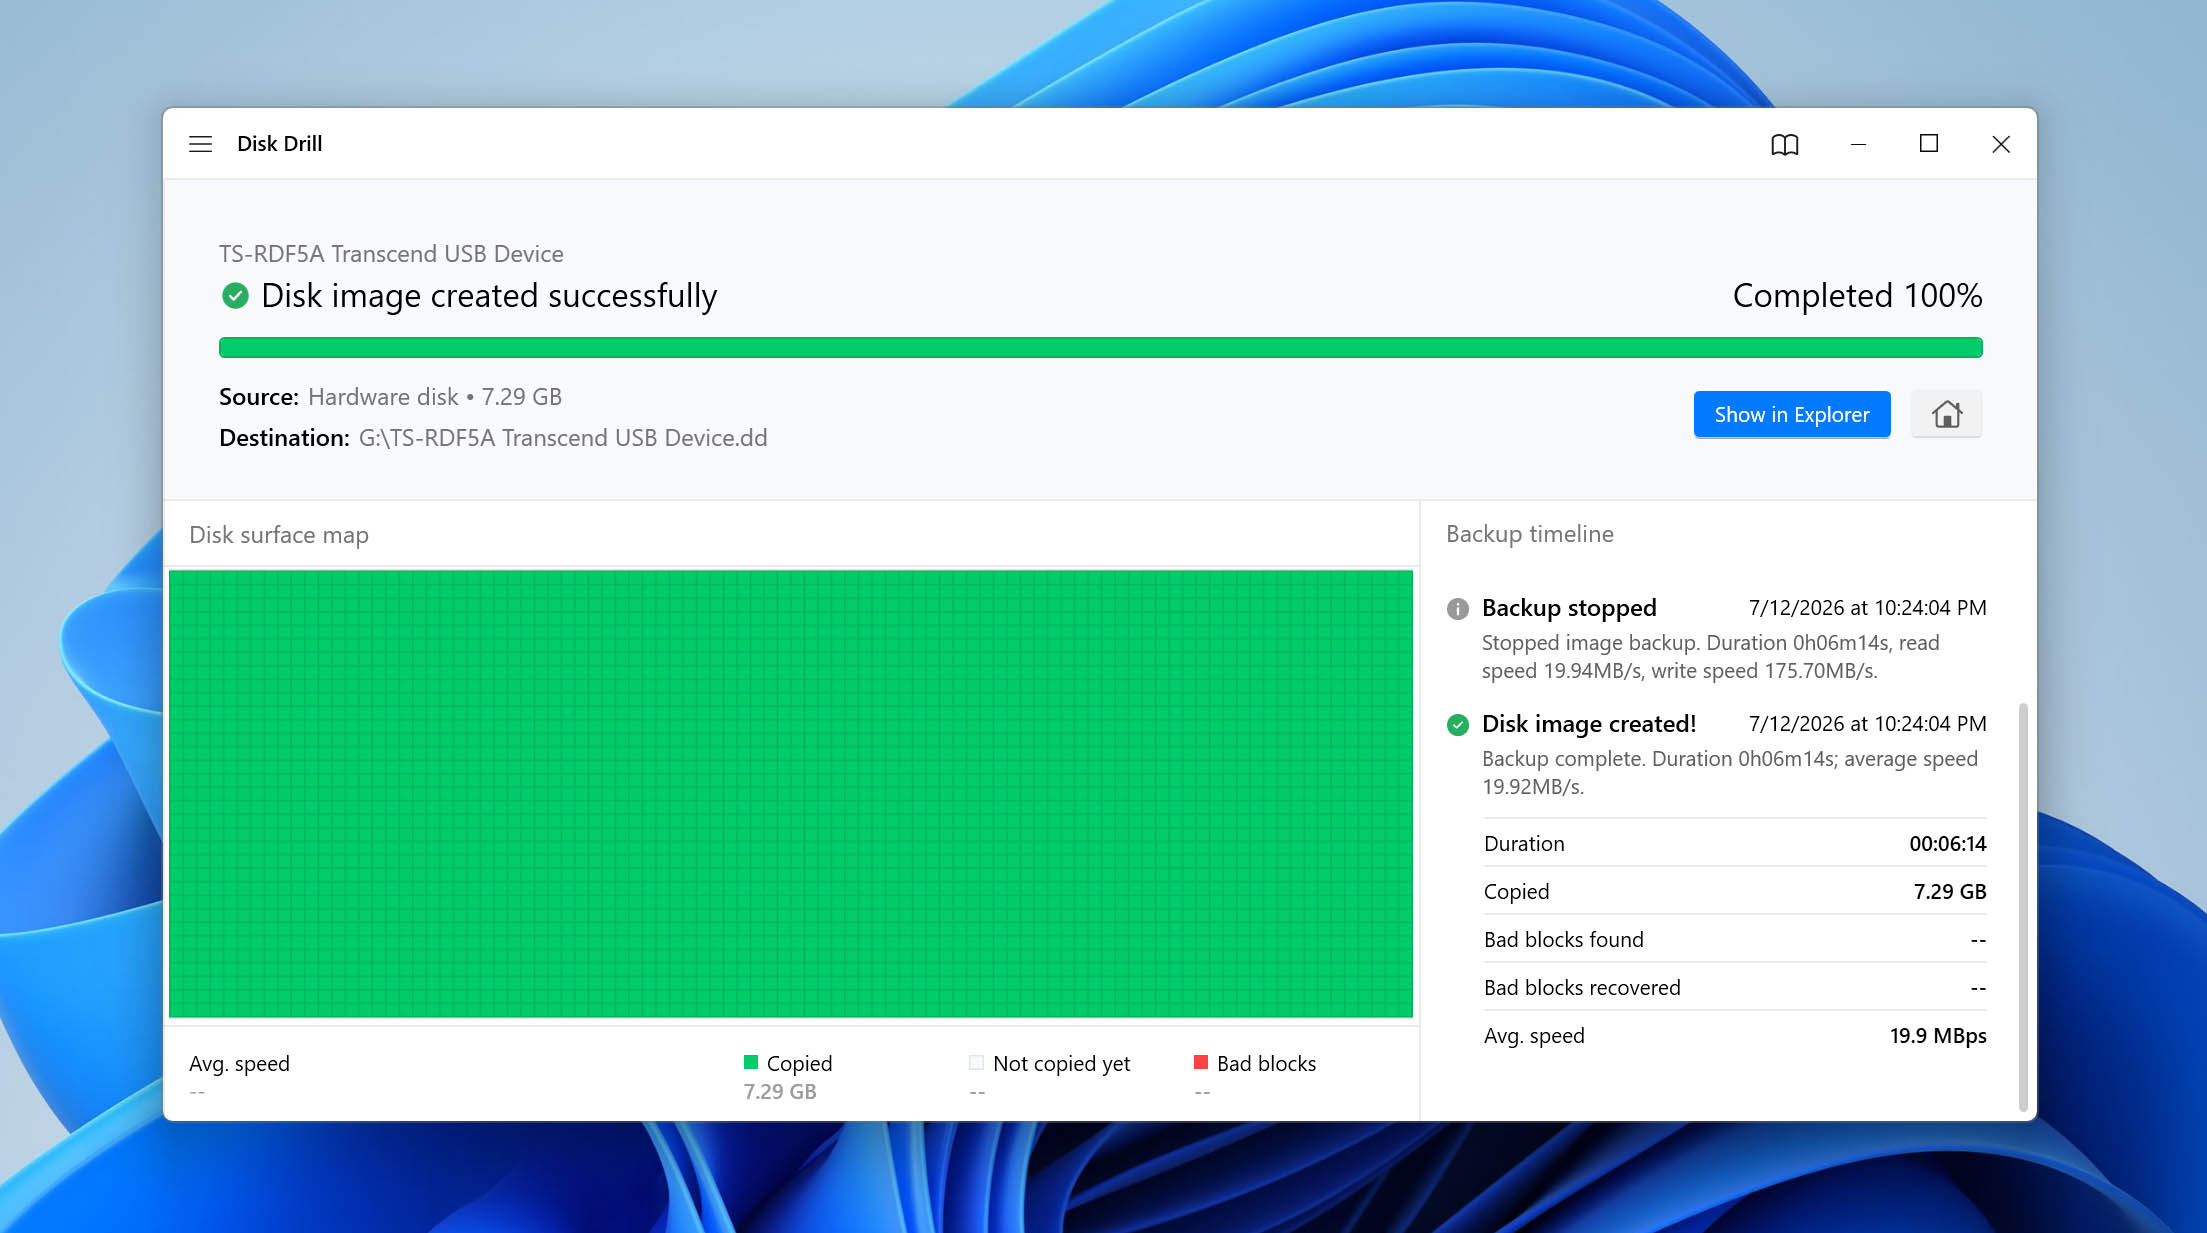
One of Disk Drill’s most valuable features for corrupted SD cards is the ability to create a full disk image of the card, and we recommend using it before scanning the card. Corruption can worsen over time, and some SD cards stop working completely after repeated read attempts. A disk image lets you recover files from a copy instead of the original card and gives you another chance if something goes wrong later.
- First, download and install Disk Drill on your computer (not on the SD card!).
- Connect your corrupted SD card via a card reader.
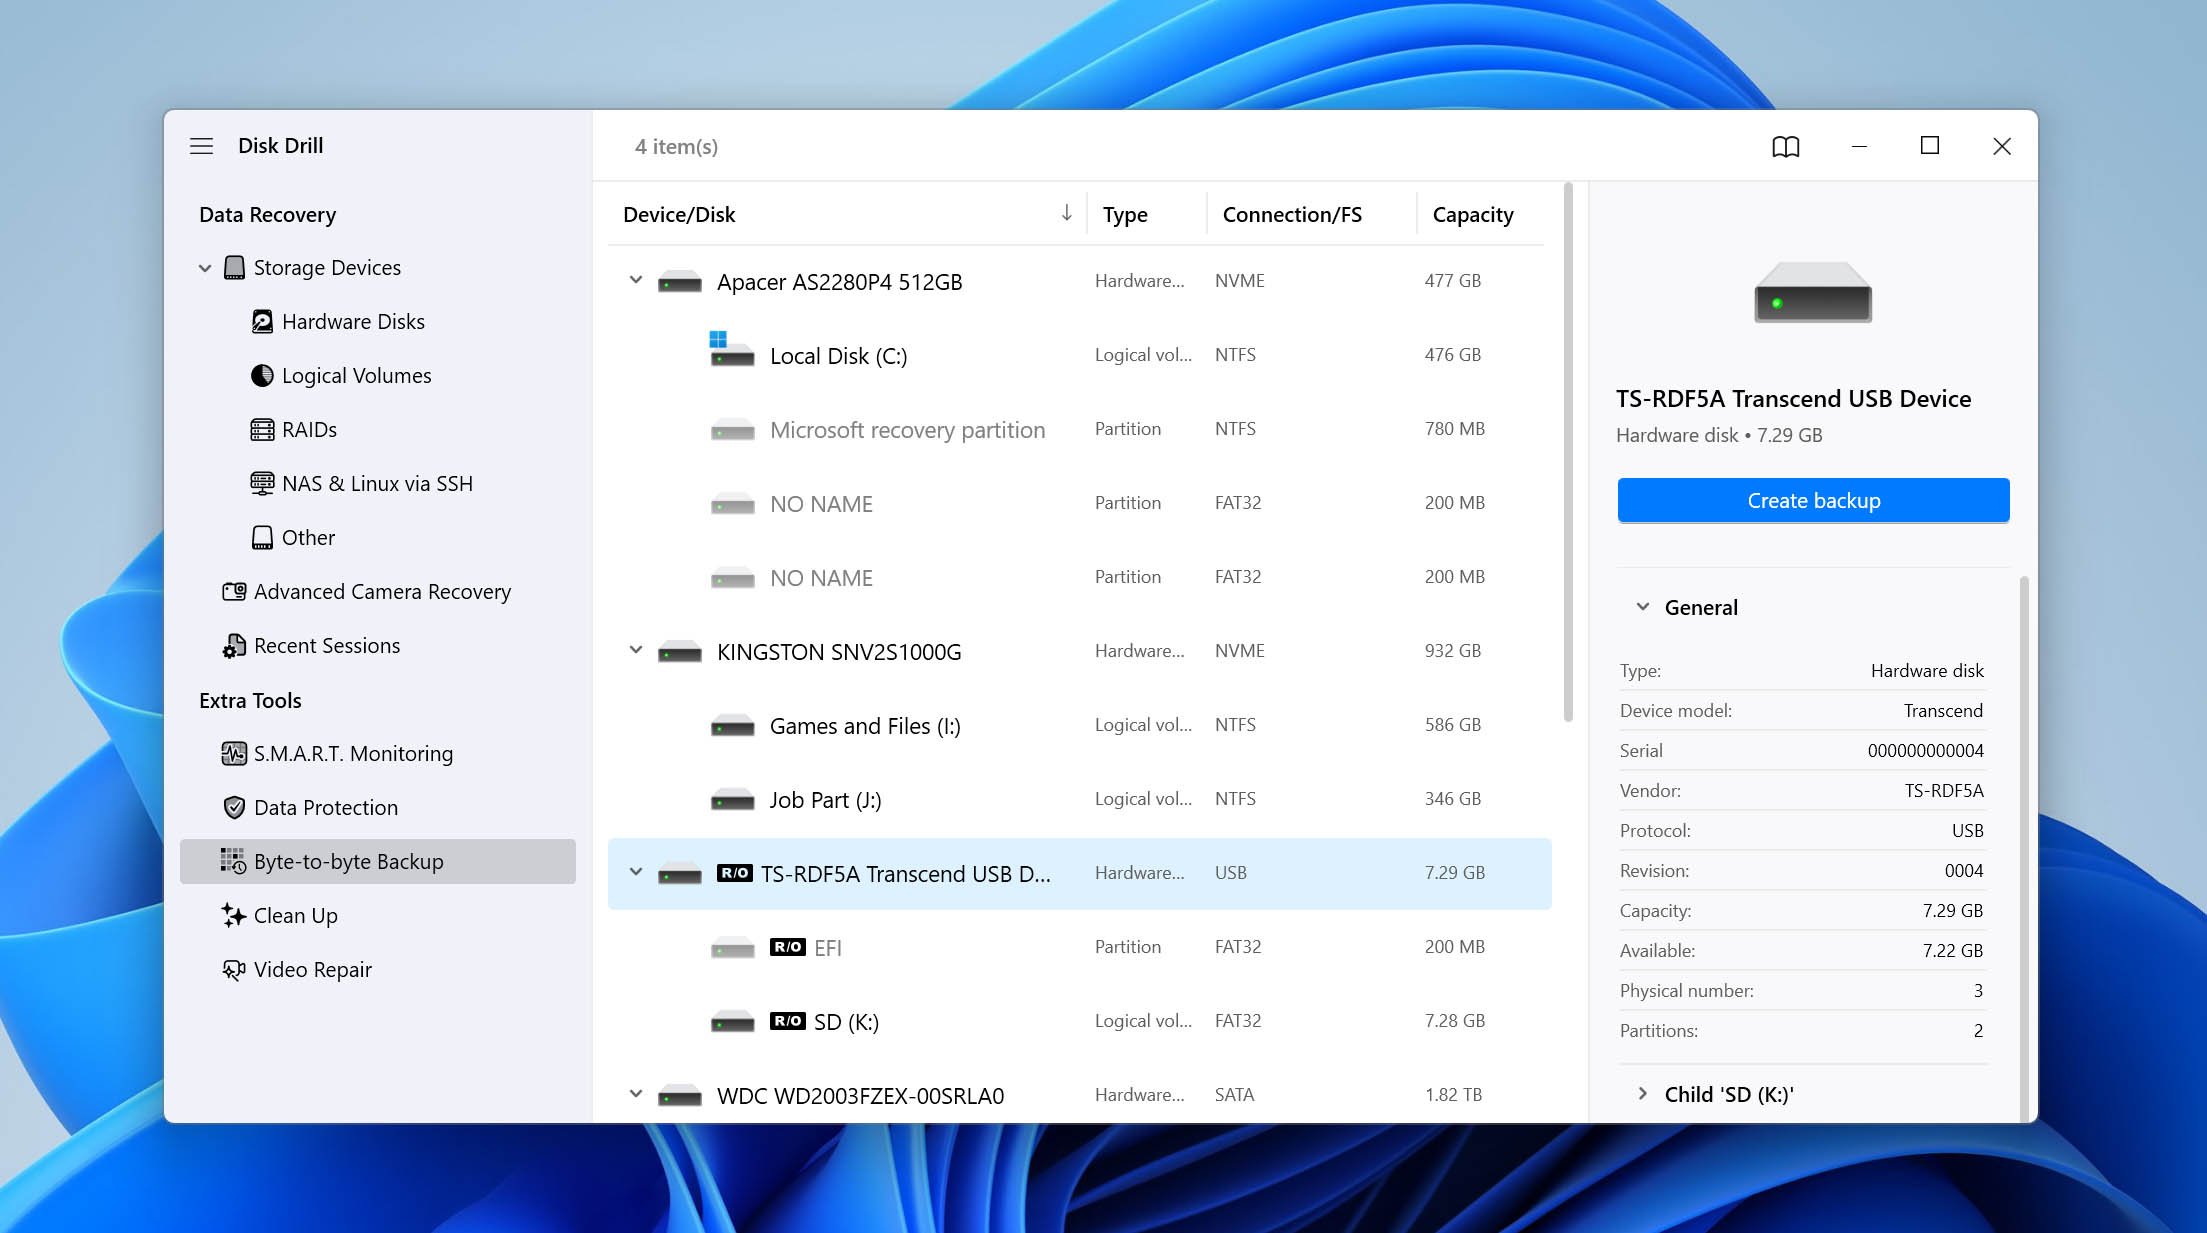
- Launch Disk Drill and look for Byte-to-Byte Backup in the left sidebar.
- Select your SD card from the list of available devices.
- Click the Create backup button in the top-right corner.
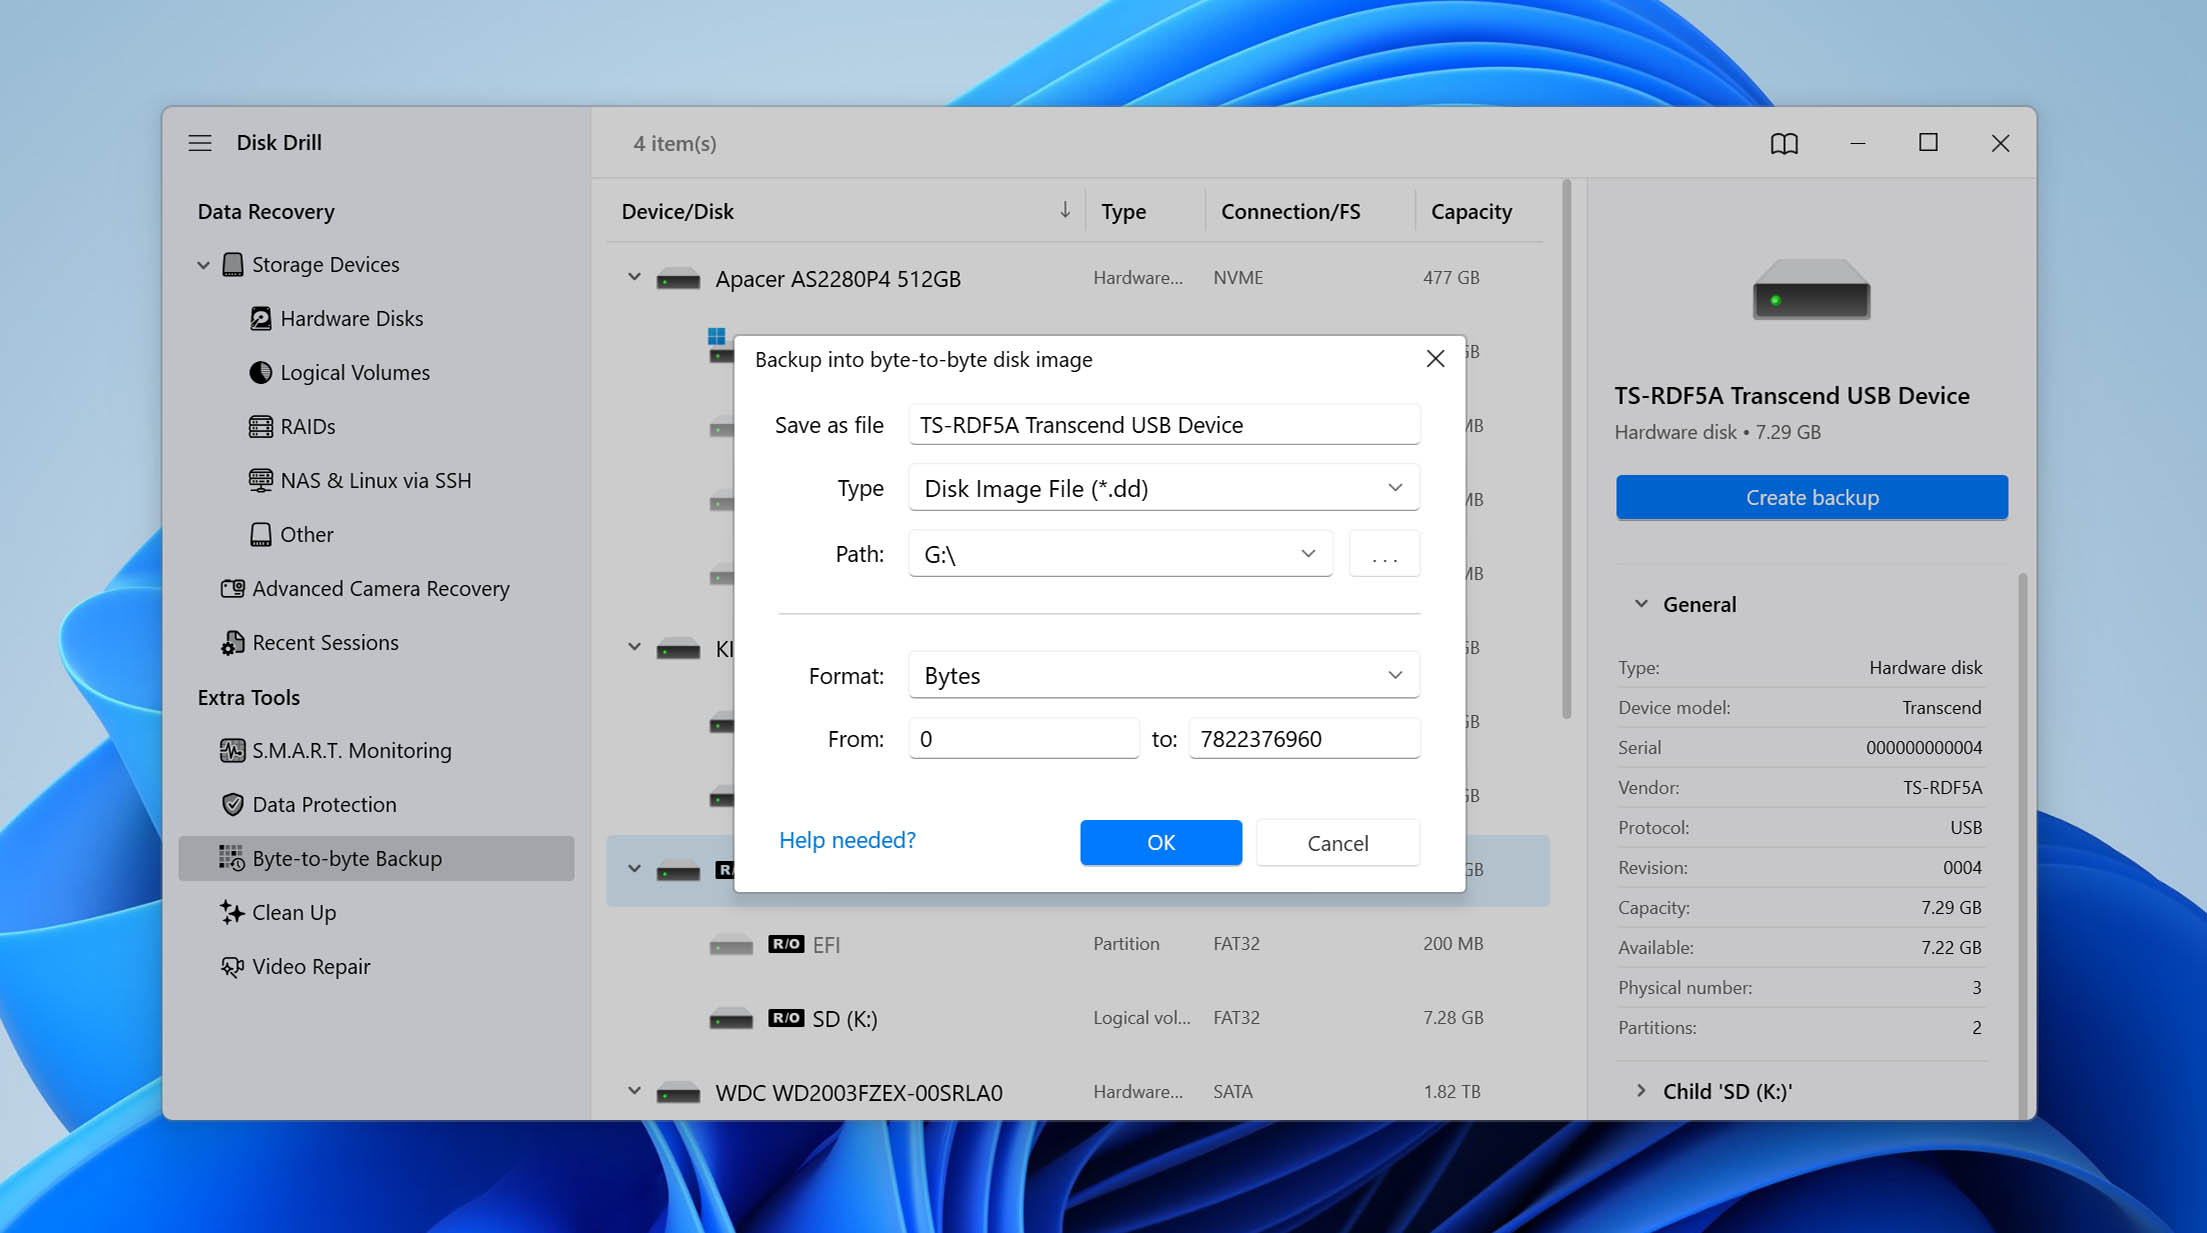
- Choose a location on your computer to save the image (make sure you have enough free space as the image will be the same size as your SD card’s capacity).
- Wait for the backup process to complete.
Once you have an image of your SD card, it’s time to recover your files. Here’s the step-by-step process:
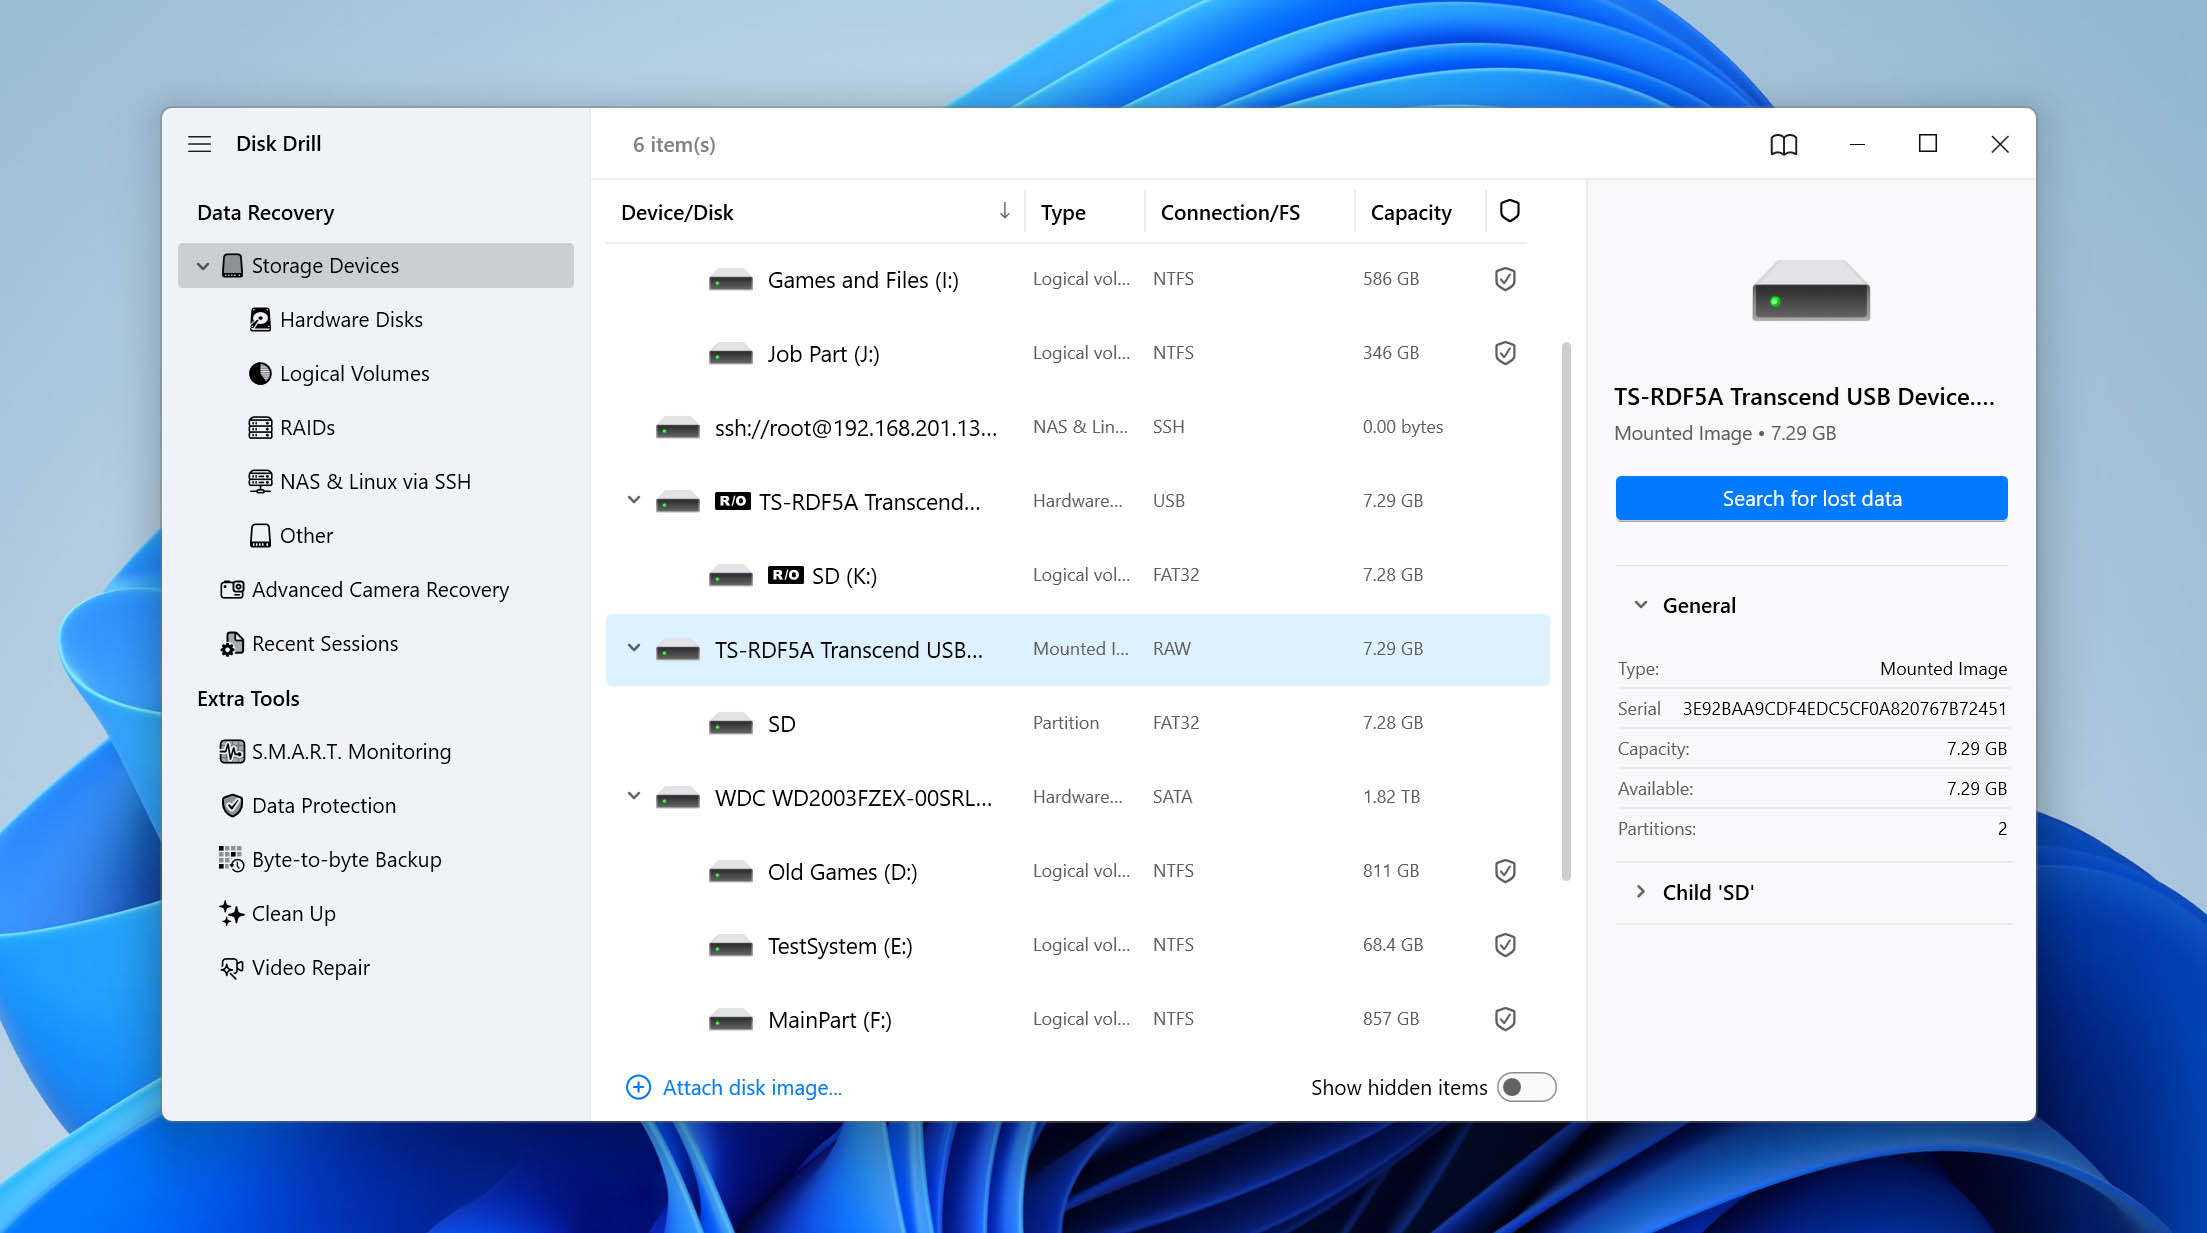
- Navigate to the Storage Devices section in Disk Drill and click Attach disk image at the bottom of the device list.
- Select the image you just created and click Search for lost data to begin scanning.
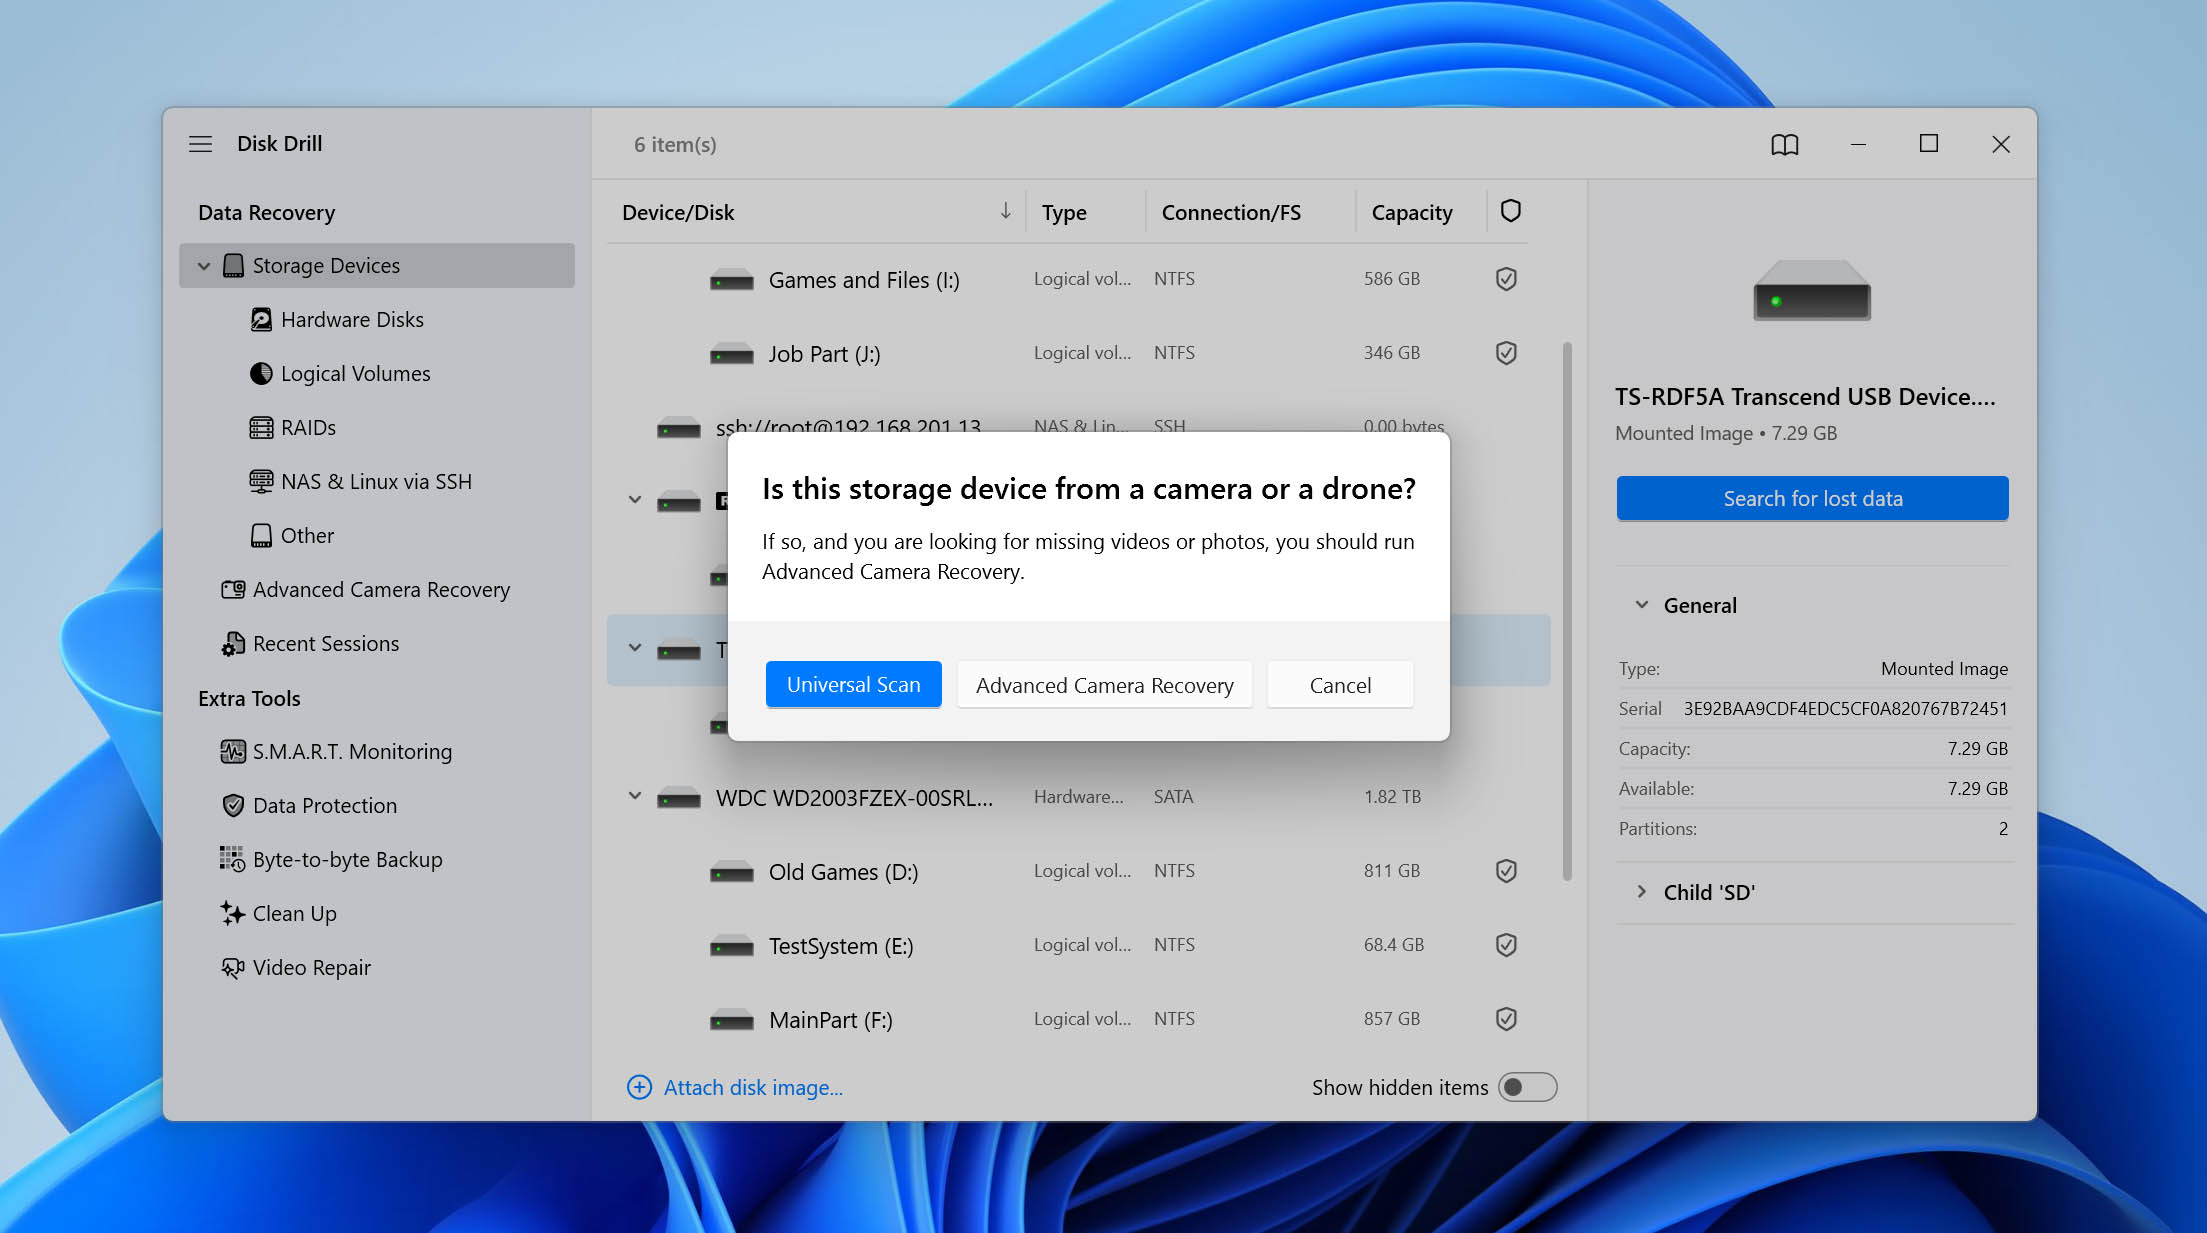
- Click Universal Scan to perform a complete scan for all recoverable files. The second feature we mentioned earlier, Advanced Camera Recovery, is designed specifically for fragmented videos recorded on cameras. If you’re trying to recover camera footage, run it as a separate scan after Universal Scan to maximize your chances of recovering those videos.
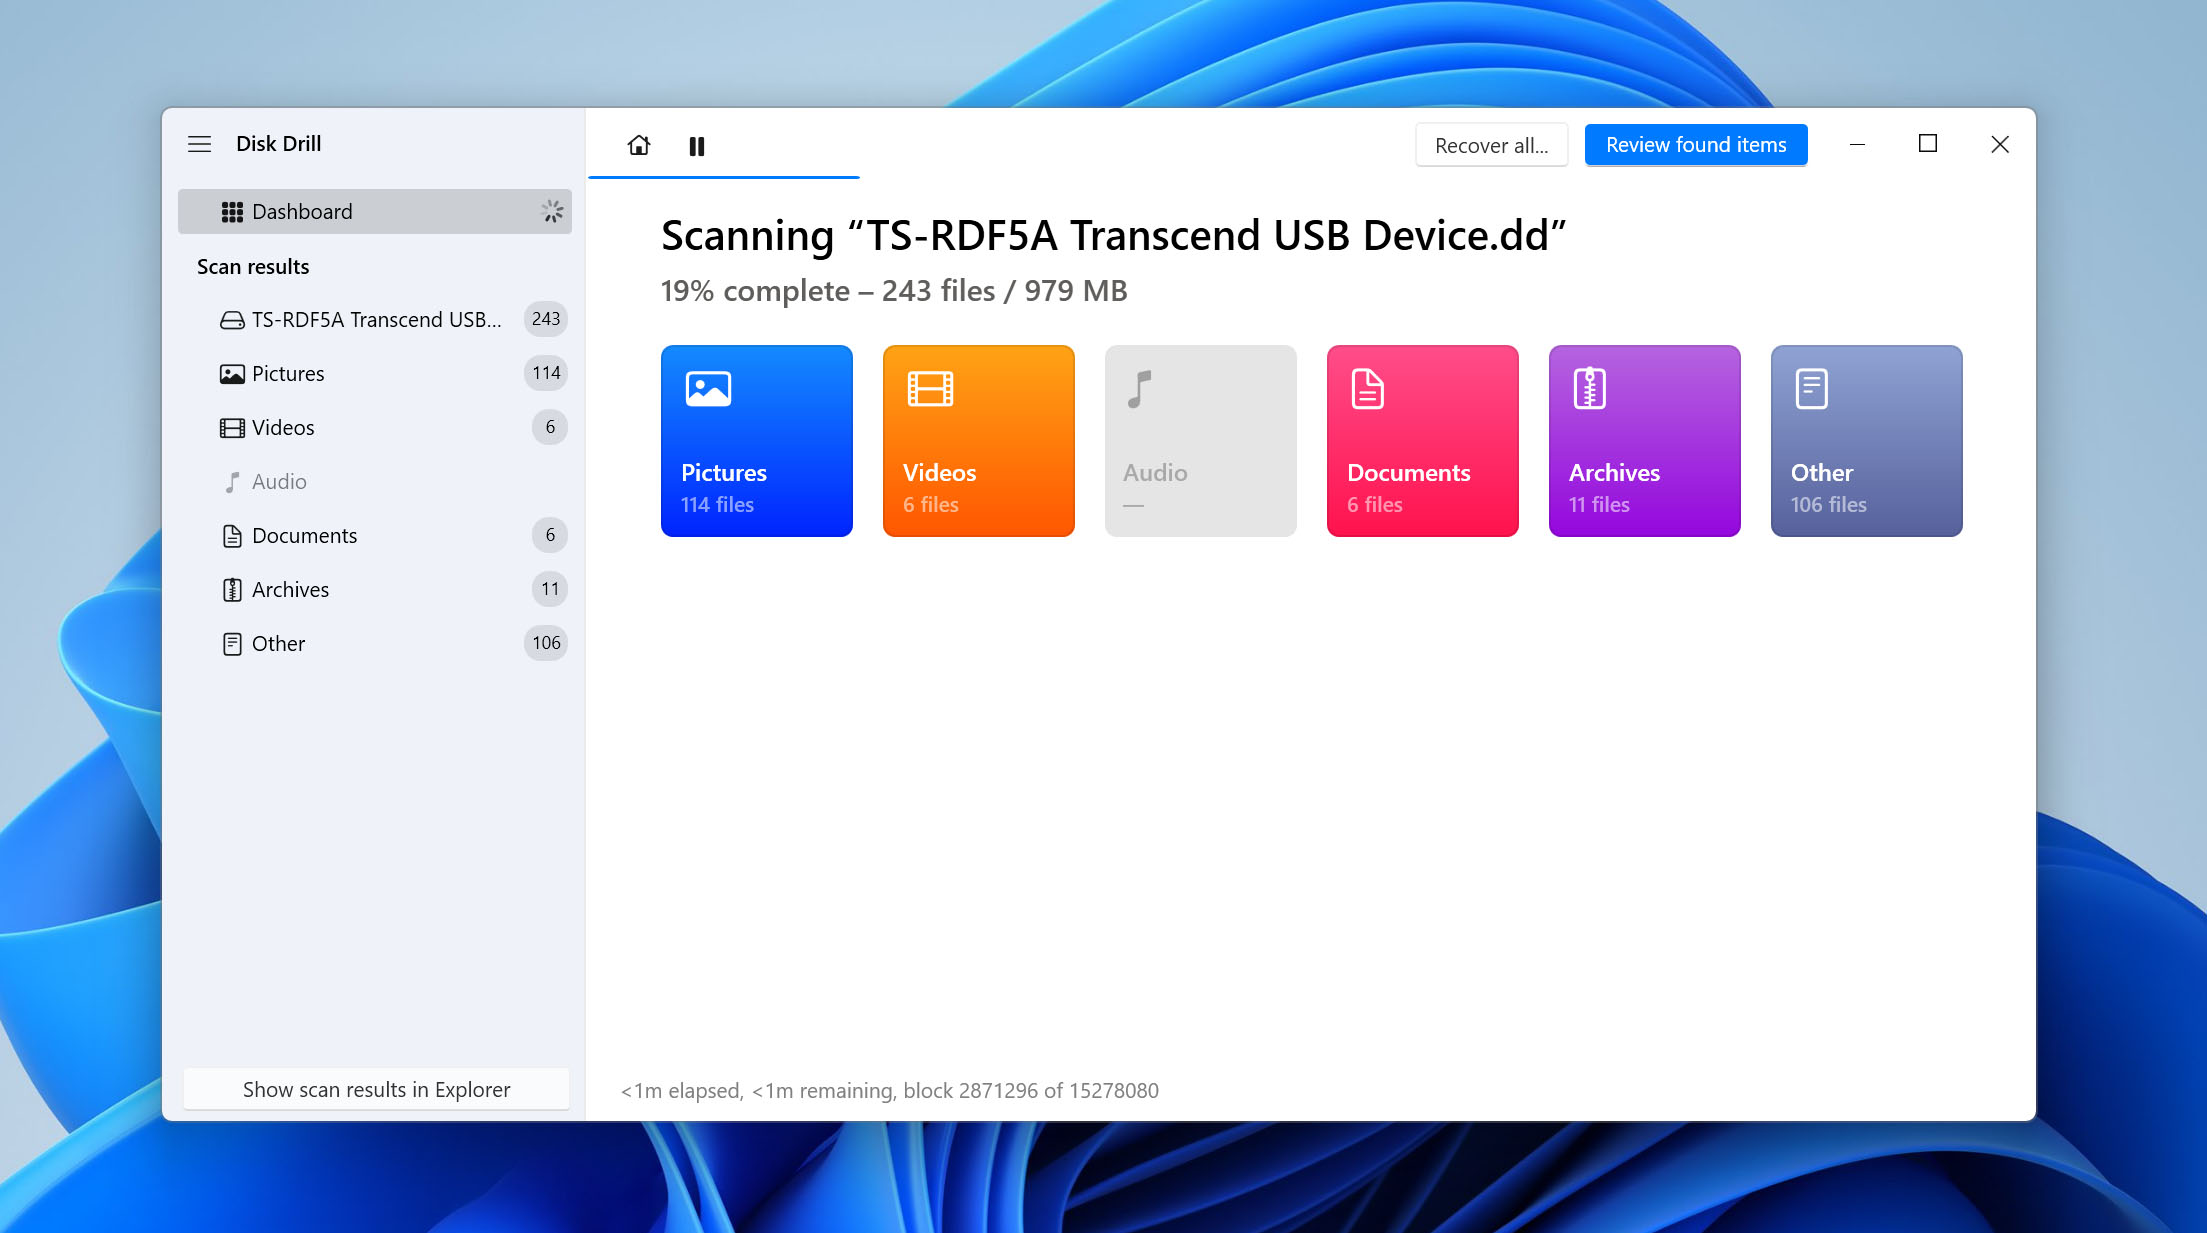
- Wait for Disk Drill to finish scanning the backup or click the Review found items button to see recoverable files as soon as they’re found (scanning will continue in the background).
- Go through the backed-up files and select everything you want to recover. You can use the filters at the top to narrow down results by file type.
- Click Recover and choose a recovery location on a different drive (never recover to the same SD card!)
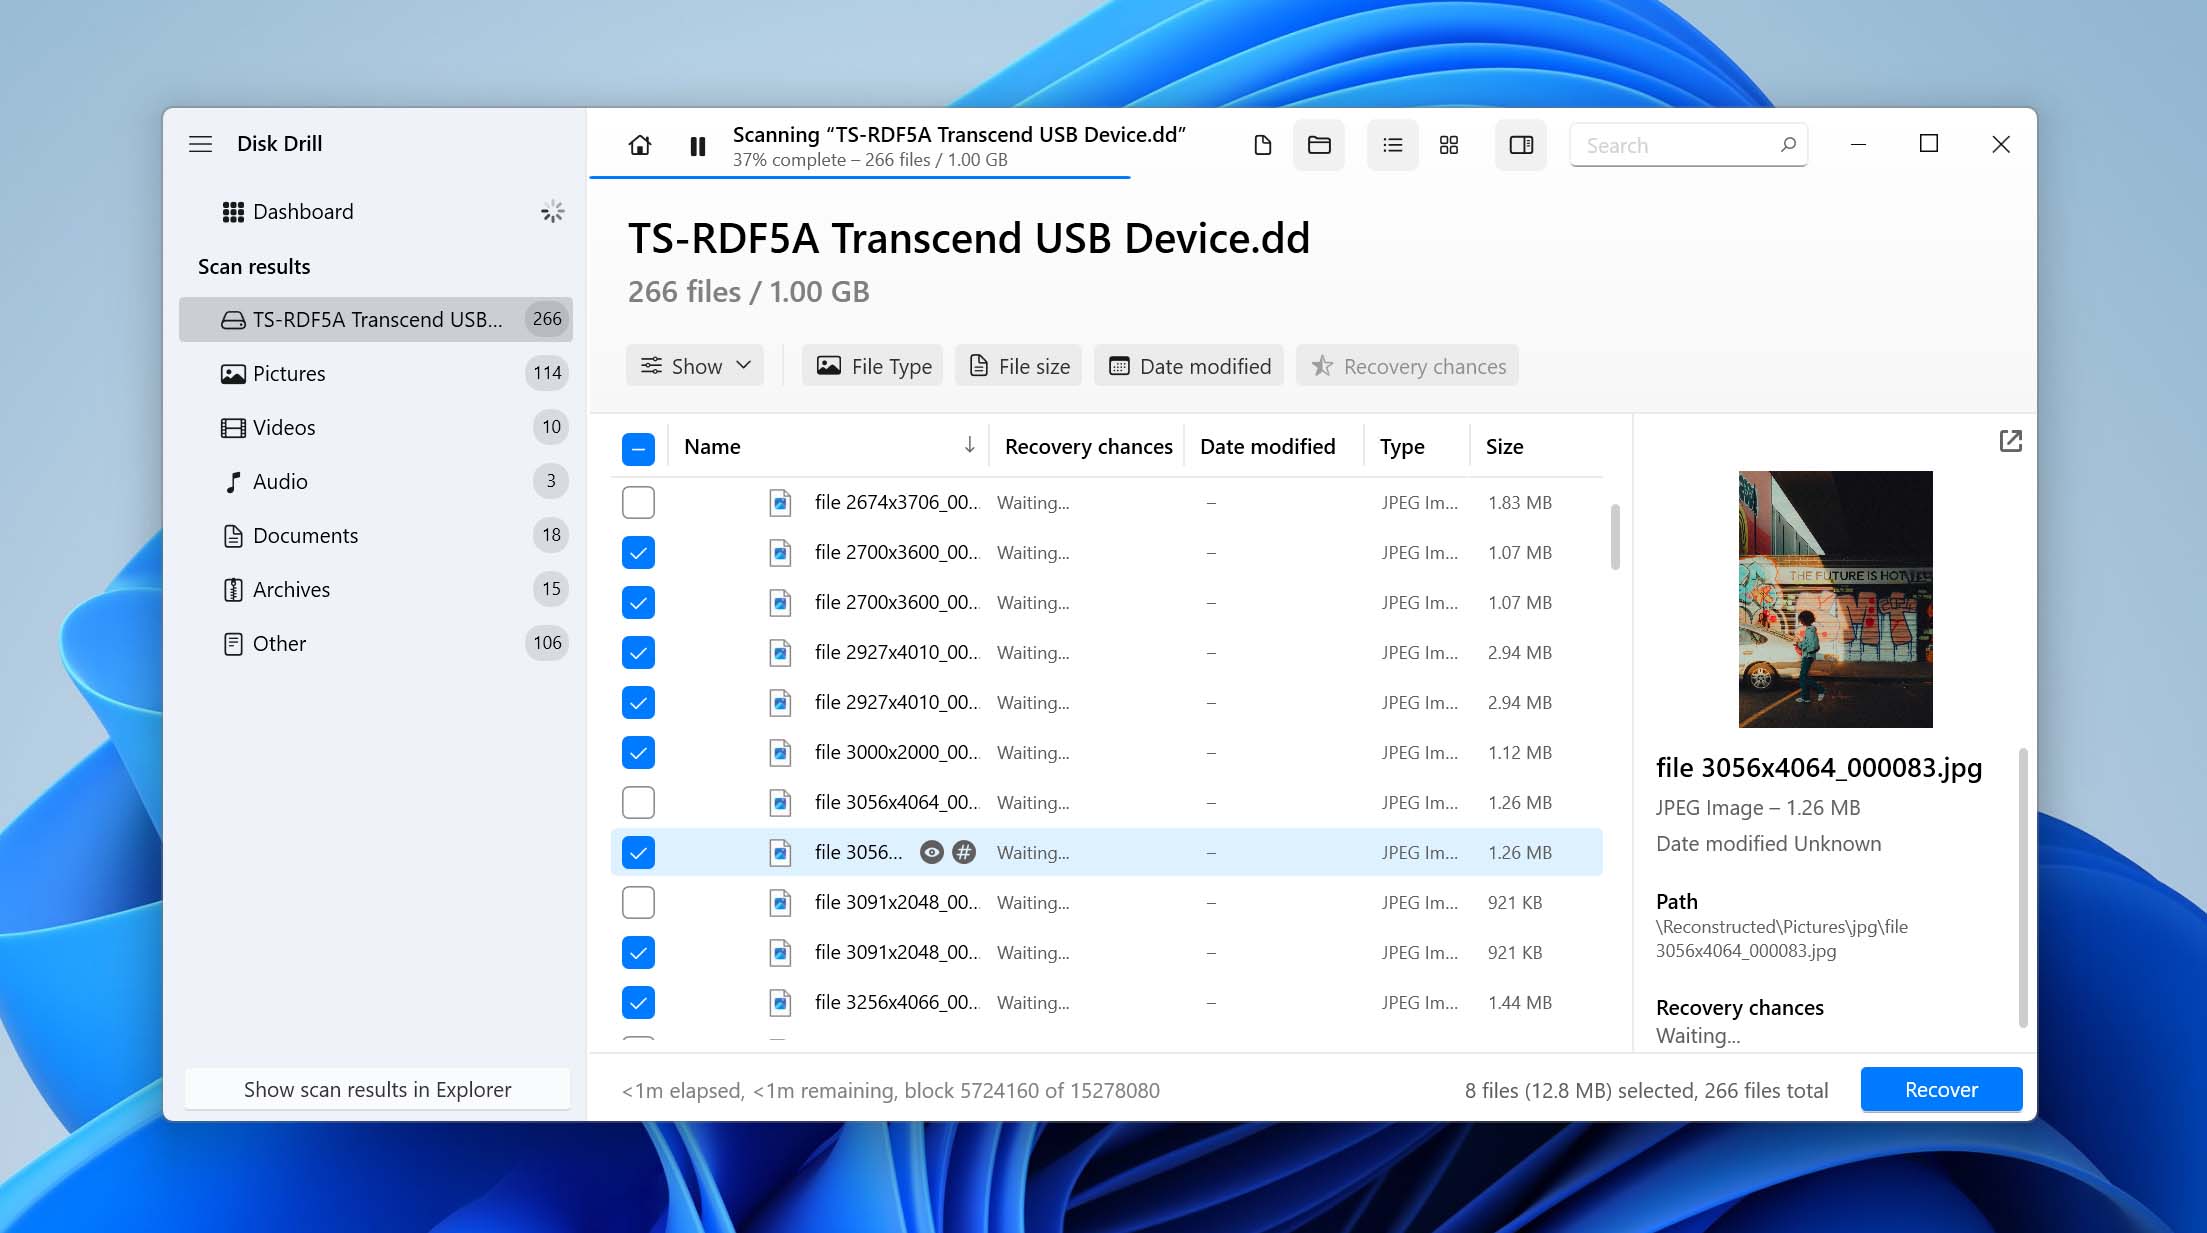
The free version of Disk Drill lets you recover up to 100 MB of data on Windows, which is often enough for recovering your most important files and testing whether your data can be saved from the card. If you need more, you can upgrade to Disk Drill Pro for unlimited recovery.
📝 Note: As a reminder, if the SD card has physical damage or isn’t detected by your computer at all, professional data recovery services are usually your only realistic option. They can recover data directly from the memory chips using specialized equipment that isn’t available to consumers. If the files on the card are important, look for a reputable recovery service and request an evaluation.
How to Fix a Corrupted SD Card on Windows
In this section, we will guide you through several effective methods aimed at restoring the functionality of your SD card. From simple troubleshooting steps to more advanced repair techniques, these methods are designed to help you make your SD card usable again.
Method 1: Access the SD Card from Another Device
To rule out the possibility of your computer being the cause of the corruption, we recommend you start by connecting your SD card to another device. If you don’t have access to another computer, you can use a smartphone or a smart TV with an SD card slot.
If you can access the content of your SD card just fine from another device, then there’s something wrong with your computer or its memory card reader. Again, the simplest solution is to get a new memory card reader and try again. If that doesn’t help, then you should check the integrity of your operating system because your issues could be caused by missing or faulty drivers.
Method 2: Check Device Manager and Update SD Card Drivers
Sometimes the SD card itself isn’t the problem. Windows may fail to load the correct driver for the card reader or storage controller, making a healthy SD card appear inaccessible or preventing it from being detected correctly. Checking Device Manager only takes a minute and can save you from attempting unnecessary repairs.
- Press Windows + X and select Device Manager.
- Expand the Disk drives, Memory technology devices, and Universal Serial Bus controllers categories.
- Look for your SD card or card reader. If you see a yellow warning icon, right-click the device and select Update driver.
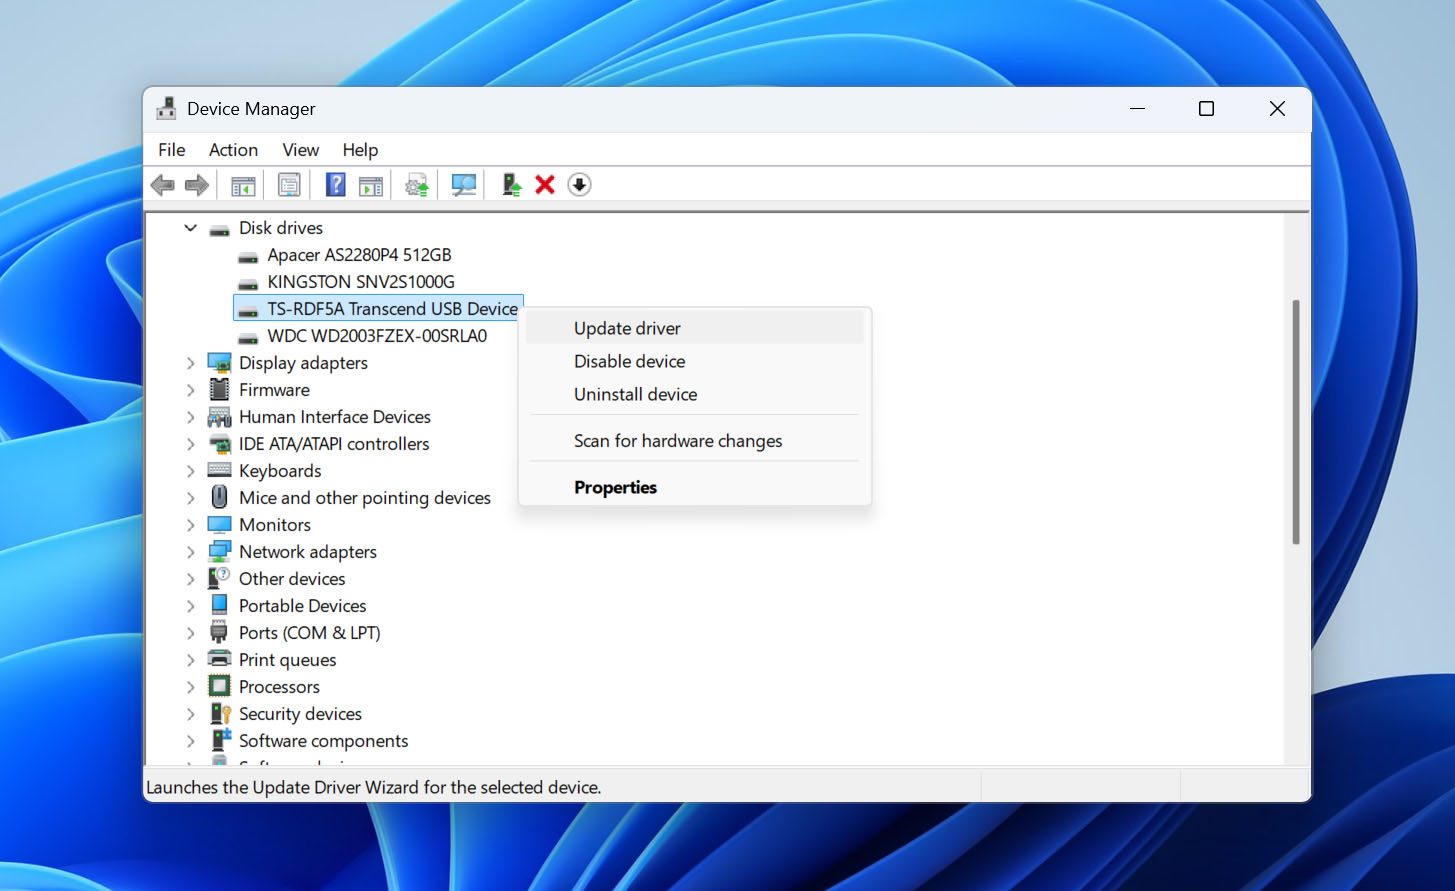
- Choose Search automatically for drivers and let Windows install any available updates.
- If no updates are found, right-click the device again and select Uninstall device. Restart your computer, and Windows will automatically reinstall the driver.
- Reinsert the SD card and check whether it is now detected correctly.
Method 3: Unhide Hidden Files on the SD Card
If your SD card appears empty even though Windows shows that storage space is still being used, your files may not actually be gone. Malware, interrupted file operations, or file system errors can change file attributes and mark everything as hidden. Before you attempt data recovery or more advanced repairs, it’s worth checking whether your files simply need to be unhidden.
- Connect the SD card to your computer.
- Press Windows + X and select Windows Terminal (Admin) or Command Prompt (Admin).
- Determine your SD card’s drive letter in File Explorer (for example, E:).
- Run the following command, replacing X with your SD card’s drive letter: attrib -h -r -s /s /d X:\*.*
- Wait for the command to finish, then reopen the SD card in File Explorer and check whether your files have reappeared.
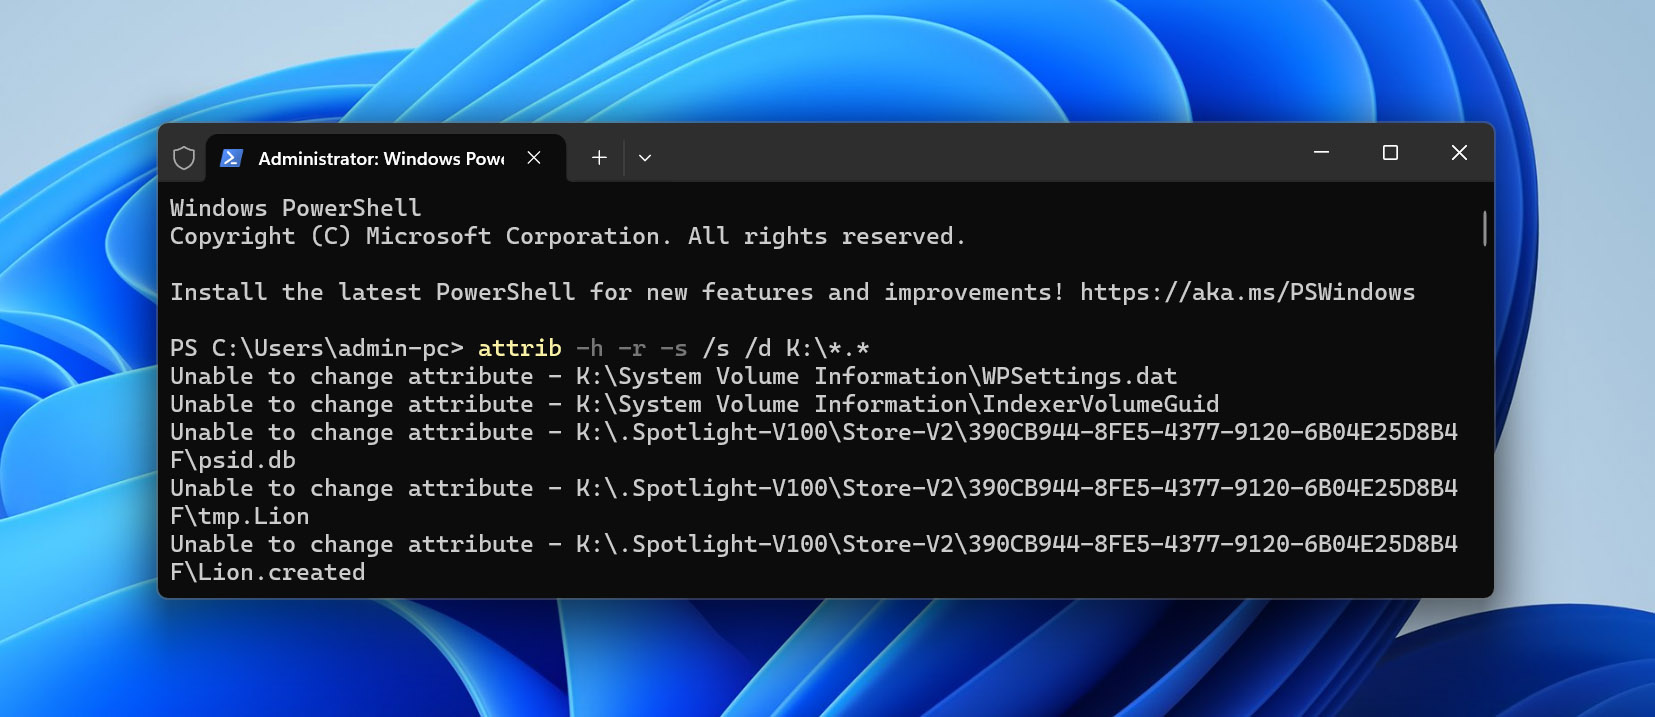
The command removes the Hidden, Read-only, and System attributes from all files and folders on the SD card. If the files were only hidden, they should become visible again immediately.
Method 4: Change the Drive Letter of the SD Card
When an SD card becomes corrupted, Windows may fail to automatically assign it a drive letter, which can cause it to appear completely inaccessible in File Explorer. By manually assigning a new drive letter, you can sometimes restore access to the card and its contents. Here’s how to change the drive letter:
- Press Windows + X and select Disk Management.
- Right-click on your SD card and select the Change Drive Letter and Paths option.
- Click Change and assign a different letter to your SD card. Click OK to confirm your choice.
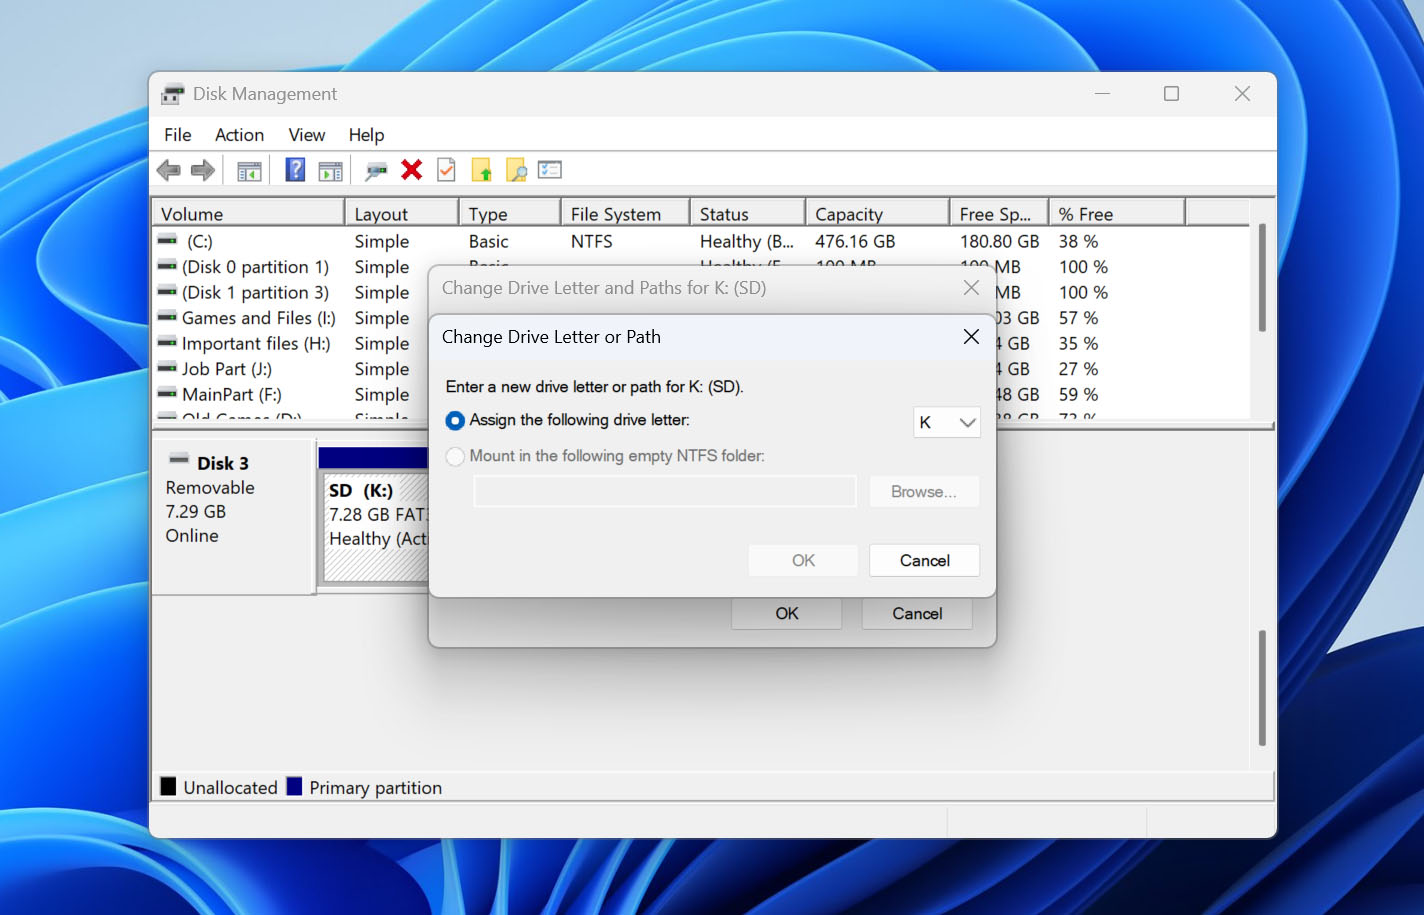
Of course, if your SD card has really been corrupted, it will take more than a drive letter change to fix the corruption and restore corrupted SD card data, which is where the next method comes in.
Method 5: Fix File System Errors Using Windows’ Built-in Repair Tools
Windows provides two ways to check and repair corrupted SD cards: the graphical Error Checking tool and its command-line counterpart, CHKDSK. Both tools can diagnose and fix file system errors, locate bad sectors, and recover readable information from them.
⚠️ Important: Before using these repair tools, make sure you’ve already recovered your important data. Built-in repair tools like CHKDSK can sometimes cause data loss, which is why we started this guide with data recovery methods.
Option 1: Using the Error Checking Tool (Graphical Interface)
If you prefer using a graphical interface, Windows includes an easy-to-use Error Checking tool:
- Open Windows Explorer and select This PC from the left panel.
- Right-click on your SD card and select Properties.
- Switch to the Tools tab and click Check.
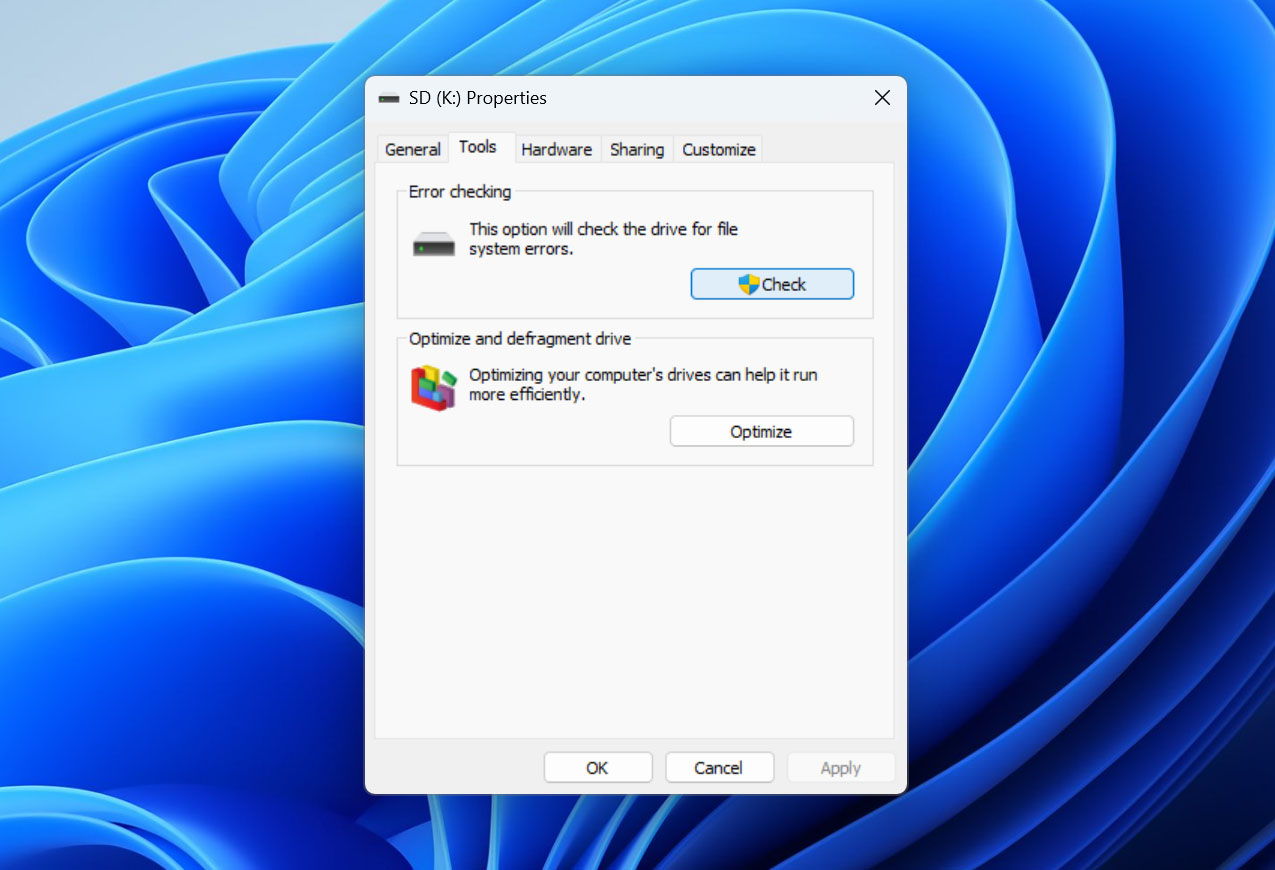
- Select Scan and repair drive even if no errors are found.
Option 2: Using CHKDSK (Command-Line)
The Error Checking tool actually uses CHKDSK behind the scenes. Using CHKDSK directly gives you more control over the repair process and provides detailed information about any problems it finds. Here’s how to use it:
- Note your SD card’s drive letter in Windows Explorer.
- Press Windows + X and select Windows PowerShell (Admin).
- Type the following command and press Enter (replace X with your SD card’s drive letter):
chkdsk X: /r. - If prompted about forcing a dismount, type Y and press Enter.
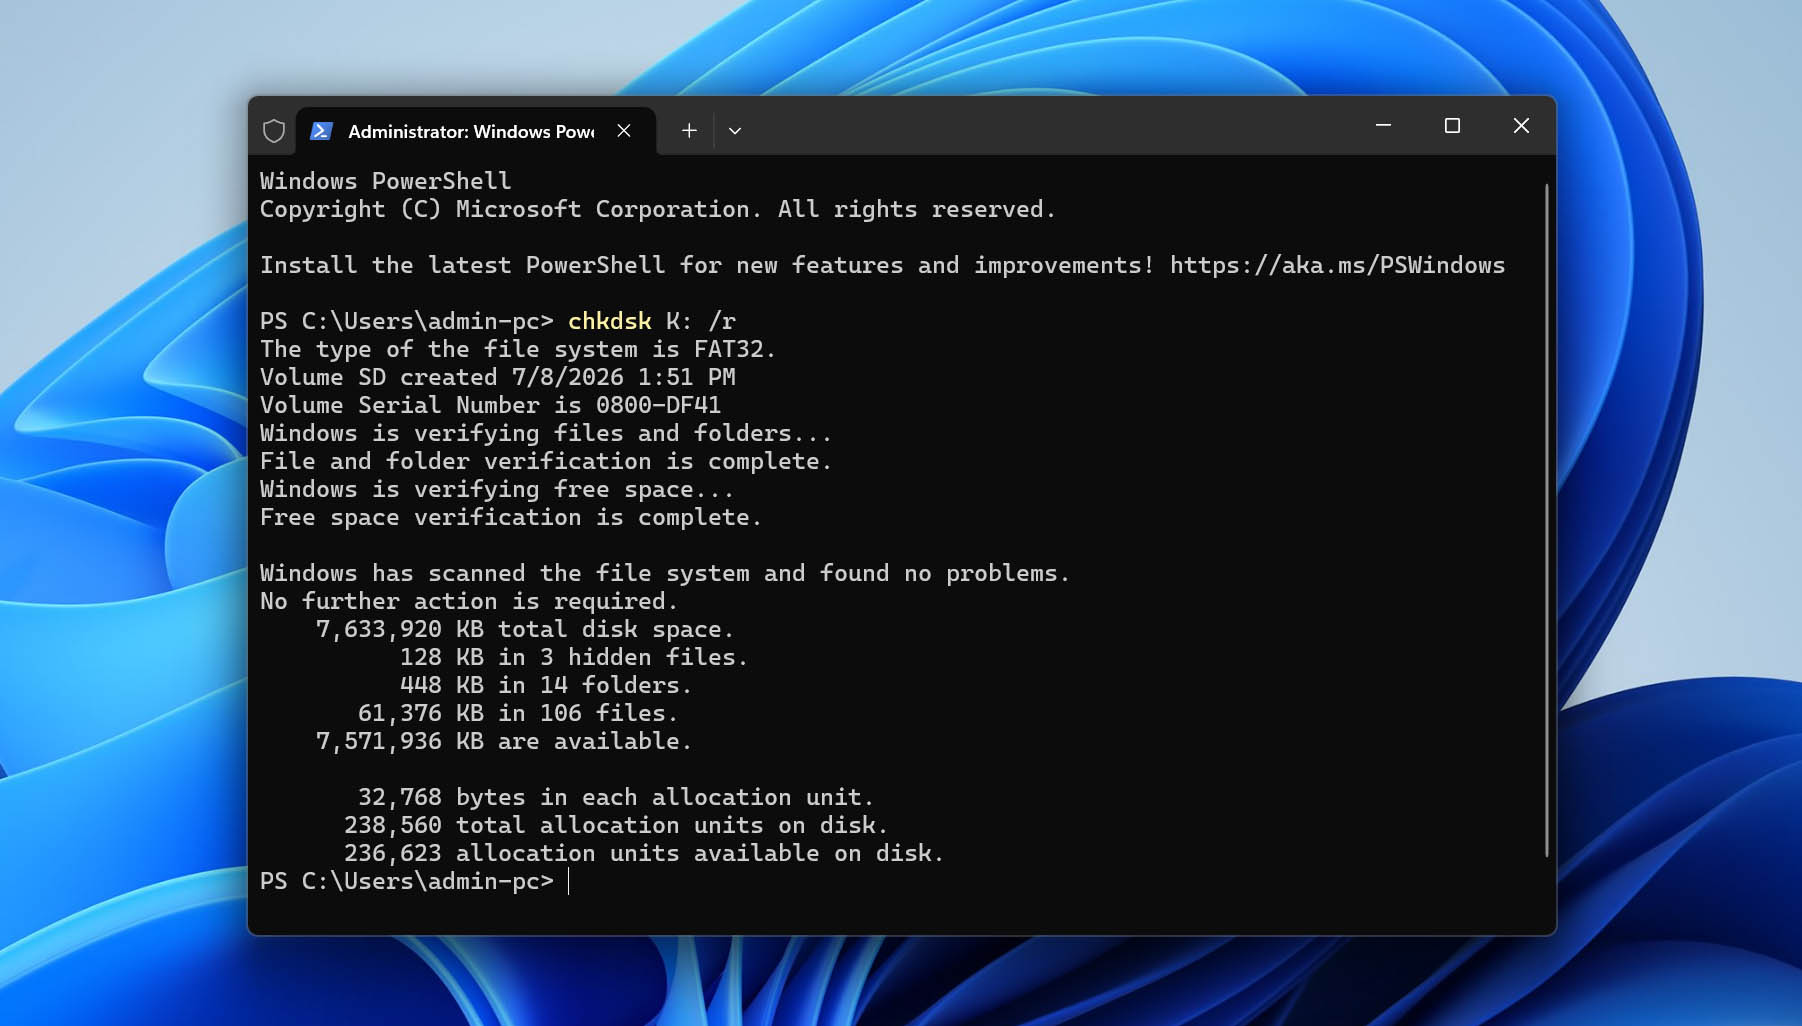
The /r parameter tells CHKDSK to locate bad sectors and recover readable information. You can also use /f to fix file system errors without checking for bad sectors.
Method 6: Recover Corrupted SD Card Partition Using TestDisk
When an SD card’s partition table becomes corrupted, Windows might not be able to recognize it properly. TestDisk is an open-source tool that can help you recover lost partitions and repair corrupted partition tables. While its command-line interface might look intimidating at first, the tool actually follows a logical step-by-step process:
- First, visit the TestDisk website and download the latest version. After extracting the downloaded archive, you’ll need to run testdisk_win.exe with administrator privileges (right-click and select Run as administrator). When prompted, choose to create a new log file.
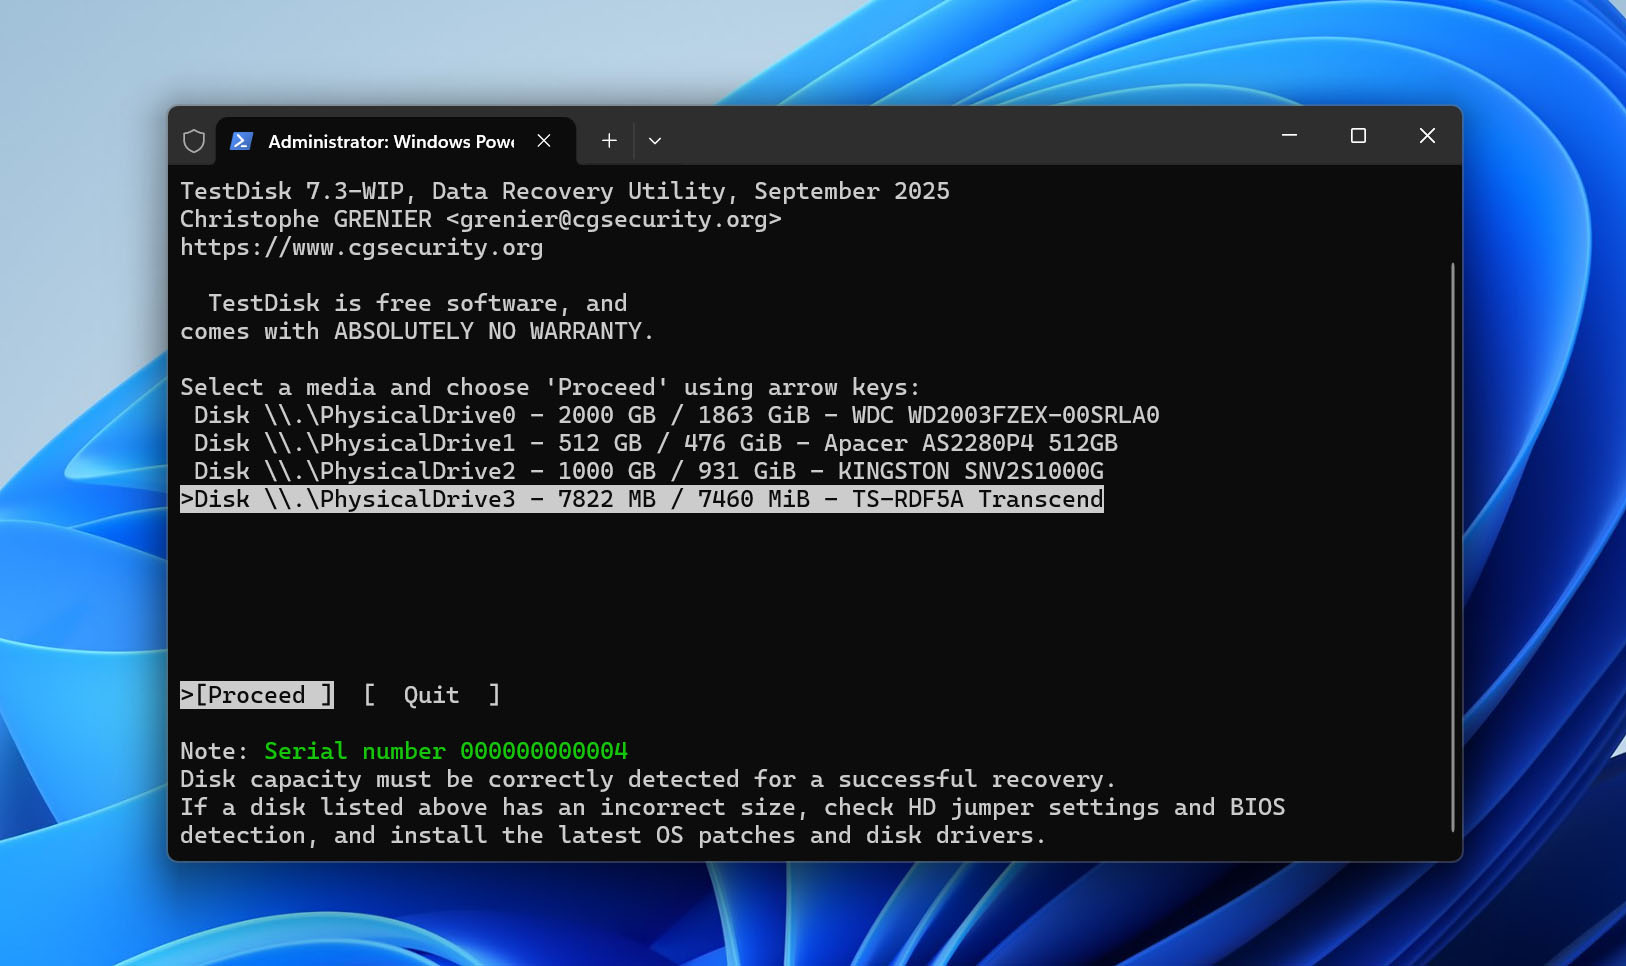
- Use the arrow keys to select your SD card (you can verify it’s the correct device by checking the listed storage capacity). Press Enter once you’ve highlighted the right device.
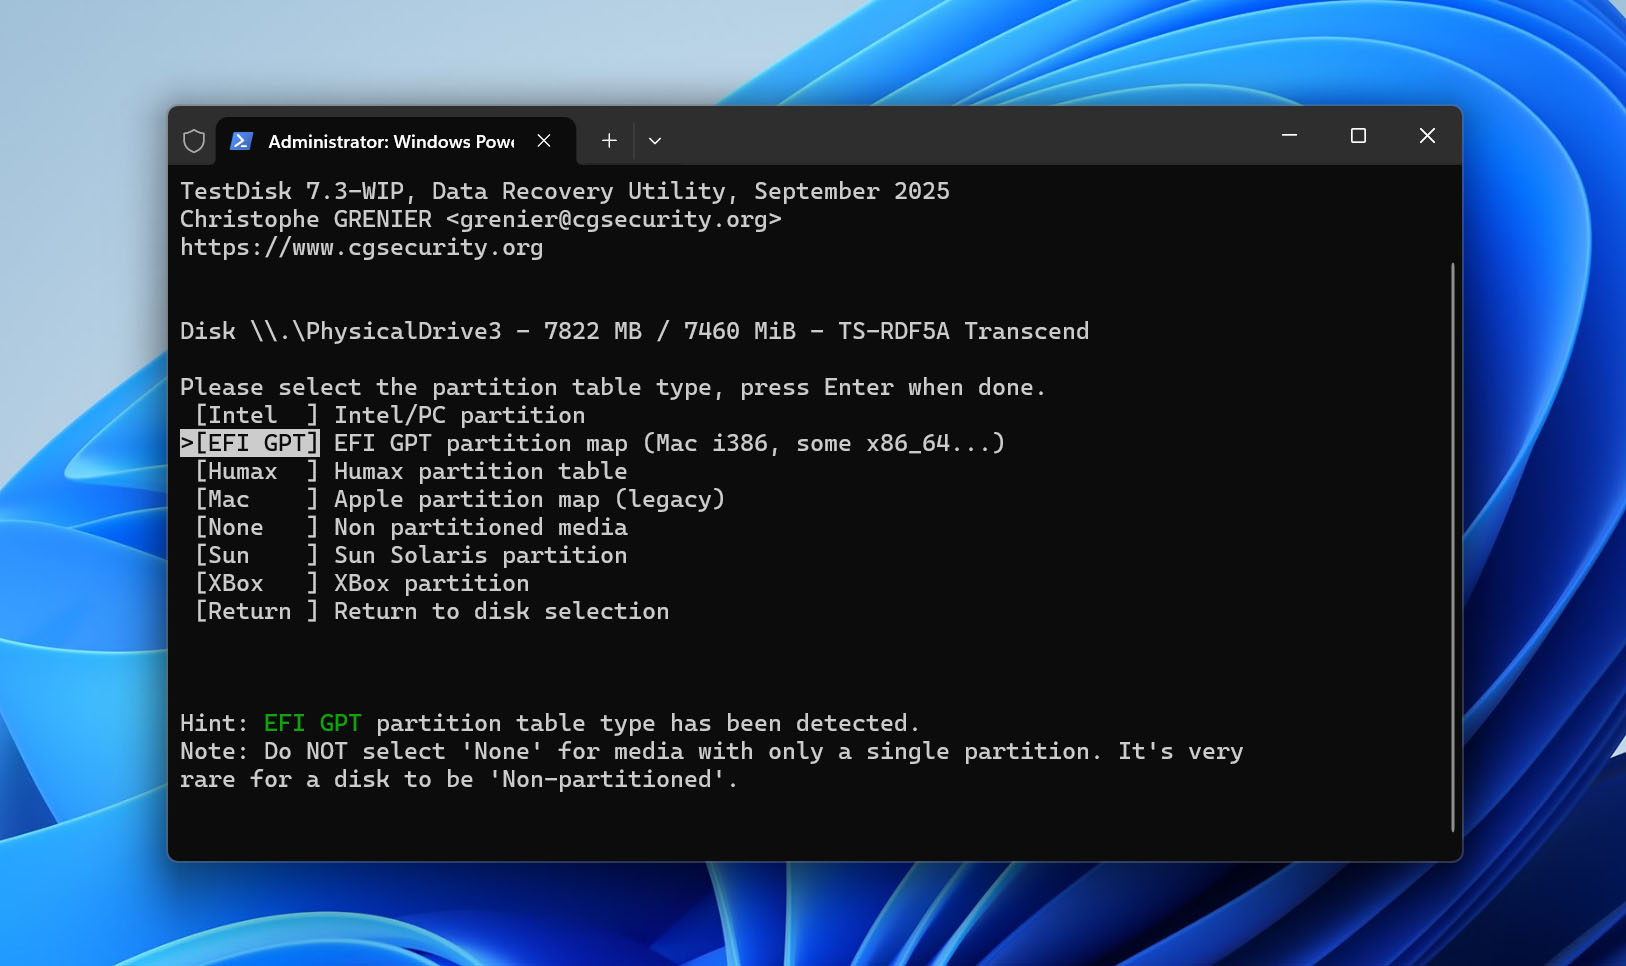
- TestDisk will attempt to detect your SD card’s partition table type automatically. For most SD cards, this will be Intel (MBR). Unless you have a specific reason to change it, accept the detected type by pressing Enter.
- Select Analyse to begin examining your SD card’s partition structure. TestDisk will show any partitions it can currently detect.
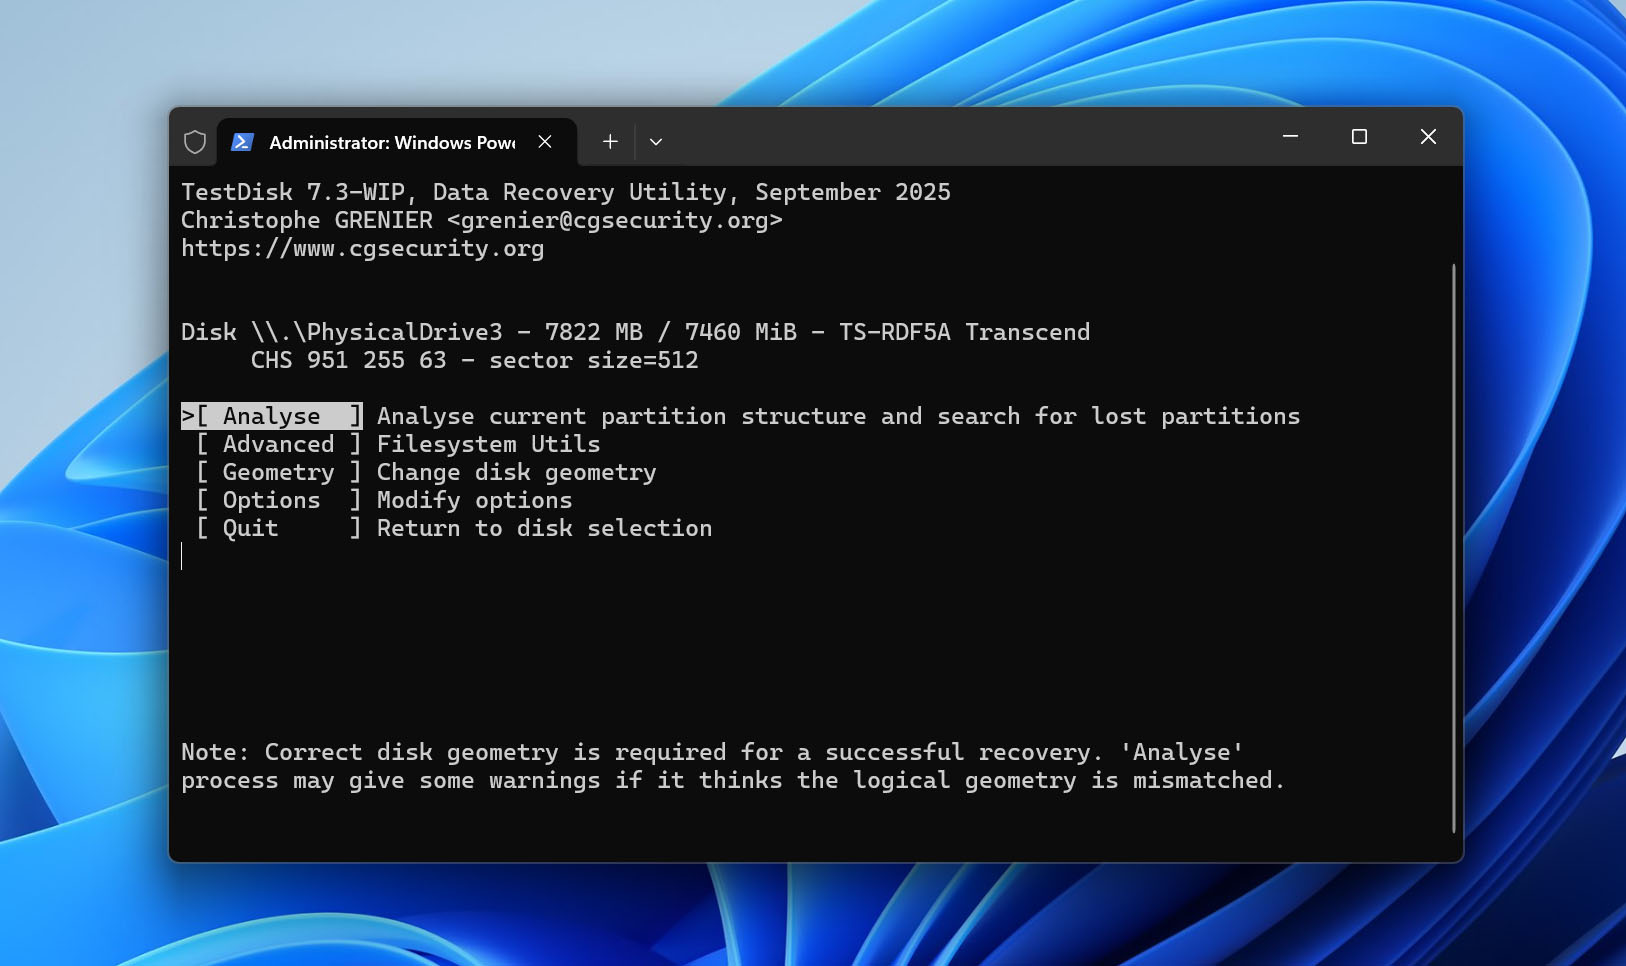
- Choose Quick Search to start scanning for lost or deleted partitions. TestDisk will display a list of all found partitions, including deleted ones. For each partition, you can press P on your keyboard to preview its contents.
- When you find the correct partition, use the left/right arrow keys to change its status from Deleted to the appropriate type (usually Primary for SD cards). Once you’ve correctly marked all the partitions you want to recover, select Write from the menu. After TestDisk finishes writing the new partition table, restart your computer to ensure Windows recognizes the changes.
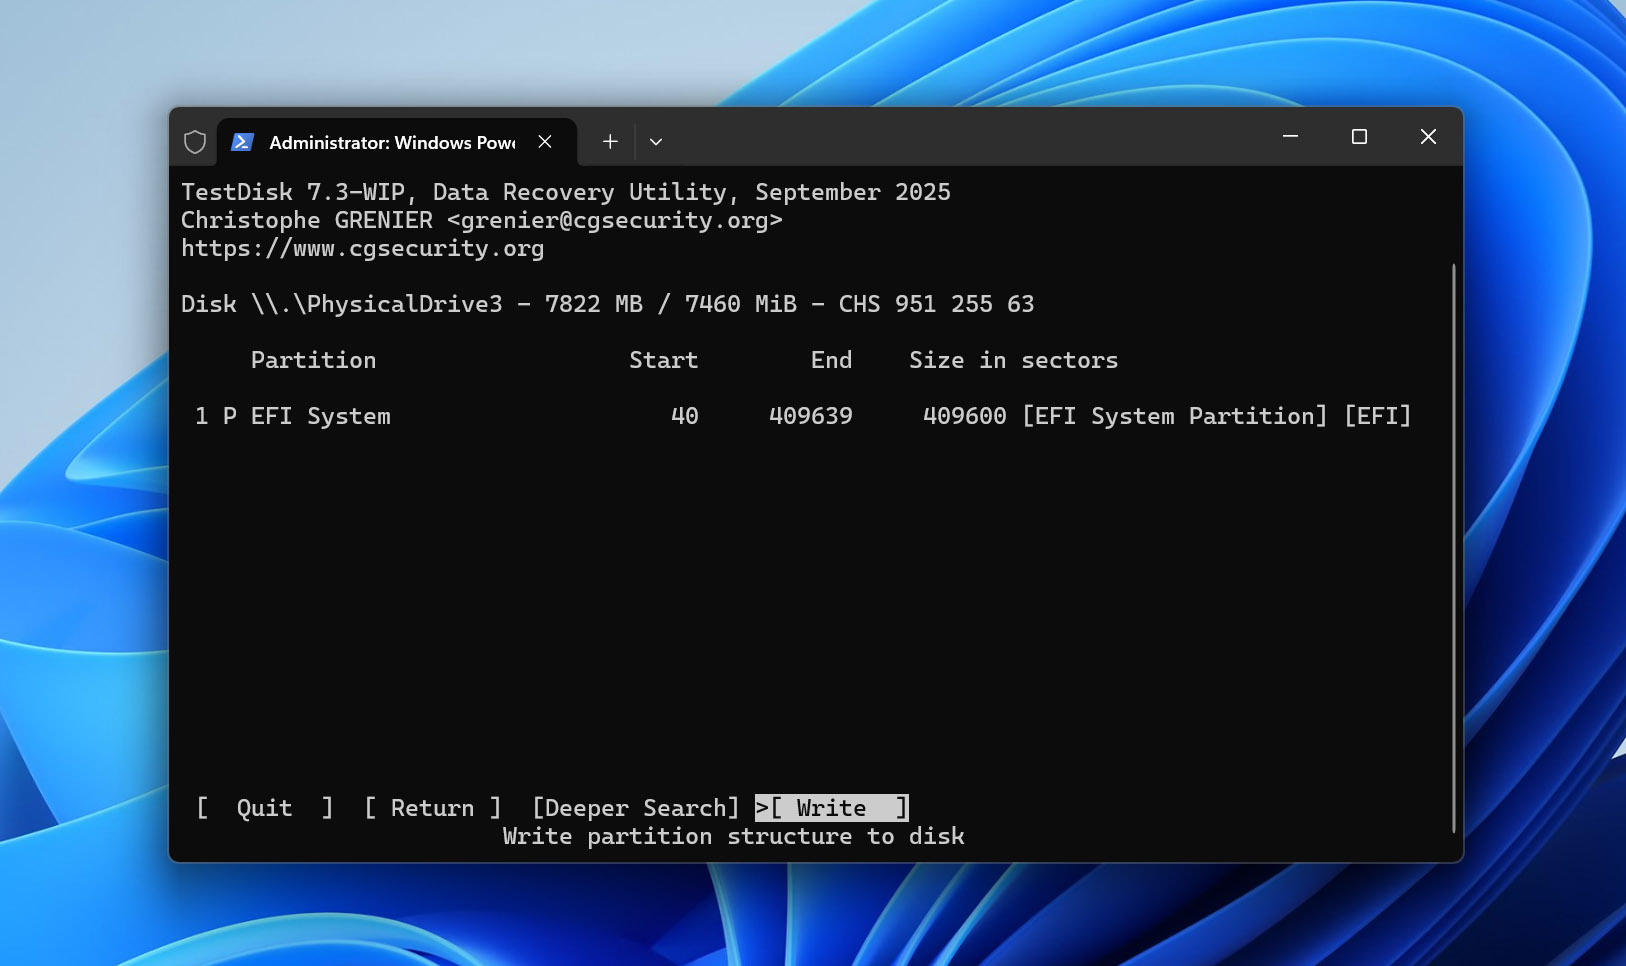
Should the Quick Search option fail to deliver any results, then you can continue with Deeper Search. While it will likely take a long time to complete, it should theoretically find any partition that’s still recoverable.
📝 Note: TestDisk ranks high on our list of the best SD card repair tools, and it comes in a package with PhotoRec, which is another data recovery software tool. Unlike TestDisk, PhotoRec works by scanning for known file signatures, so it’s useful when your SD card’s file system is severely damaged or completely missing. If you’d like to learn more, read our detailed reviews of TestDisk and PhotoRec, where we explain their capabilities, limitations, and ideal use cases.
Method 7: Check if the SD Card is Legit
There are surprisingly many fake SD cards sold on sites like Amazon and AliExpress. Such SD cards promise a large storage capacity but deliver only a small fraction of it. Because fake SD cards are programmed to display a different storage capacity than the one they actually offer, your device won’t be able to use the card correctly, so data corruption may occur.
We’ve seen plenty of cases like this, especially with deals that seem too good to be true. “Two friends instead bought 1TB cards for $30. Yes, both of these people bought fake SD cards,” wrote one Reddit user. The scammers bank on you not noticing until it’s too late. However, once you write more data than the card’s real capacity, it starts overwriting your existing files, leading to corrupted SD card problems.
To check if your SD card is legit, you can use a free tool such as FakeFlashTest, which works by writing large random files to the free space and then verifying their integrity. When the tool encounters a file whose integrity has been compromised, you know that’s where the real storage capacity ends.
- Download and launch the tool.
- Select your SD card and click the Quick Size Test button (make sure there are no important data on the SD card because they will be erased).
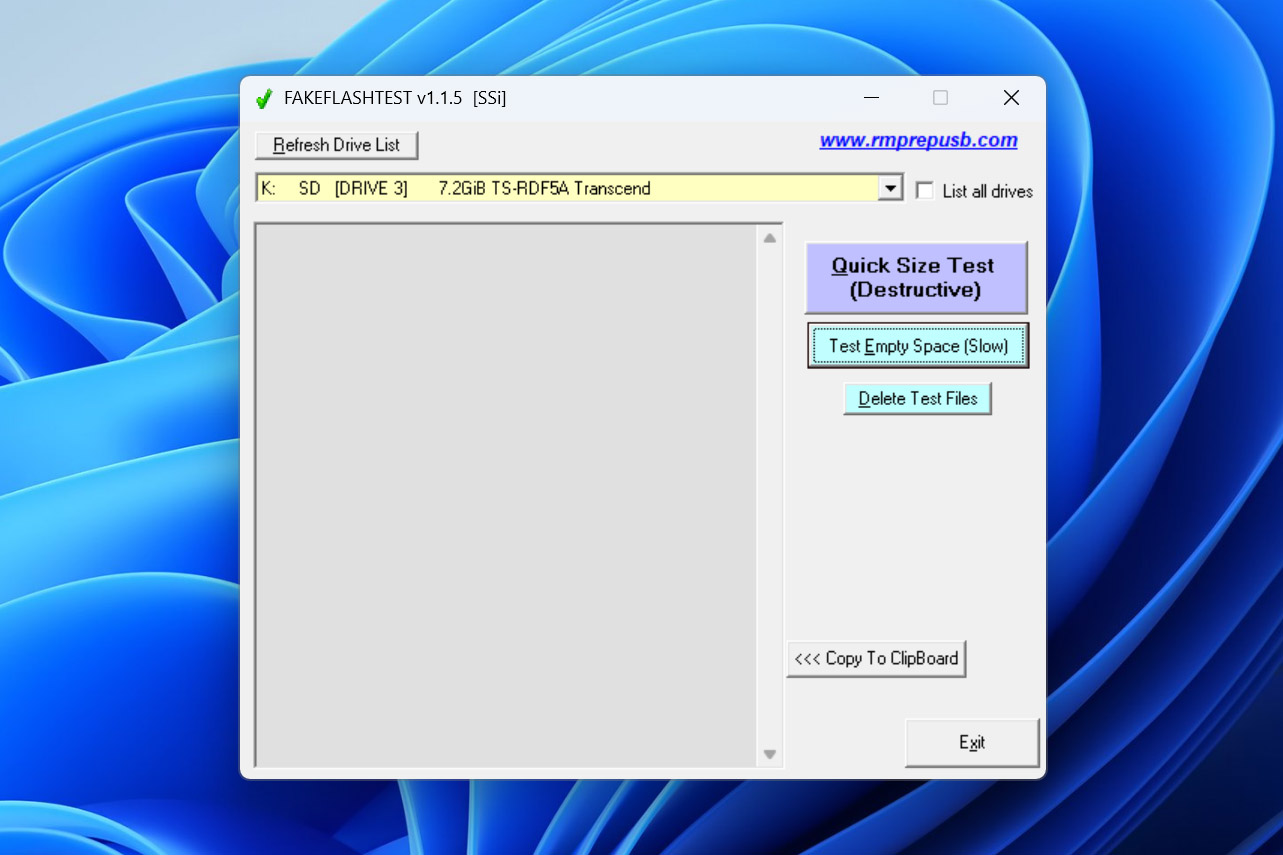
- Wait for FakeFlashTest to determine the true capacity of the SD card.
While it’s possible to use a fake SD card, we strongly recommend you avoid doing so because the risk of data corruption is simply too high. In extreme cases, the SD card could even become dead, and it’s not always possible to recover a dead SD card.
Method 8: Create a Partition on the RAW SD Card
If your SD card has become so corrupted that it now has no file system (=is RAW), then you need to create a new partition on it to be able to use it again. Just know that this method involves re-partitioning and formatting the card, which can restore its functionality but can make the recovery of lost data more difficult.
Therefore, it’s critical to attempt data recovery before proceeding with this fix. If you’ve already recovered as much important data from the SD card as possible, then you can proceed with creating a new partition on your RAW SD card.
- Press Windows + X and select Disk Management.
- Locate the RAW SD card and right-click on the unallocated space.
- Select the New Simple Volume option.
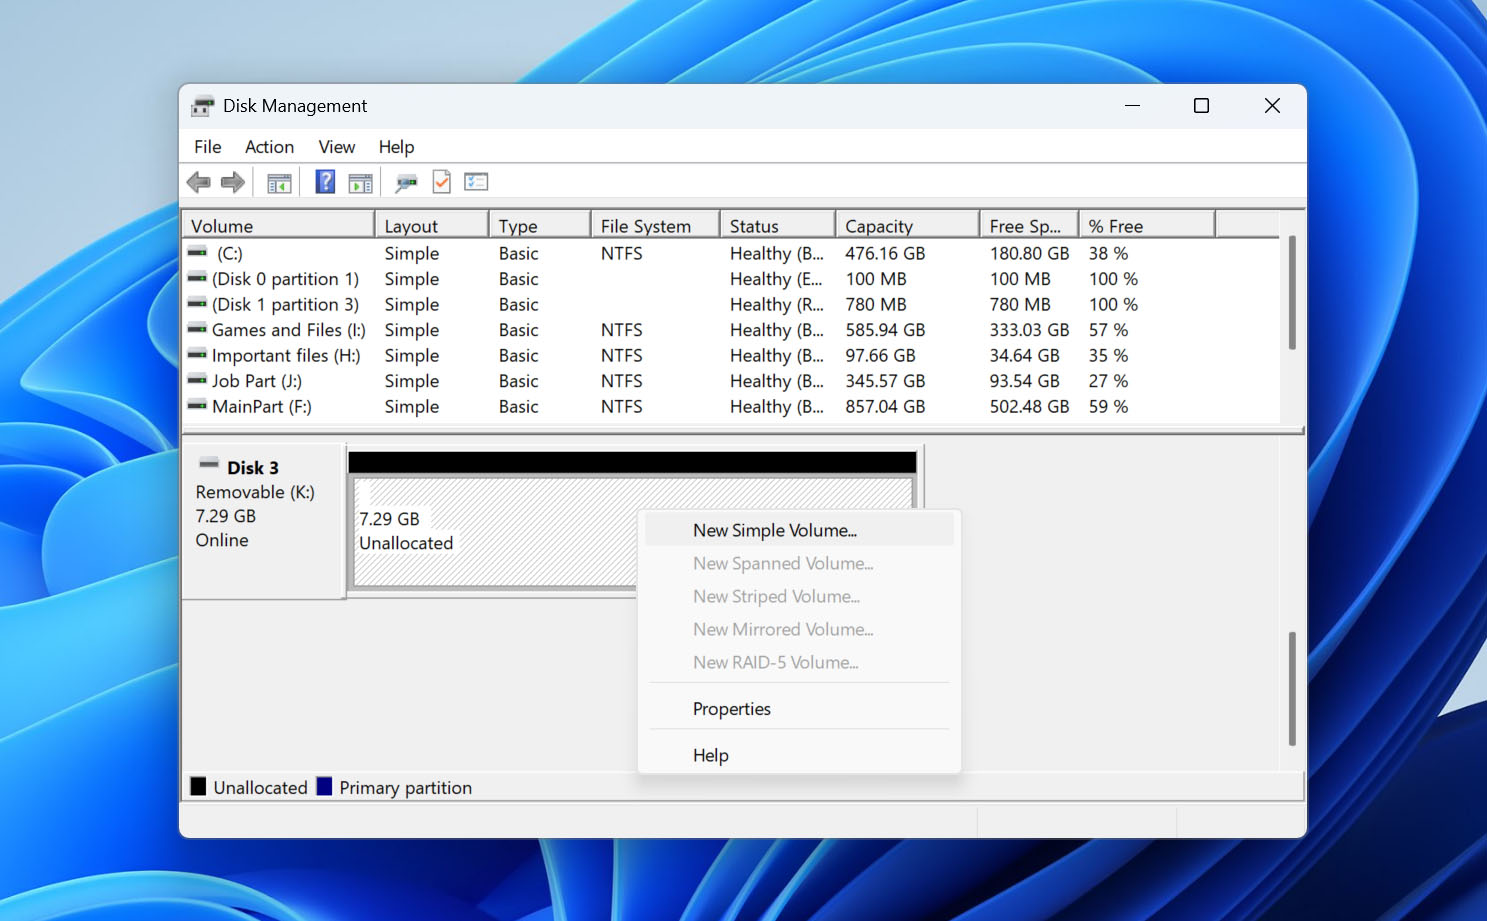
- Go through the partition creation wizard. When asked to select your desired file system, choose FAT32 or exFAT (if your SD card is larger than 32 GB).
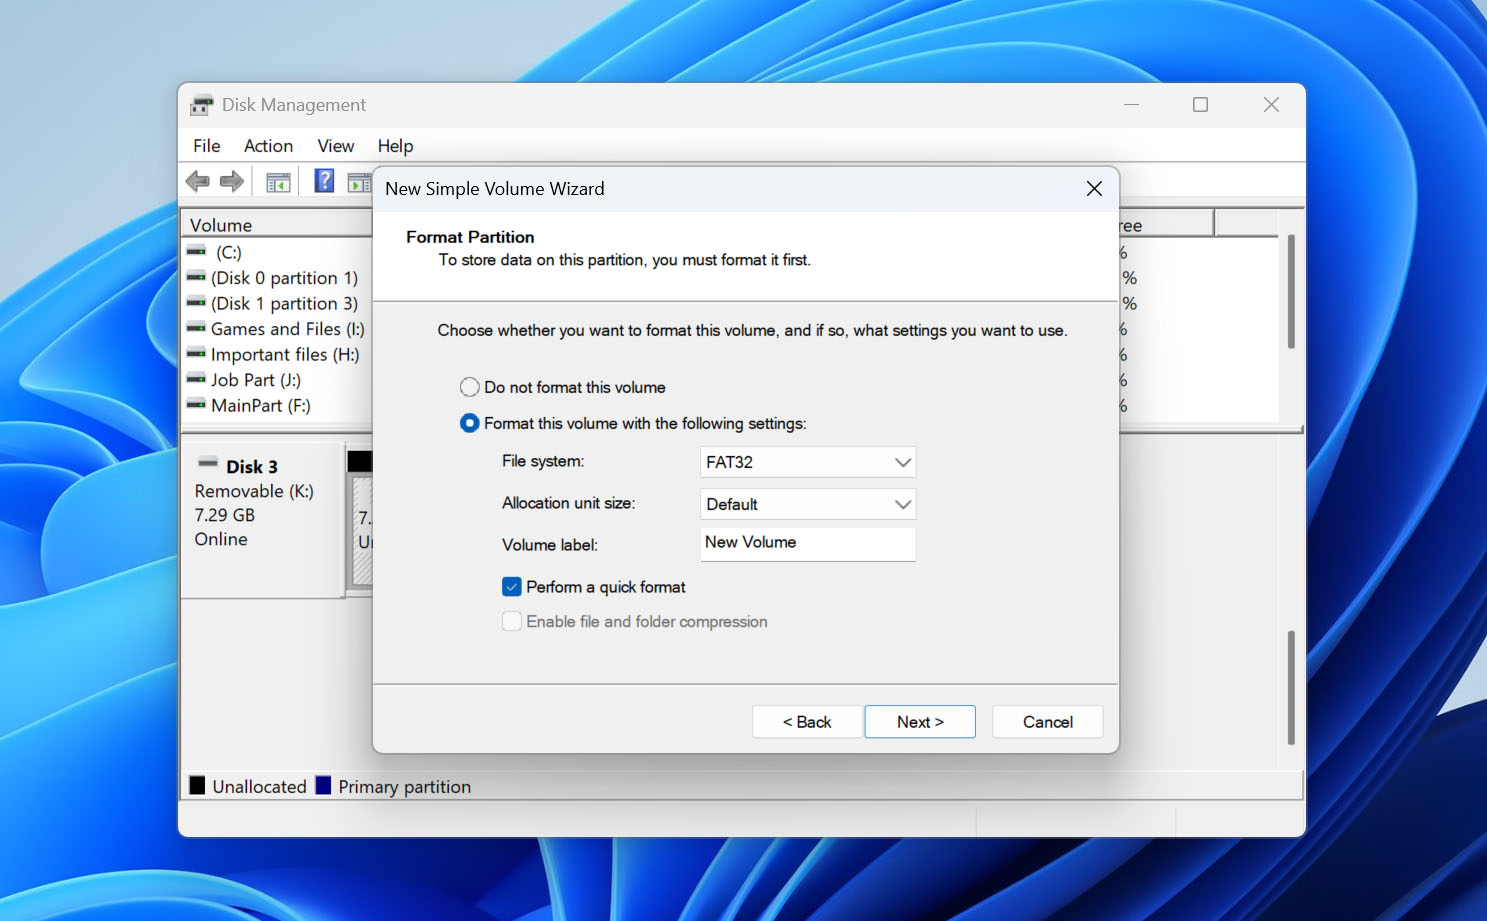
- Click Finish to close the partition creation wizard.
If you need more help with RAW SD cards, then you can check out our detailed guide on how to recover RAW SD card data for additional recovery methods and troubleshooting steps specific to RAW file system issues.
Method 9: Fix the SD Card by Reformatting It from Scratch
If you don’t care about the data stored on your SD card and you just want to fix the corruption that’s preventing you from using it (or you’ve recovered everything important already), you can recreate the file system by performing a quick format using the built-in format tool in Windows:
- Open Windows Explorer and select This PC from the left panel.
- Right-click on your SD card and select the Format option.
- Choose your preferred file system. The best file systems for SD cards are FAT32 and exFAT. The former is supported by the vast majority of devices that accept SD cards, while the latter can store extremely large files, which comes in handy when recording high-resolution videos.
- Make sure the Quick Format option is checked and click Start.
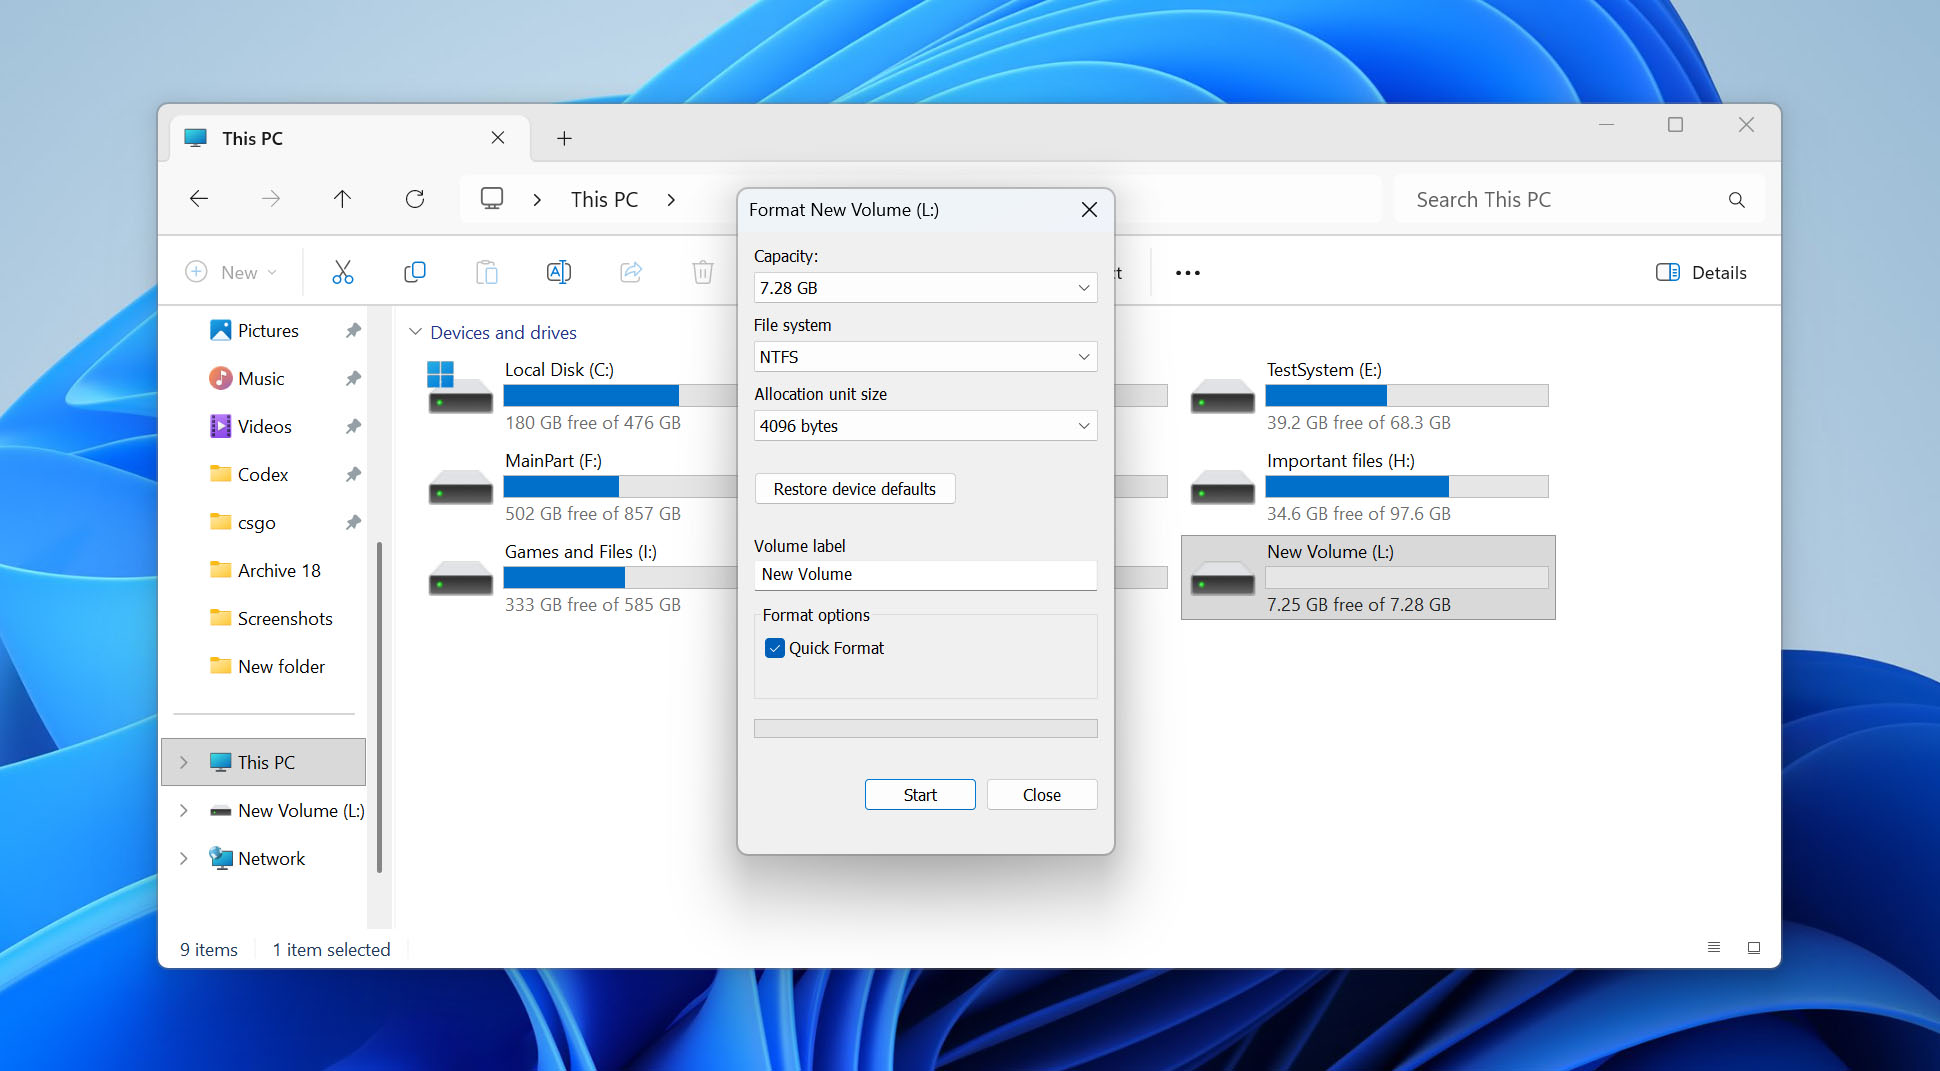
Quick Format simply erases the file system structure and marks all space as available. If you uncheck the Quick Format option, Windows will perform a Full Format instead, which thoroughly scans the entire SD card for bad sectors and rewrites every storage location. If you’d like to better understand what happens to your data after formatting an SD card and how different formatting methods affect your recovery chances, check out our detailed article on the subject.
How to Prevent SD Card Corruption in the Future
While no SD card lasts forever, many cases of corruption are caused by everyday mistakes that are easy to avoid. Following the recommendations below can help reduce the risk of file system corruption, unexpected data loss, and premature card failure.
- Never remove the card while your computer, camera, or phone is still reading or writing data. On Windows, use Safely Remove Hardware, and on other devices, eject the card through the operating system whenever possible.
- Format the card in the device that will use it. Cameras, drones, and other devices often create their own folder structure and storage settings. Formatting the card directly in the device helps avoid compatibility issues later.
- Avoid using the same SD card across multiple devices. Frequently switching a card between cameras, phones, drones, and computers increases the likelihood of file system conflicts and corruption.
- Try to keep at least 10-15% of the card’s capacity free. A completely full SD card is more prone to write errors and has less room for the controller to manage wear leveling efficiently.
- Don’t remove the battery, power off the device, or eject the SD card while photos, videos, or other files are still being saved. Interrupted writes are one of the most common causes of file corruption.
- Counterfeit and low-quality cards often use inferior flash memory or fake their advertised capacity, making corruption much more likely. If you’ve purchased a new card from an online marketplace, it’s worth verifying its true capacity with a tool such as FakeFlashTest before storing important files on it.
- Flash memory wears out over time. If your SD card has been heavily used for several years or has already started showing occasional errors, it’s safer to replace it than wait for a complete failure.
- Protect the card from physical damage. Store SD cards in protective cases and avoid exposing them to moisture, excessive heat, bending, dust, or static electricity. Physical damage can quickly turn a recoverable problem into permanent data loss.
- Back up important files regularly. Even with careful use, SD cards can fail without warning. Keeping another copy of your photos, videos, and documents on a computer, external drive, or cloud storage remains the best protection against permanent data loss.
Final Thoughts
We hope this guide helped you recover your files and restore your corrupted SD card to working condition. You now know not only what to do when corruption happens, but also how to reduce the chances of facing the same problem again.
Of course, every corrupted SD card situation can be unique and prevention may not always be possible. If you’re facing a specific issue not addressed here, check out the FAQ section below. You can also reach out directly in the comments section below, or connect with us on our social channels: Facebook, X (Twitter), or LinkedIn. We monitor these channels regularly and enjoy helping readers solve their data recovery challenges.
We’ve also recently launched our community forum, where you can browse existing discussions to see how others solved similar SD card problems or start your own topic. Our data recovery experts and community members regularly answer questions there, so it’s a great place to get help with more unusual cases.