


Lost files on your Windows PC and not sure where they went? Files can seem to disappear after updates, sudden shutdowns, or simple actions like moving or renaming folders. Often, the data is still on the drive, but Windows no longer shows it in the expected location.
✅Quick advice: To find missing or disappeared files on Windows, you should first check common locations and visibility issues, including Windows Search, the Recycle Bin, user folders, OneDrive sync, hidden files, temporary files, and the Windows.old folder.
Then move on to more advanced solutions like Disk Management checks, antivirus quarantine review, File History backups, and data recovery software if the files still do not appear. If you suspect deletion or file system damage, stop using the drive as much as possible before running recovery tools, since new data can overwrite recoverable files.
How to to Find Lost Files on Windows
Missing files do not always mean permanent data loss. Windows can hide files, move them into different user profiles, disconnect cloud synced folders, or lose track of partitions after crashes and updates. The methods below cover both quick visibility fixes and more advanced ways to locate or restore missing files.
Here we used screenshots for Windows 11, but all of the methods will work for Windows 10 as well. There might be some differences in the interface, such as slightly different menu layouts or naming of certain options. However, the core functionality and steps remain the same across both versions, so you can follow the instructions without any issues.
Method 1: Search for the File Using File Explorer
Search is the fastest way to locate missing files when their exact location is unclear. Even if a file was moved or saved to a different folder, Windows can still find it as long as it exists on the drive.
Here are different ways you can use Search to find a missing file:
- Open File Explorer (press Win + E).
- Click the search bar in the top-right corner.
- Type part of the file name. If the exact name is unknown, use file extensions like .jpg, .png, .docx, .xlsx, or .mp4.
- Select a broader location before searching, such as This PC or a specific drive (for example, Local Disk (C:)), to widen the scope.
- Wait for results to load, then sort them by Date Modified to quickly find recent files.
- Use filters like Type, Size, or Date from the search toolbar to narrow down the results.
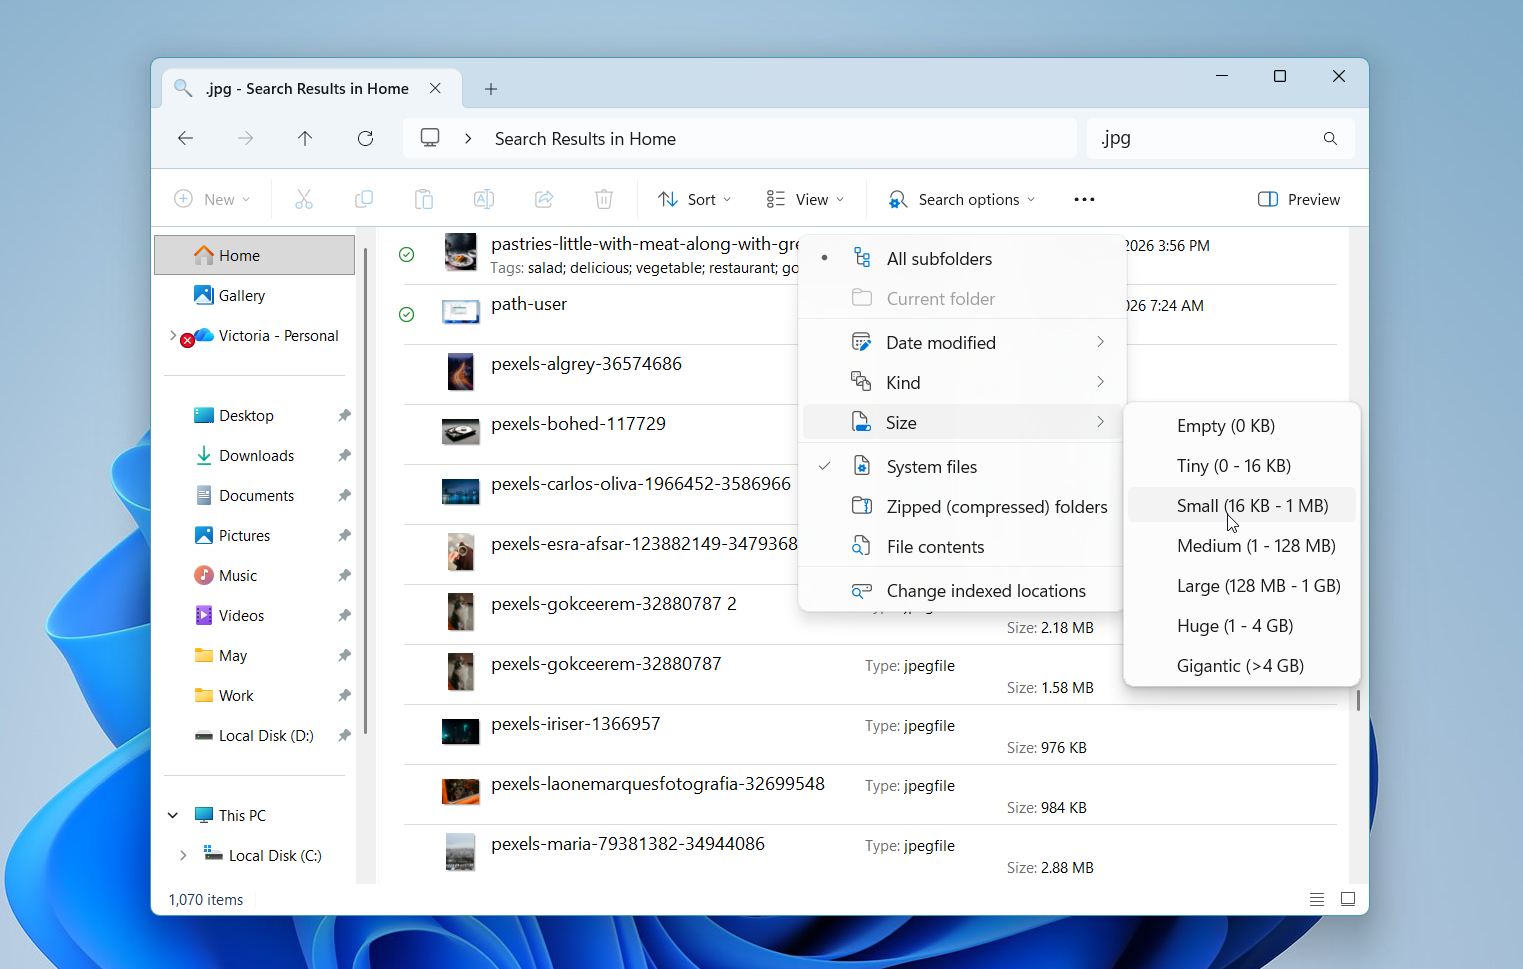
- Check Quick Access or recent files if the file was opened not long ago.
Search works best when files were moved, renamed, or saved in a different folder. If nothing appears, the file may be hidden, deleted, or affected by a deeper issue, so continue with the next methods.
Method 2: Check the Recycle Bin
This step may seem obvious, but it’s still worth checking. Files that were deleted (intentionally or by accident) are usually moved to the Recycle Bin first, not removed right away. A quick check can save time and avoid unnecessary steps, especially when the disappearance was recent.
- Open the Recycle Bin from your desktop.
- Look for the missing file or folder.
- Use the search bar in the top-right corner if there are many deleted items.
- Sort files by Date Deleted, Name, or Original Location to narrow down the results.
- Right-click the file you want to recover.
- Select Restore.
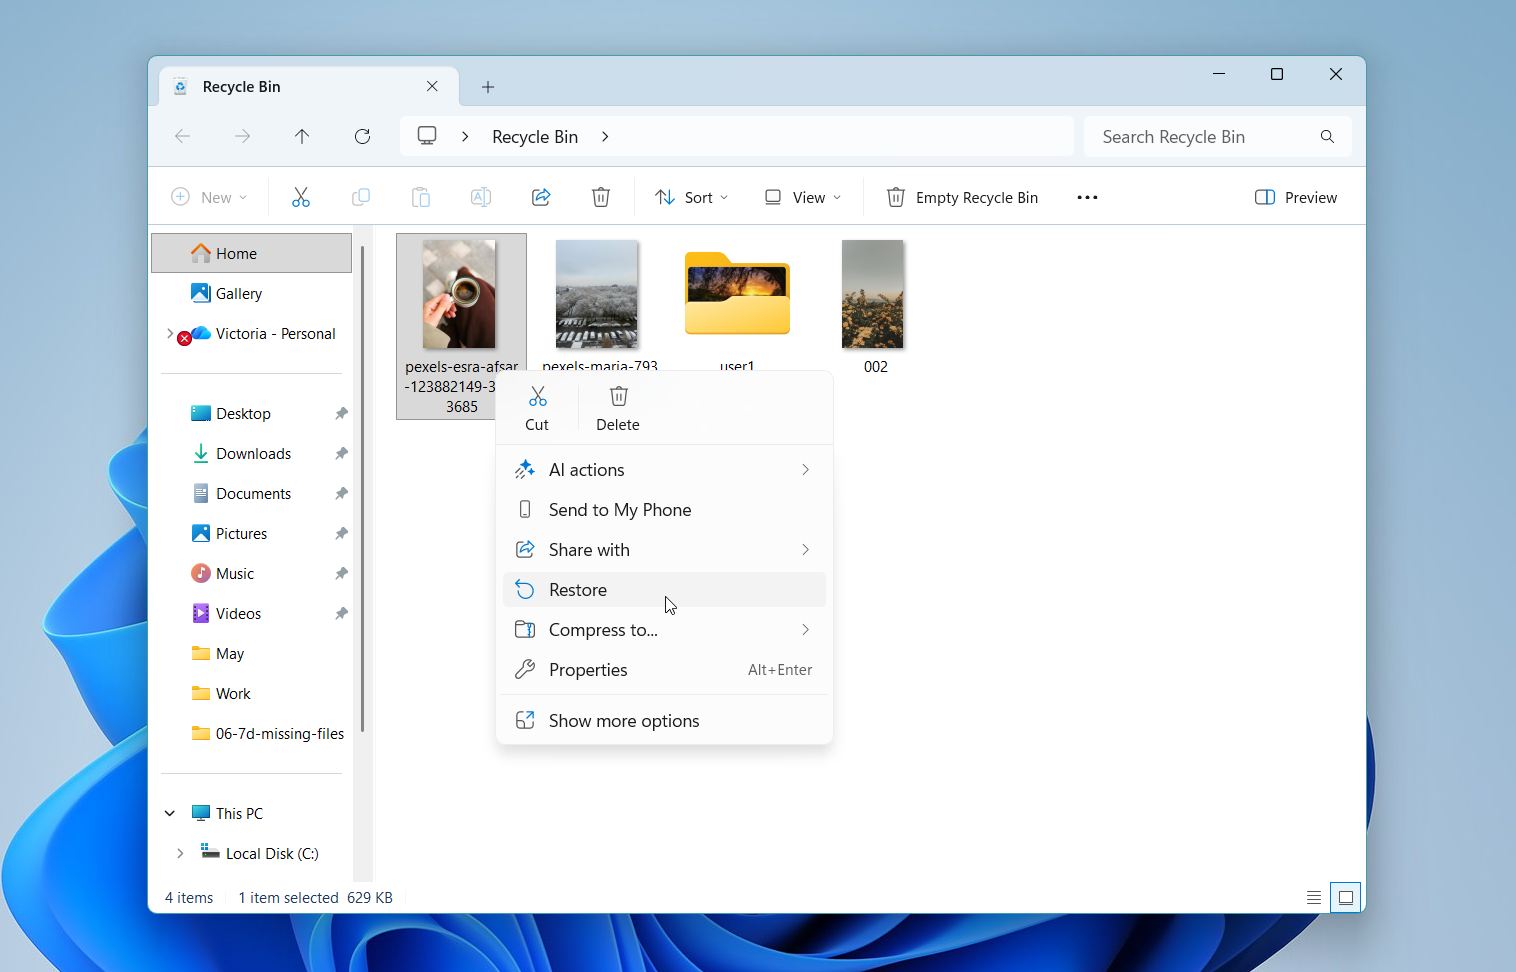
Go back to the original folder and check if the file has returned.
Method 3: Check the User Folder
Files may appear missing when Windows saves them under a different user profile or logs you into a temporary account. This often happens after updates or system errors. In these cases, the files are still on the drive but stored in another user folder.
Follow these steps to check all available user folders and locate your files:
- Open File Explorer (press Win + E).
- Go to Local Disk (C:). Select Users.
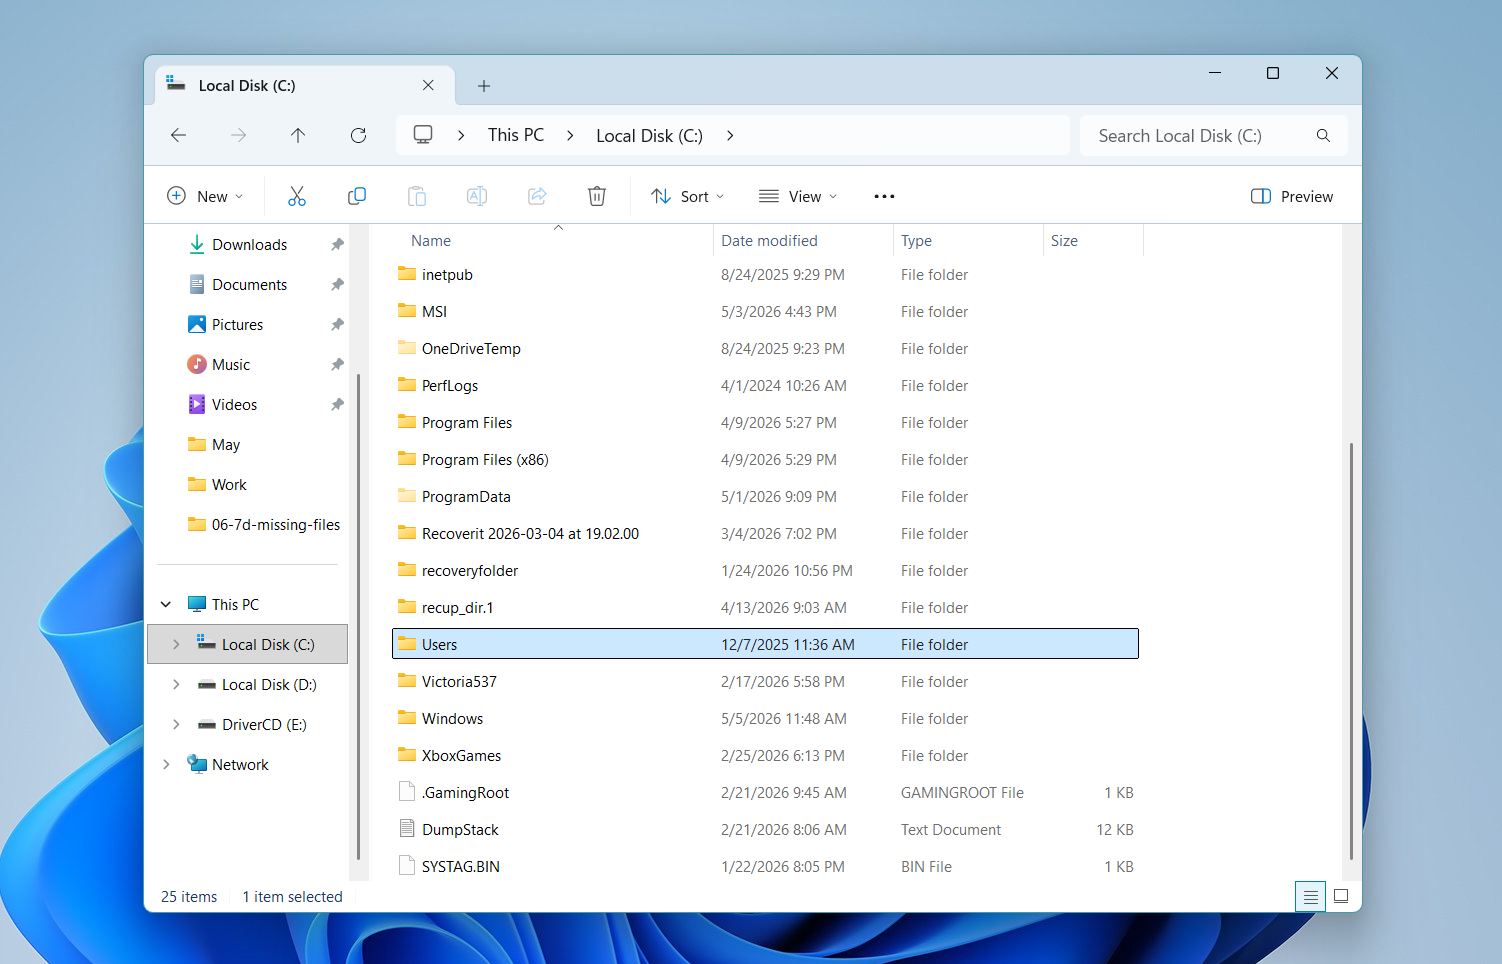
- Look for multiple user folders (for example, your current username, Default, or other names).
- Open each folder and check common locations like Desktop, Documents, Downloads, and Pictures.
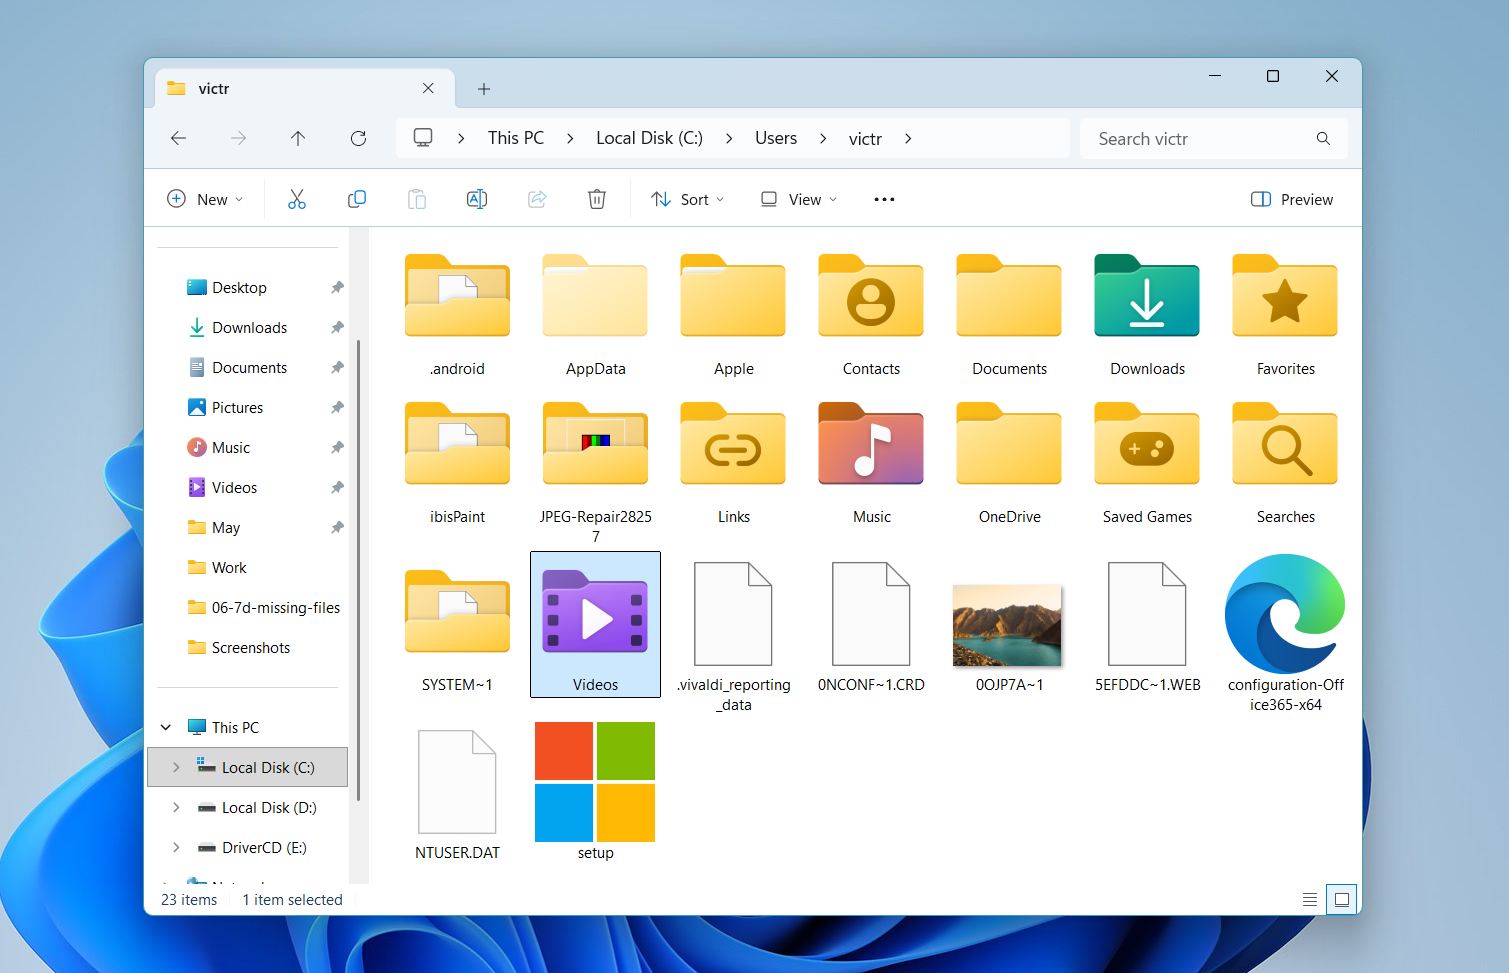
- Sort files by Date Modified to quickly find recent data.
- If you find your files in another profile, copy them to your current user folder.
If you notice a folder with a similar name to yours (for example, with a .TEMP suffix), Windows may have created a temporary profile. In that case, you should switch back to your main account to restore access to your original files.
Method 4: Check Microsoft OneDrive
The next method we suggest is to check OneDrive, especially if you use it for file syncing or backups. Windows can automatically move or sync files to the cloud, which may make them seem missing from your local folders even though they still exist online.
Follow these steps to check OneDrive:
- Click the OneDrive icon in the taskbar (near the clock), or open it from the Start menu.
- Open your synced folders and look for the missing files.
- Check the OneDrive Recycle Bin in case the files were deleted.
- Look at file icons: a cloud icon means the file is stored online and not downloaded locally.
- Right-click the file and select Download or Always keep on this device to restore local access.
- If needed, sign in to your account through a browser and check files directly on the OneDrive website.
If files are found in OneDrive, you can restore or download them back to your device. If not, continue with the next methods.
Method 5: Enable Hidden Files
Sometimes files remain on the drive but don’t appear in File Explorer because their visibility settings have changed. This can happen after system updates, software actions, or minor file system inconsistencies. In these cases, folders may look empty even though they still occupy disk space. Enable hidden files and check if your data is simply not being displayed.
Follow these steps to show hidden files:
- Open File Explorer (press Win + E).
- Click View in the top menu.
- Select Show and enable Hidden items.
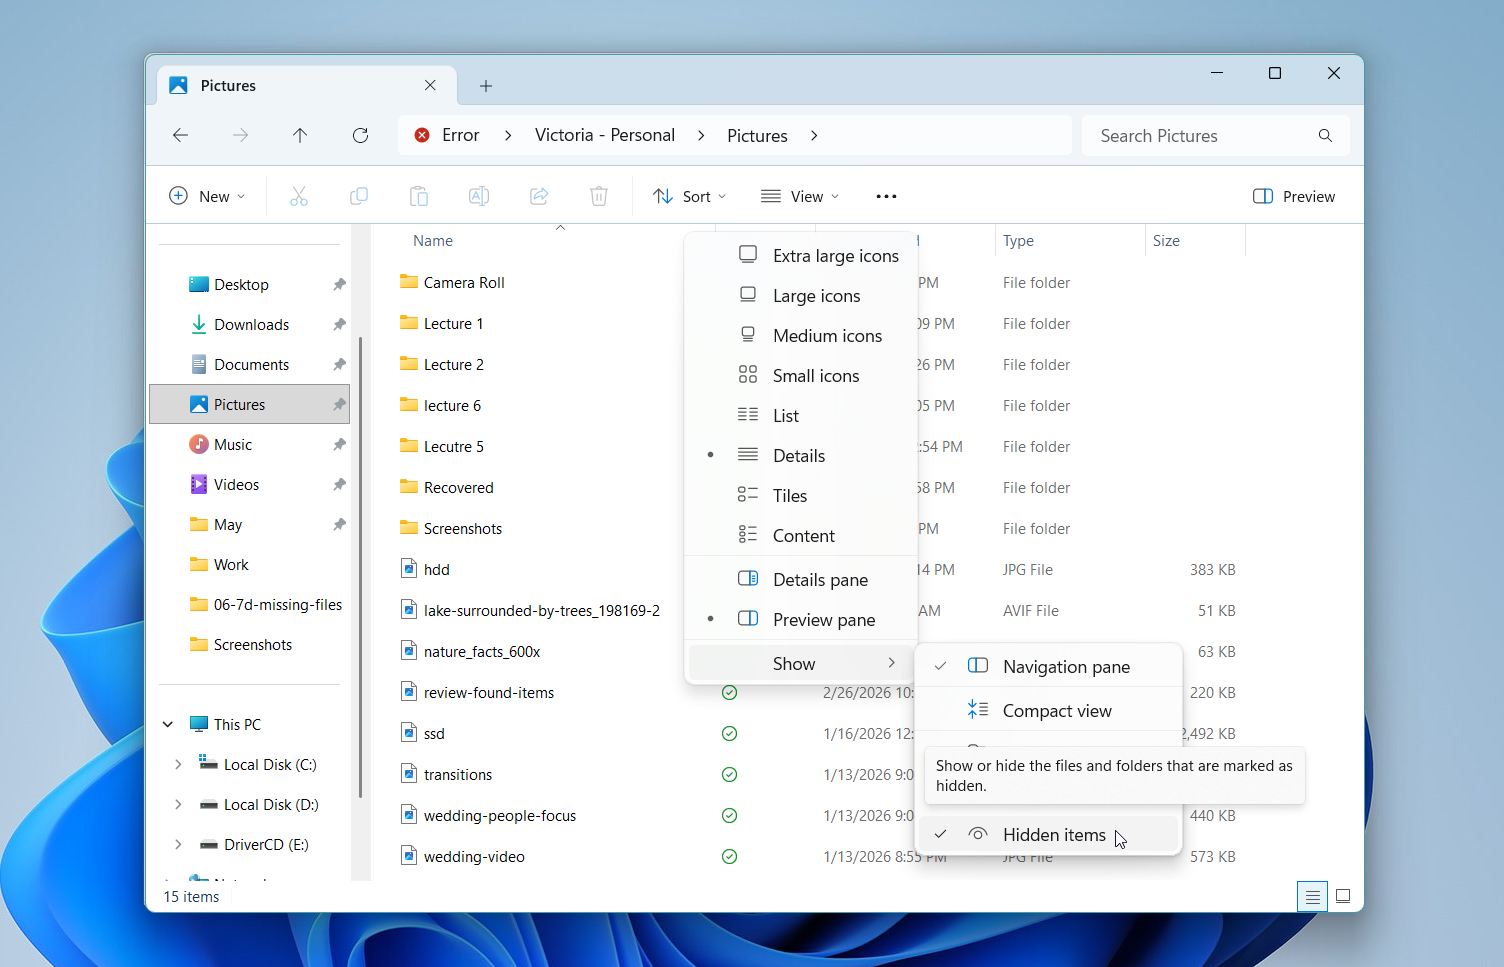
- Go to the folder where your files were stored.
- Look for faded (semi-transparent) files or folders.
- If you find them, right-click the file or folder and select Properties.
- In the General tab, uncheck Hidden, then click Apply and OK.
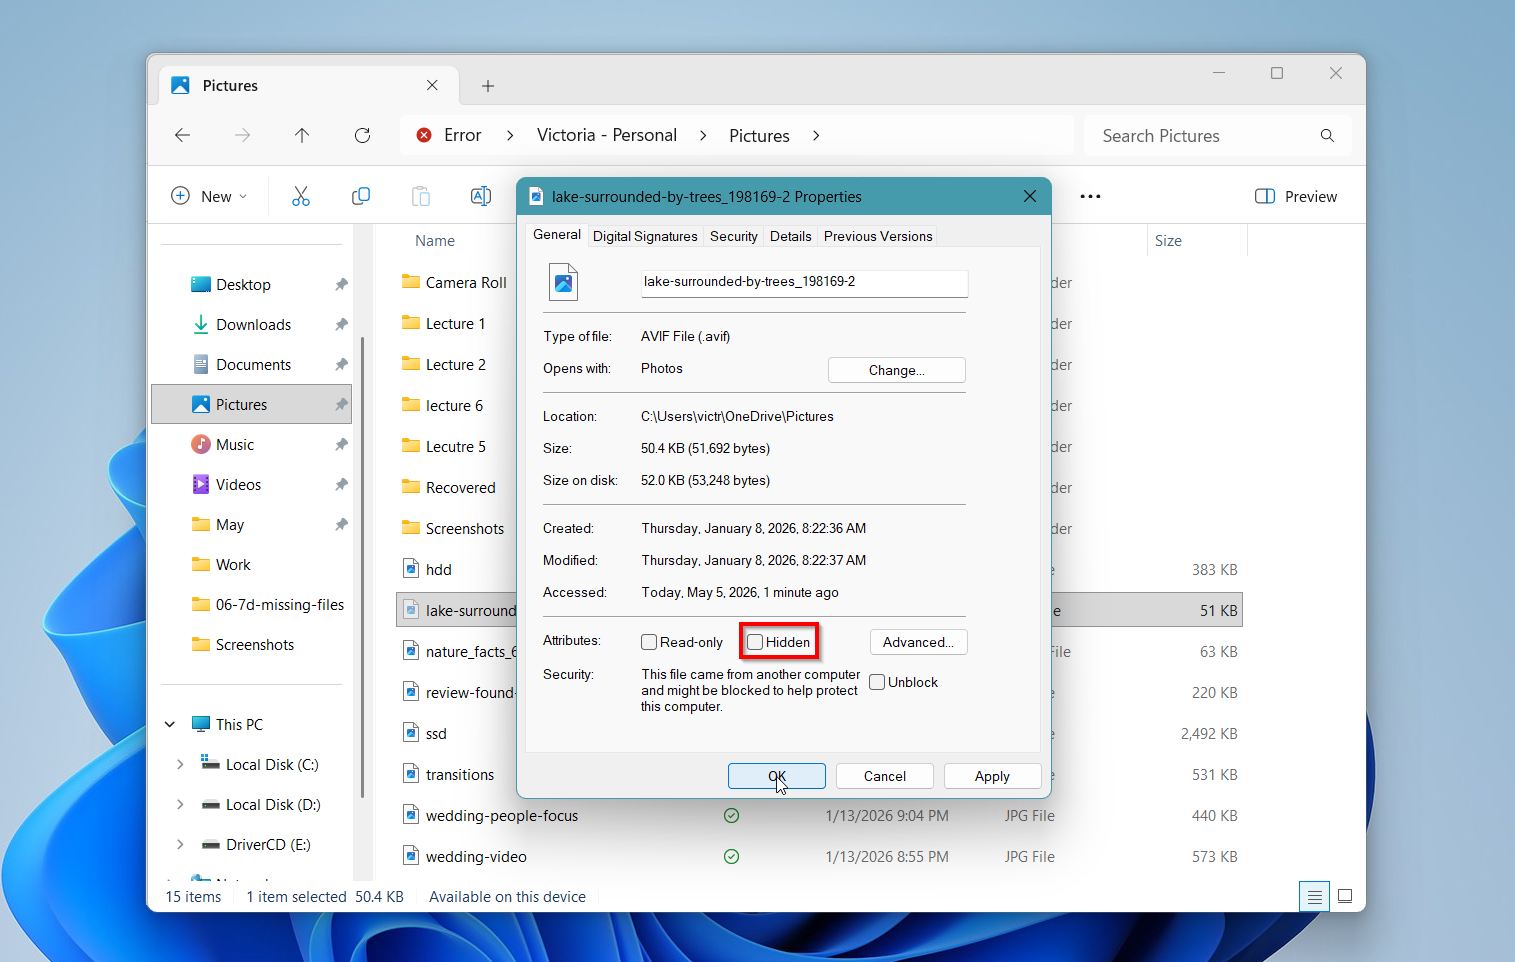
If files appear after this step, it confirms they were hidden rather than lost. If the folder still looks empty, the cause likely goes beyond visibility settings, so proceed to the next methods
Method 6: Look in Temporary Files
In some situations, files don’t disappear completely but get redirected to temporary storage. This often happens when a program crashes, a save operation fails, or the system shuts down unexpectedly. Many applications create temporary working copies while you edit files, and those copies can remain even when the original file is no longer visible.
These temporary files may not have the exact original name or extension, which makes them harder to recognize at first glance. However, sorting by recent activity usually helps surface relevant items.
Follow these steps to check temporary files:
- Press Win + R to open the Run dialog.
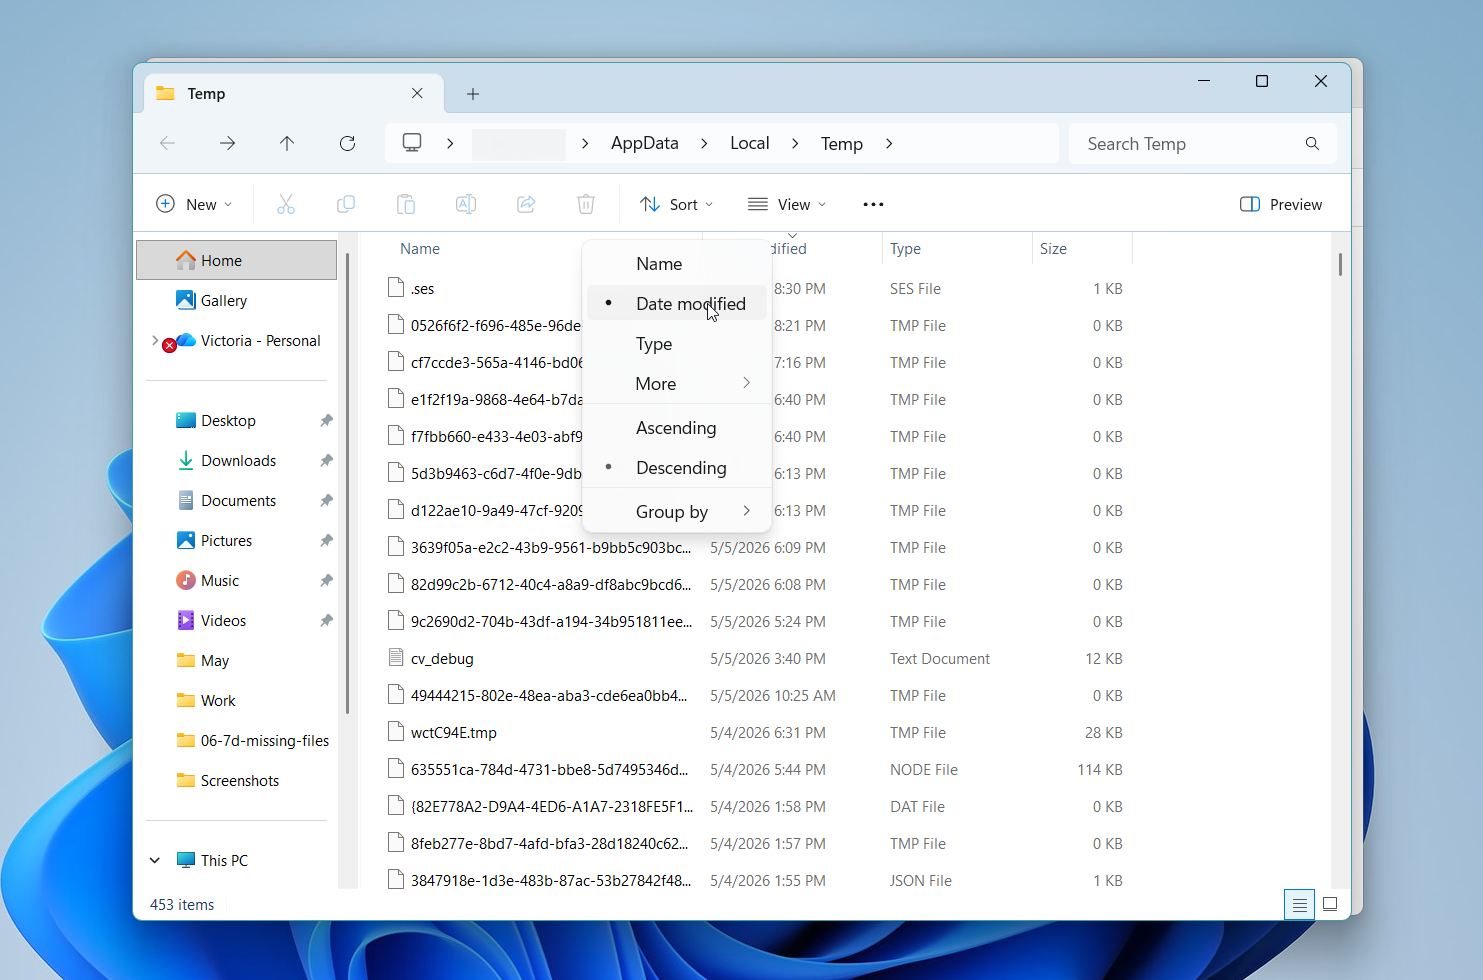
- Type %temp% and press Enter.
- A folder with temporary files will open.
- Sort files by Date Modified to bring the most recent items to the top.
- Look for files with familiar names, partial names, or common extensions like .tmp, .asd, .wbk, .txt, or even standard formats like .docx or .xlsx.
- Try opening suspicious files to check their contents.
- If you find the correct file, copy it to a safe location such as Desktop or Documents and rename it if needed.
If the file was recently open in an application like Word or Excel, also check that app’s built-in recovery section (for example, “Document Recovery” in Microsoft Word). Temporary files don’t stay forever, so act quickly once you find something relevant.
Method 7: Check the Windows.old Folder
Files may appear missing after a major Windows update or system reset. In many cases, Windows keeps a copy of the previous installation in a folder called Windows.old. This folder can contain your old user profile, including Desktop files, documents, downloads, and other personal data from before the update.
Follow these steps to check it:
- Open File Explorer (press Win + E).
- Go to Local Disk (C:).
- Look for a folder named Windows.old.
- Open Windows.old, then Users and YourUsername.
- Check common folders such as Desktop, Documents, Downloads, and Pictures.
- Sort files by Date Modified to quickly find recent data.
- Copy any important files to a safe location, such as your current user folders.
This method works best when files disappeared after a system update, reset, or reinstall. Windows does not merge old files automatically in every case, so they may remain in Windows.old instead of your current profile. Keep in mind that Windows.old is temporary. Windows usually removes it automatically after a short period (often around 10 days) to free up space, so check it as soon as possible.
Method 8: Check Disk Management
Files may seem missing when the issue is not with the files themselves, but with the drive or partition they are stored on. In some cases, a drive may lose its letter, appear as unallocated, or fail to mount properly, which makes all files on it invisible in File Explorer.
Disk Management allows you to see the real status of your storage devices and identify problems that are not visible in normal folders.
Follow these steps to check your drives:
- Right-click the Start button and select Disk Management.
- Wait for Windows to load all connected drives.
- Look through the list and identify your drive based on size and type.
- Check its status. If it shows as Healthy but has no drive letter, right-click it and select Change Drive Letter and Paths to assign a letter.
- If it appears as Unallocated, the partition may be missing. If it shows as RAW, the file system may be damaged.
- Do not format the drive if your files are missing. Formatting can overwrite recoverable data.
- If the drive is visible but inaccessible, consider scanning it with data recovery software before making changes.
This method helps confirm whether the issue relates to file visibility or a deeper disk problem. If the drive does not appear correctly in Disk Management, avoid writing new data to it and proceed carefully with recovery options.
Method 9: Scan for Malware or Antivirus Quarantine
Antivirus software can remove, block, or isolate files without clear notice. Instead of deleting them right away, many tools move flagged files to quarantine. Malware can also hide files, change their attributes, or relocate them, which makes them appear missing even though they still exist on the drive.
Here is how to check this:
- Open your antivirus application.
- Find a section called Quarantine, Threat History, Protection History, or similar.
- Review recent detections and removed items.
- Look for file names or paths that match what you are missing.
- If you recognize a file, select it and choose Restore or Allow.
- Confirm the file returns to its original location or a restored folder.
- Run a full system scan to check for threats that may affect file visibility.

If a file was flagged incorrectly, restoring it should bring it back. Some antivirus tools may require you to mark it as safe to prevent it from being removed again. If malware caused the issue, remove it first, then check your files again.
How to Recover Deleted or Disappeared Files on Windows
If the previous methods didn’t help you locate your files, the issue likely goes beyond simple visibility or location changes. At this point, files may be deleted, lost due to file system issues, or no longer accessible through standard Windows tools. This is where data recovery methods become necessary. They allow you to scan the drive directly and locate files that no longer appear in File Explorer.
Method 1: Use Data Recovery Software to Restore Lost Files
Data recovery software is one of the most reliable ways to restore deleted or disappeared files. It works by scanning the storage device at a deeper level and detecting data that Windows no longer tracks.
We recommend Disk Drill because it’s one of the best options for this task. It supports all major file systems such as NTFS, FAT32, exFAT, and others, which makes it suitable for internal drives, external HDDs and SSDs, USB flash drives, and memory cards. The tool can find files that were deleted, lost after formatting, or hidden due to file system corruption.
Here is how to recover files using Disk Drill:
- Go to the official website and download Disk Drill.
- Follow the on-screen prompts and install the software on your PC. We do not recommend installing it on the same drive where files are missing, as this can overwrite recoverable data.
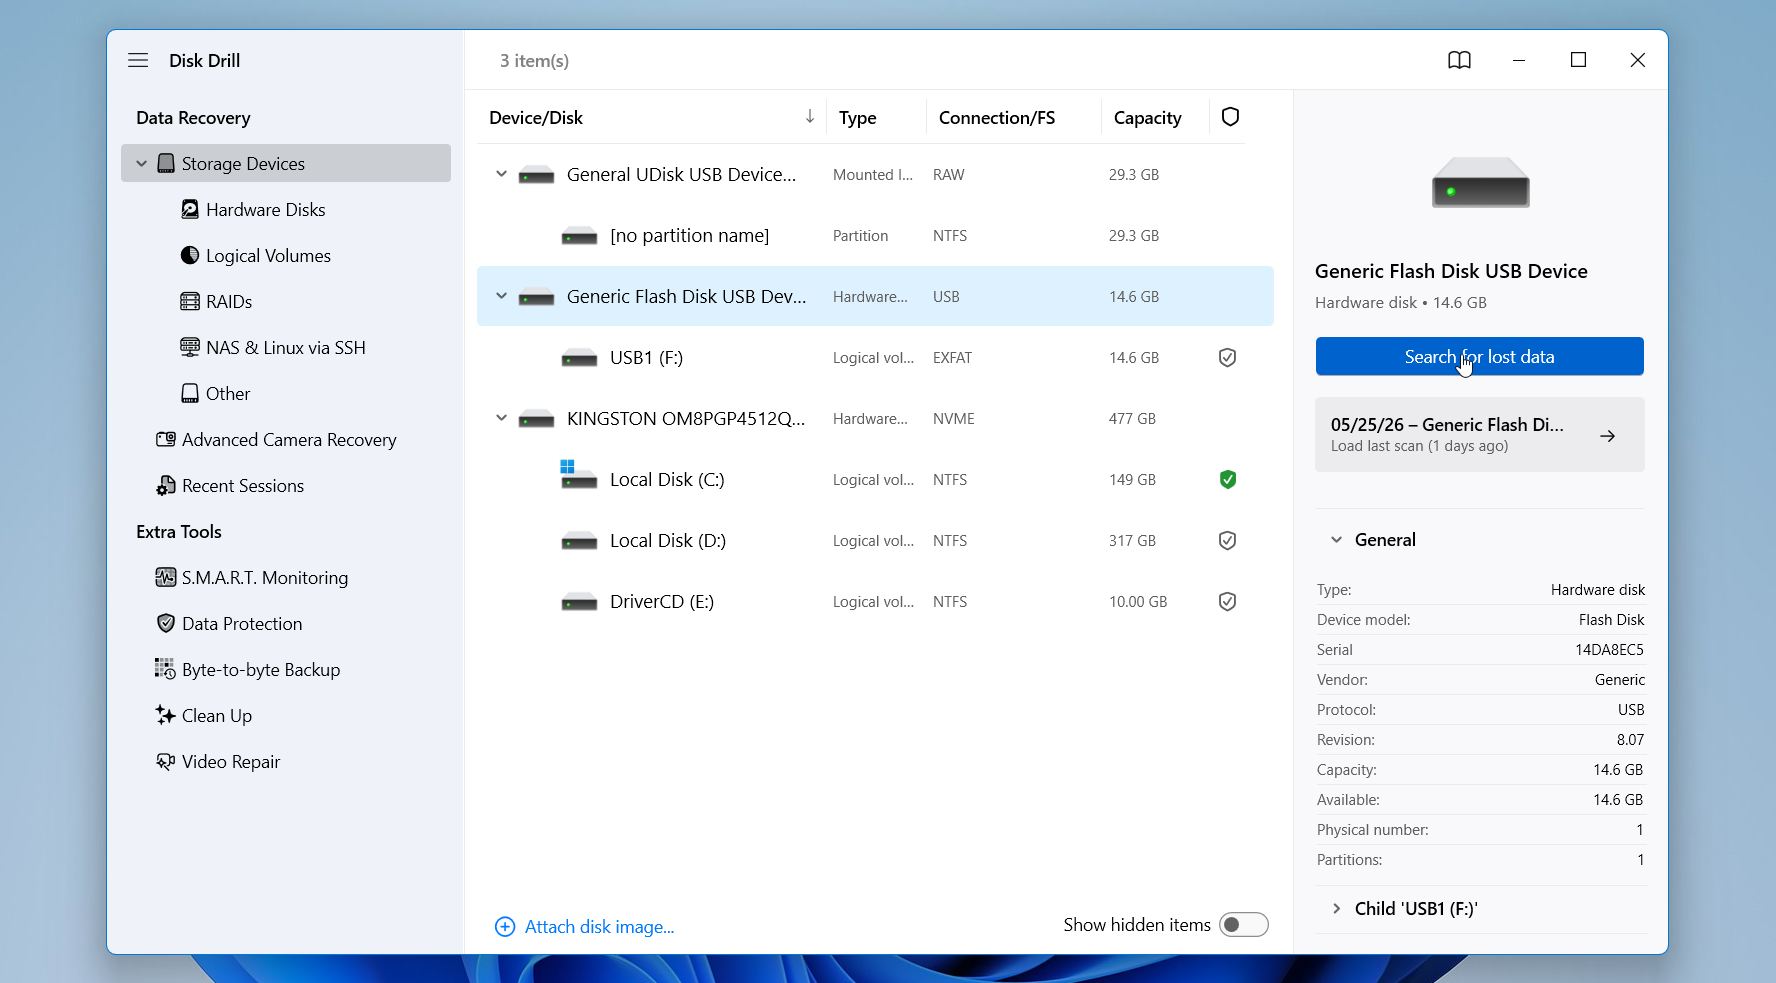
- Run Disk Drill. Select your drive from the list and click Search for lost data.
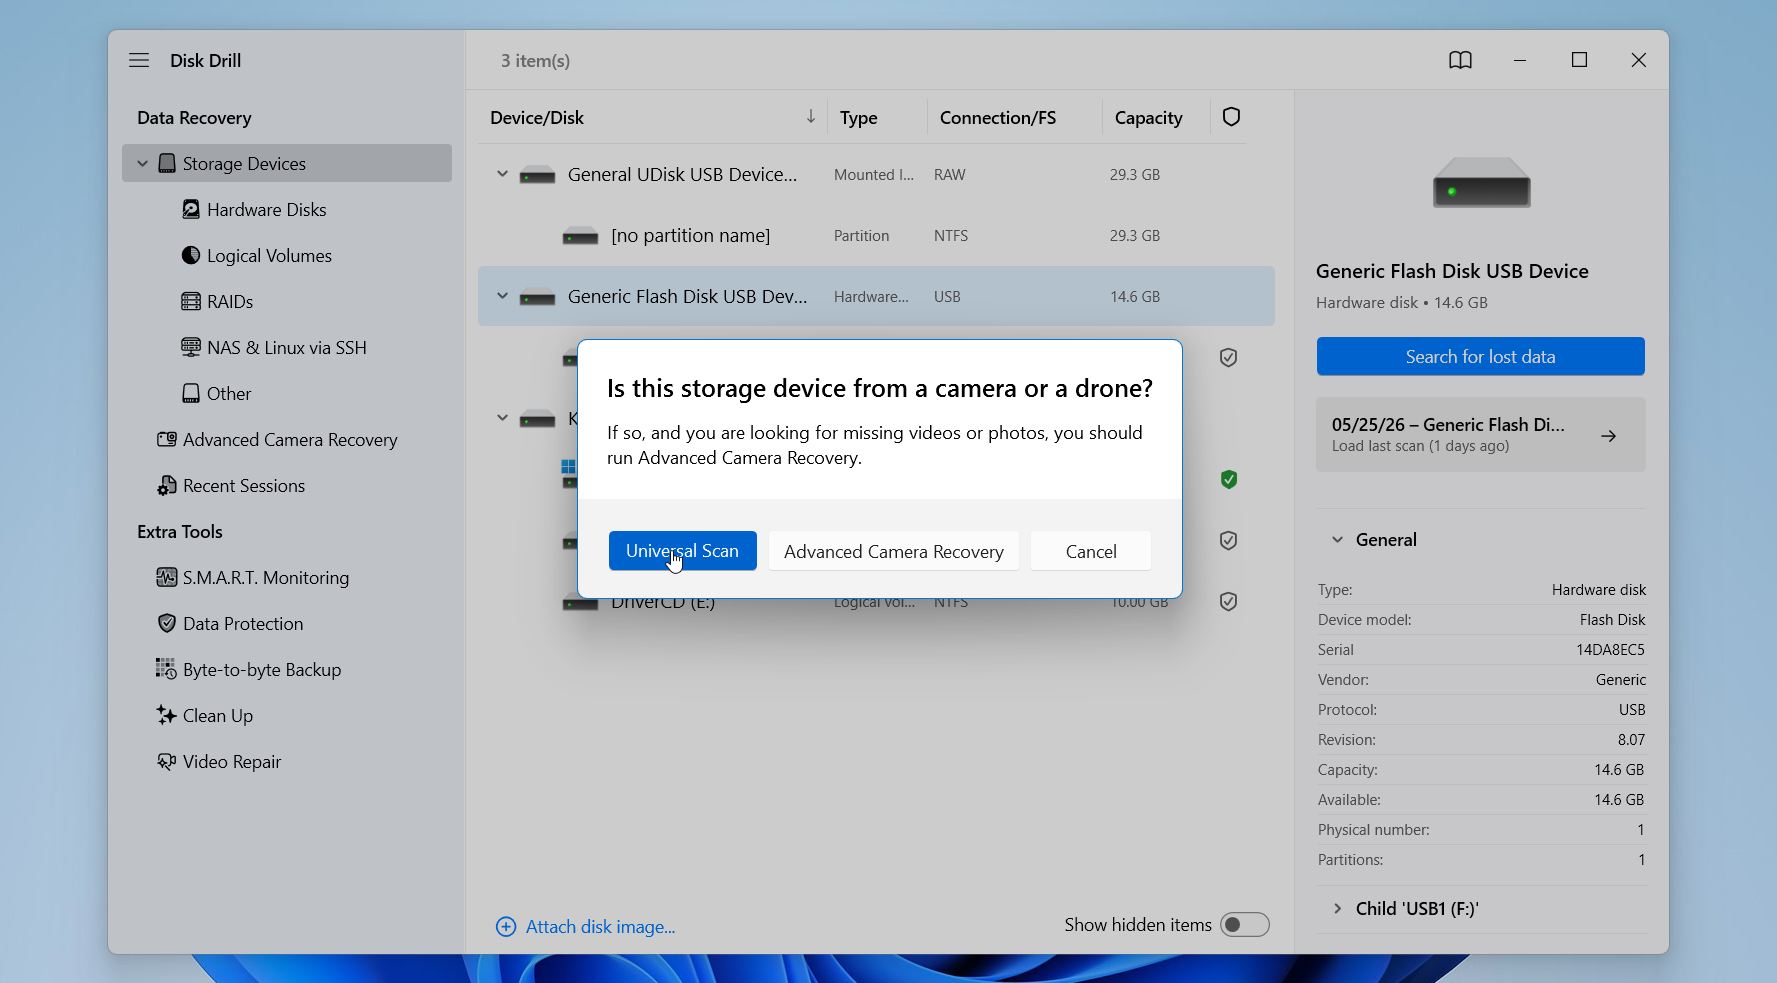
- If you’re working with an external drive, Disk Drill may prompt you to choose a recovery mode. In most cases, select Universal Scan. Use the Advanced Camera Recovery option only when you recover videos from a camera or drone SD card.
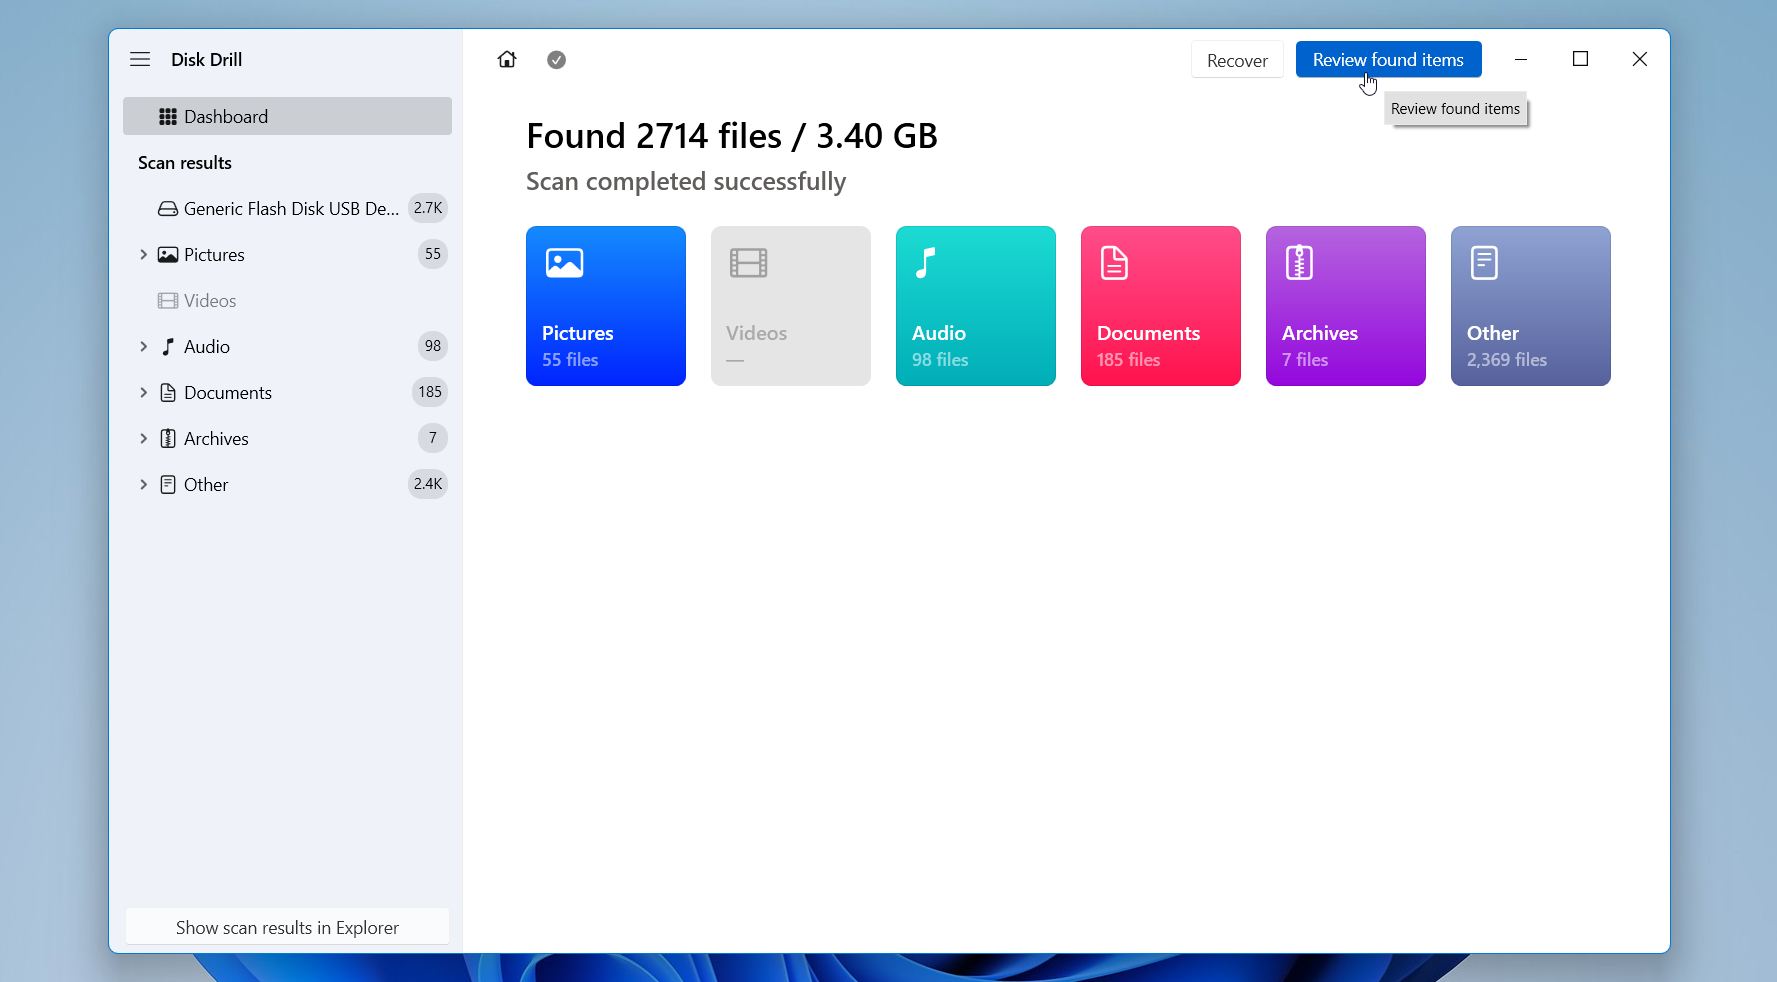
- Wait for the scan to run. Results will start appearing gradually, so you don’t need to wait for it to finish. You can browse found files during the scan or wait for it to finish. Click Review found items to check what Disk Drill finds.
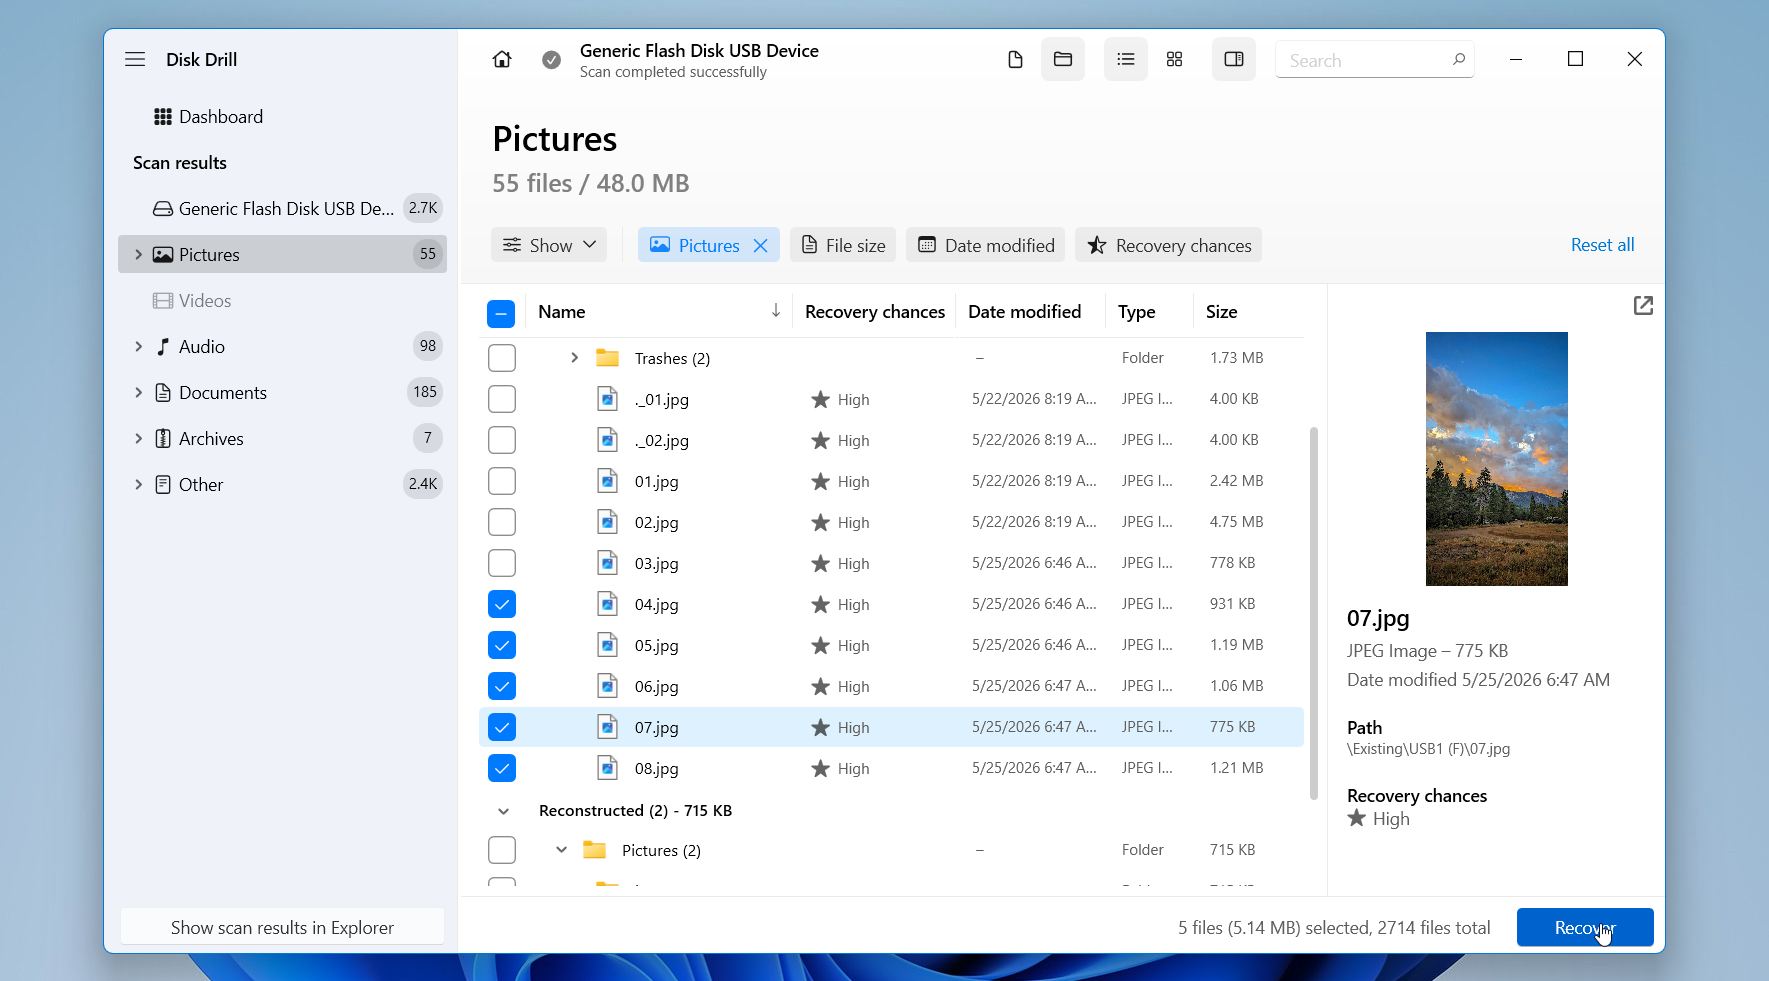
- Next, review and organize the scan results to locate your files faster. You can switch between sections like Deleted or lost, Reconstructed, and Existing to browse different categories of recovered data. Use filters such as File type, Size, Date Modified, and Recovery chances to narrow down the results and focus on relevant files. The search bar also helps locate specific file names or extensions. Before recovery, select a file and use Preview to check that it opens correctly and contains the data you need.
- Select the files you want to restore by checking the boxes next to them, then click Recover.
- Choose a location where you want to save the recovered files. Do not save them back to the same drive you are recovering from, as this can overwrite other recoverable data. Instead, select a different drive or an external storage device to keep the recovery process safe. Click Next.
Note: Disk Drill for Windows allows you to recover up to 100 MB of data for free, so you can test the results before deciding on a full recovery. If you need to restore more data, a paid license is required.
Method 2: Recover Data Using File History
This method relies on backups, so it only works if File History was enabled before the files disappeared. That’s why it appears lower in the list. Unlike search-based methods, it cannot help without a pre-existing backup, but when available, it provides one of the safest ways to restore files with their original structure and versions.
File History automatically creates copies of files stored in common folders like Desktop, Documents, Pictures, and others. It also keeps multiple versions over time, which helps in cases where a file was modified, overwritten, or deleted.
Follow these steps to recover data using File History:
- Open Control Panel.
- Go to System and Security, then select File History.
- Click Restore personal files.
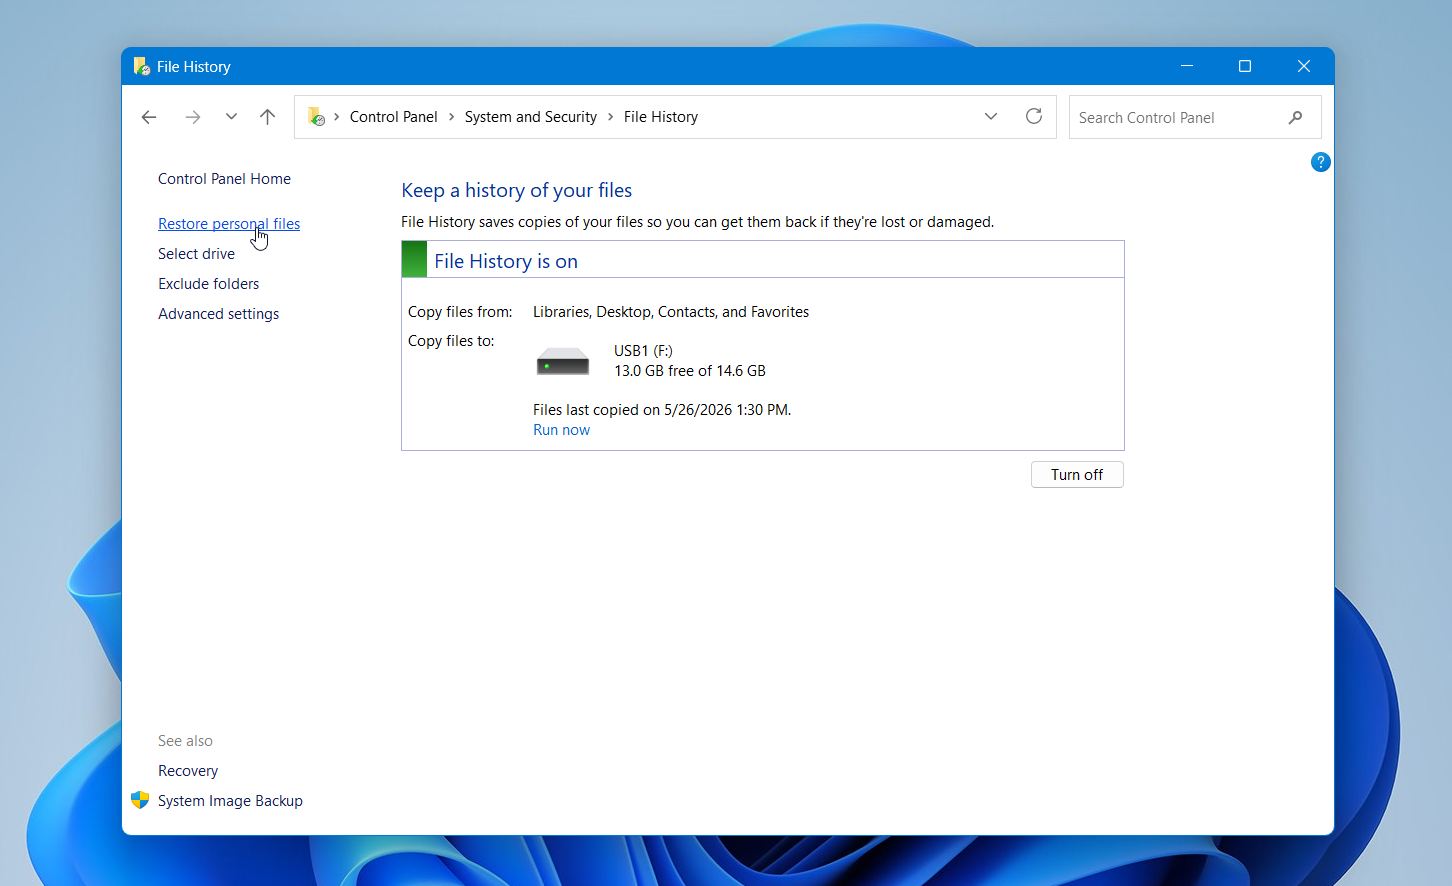
- Browse through backups and locate your files.
- Select the files and click the Restore button.
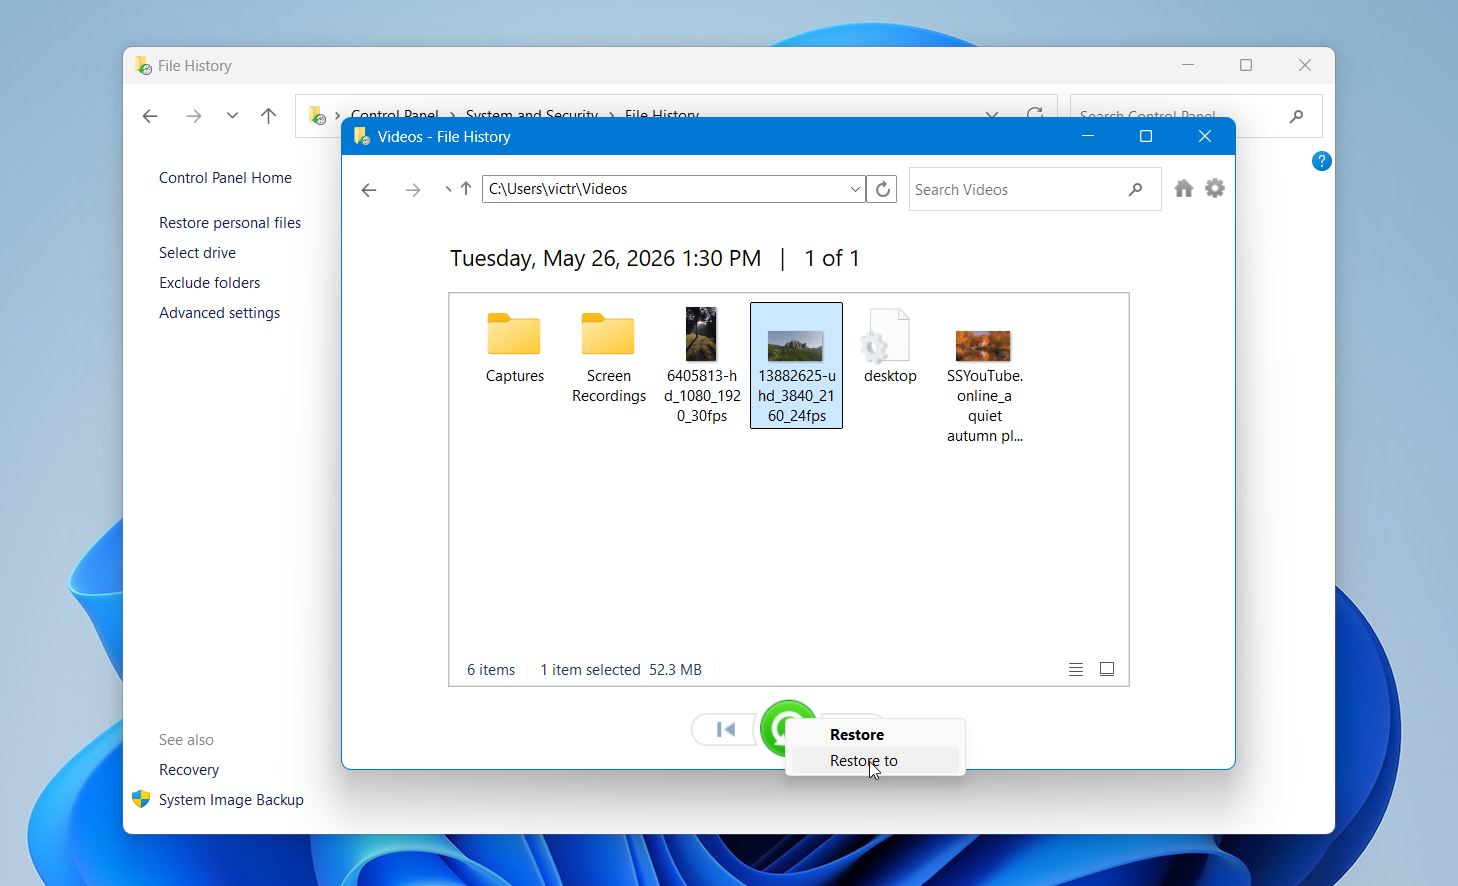
This approach works best when files were deleted or replaced but backups were created beforehand. If no versions are available, it likely means File History was not enabled, so you will need to rely on other recovery methods.
Why Do Files Suddenly Disappear on Windows
Files don’t disappear without a reason. In most cases, Windows either loses track of their location, changes how they are displayed, restricts access to them, or associates them with a different user profile or storage location. The data often still exists on the drive, but something in the system prevents it from appearing where you expect it. This is why it’s important to identify the cause before taking action, since the wrong step (like formatting or running repair tools too early) can make recovery harder.
Some situations are purely visual or account-related, while others involve file system damage or storage issues. The difference is quite important, because simple cases can be resolved in seconds, while more serious ones require a careful approach to avoid overwriting data.
To make it easier for you to understand, we prepared a table with the most common causes, how they typically appear, and what you can do in each case.
| Reason | Symptoms | How to Solve |
| 🔄 File moved or renamed | File no longer in the original folder, search may show it under a different name or path | Use Windows Search with partial names or file types; sort folders by “Date Modified”; check common locations like Downloads, Desktop, or Documents |
| 🧑💻 Different user account | Files appear missing after login, other data or settings also look different | Check you are signed into the correct account; look inside C:\Users\ for other user folders; switch accounts if needed |
| ☁️ OneDrive sync changes | Files missing locally but visible in OneDrive, icons show cloud status | Open Microsoft OneDrive and check folders; restore files from OneDrive Recycle Bin or enable syncing again |
| 🗑️ Accidental deletion | Files not in original location, may still exist in Recycle Bin | Open Recycle Bin and restore files; if not there, use data recovery software to scan the drive |
| ⚠️ File system errors | Files disappear after crash or power loss, folders may show as empty or inaccessible | Run CHKDSK carefully; if data is important, scan first with recovery software to avoid overwriting metadata |
| 🔒 Hidden files or attributes | Files don’t appear in folders but space is still used | Enable “Show hidden files” in File Explorer; check file properties and remove hidden attribute |
| 🔄 Windows update or system reset | Files missing after update, desktop layout or settings changed | Check C:\Windows.old folder; review OneDrive sync; search entire system for file names |
| 💾 Drive or partition issues | Entire folder or drive appears empty or unallocated, errors when opening | Open Disk Management and verify status; avoid formatting; create a disk image and scan with recovery software |
| 🛑 Permission restrictions | “Access denied” errors, files exist but cannot be opened | Adjust folder permissions in Properties > Security; take ownership if needed |
| 🧩 Software conflicts or antivirus action | Files disappear after installing software, may be quarantined | Check antivirus quarantine; review recent app activity; restore files if flagged incorrectly |
Many of these issues overlap. For example, a Windows update may also trigger account changes or cloud sync conflicts, which makes files appear missing even though they were never deleted. In other cases, a sudden shutdown can lead to file system errors that hide entire folders.
Final Thoughts
Simple checks like search, user folders, and visibility settings often bring files back quickly. When they don’t, switch to recovery methods and run a scan as soon as possible. Tools like Disk Drill help locate files that no longer appear in the system and increase the chances of a successful recovery.
Regular backups make the biggest difference in avoiding this situation in the future. Tools like File History or cloud services such as Microsoft OneDrive keep copies of your data available when something goes wrong. Keep important files in more than one location, handle drives carefully during transfers, and maintain basic system protection.