
Did you connect your SD card to your computer to transfer photos or other files and notice something strange about its behavior? Maybe the partition is missing, the card shows up as unallocated space, and you can’t access your files at all. If so, it’s likely that something went wrong with the partition and it may be lost or corrupted. At this point, the main question is what to do with the data that was stored on it. And if the partition is no longer accessible, how do you get your SD card back to a working state?
Fortunately, your data may still be recoverable, and the SD card itself can often be fixed. Continue reading, this guide explains step by step how to recover a lost or corrupted SD card partition on Windows.
When SD Card Partition Recovery Is Possible
While we’ve mentioned that recovering data from a lost or corrupted SD card partition is possible, the truth is that it only works under certain conditions:
- First, your SD card should still be visible in Disk Management and display the correct capacity. If it does, you can proceed with the methods described in this guide.
If the capacity shows random values or the SD card doesn’t appear at all, try connecting it to a different USB port or another computer. If that doesn’t change anything, the issue may be hardware-related and at that point, recovery is typically only possible with professional help.
- It’s also important to avoid using the SD card. If only one partition is lost or corrupted while others are still accessible, don’t copy new data to the card. Doing so can overwrite the space where your lost files are stored and significantly reduce the chances of recovery.
- For the same reason, you should avoid attempting random fixes before recovering your data. Some repair methods may restore the partition but permanently erase your files.
It’s best to read this guide fully and understand the correct steps before making any changes to an SD card with a lost or corrupted partition.
How to Recover Data from a Missing or Corrupted Partition
Although you can’t see the partition, your files are still on the SD card. This means they can often be recovered with the help of partition recovery software. One of the best options is Disk Drill, which combines strong recovery capabilities with a simple, easy-to-follow interface. It’s also one of the few tools on the market that can recover fragmented videos, a common issue with SD cards used in cameras and drones.
Another useful feature is the ability to create a byte-to-byte image of your SD card. In this case, it’s especially important because a corrupted partition may become less stable over time or fail completely during repeated scans. Disk Drill also includes several additional features, which you can explore in more detail in our full review.
Follow the below steps to use DiskDrill and recover data from the missing/corrupted SD card partition.
- Download Disk Drill from the official website and install it on your computer.
- Connect your SD card using a reliable card reader.
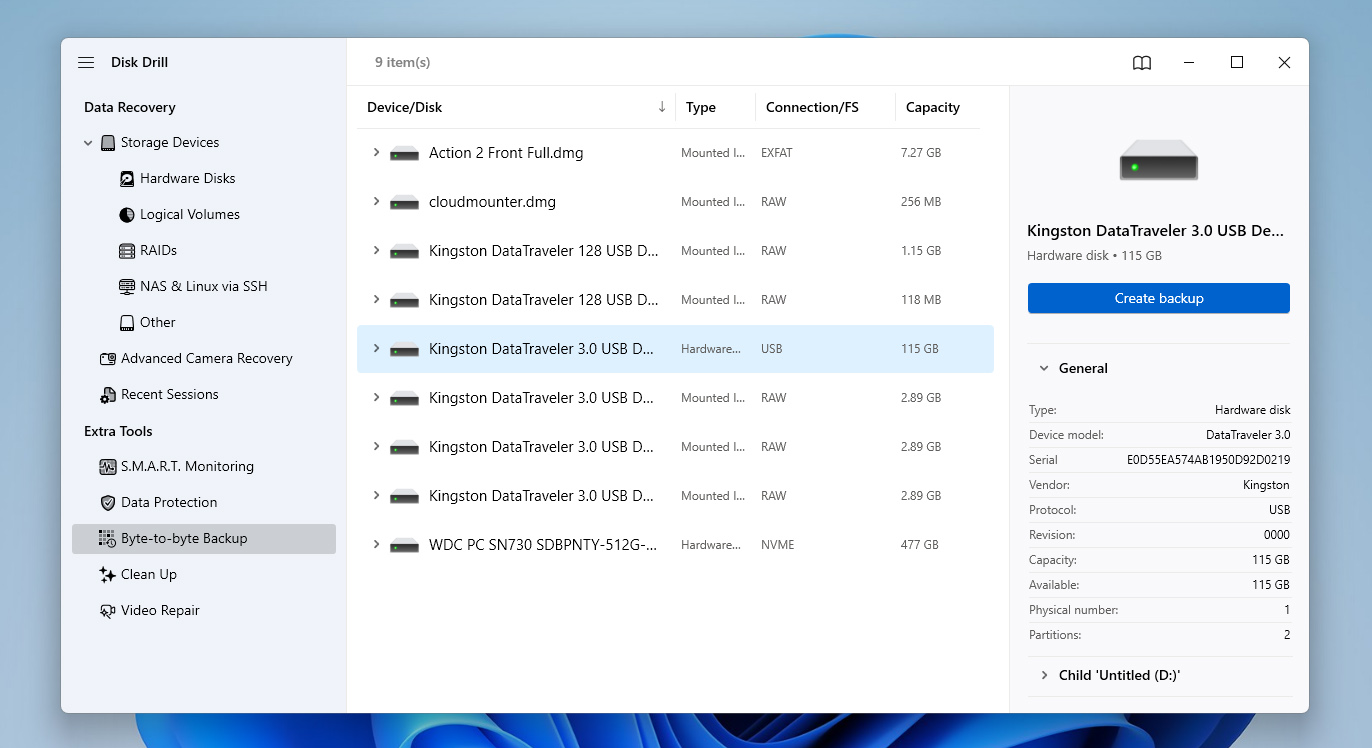
- Open Disk Drill and go to the Byte-to-Byte Backup section from the sidebar. Select your SD card from the list and click Create Backup to create a full image of the card.
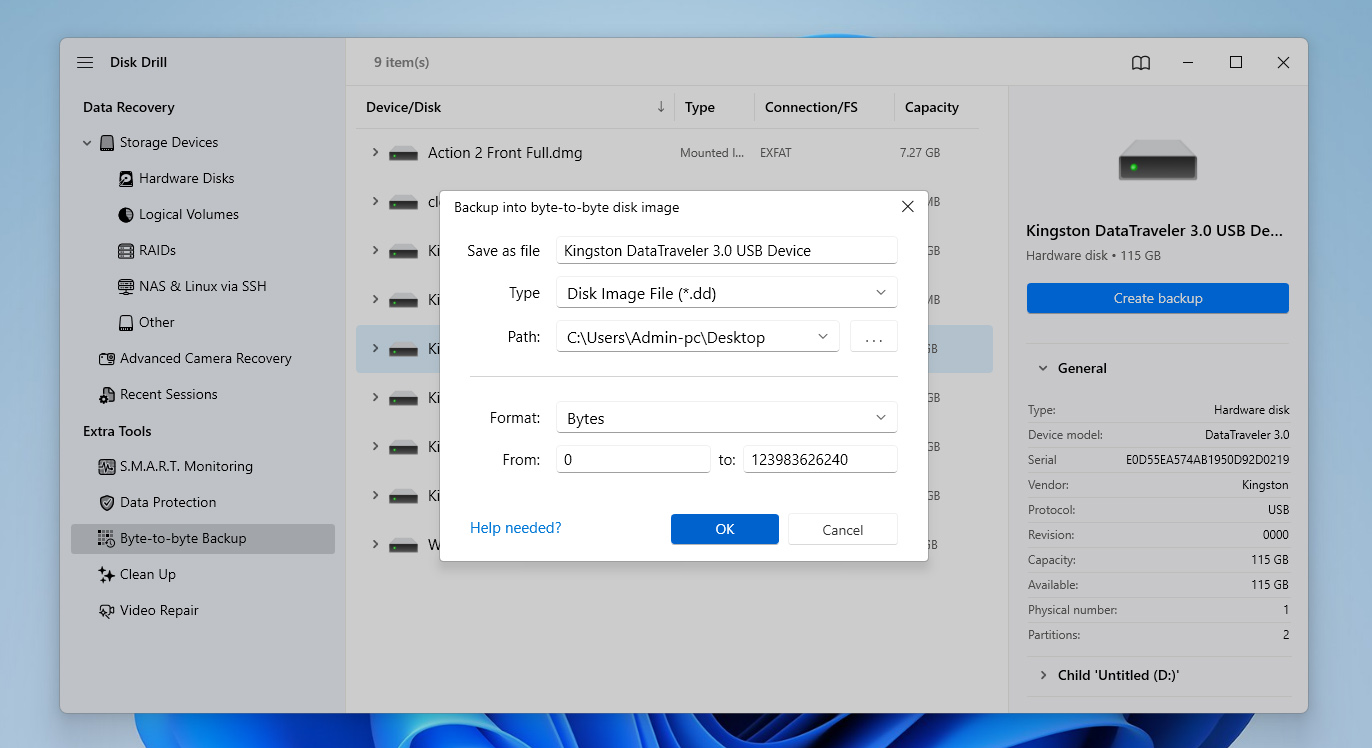
- Choose a safe location on your computer to save the image and wait until the process is complete. Once done, you can work with the image instead of the original SD card.
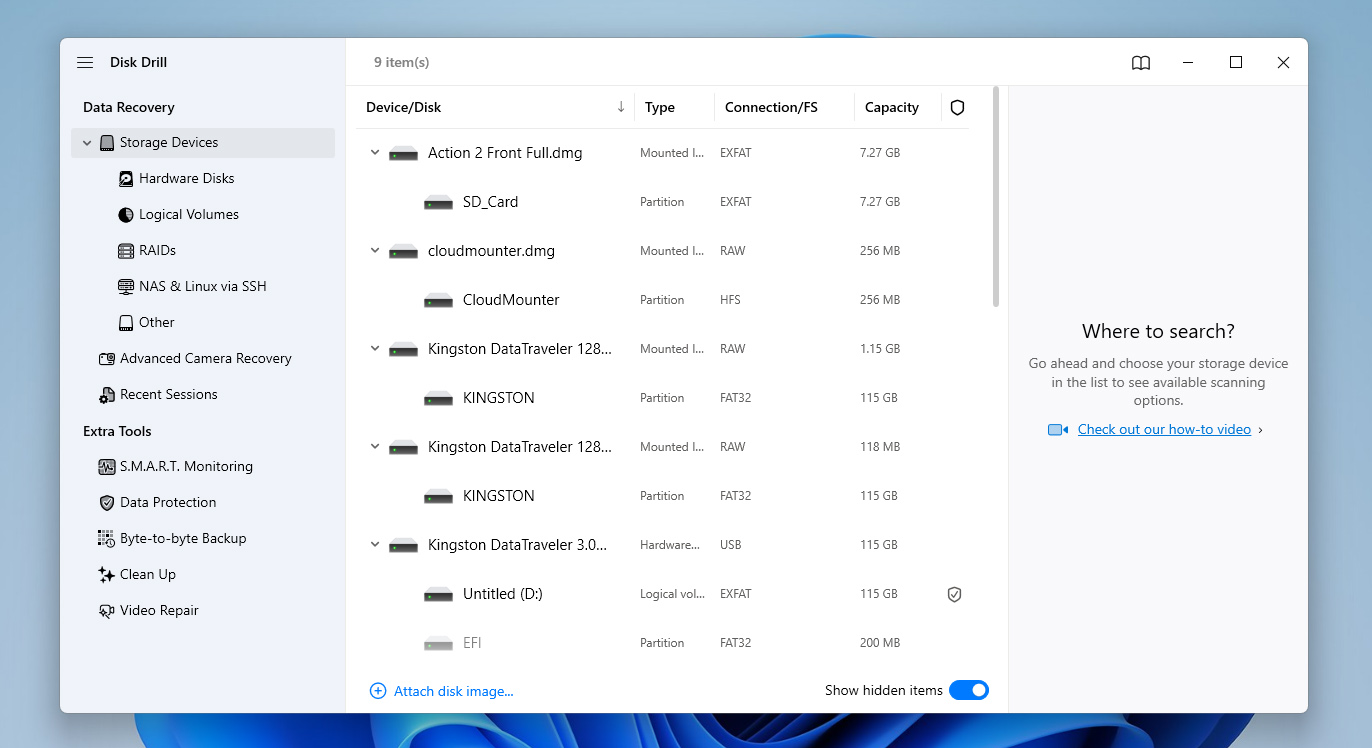
- Switch to the Storage Devices section and use the Attach disk image option at the bottom of the device list. Select the image you just created.
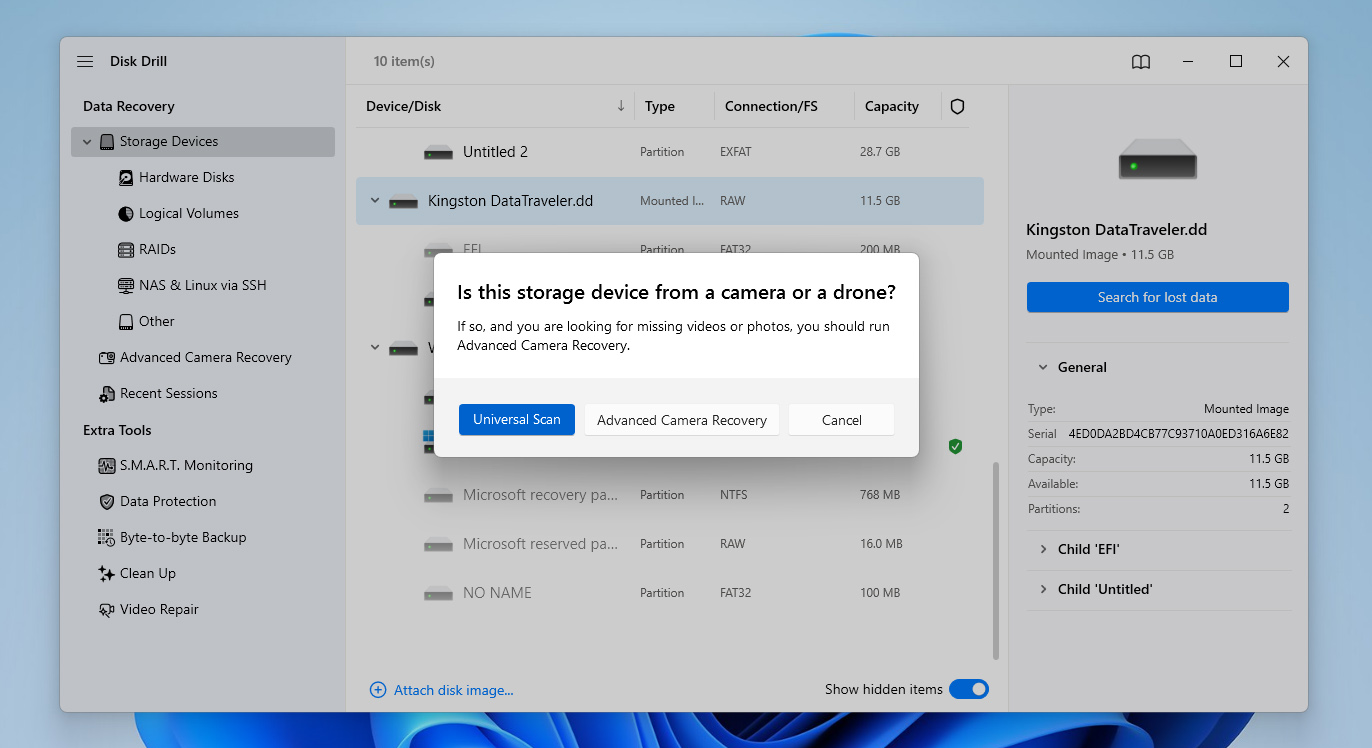
- Choose the attached image and click Search for lost data to start scanning.

- When prompted, select the scan method. Start with the default Universal scan. If you’re trying to recover videos from a camera or drone and notice playback issues later, you can rerun the scan using Advanced Camera Recovery.
- Wait for the scan to finish. You can review found files during the scan, but it’s usually better to let it complete for the most accurate results.
- Browse the results, use preview to check files, and select the ones you want to recover and click Recover.
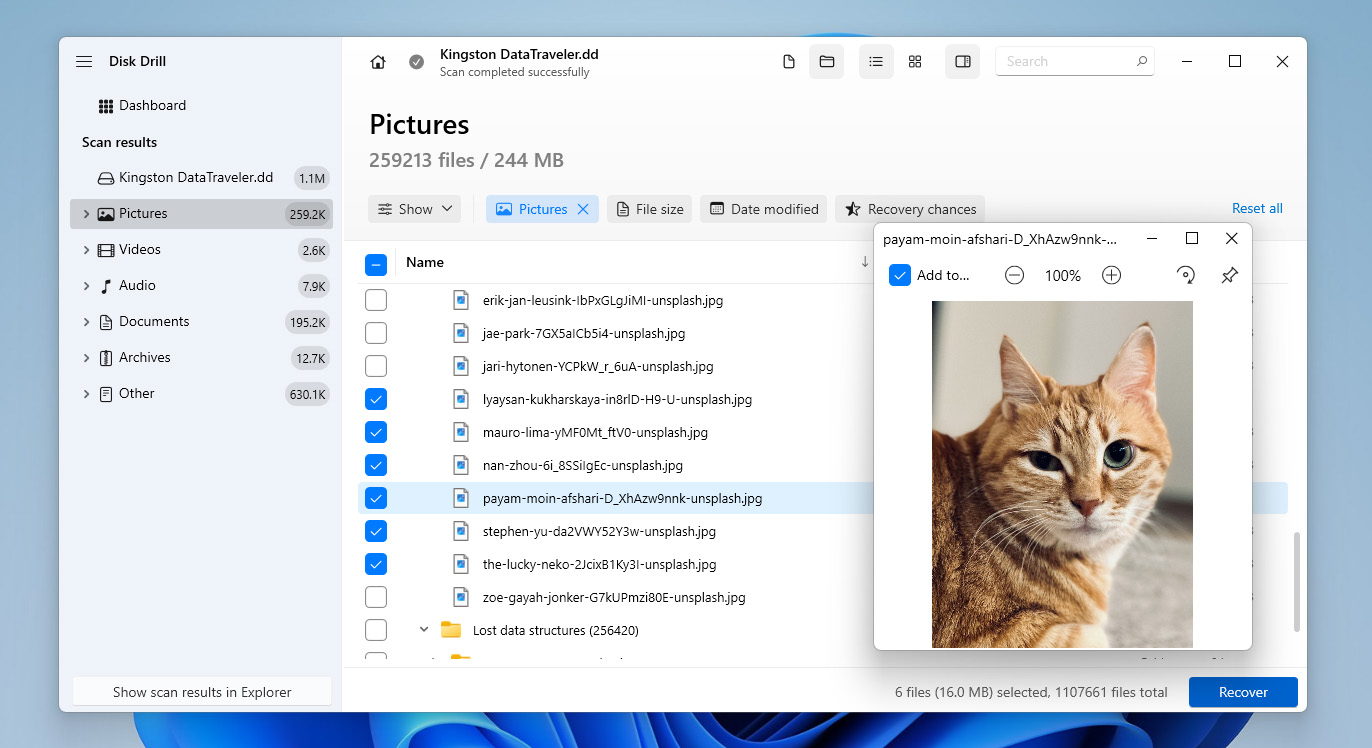
- Choose a location on your computer or an external drive, then click Next, but do not save the recovered files back to the same SD card.
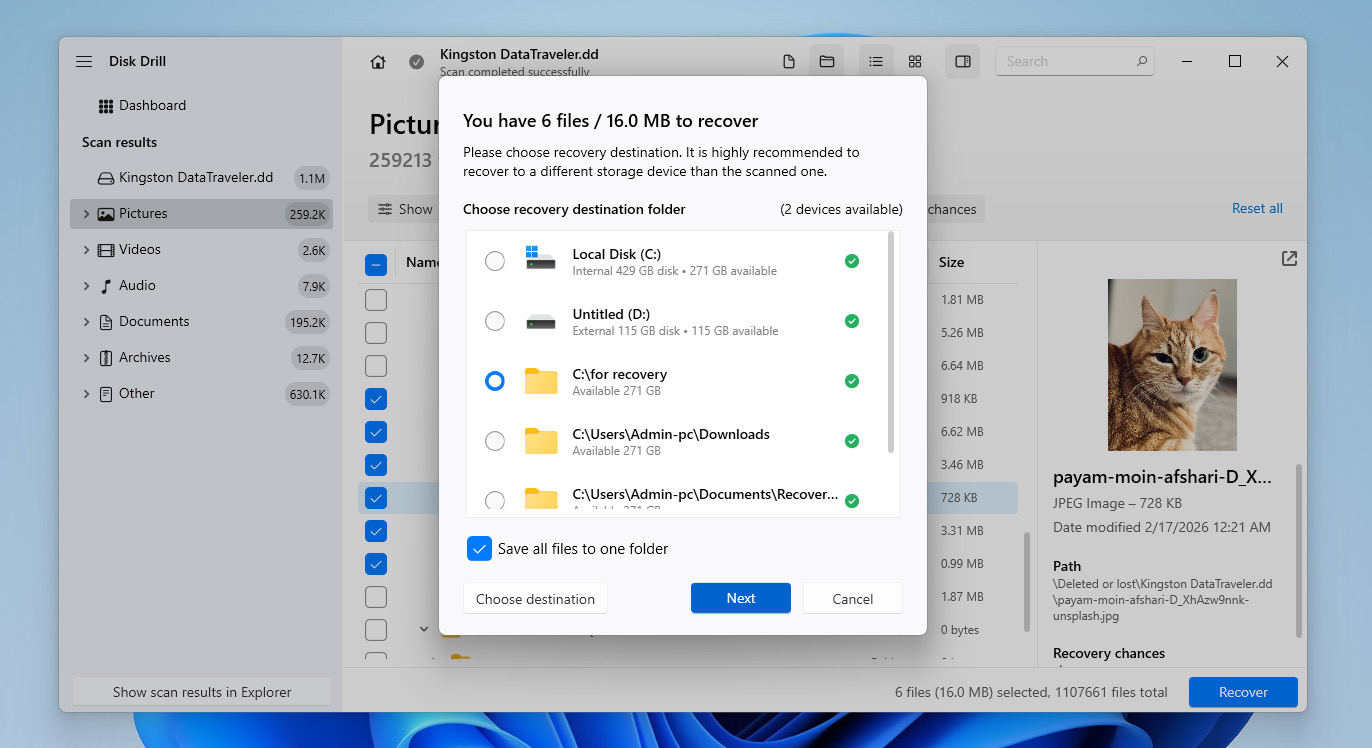
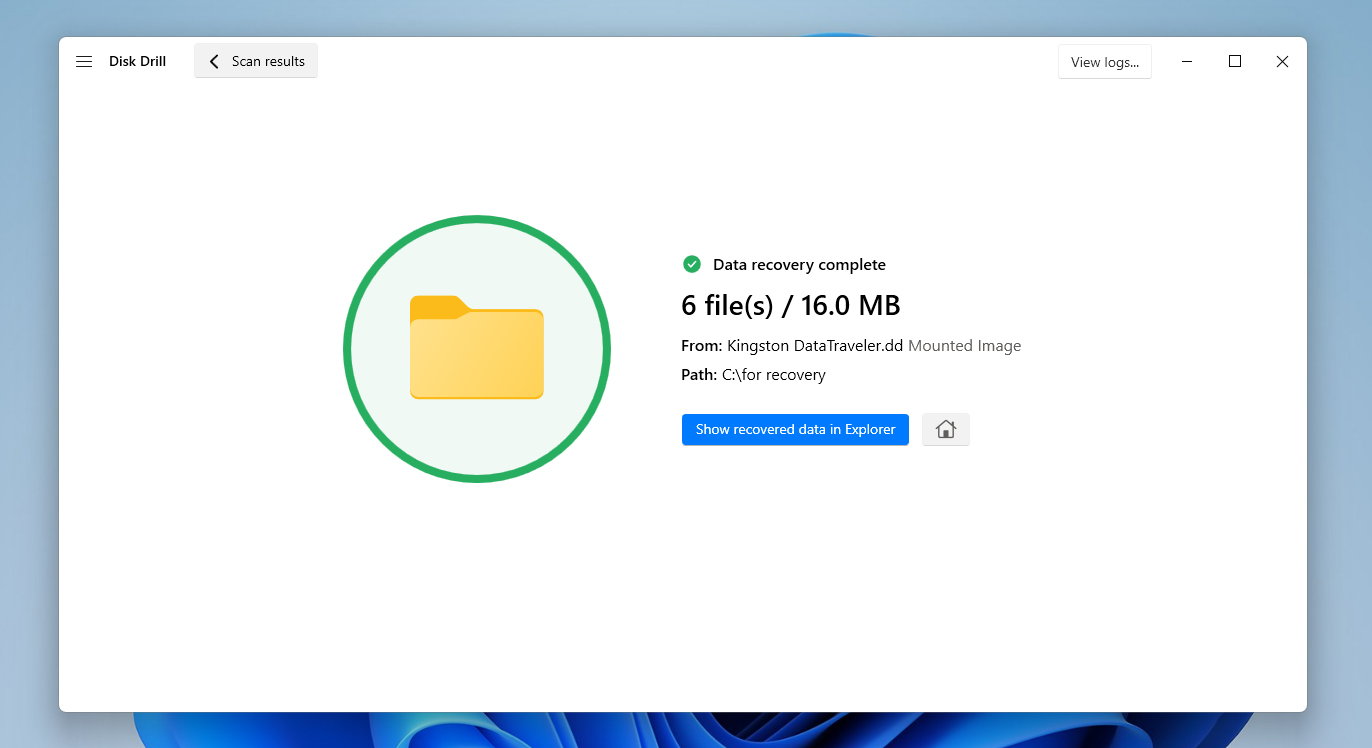
- Disk Drill will initiate the final recovery process and save the files to your computer. Once your important data is secured, you can move on to fixing the SD card itself, whether that means repairing the corrupted partition or restoring the missing one.
Disk Drill lets you create a byte-to-byte backup and scan either the image or the SD card itself for free. However, the free version allows you to recover up to 100 MB of data only. This is enough to test the software and verify that your files are recoverable, but not enough to fully restore the contents of a lost or corrupted partition of the SD card.
How to Restore Lost or Repair Corrupted SD Card Partitions
Below, you’ll find several methods that can help deal with lost or corrupted SD card partitions. Some of them are useful both for restoring a missing partition and fixing underlying issues, while others focus only on recovering the partition itself.
Since it’s not always clear what exactly caused the problem, it’s best to go through these methods one by one. However, make sure you only proceed with them after you’re confident that all important data has already been recovered from the SD card.
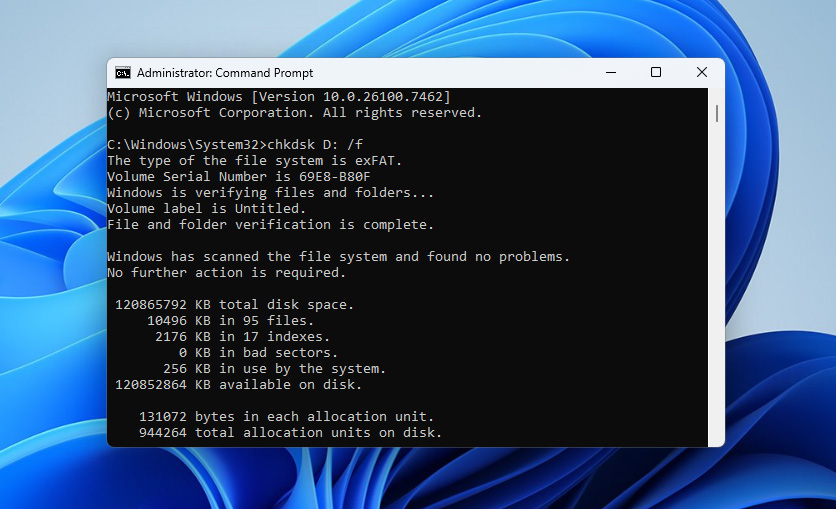
Method 1: Run chkdsk Scan
The Check Disk command, popularly known as chkdsk, is a useful utility in Windows. You can use it to check the file system for errors and attempt to fix logical issues that may prevent a partition from being recognized or accessed. Below are the steps to run a chkdsk scan on your SD card.
- Connect your SD card to the system.
- Open Command Prompt as Administrator and type chkdsk <drive letter>: /f and hit Enter, where the <drive letter> with your SD card drive letter.
- If prompted, type Y to confirm and allow the scan to proceed.
- After it, check if the Check Disk command has fixed the lost partition on your SD card.
Method 2: Check and Assign a Drive Letter to Your SD Card
If you can’t access a partition on your SD card, then one of the reasons behind it may be a missing drive letter. The missing partition is still there but is not appearing because it doesn’t have an assigned letter.
However, you can quickly check whether the drive letter is assigned or not using Disk Management. If you see that the drive letter is missing, you can create it. The below steps will help you check and assign a new drive letter in Disk Management.
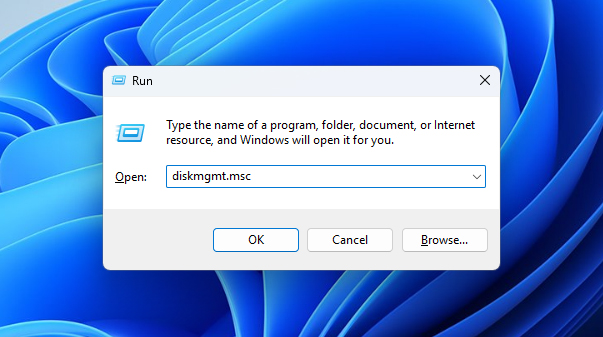
- Press Windows + R, type diskmgmt.msc, and press Enter to open Disk Management.
- In the list of connected drives, locate your SD card (it usually appears as Removable Disk).
- Check whether a drive letter is assigned to the SD card in the Volume column. If a letter is already present, then the issue is not related to a missing drive letter, so move on to the next methods. If no letter is assigned, continue with the steps below.
- Right-click on the SD card partition and select Change Drive Letter and Paths.

- Click Add, choose an available drive letter, and click OK. Confirm the action when prompted.
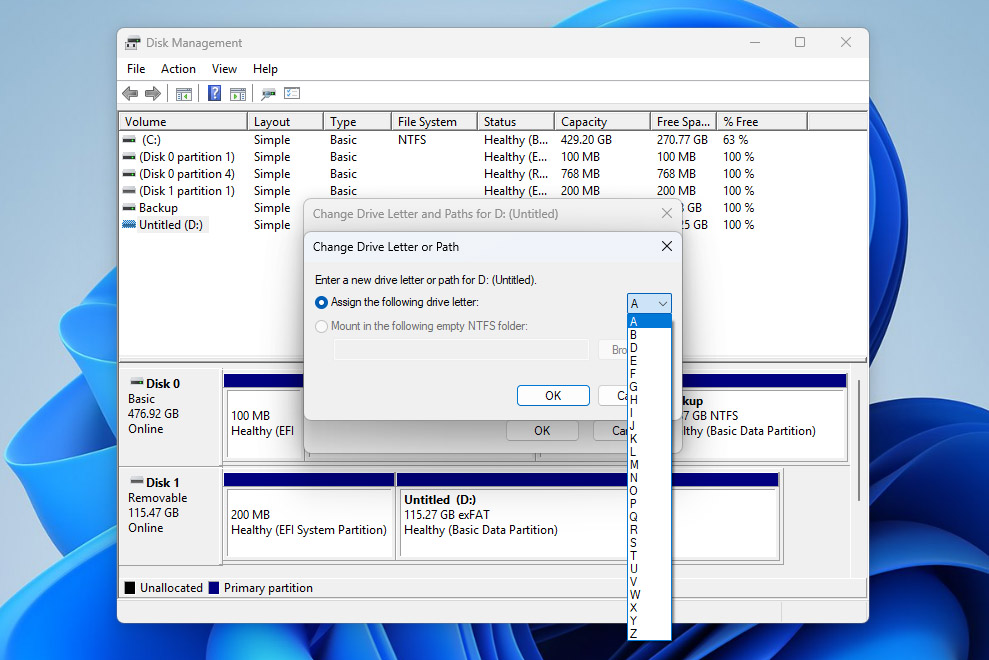
- After assigning a drive letter, check if the SD card partition becomes accessible in File Explorer.
Method 3: Restore an SD Card Partition with TestDisk
If your SD card partition was deleted, became inaccessible, or disappeared because the partition table was damaged, you may be able to restore it with TestDisk. This free, open-source tool can search for lost partitions, rebuild the partition table, and in some cases restore access without requiring you to create a new partition from scratch. However, TestDisk works through a command-line interface, so you need to be careful at every step and follow the instructions closely:
- Connect the SD card to your PC.
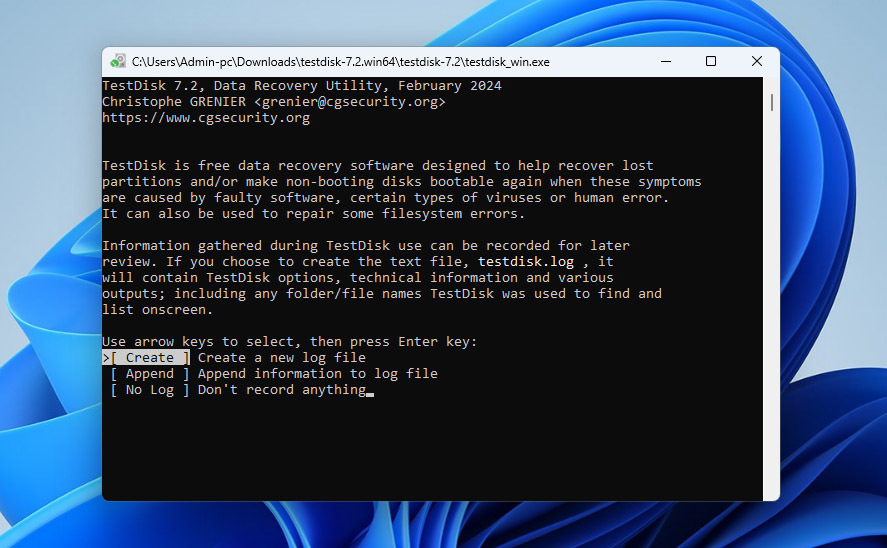
- Download TestDisk, open the download file, and extract it, then run the testdisk_win file.
- TestDisk will open in a command-line interface. From there, select Create and press Enter.
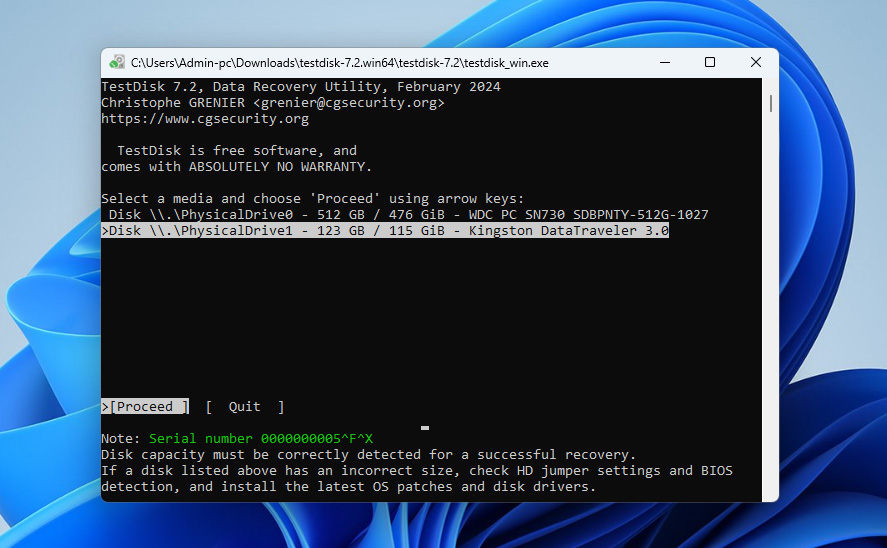
- Now, TestDisk will scan and list all the drives connected to your PC. Select your SD card and click Proceed.
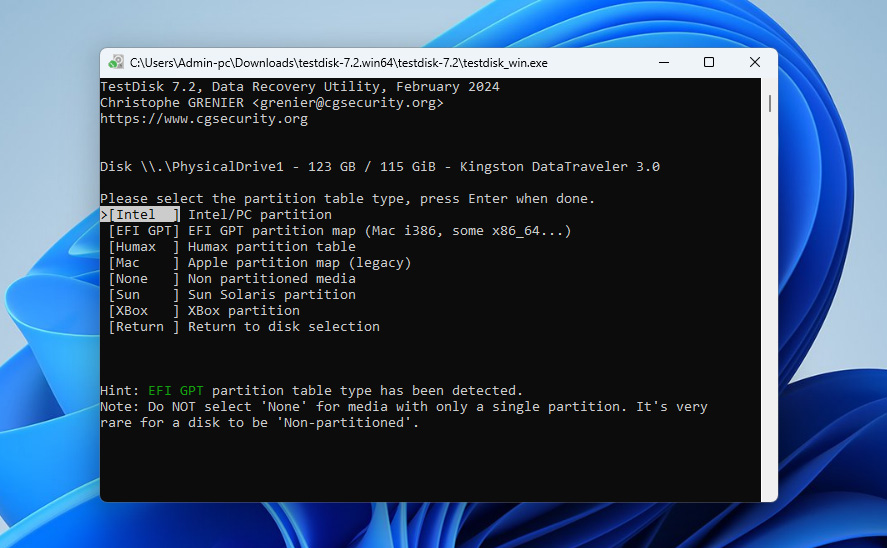
- On the next screen, you will be asked to select the partition table. Select Intel and press Enter.
Note: We selected Intel as the partition table because we are doing it on a Windows PC. As TestDisk also supports other operating systems, select a partition table based on your device.
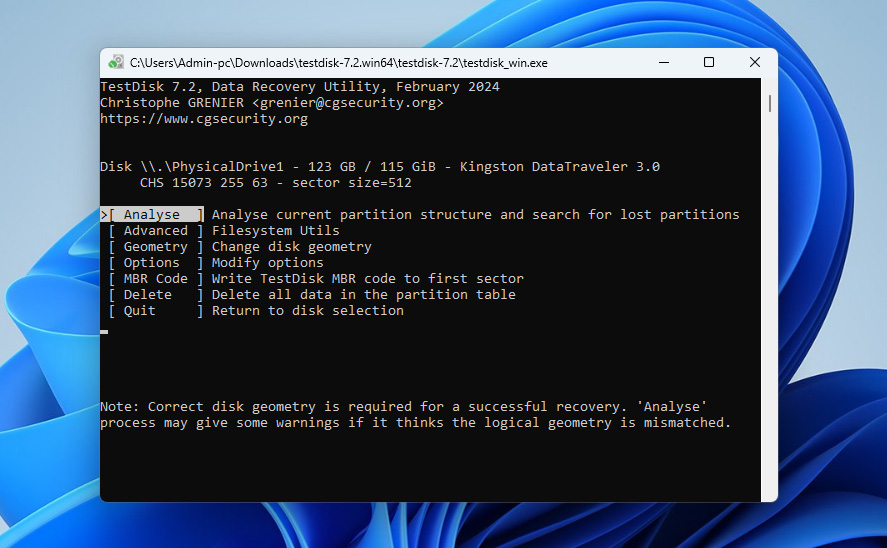
- Now, TestDisk will show different options, select Analyze and hit Enter.
- After it, TestDisk will display the partitions currently present on your SD card. Select the Quick Search option at the bottom and press Enter.
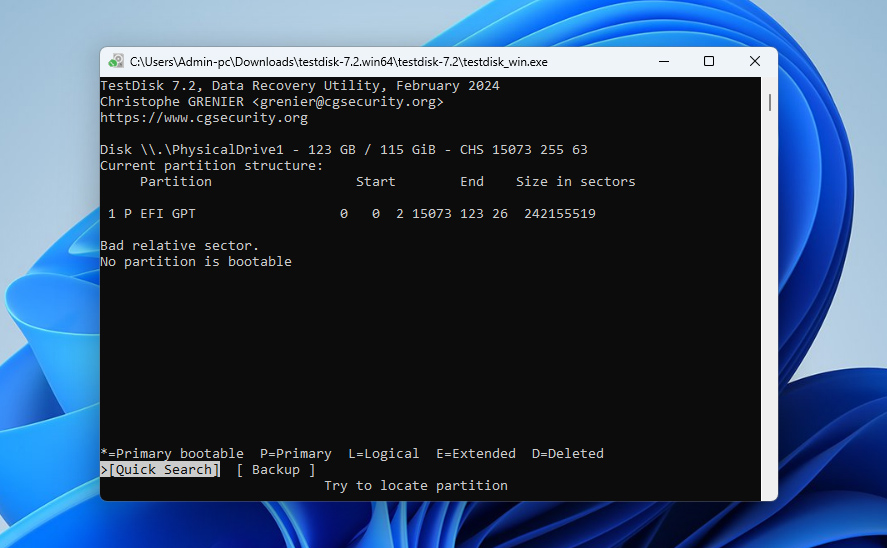
- TestDisk will look for deleted partitions and list them. To write the partition table on the SD card, select Write and press Enter.
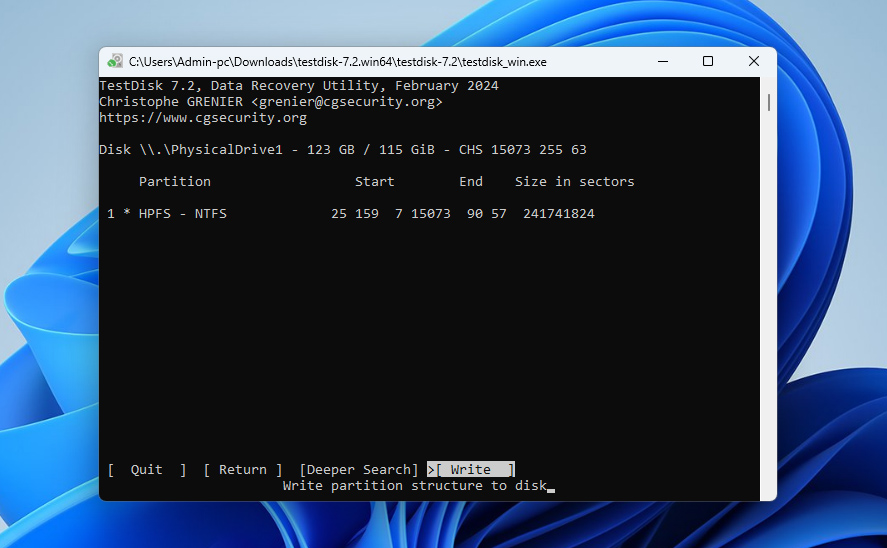
- On the next screen, confirm by pressing Y. TestDisk will ask you to restart your computer for the changes to take effect. Quit the program and reboot your computer.
- Once done, check the lost partition in the File Explorer, which should be recovered.
Method 4: Add New Partition on SD Card
If the previous methods didn’t work, or you’ve already recovered your data and don’t want to spend more time troubleshooting, you can simply create a new partition on the SD card.
This process creates a new partition table and file system, which allows the operating system to recognize and use the card again. It doesn’t repair the old partition, but it replaces the damaged structure with a new one. In cases of corruption, this is often enough to restore normal functionality and make the SD card usable again.
- Press Windows + R, type diskmgmt.msc, and press Enter to open Disk Management (the same tool you used in the previous method).
- Locate your SD card in the list of drives.
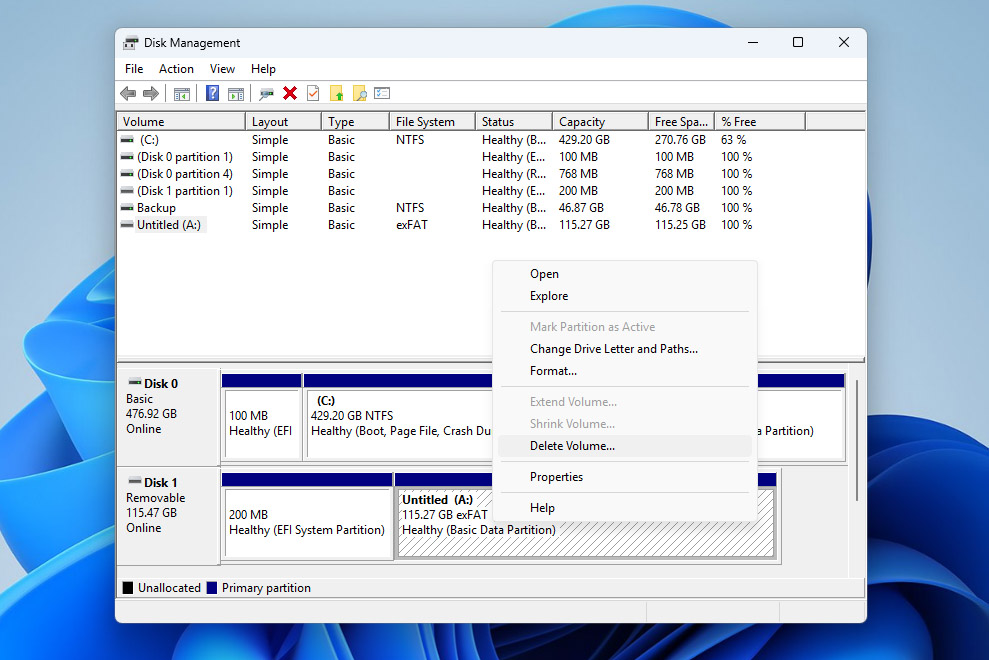
- If a corrupted or inaccessible partition is still present, right-click on it and select Delete Volume. This will turn the space into Unallocated.
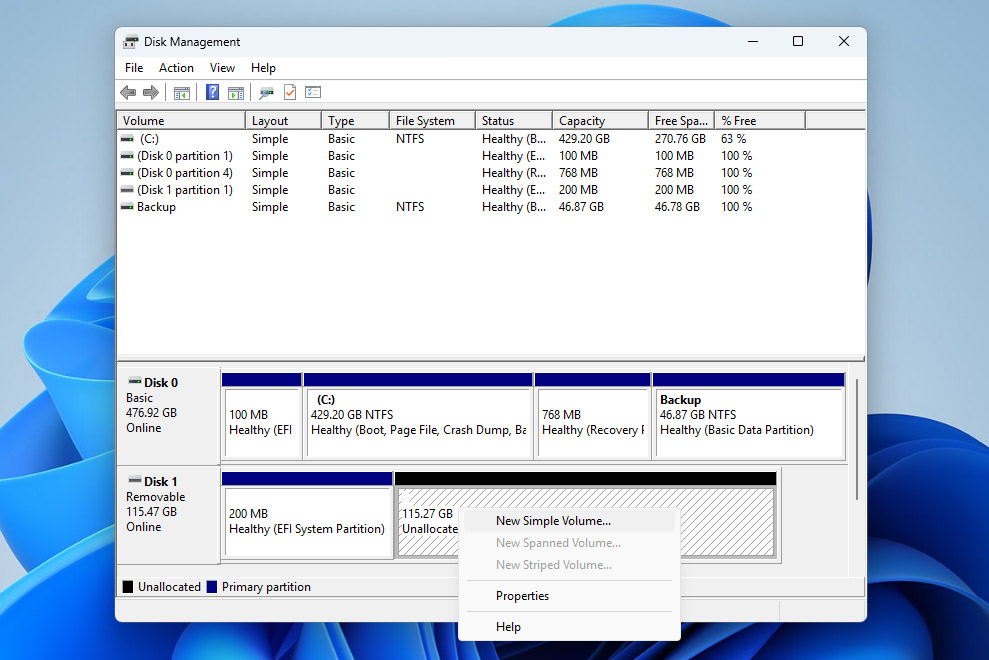
- Once you see unallocated space on the SD card, right-click it and select New Simple Volume.
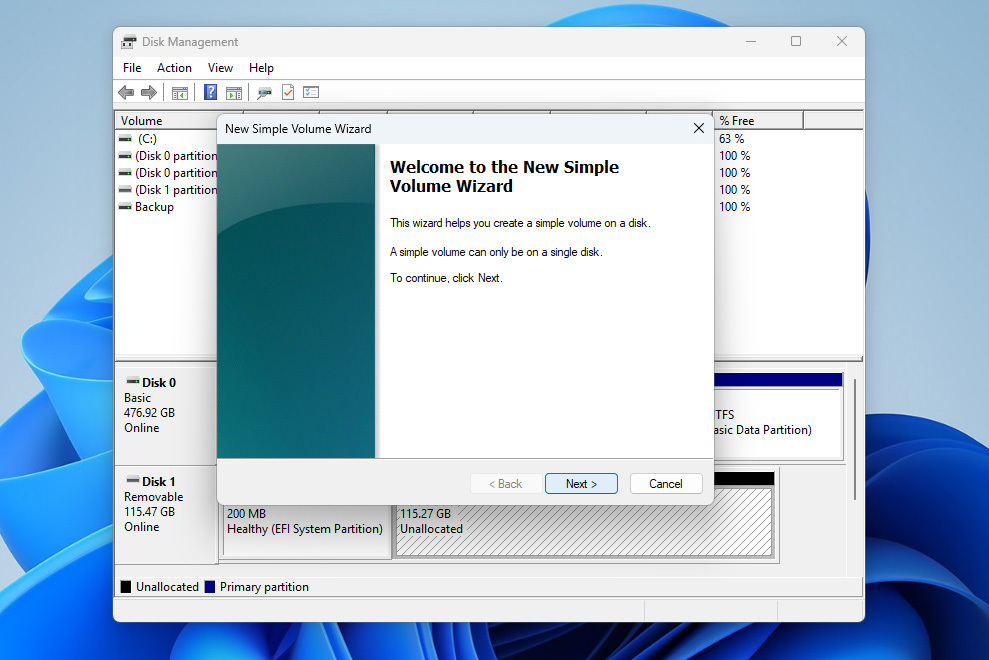
- The New Simple Volume Wizard will open. Click Next, then specify the volume size (you can leave the default to use the full capacity).
- Assign a drive letter when prompted and click Next.
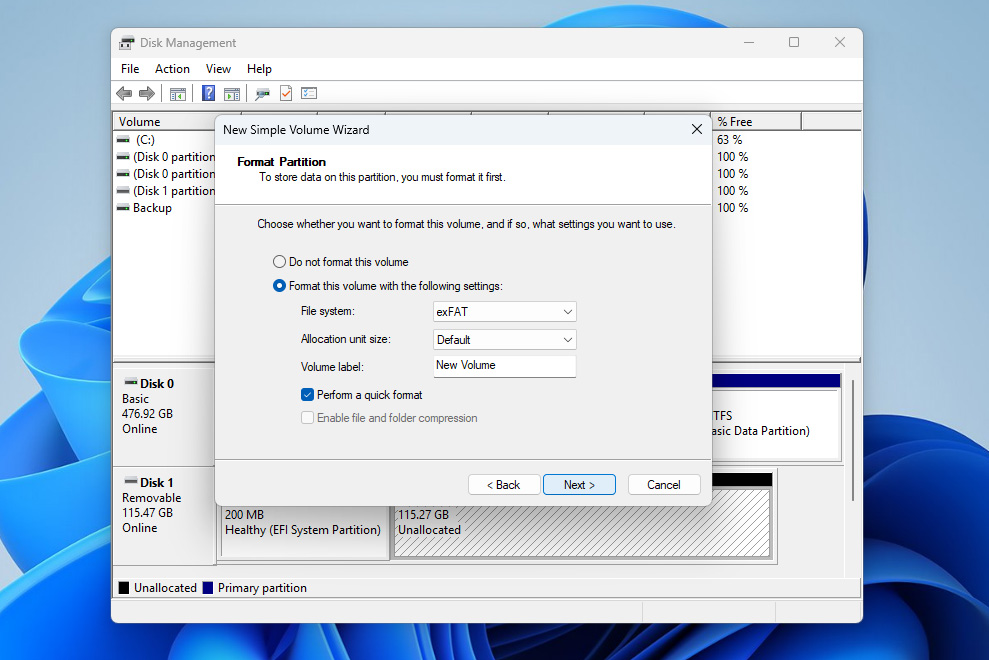
- Choose a file system (typically exFAT for SD cards) and enable the Quick Format option. Click Next, then Finish to create the new partition.
- After the process is complete, your SD card should appear in File Explorer and be ready to use again.
Common Causes of SD Card Partition Issues and How to Avoid Them
We hope that by this point, you’ve managed to deal with the lost or corrupted partition on your SD card. Now it’s worth taking a step back and understanding what may have caused the problem in the first place, so you can avoid it in the future.
Here are some of the most common causes and how to prevent them:
| Cause | How to Avoid It |
| 👆 Human error | Be careful when working with partitions in tools like Disk Management. Double-check actions like deleting or formatting volumes before confirming them. |
| 🔌 Improper SD card usage | Always safely eject the SD card before removing it. Avoid interrupting file transfers or removing the card during use. |
| 🦠 Malware or system issues | Use reliable antivirus software and avoid connecting your SD card to untrusted or infected systems. |
| 🔨 SD card wear or physical damage | SD cards have a limited lifespan. Avoid excessive use, protect the card from physical damage, and replace it if you notice repeated issues. |
| ⚠️ File system errors or bad sectors | Regularly back up your data and avoid using the same SD card across too many different devices without proper formatting when needed. |
Conclusion
So, to sum up, recovering a lost or corrupted SD card partition is possible, as long as the card is still listed in Disk Management with the correct capacity and nothing has overwritten the data after the issue occurred.
The safest approach is to first recover your data using a tool like Disk Drill, and only then move on to fixing the partition itself. This order of steps gives you the best chance of success, and it applies not just to this case, but to most data loss situations involving SD cards.
If you still have questions, feel free to leave a comment below. Or, if you want to hear not only from data recovery experts but also from other users with similar experiences, you can visit our forum to browse existing discussions or start your own. Good luck, you’ve got this!


