
Recovery may still be possible even when an external hard drive is not detected or recognized by your computer. If the drive appears in Disk Management and shows the correct capacity, recover your important data first before attempting any repairs. If it is not detected at all, shows 0 bytes, No Media, an incorrect capacity, or makes clicking sounds, do not format it or run repair tools. In these cases, professional data recovery is the safer option.
This guide will help you identify the state of your external hard drive and choose the right recovery approach without putting the remaining data at unnecessary risk.
Before trying to repair an external hard drive, check how Windows sees it. Open Disk Management by right-clicking Start and selecting Disk Management, then find the external drive and compare its status with the table below.
What to Do First
| Status | Meaning | Recover files? | What NOT to do |
| Correct capacity, but inaccessible | Windows detects the drive, but the file system or partition may be damaged. | Yes, often. Recovery software can usually scan the drive if it remains stable. | Don’t format the drive or run repair tools before recovery. |
| RAW | Windows detects the volume but cannot recognize a valid file system. | Yes, often. Recovery software can scan the drive or its byte-to-byte image. | Don’t format the RAW partition or run CHKDSK. |
| Unallocated | The partition may have been deleted or its partition information corrupted. | Yes, often. Recovery software may find files or lost partitions. | Don’t create a new volume or overwrite the partition table. |
| Not Initialized | Windows detects the physical disk but cannot read a valid partition table. | Yes, potentially. Recovery may be possible if the drive reports its correct capacity. | Don’t initialize the disk or create new partitions. |
| 0 bytes / No Media / Wrong capacity | Windows cannot properly access the underlying storage, possibly due to hardware or controller failure. | Professional recovery may be required. Standard recovery software is unlikely to help. | Don’t initialize, format, or repeatedly scan the drive. |
| Not detected in Disk Management | Windows cannot detect the storage device at the disk level. | Not with software until detected. Check the connection, power supply, and enclosure first. | Don’t repeatedly reconnect a potentially failing drive or attempt software repairs. |
| Clicking / Grinding / Unusual noises | The drive may have a mechanical failure. | Professional recovery recommended. Continued operation may cause further damage. | Don’t power it on repeatedly, scan it, or attempt repairs. |
When you need to recover data from an external hard drive not recognized by Windows, what you do before recovery matters just as much as the recovery method itself. Until your important files are safe:
- Don’t format the drive.
- Don’t initialize it.
- Don’t create a new partition or volume.
- Don’t run CHKDSK.
- Don’t save recovered files back to the same drive. Always use a different physical drive.
- Don’t continue using the drive if it clicks, grinds, beeps, or repeatedly disconnects. These symptoms may indicate physical failure and require professional data recovery.
Recover first, repair second.
Step 1: Recover Data from an External Hard Drive Not Recognized by Windows
If your external hard drive appears in Disk Management and shows the correct capacity, there’s a good chance you can still recover your files, even if the drive is missing from File Explorer or you can’t open it. In most cases, Windows can still communicate with the device, but a damaged file system, lost partition, or another logical issue prevents normal access. Data recovery software can often bypass these problems and retrieve your files without modifying the drive or requiring you to format it first.
Over the years, our team has tested many data recovery applications, but lately, we’ve been using Disk Drill for most recovery scenarios. It combines a high recovery rate and fast scanning with several extra tools that make it suitable for different types of data loss. For an external HDD that isn’t recognized normally, the most relevant one is Byte-to-byte Backup, which lets you create a complete disk image and scan the image instead of repeatedly working with the affected drive. You can read about its other capabilities in our Disk Drill review.
Note: A byte-to-byte backup requires enough free space to store an image of the entire external drive. If the drive is stable and responds normally, you can scan it directly with recovery software. However, creating a disk image first is safer if the drive behaves unpredictably, as it reduces the need to repeatedly access the affected drive.
Follow these steps to back up and recover an external hard drive without formatting:
- Open Disk Management and confirm that the external HDD appears there and reports the correct capacity.
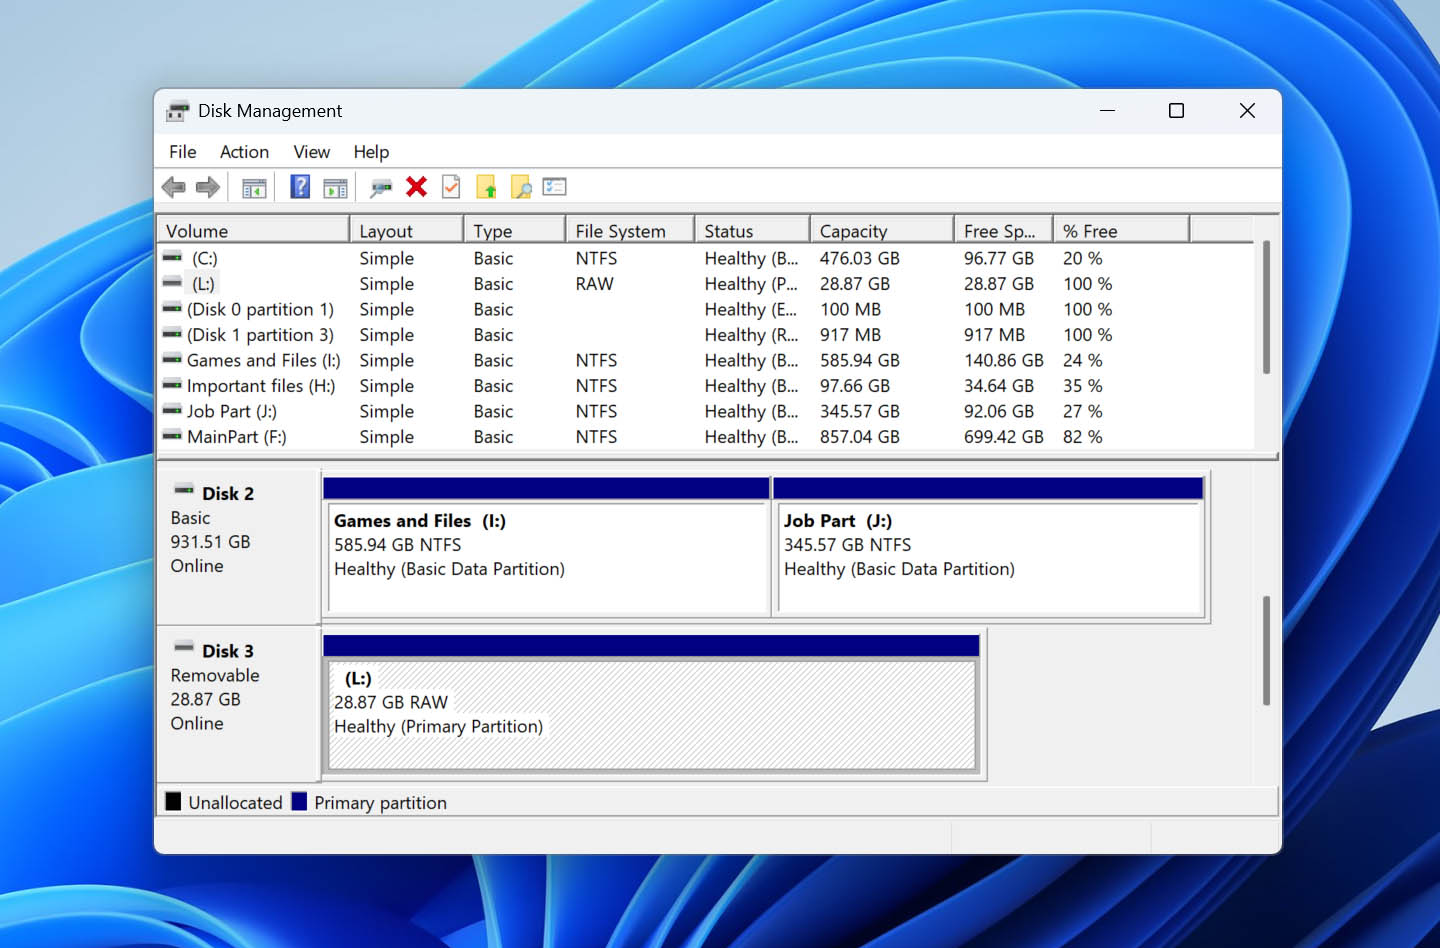
It’s fine if the drive shows as RAW, Unallocated, Not Initialized, or has no drive letter – these states can still allow data recovery as long as the physical disk is detected correctly. If it shows 0 bytes, No Media, an incorrect capacity, or repeatedly disconnects, stop here and do not run a software scan.
- Download and install Disk Drill, then open it.
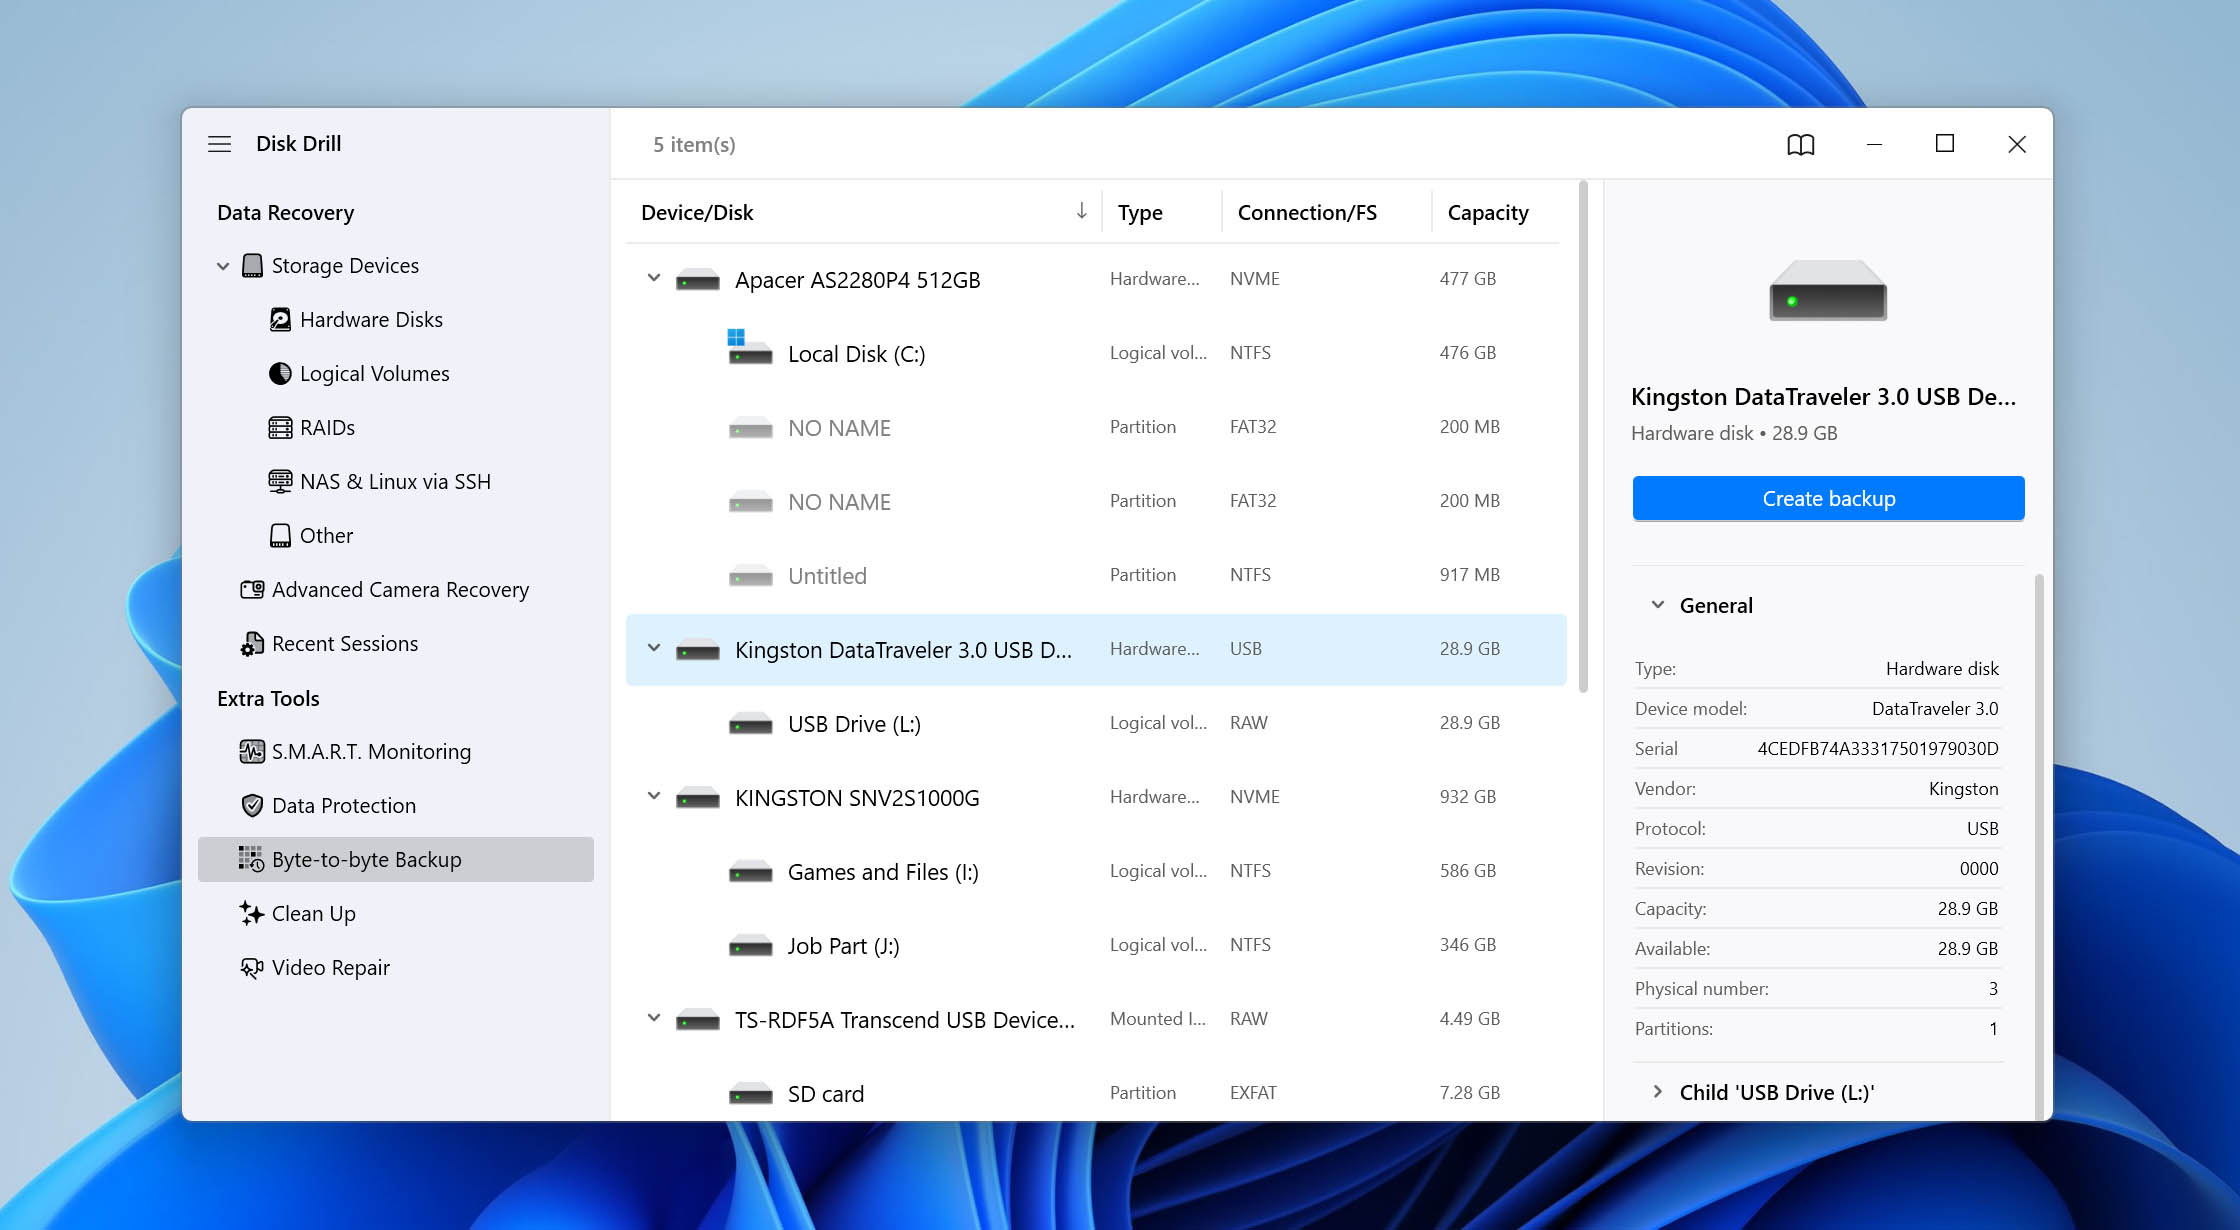
- Select Byte-to-byte Backup from the left sidebar.
- Select the affected external hard drive and click Create backup.
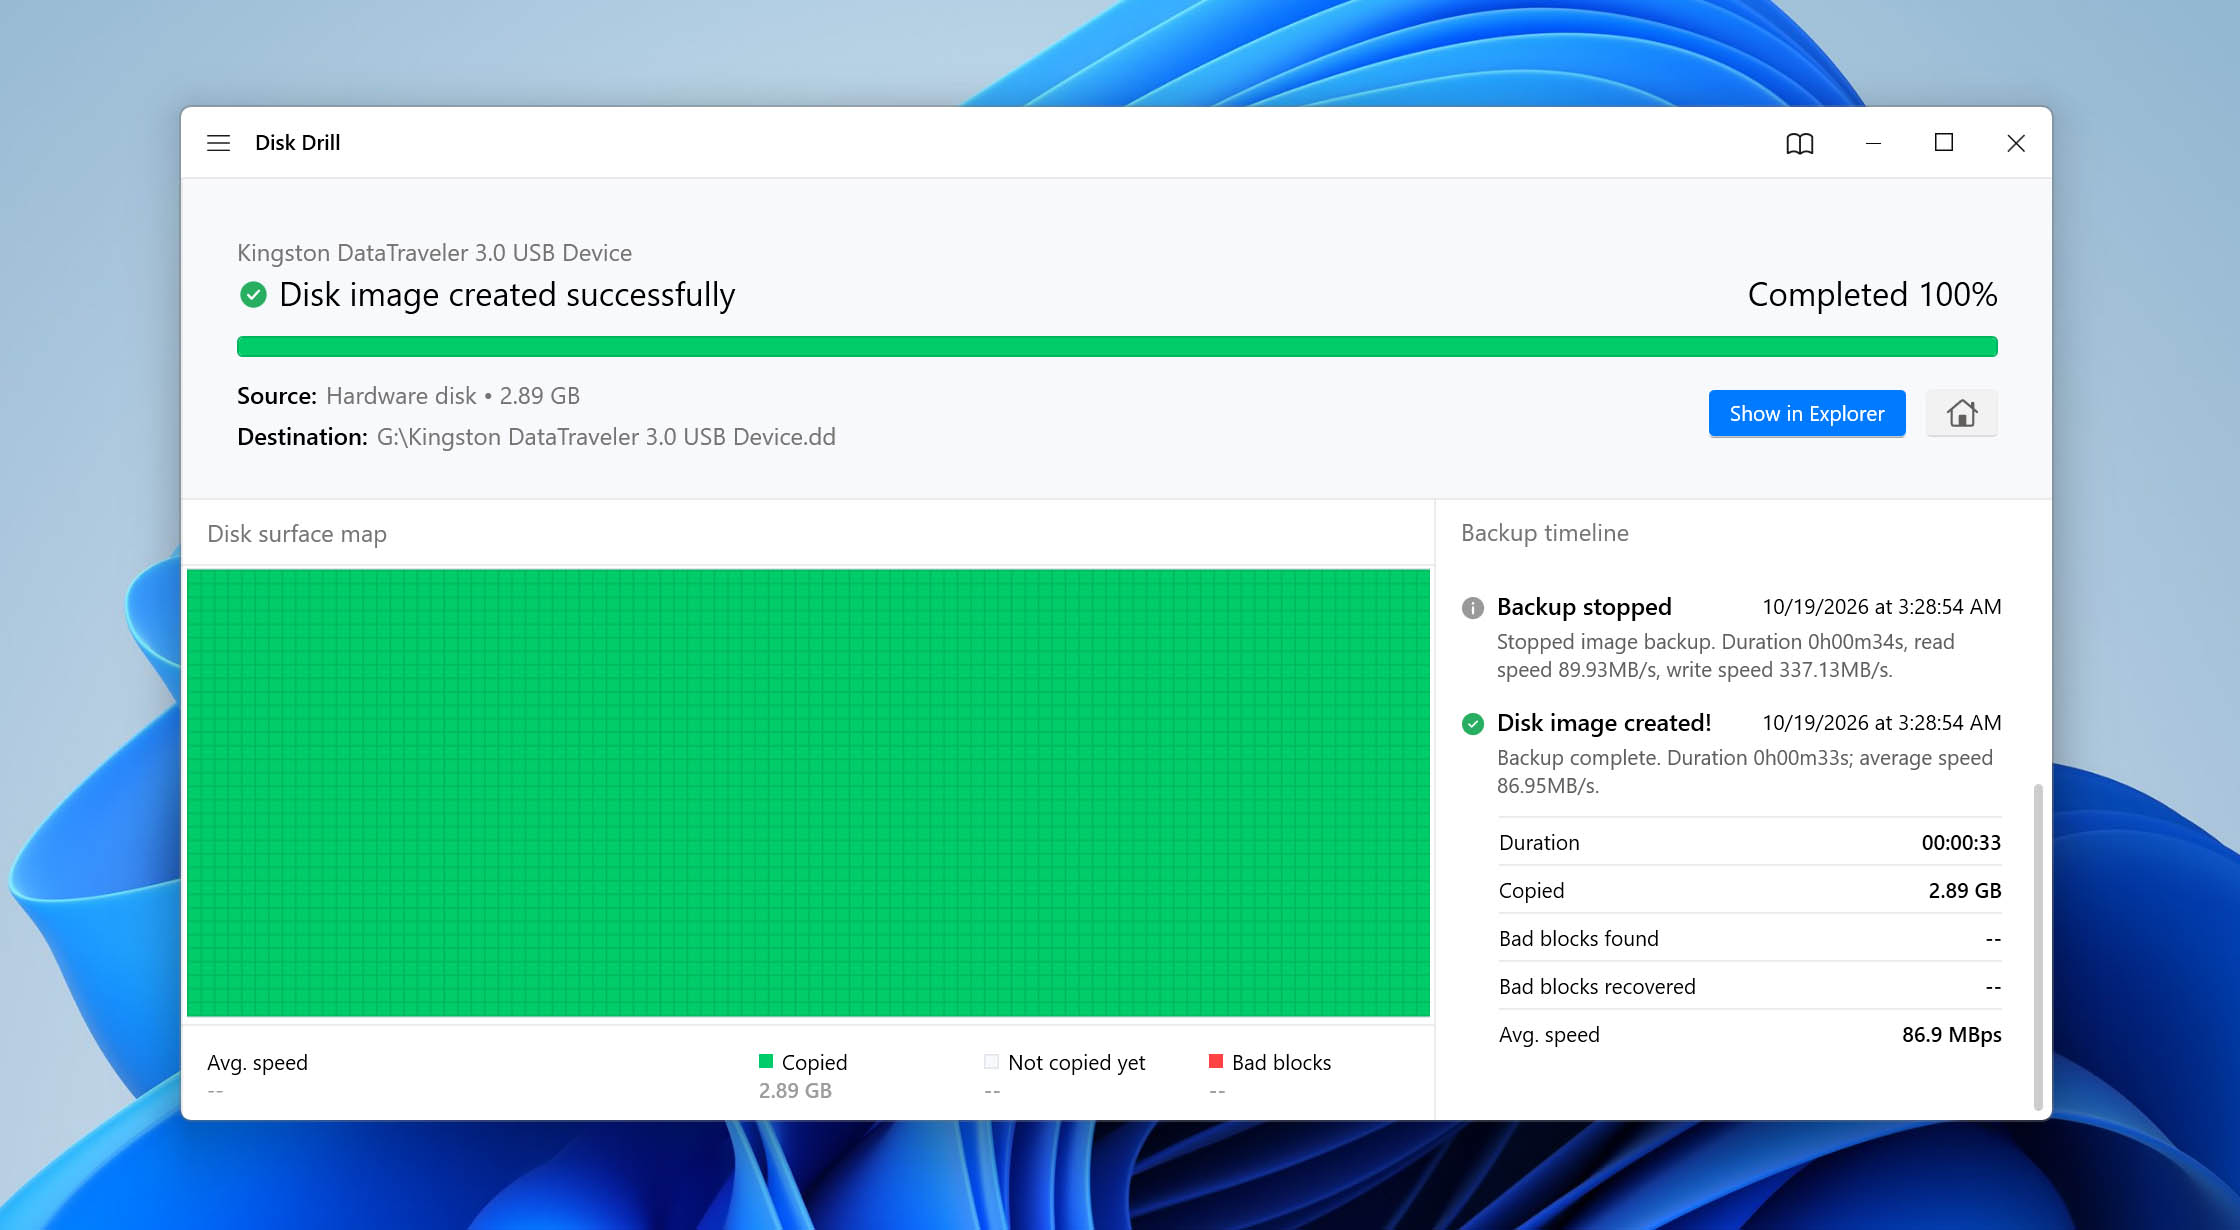
- Choose a name and destination for the backup, then click OK. Store the image on a separate drive with enough free space for the entire external HDD.
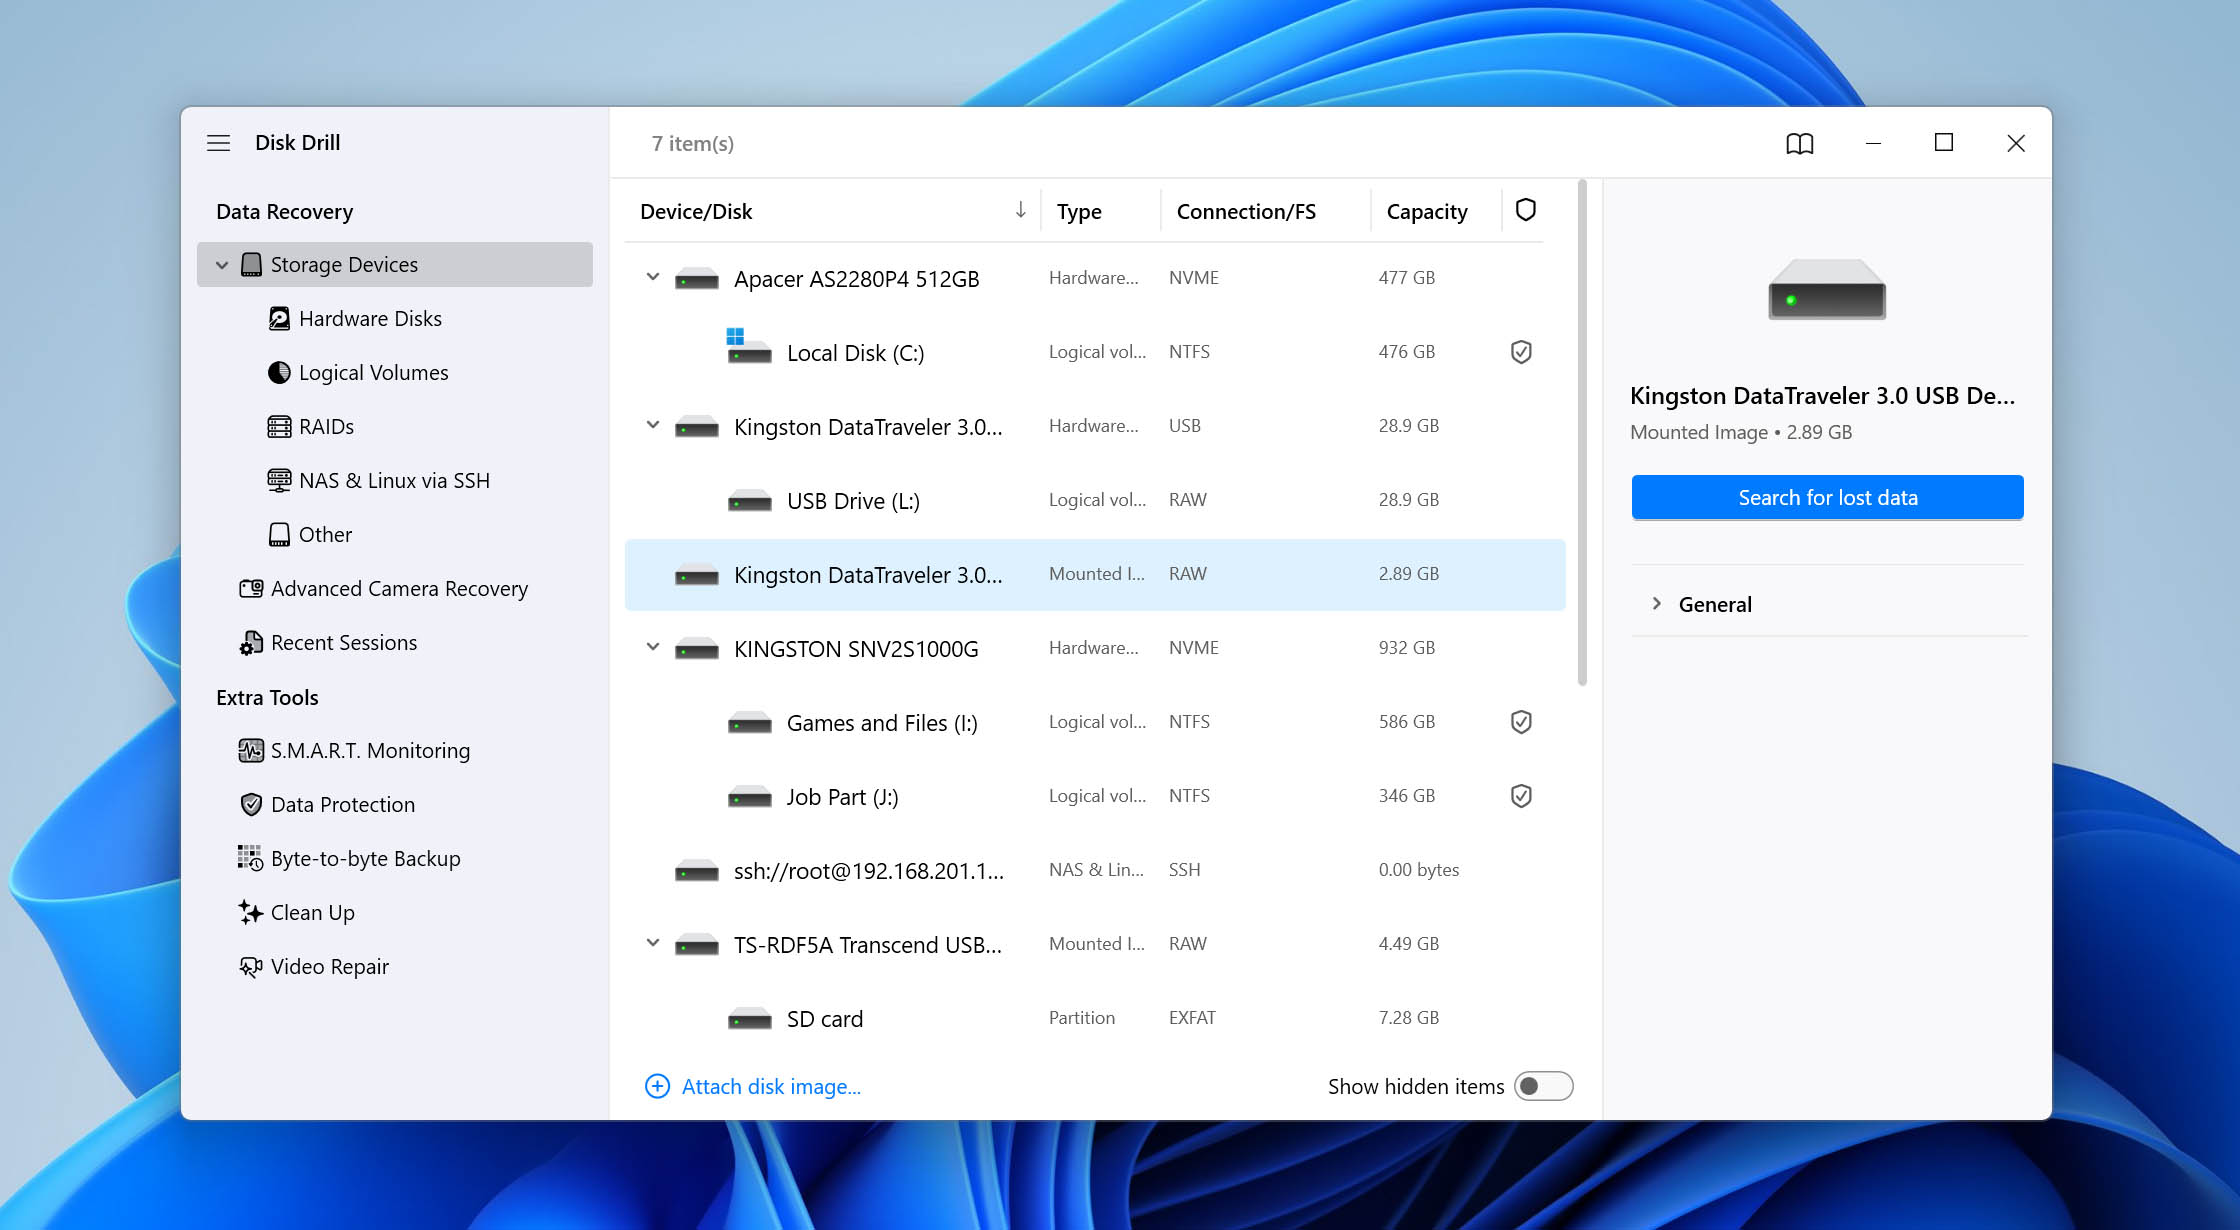
- Once the backup is complete, return to Storage Devices and click Attach disk image. Select the byte-to-byte image you just created.
- Select the mounted disk image and click Search for lost data.
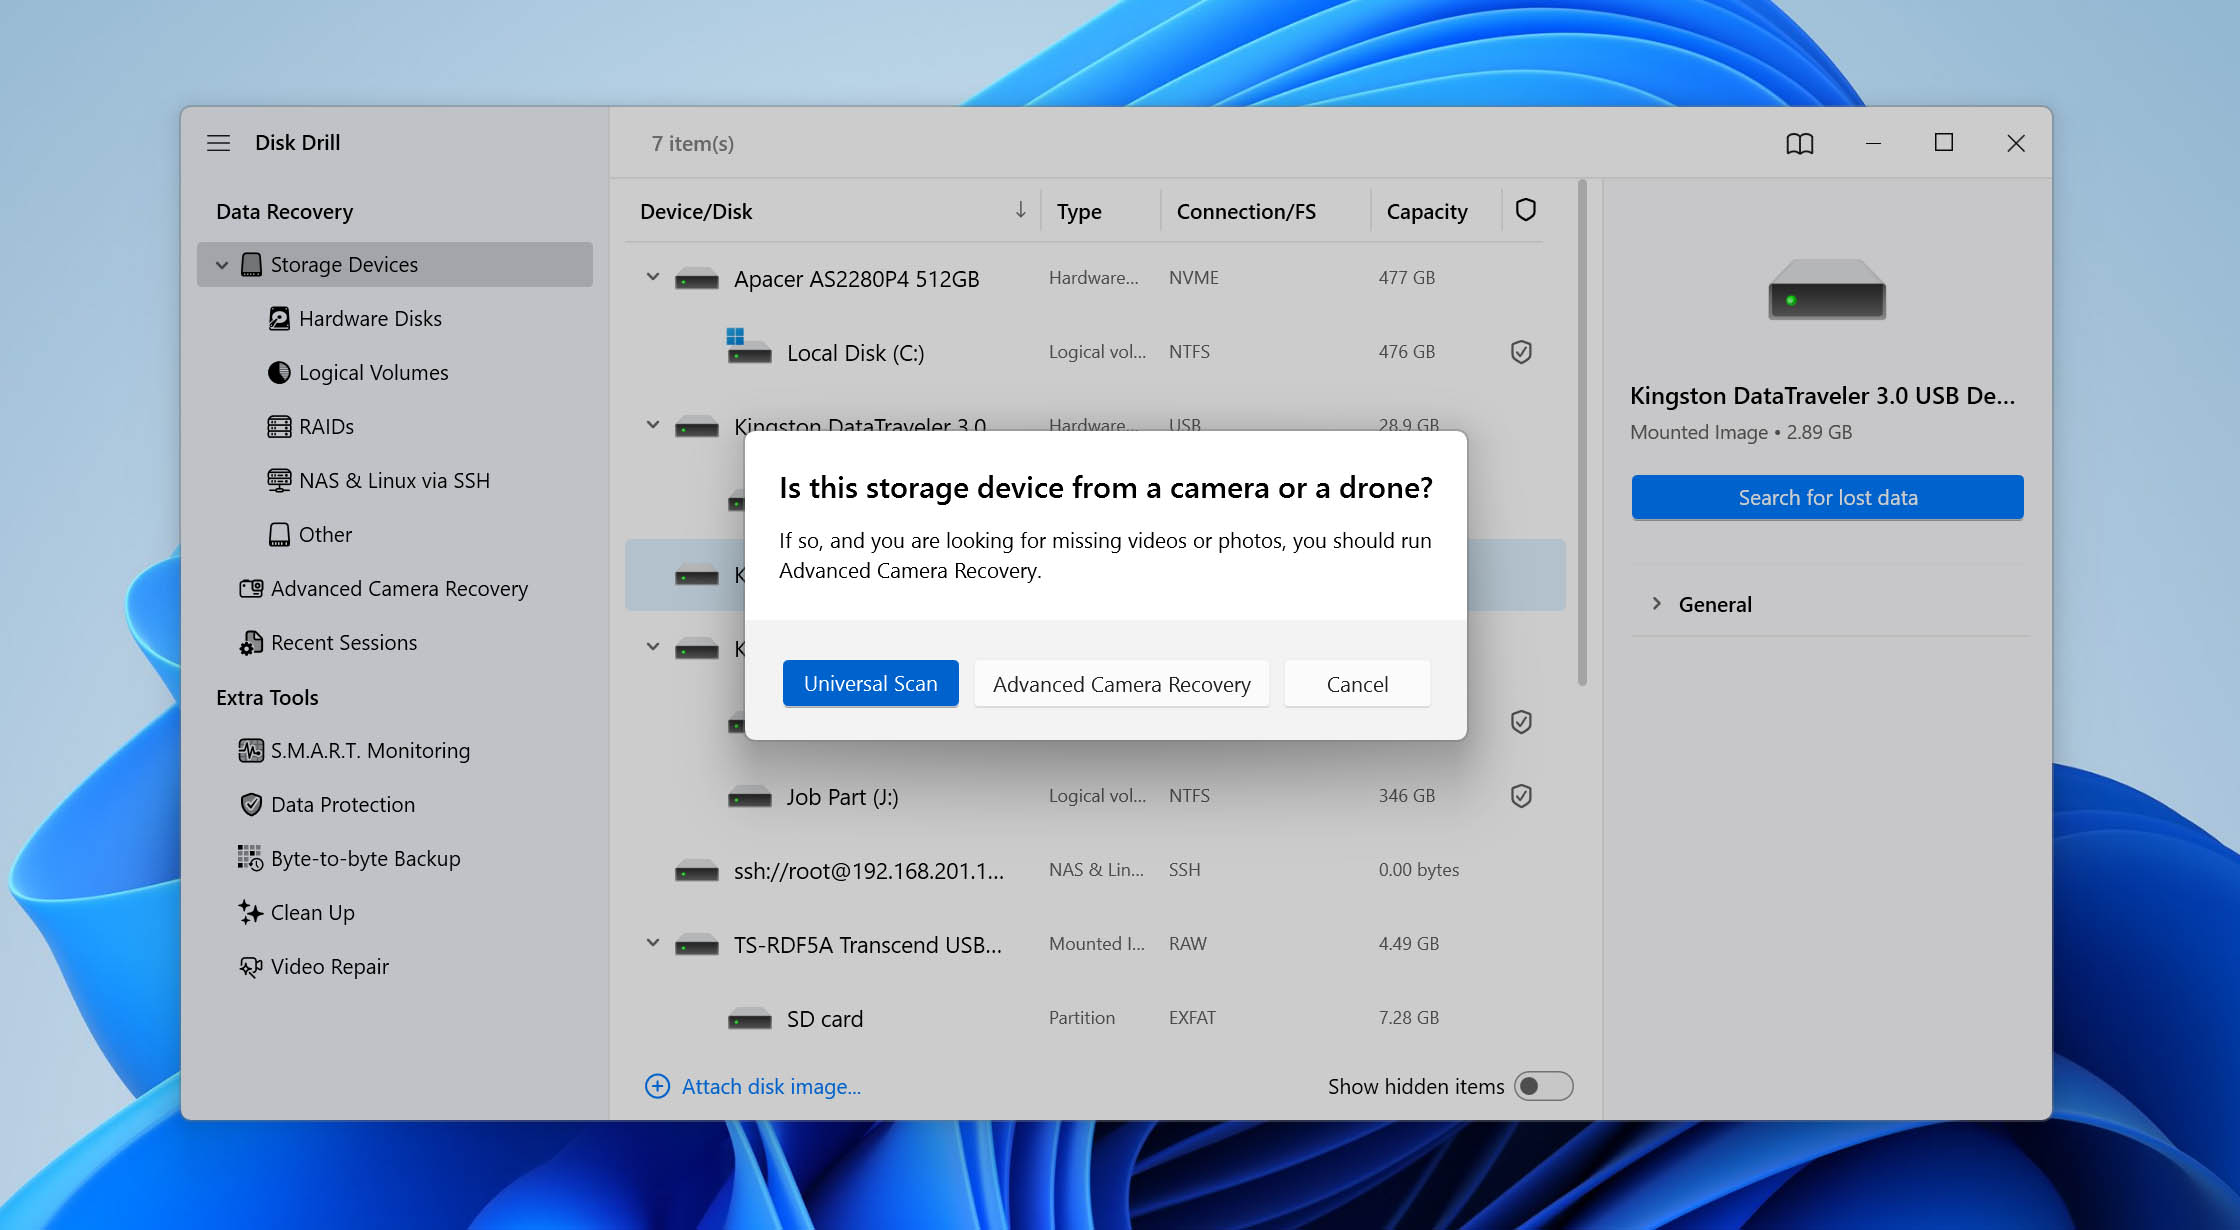
- Choose Universal Scan to search the image for recoverable data. Advanced Camera Recovery is intended for fragmented video files from cameras, drones, and similar recording devices.
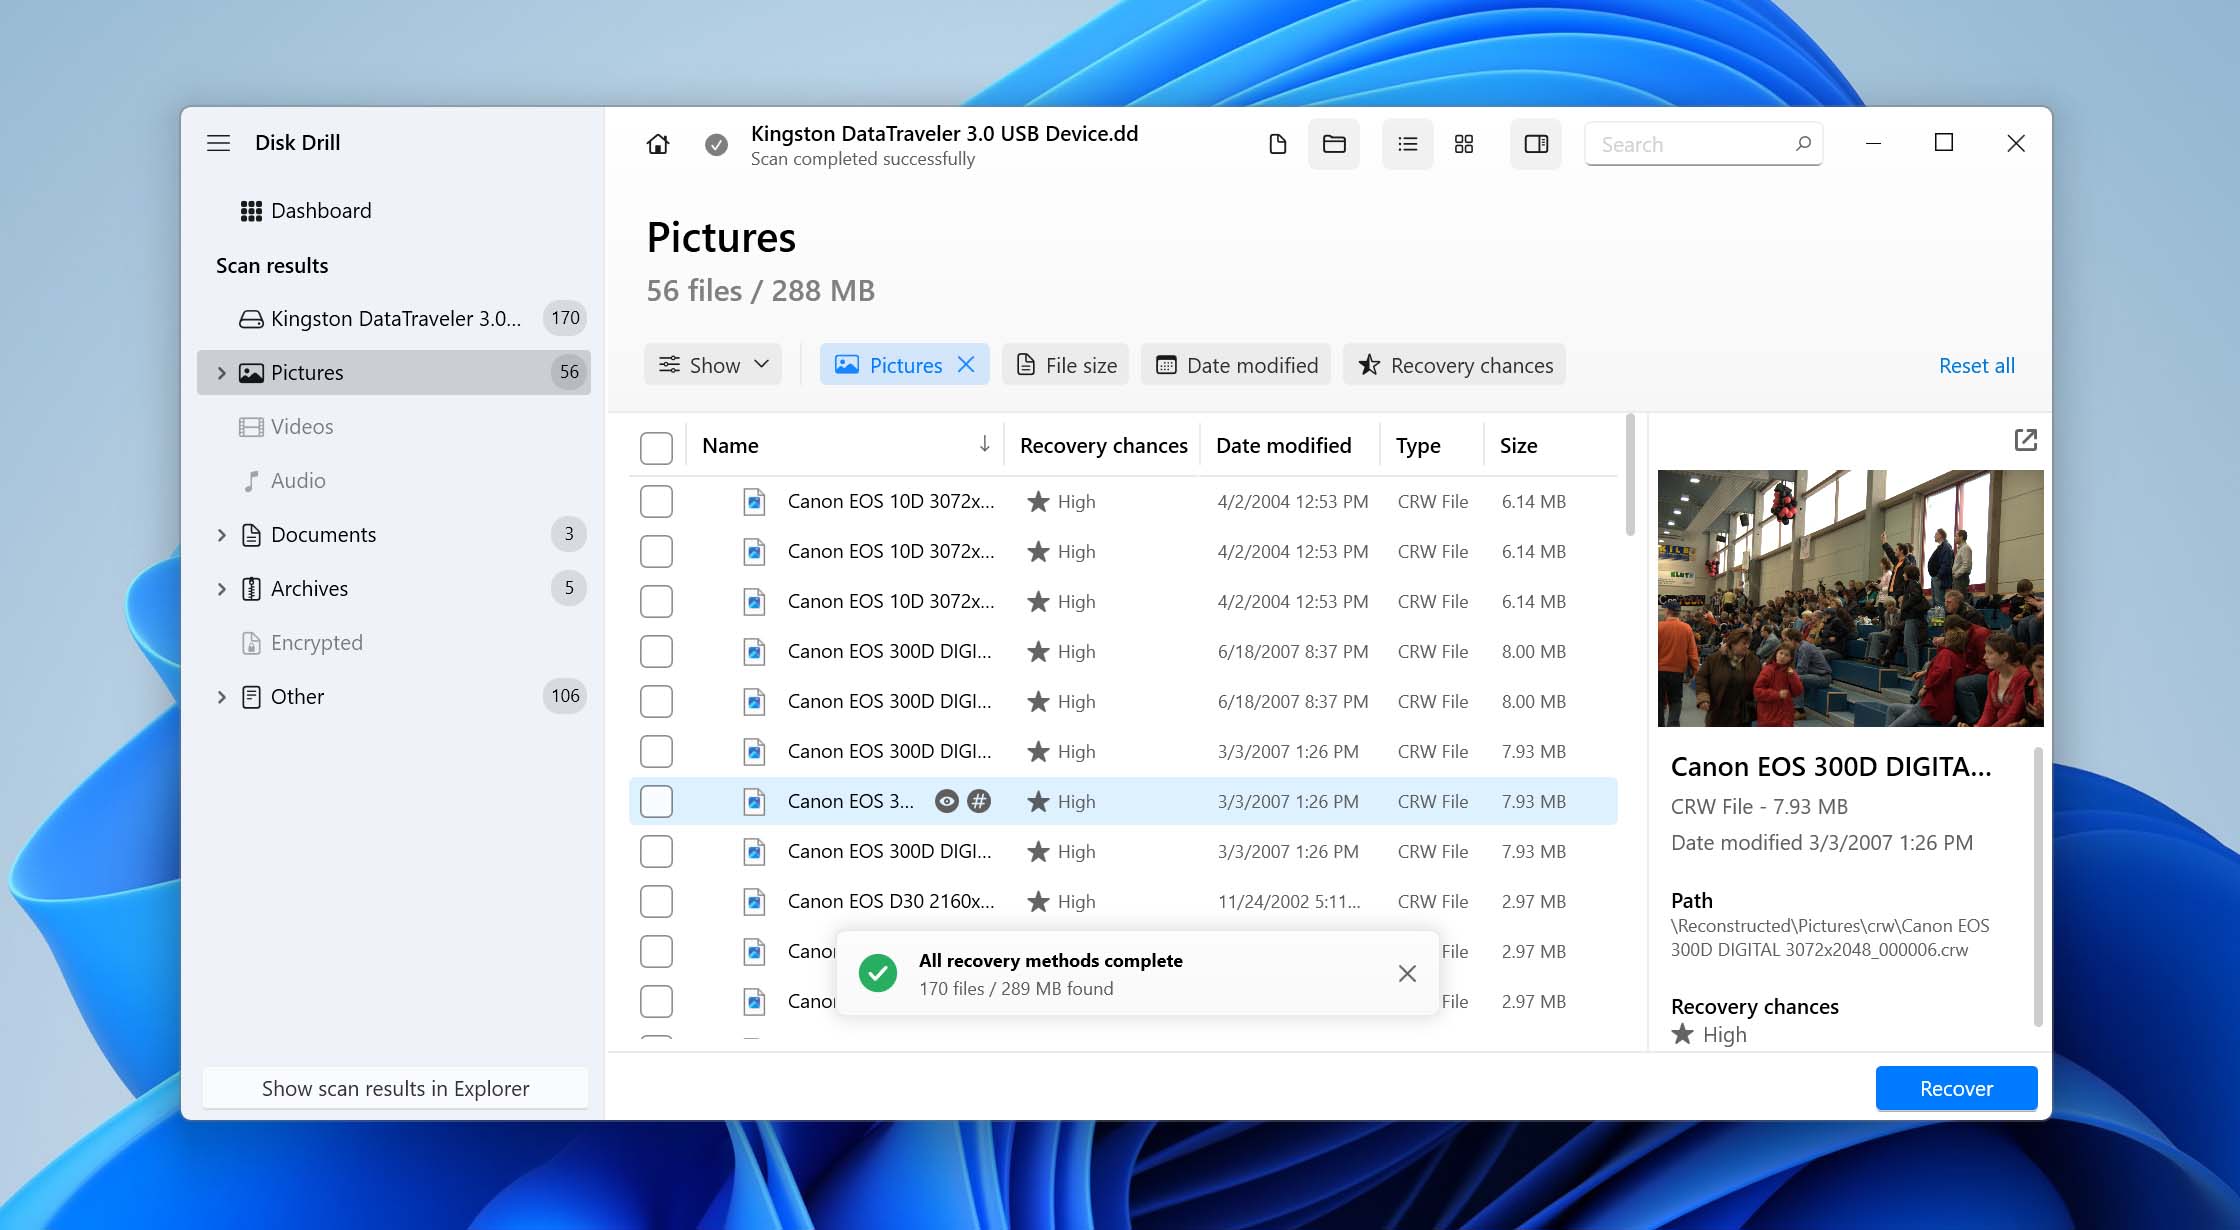
- When the scan is complete, click Review found items. Use the search and filters to locate your files, and preview important files whenever possible. Disk Drill also displays Recovery Chances to help indicate which files are likely to be recoverable.
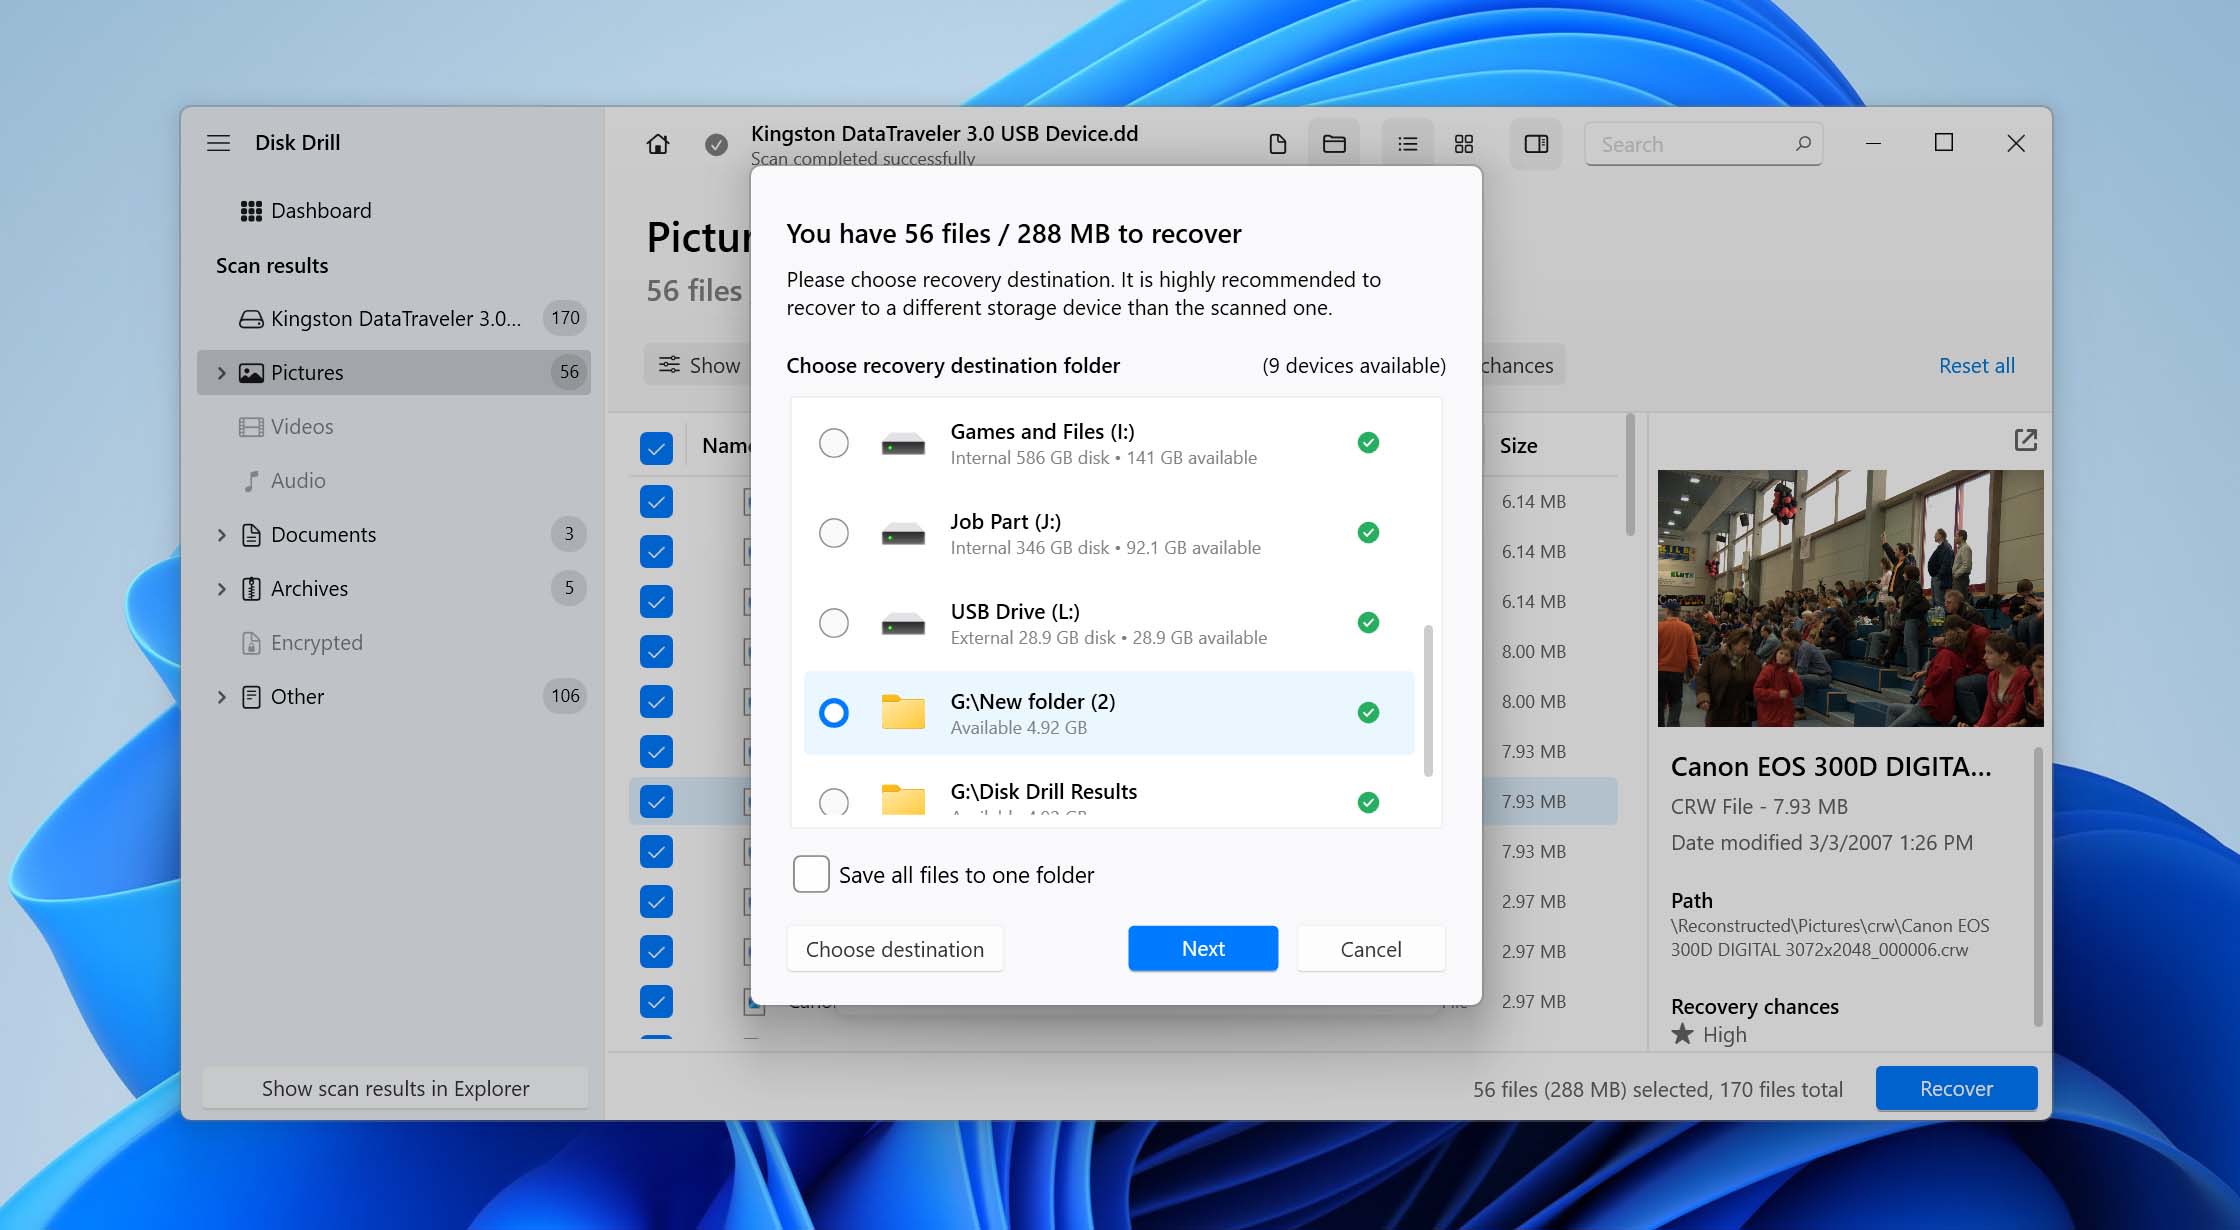
- Select the files you need and click Recover.
- Choose another physical drive as the recovery destination. Do not save recovered files back to the external HDD you are recovering from, as new writes can overwrite data that has not yet been recovered.
Step 2: How to Get an External Hard Drive Recognized Again
Now that you’ve had a chance to recover data from an external hard drive not recognized by Windows, you can move on to troubleshooting the drive itself and see how to recover an external hard drive that is not detected.
If the drive still contains important data that you haven’t recovered, do not continue yet. Go back to the recovery steps above and secure those files first, as some of the fixes below can modify the file system, partition structure, or existing data.
Case 1: If the Drive Appears in Disk Management
It’s worth repeating that if your external hard drive appears in Disk Management and shows the correct capacity, Windows does recognize the physical drive. It simply isn’t recognizing or presenting it in the way it normally should, which is why the drive may still be missing from File Explorer or remain inaccessible.
The good news is that there are several ways to fix this. The right method depends on what Disk Management shows for the drive, so check its current status and use the corresponding solution below.
Method 1: Assign a Drive Letter
Use this method if: the partition appears normally and shows the correct size, but it has no drive letter.
As unlikely as it sounds, the external hard drive may be inaccessible through File Explorer solely because it’s missing a drive letter. Although technically Microsoft could forego this system, Windows continues to use drive letters for any attached storage to assign paths for the sake of backward compatibility.
This method will guide you through assigning a new drive letter to your external HDD:
- Right-click Start, then select Disk Management.
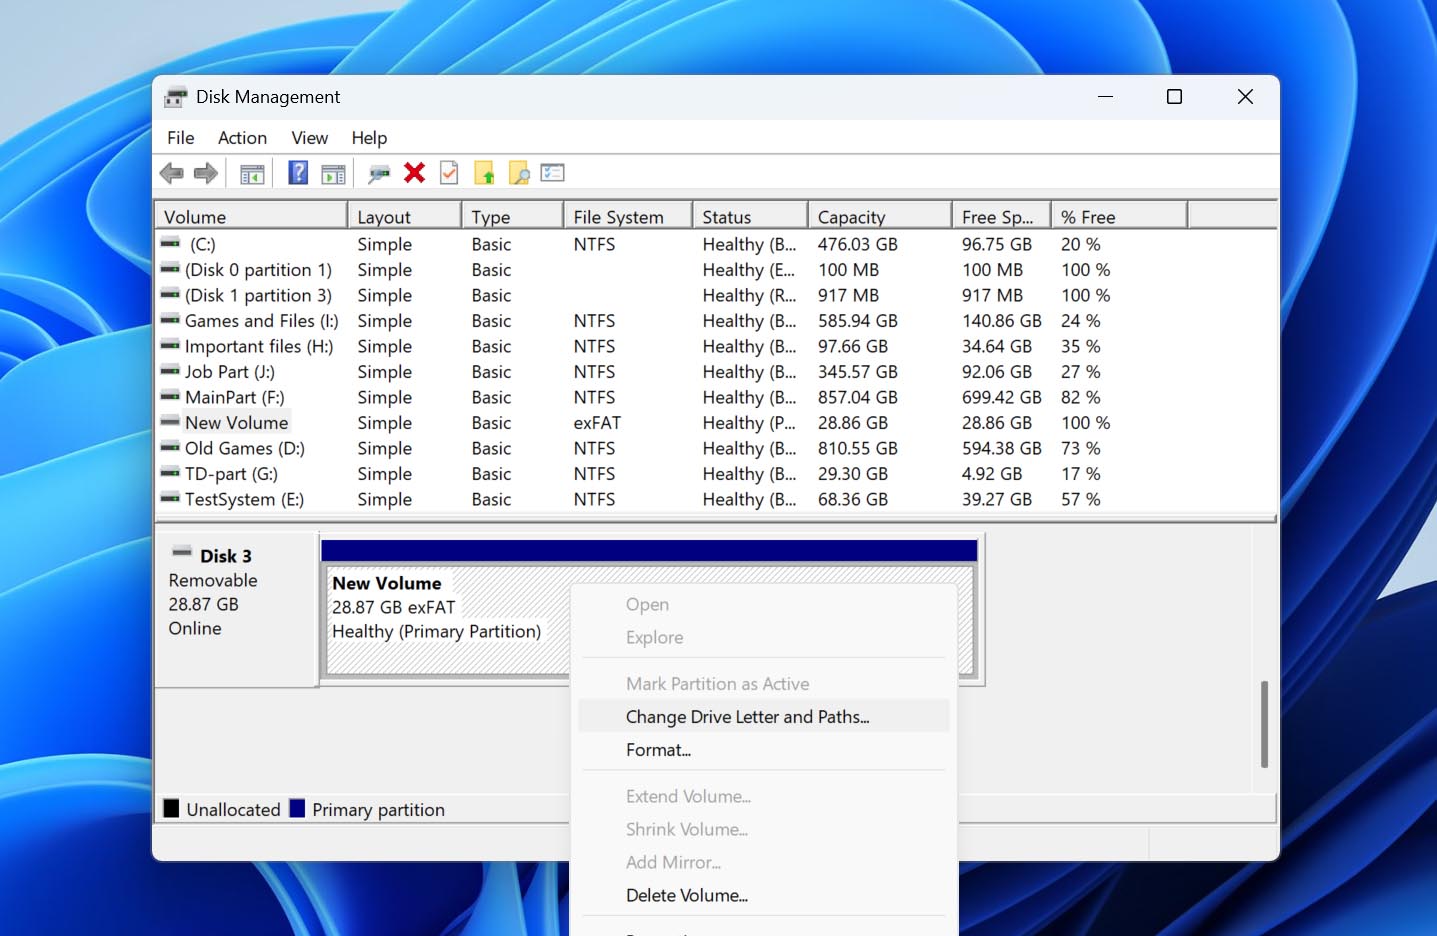
- Right-click the partition of your external hard drive, then select Change Drive Letter and Paths.
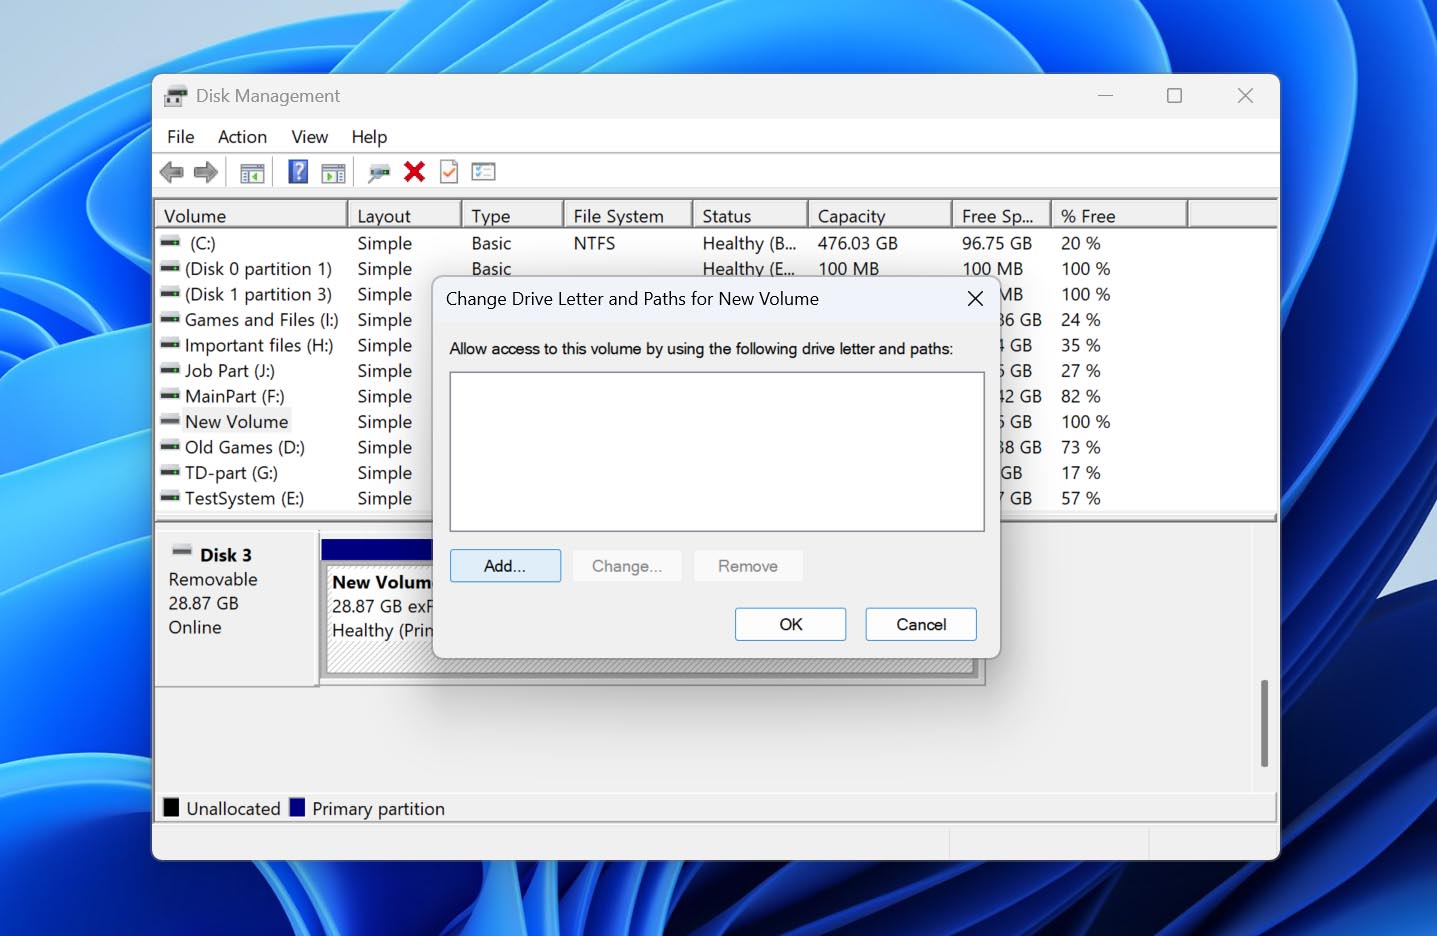
- Click Add.
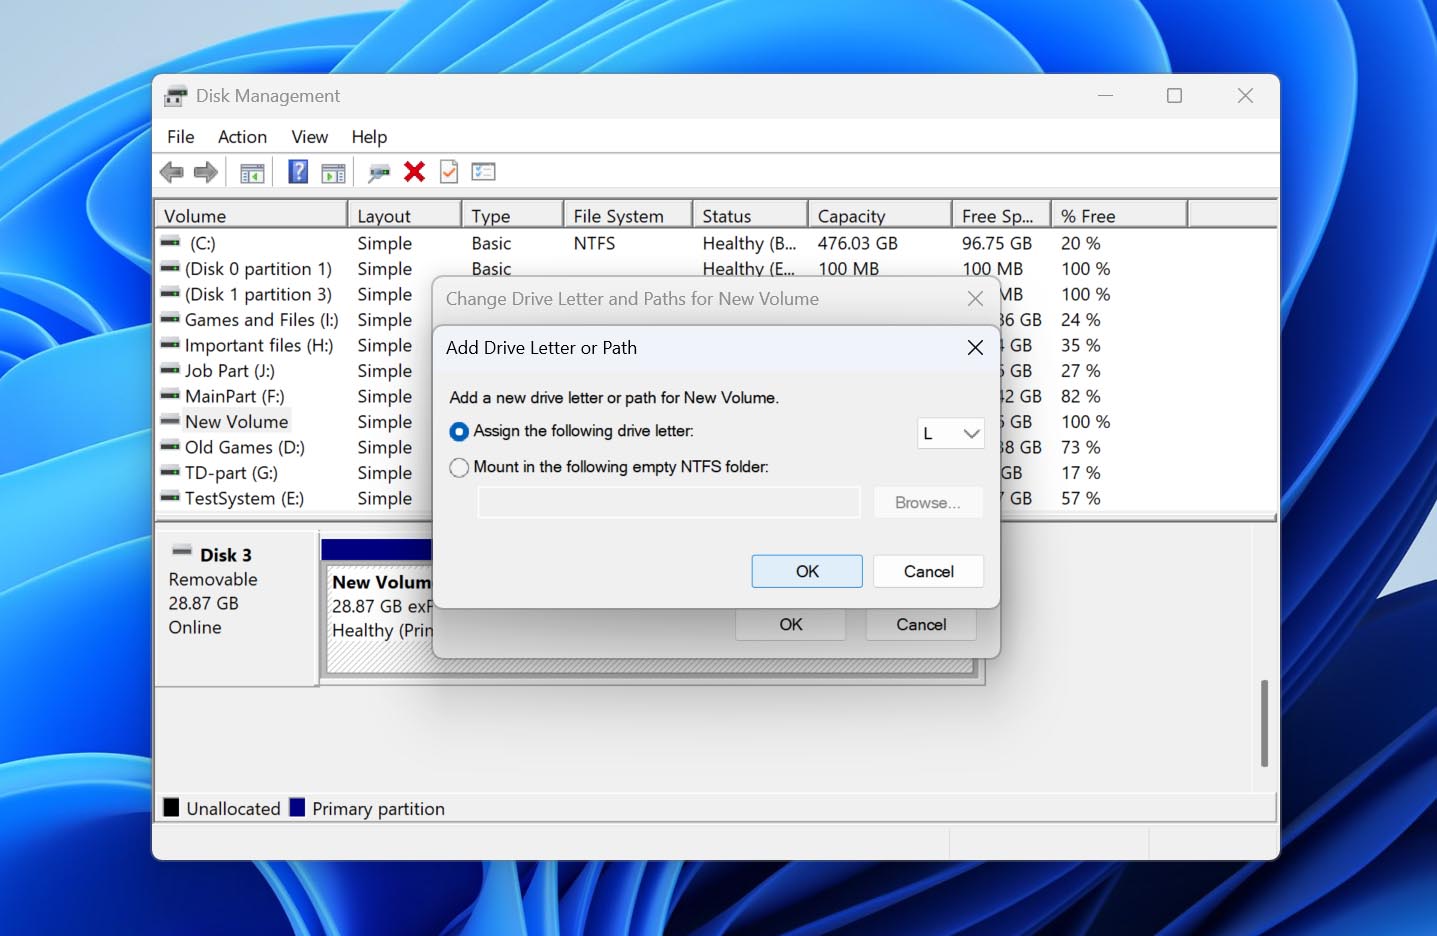
- Select a new drive letter from the dropdown, then click OK. Click OK again to finalize.
Method 2: Format a RAW Drive
Use this method if: the partition appears as RAW.
When a drive becomes RAW, Windows can still detect the drive and its partition, but it can no longer recognize a valid file system on it. As a result, the drive may be inaccessible in File Explorer, and Windows may display prompts asking you to format it before you can use it.
If the drive contains important data, do not accept these formatting prompts yet. Formatting creates a new file system and can complicate subsequent recovery. Recover the files you need first using the steps above. Once your data is safely stored elsewhere, you can format the RAW partition and make the external hard drive usable again.
We have a separate guide that covers RAW hard drives and their recovery options in more detail. Here, we’ll use Disk Management to perform a simple format:
- Right-click Start and select Disk Management.
- Find your external hard drive and confirm that the affected partition is marked as RAW.
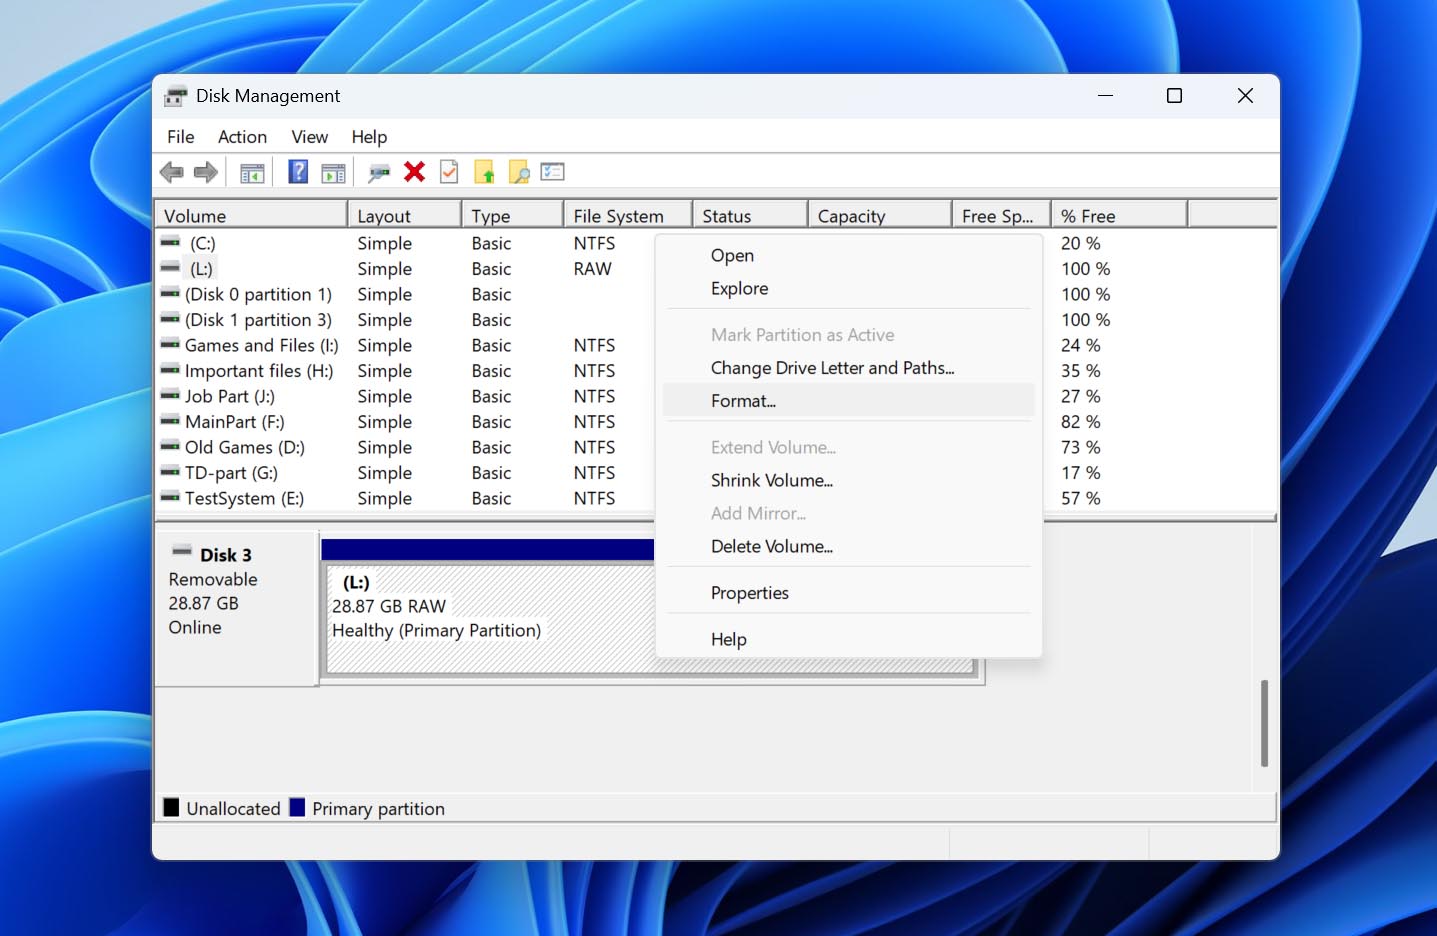
- Right-click the RAW partition and select Format.
- Enter a Volume label and choose a file system. NTFS is a good choice if you plan to use the drive primarily with Windows, while exFAT is more suitable if you need compatibility with both Windows and macOS.
- Leave Perform a quick format selected and click OK.
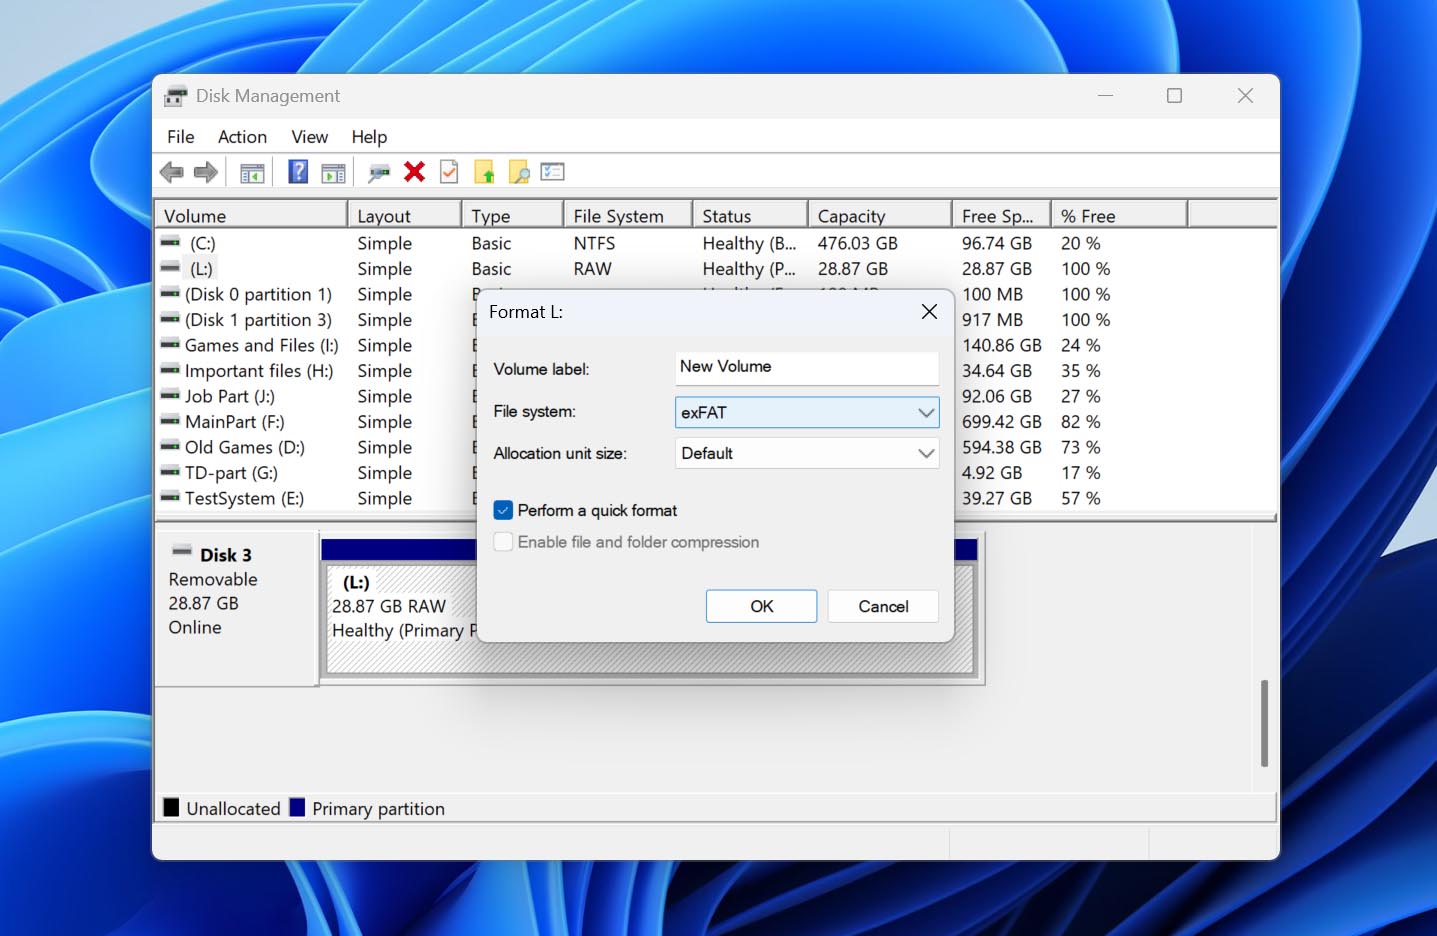
- Read the formatting warning and click OK to confirm.
Once formatting is complete, Windows should recognize the new file system and the drive should become accessible again in File Explorer.
Method 3: Restore an Unallocated Partition With TestDisk
Use this method if: some or all of the drive’s expected space appears as Unallocated.
If your external hard drive shows the correct overall capacity but some or all of its space is marked as Unallocated, the partition may have been deleted or its partition table may be damaged. In this case, instead of creating a new partition, you can try to restore the existing one with TestDisk. The tool searches for lost partitions and can write the recovered partition structure back to the disk, which may make the volume accessible again without formatting it.
[TestDisk is more technical than the other tools in this guide, and writing the wrong partition information can make the situation worse. Only proceed if you have already recovered your important files or created a byte-to-byte backup of the drive.
Follow these steps to restore a lost partition with TestDisk:
- Download TestDisk, extract the archive, and open testdisk_win.exe.
- Select Create and press Enter to create a new log file.
- Highlight your external hard drive and press Enter.
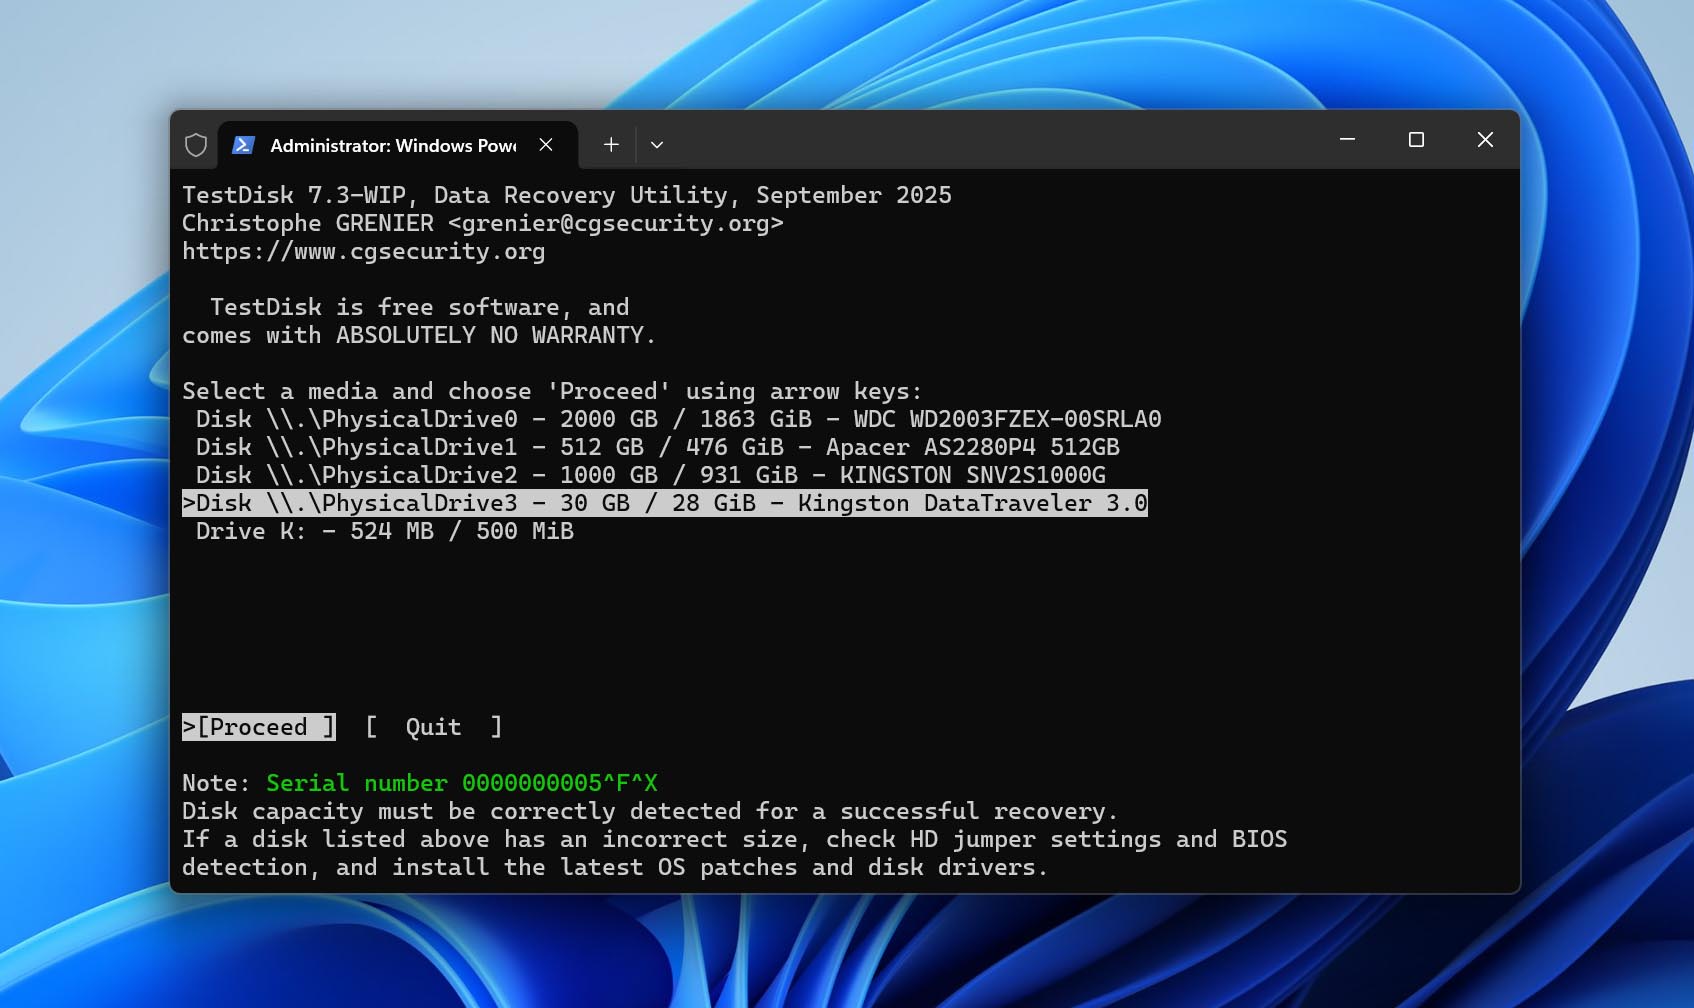
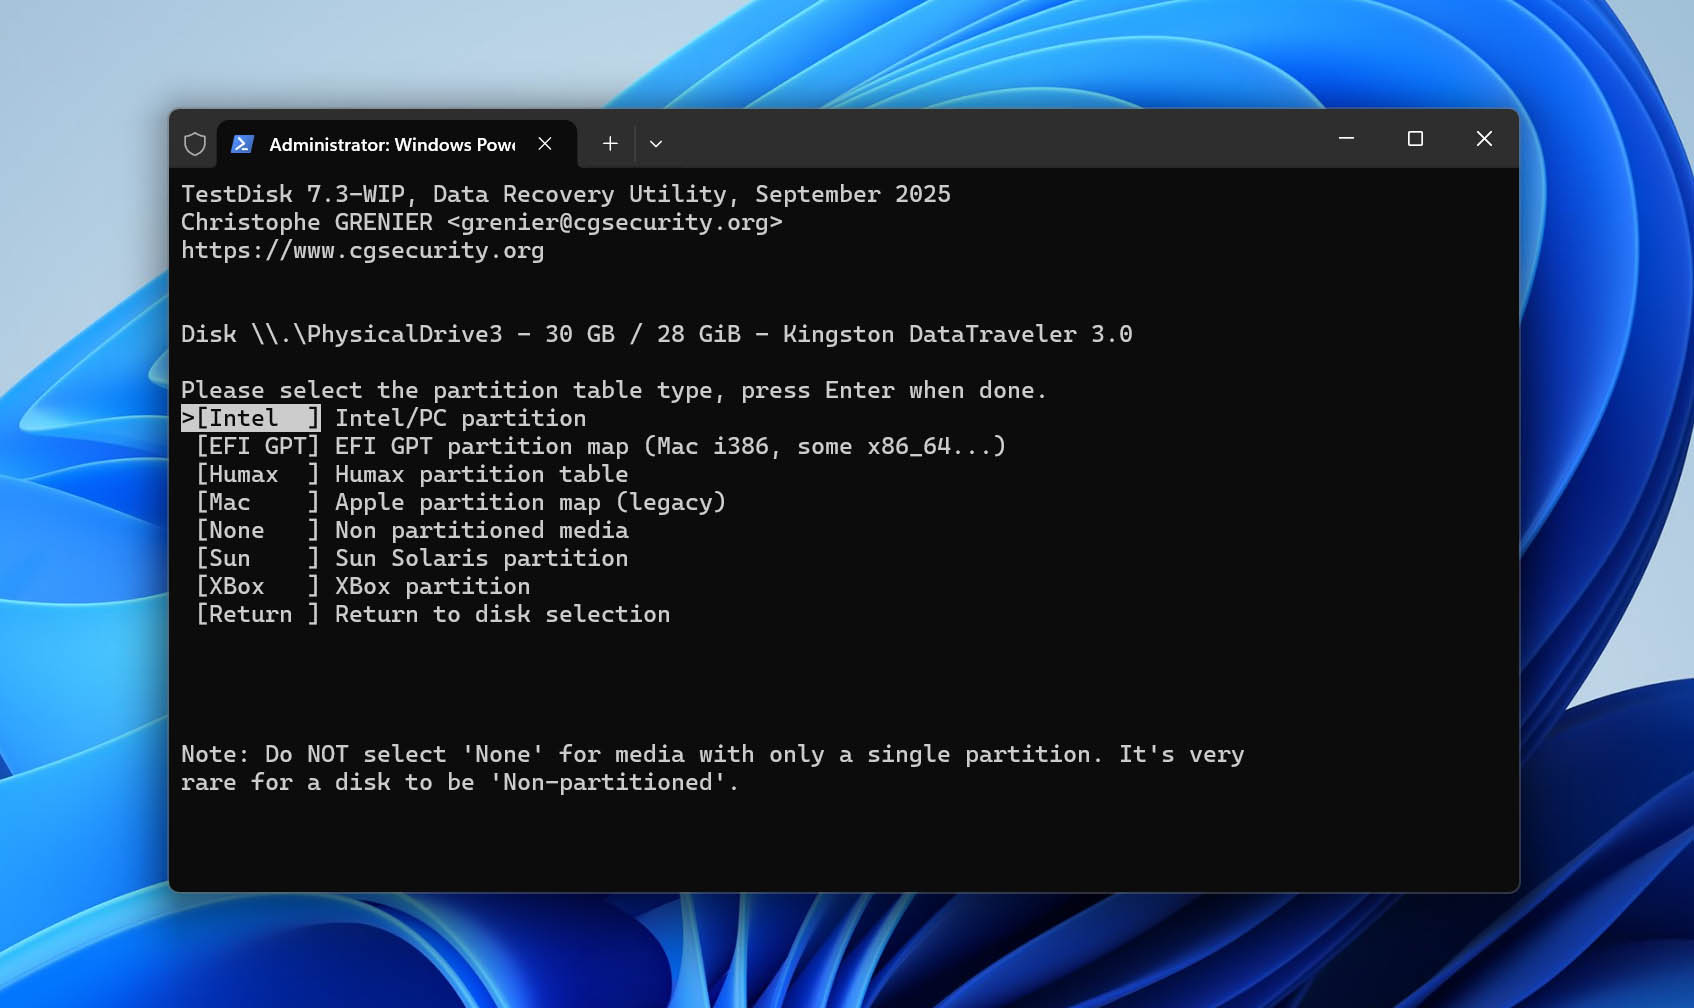
- Select the partition table type. TestDisk usually detects the correct type automatically, so leave the suggested option selected and press Enter.
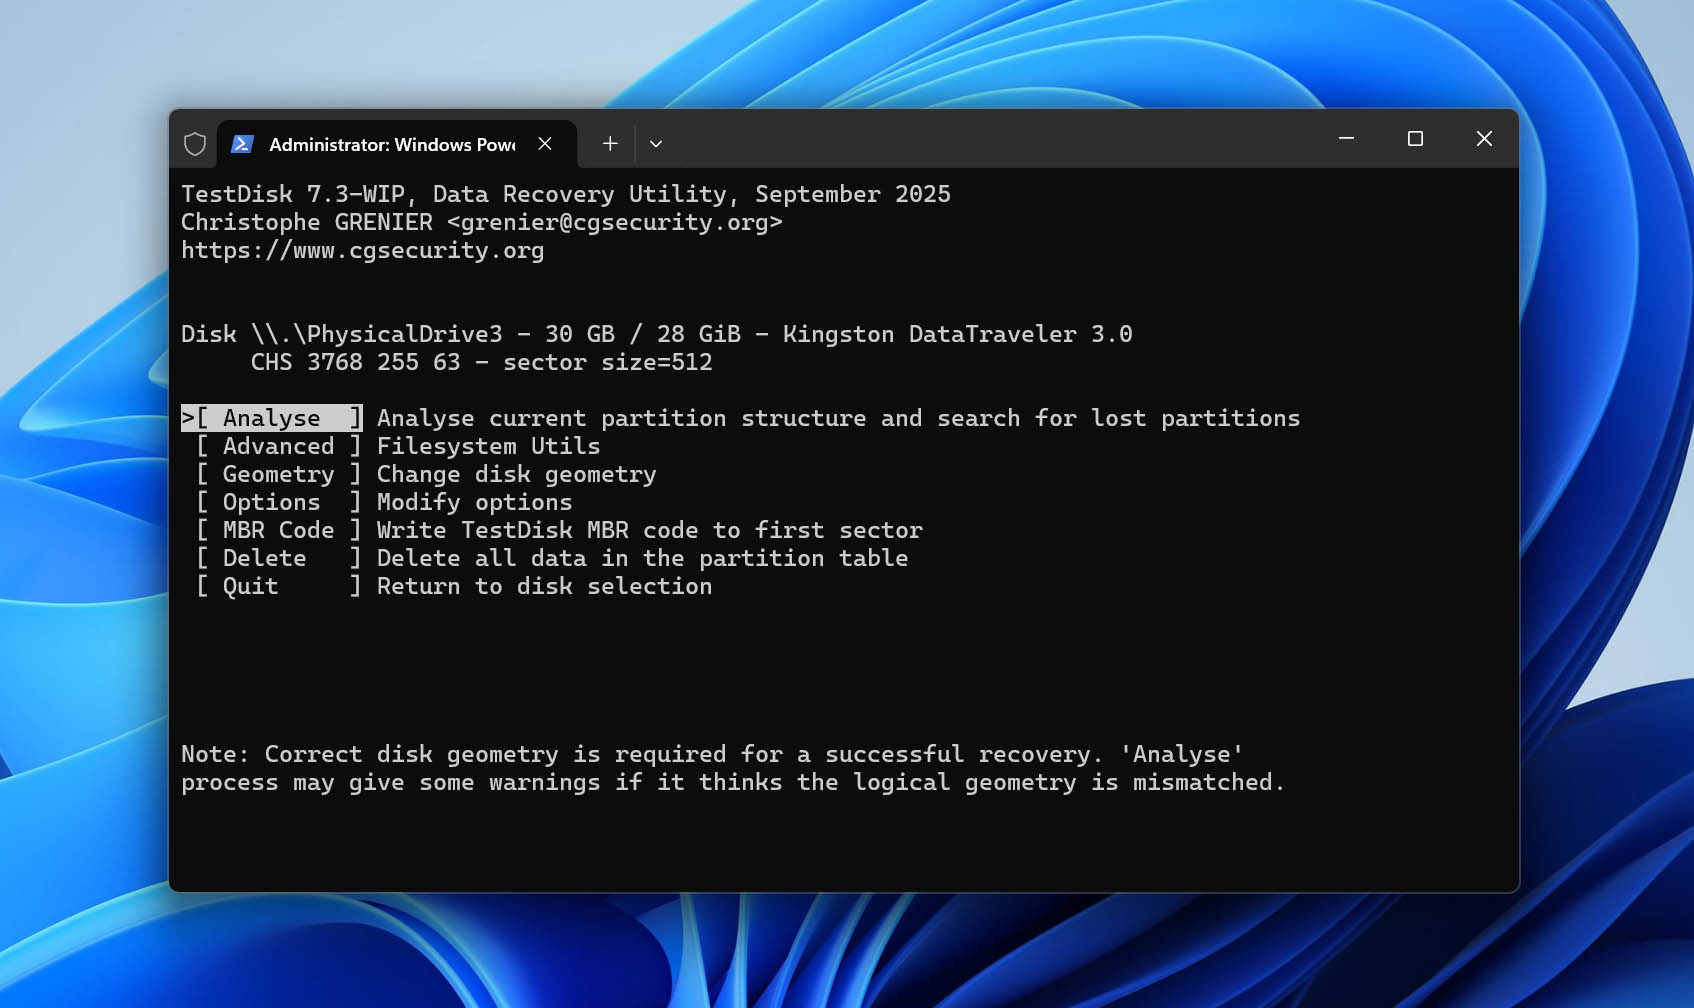
- Select Analyse and press Enter to check the current partition structure.
- Select Quick Search and press Enter to search for lost partitions.
- When the search is complete, highlight the lost partition and press P to check whether TestDisk can list the files it contains. If the expected files and folders appear, press Q to return to the partition list.
- Continue to Write and press Enter to save the recovered partition structure. If the missing partition was not found during Quick Search, run Deeper Search before using Write.
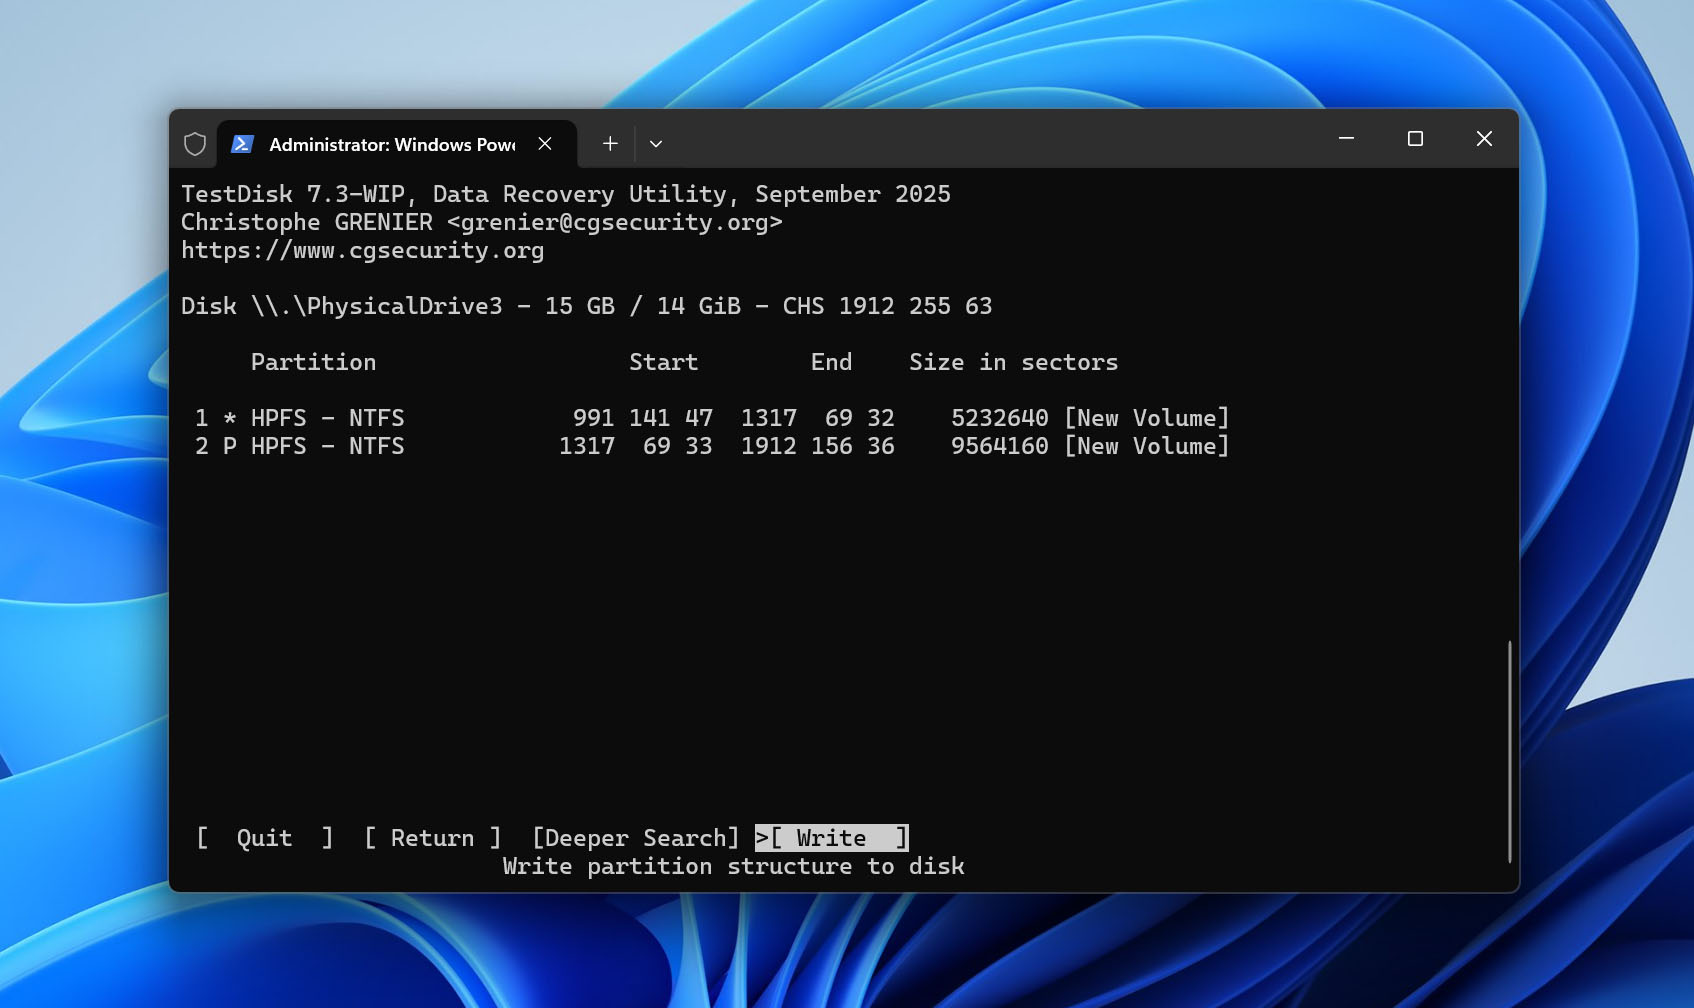
- Press Y to confirm the changes.
- Restart your computer, or safely disconnect and reconnect the external hard drive, then check whether the partition is accessible again.
[Interestingly, the TestDisk download also includes PhotoRec, a separate data recovery program from the same developer. While TestDisk focuses mainly on recovering lost partitions and repairing partition structures, PhotoRec is designed to recover individual files. If you want to learn more about either tool, we have separate in-depth reviews of both TestDisk and PhotoRec.
Method 4: Create a Partition on Unallocated Space
Use this method if: some or all of the drive’s expected space appears as Unallocated.
If TestDisk couldn’t restore the lost partition, or you no longer need the original partition and its data, you can use the Unallocated space to create a new volume. This won’t restore the old partition or its files, but it will make the space usable again by creating a new partition and formatting it with a supported file system.
Only proceed after you have recovered all important data from the drive. Creating and formatting a new volume writes new file system structures to the disk and can overwrite data that may still be recoverable.
These steps will show you how to create a new volume on the unallocated space:
- Right-click Start, then select Disk Management.
- Right-click the block of your external hard drive with unallocated space and click New Simple Volume.
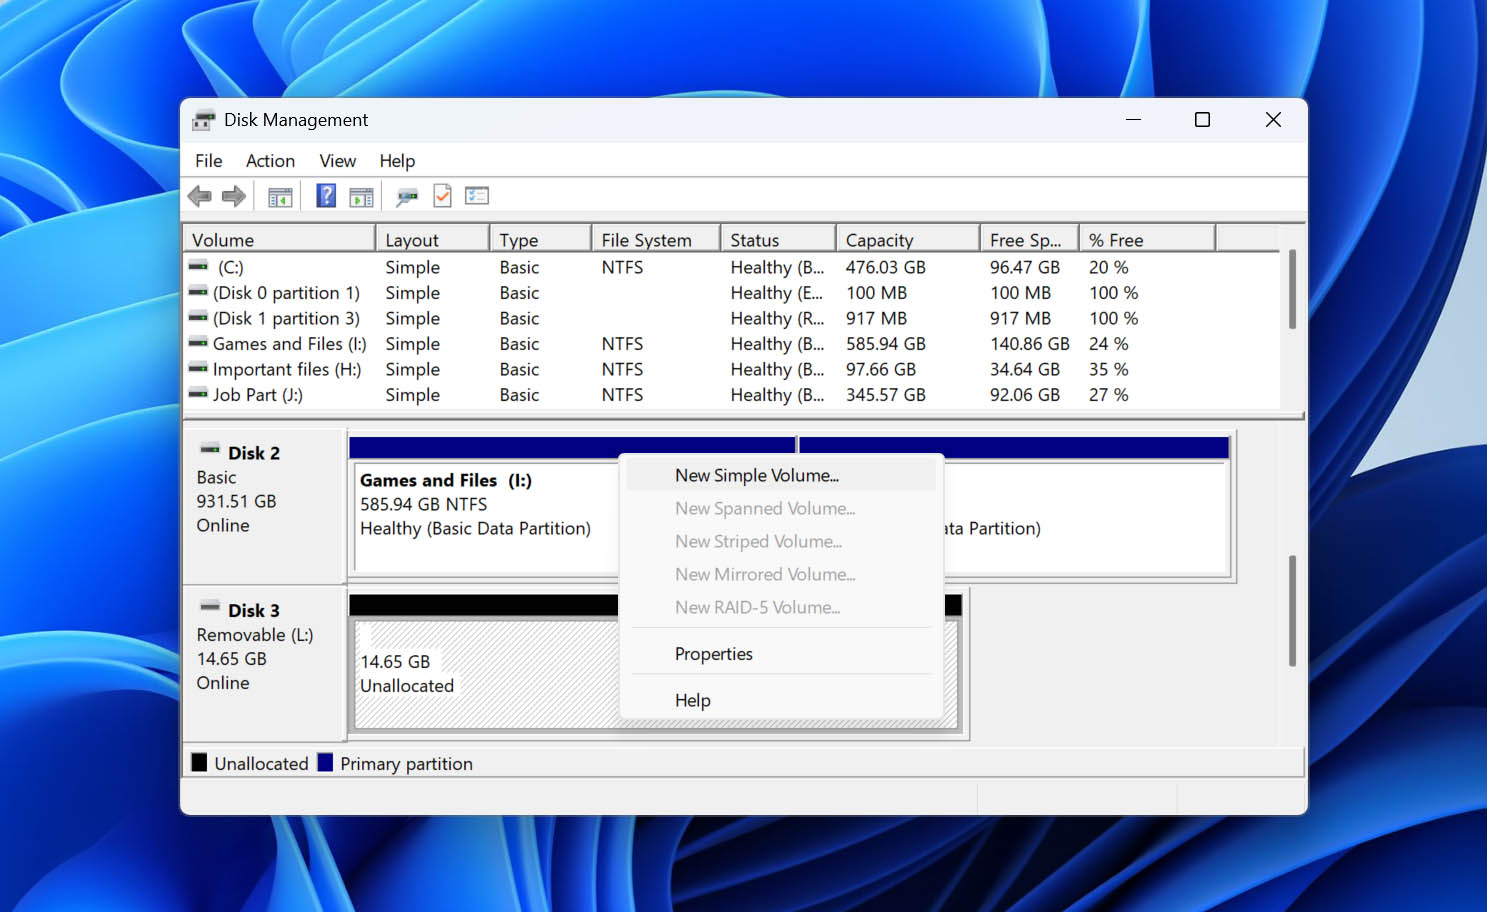
- Click Next.
- Choose a volume size and click Next.
- Choose a drive letter and click Next.
- Give the volume a label, make sure NTFS is selected and Perform a quick format is ticked, then click Next.
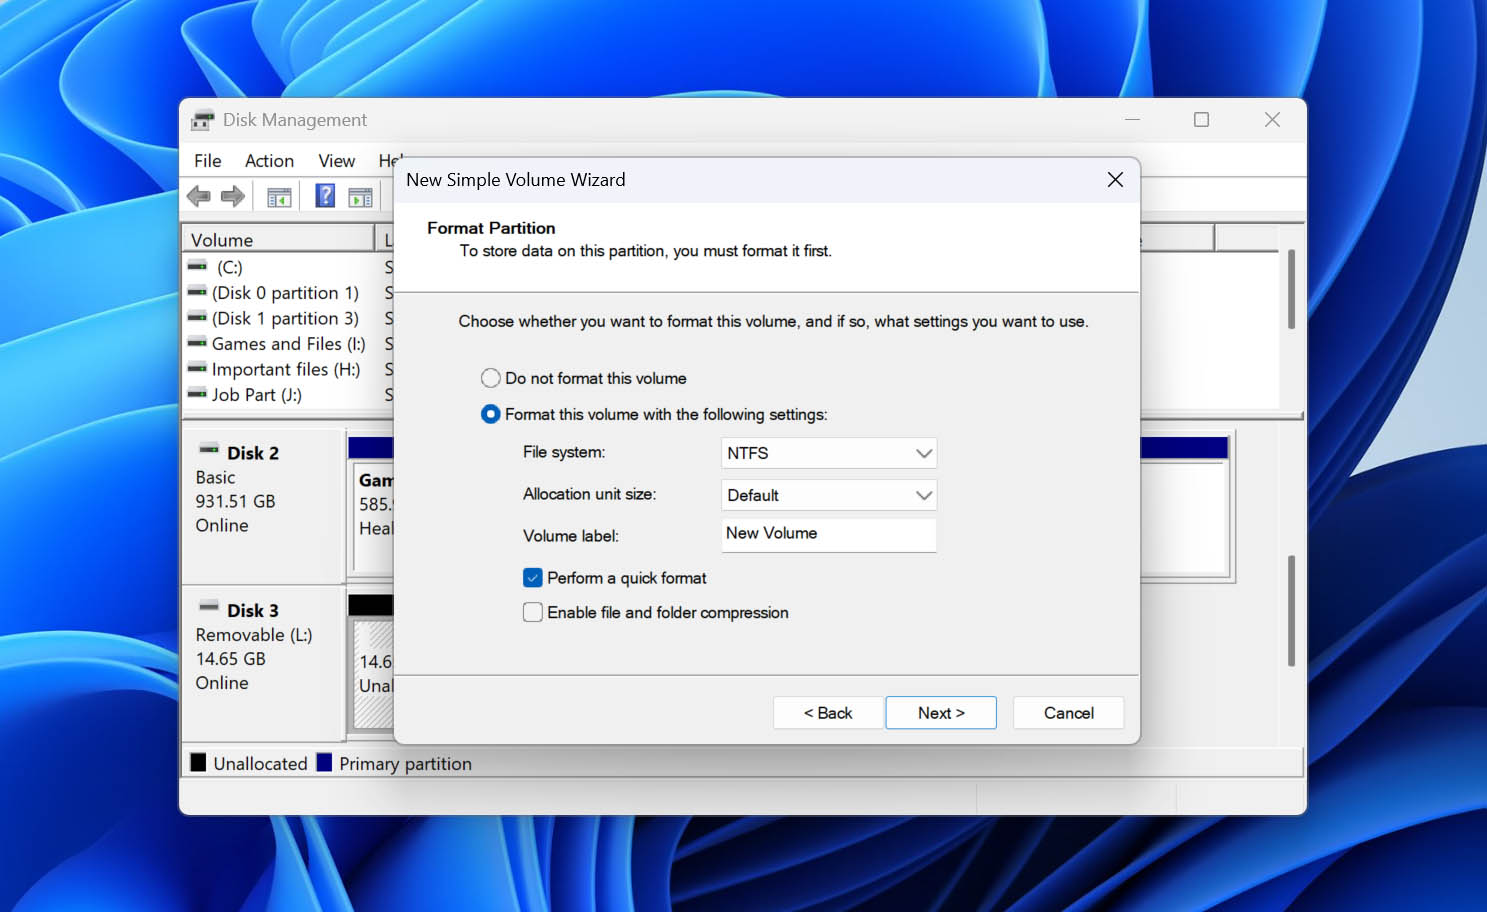
- Click Finish to confirm.
Method 5: Initialize a Not Initialized Drive
Use this method if: the external hard drive appears in Disk Management as Not Initialized.
A Not Initialized status means Windows detects the physical drive but cannot use its current disk structure. Disk Management may prompt you to initialize the drive and choose between MBR and GPT.
If this is a drive that previously contained data, do not initialize it until you have recovered the files you need. Initialization writes new partition information to the disk and is not a recovery method. Once your important data is safely stored elsewhere, you can initialize the drive and prepare it for use again.
We explain what disk initialization does, why Windows may report a drive as Not Initialized, and what you should consider before proceeding in our complete guide to disk initialization.
To initialize the external hard drive in Disk Management:
- Right-click Start and select Disk Management.
- Locate the external hard drive marked Not Initialized.
- Right-click the disk label on the left and select Initialize Disk.

- Make sure the correct external drive is selected.
- Choose GPT or MBR as the partition style. For most modern Windows PCs and drives, GPT is the better choice.

- Click OK to initialize the disk.
- The drive space should now appear as Unallocated. To make it usable, right-click the Unallocated space and select New Simple Volume, then follow the wizard to create and format a new partition.
Case 2: If the Drive Does Not Appear in Disk Management
If your external hard drive isn’t visible in Disk Management, the damage may be more severe. In such cases, you have limited options.
Method 1: Connect With a Different Cable
Start by replacing the USB cable and, if the drive has a separate power cable, try replacing that as well. A faulty cable can prevent Windows from detecting the external hard drive even when the drive itself is working properly.
Additionally, check the connection point on your external hard drive to ensure the pins aren’t bent out of place. You can also inspect it for any foreign debris, like lint or dust, as it could be preventing a stable connection.
Method 2: Try Another USB Port
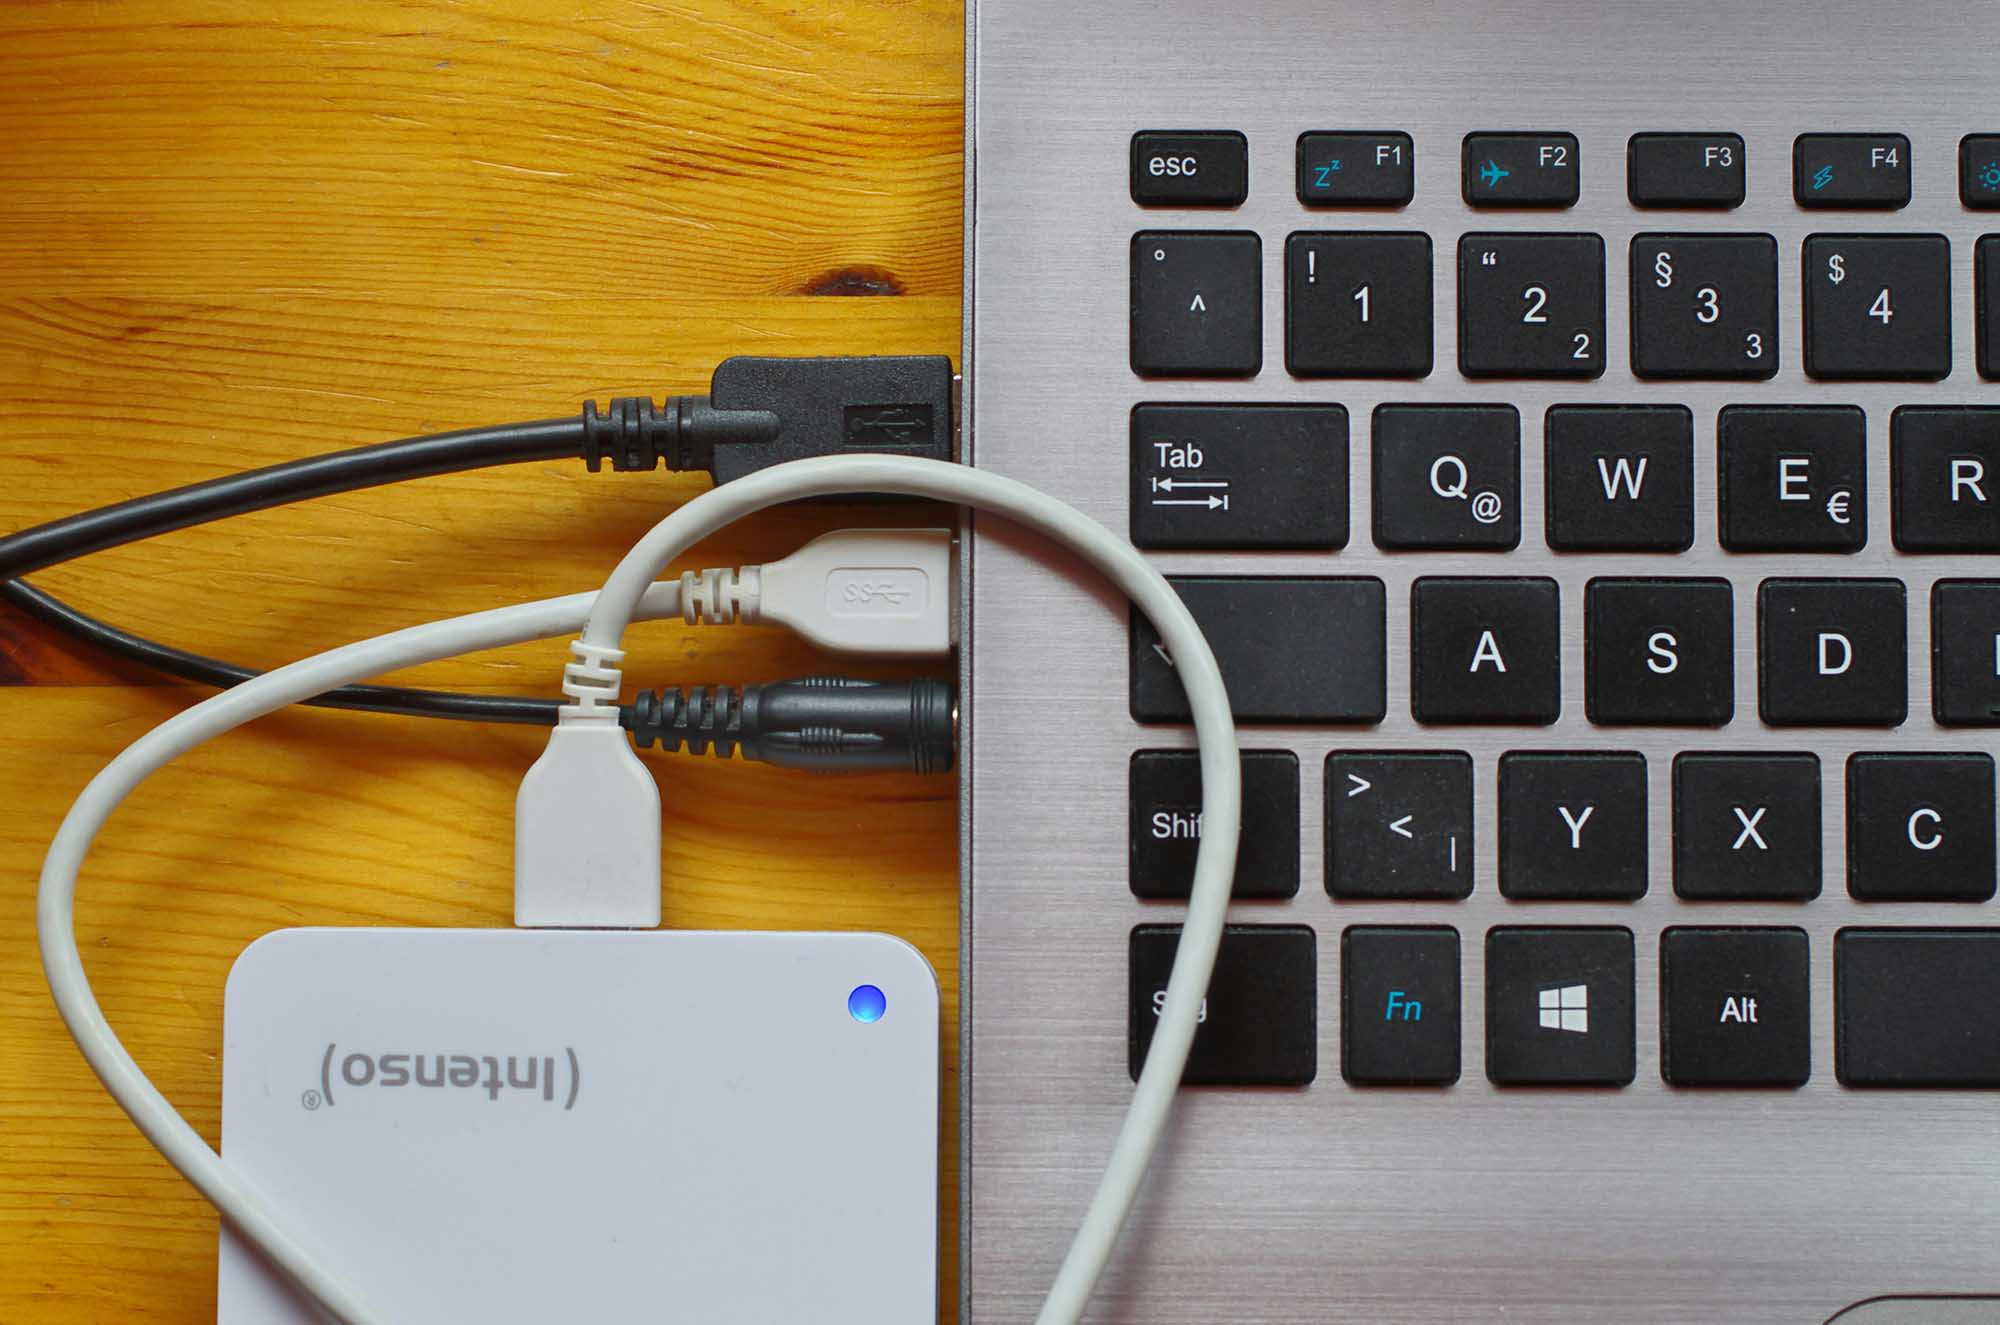
Connect the drive directly to another USB port on the computer. Avoid USB hubs, docks, and adapters while troubleshooting, as they introduce another possible point of failure. If you are using a desktop PC, try a port directly on the motherboard rather than a front-panel port.
Method 3: Test the Drive on Another Computer
Connect the external hard drive to another computer. If it appears in Disk Management there, the problem is more likely related to the original computer, USB connection, or Windows configuration than to the drive itself. If the drive remains undetected on multiple computers, continue with the checks below.
Method 4: Check the Power Supply and Enclosure
Some external hard drives require their own power adapter, while others receive power through USB. Check that the drive powers on normally and, where applicable, test its power adapter.
The USB-to-SATA bridge inside an external enclosure can also fail even when the HDD itself is still functional. If the enclosure is replaceable and the drive uses a standard interface, testing it in a compatible enclosure or adapter can help determine whether the enclosure is the problem.
Note: Before removing a drive from its enclosure, check whether your model uses hardware encryption. Some WD My Passport, My Book, and Seagate models may rely on encryption handled by the USB bridge board. If you connect the bare drive through another enclosure, its data may appear as RAW or unreadable. Don’t format the drive if this happens. If you can’t access the data through the original enclosure, consider contacting a professional data recovery service.
Method 5: Check Device Manager
Even if an external hard drive does not appear in Disk Management, Windows may still detect the connected hardware in Device Manager. This makes it a useful next diagnostic step: if the drive or its USB interface appears there, the computer is at least detecting the device, and the problem may be related to the driver or how Windows is communicating with it.
The drive may appear under its normal model name, as a generic USB storage device, or as an unknown device with a warning icon. In the latter cases, updating the driver gives Windows a chance to reinstall or replace the driver it uses to communicate with the device.
- Right-click Start and select Device Manager.
- Expand Disk drives and look for your external hard drive.
- If you don’t see it there, check Other devices and Universal Serial Bus controllers for an unknown device or an entry with a warning icon.
- If Windows detects the device, right-click it and select Update driver.
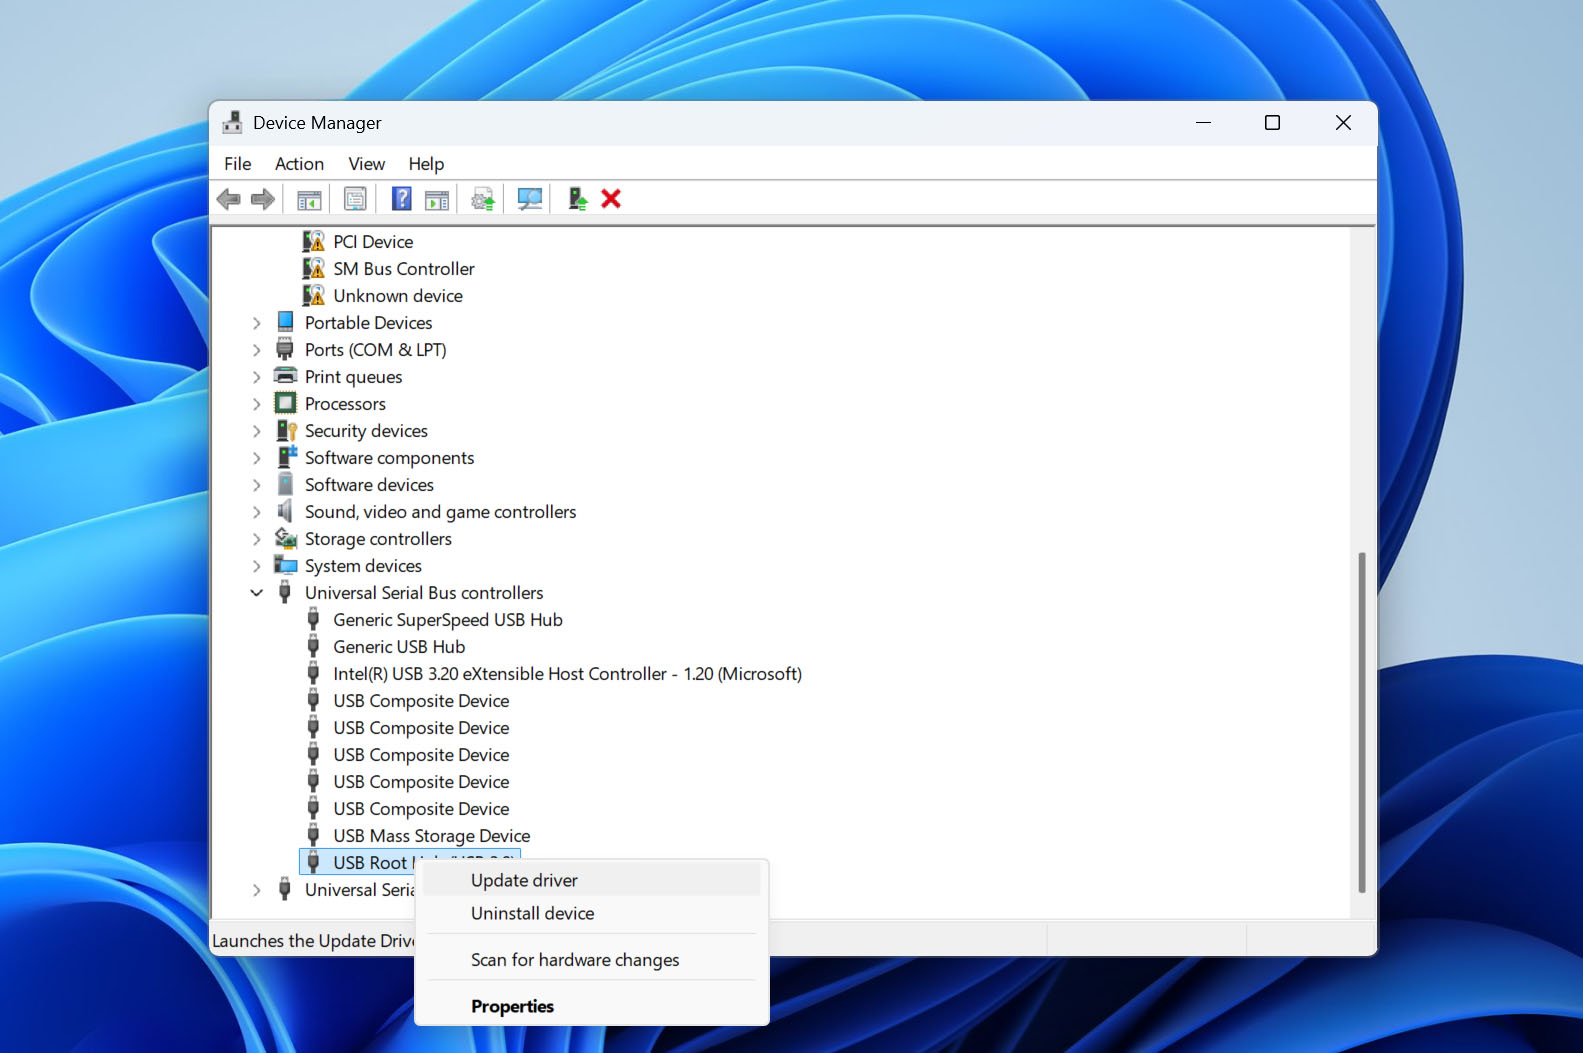
- Select Search automatically for drivers and let Windows check for an appropriate driver.
Most standard external hard drives use storage drivers already included with Windows, so you typically don’t need to download a dedicated HDD driver from the manufacturer. If the drive does not appear anywhere in Device Manager either, the problem is more likely to be with the connection, enclosure, power supply, or the drive hardware itself.
When an External Hard Drive Needs Professional Data Recovery
Not every undetected external hard drive can be fixed with software. If Windows cannot communicate reliably with the storage hardware itself, recovery programs cannot access the sectors where your files are stored. Continuing to scan, repair, initialize, or repeatedly reconnect a failing drive can also put the remaining data at greater risk.
Stop DIY troubleshooting and consider a professional data recovery service if you notice any of these symptoms:
- Unusual mechanical noises can indicate a problem with the drive’s internal components. Disconnect the drive rather than repeatedly trying to power it on.
- If a mechanical HDD shows no signs of spinning even after you have checked the cable and power supply, the problem may be internal.
- A drive that reports 0 bytes instead of its actual capacity is not exposing its storage correctly to Windows. Formatting or CHKDSK will not address the underlying problem.
- This status means Windows detects an interface or device but cannot access the storage media behind it. Data recovery software has nothing usable to scan in this state.
- An unstable connection can come from a cable, port, enclosure, or power problem, so rule those out first. If the behavior continues, stop using the drive.
- If a 2 TB drive suddenly appears as a few gigabytes, for example, do not treat it as ordinary file-system corruption or attempt to format it.
- Once you have tested a known-good cable, appropriate power supply, and another computer and the drive remains undetected, a hardware problem becomes much more likely.
In these situations, do not format, initialize, repartition, or run CHKDSK on the drive. If the data matters, a professional recovery lab is the appropriate next step. Technicians can diagnose hardware faults and, where possible, stabilize or repair the device sufficiently to access its data.
Why External Hard Drives Become Undetectable and How to Prevent It
An external hard drive can stop appearing in Windows for reasons ranging from a loose USB connection to file system corruption or physical failure. The symptoms can look similar, but the underlying causes (and whether they can be prevented) are different.
The table below covers the most common reasons an external hard drive may become undetectable or inaccessible and what you can do to reduce the chance of the same problem happening again:
| Problem | What can happen | How to reduce the risk |
| ❌ Improper device removal | Disconnecting a drive while Windows or an application is writing to it can interrupt an operation and damage the file system or files being written. | Eject the drive through Windows before disconnecting it, particularly after copying, moving, or editing files. |
| 💾 File system corruption | Damage to NTFS, exFAT, or another file system can leave a drive RAW or otherwise inaccessible even though Windows still detects the physical disk. | Eject the drive properly, avoid disconnecting it during file transfers, and shut down the computer normally when the drive is connected. |
| 🔌 Faulty USB cable or port | A damaged cable, loose connector, or failing USB port can prevent Windows from communicating with the drive or cause repeated disconnections. | Avoid sharply bending cables, replace damaged ones, and connect the drive directly to a reliable USB port rather than an unstable hub. |
| ⚡ Power problems | Insufficient or unstable power can prevent an HDD from spinning up correctly or cause it to disconnect while in use. This is particularly relevant to larger external drives with separate power supplies. | Use the correct power adapter where required and avoid questionable USB hubs, adapters, and power supplies. |
| 📦 Failed external enclosure or USB-to-SATA bridge | The HDD itself may still work, while the electronics that connect it to USB have failed. Windows may then fail to detect the actual storage device. | Protect the enclosure and connectors from physical damage and excessive heat. If problems begin, back up the drive before they become worse. |
| 🔧 Driver or Windows communication issue | A corrupted or malfunctioning storage or USB driver can prevent Windows from communicating with an otherwise detectable device correctly. | Keep Windows updated and avoid unnecessary third-party storage or USB drivers unless the hardware specifically requires them. |
| 🧩 Damaged or lost partition information | Damage to the partition table can cause an existing partition to disappear and its space to show as Unallocated or the disk to appear Not Initialized. | Avoid partitioning tools and disk-management operations unless you know which physical disk you are modifying, and keep backups before changing partition layouts. |
| 💥 Physical damage or mechanical failure | Drops, impacts, worn mechanical components, or other internal failures can cause clicking, grinding, incorrect capacity, intermittent detection, or complete loss of access. | Handle external HDDs carefully, keep them stationary while operating, protect them during transport, and replace aging drives rather than relying on them as the only copy of important data. |
| 🌡️ Excessive heat | Poor ventilation and prolonged high temperatures can contribute to electronic or mechanical problems and unstable operation. | Keep the drive on a hard, ventilated surface and avoid covering it or operating it next to heat sources. |
| 🦠 Malware or software-related damage | Malicious or faulty software can alter files, partitions, or file-system structures, making data inaccessible even when the hardware itself still works. | Keep Windows security protections enabled and be cautious with software that can modify partitions, boot records, or low-level disk structures. |
Final Thoughts
These practical methods will show you how to retrieve data from an external hard drive when it is not detected. If you’ve found yourself in a more complex recovery situation, reach out to a data recovery service instead.
While these methods are useful after the fact, your best bet for keeping the data safe is storing a copy of it. Back up your external hard drive regularly, and consider implementing the 3-2-1 backup strategy.