 Partitions make data organization significantly easier, and most storage drives have multiple partitions. If you’re unable to access a specific partition on your drive, or it has suddenly disappeared from the Windows File Explorer, the partition could be corrupt. The good news is that you can repair and recover a corrupted partition, and it’s easier than you think—the sections below will show you how.
Note: We’ve placed the data recovery section before the actual partition repair methods, because it’s best to recover any important files from the corrupt partition before repairing it. Don’t skip the section, unless the drive contains nothing of value.
Before We Begin (Save Your Data First)
You may need to go through a bit of trial and error to fix a corrupted partition. Some of the methods involved—for instance, CHKDSK—may even cause minor data loss on the drive. That’s why it’s best to recover your files before performing any repairs.
But, how do you recover files from a partition you can’t even access? Well, that’s where third-party data recovery tools come in. Most tools can scan and recover data from your hard drive as long as it’s detected by your computer with the correct storage capacity. There are numerous tools to choose from, each with its own pros and cons.
For this tutorial, we opted to use Disk Drill – a capable, and user-friendly data recovery program. The program supports all major file systems across Windows and macOS. In fact, it’ll even work with RAW drives, i.e., drives that have a missing or corrupt file system. The best part of Disk Drill is that it lets you create and scan disk images–an effective way to prevent further data loss and protect your drive from repeated, stressful data recovery scans.
Let’s see how you can recover your data before attempting partition repair:
Step 1: Create a Disk Image (Optional)
While not strictly necessary, it’s always a good idea to create a disk image and scan it instead of directly scanning the corrupt partition. Not only does it shield you from further data loss by saving the current state of the partition, but it also prevents further stress—caused by data recovery scans—to an already corrupt drive.
Here’s how to create a disk image of the corrupt partition using Disk Drill:
- Download Disk Drill and install it. Do this on a separate drive.
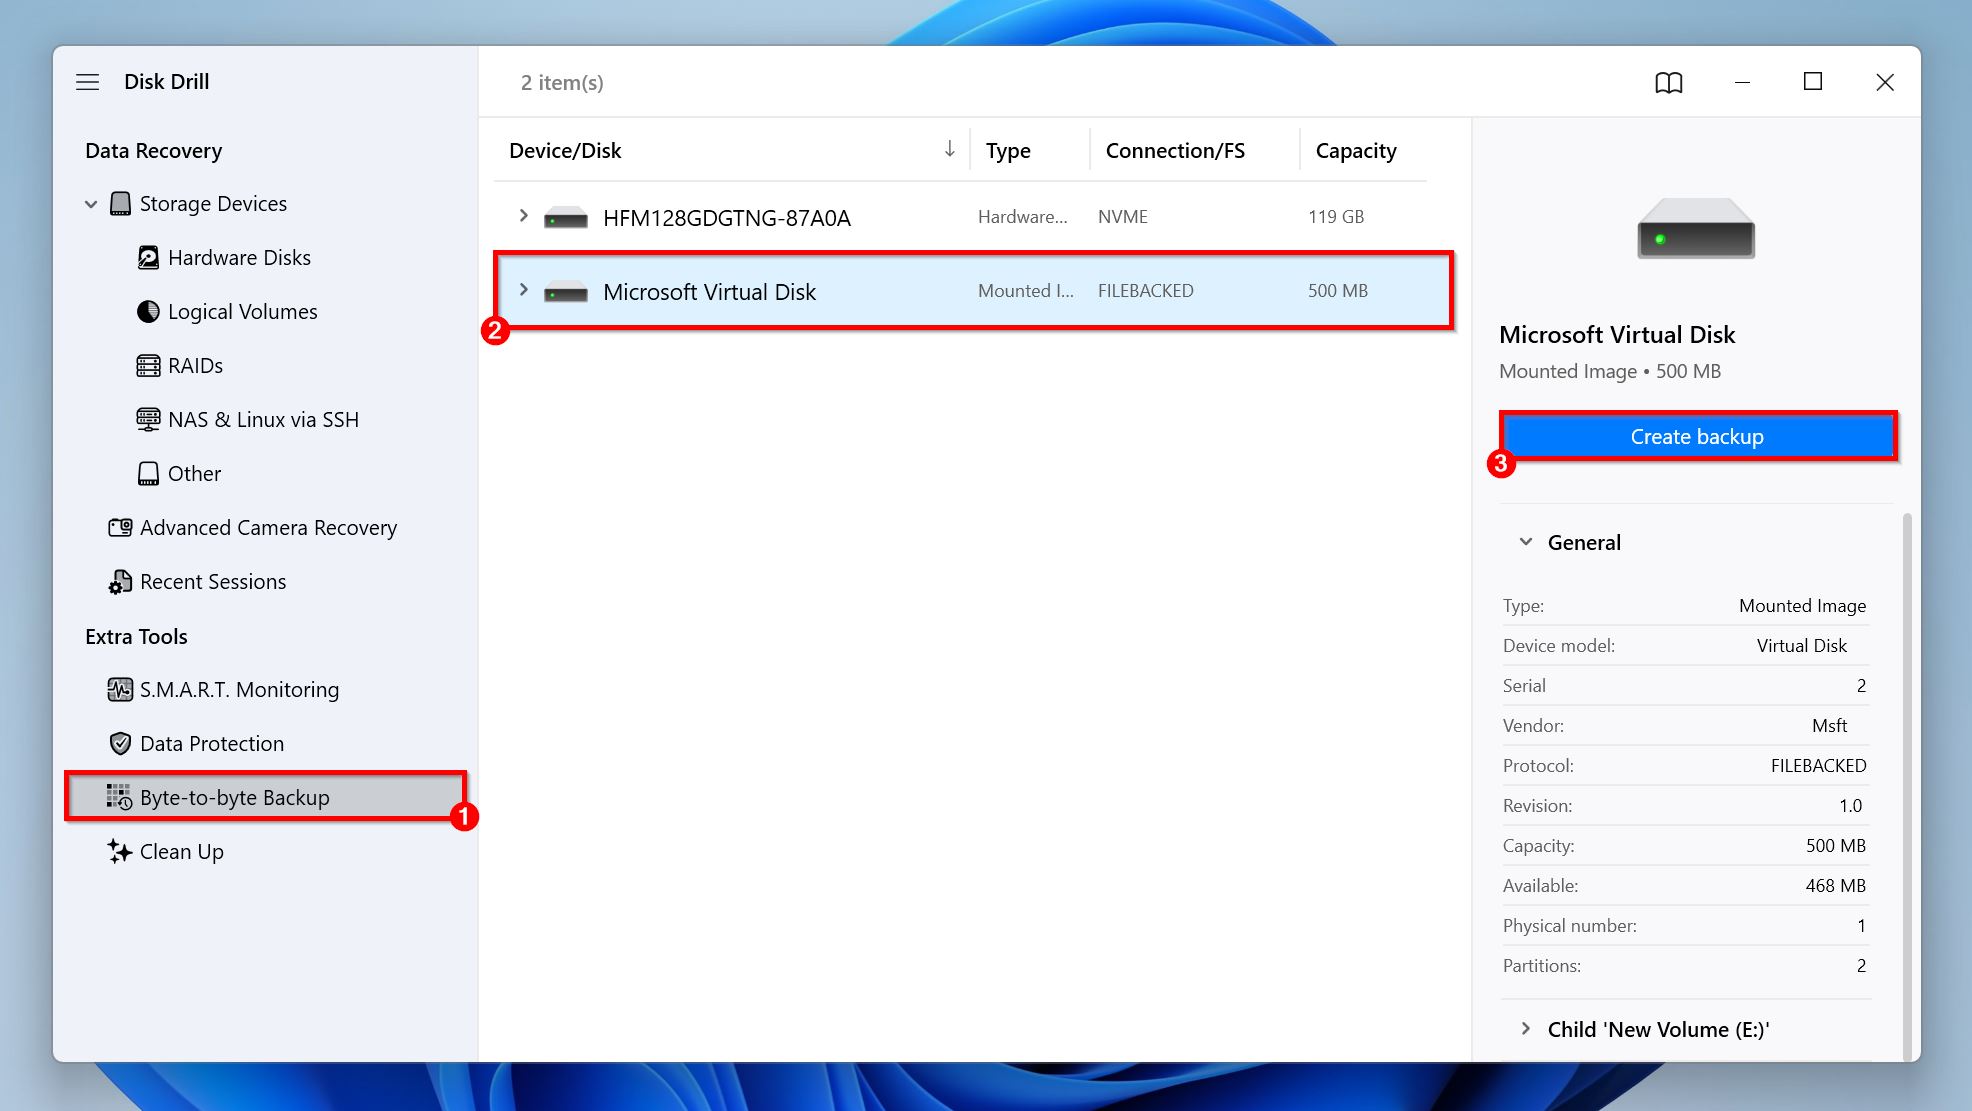
- Open Disk Drill, and click on Byte-to-byte Backup, under Extra Tools.
- Select the corrupt partition, and click on Create Backup.
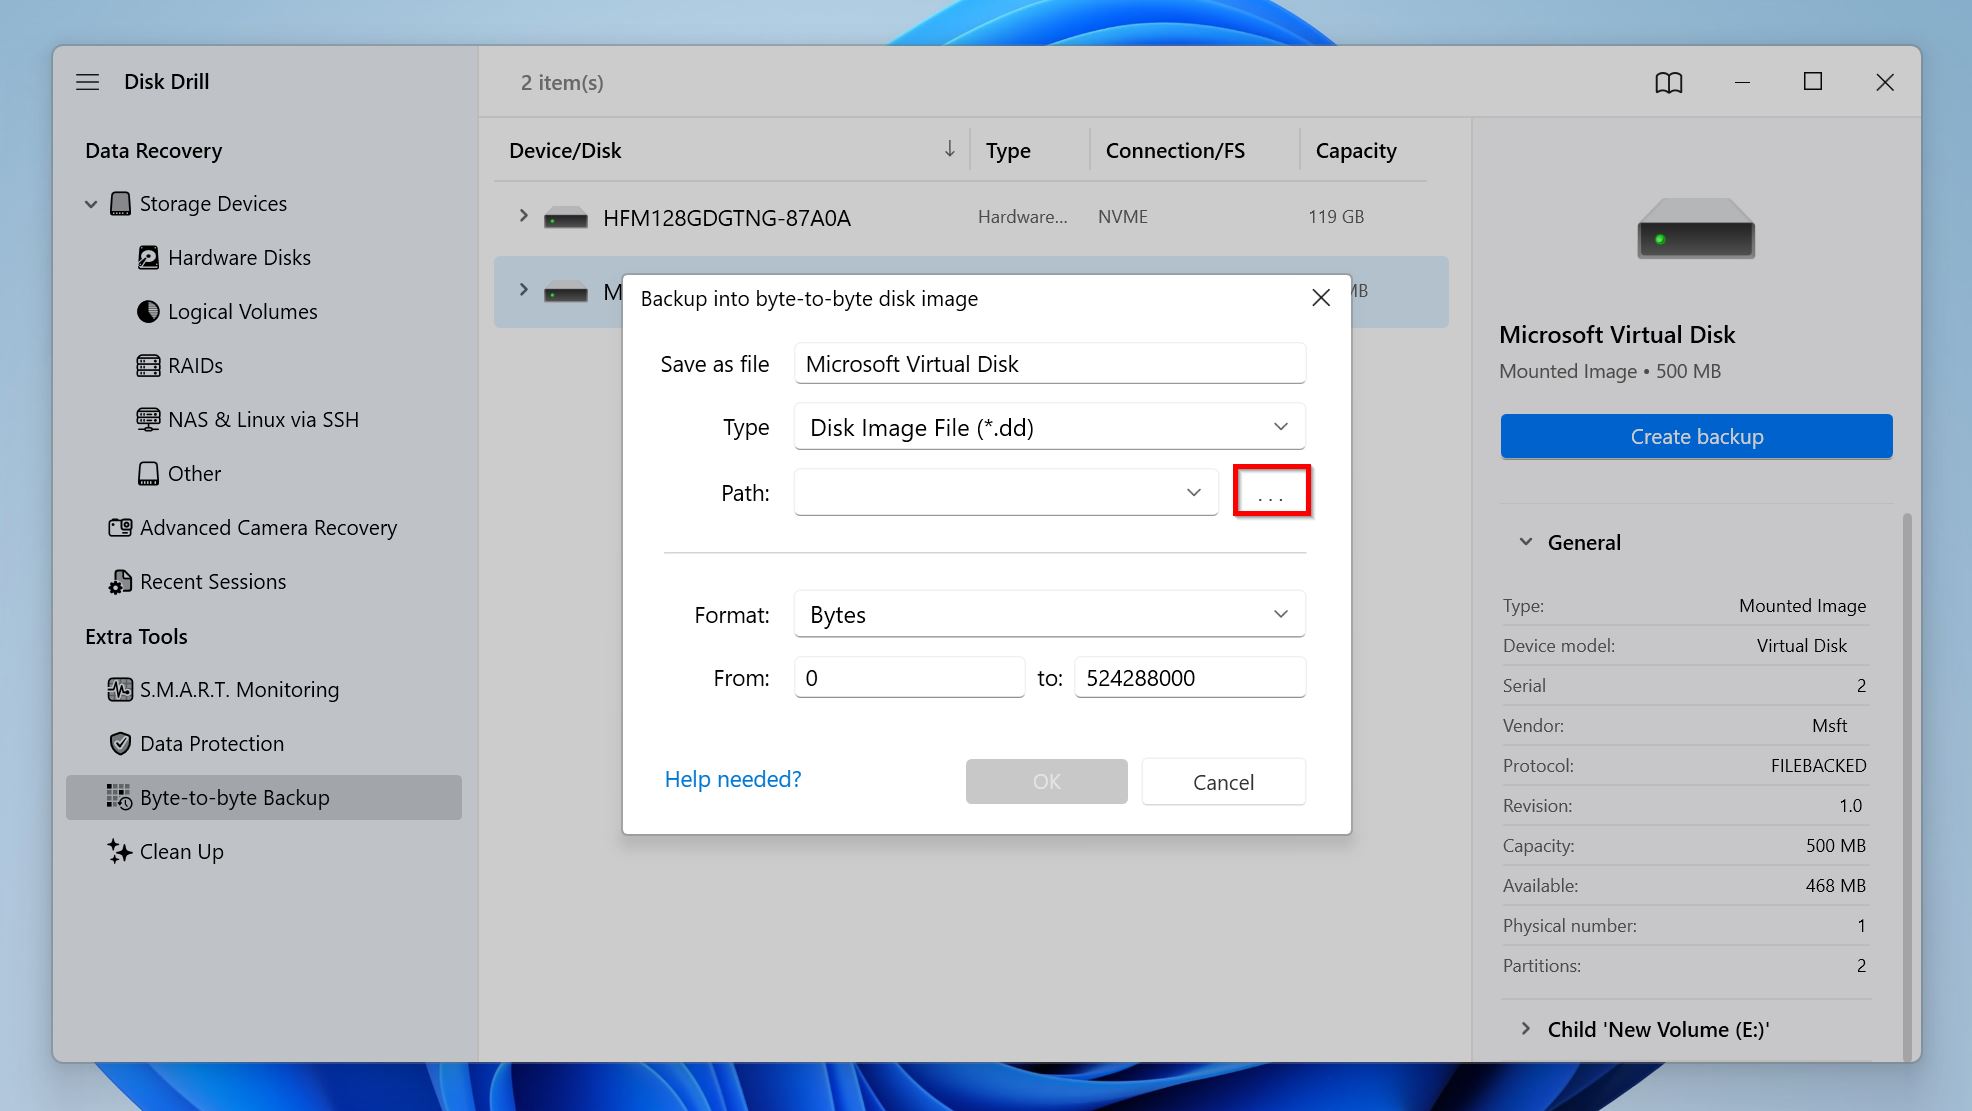
- Choose where you wish to save the disk image by clicking the three dots (…) next to Path, and any other parameters you’d like to change. Click on OK. Keep in mind, the destination should have enough free space—more than the total storage size of the partition.
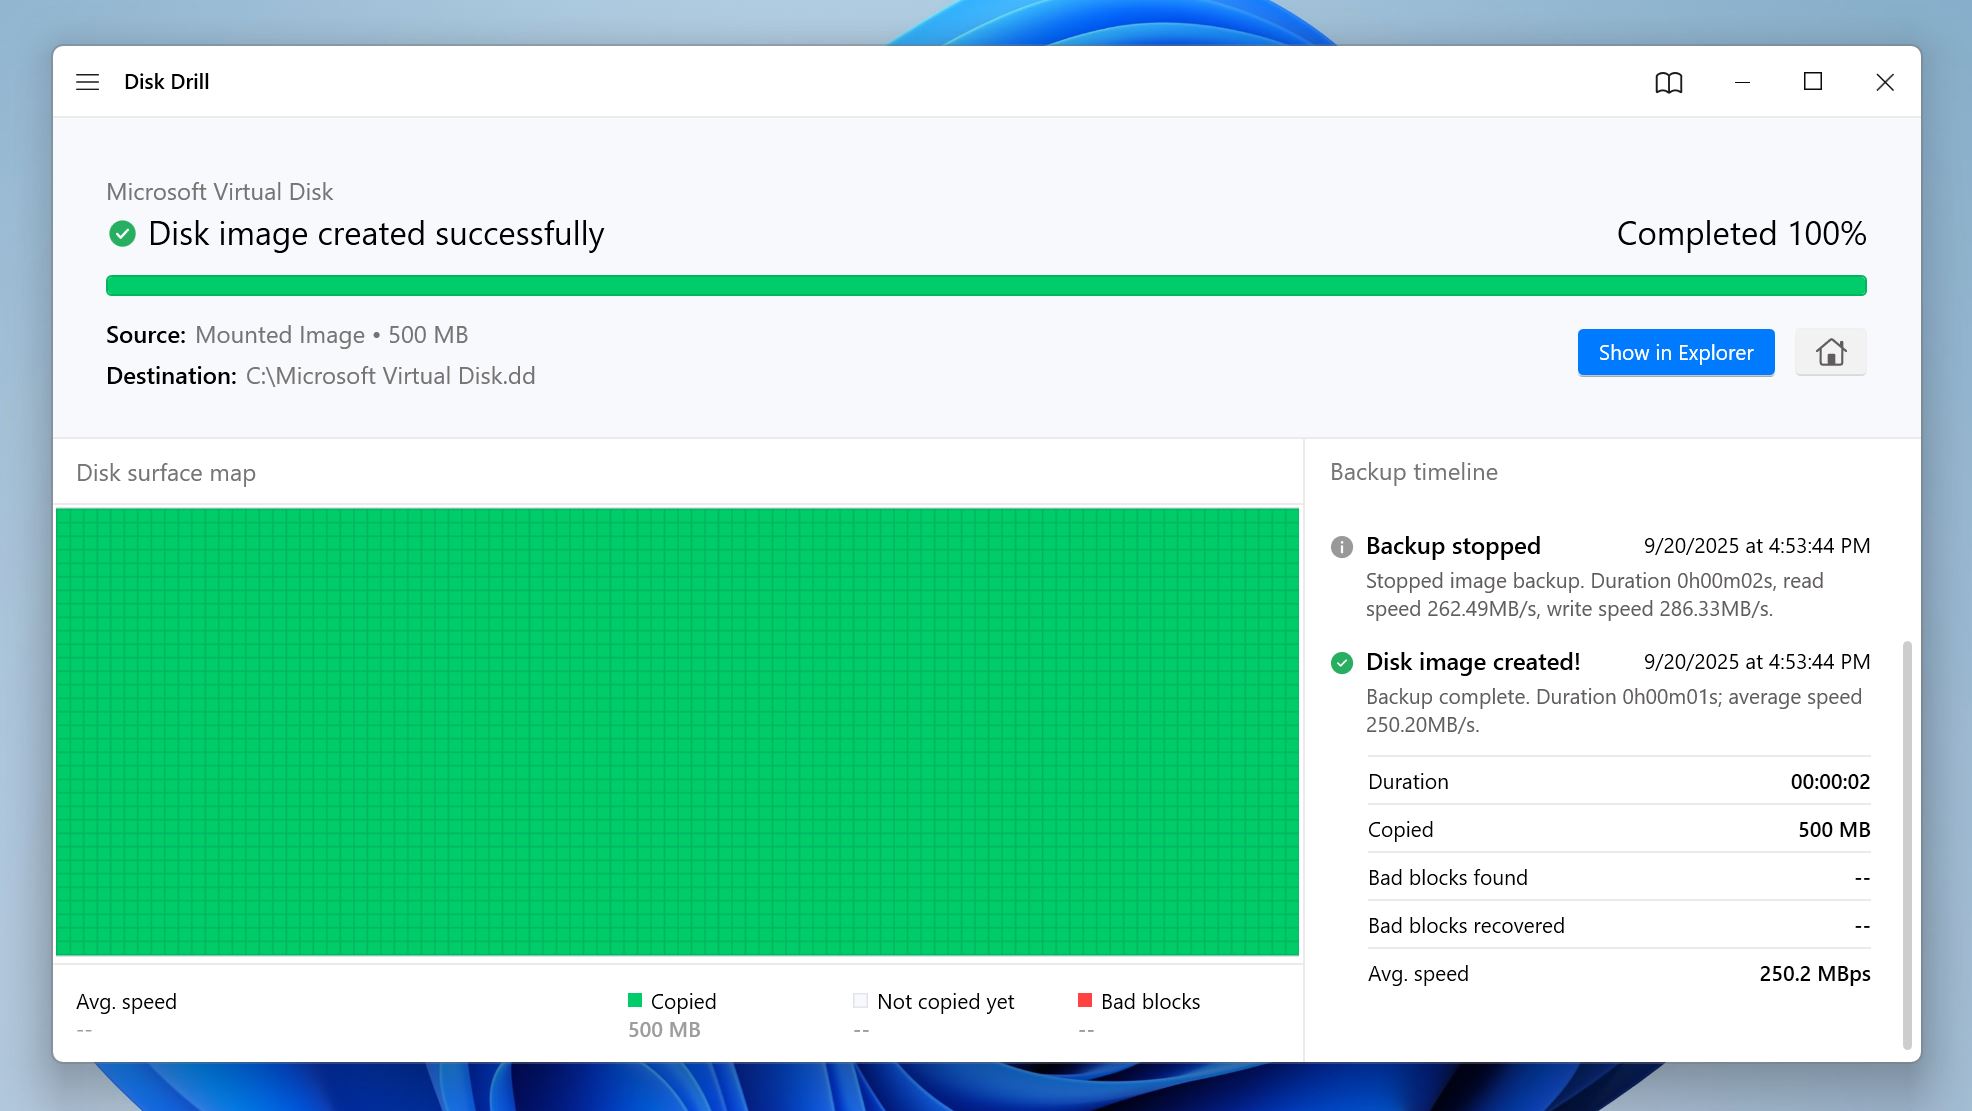
- Disk Drill will begin creating the disk image. The area below Disk surface map will display the progress of the image creation process—red blocks indicate unreadable blocks of the partition, which is another way to see how damaged the partition is.
A good way to determine if it’s worth creating a disk image, is to use Disk Drill’s S.M.A.R.T. Monitoring feature. Open Disk Drill, click on S.M.A.R.T. Monitoring under Extra Tools, and see if there’s an error next to any of the values. If everything seems fine, you can skip disk image creation and directly recover your data. Else, it’s best to create a disk image using the steps above.
For Advanced Users: Disk Drill lets you further modify the backup process using Windows’ Registry Editor, or macOS’ Terminal. These are some parameters you can modify:
- backupSkipBlocks (0 to 128): The number of blocks to automatically skip after encountering a bad block.
- backupRetryCount (0 to 10): The number of additional attempts to read a bad block when Disk Drill encounters one.
- backupBlockSize (131072–2097152):This lets you modify the backup block size (value in bytes) manually. The value must align with your drive’s sector size.
Step 2: Scan the Drive or Disk Image for Recoverable Data (Required)
- Download Disk Drill and install it if you haven’t already.
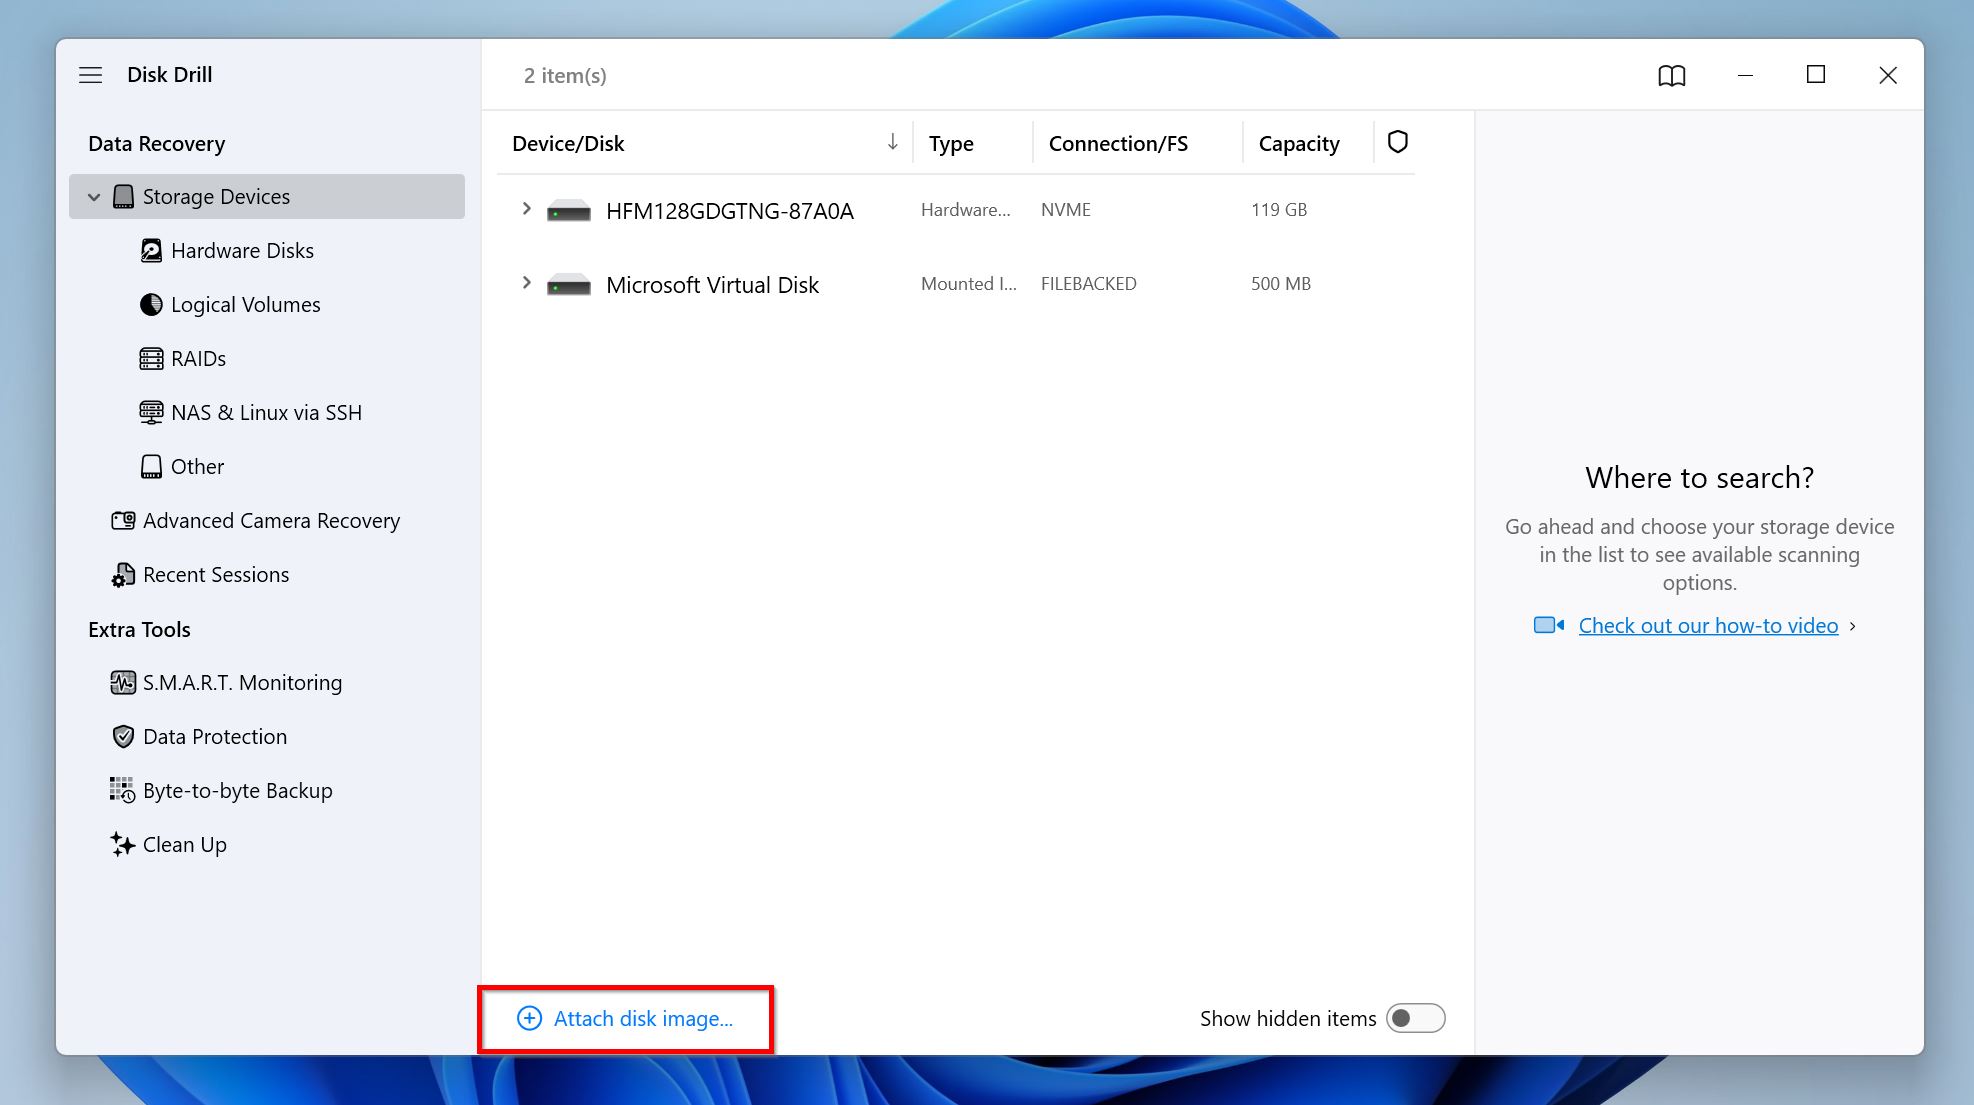
- Open Disk Drill, and ensure you’re on the Storage Devices tab under Data Recovery.
- Click on Attach disk image, browse for the corrupt partition’s disk image and double-click on it. Disk Drill will add it as a separate disk in the list of storage drives with Mounted Image mentioned in the Type column. Skip this step if you didn’t create a disk image.
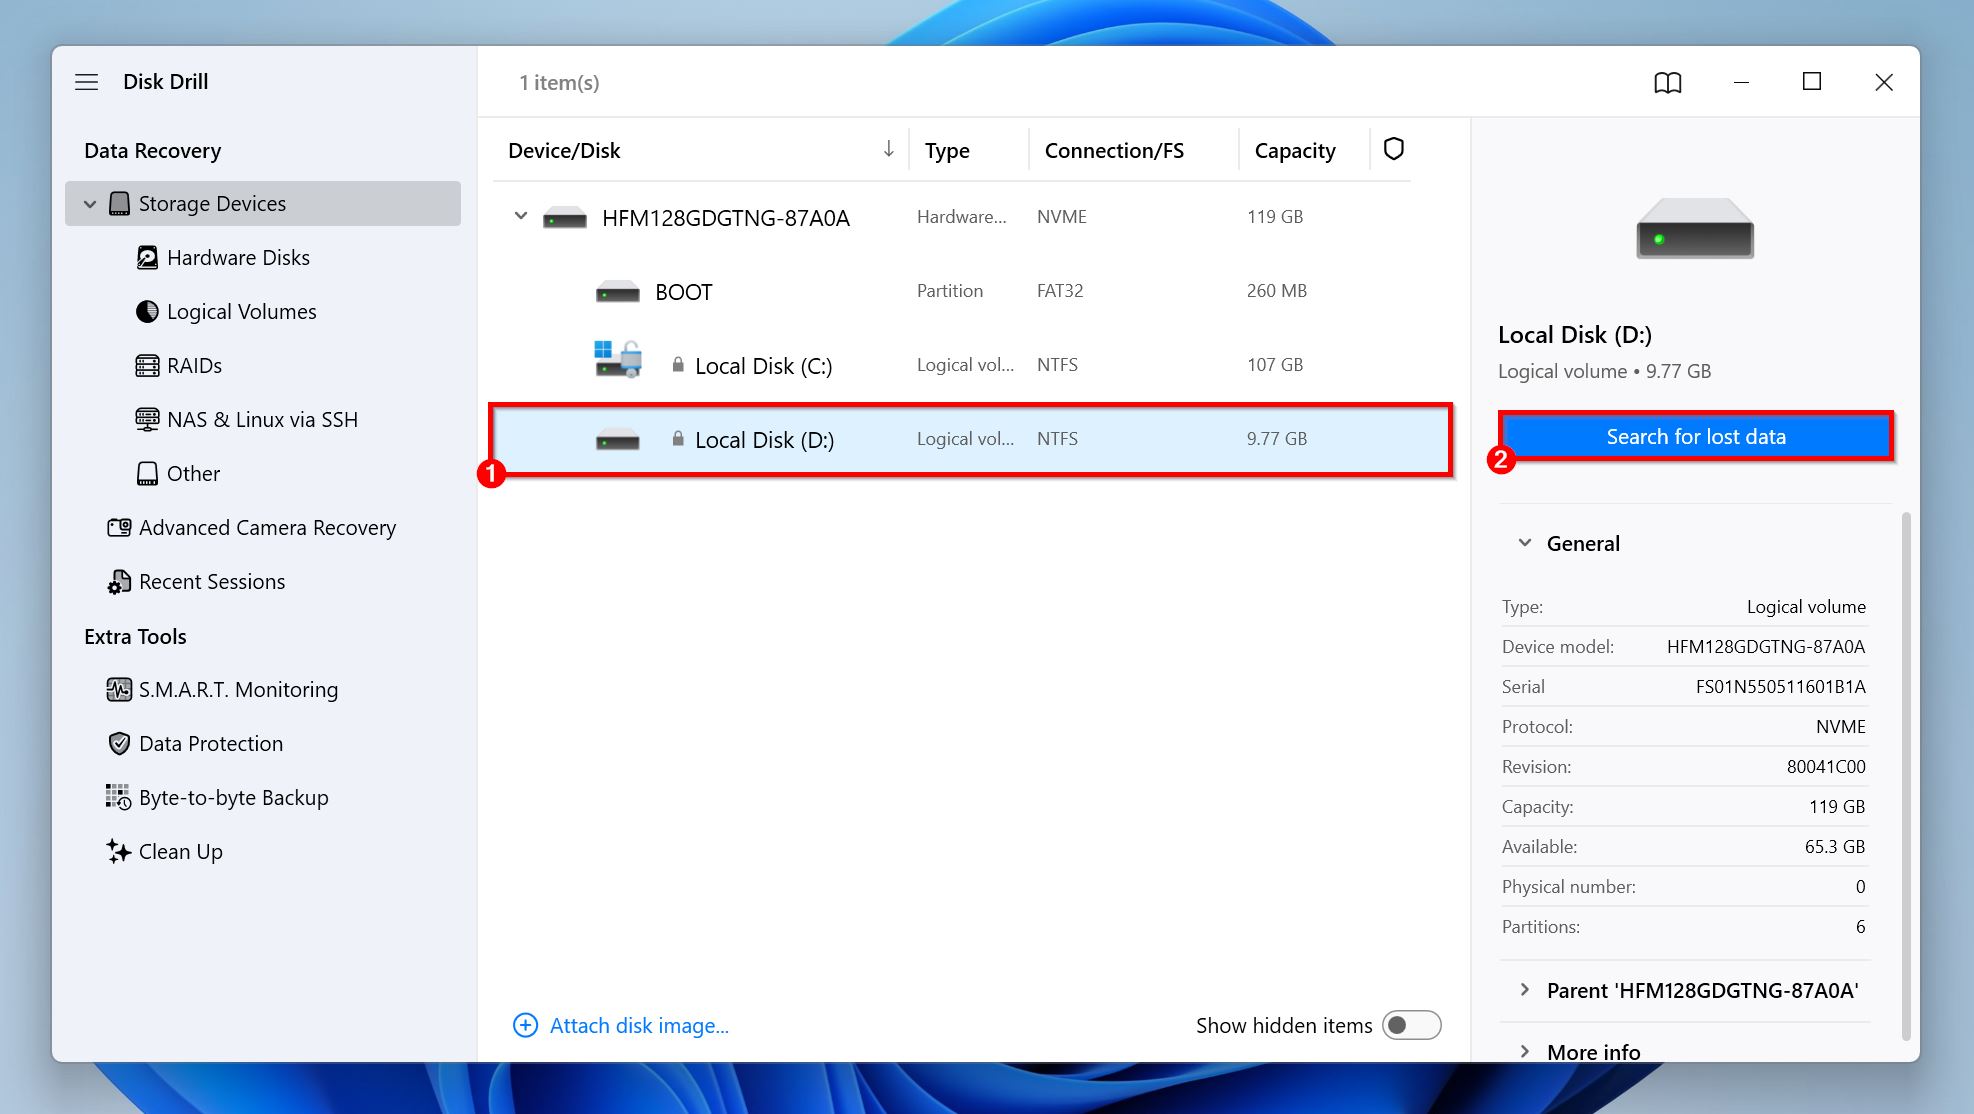
- Select the corrupt partition, or its disk image if you created one. Click on Search for lost data to begin the data recovery scan.
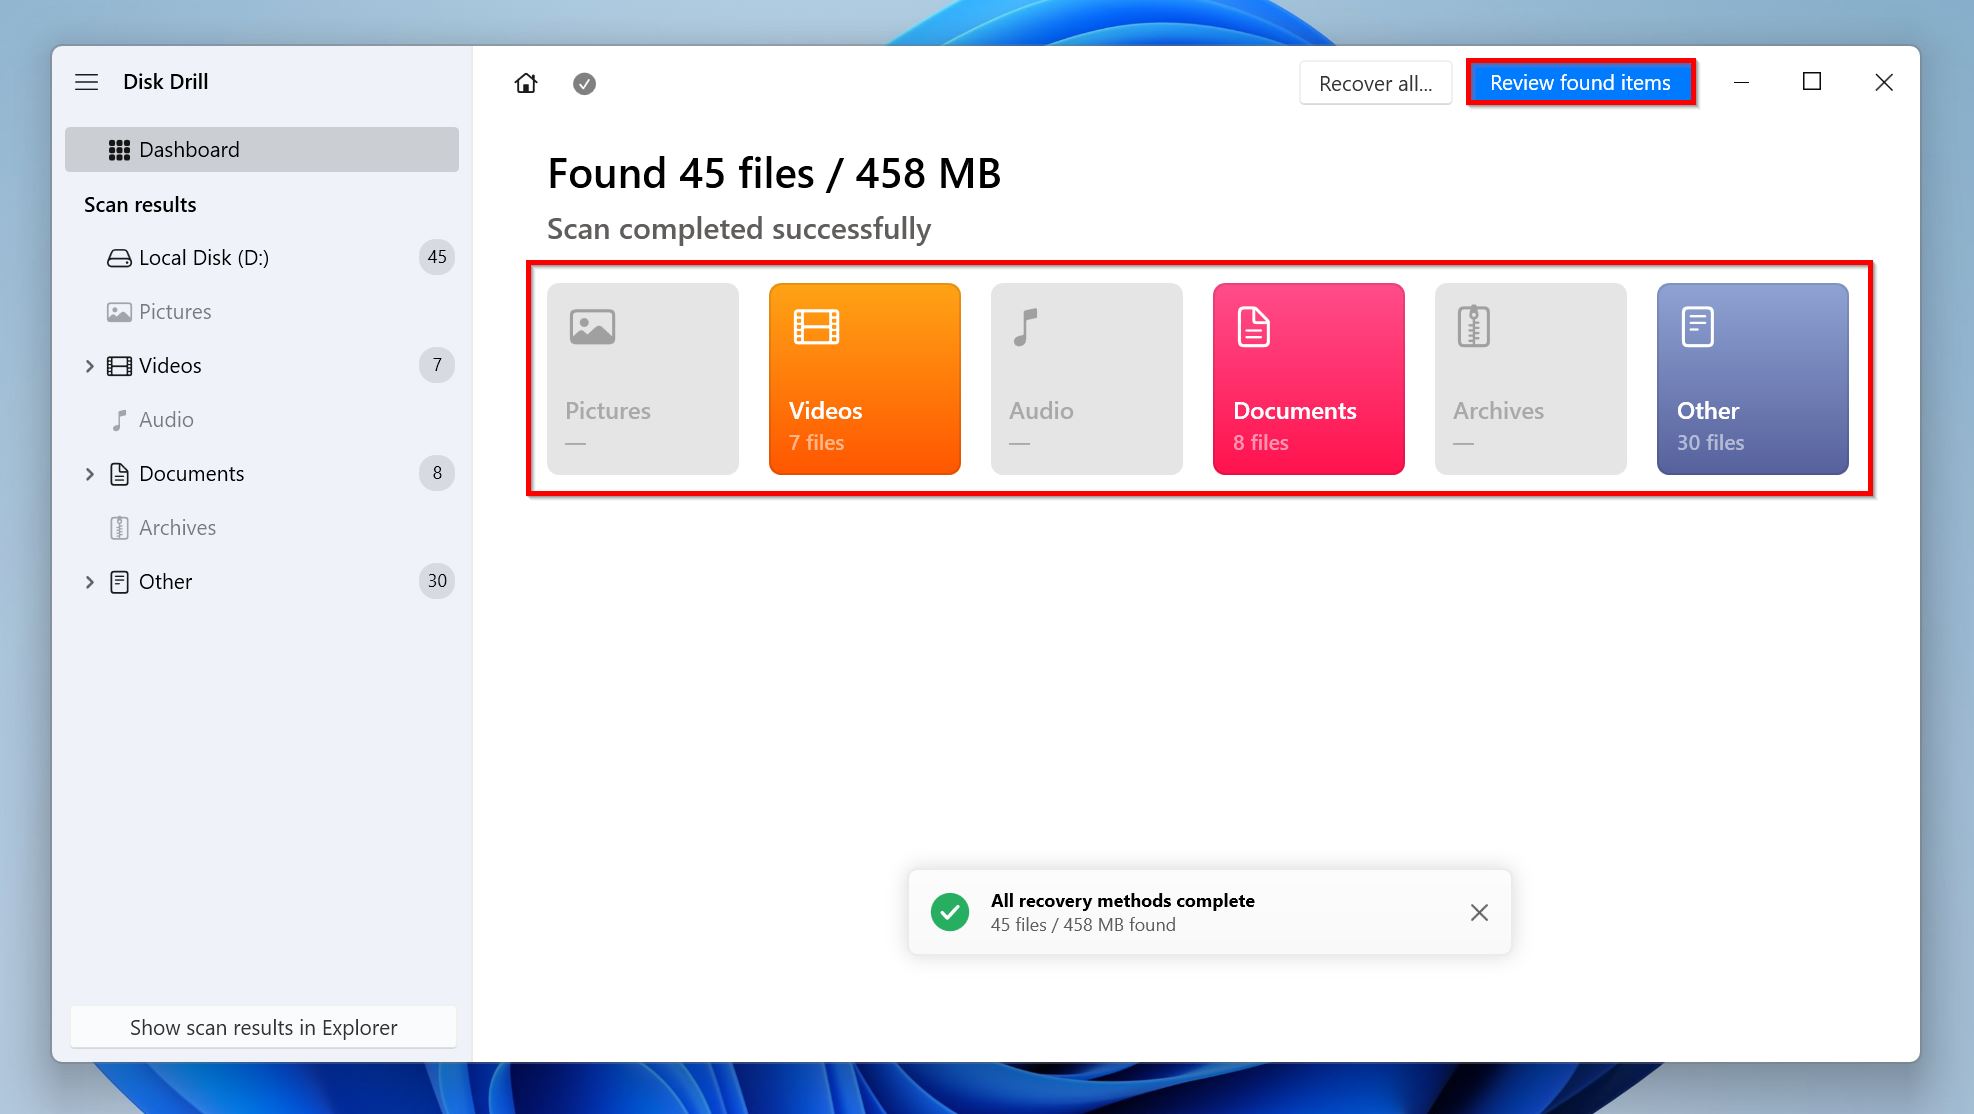
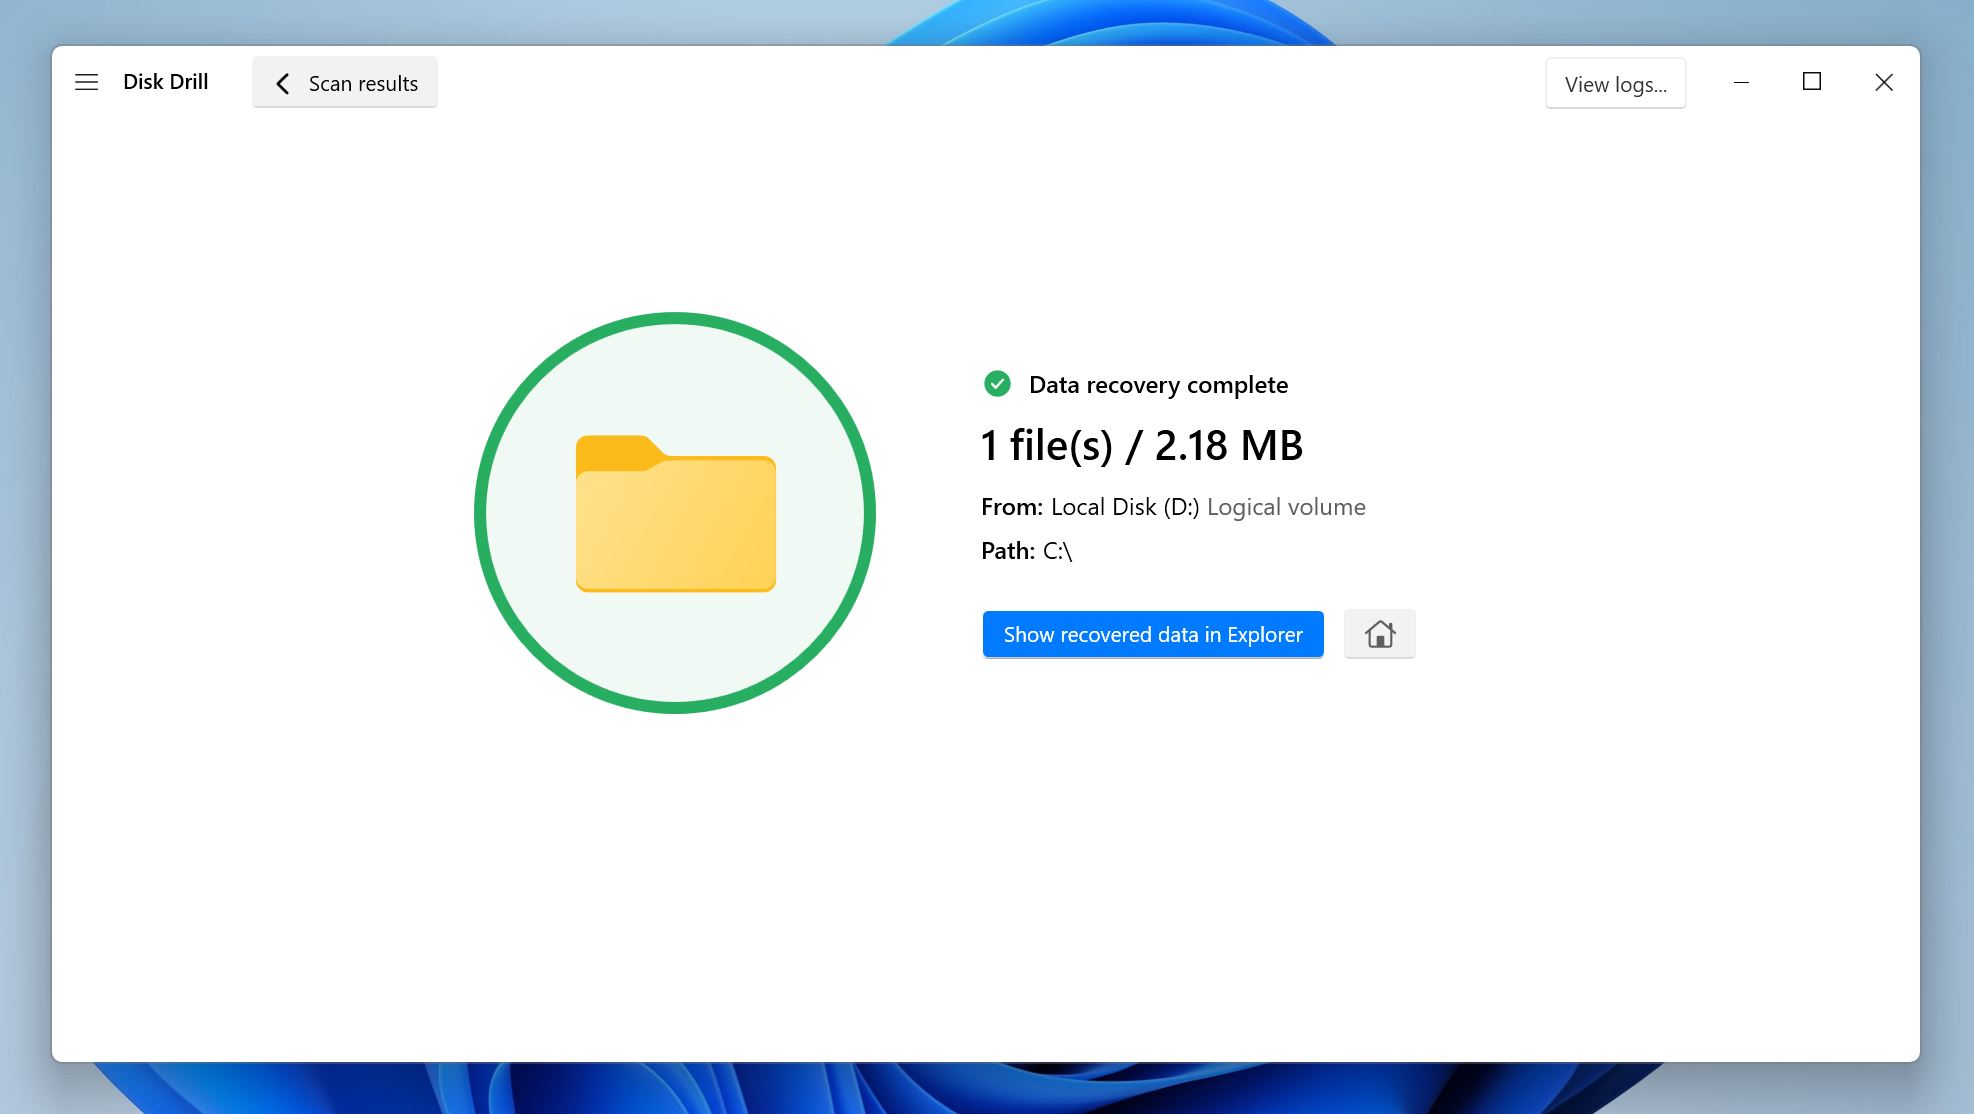
- Click on Review found items to view all recoverable files. Alternatively, you can click on the relevant file type tile—Pictures, Videos, Audio, Documents, Archives, and Other—to filter out the results right away. In case you wish to simply recover all the files before taking a look at them, click on Recover all, pick a recovery destination, and click Next.
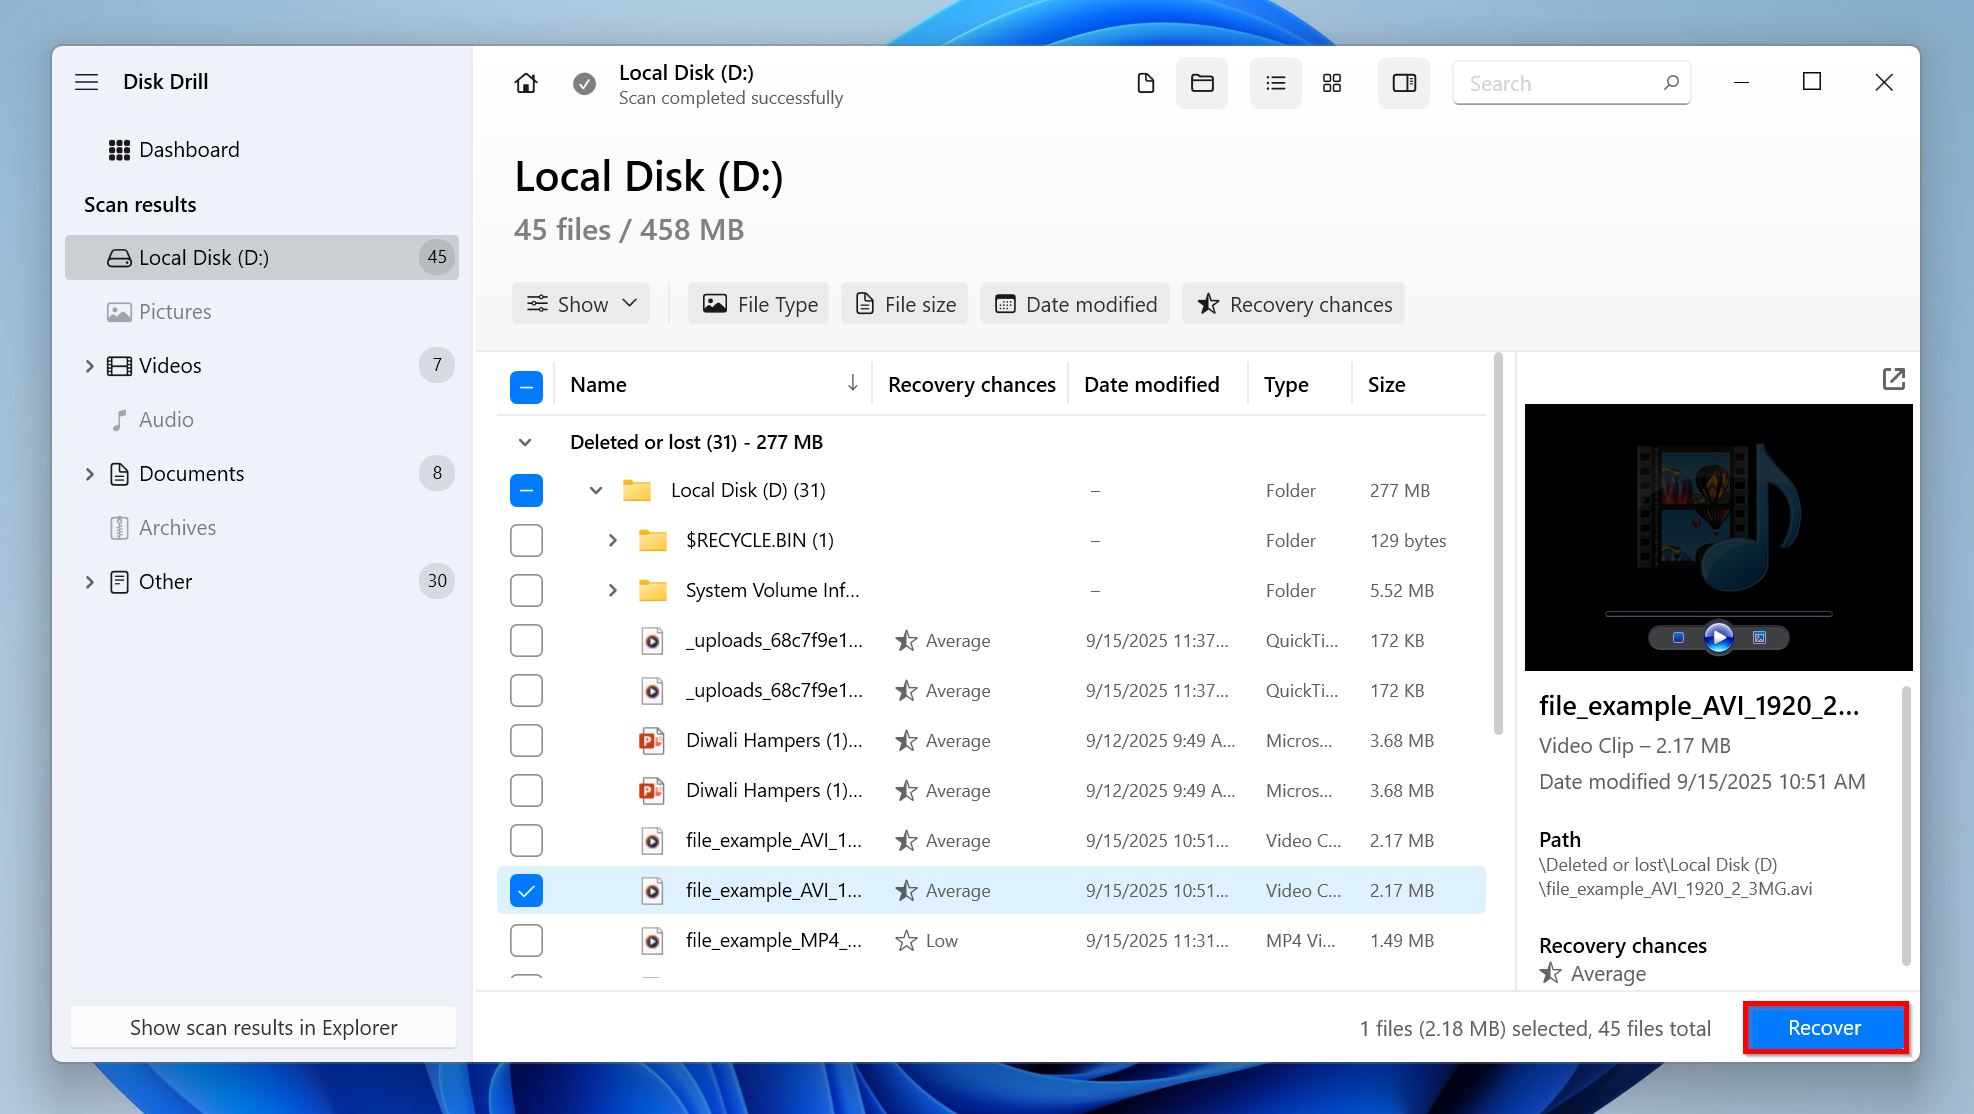
- Select the files you wish to recover by ticking the checkbox next to them. Disk Drill automatically displays a preview of the currently selected file, but you can manually preview any file by clicking the eye icon next to its filename. Files with proper previews have higher recovery chances than ones that don’t. Click on Recover once you’re done selecting the files.
- Choose a recovery destination for the files, and click Next. It’s best to recover these files to a drive other than the one with a corrupt partition.

- Disk Drill will recover the files.
Note: Disk Drill lets you recover up to 100 MB of data for free on Windows. This is usually enough for recovering small important files, and testing the program. To recover more than 100 MB of data, you’ll need to upgrade to Disk Drill PRO.
How to Fix a Corrupted Partition on Windows 10 and 11
There are several methods to diagnose and potentially repair a corrupt/damaged partition on Windows. We recommend you attempt the following fixes in the order in which they’re listed. Additionally, if you haven’t recovered your data yet, now is a good time to do so.
Method 1: Add a Drive Letter to the Partition
It’s possible that the partition in question simply doesn’t have a drive letter. Without a drive letter, the partition won’t be visible in Windows Explorer, leading you to assume that it’s corrupt or damaged. Sometimes, drive letter conflicts can also lead to drives becoming invisible in the Windows Explorer. Fortunately, you can manually add or change a drive letter using Disk Management. Here’s how:
- Press Windows Key + R to open the Run app. Type diskmgmt.msc in the text box and press Enter to launch Disk Management.
- Look for the partition you wish to fix and right-click on it. Choose Change Drive Letter and Paths.
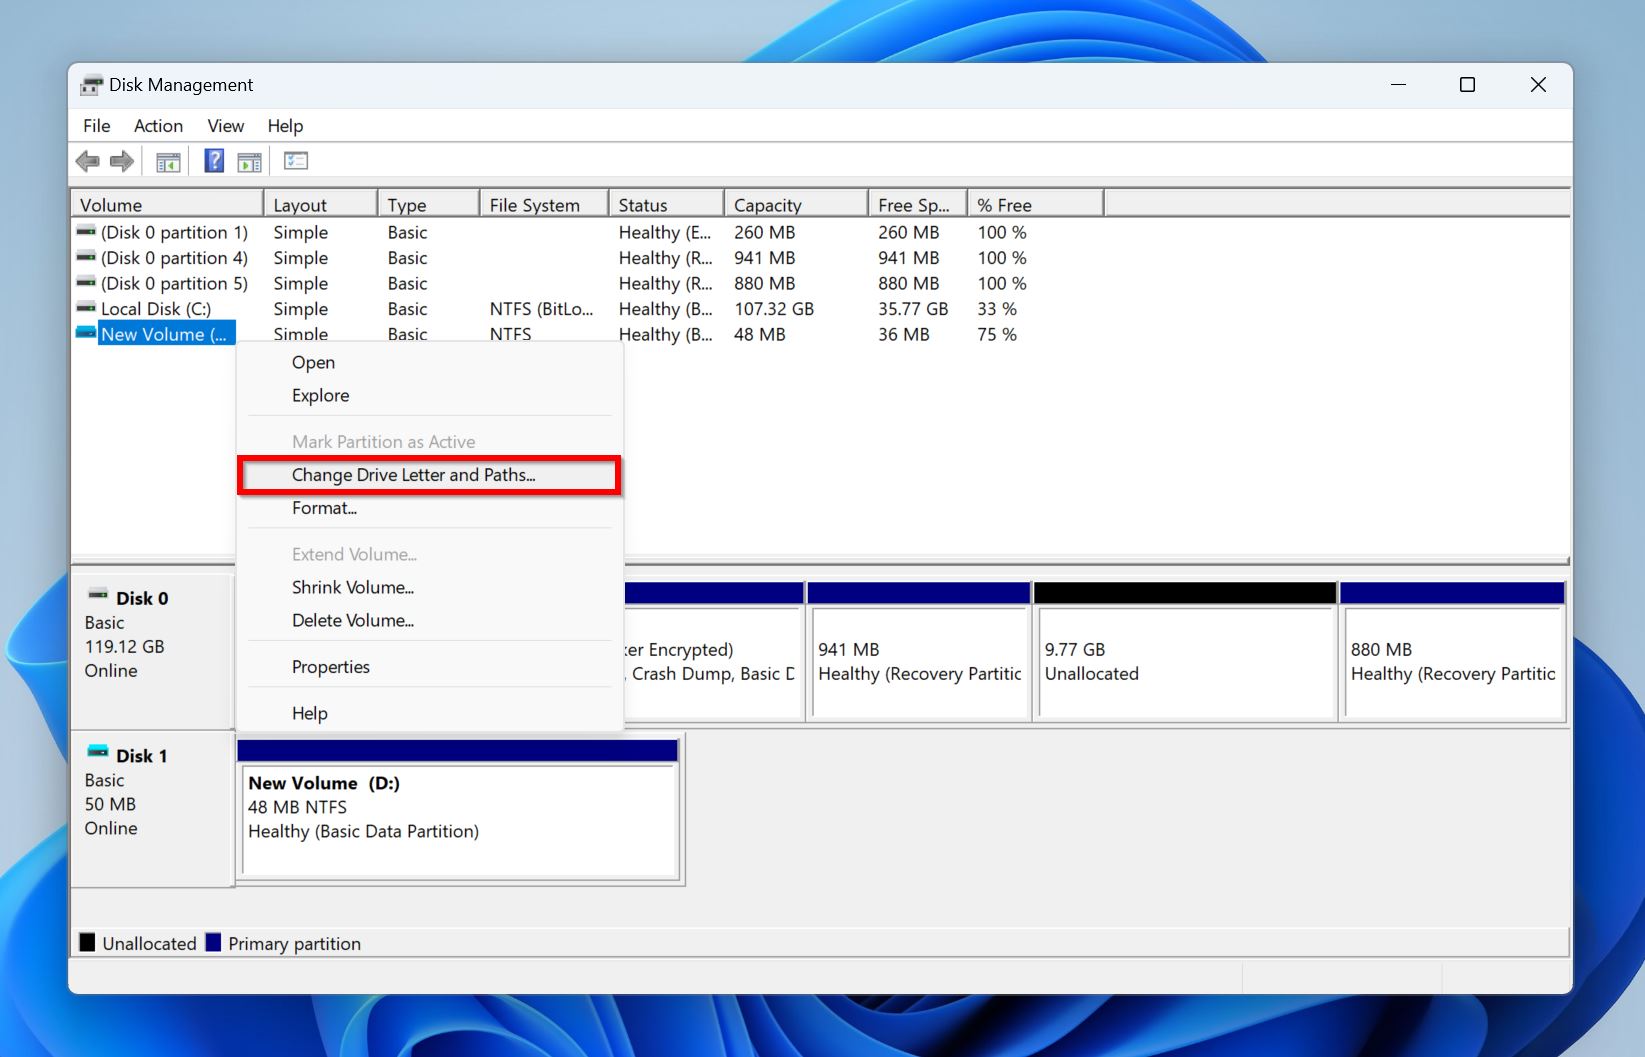
- If you wish to change the drive letter so it doesn’t conflict with other drives you periodically attach to your computer, click on Change. If the drive/partition doesn’t have a drive letter, click on Add.
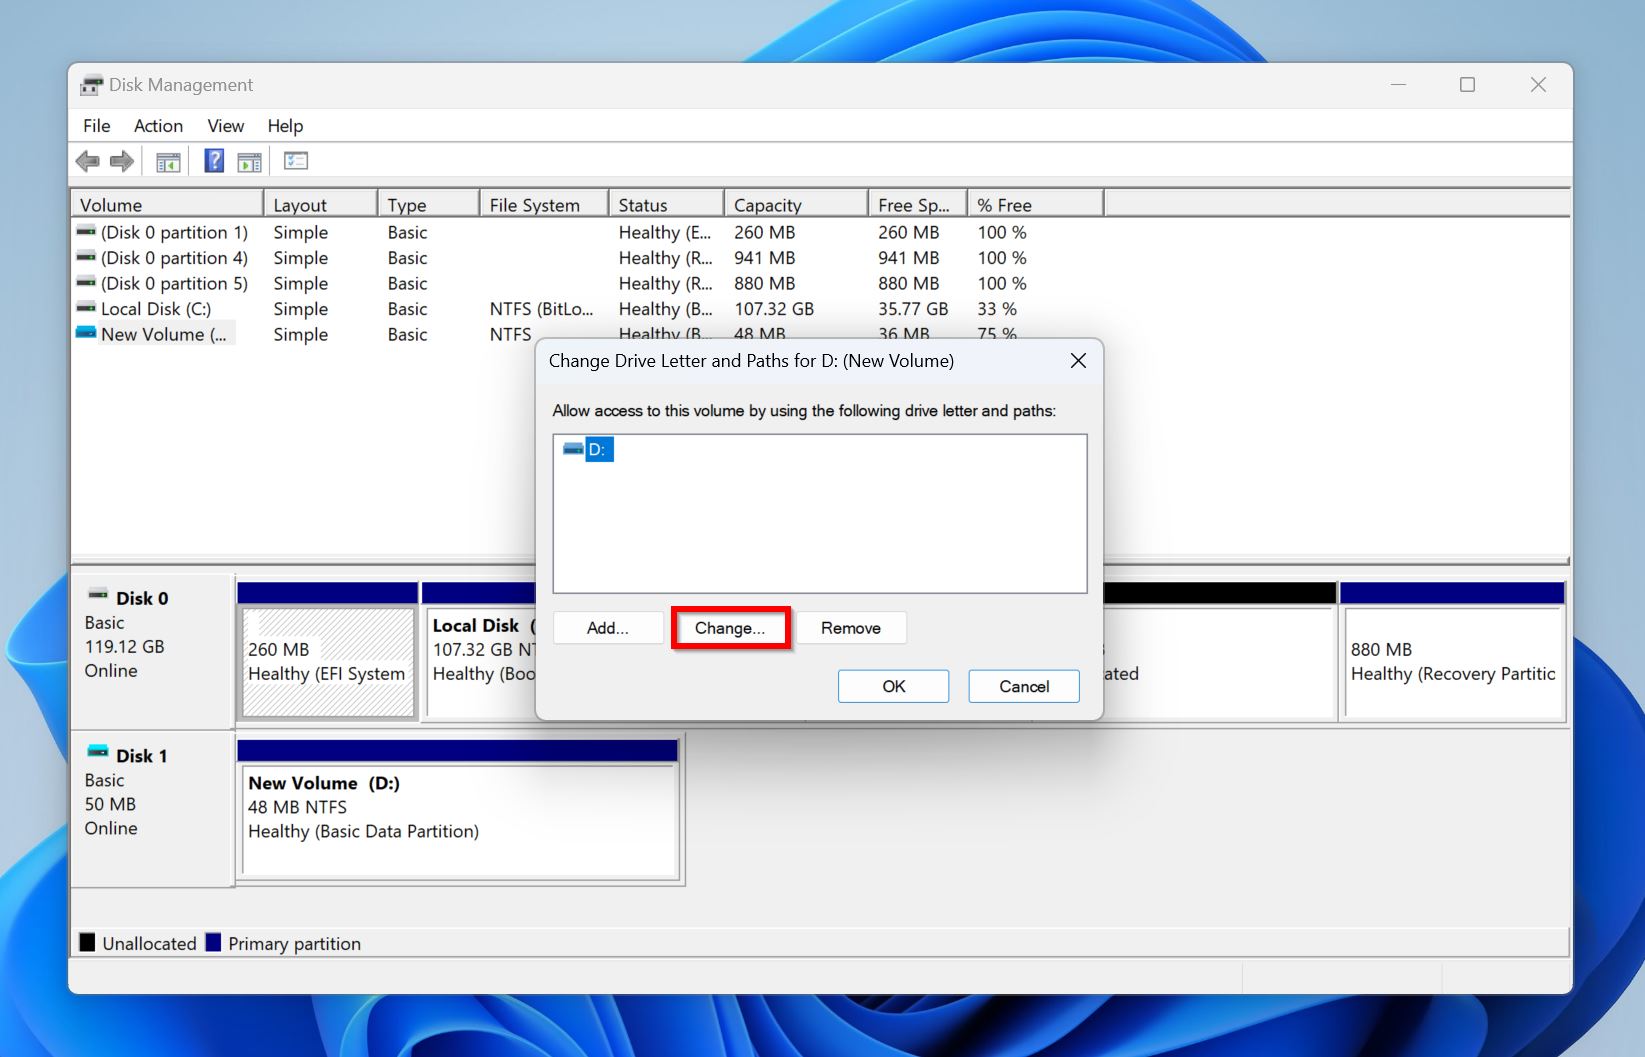
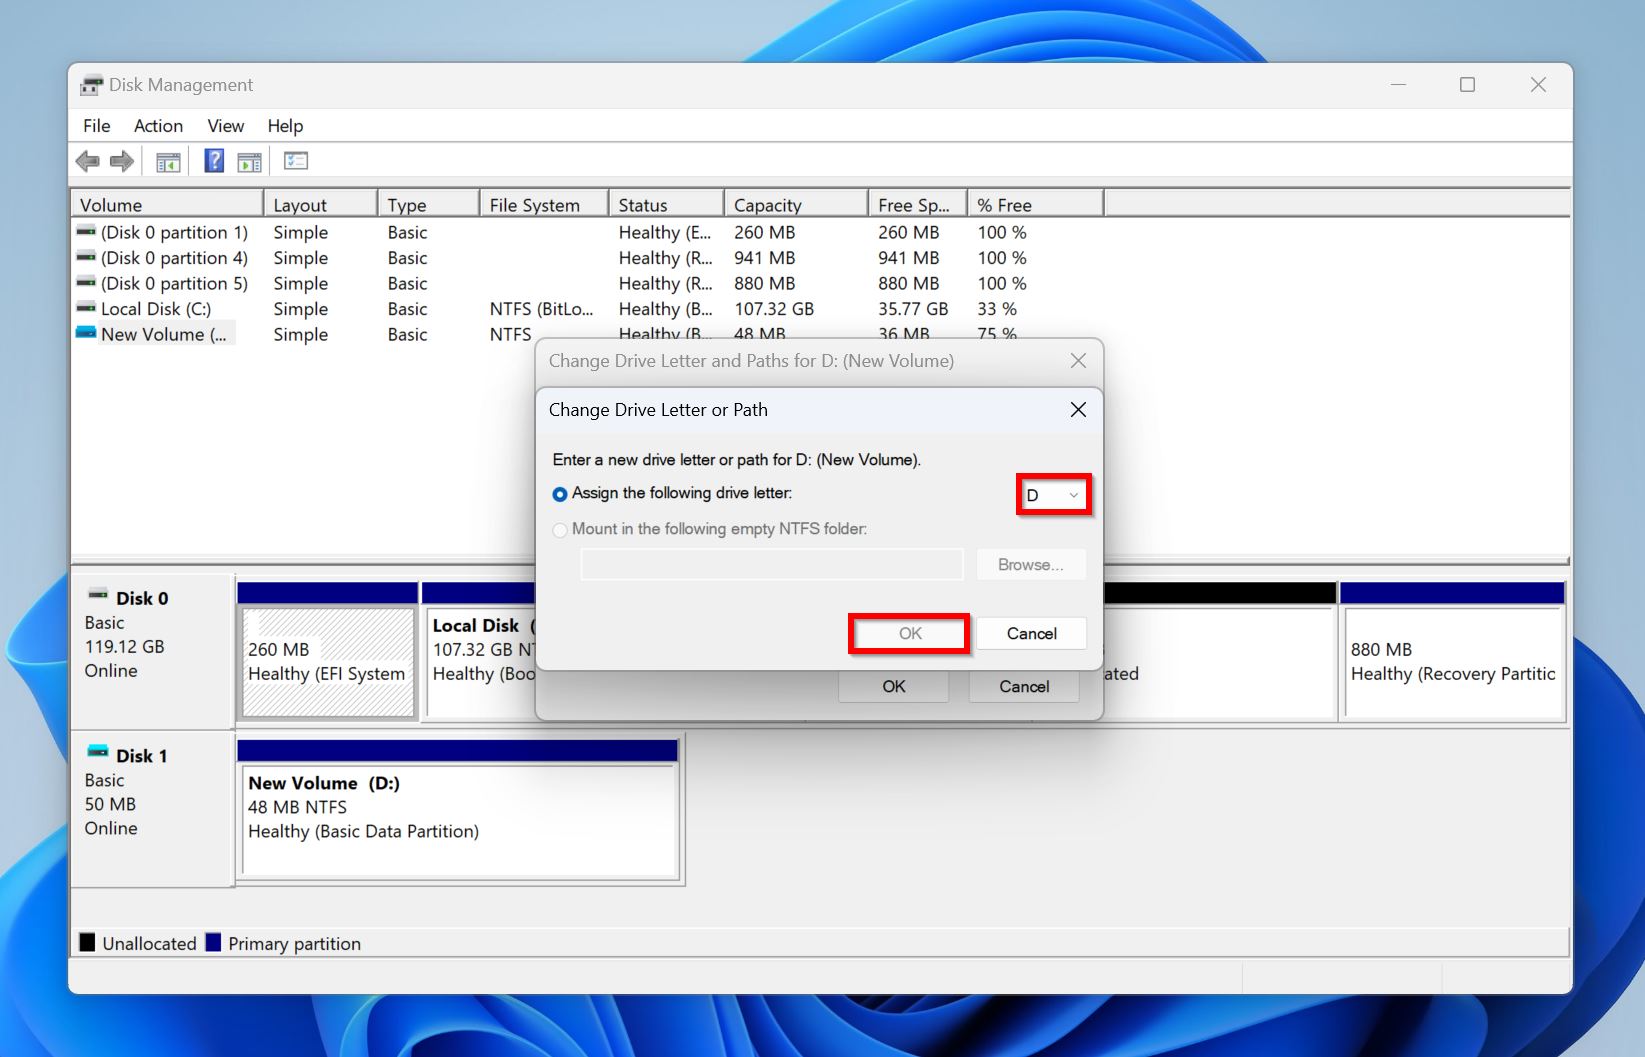
- Pick a drive letter from the Assign the following drive letter drop-down menu and click OK.
Note: There may be instances where Windows won’t let you assign a drive letter to the partition even though it appears in Disk Management. This indicates that the drive has other, more serious issues than just a missing drive letter. Here, it’s best to recover any files from the drive, and re-partition it as shown in Method 5.
Method 2: Run the CHKDSK Utility
CHKDSK (Check Disk) is an in-built command line tool in Windows, that can detect and automatically resolve any logical issues on your drive. A simple CHKDSK scan can address any problems with the drive’s file system, as well as fix bad sectors on the drive.
CHKDSK may cause minor data loss as it finds and reassigns bad sectors on your drive. Make sure you save your data before attempting this method.
Here’s how to run CHKDSK and repair a Windows partition:
- Search for “cmd” in Windows Search (Windows Key + S). In the search results, right-click on Command Prompt and choose Run as administrator.
- Type
chkdsk X: /r /xand press Enter. Replace X with the drive letter of the partition you wish to scan. It’s best to run CHKDSK on each partition.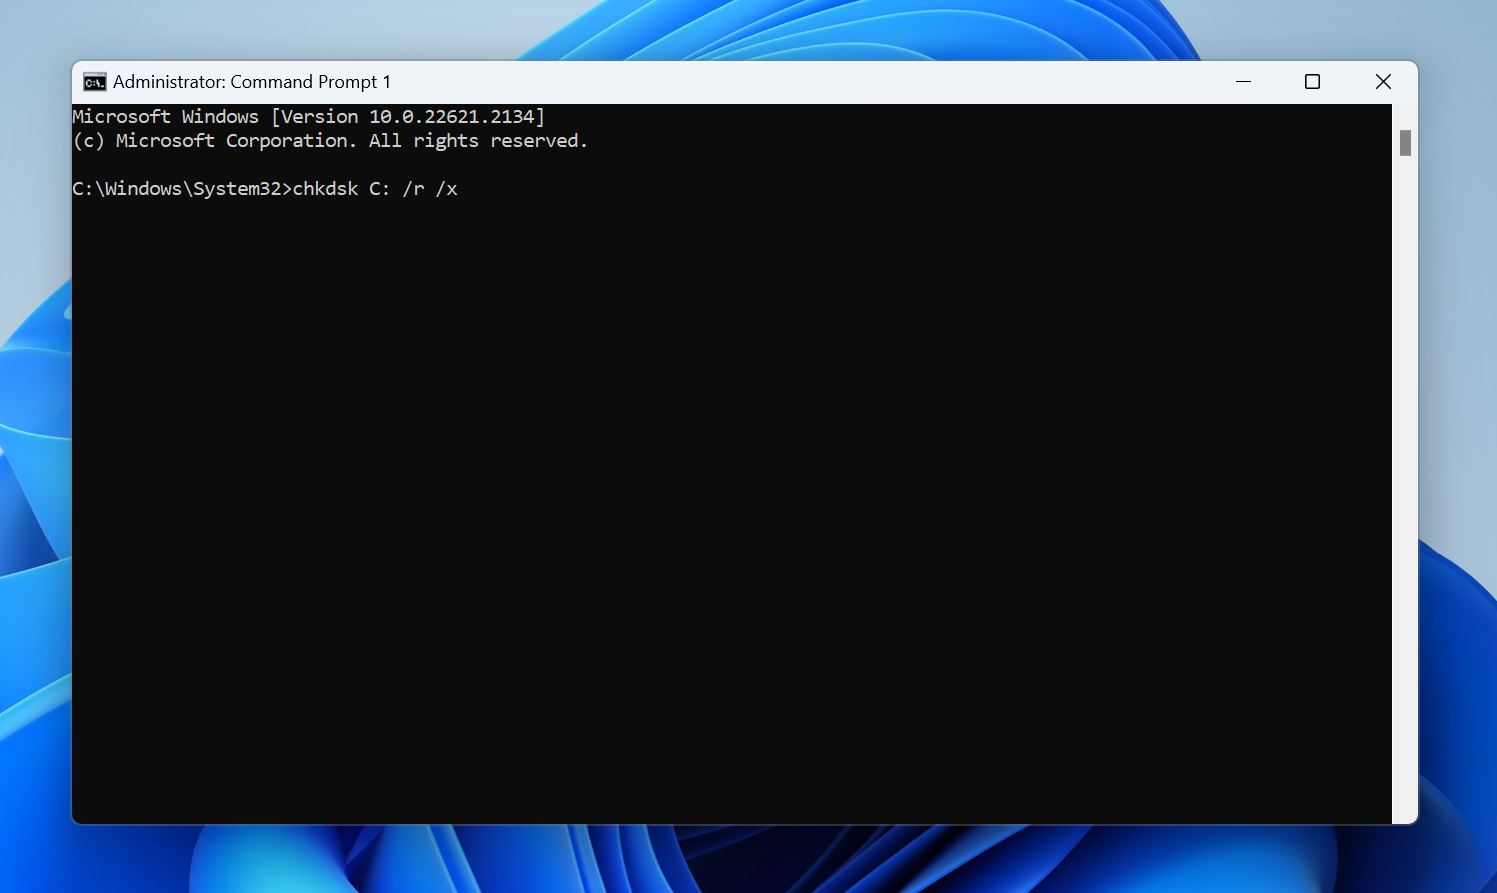
- Wait for the CHKDSK scan to complete.
- Reboot your PC.
You can also run the CHKDSK command with the /f parameter (chkdsk X: /f /x). This essentially performs a less intensive scan that takes less time than /r. Here’s a detailed guide on the difference between CHKDSK /f and /r and when to use each one.
Method 3: Use TestDisk to Recover the Partition
TestDisk is a third-party tool that can be used to fix a range of issues on your storage drive. It’s often used to fix corrupted partitions and recover deleted ones. Using the program, you can rewrite your drive’s partition table, potentially fixing the corrupt partition. TestDisk’s only pitfall is its lack of a GUI, so ensure you follow the steps below carefully:
- Download TestDisk and extract the downloaded archive. We advise downloading the latest Stable build which, as of writing this, is version 7.2.
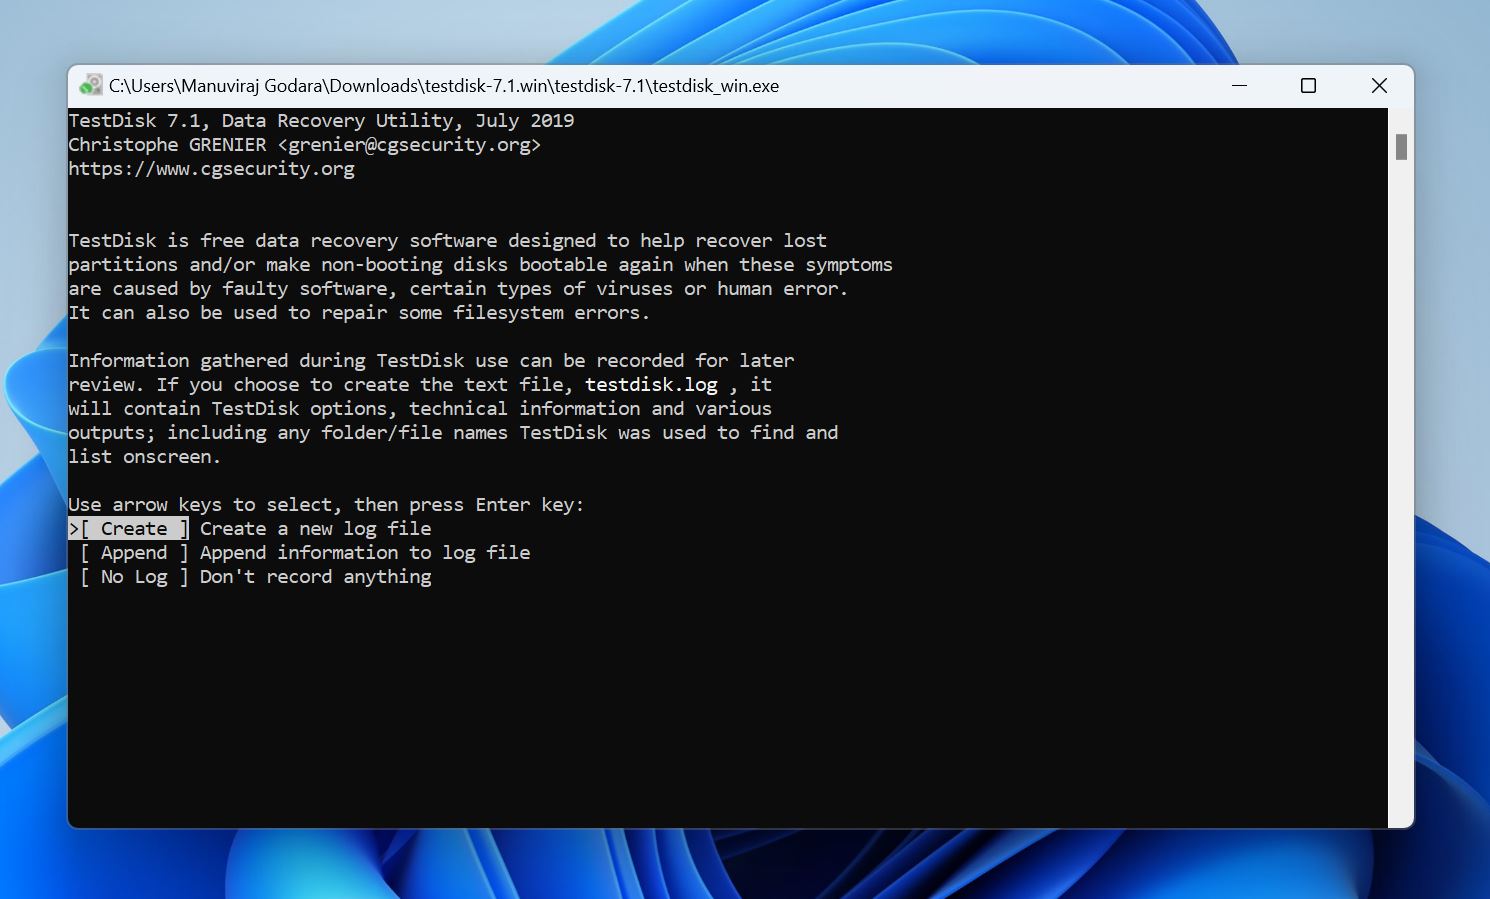
- Run testdisk_win.exe from the extracted folder.
- Pick whether you want to create a log file or not. Use the arrow keys to navigate, and press Enter to confirm your selection.
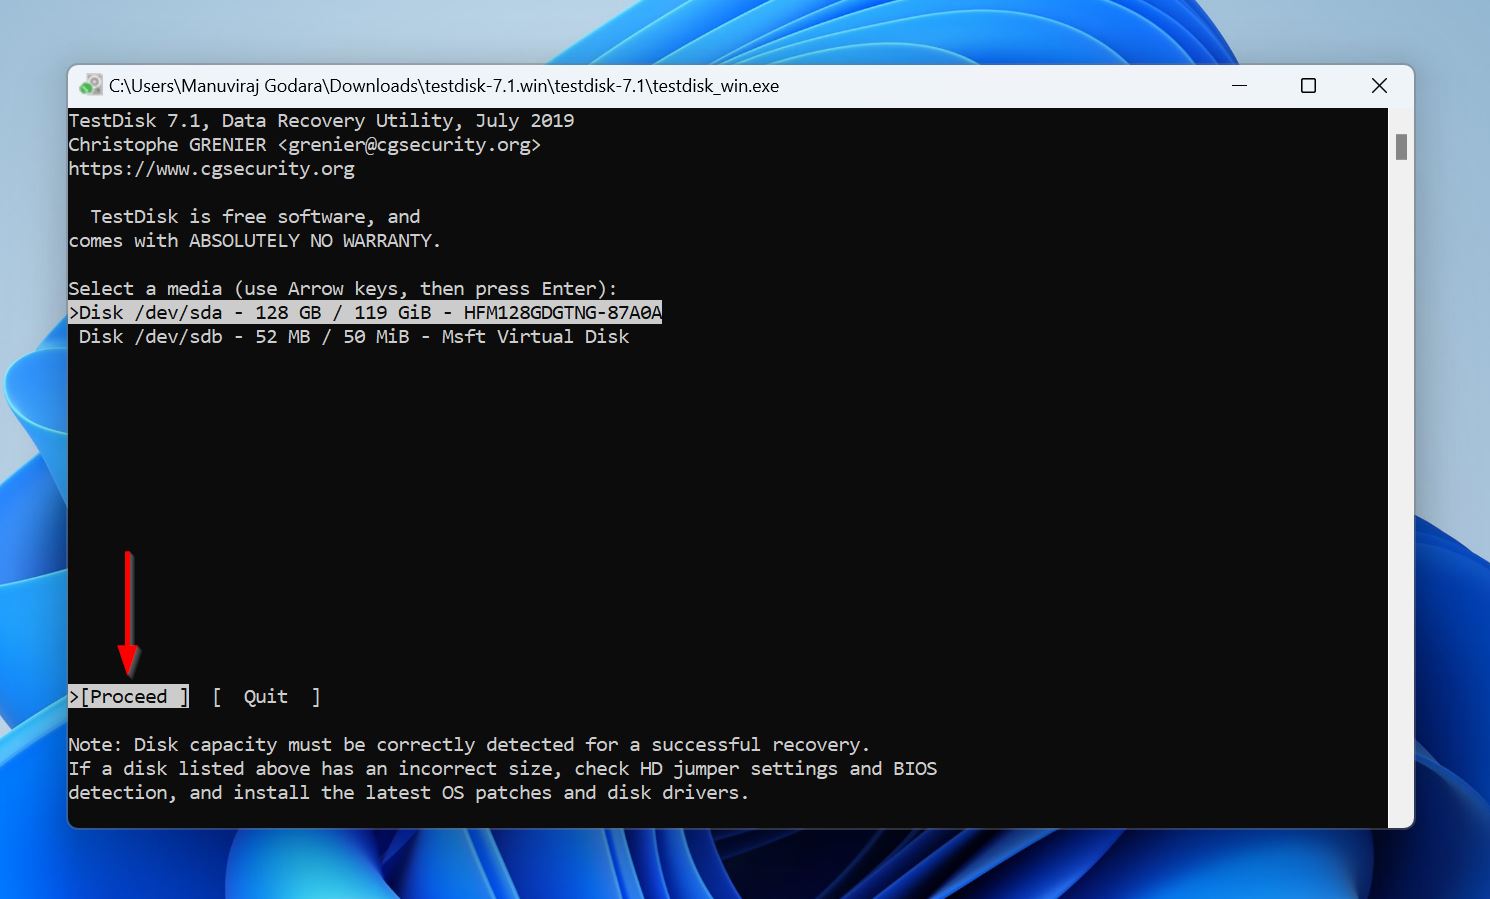
- Select the drive which contains the corrupt partition, and press Enter.
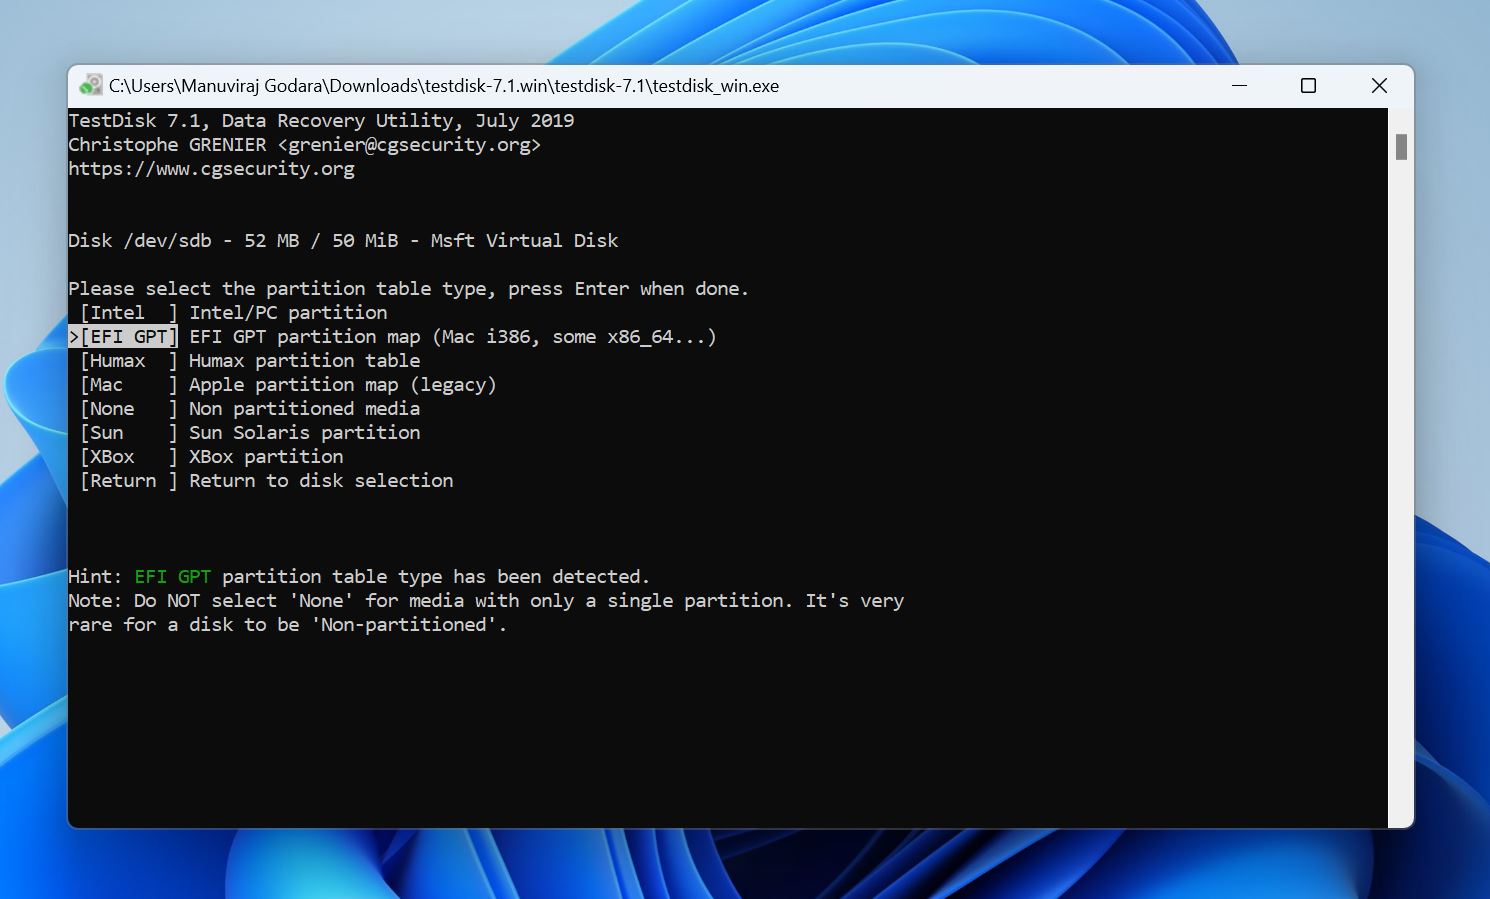
- Choose the partition table used by the disk and press Enter. Since TestDisk auto-detects the partition table, it’s best to simply press Enter unless you’re sure the drive uses some other partition table type.
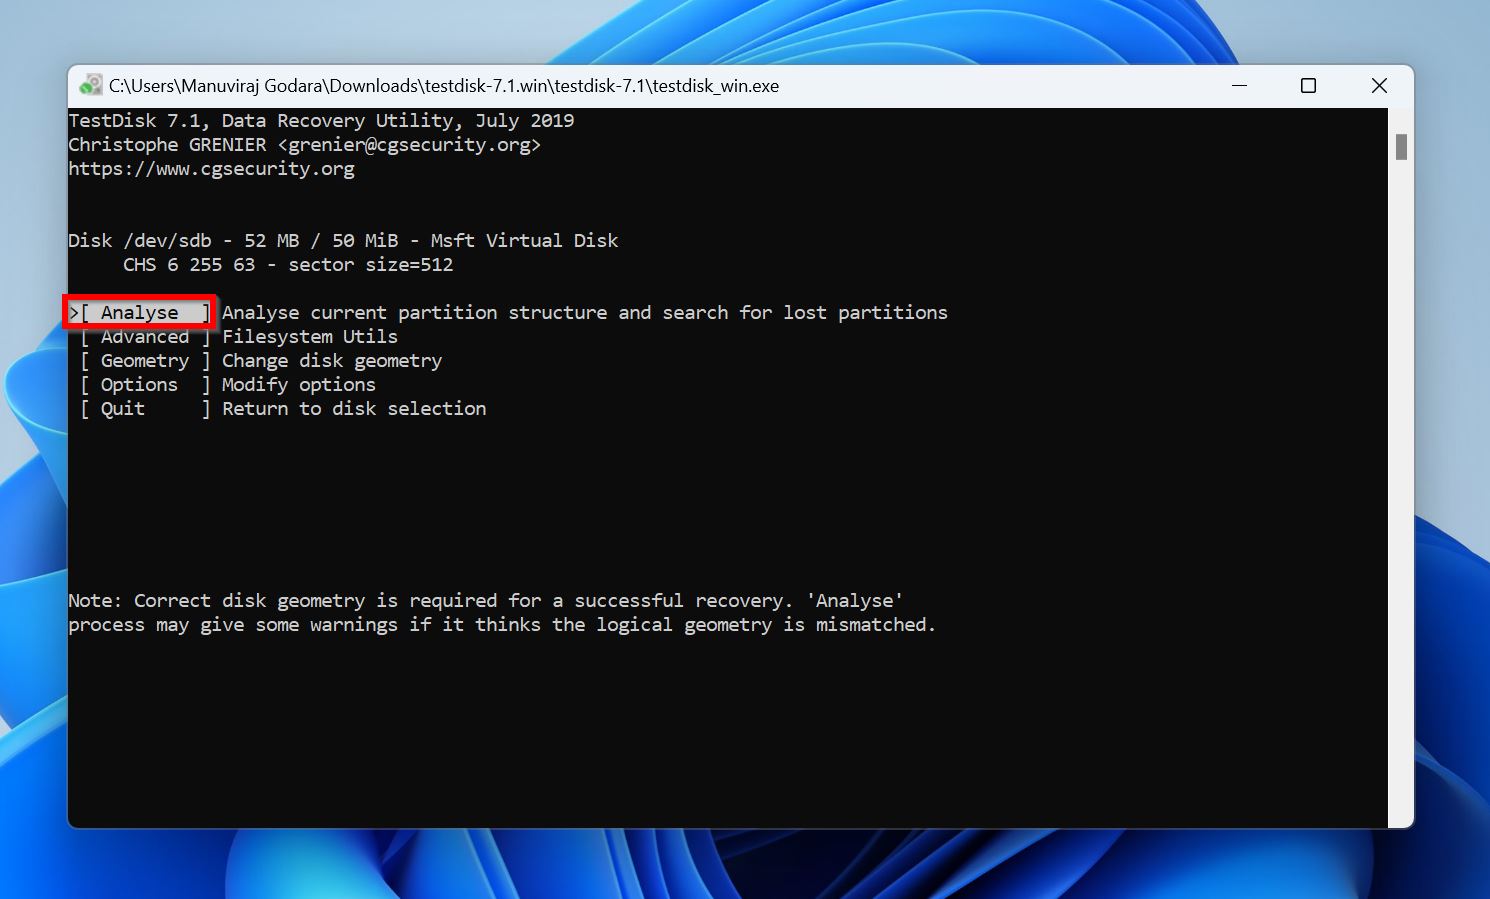
- Select Analyse and press Enter.
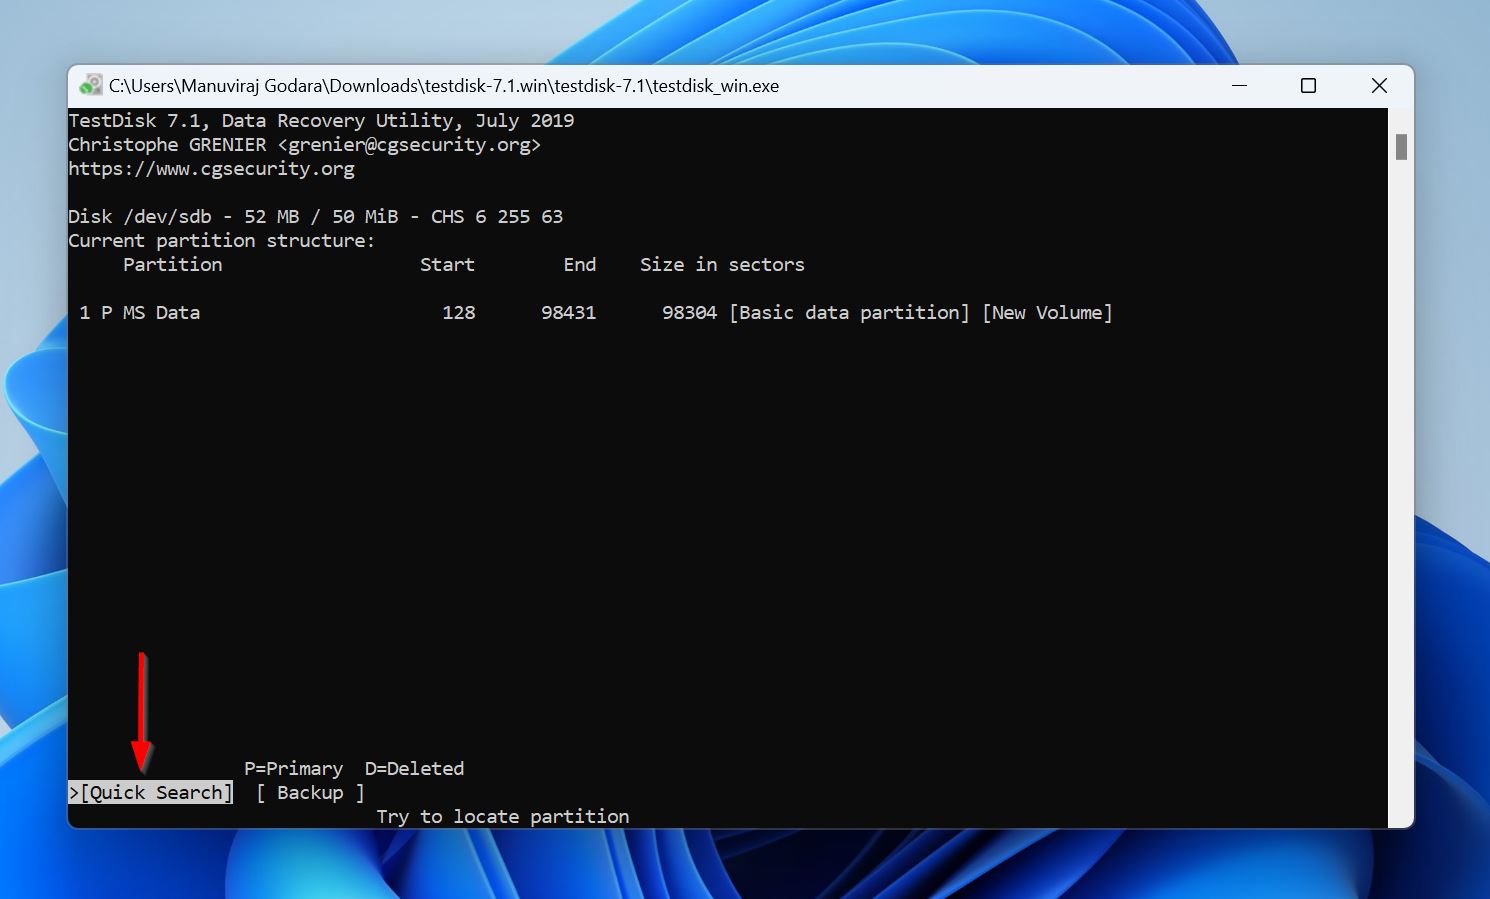
- Choose Quick Search, press Enter, and wait for TestDisk to list the recoverable partitions in the drive.
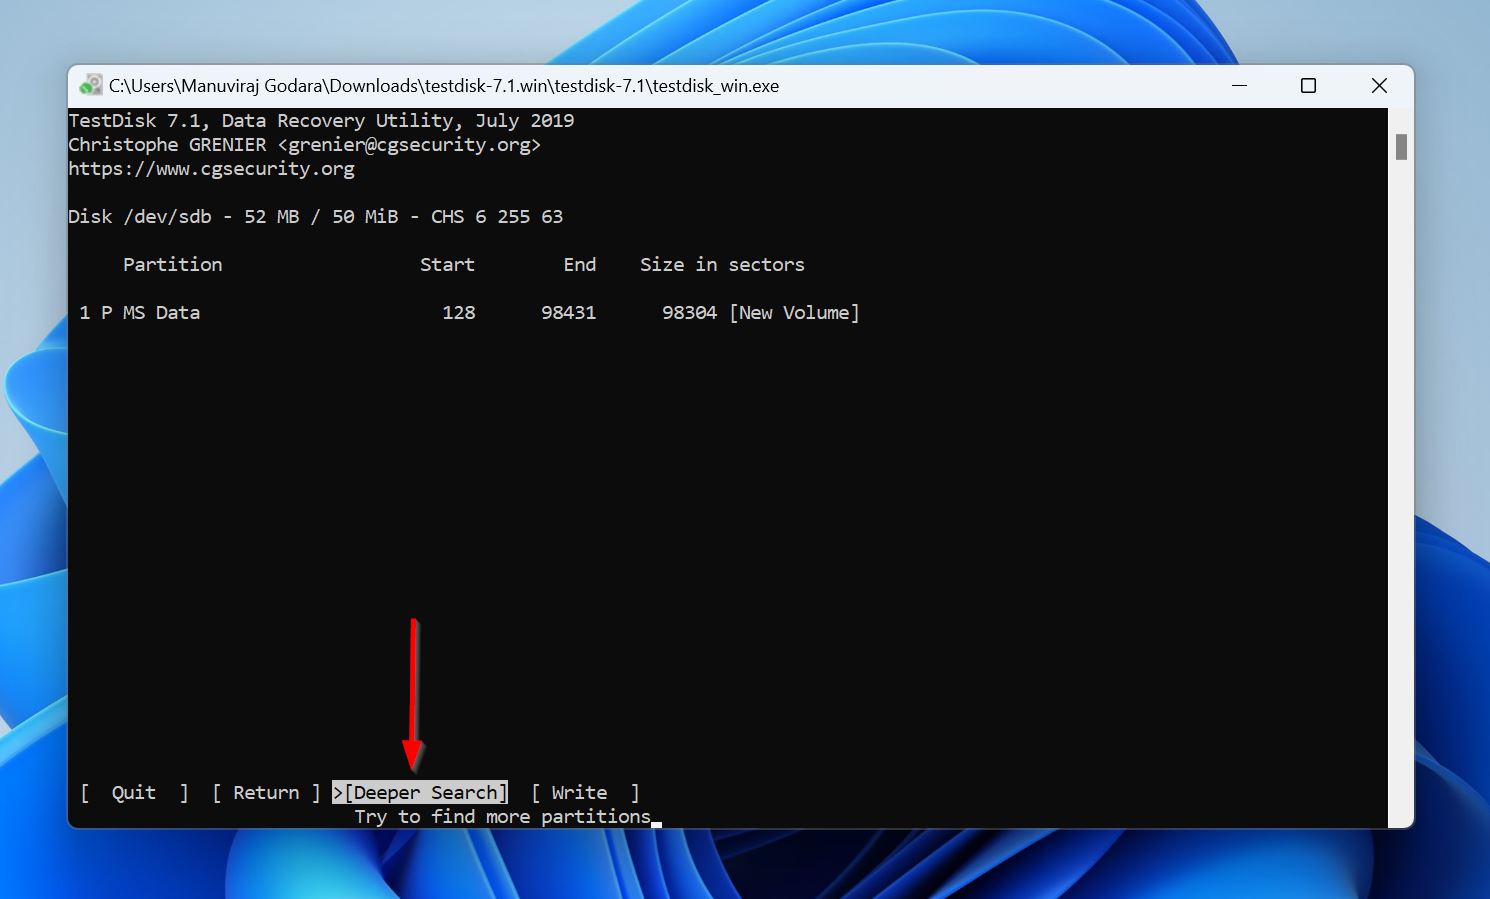
- Use the arrow keys to highlight the corrupt partition, and press P to view the files stored in the partition. Press Q to return to the previous screen. If you didn’t see the corrupt partition in the partition list, select Deeper Search and press Enter.
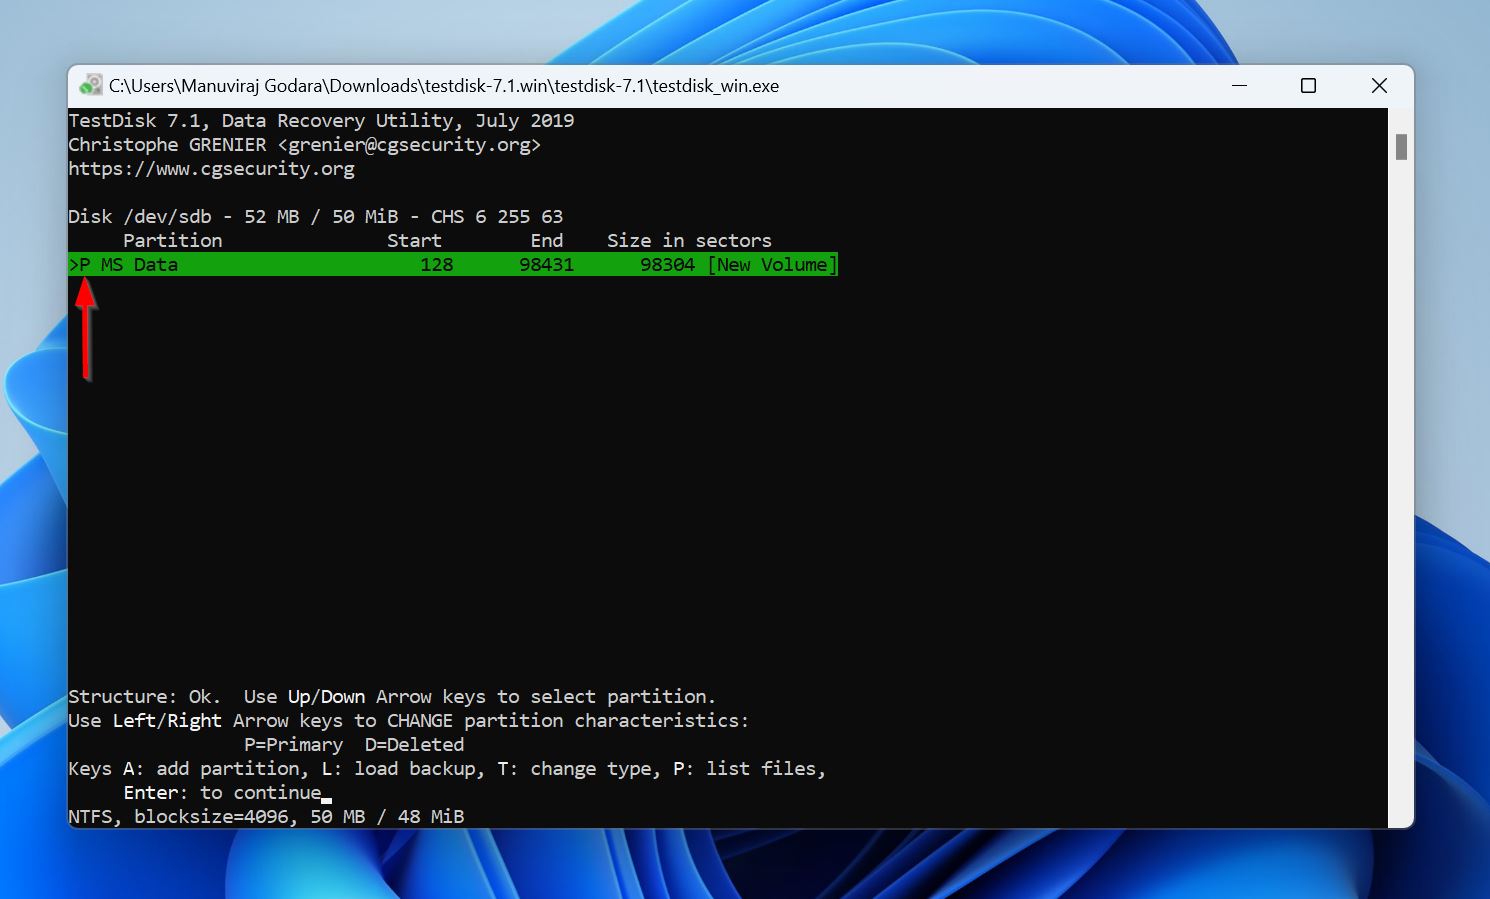
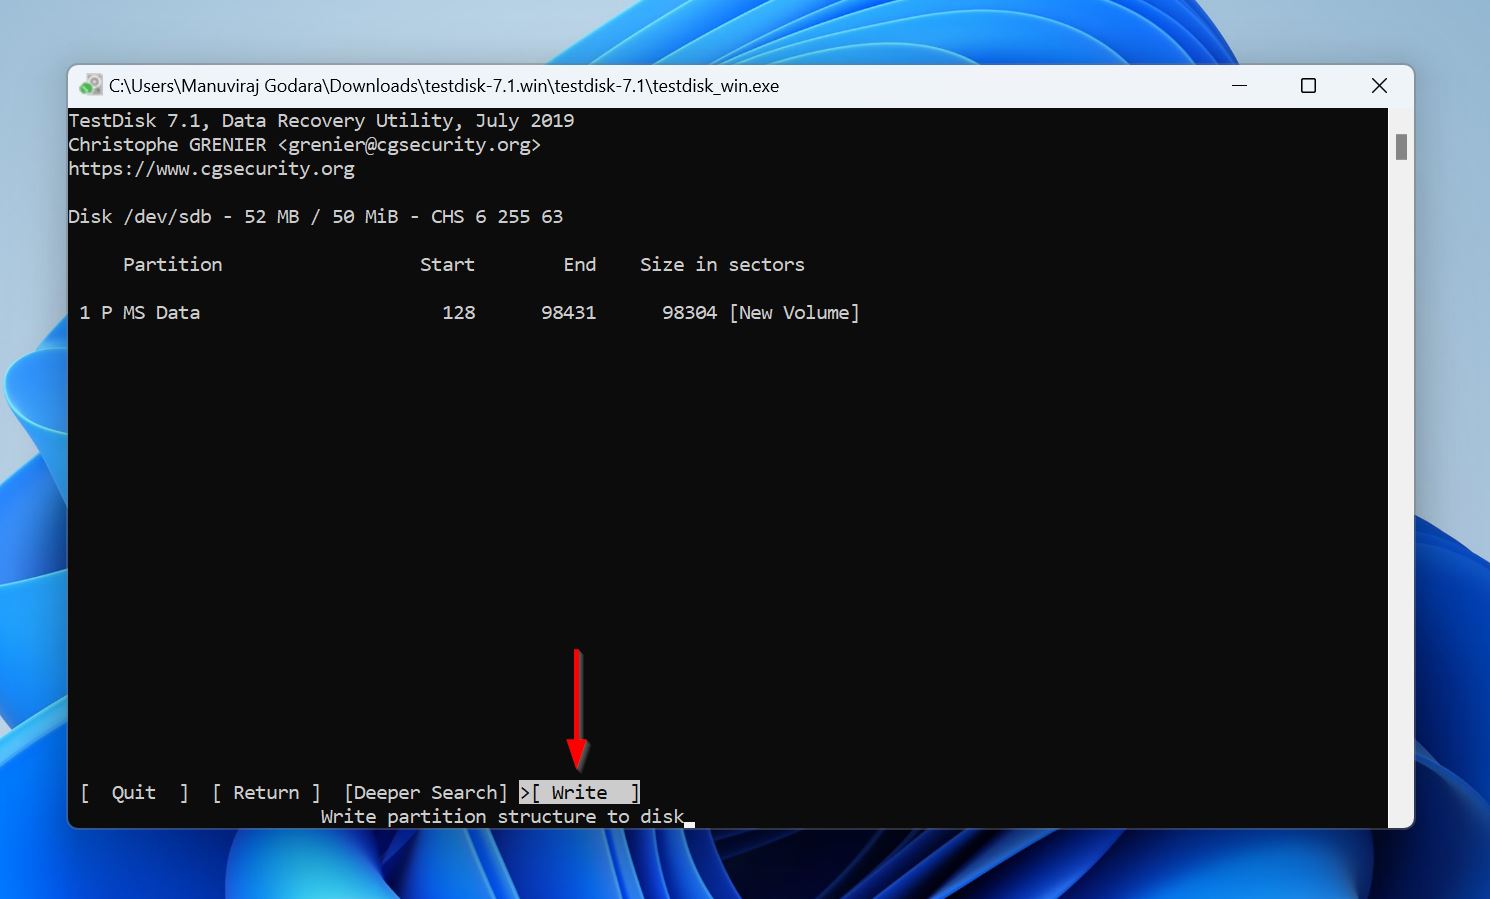
- You’ll notice that each partition has a prefix before it—D (Deleted), P (Primary), * (Bootable), or L (Logical). Select the corrupt partition, and use the Left and Right Arrow Keys to cycle through the prefixes, until it has a P prefix before it. Press Enter.
- Select Write and press Enter.
- Press Y on the confirmation screen.
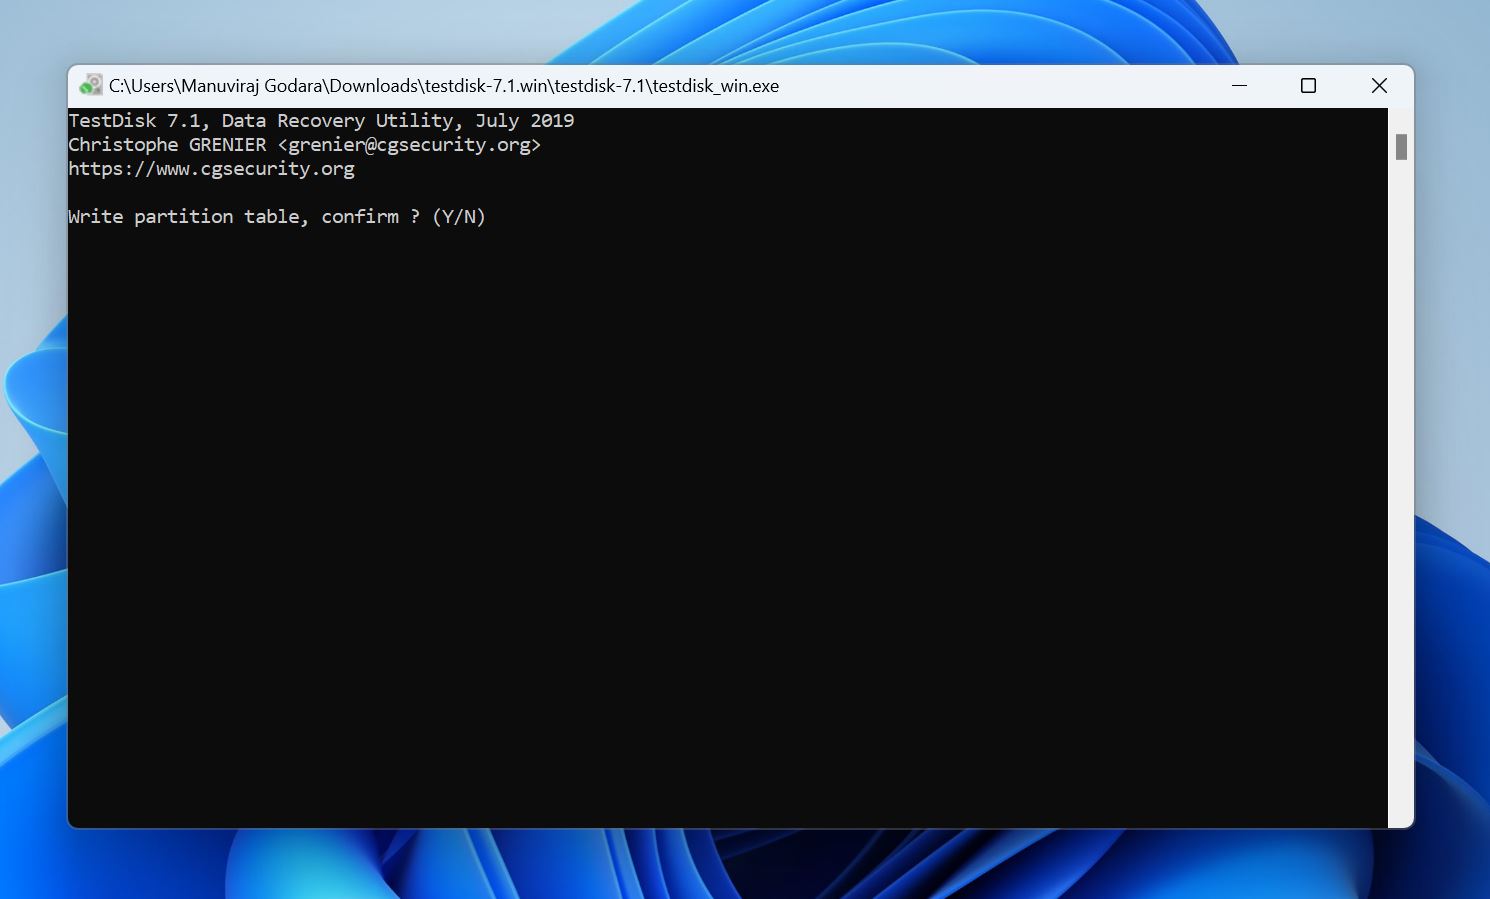
- Reboot your PC.
TestDisk has a high success rate when it comes to partition recovery. However, you may be put off by its command-line interface and tedious recovery process. If this happens, you can check out our list of expert-vetted partition recovery tools for alternatives.
Method 4: Use Partition Assistant to Repair the Master Boot Record
Sometimes, the partition may not be corrupt at all. It could be the result of a damaged Master Boot Record (MBR)—the first sector on a hard drive that contains the bootloader, partition table, boot signature, and disk signature. Without it, your PC won’t boot, and neither will you be able to access the data on your hard drive. And yes, you won’t be able to see any partitions on your hard drive, even though your files themselves will be intact.
For most users, the easiest way to fix a corrupt MBR is to use a third-party app called AOMEI Partition Assistant. While rebuilding the MBR is free, you do need access to another PC on which you can install the program and connect your current computer’s internal drive externally. The alternative is to use a paid feature that lets you create a Windows PE Bootable USB using AOMEI Partition Assistant and run the program on a non-booting PC.
Here’s how to fix a corrupt partition by rebuilding your drive’s MBR using AOMEI Partition Assistant:
- Download and install AOMEI Partition Assistant. Rebuilding the MBR is free, but in case you need to run it on a non-booting computer, you’ll need to use AOMEI’s paid bootable USB feature.
- Ensure the hard drive with the corrupt partition is connected to the PC, and launch AOMEI Partition Assistant.
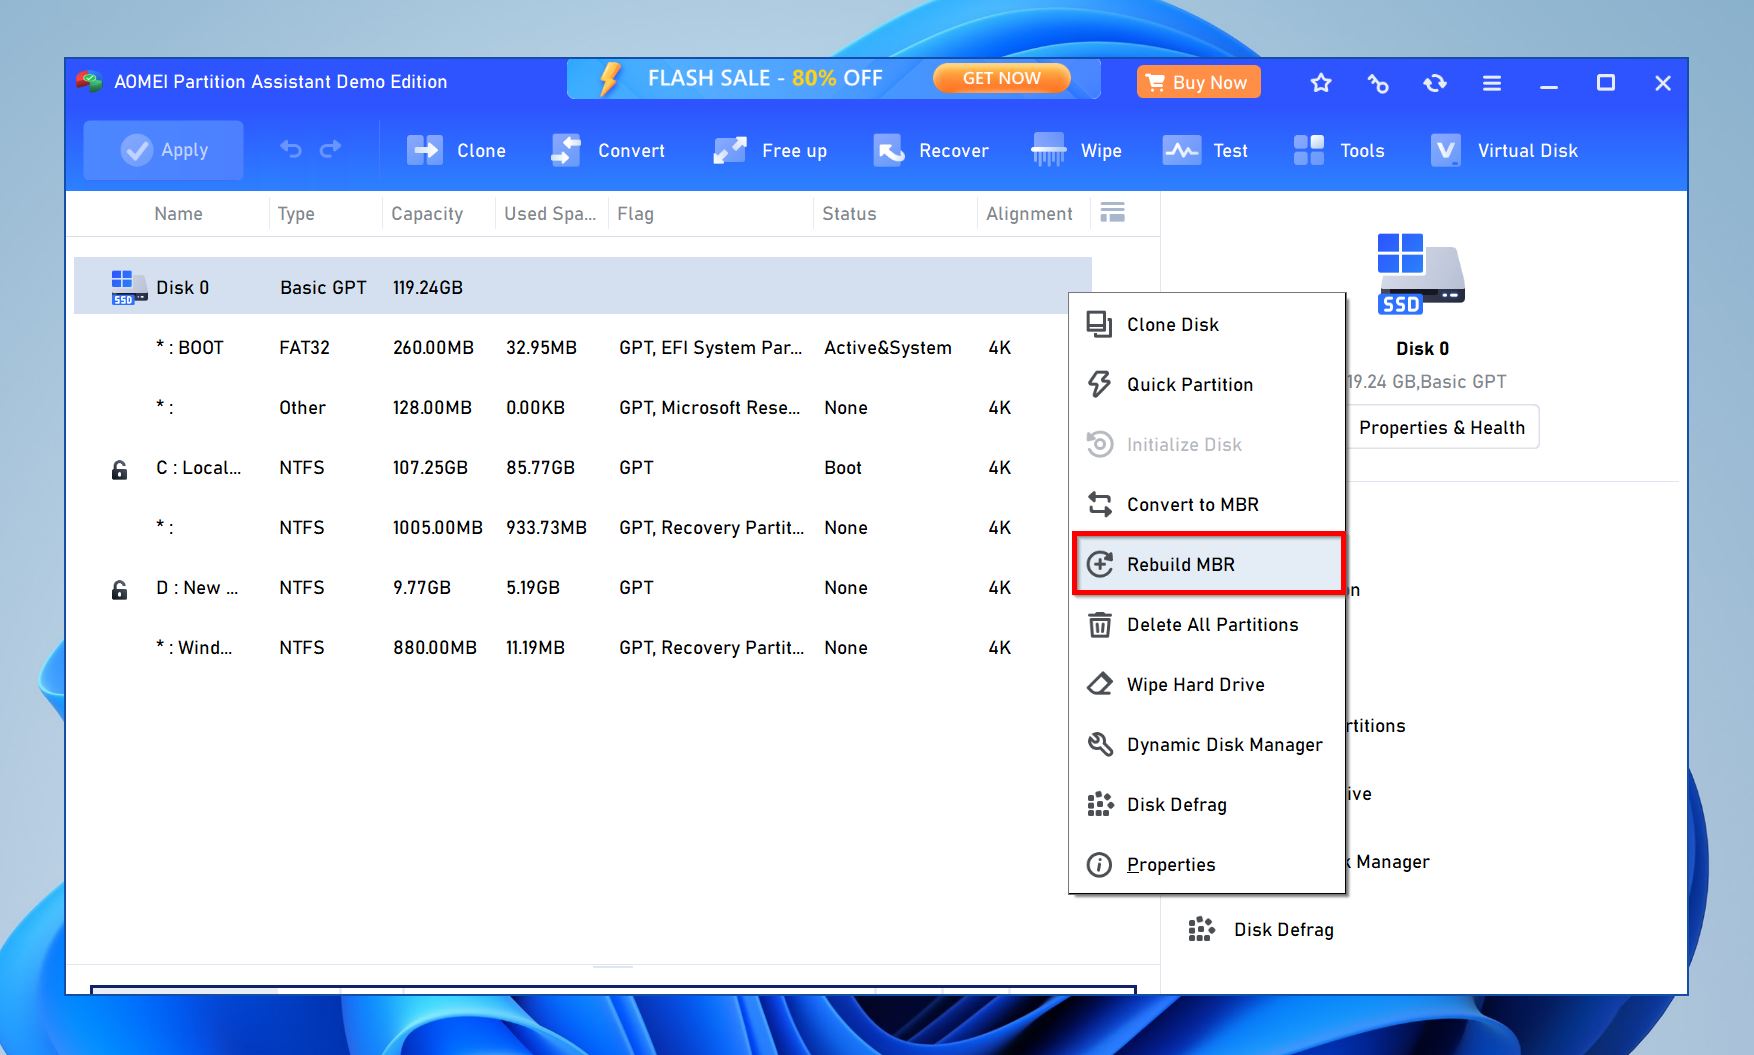
- Right-click the hard drive with a corrupted partition, and choose Rebuild MBR.
- Pick your Windows version from the drop-down menu in the pop-up window.
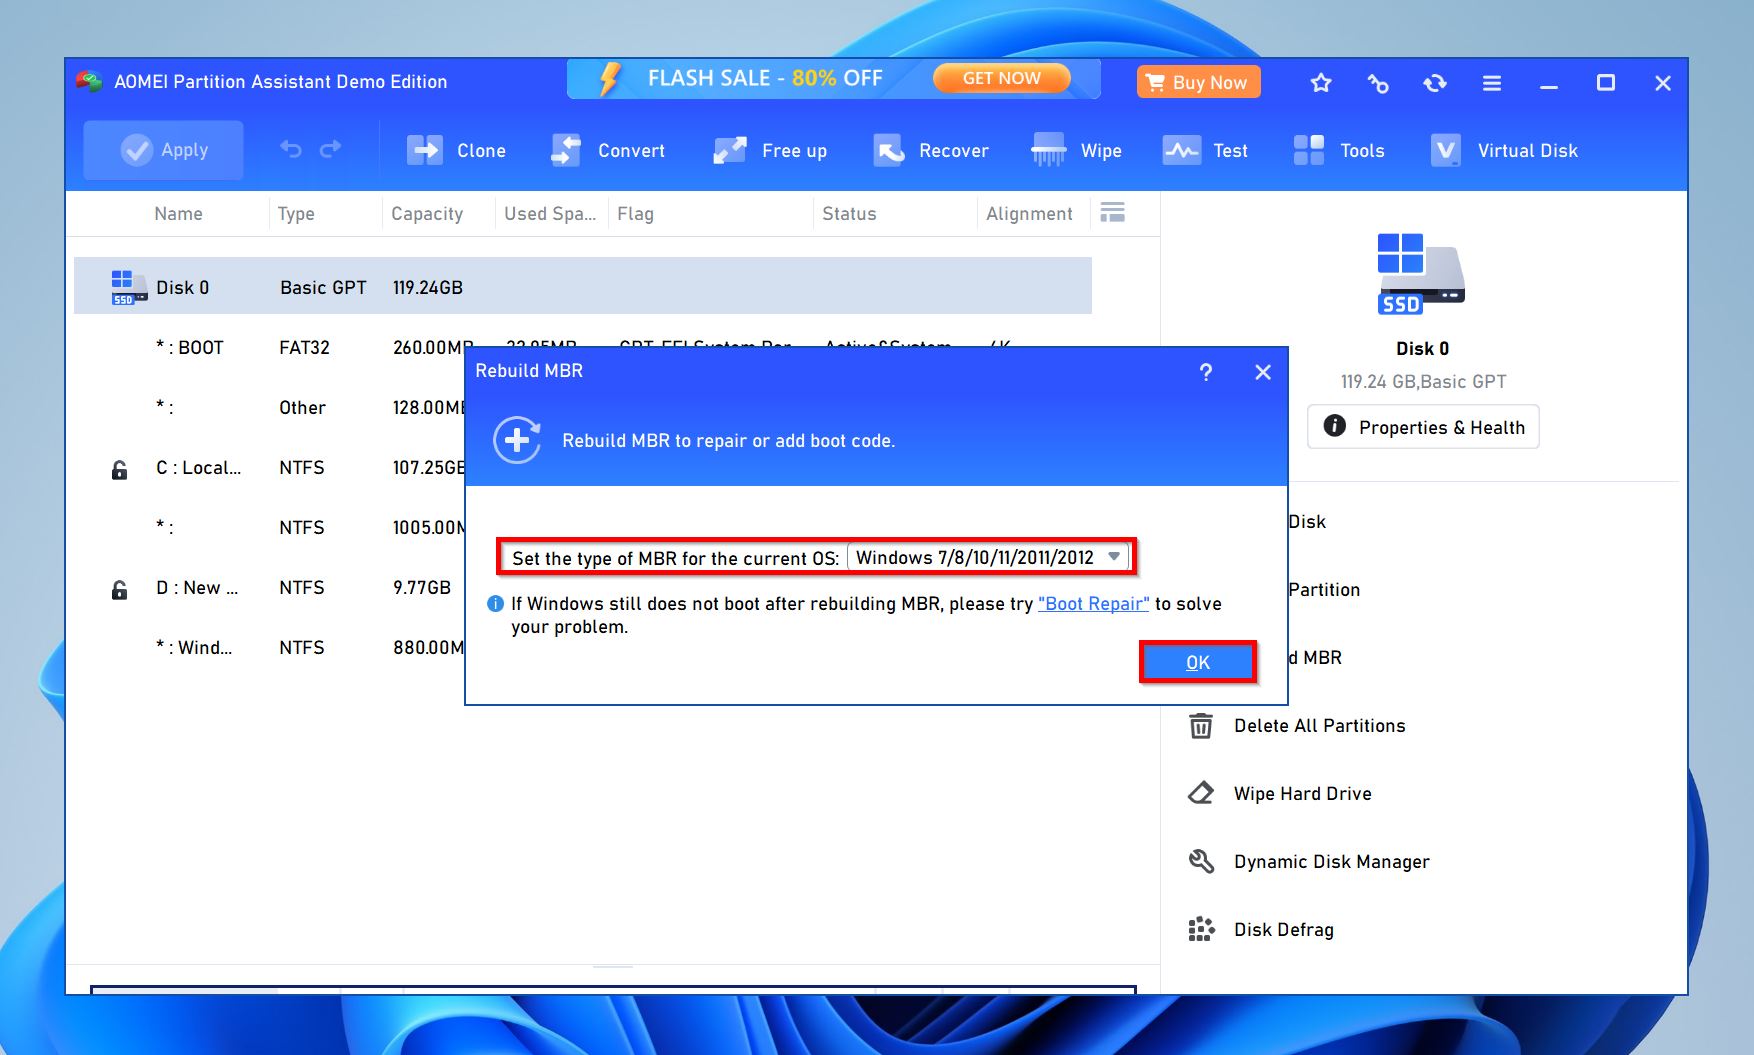
- Click on Proceed.
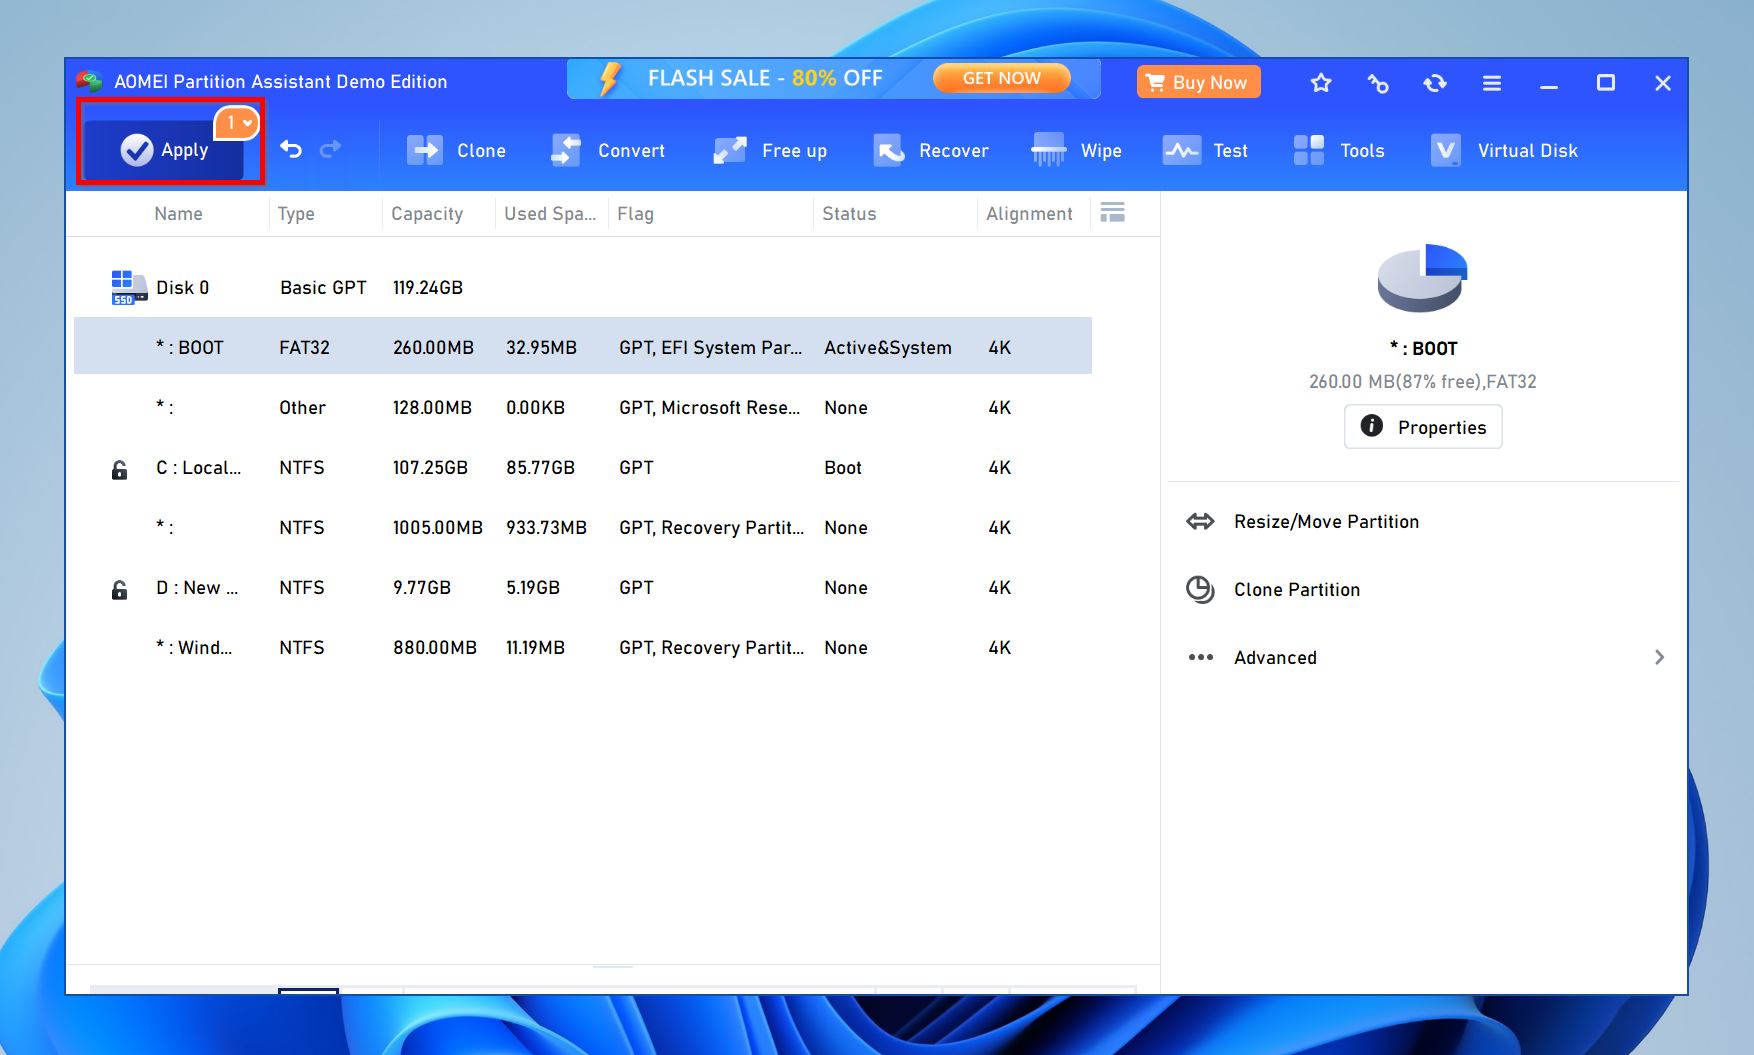
- AOMEI Partition Assistant will repair the MBR.
Method 5: Repartition the Drive
It’s recommended you format and re-partition the drive if none of the aforementioned methods helped fix the problem. Repartitioning involves deleting the corrupt partition and creating a new one. You will need to format it during the process, so it’s best to recover your data beforehand. Here’s how to repartition the drive:
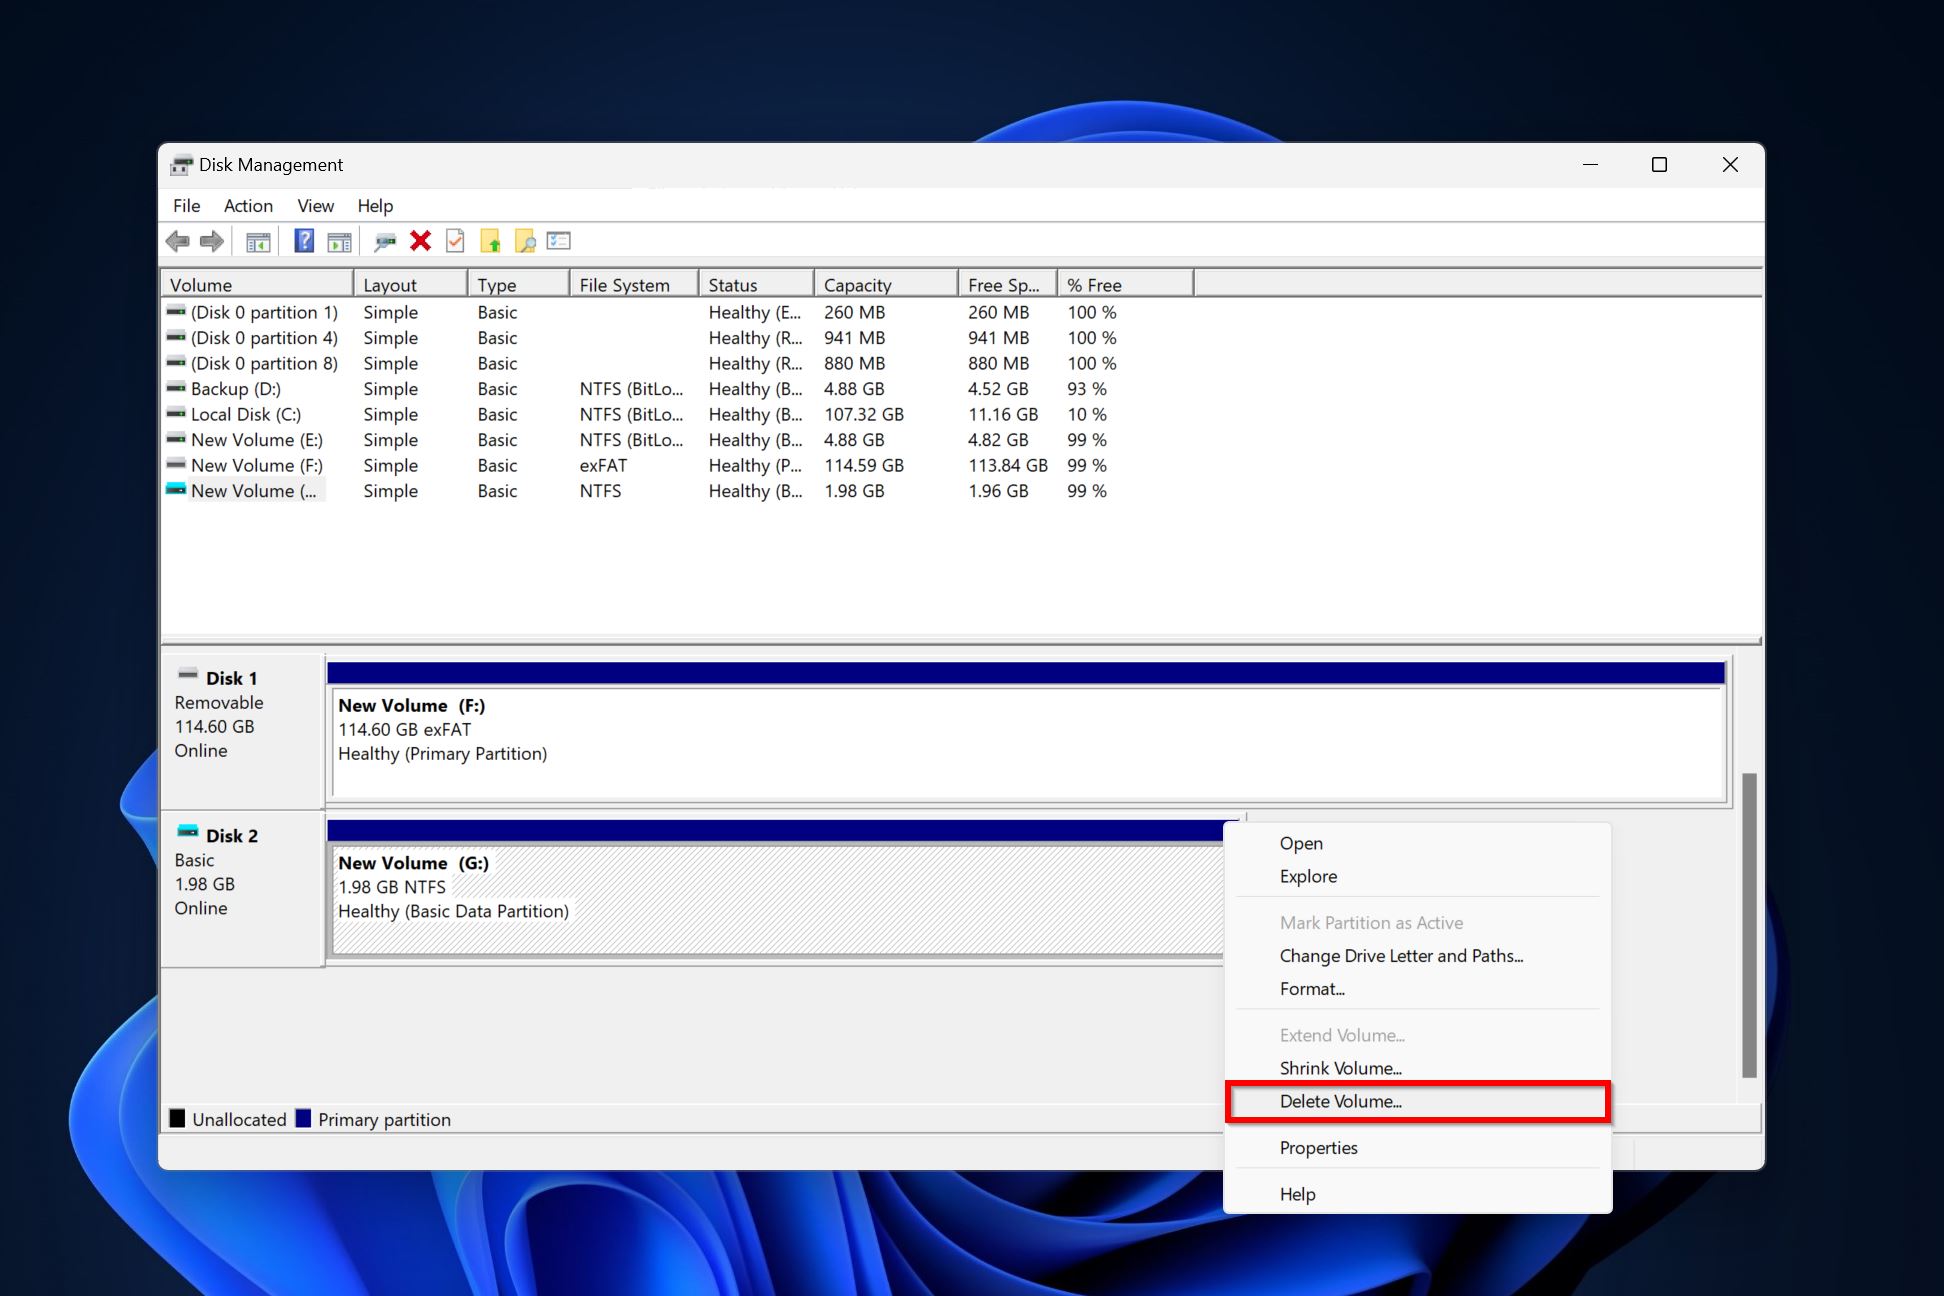
- Search for “disk management” in Windows Search (Windows Key + S). Click on Create and format hard disk partitions from the search results.
- Right-click the partition you wish to delete and choose Delete volume. Click Yes on the confirmation prompt.
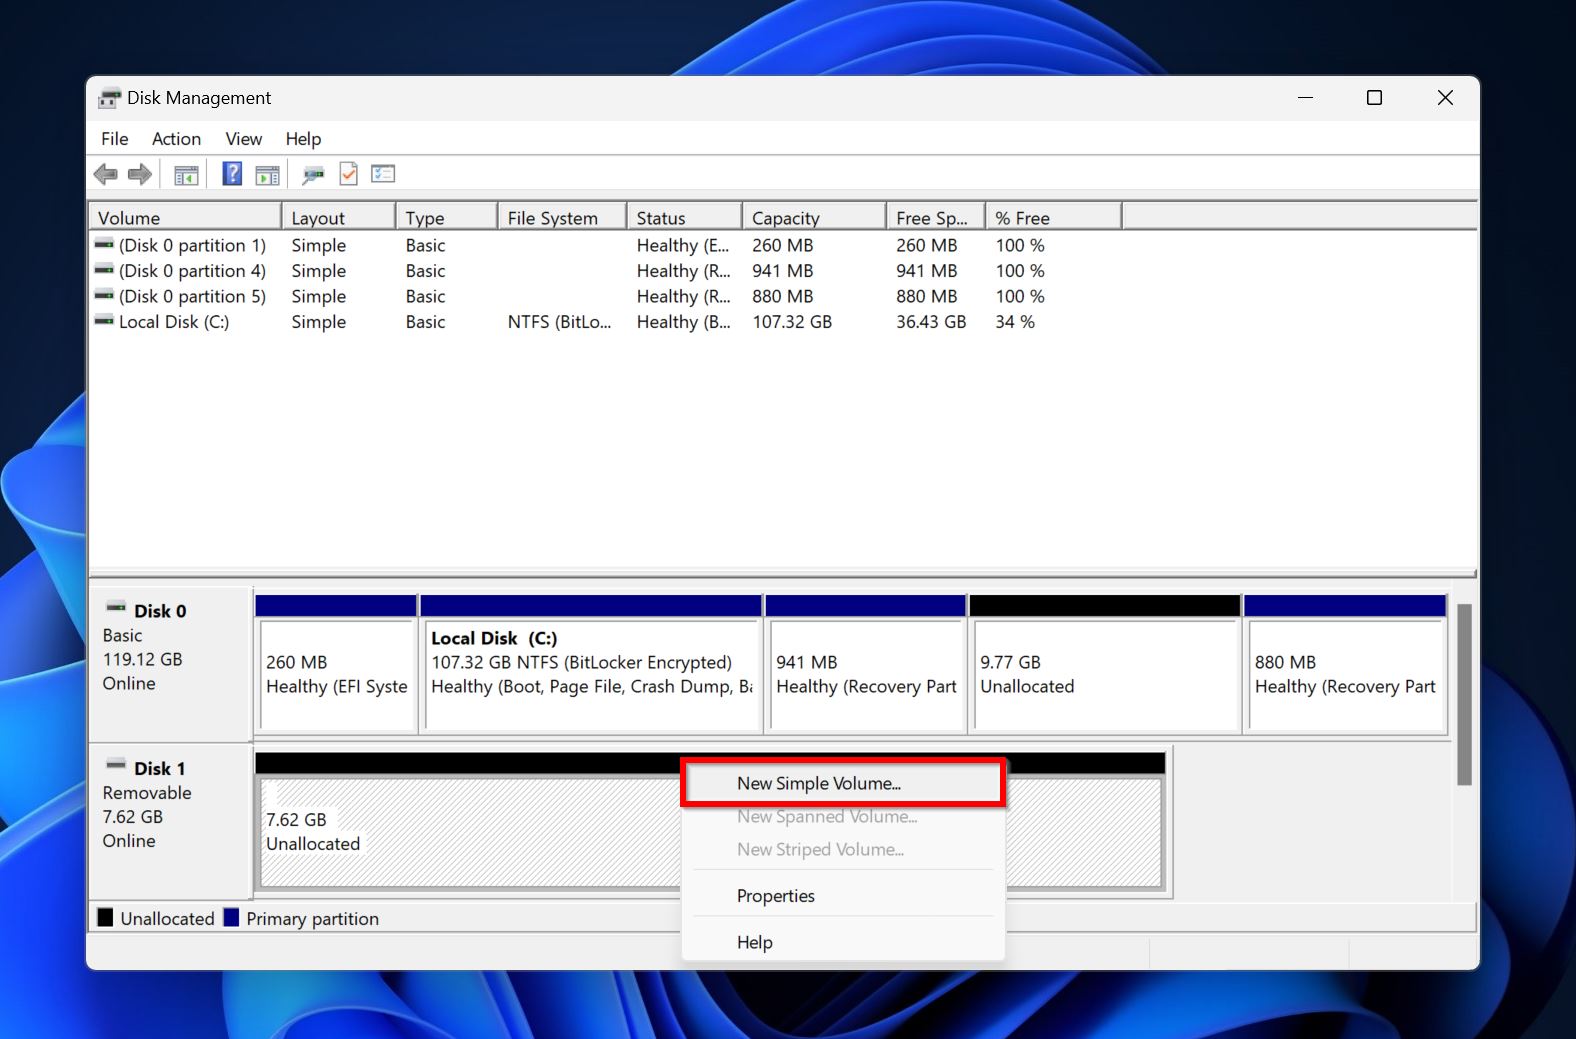
- The space that the deleted partition occupied will now become unallocated, denoted by a black color. Right-click on this unallocated space and choose New Simple Volume.
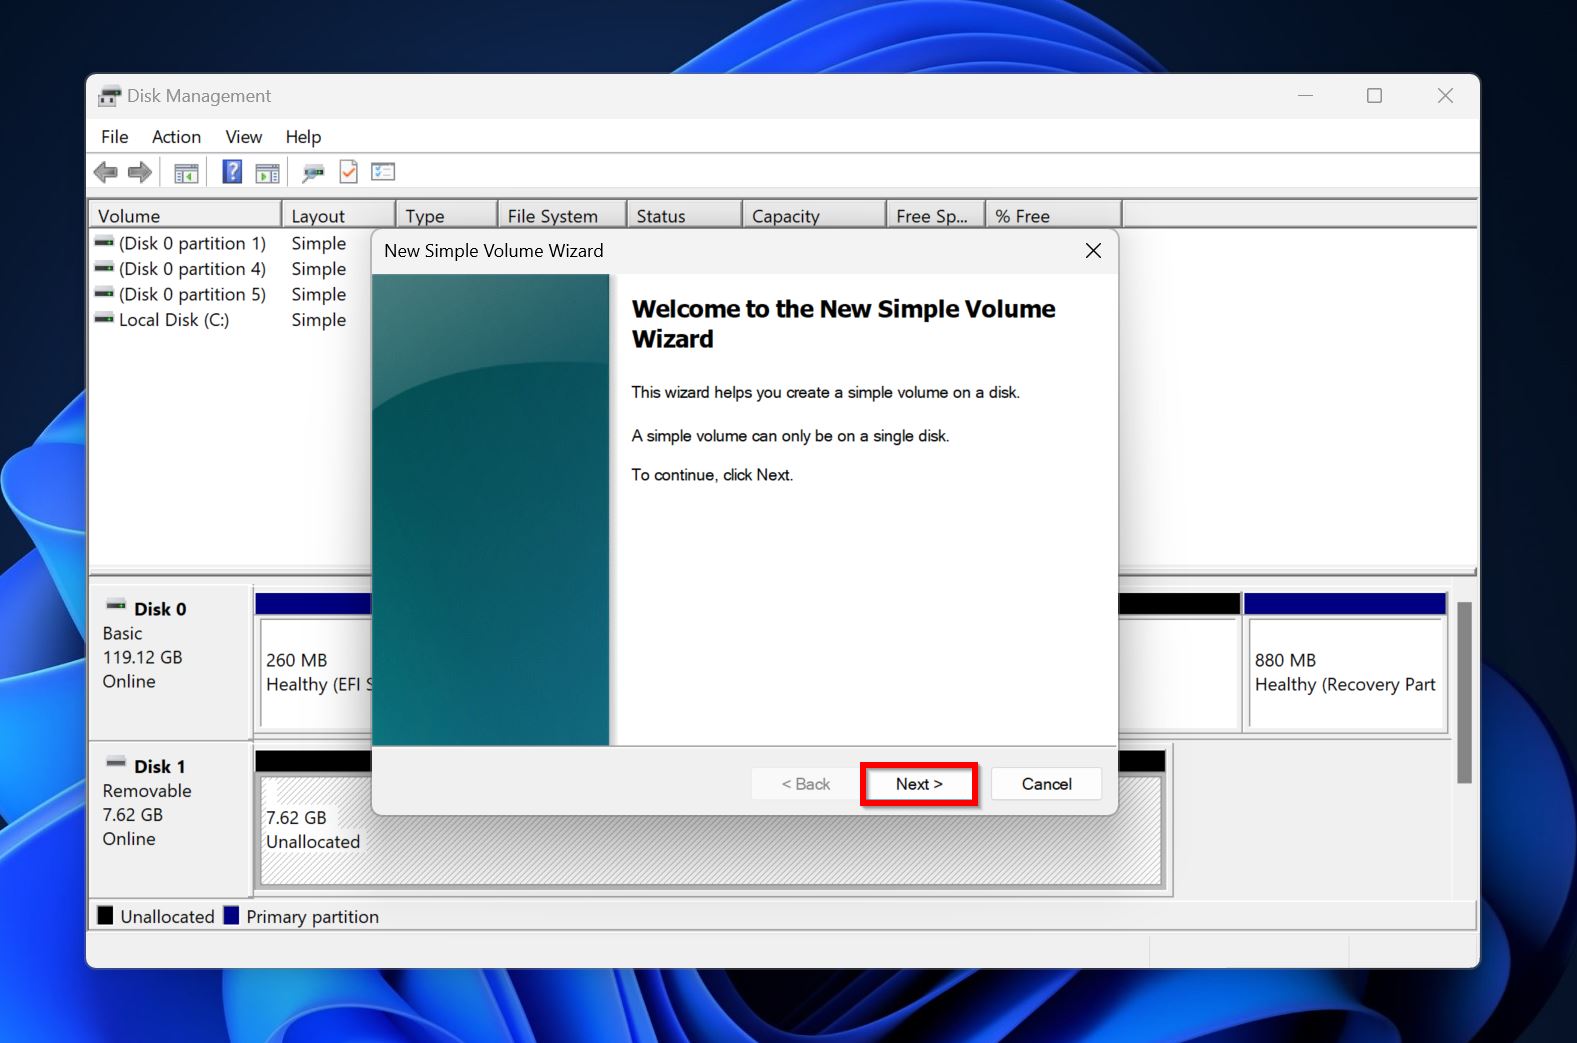
- Click Next on the New Simple Volume Wizard welcome screen.
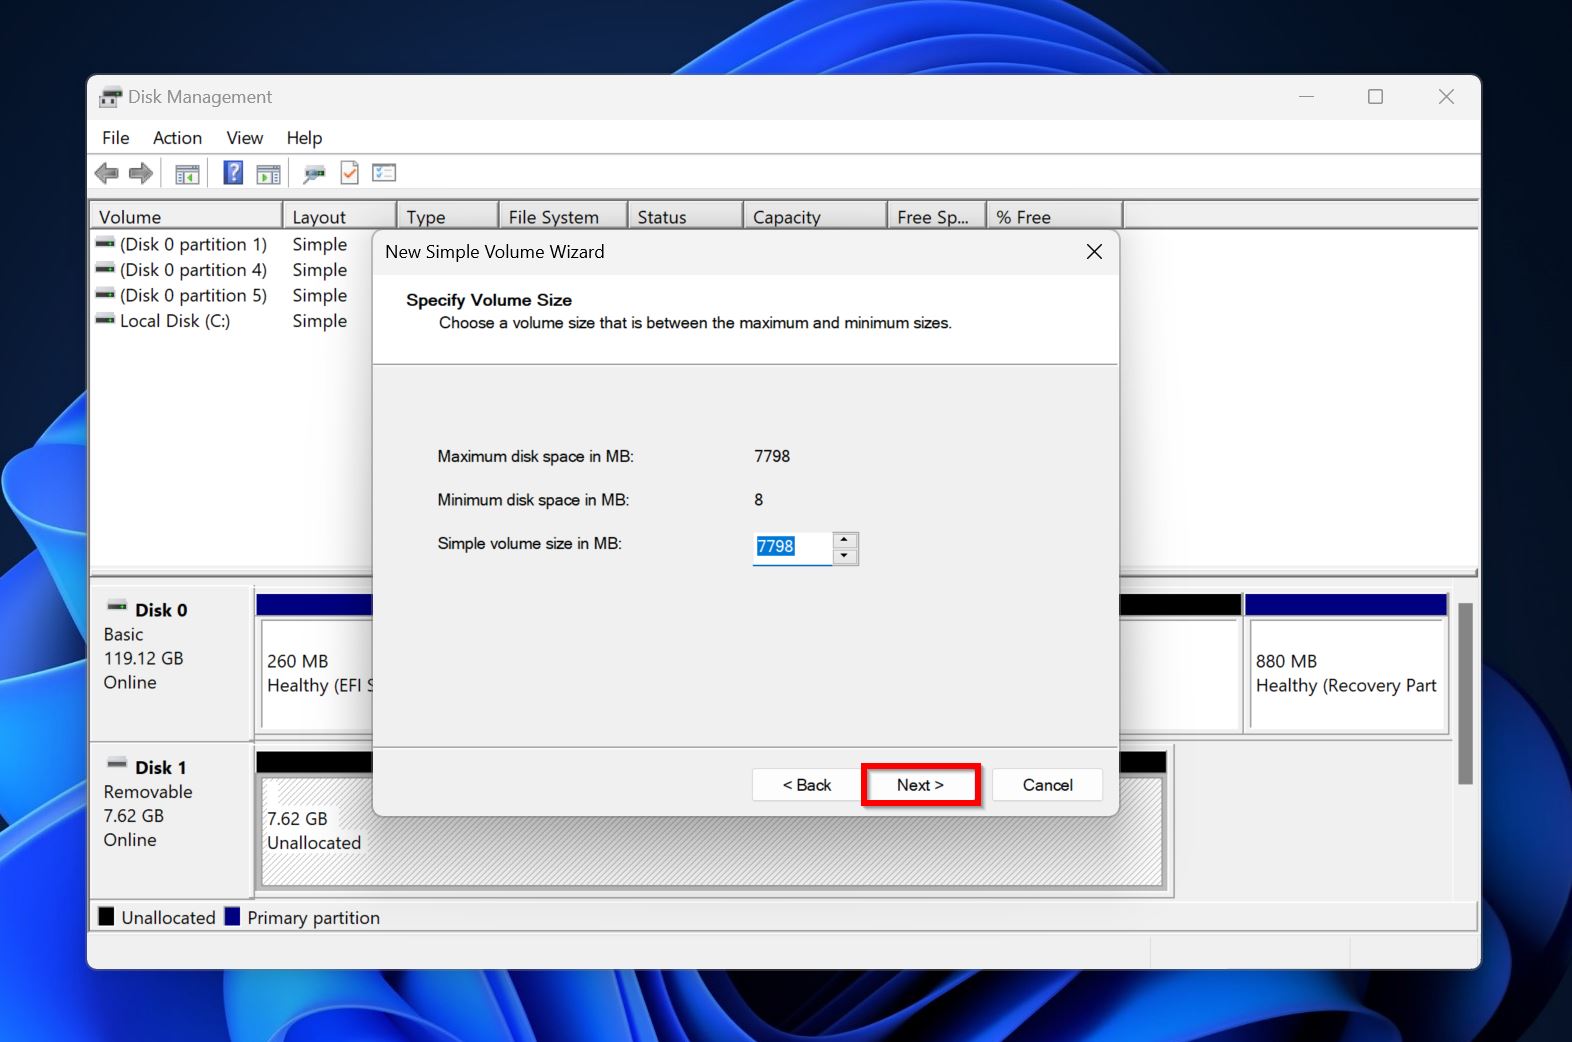
- Choose the size of the partition (in MB) and click Next.
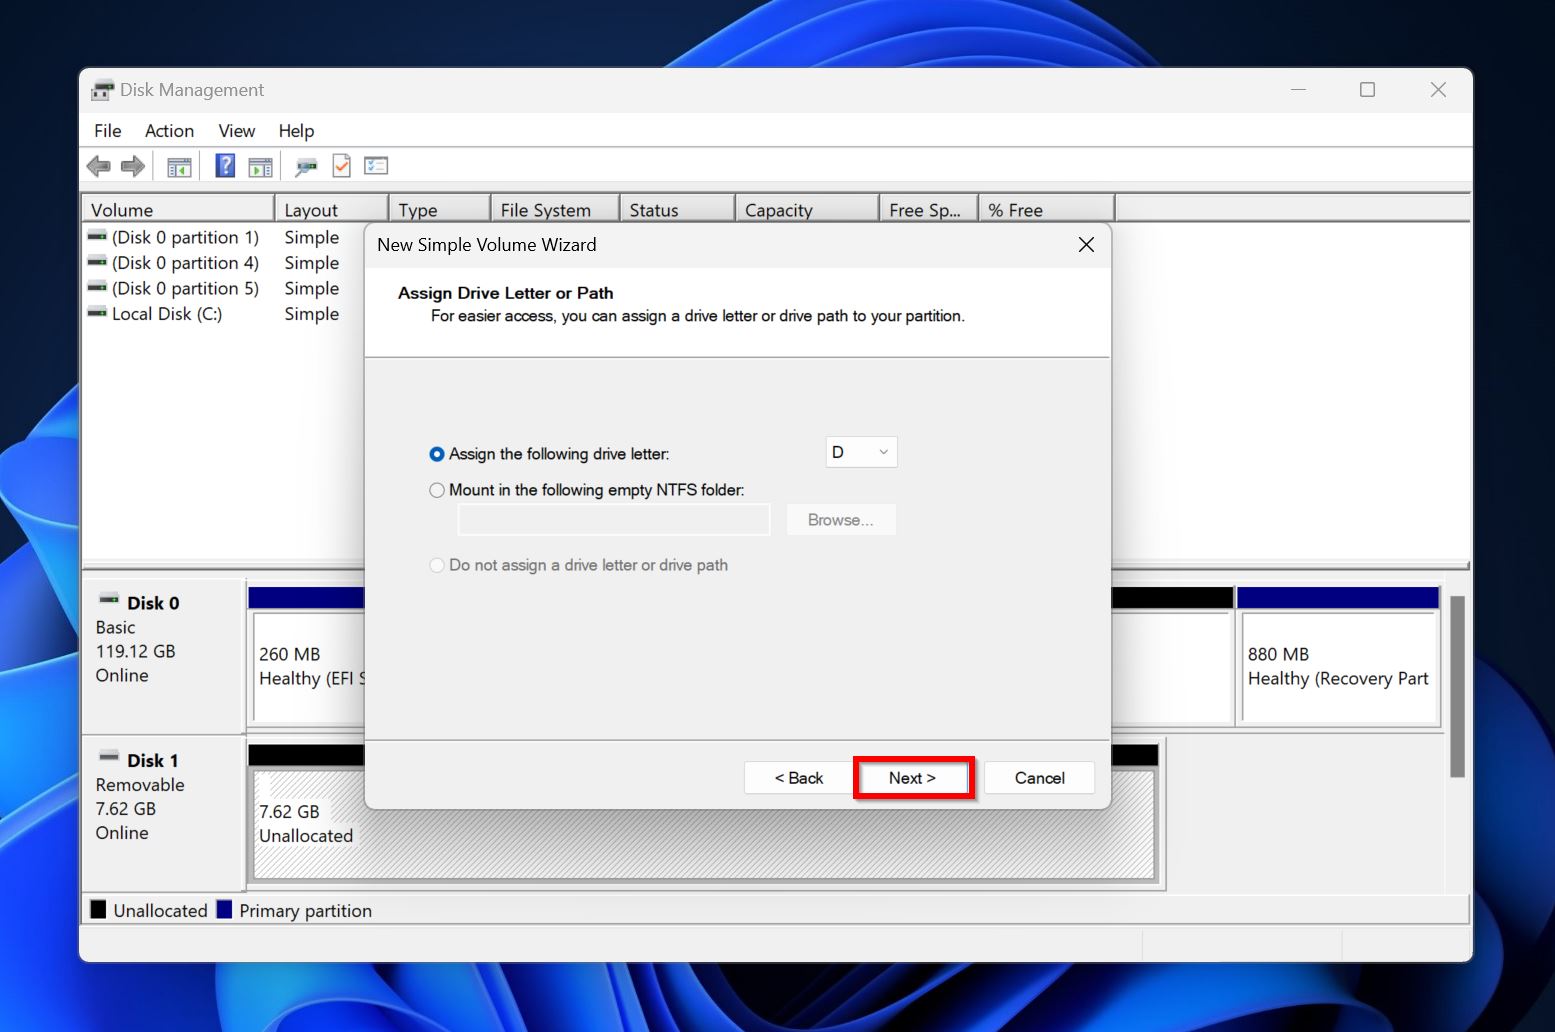
- Pick a drive letter from the drop-down menu and choose Next.
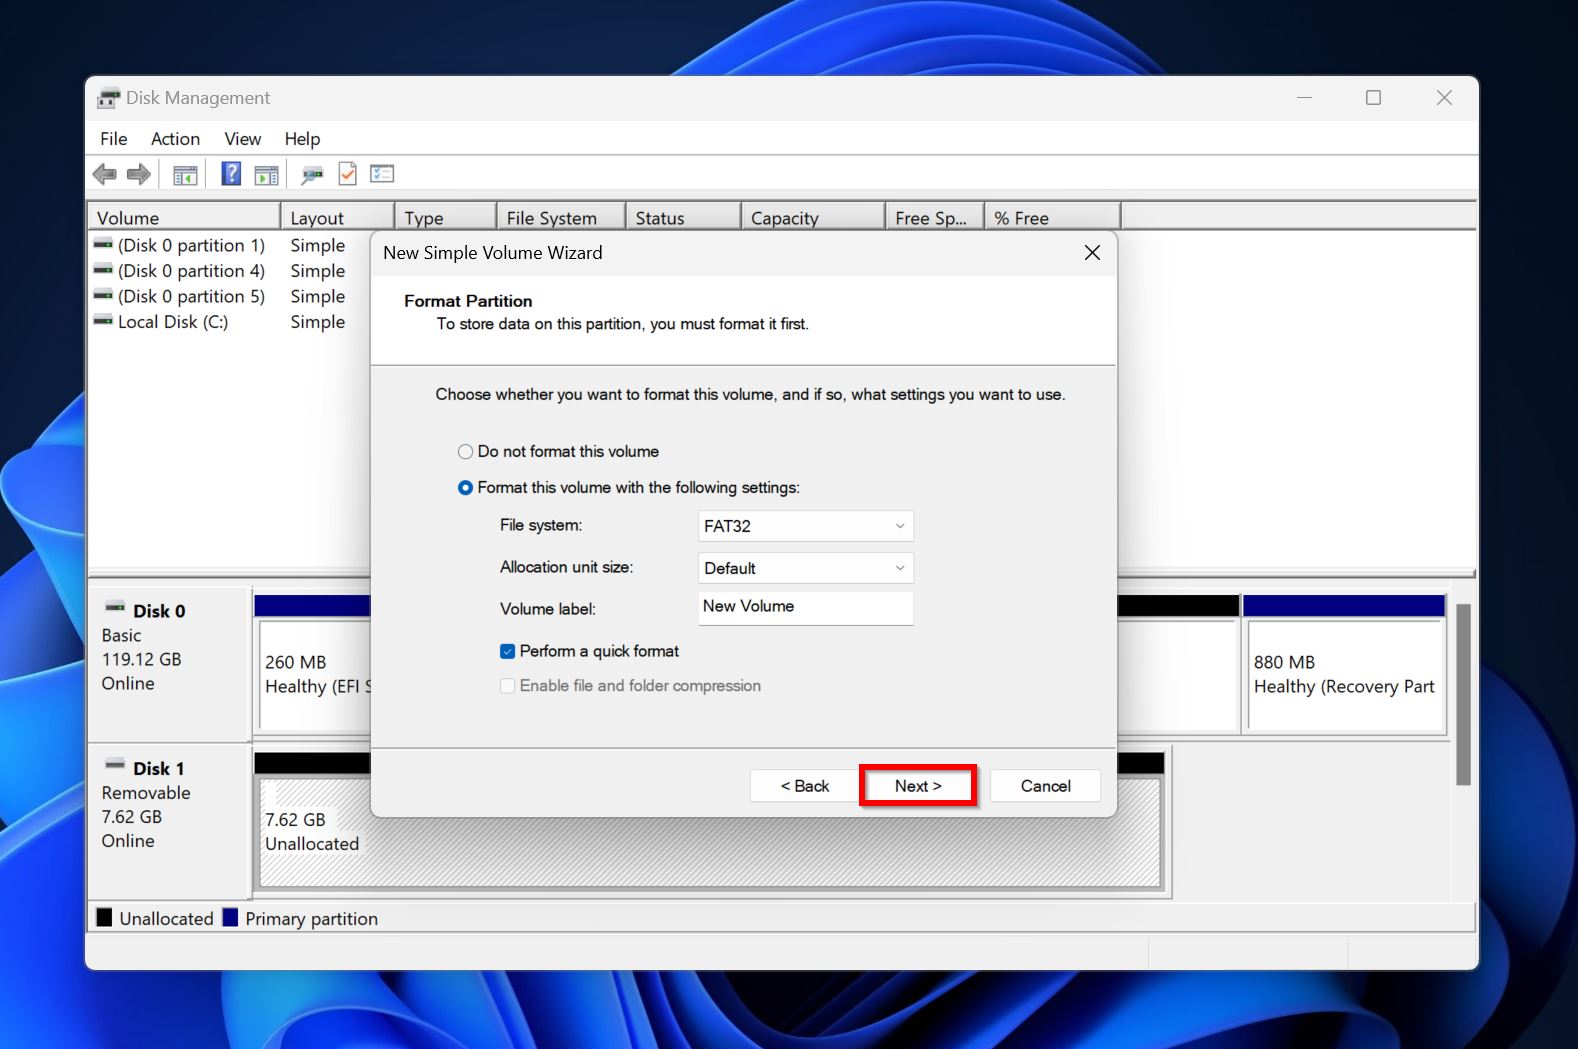
- Assign the required Format parameters or leave them as they are and simply click Next.
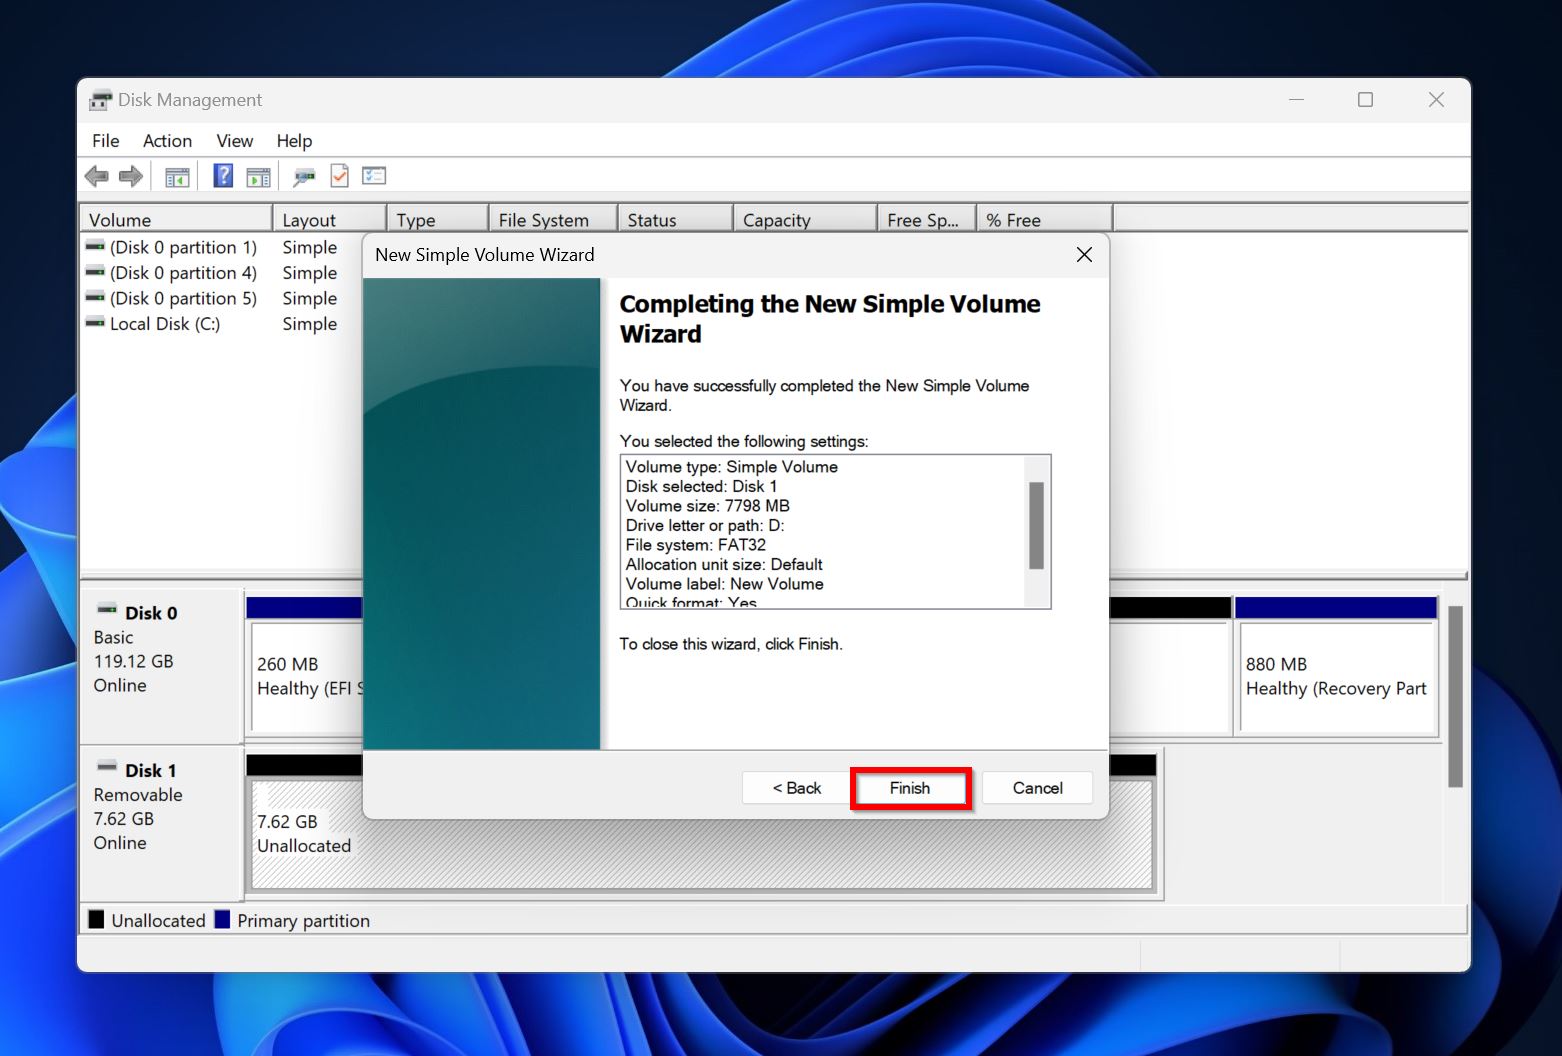
- Click on Finish.
Once you’re done repartitioning, you can safely copy your files back to the drive if you’re sure there’s nothing else wrong with it.
How to Deal With Stubborn Partitions on Windows
Usually, one of the methods above ought to fix the corrupted partition on Windows 10 and Windows 11. But, there may be exceptions where nothing helps you (not even formatting and re-partitioning the drive). Several things can cause this, but the most common culprits are:
- A write-protected partition.
- An accumulation of bad sectors.
- Hardware or connection issues.
- Third-party utilities blocking write operations to the drive.
In this case, first try the methods listed below, and then try re-partitioning the drive:
Method 1: Use Victoria to Scan For Bad Sectors
Windows itself doesn’t offer any user-friendly way to check if your drive has accumulated bad (unreadable) sectors, so many users opt for free third-party tools like Victoria SSD/HDD instead. Using the tool, you can get a detailed overview of your drive’s condition and decide whether it’s the bad sectors that are causing re-partitioning issues.
Here’s how you check for bad sectors using Victoria SSD/HDD:
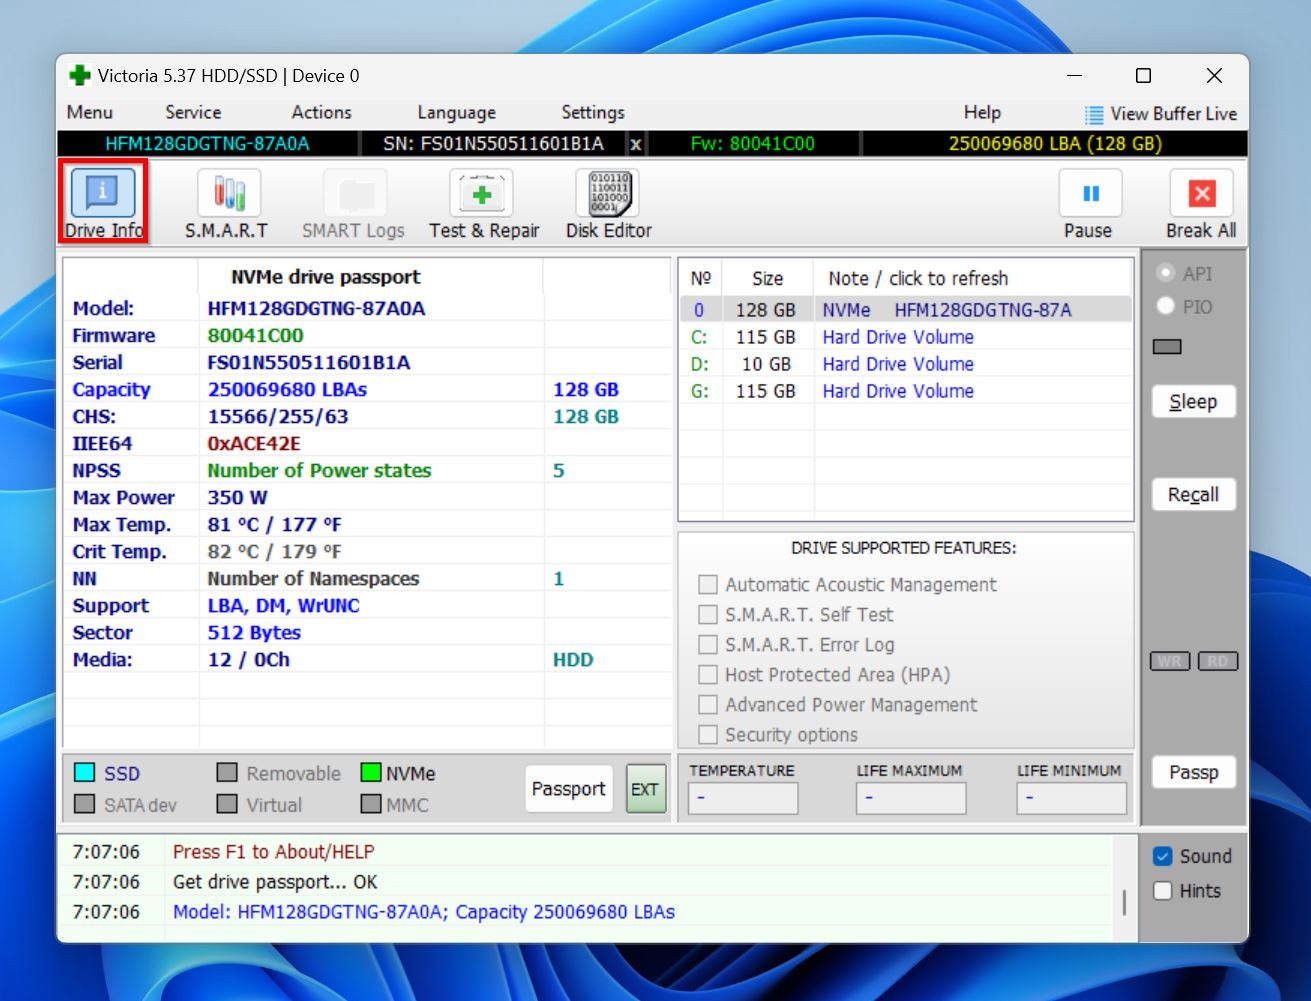
- Download and install Victoria SSD/HDD.
- Launch the app, and click on Drive Info.
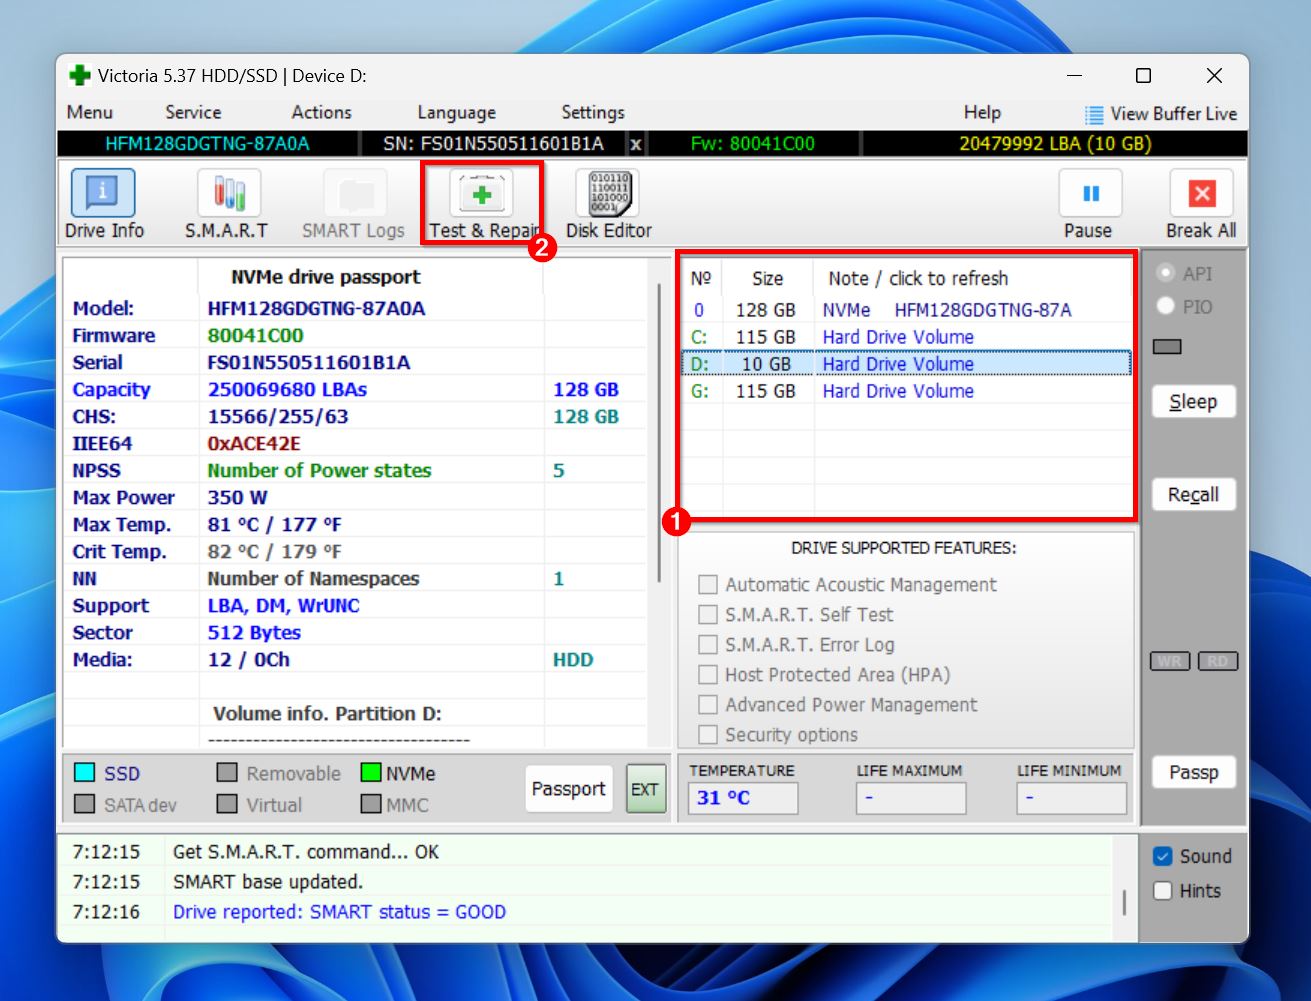
- Select the drive with the corrupt partition from the list, and click on Test & Repair.
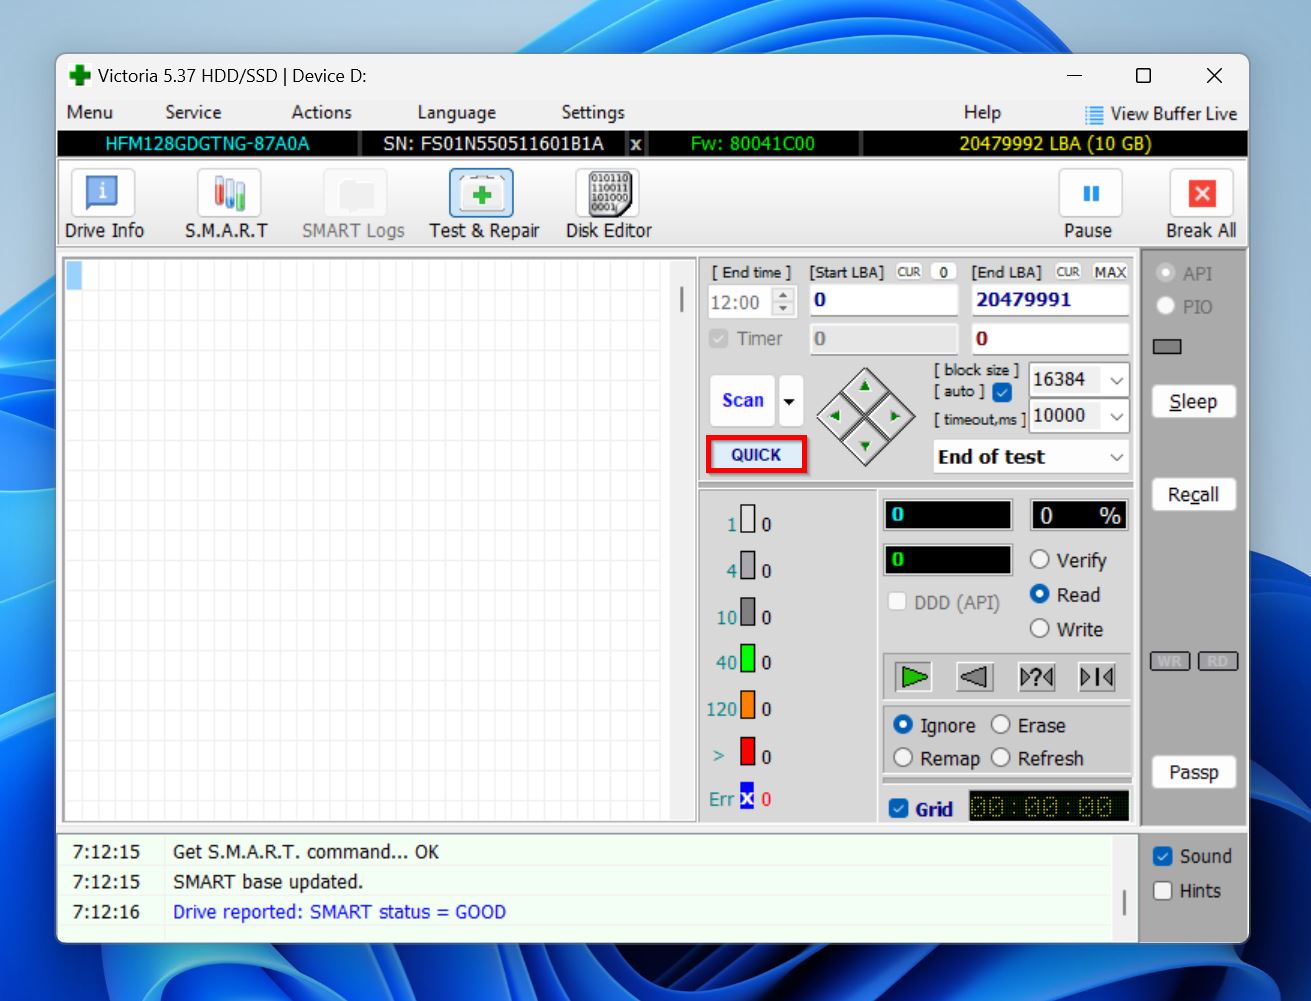
- Click on Quick and wait until Victoria finishes scanning your drive.
- Tick the Grid option in the bottom-right corner of the window.
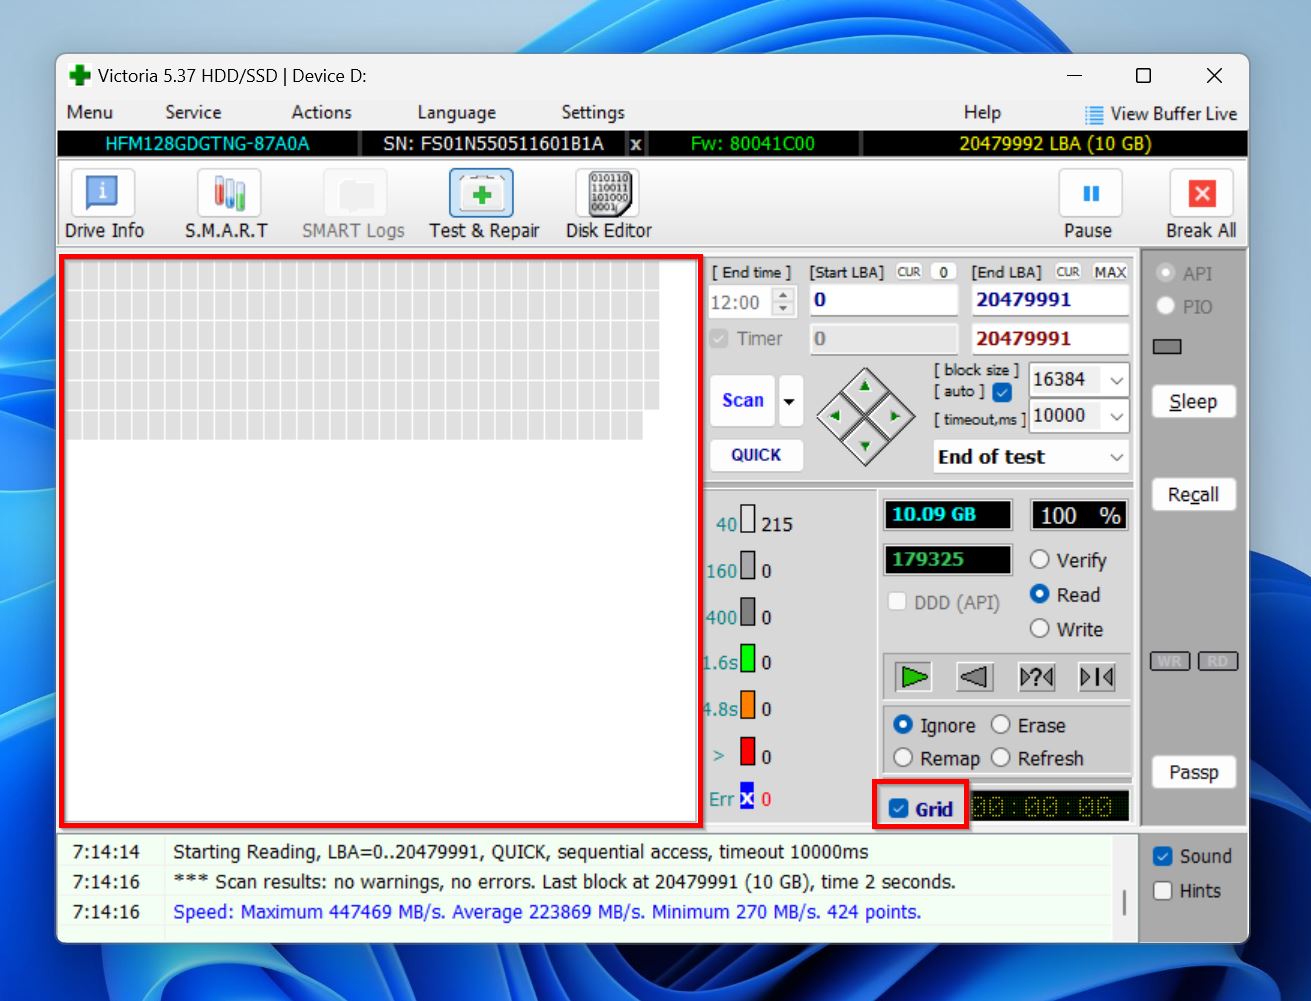
- Any bad sectors on your drive will be marked with an X in the grid.
If the Victoria SSD/HDD scan reveals a lot of bad sectors, it’s worth running a CHKDSK scan with the correct parameters so they can be reassigned. Don’t forget to recover your data before running CHKDSK as it can cause some minor data loss.
Method 2: Clear Read-Only Attributes Using Diskpart
If your drive is set to read-only, you won’t be able to re-partition it. Windows has an in-built utility, Diskpart, that lets you change the attributes of your drive.
Here’s how to clear the read-only attribute from your drive using Diskpart:
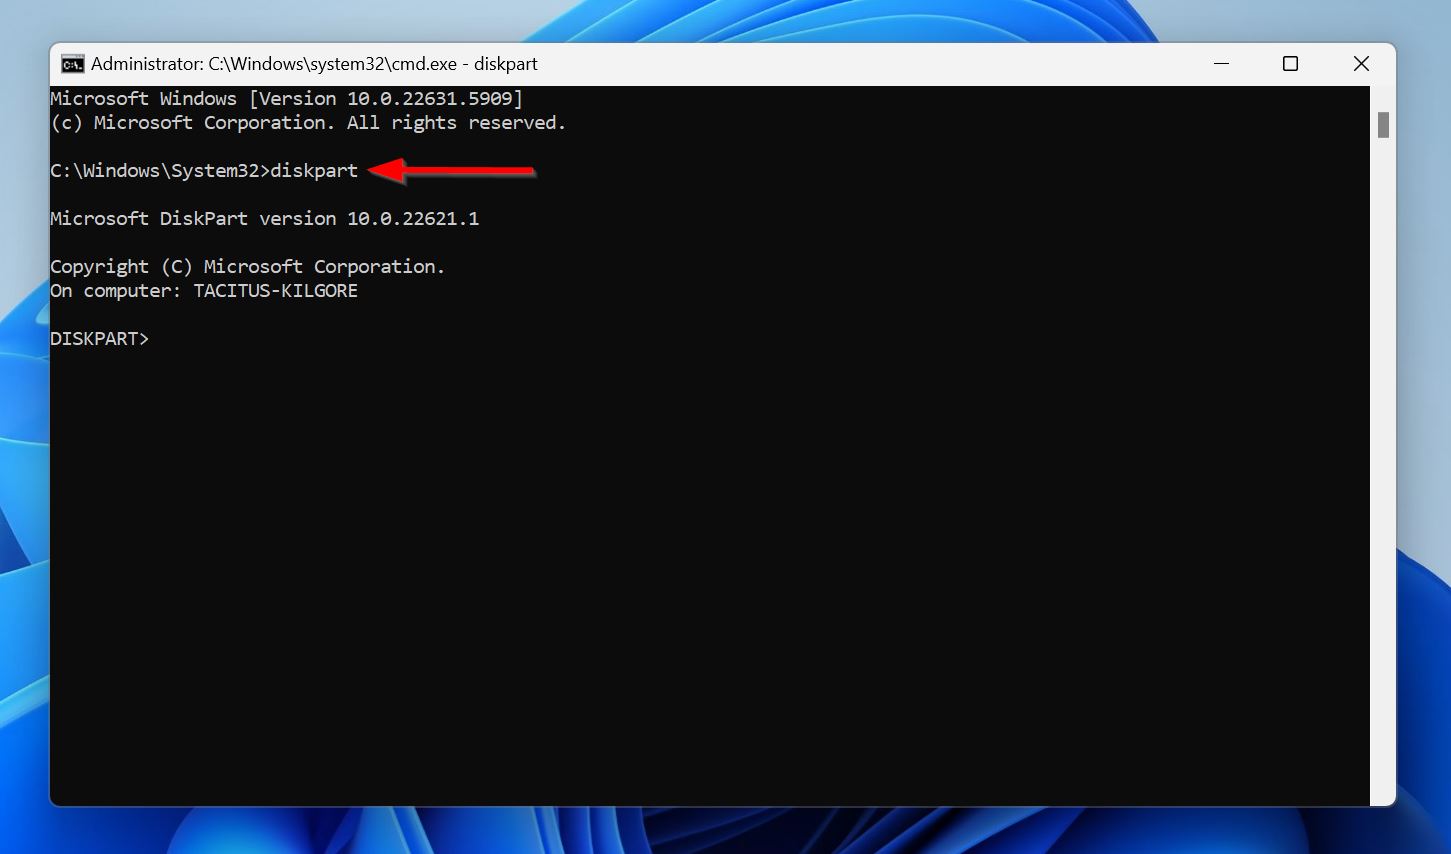
- Type cmd in Windows Search (Windows Key + S). From the search results, right-click on Command Prompt, and click Run as Administrator.
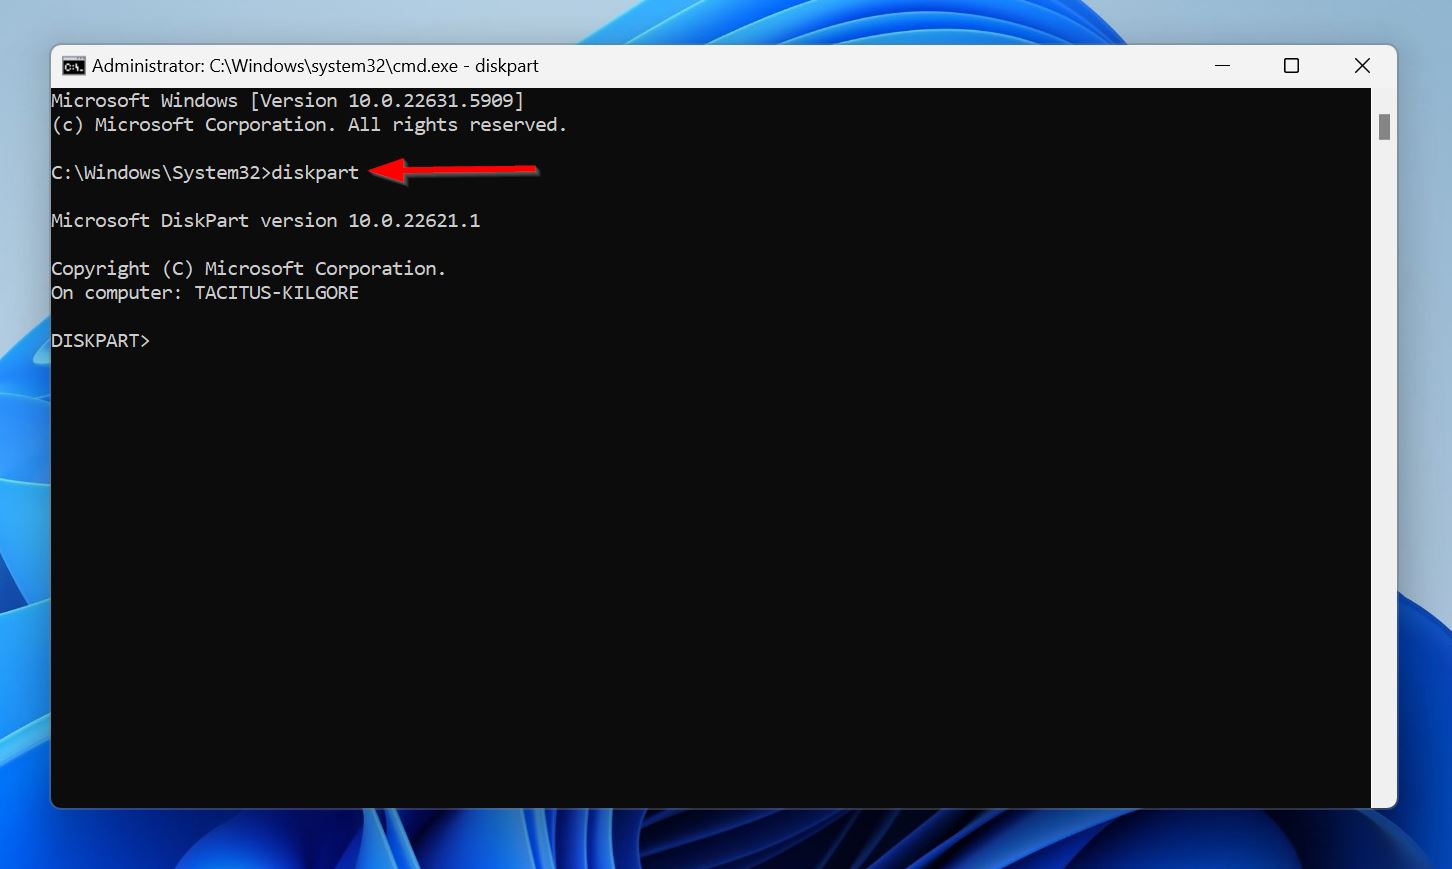
- Type diskpart in the Command Prompt console, and press Enter.
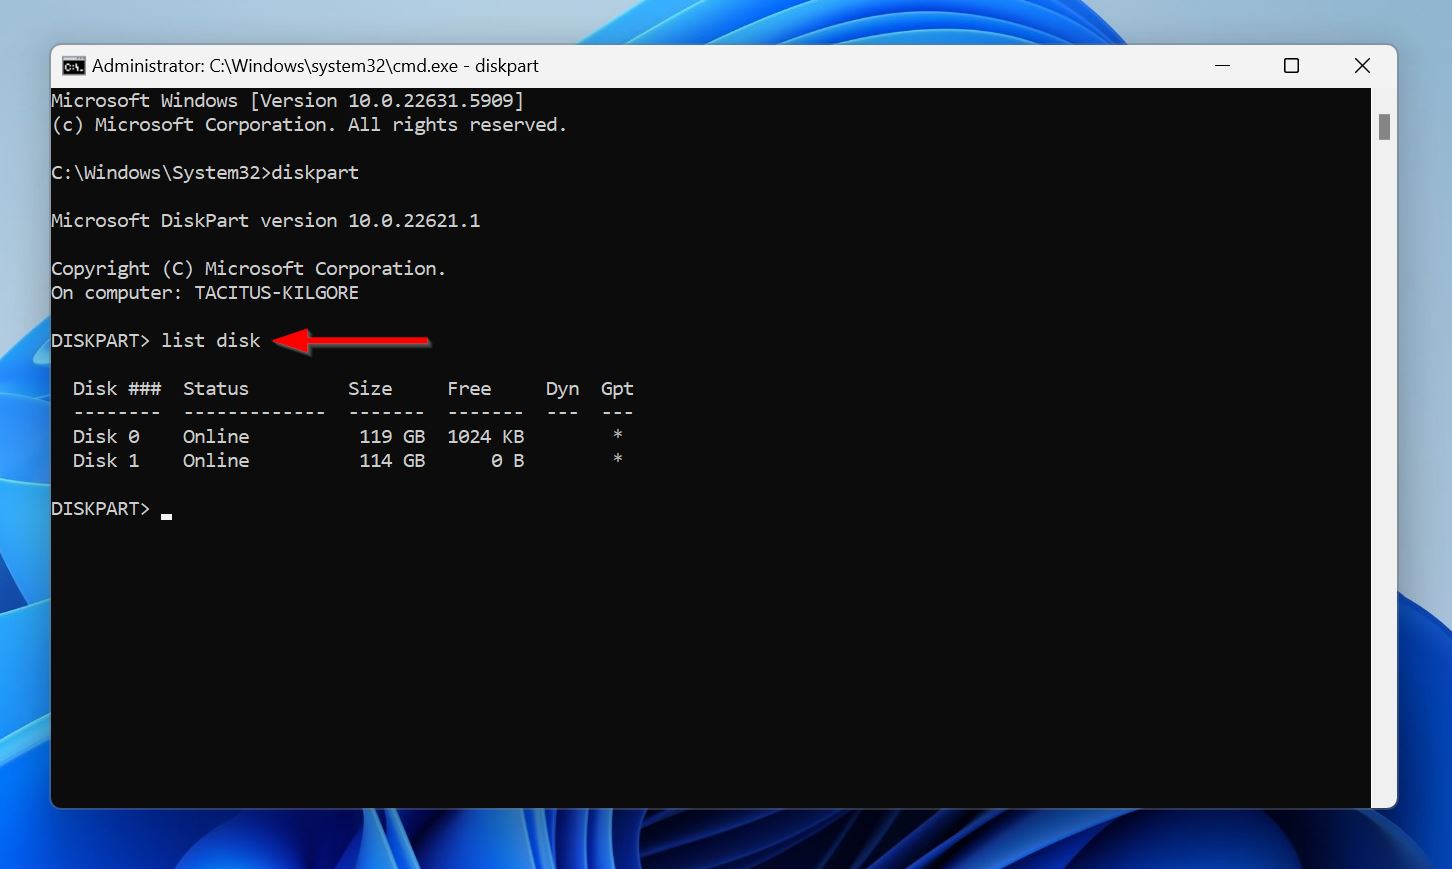
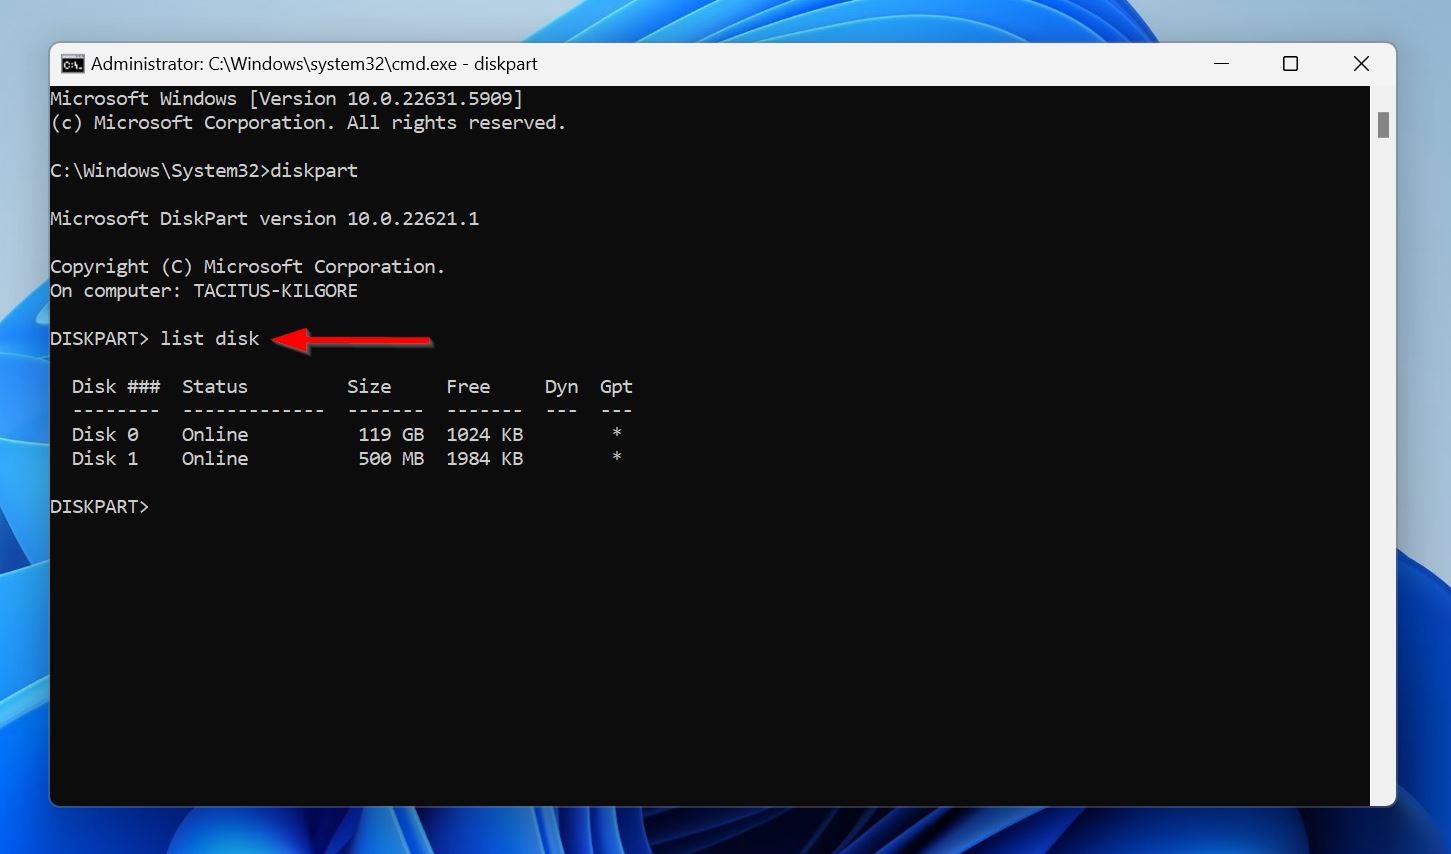
- Type list disk and press Enter. You should see a list of the drives connected to your PC. From this list, confirm which drive contains the corrupt partition.
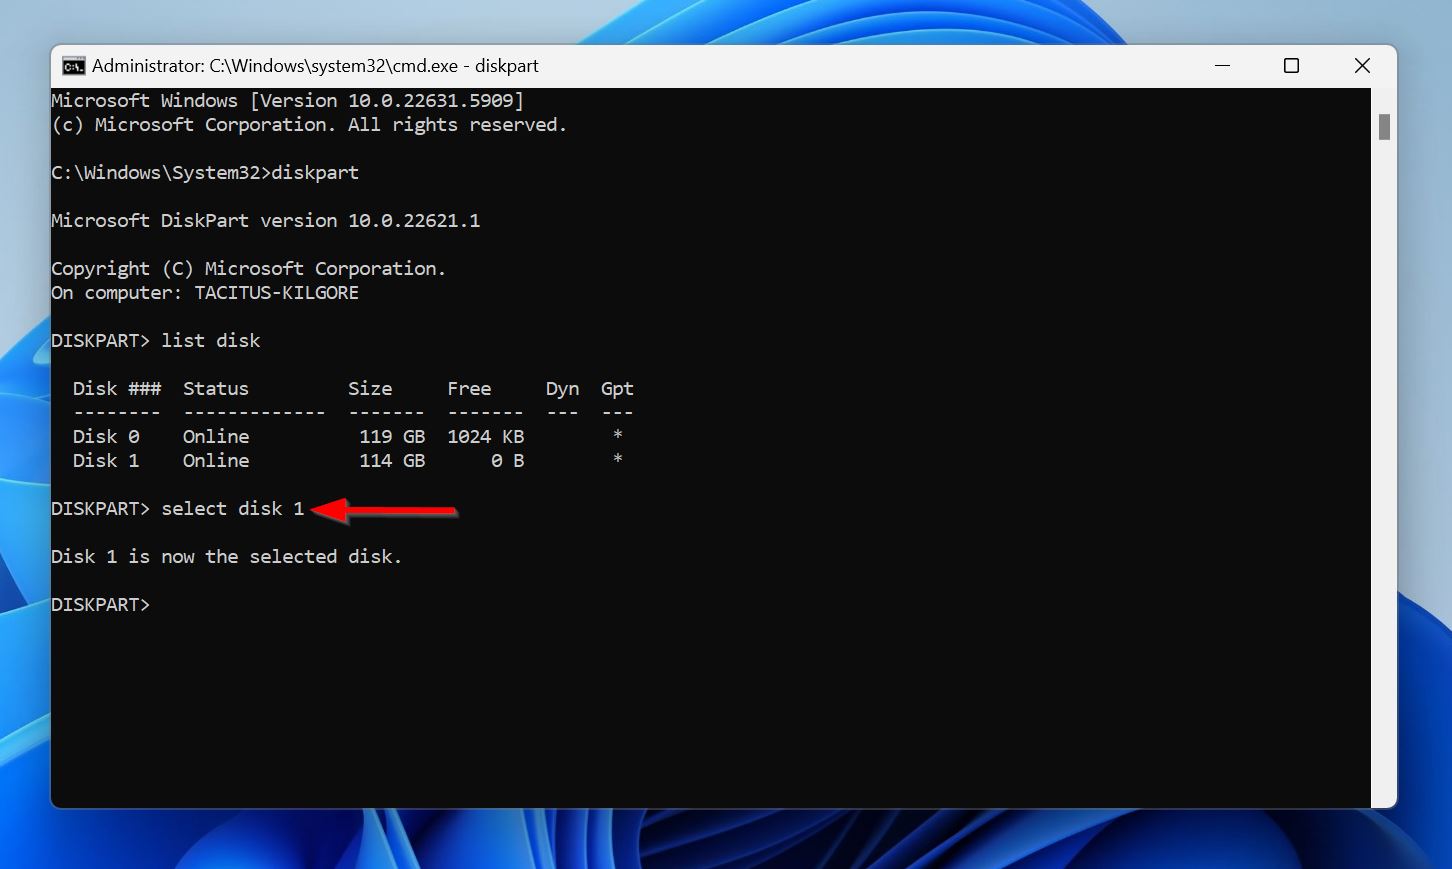
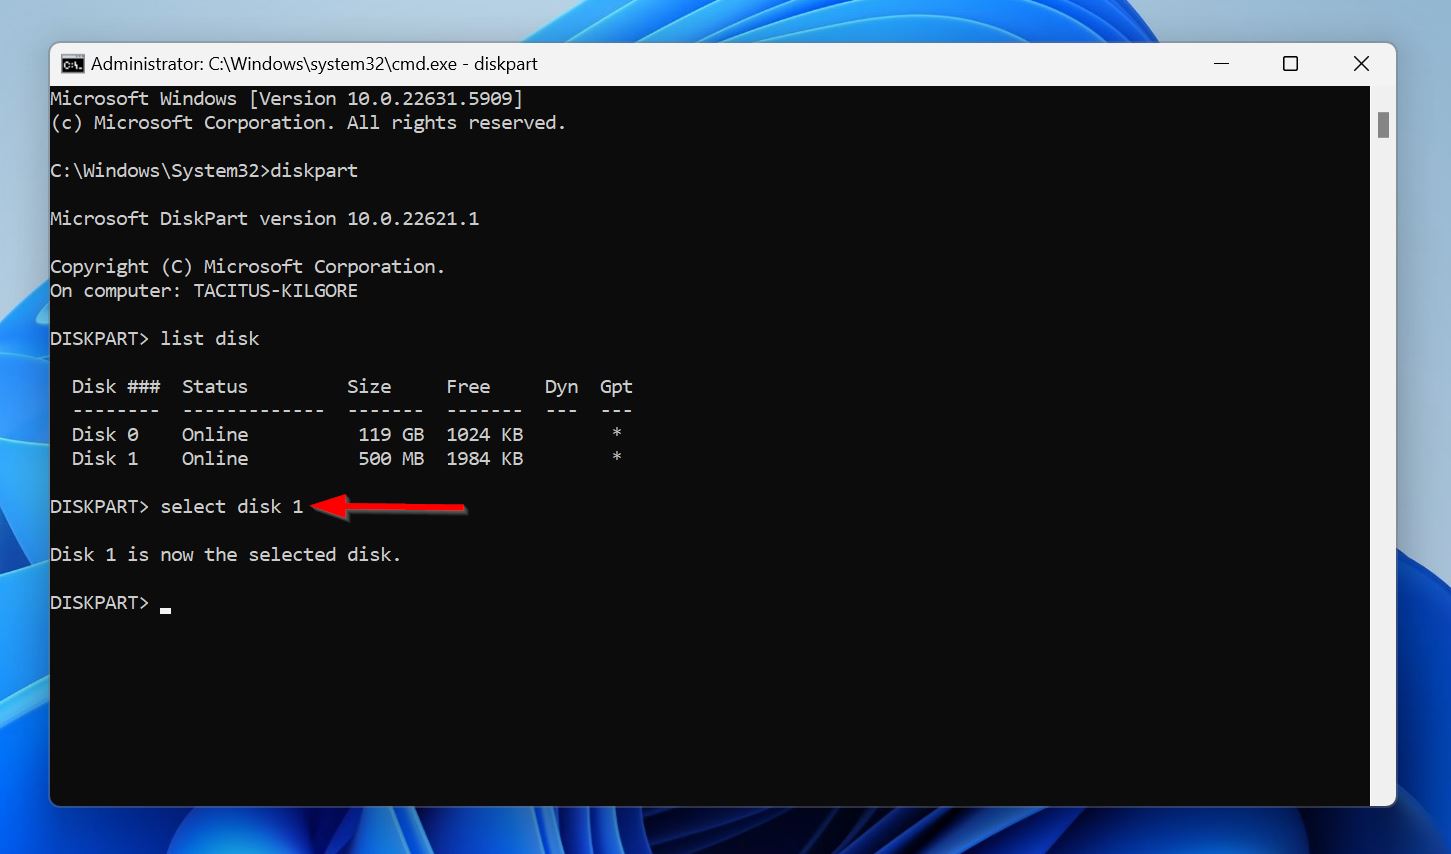
- Type select disk X, replacing X with the disk number like 0, 1, 2, etc. Press Enter.
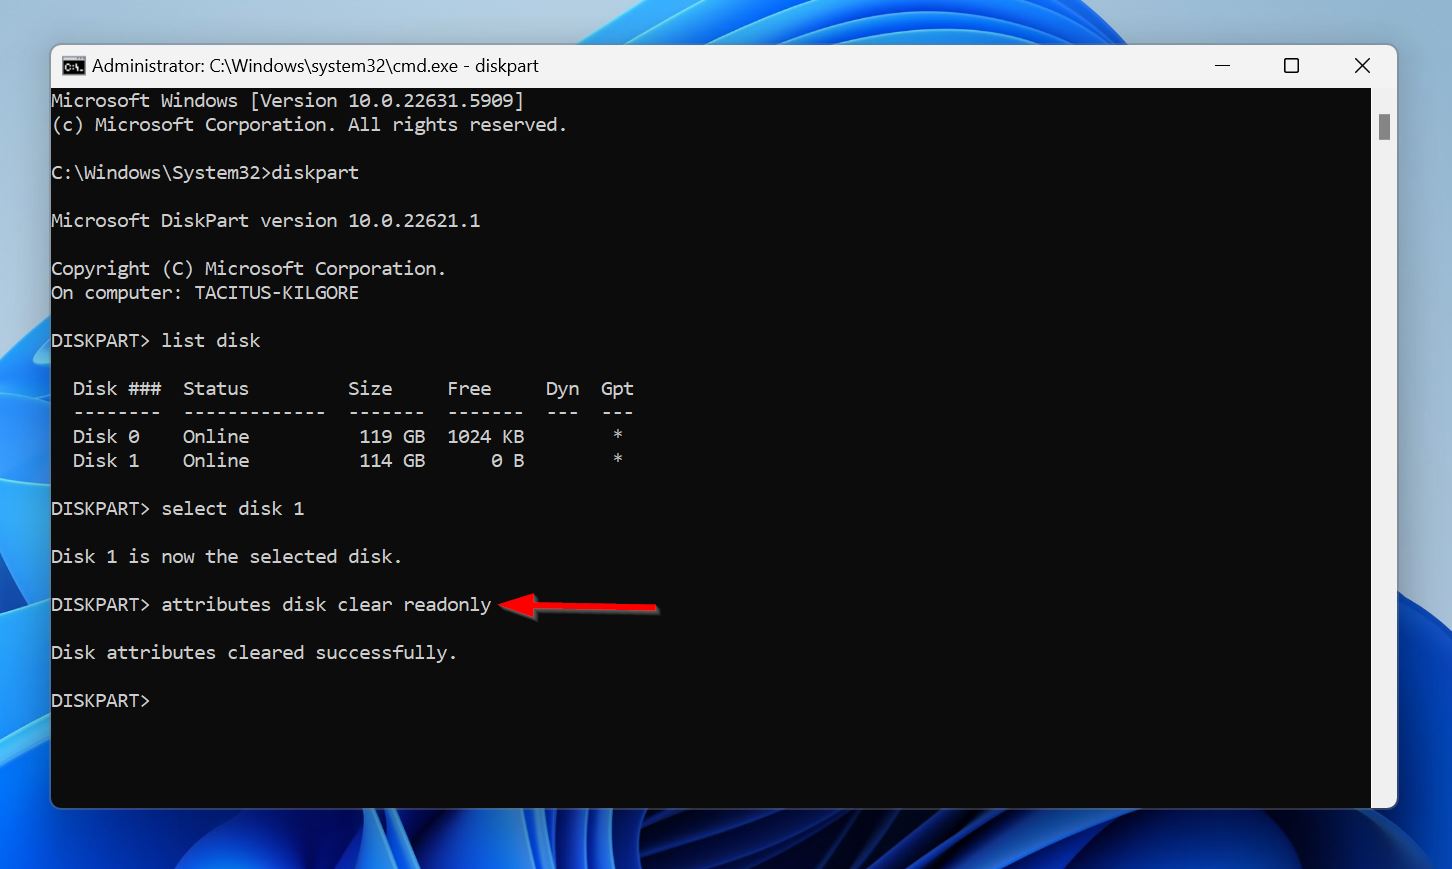
- Type attributes disk clear readonly to clear the read-only attribute from your drive.
Method 3: Clean and Reinitialize the Drive Using Diskpart
When all else fails, your only option to fix a Windows partition, is to give your drive a fresh start. This means using Diskpart to unallocate all storage space and reinitialize the drive. Keep in mind, this removes all your data from the drive, so make sure you recover everything beforehand. Additionally, you can’t clean and reinitialize your Windows’ drive while Windows is running. Either connect the drive to another PC, or access Command Prompt in Windows Recovery Environment (WinRE).
Here’s how to clean and reinitialize a drive using Diskpart:
- Search for cmd in Windows Search (Windows Key + R), right-click on Command Prompt, and click Run as administrator. If you’re in the Windows Recovery Environment (WinRE), click on Troubleshoot > Advanced > Command Prompt.
- Type diskpart and press Enter.
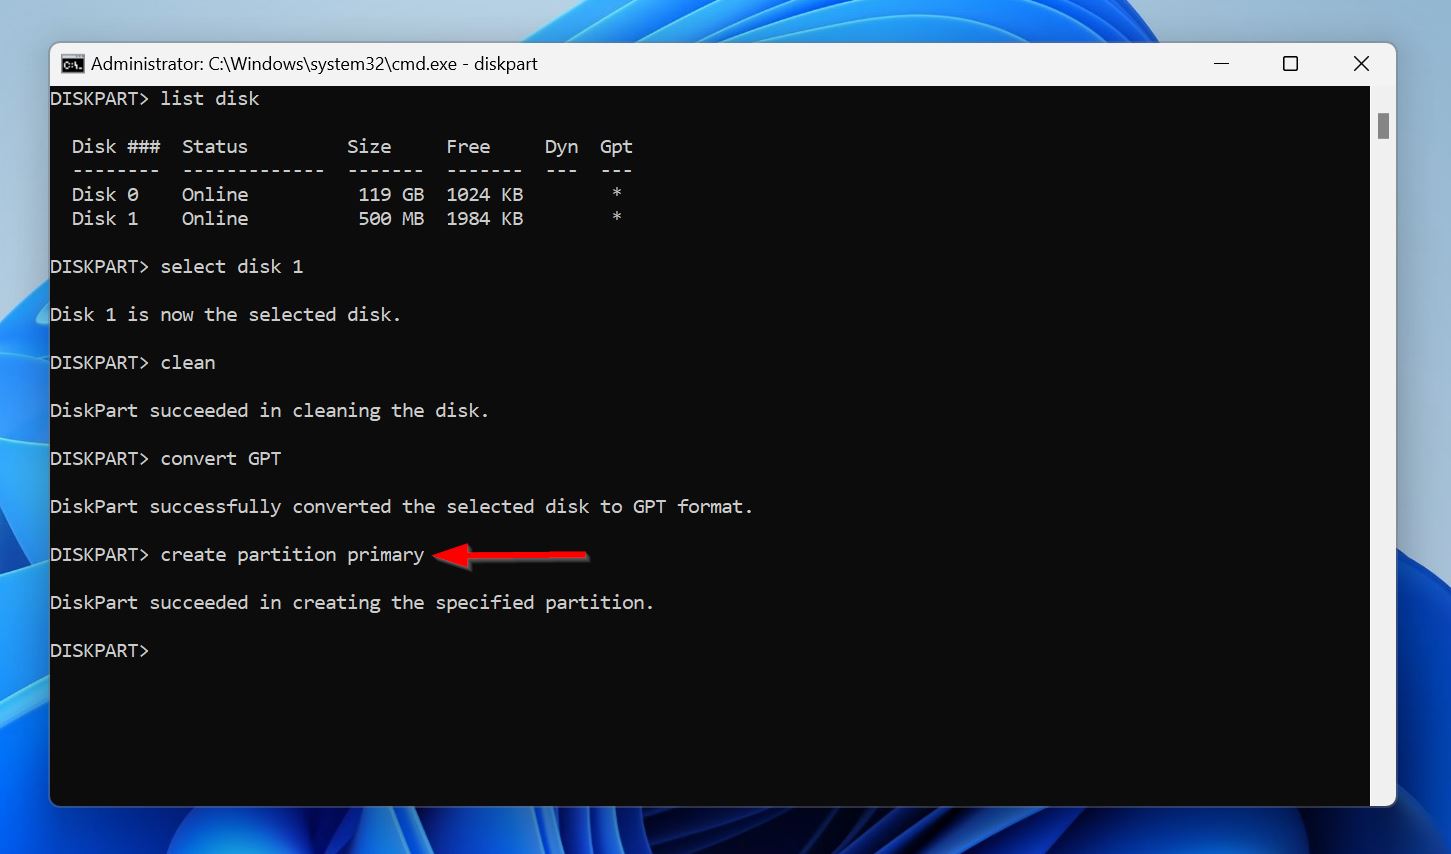
- Type list disk and press Enter to see the drives connected to your PC. Take note of the disk number (Disk 0, Disk 1, etc.) of the drive with the corrupt partition.
- Type select disk X, replacing X with the disk number (0, 1, etc.) and press Enter.
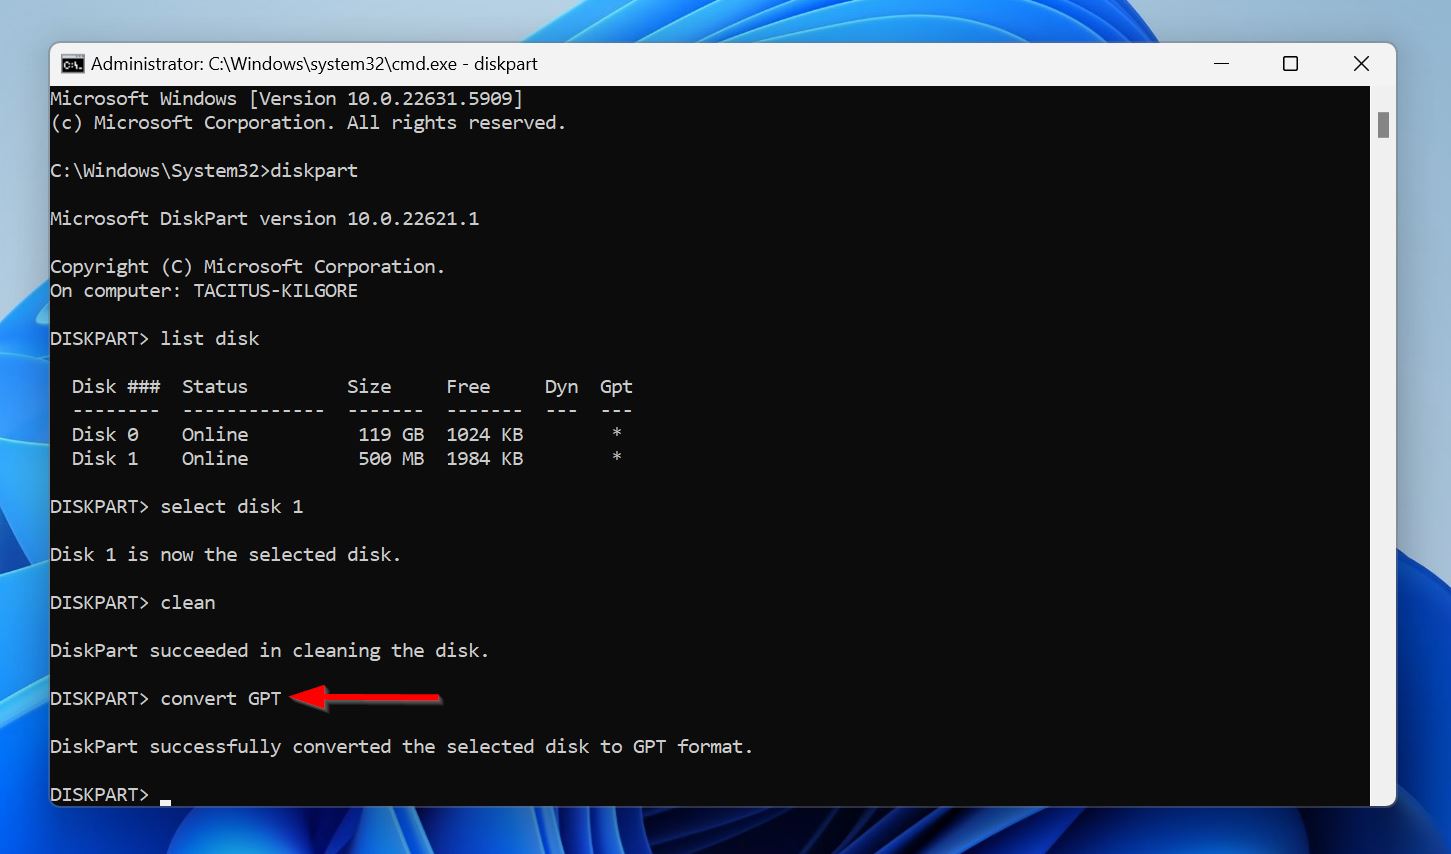
- Type clean and press Enter.

- Type convert GPT and press Enter. This initializes the drive with the GUID Partition Table (GPT).
- Type create partition primary and press Enter. This creates one primary partition that takes up the entire disk. If needed, you can specify the size of the partition by adding the size (in bytes) parameter to the command. For example, create partition primary size=102400 will create a 100 GB primary partition.
- Type format quick fs=NTFS and press Enter. This will format the partition, making it ready to store files. The fs parameter specifies the file system.
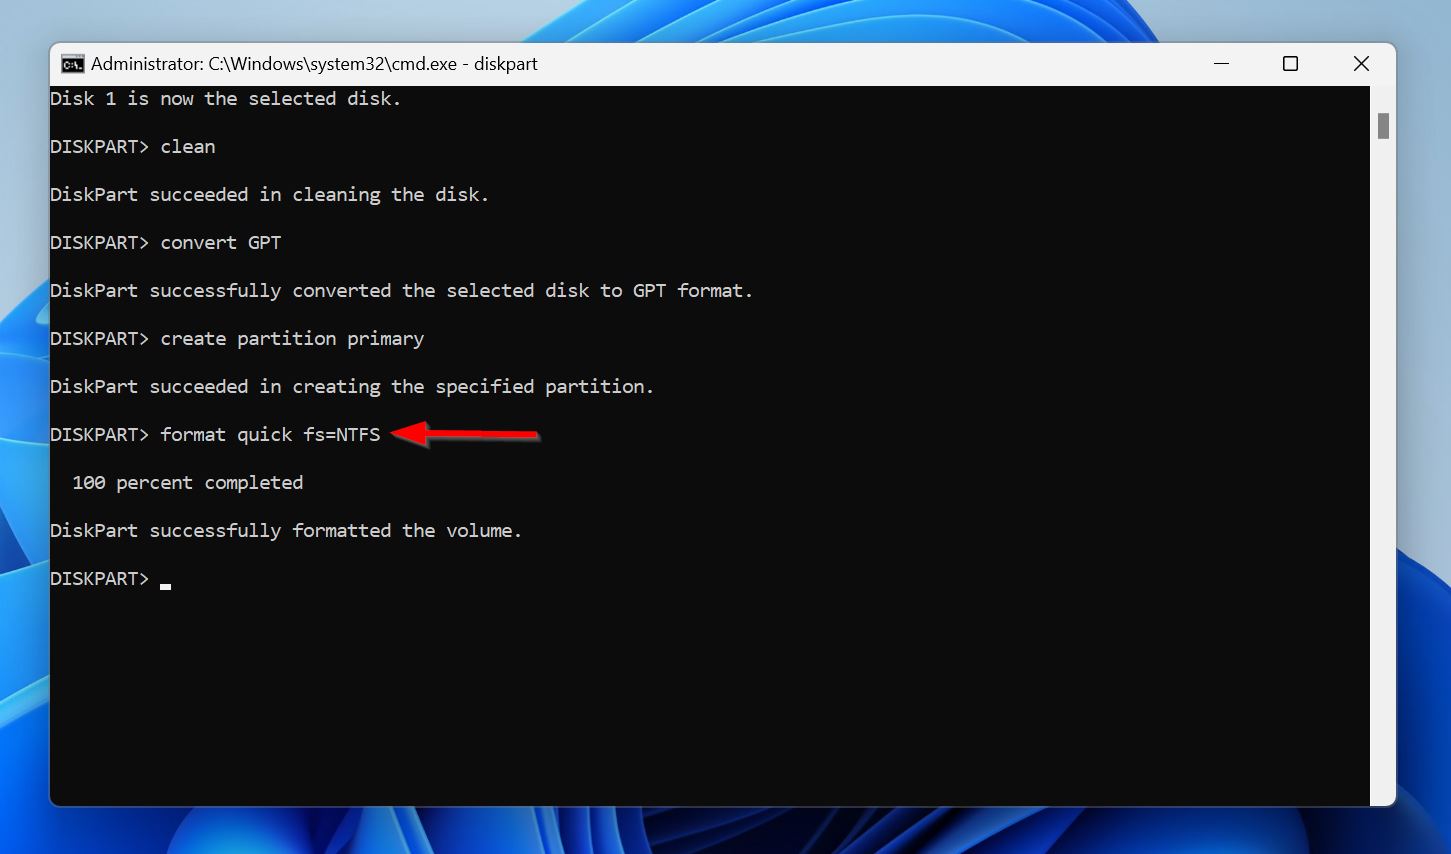
- Close Command Prompt.
No Luck So Far? Contact Our Experts
You can always reach out to us if none of the methods helped you repair the partition, or you’re stuck at one of the methods. We actively respond to comments, so don’t hesitate to drop one below. Alternatively, you can contact us on Facebook, X (formerly Twitter), or LinkedIn, and we will get back to you as soon as possible.
FAQ
- User errors while managing partitions.
- Sudden power loss or unexpected shutdowns while the drive is in use.
- Errors while converting one partition table to another.
- Malware attacks.
- Physical damage.
- Add a drive letter or change conflicting drive letters.
- Run CHKDSK.
- Use TestDisk to repair the partition table.
- Repair the MBR using Partition Table.
- Repartition the drive.


