
When you turn on your computer, the last thing you want to see is a RAW partition. When one of your partitions has become RAW, it usually means something has gone wrong, and you can no longer use it properly or access your files through normal means. To fix this, you’ll need to convert the RAW partition to NTFS by formatting it. At this point, you might assume that formatting will erase all your data, and you’d be right. It won’t just remove access to your files, it will delete them entirely.
That’s exactly why we put this guide together – to show you ways you can convert RAW to NTFS without losing data. Make sure you read all information below before formatting the partition ⤵
What Is a RAW Partition and What Does It Mean for Your Data?
A RAW partition is a volume that no longer has a recognizable file system from the operating system’s perspective. In most cases, it used to be formatted as NTFS (or another file system), but something went wrong, and now Windows can’t interpret its structure. As a result, you lose access to your files, even though they may still physically exist on the drive.
There are several reasons why an NTFS partition can suddenly become RAW. Common ones include file system corruption caused by power loss or unsafe removal, accidental damage to the partition structure, malware interference, unsupported file systems, or physical issues like bad sectors.
When this happens, the first thing you should do is check whether the issue is related to your current system. Try connecting the drive to another computer. If it’s an external drive, simply plug it into a different machine. If it’s internal and you have enough technical experience, remove it and connect it externally using an adapter or another system. Sometimes the partition appears RAW only due to compatibility issues.
If the problem persists across multiple systems, the usual way to change from RAW to NTFS is formatting. However, you should proceed carefully. One common mistake is running CHKDSK. Even though it’s generally stated that CHKDSK doesn’t work with RAW partitions, in some cases, like when the NTFS boot sector is damaged, but its backup is still intact, it may attempt to repair the file system. While this can make the partition accessible again, it may also cut off parts of your data or cause partial data loss.
How to Convert RAW to NTFS Without Losing Data
As we’ve already mentioned, there are two key things to understand about a RAW partition. First, the most common way to fix it is formatting. Second, formatting will erase all the data stored on that partition. That’s why your priority should always be the data first, and only then the process of converting RAW to NTFS.
Since you don’t have direct access to files on a RAW partition, the only reliable way to protect them is by using data recovery software. A good tool should not only recover files but also allow you to create a full image of the drive, so you can work with a copy instead of risking further damage to the original device.
In our case, we didn’t find a better all-in-one option than Disk Drill. It allows you to both create a byte-to-byte backup and recover data from RAW partitions, which makes it a practical choice for this workflow. Below, we’ll walk you through the entire process step by step.
Step 1: Create a Byte-to-Byte Image of the RAW Drive
While Disk Drill’s main feature is data recovery, it also includes a tool that lets you create a byte-to-byte image of the disk.
This step isn’t strictly required if you’re confident that the drive became RAW due to something minor and not because of file system corruption or bad sectors. However, if you’re not sure about the cause, it’s safer to take the time to create an image first. Drives with underlying issues can behave unpredictably during a scan, and there’s always a risk they may disconnect or fail completely under load. So creating a byte-for-byte backup ensures you have a full copy of the data, allowing you to continue recovery without putting additional stress on the original device.
- Download, install, and open Disk Drill.
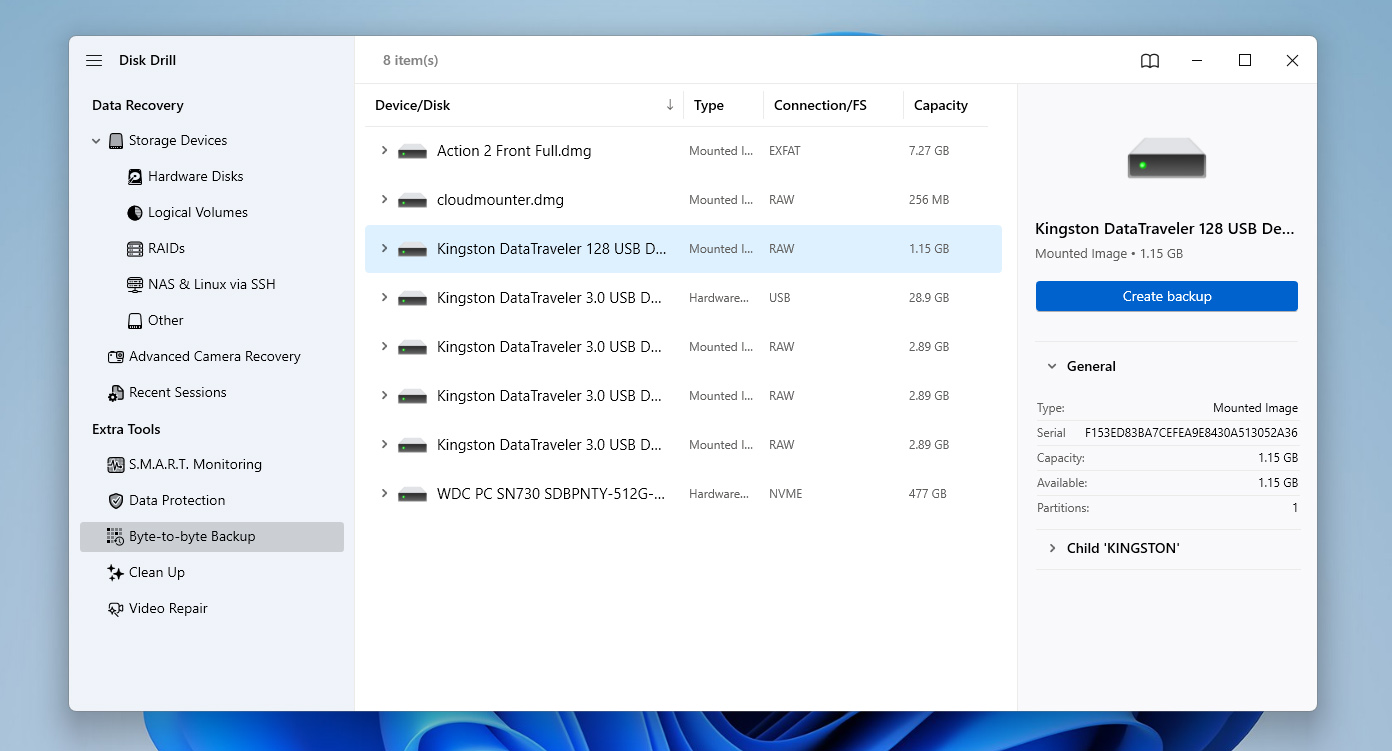
- When the app launches, you’ll land on the Storage Devices tab by default. From there, switch to the Byte-to-byte Backup section using the left-hand panel.
- You’ll see a list of all available drives. Locate the one with the RAW file system, click on it to select it, then click Create Backup.
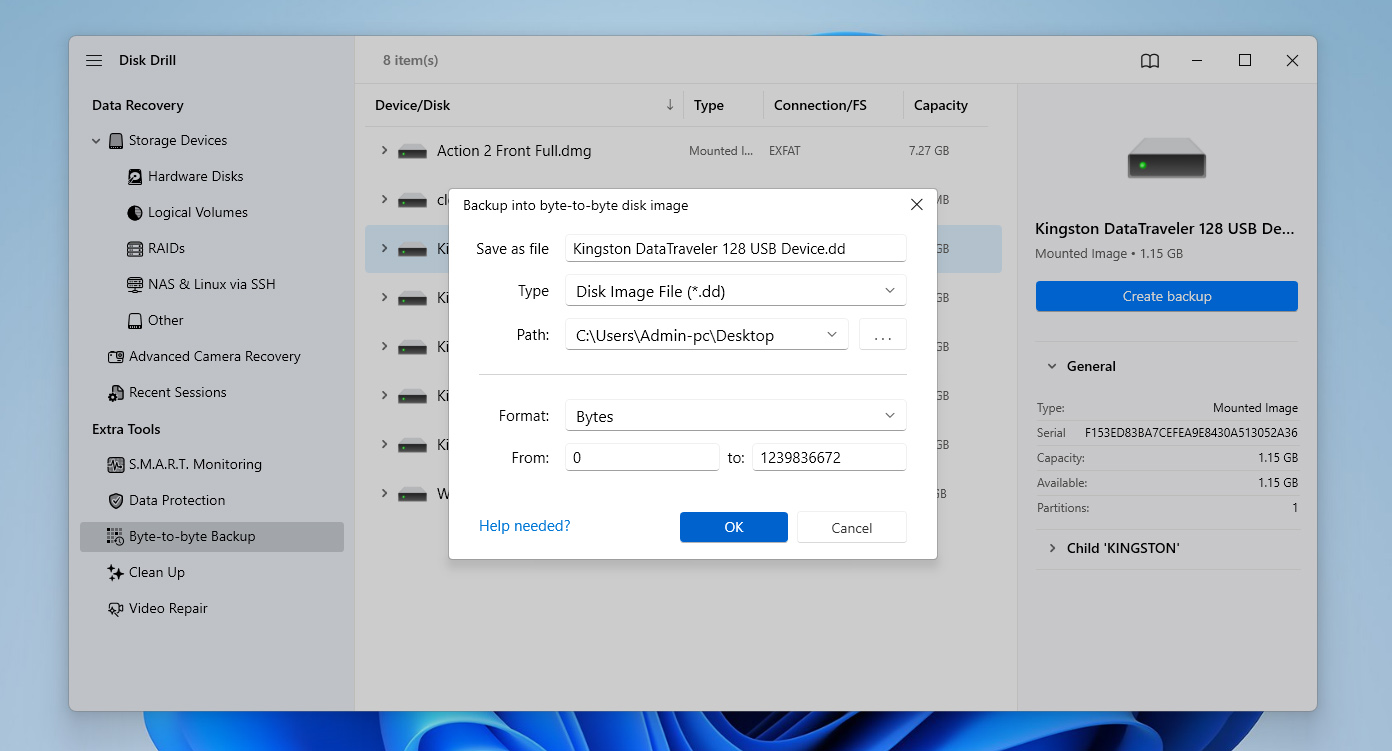
- A small window with image settings will appear. Choose a destination folder where you want to save the backup, then click OK.
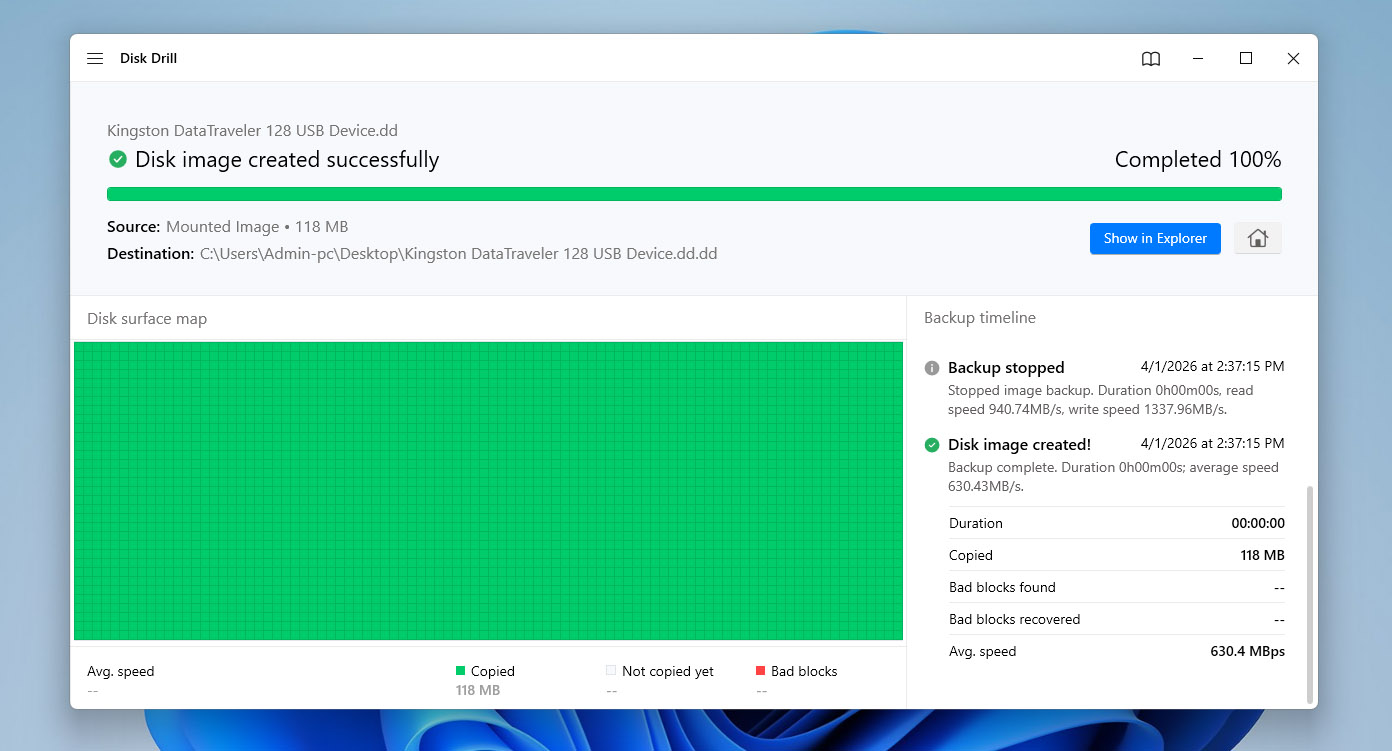
- Disk Drill will begin creating the image and show you the status of each block in real time – green indicates copied sectors, while red highlights bad blocks. Wait until the process completes, then you can close or minimize the app.
Once that’s done, you can move on to fixing the RAW partition, knowing your data is protected and you can proceed without risking data loss.
Step 2: Format the Drive to Convert RAW to NTFS
Once the part of the process responsible for data safety is complete, you can move on to the main step – formatting the drive. On Windows, there are several ways to do this. We’ll go through each option, starting with the simplest and moving toward more advanced methods. All of them lead to the same result (they convert the RAW file system to NTFS), and the only difference is how convenient they are.
Option 1: Convert RAW to NTFS Using File Explorer
The File Explorer in Windows provides the simplest way of formatting your drive with the NTFS file system to repair RAW partitions. Though it may not work in all cases, it’s still the simplest and fastest way to format the partition to the other file system.
- Open File Explorer.
- Right-click the drive that contains the RAW partition, then click Format.
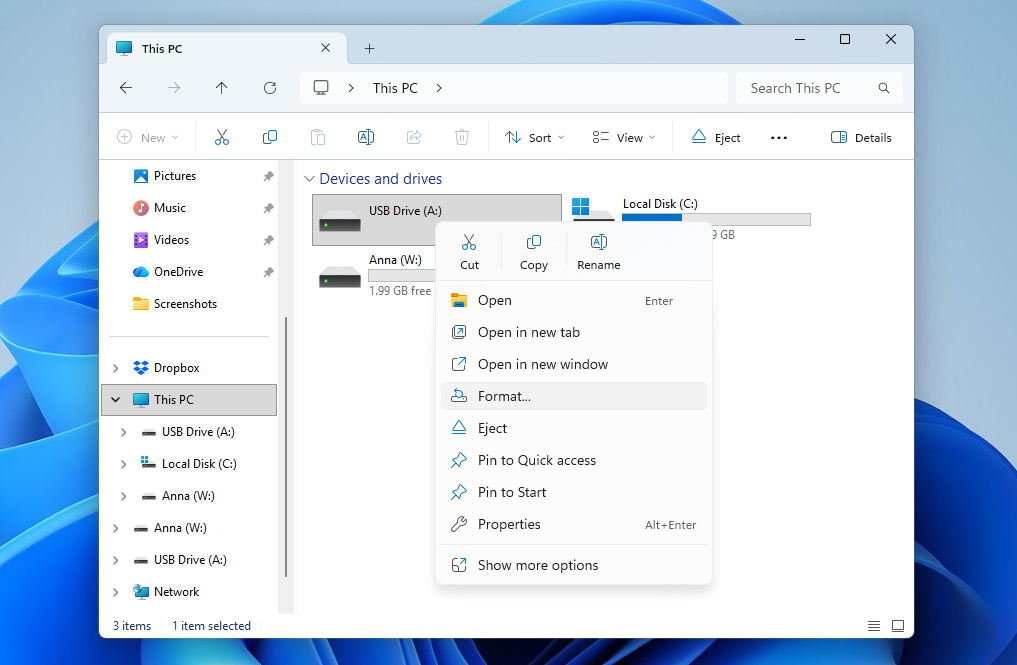
- Specify a volume label (or leave it blank), and select NTFS as the file system. Ensure that Quick Format is enabled, and click Start when ready.
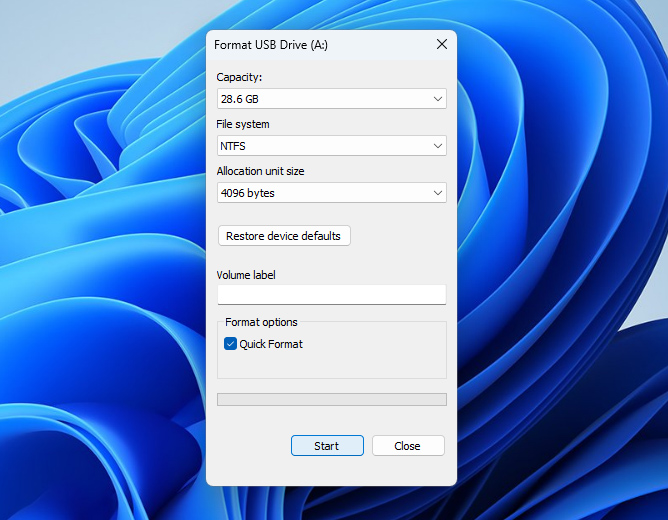
- When the warning dialogue appears, click OK to finalize the format.
Option 2: Format RAW Drive Using Disk Management
If you prefer an alternative to File Explorer, or if it doesn’t work in your case, you can format a raw drive using Disk Management. This is a built-in Windows utility that provides a more detailed view of your disks and partitions, along with additional control over how they’re managed.
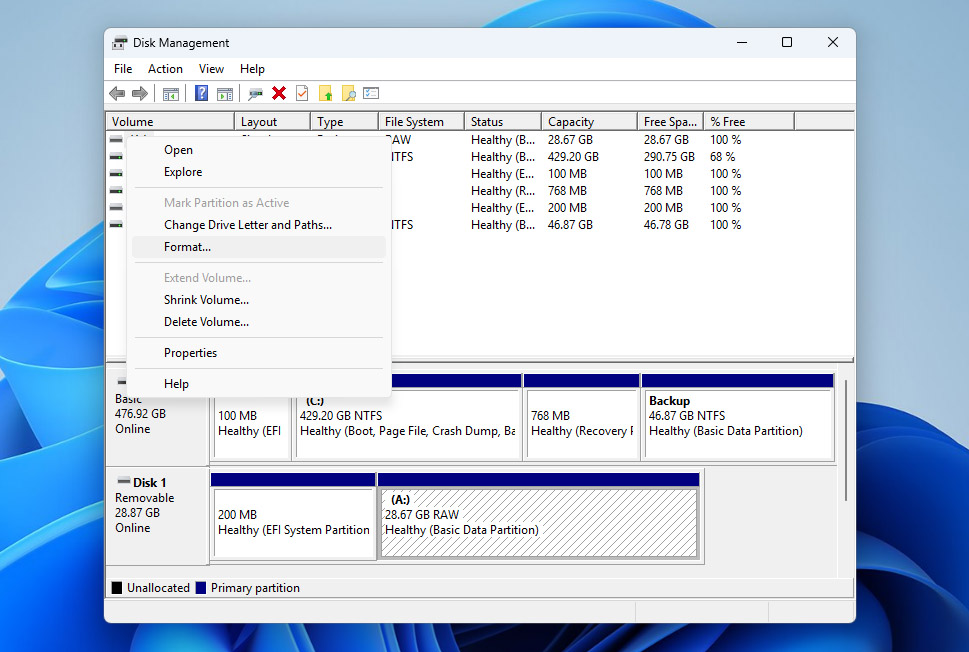
- Right-click Start and click Disk Management.
- Right-click the RAW partition, then click Format.
- Provide a name for the partition. For the file system, choose NTFS from the dropdown. Press OK when ready.
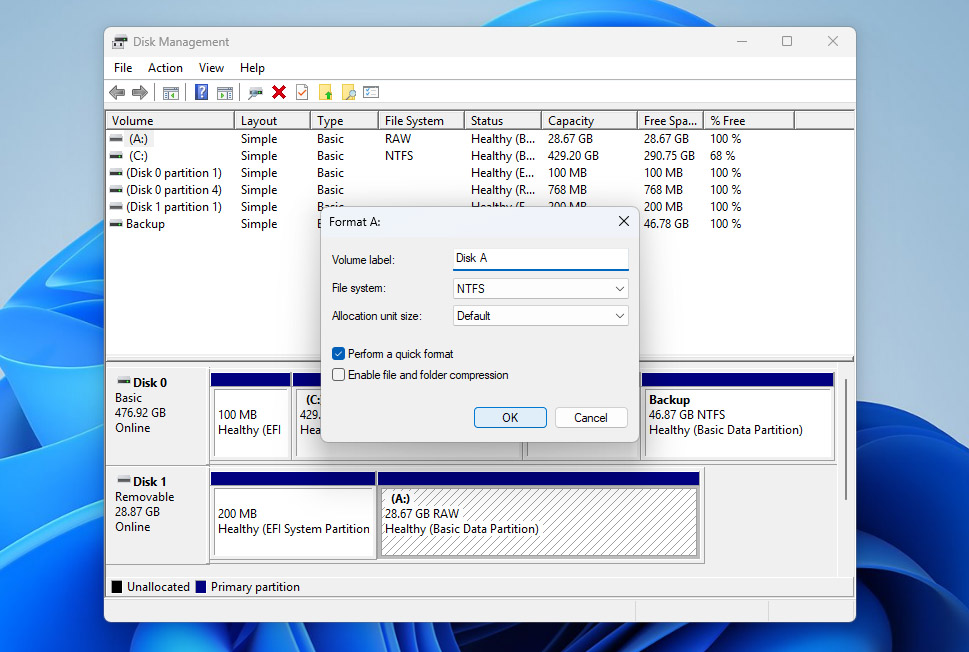
- When the warning dialogue appears, click OK to confirm your selection.
As a last resort, you can delete the entire RAW partition and create a new one from the free space. If you’re not sure how to do this correctly, refer to the steps in our guide on unallocated space and follow it as needed.
Option 3: Convert RAW Drive to NTFS Using Command Prompt
If you’re more comfortable with a command-line interface, you can do the same thing using Command Prompt, the built-in Windows terminal. This method gives you the most direct control over the disk, which also means the highest risk if you enter the wrong command. For example, selecting the wrong disk and using the clean command can wipe an entirely different drive. Because of that, follow the instructions below carefully:
- Press Windows Key + S and search Command Prompt. Right-click the top result and select Run as administrator. If prompted to allow access, click Yes.
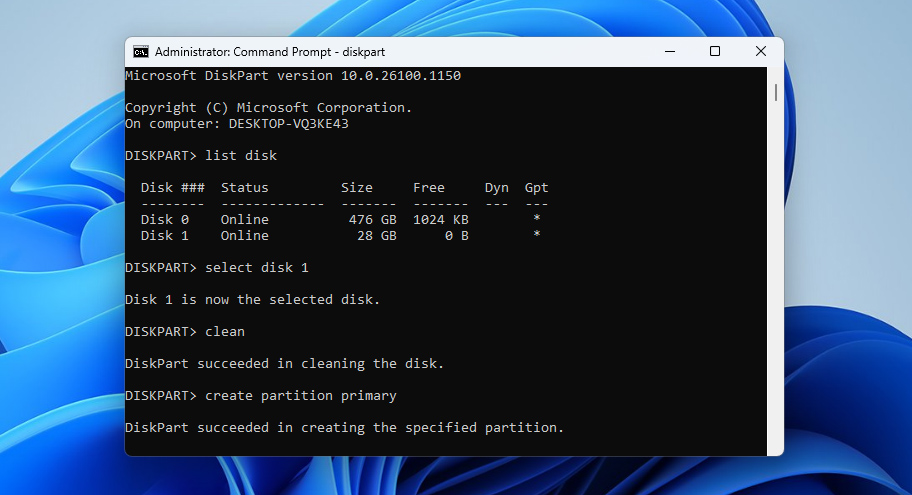
- Type diskpart and press Enter.
- Type list disk and press Enter.
- Type select disk 1 and press Enter. Replace the number with whichever number appears for the applicable disk.
- Type clean and press Enter. This will wipe the disk so it’s ready to accept a new file system.
- Type create partition primary and press Enter.
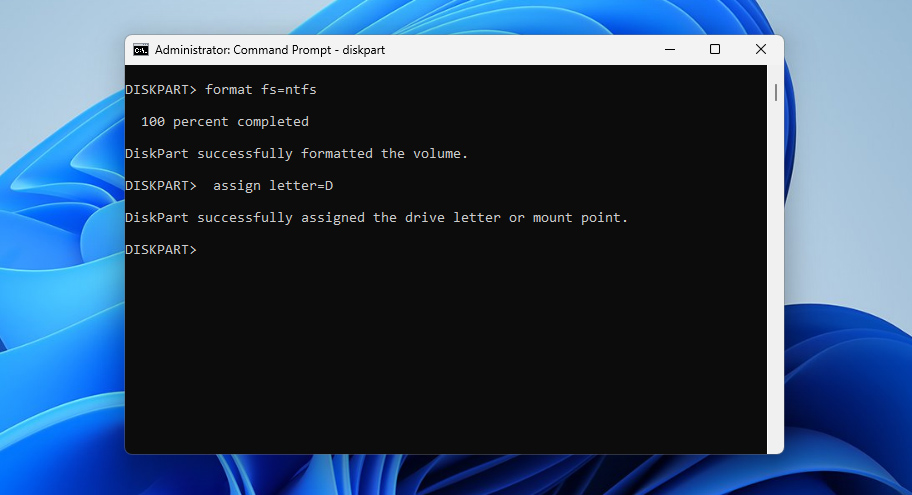
- Type format fs=ntfs and press Enter. This will format the drive with the NTFS file system.
- Finally, type assign letter=D and press Enter. This will apply a drive letter so that the partition becomes accessible.
Step 3: Recover Your Data From the Backup Image
Once you’ve converted RAW to NTFS using any of the formatting methods above, it’s time to return to your data. At this point, you can safely recover it from the image you created earlier and restore it onto the newly formatted NTFS partition. To do this:
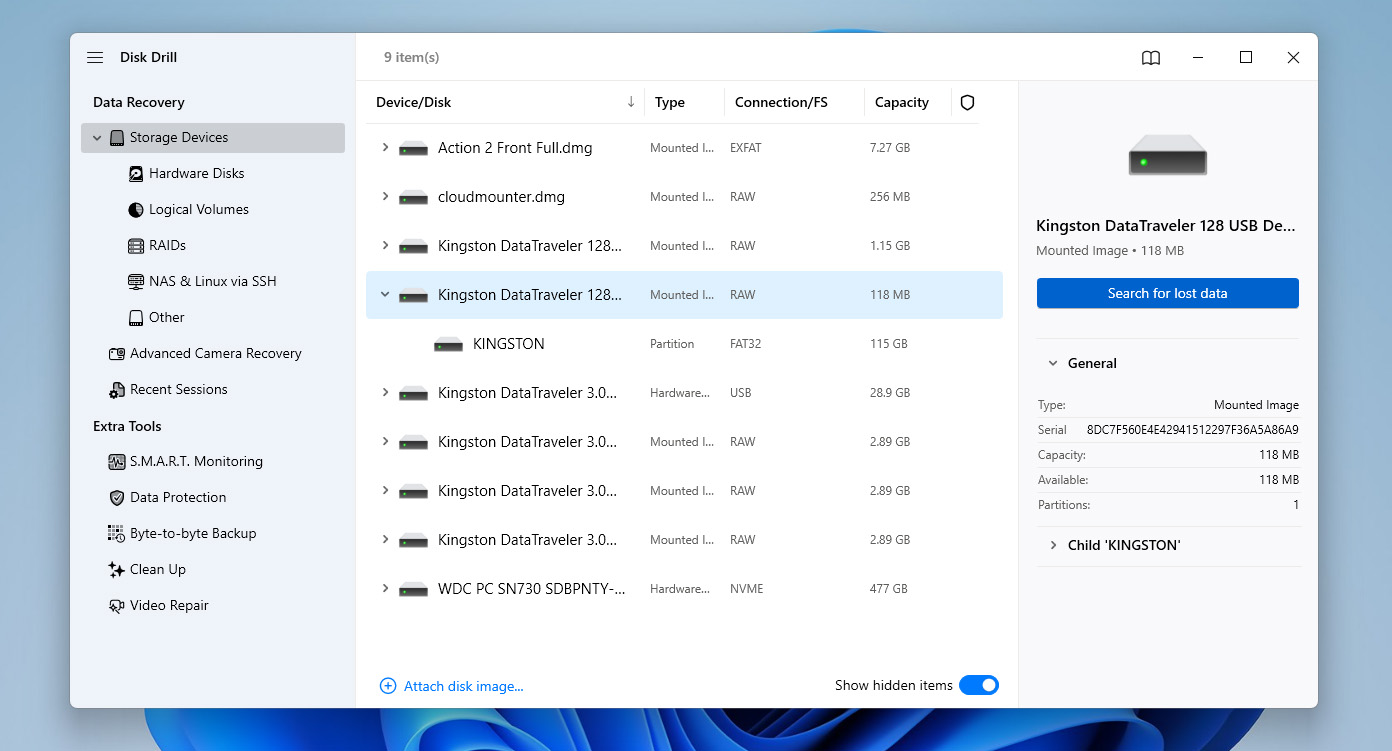
- Open Disk Drill and go back to the Storage Devices section.
- In the bottom-left corner, click Attach disk image, then select the backup image you created earlier.
- Once the image appears in the list of available drives, click on it to highlight it, then click Search for lost data.
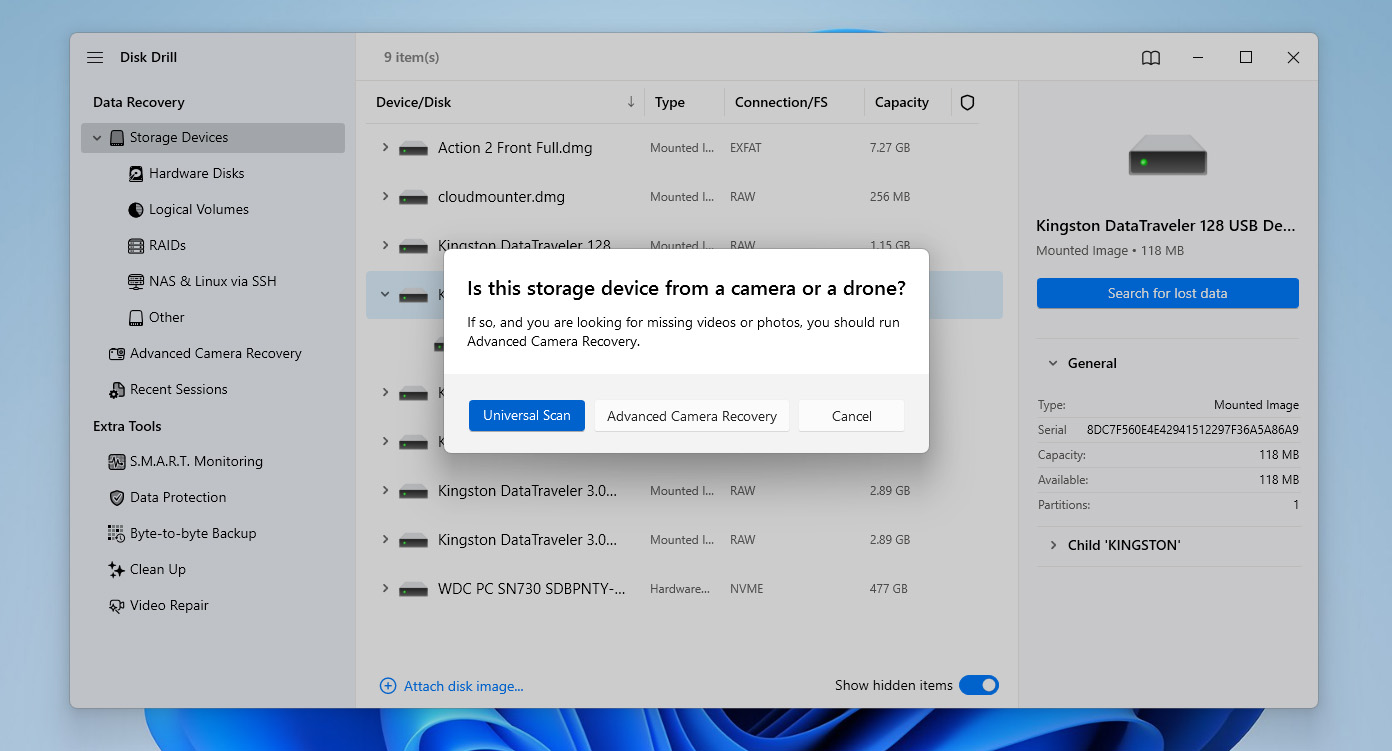
- If prompted to choose a scan type, select Universal Scan (not Advanced Camera Recovery), then wait for the scan to complete.
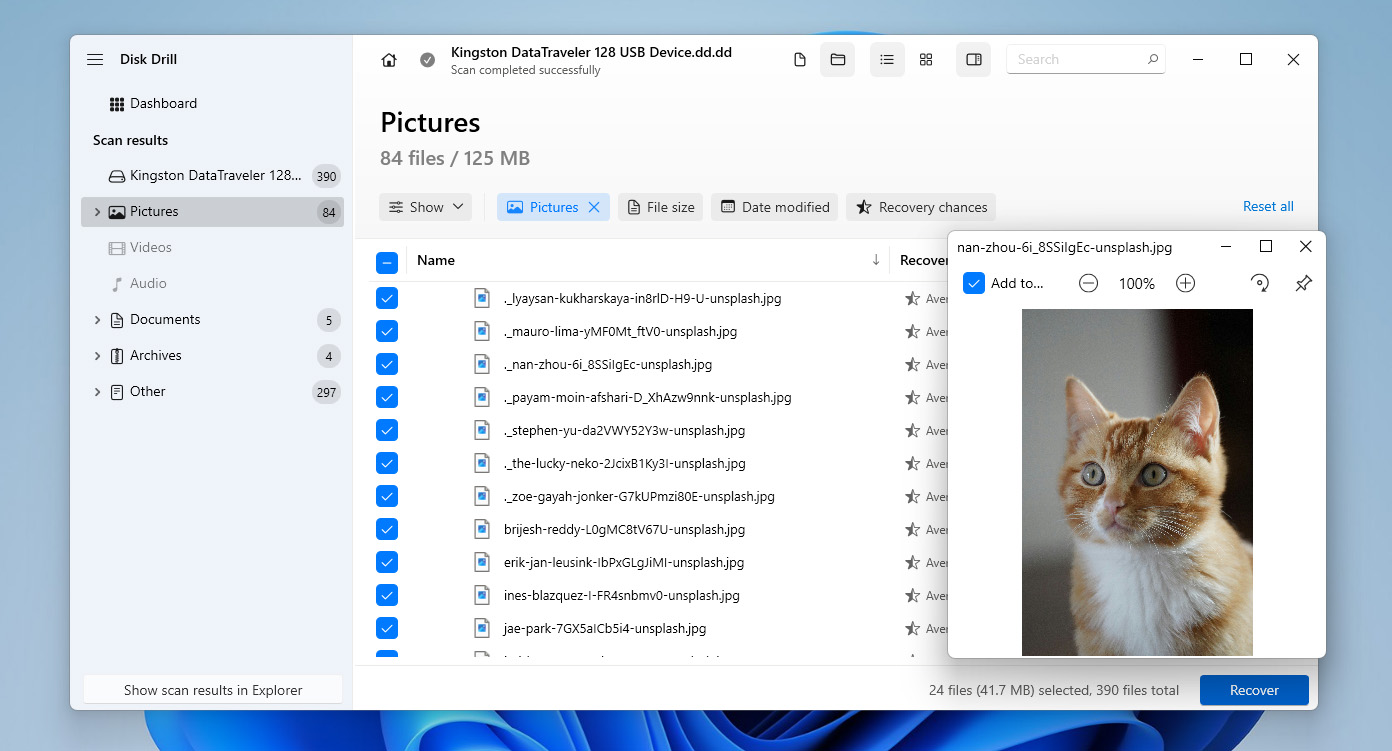
- If you want to restore everything from the image, click Recover All. This will bring back all data that existed on the drive at the time the image was created, including deleted files that hadn’t yet been overwritten. If you only need specific files, click Review found items instead.

- You’ll see several categories, including Deleted or Lost, Existing, and Reconstructed. To restore the files that were present on the drive at the moment the image was created, go to the Existing section. Browse through the list, select the files you want to recover by checking the boxes next to them, and use the search feature if needed. When ready, click Recover.
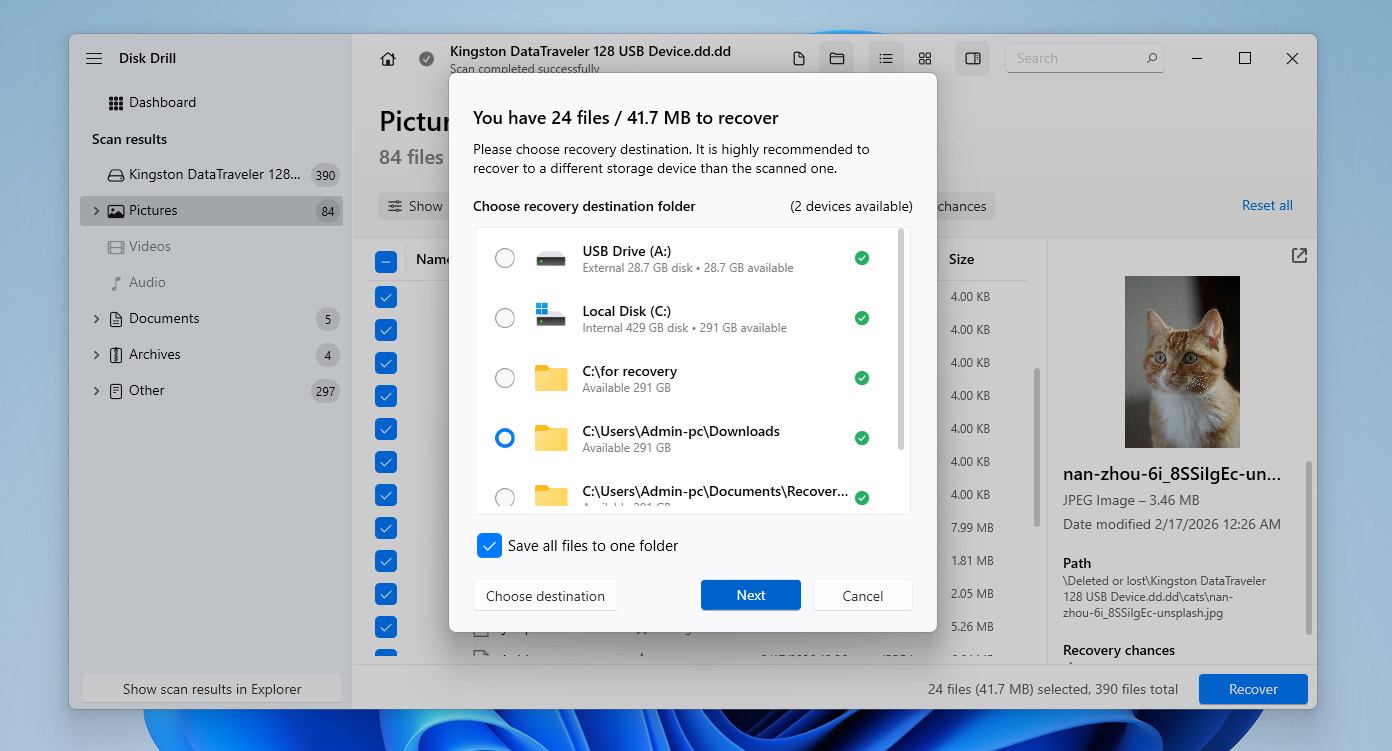
- Choose a destination where the recovered files should be saved, then click Next.
- Once the process is complete, your data will be restored. At this point, you’ve successfully converted the RAW partition to NTFS and recovered your data without losing it.
Disk Drill for Windows allows you to recover up to 100 MB of data for free. This is enough to test the software and confirm that your files are recoverable, but it’s usually not sufficient to fully restore your data before converting RAW to NTFS. Because of that, you may need to consider upgrading to the Pro version if you’re planning a full recovery. At the same time, the byte-to-byte backup feature remains completely free.
How To Fix a RAW Drive Without Formatting
If you want to try restoring access to the drive without formatting, you can use tools like TestDisk. It’s a free, open-source utility that works through a command-line interface and is designed to repair partition structures.
This method can help if the RAW state is caused by a damaged or missing partition table. However, it comes with a higher risk – TestDisk works directly with disk structures, so choosing the wrong option or making incorrect changes can lead to data loss. Because of that, it’s strongly recommended to return to Step 1 of this guide and create a byte-to-byte image (or recover your data) before proceeding.
To perform a RAW disk recovery by rewriting the partition table using TestDisk:
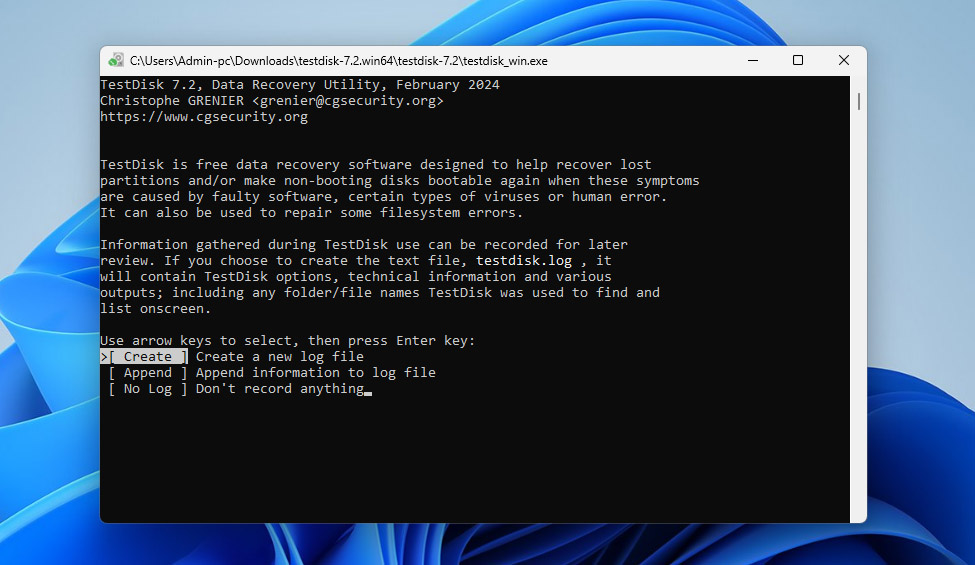
- Download TestDisk from its official website and extract the archive. There’s no installation required, just open the extracted folder and run testdisk_win.exe.
- When the program launches, select Create to generate a new log file and press Enter.
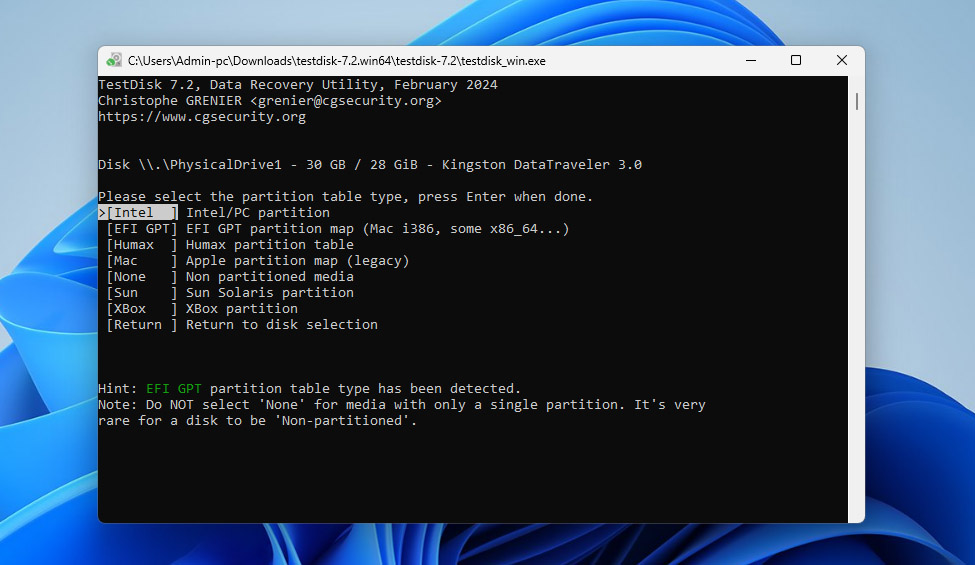
- Use the arrow keys to select the disk that contains the RAW partition, then press Enter.
- Choose the partition table type. In most cases, TestDisk will detect it automatically, so you can just press Enter to proceed.
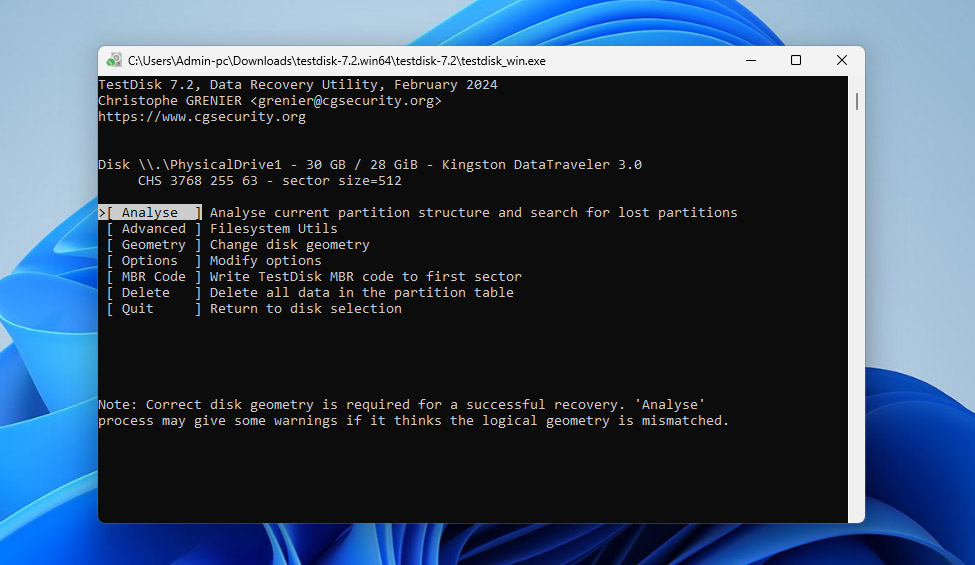
- Select Analyse and press Enter to analyze the current partition structure.
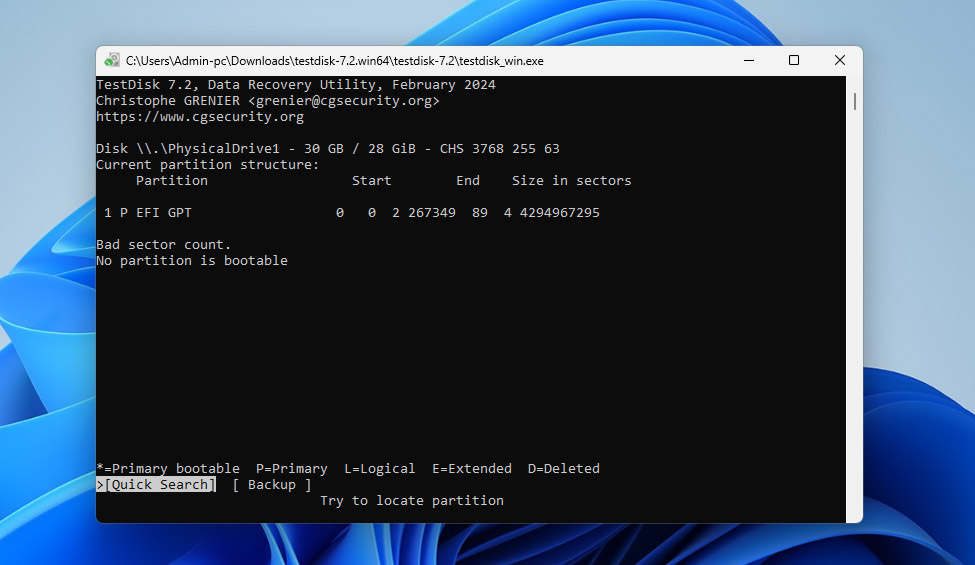
- Choose Quick Search and wait for the scan to complete. If your lost partition appears, highlight it and press Enter.
- If nothing useful is found, select Deeper Search and let TestDisk perform a more thorough scan.
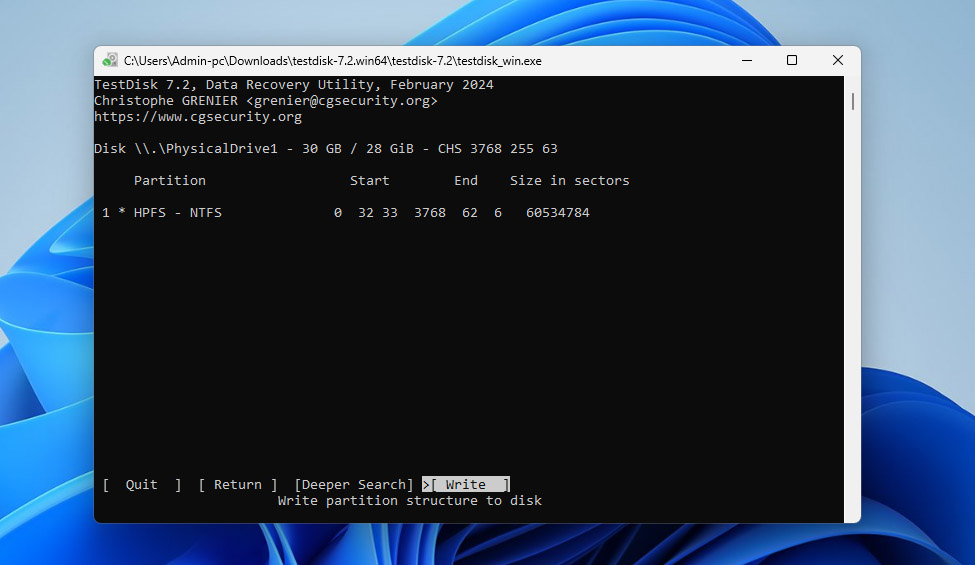
- Once the correct partition is found, select it, then choose Write and confirm with Y to rewrite the partition table.
- After that, restart your computer and check if the partition is accessible again.
If the drive is still not accessible, then converting RAW to NTFS without formatting is no longer possible in your case. At that point, the only remaining option is to format the partition and restore your data from the backup.
Conclusion
Now you know how to restore your RAW partition to NTFS without losing your files. The key is to follow the right sequence:
- Create a byte-to-byte image of the RAW drive
- Format the drive or attempt to fix it without formatting using TestDisk
- Recover your data back onto the NTFS partition from the backup
This approach, where data comes first, and fixes come second, is what consistently leads to successful recovery. If you want to avoid dealing with RAW-to-NTFS conversion (or similar file system issues) in the future, follow a few basic rules:
- Always keep backups of important data
- Avoid unsafe removal of drives
- Don’t ignore system errors or unusual drive behavior
- Monitor your drive’s health by checking S.M.A.R.T. data from time to time, as it can indicate early signs of failure
If you still have questions, feel free to drop them in the comments below or head over to our forum and post them there. Other users and our data recovery experts will do their best to help you resolve any issues you may run into while converting RAW to NTFS or dealing with other data recovery–related problems.


It automated test disk to have efi gpt but said at the end of deep search no partitions can be recovered this drive is very important to me
This article was incredibly helpful! I was panicking when my external hard drive suddenly became RAW, but the detailed steps using CMD made it easy to convert it back to NTFS without losing any of my precious data. The screenshots were a nice touch, too. Thanks a ton!