
Windows doesn’t natively read Mac-formatted drives that use APFS or HFS+, so connecting one to a PC may prompt you to format it (click Cancel if you see this message). There are several ways to recover data from a Mac hard drive to a PC, and the right one depends on your situation. For example, it matters whether you still have access to the Mac, whether the drive can be connected directly to the PC, and whether you simply need to transfer existing files or recover files that were deleted or lost. We’ll cover these scenarios and the available methods in this guide.
Which Method Do You Need?
The best way to get files from a Mac hard drive to a PC depends on the condition of the Mac, the drive, and the files themselves. Use the table below to quickly find the method that fits your situation.
| Situation | What to Use |
| Your Mac works and you simply need to transfer files from Mac to PC | File Sharing over the network or an exFAT-formatted external drive |
| You have an external hard drive formatted for Mac, the files are still there, and you only need to read the Mac hard drive on Windows | An APFS/HFS+ driver for Windows |
| Files were deleted, the drive is damaged, or Windows detects it as RAW | Data recovery software such as Disk Drill |
| The Mac no longer starts, but its HDD or SSD is removable, as on many older MacBook and iMac models | Remove the drive, connect it to the PC using an enclosure, then use data recovery software if needed |
| The Mac no longer starts and uses a soldered SSD, including T2 and Apple Silicon models | macOS Recovery, Target Disk Mode (Intel Macs), or Share Disk (Apple Silicon Macs). If the storage remains inaccessible, contact a professional data recovery service. |
| The drive is not detected correctly, shows 0 bytes, repeatedly disconnects, or makes clicking or other unusual mechanical noises | Professional data recovery service. Do not scan or repair the drive |
| You previously used iCloud Drive or have a Time Machine backup | Download the files from iCloud or access the available Time Machine backup |
If your Mac hard drive is not recognized on PC, keep the following in mind before attempting to access or recover your data:
- Do not format the drive. If Windows displays “You need to format the disk in drive before you can use it,” click Cancel. Follow this guide if Windows keeps asking you to format the drive.
- Check the drive in Disk Management and pay particular attention to its capacity. If Windows shows the correct drive size, you can proceed with the methods below even if the partition has no drive letter or its file system isn’t recognized. If the capacity is incorrect, the drive shows 0 bytes, or it isn’t detected at all, stop here and consider a professional data recovery service.
- A FileVault or encrypted APFS volume requires the correct password or recovery key. Data recovery software cannot bypass this encryption, so you may need access to a Mac to unlock the drive first.
- You may need a SATA/M.2 enclosure or a compatible adapter for older proprietary Apple SSDs. You’ll also need a separate drive with enough free space to store the recovered files.
How to Connect a Mac Drive to a Windows PC
Before you can recover data from a Mac hard drive, you need to give the Windows PC access to the drive itself. How you do this depends on the Mac model. Older Macs often have removable HDDs or SSDs that can be connected directly to another computer, while newer models use storage that is soldered to the logic board and has to be accessed through the Mac.
- If you have an internal drive removed from an older Mac, connect it to the PC using a compatible enclosure or adapter. SATA HDDs and SSDs are relatively straightforward, while some Apple SSDs from 2013-2015 use proprietary connectors and require a specific adapter. Once connected, the drive should appear in Disk Management even if Windows cannot read its APFS or HFS+ file system.
- If the drive cannot be removed but the Intel Mac still powers on, Target Disk Mode can provide access to its internal storage over a Thunderbolt connection. Start the Mac while holding T to enter this mode. Apple officially documents Target Disk Mode for transferring files to another Mac, so using it directly with a Windows PC is not a supported workflow. If another Mac is available, you can access the drive there and copy the files or create a disk image for recovery on the PC.
- The situation is similar with Apple Silicon Macs, where the SSD is soldered to the logic board. These models provide Share Disk in macOS Recovery instead of Target Disk Mode, but Apple designed this feature for sharing the disk with another Mac, not a Windows PC. If another Mac is available, you can use Share Disk to access the files and then transfer them to the PC.
- If another Mac isn’t available, boot the affected Mac into macOS Recovery and create a disk image on an external drive using Disk Utility. You can also use Disk Drill’s Byte-to-byte Backup where applicable. Connect that external drive to the Windows PC and scan the image instead of trying to remove the soldered SSD. A Mac with startup problems will often enter recovery mode automatically. If it doesn’t, follow these instructions to manually boot into recovery mode on Apple Silicon and Intel Macs.
How to Recover Data from a Mac Hard Drive to a PC
Once the Mac drive is connected or otherwise accessible, don’t rush to copy or modify anything on it. The next step depends on what Windows can see and whether the files are still there. We’ll start with the method that works when files are deleted or the file system is damaged, then move on to simpler ways to access and transfer intact data.
Method 1: Recover Data with Data Recovery Software (Disk Drill)
Data recovery software is one of the more versatile ways to recover data from a Mac hard drive on Windows. It can help with an external Mac-formatted drive that Windows can’t open, deleted or lost files, and an internal Mac drive that you can connect or otherwise make accessible to the PC.
However, not every Windows data recovery program can read Mac file systems. For this tutorial, we’ll use Disk Drill. Its Windows version supports APFS and HFS/HFS+ drives, can scan partitions that appear as RAW, and lets you preview found files before recovery. Scanning and previewing are free, while the Windows version can recover up to 100 MB of data without a license. You can find more details in our Disk Drill review or compare it with other options in our ranking of data recovery software for Mac.
In some cases, it’s better to create a disk image and recover data from the image instead of scanning the original drive. For Macs with soldered SSDs, you can boot into recovery mode and use Disk Utility to save an image to an external drive with enough free space; choose the DMG format if you plan to scan it with Disk Drill. If you can access the drive directly but it is unstable, frequently disconnects, or responds slowly, use Disk Drill’s Byte-to-byte Backup feature to create an image first and scan that copy instead. You can find the complete steps in our guide on recovering data from a corrupted hard drive.
The data recovery process in Disk Drill is as follows:
- Download Disk Drill and install it.
- Open Disk Drill. If applicable, click on Attach disk image, browse for your Mac’s disk image, and double-click on it. It’ll be added to the storage devices list as a mounted drive.
- Select the Mac drive, or the disk image and click on Search for lost data.
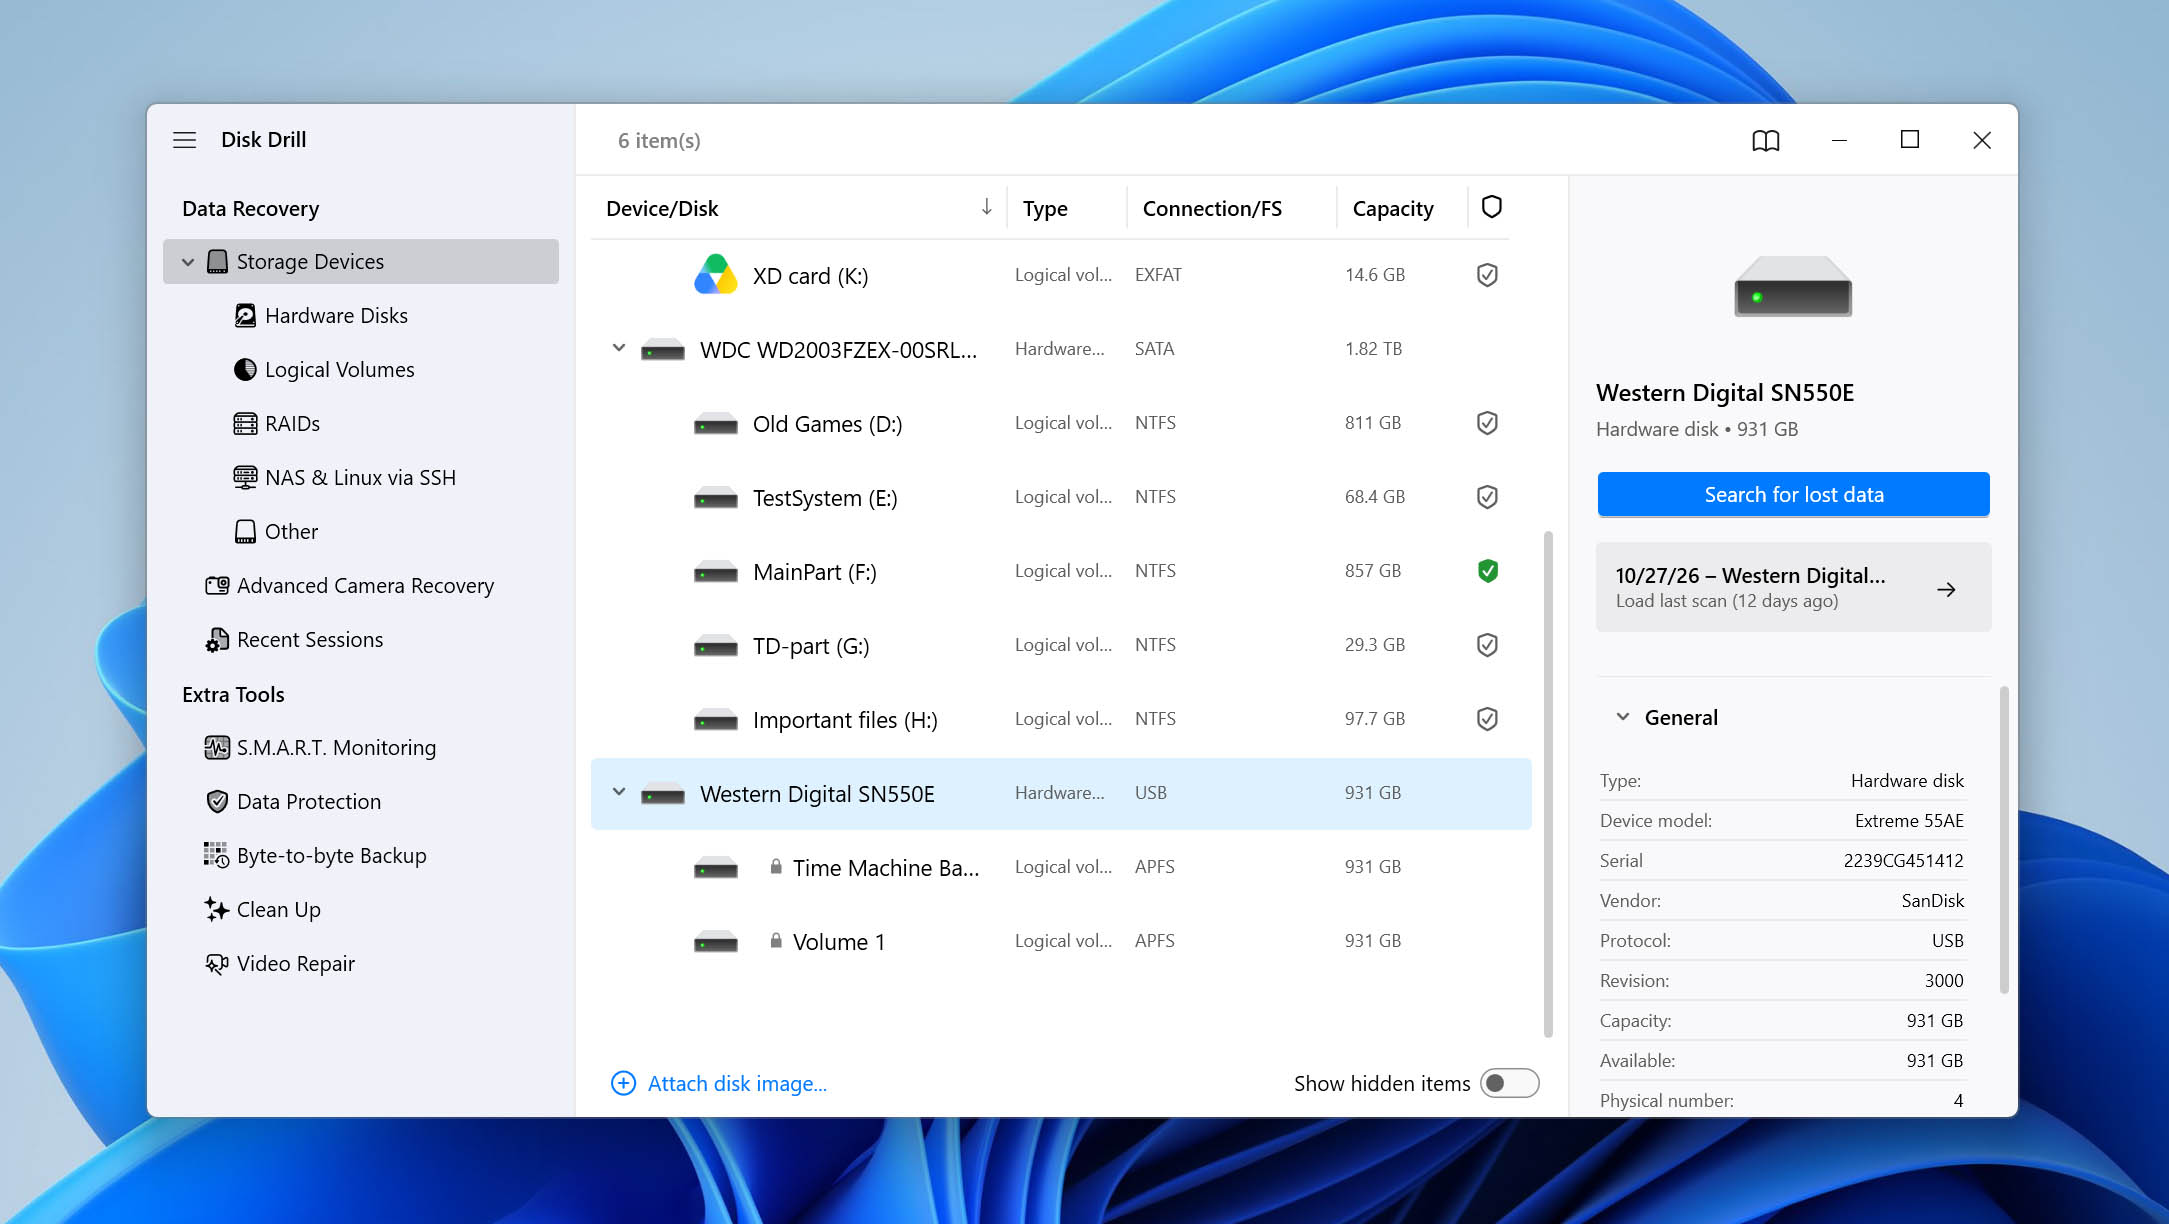
- If Disk Drill asks you to choose a scan type, select Universal Scan. Advanced Camera Recovery is intended for recovering fragmented video files recorded by cameras, drones, and similar devices.
- Click on Review found items. If you wish to view a certain filetype, click on the relevant option, instead (Pictures, Video, Audio, Documents, Archives, and Other).
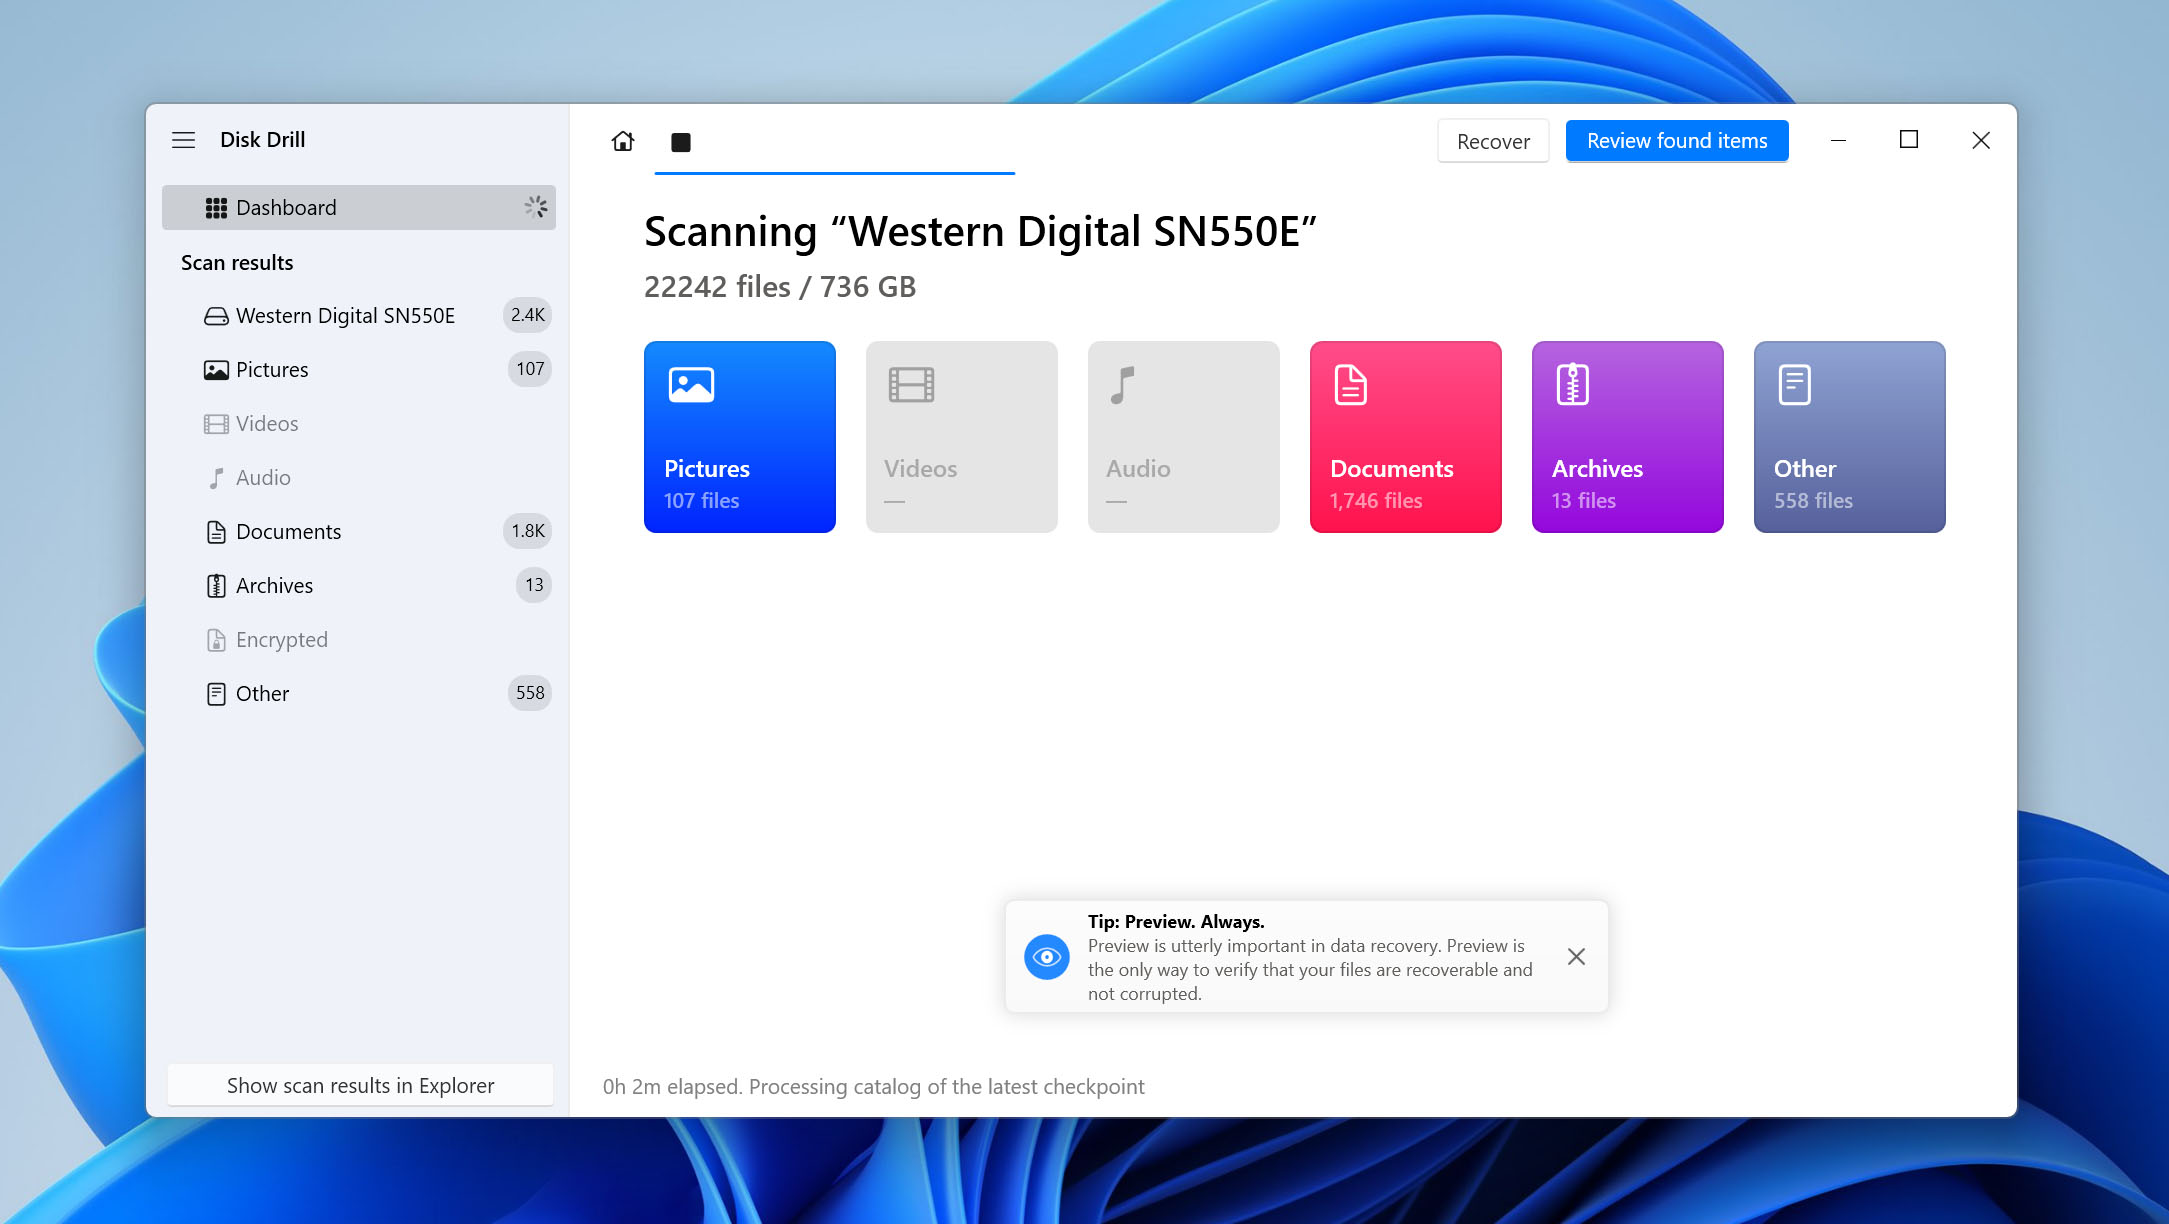
- Expand the Existing section to view files that are currently stored on your Mac’s drive. To view deleted files that can be recovered, expand the Deleted or lost and Reconstructed sections.
- Select the files you wish to recover and click on Recover. Disk Drill will display a preview of the currently selected file, but you can manually preview any file by clicking the eye icon next to a filename.
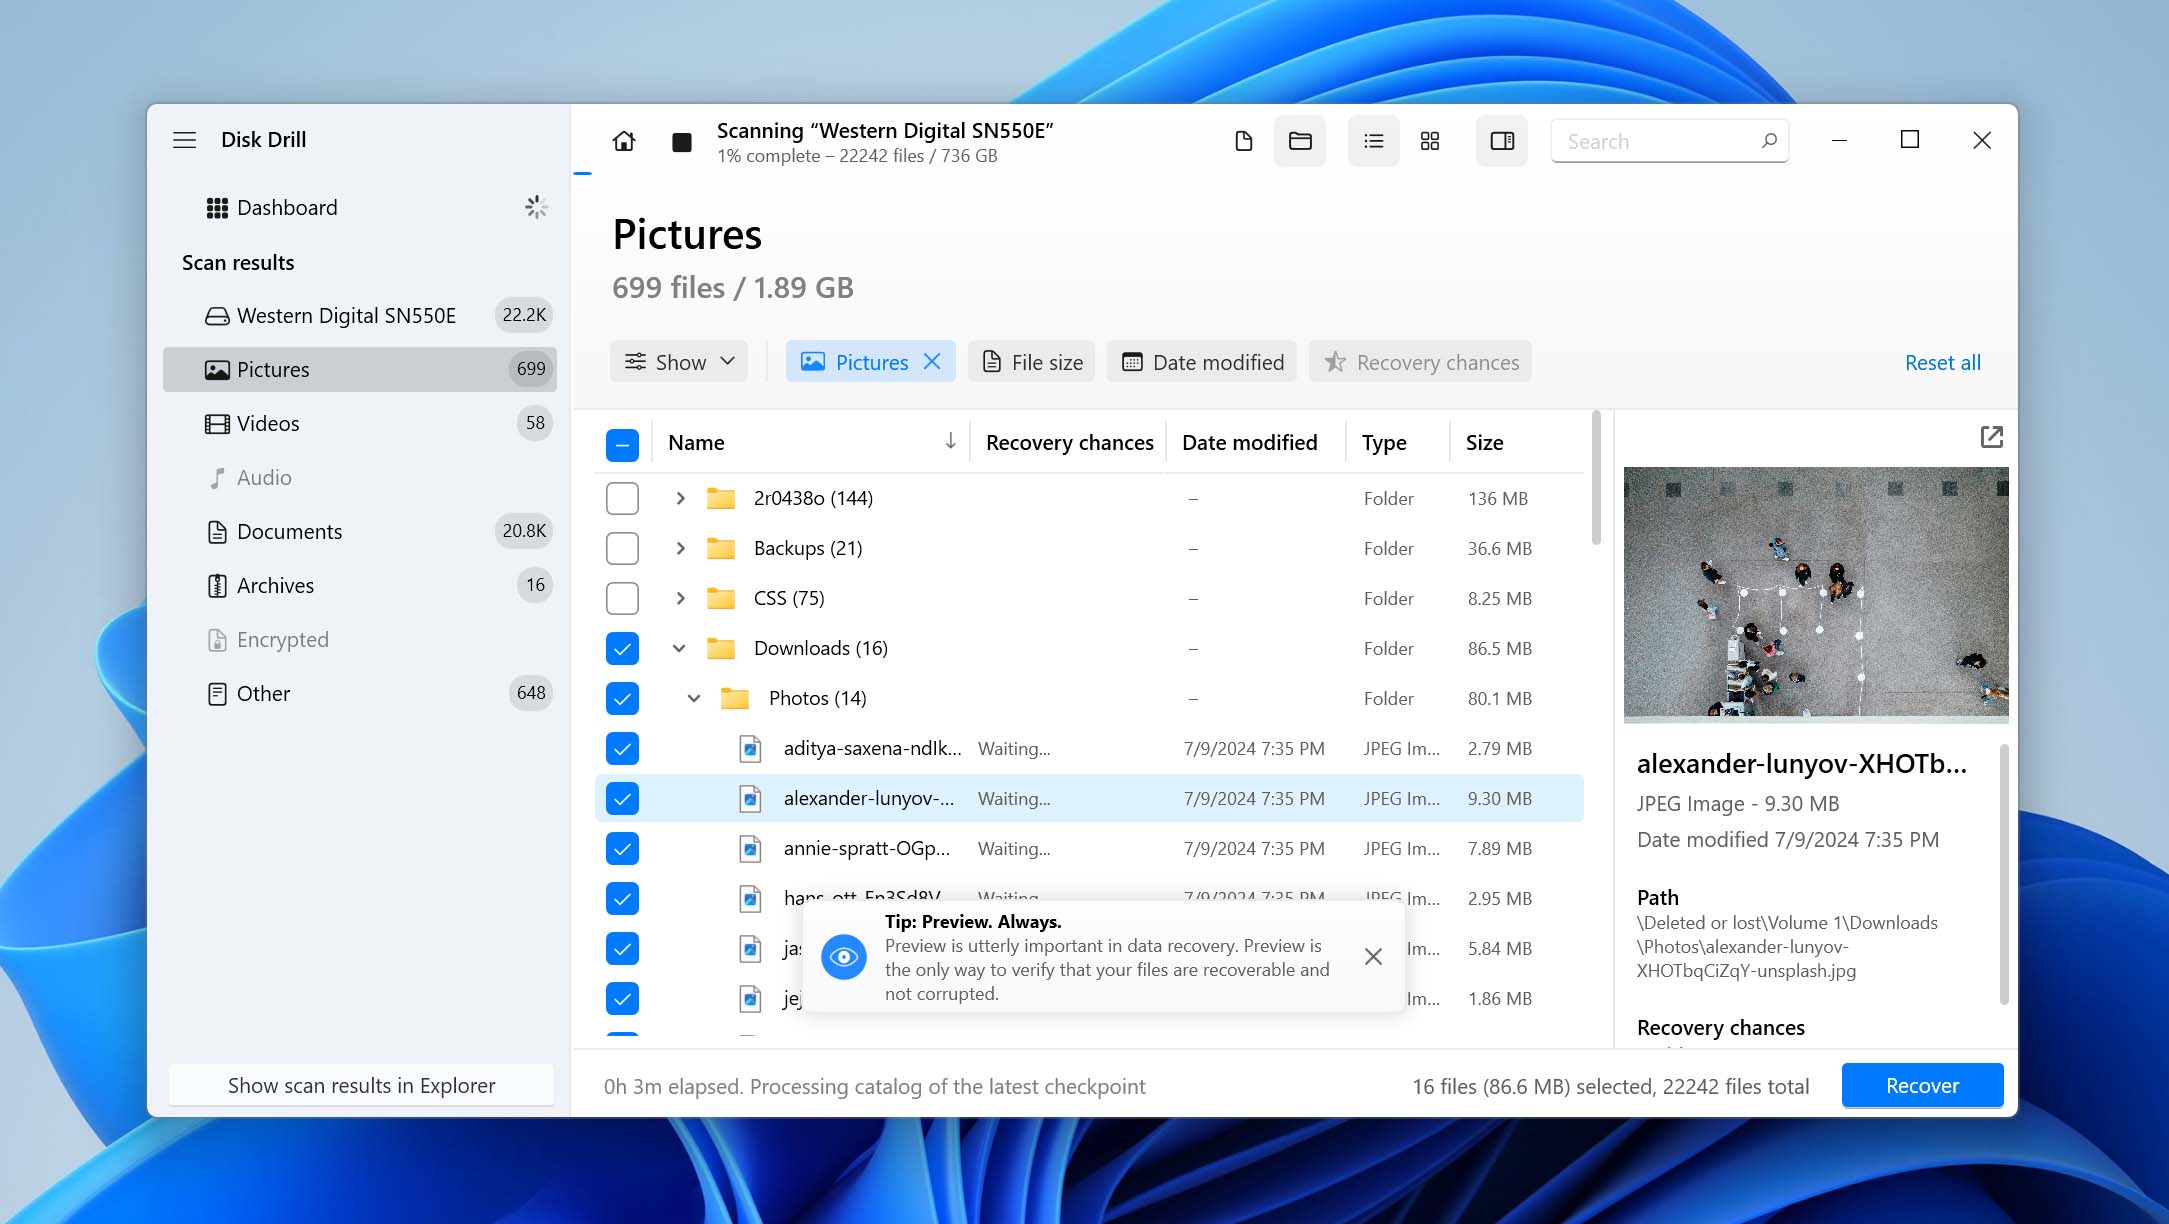
- Choose a recovery destination and click Next.
- Disk Drill will recover the selected files. You can recover up to 100 MB of data for free on Windows. Further recovery requires a Disk Drill Pro license.
Most recovered files can be used on Windows just as they were on the Mac, provided Windows has an application that supports their format. One common exception is Apple’s Pages, Numbers, and Keynote documents. Windows doesn’t natively open these formats, so a file that won’t open after recovery isn’t necessarily corrupted. You can open it through iCloud.com or use the corresponding Apple app on a Mac to export it to a Windows-friendly format.
Method 2: Read the Mac Drive on Windows with an APFS/HFS+ Driver
If the Mac-formatted drive is healthy and all your files are still there, you don’t need to recover anything. The problem is simply that Windows cannot natively read APFS or HFS+ volumes. Third-party file system drivers and readers can add this support and let you copy the files to your PC.
| Software | File Systems | Access | Free Trial | Price |
| Paragon Mac ToolBox | APFS, HFS+ | Read/write | 10 days for the individual file system drivers | $54.99 |
| MacDrive 12 | APFS, HFS+ | Read/write | 5 days | From $59.99 |
| HFSExplorer | HFS, HFS+, HFSX | Read-only | Free | Free |
For example, MacDrive 12 lets you access both APFS and HFS+ drives directly through Windows File Explorer:
- Download and install MacDrive on your Windows PC.
- Connect the Mac-formatted drive to the computer.
- Open File Explorer and locate the Mac drive.
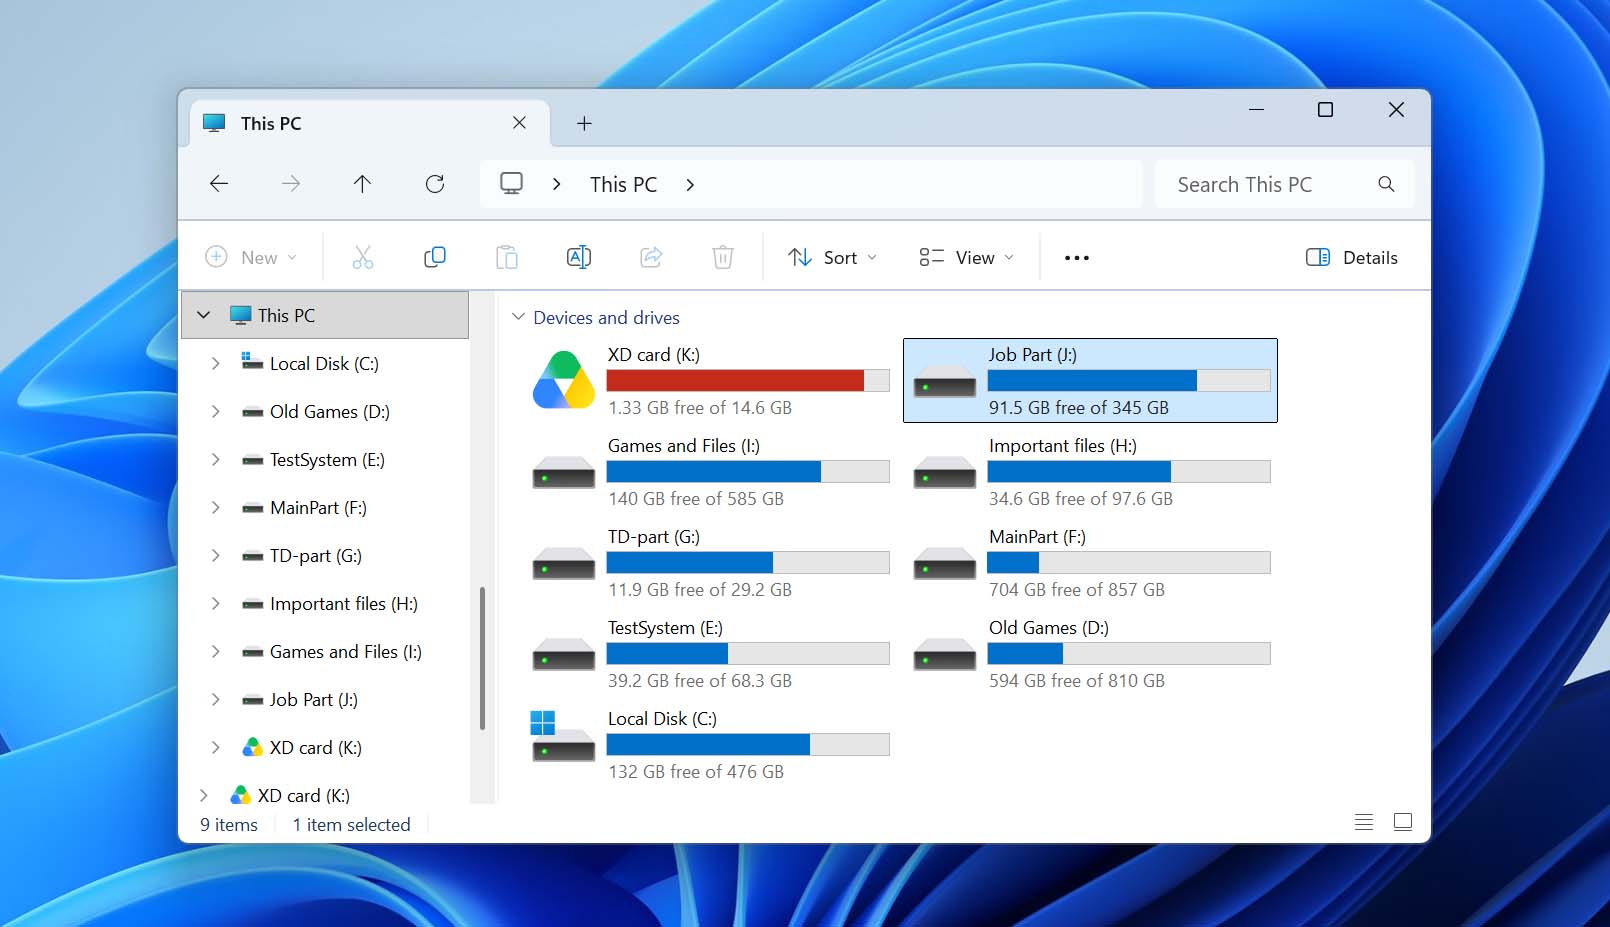
- Open the drive and copy the files you need to a Windows drive.
This method is for a healthy drive with an intact file system. If the software cannot see the partition, fails to mount it, or reports file system errors, don’t format the drive. Go back to Method 1 and scan it with data recovery software instead.
Method 3: Download Files from iCloud Drive or Time Machine
If you can’t access the original Mac drive, copies of your files may still be available in iCloud Drive or a Time Machine backup.
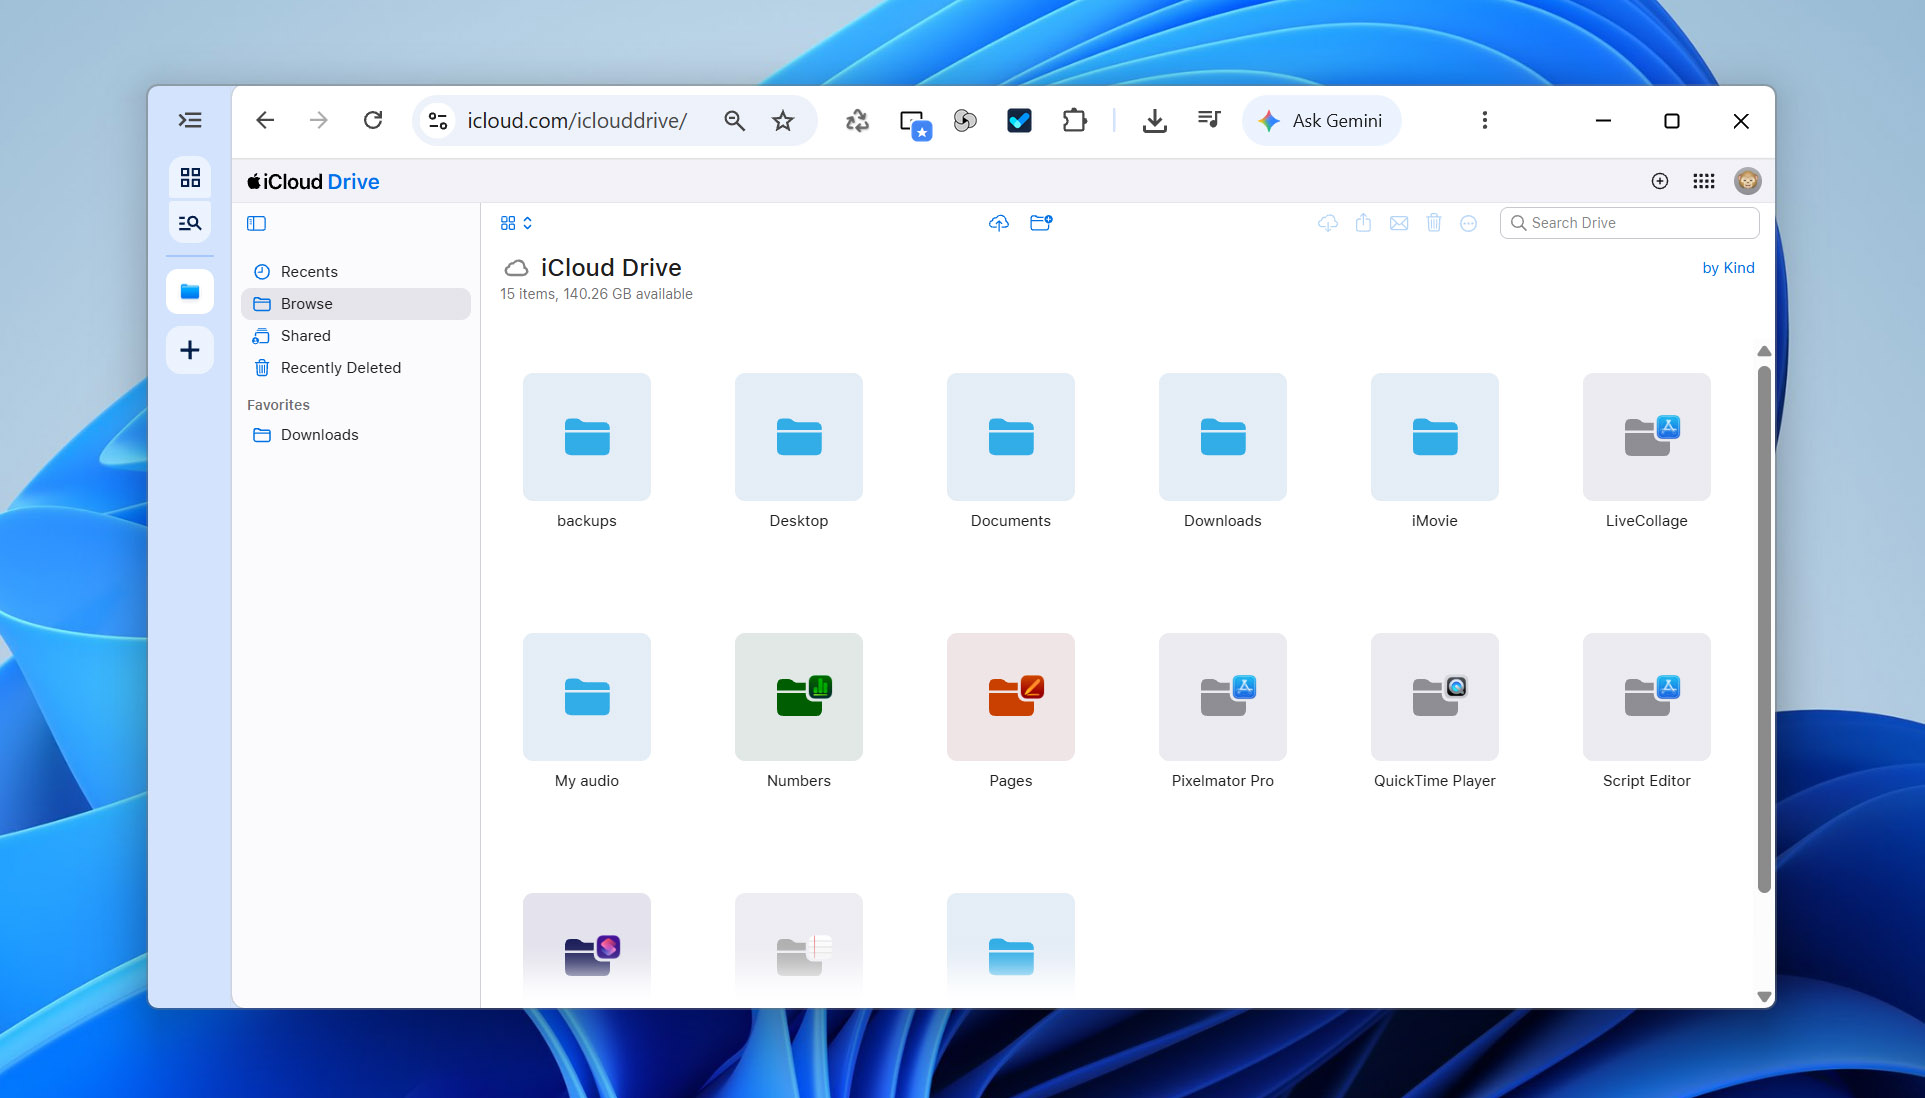
If you previously enabled Desktop & Documents Folders in iCloud Drive, files from these folders should be available in iCloud. The same applies to files you manually saved to iCloud Drive. On a Windows PC, open iCloud.com, sign in with your Apple Account, select Drive, find the files you need, and download them. You can also use iCloud for Windows to access iCloud Drive through File Explorer.
If you have a Time Machine backup, you can restore the files to another Mac and then transfer them to your Windows PC. If another Mac isn’t available, you can connect the Time Machine backup drive directly to the PC. Since Time Machine backup drives can use APFS or HFS+, Windows may not be able to read the drive natively. In this case, use one of the APFS/HFS+ tools from Method 2 to access the files. If the backup drive itself is damaged or files are missing, use the data recovery software described in Method 1 instead.
Method 4: Use Network Features on Mac and Windows
If your Mac is working properly, and you simply wish to transfer data from it to a Windows PC (no data recovery), you can use macOS’ File Sharing feature, or create a shared folder on Windows.
[This method only works if the Mac is running normally and you simply need to transfer files from Mac to PC. Both computers should be connected to the same local network. You can also directly connect your PC and the Mac using an ethernet cable. On newer Macs, you may need a USB-C to Ethernet adapter to do this.
Use File Sharing on a Mac:
- On the Mac, open Apple menu > System Settings > General > Sharing and turn on File Sharing.
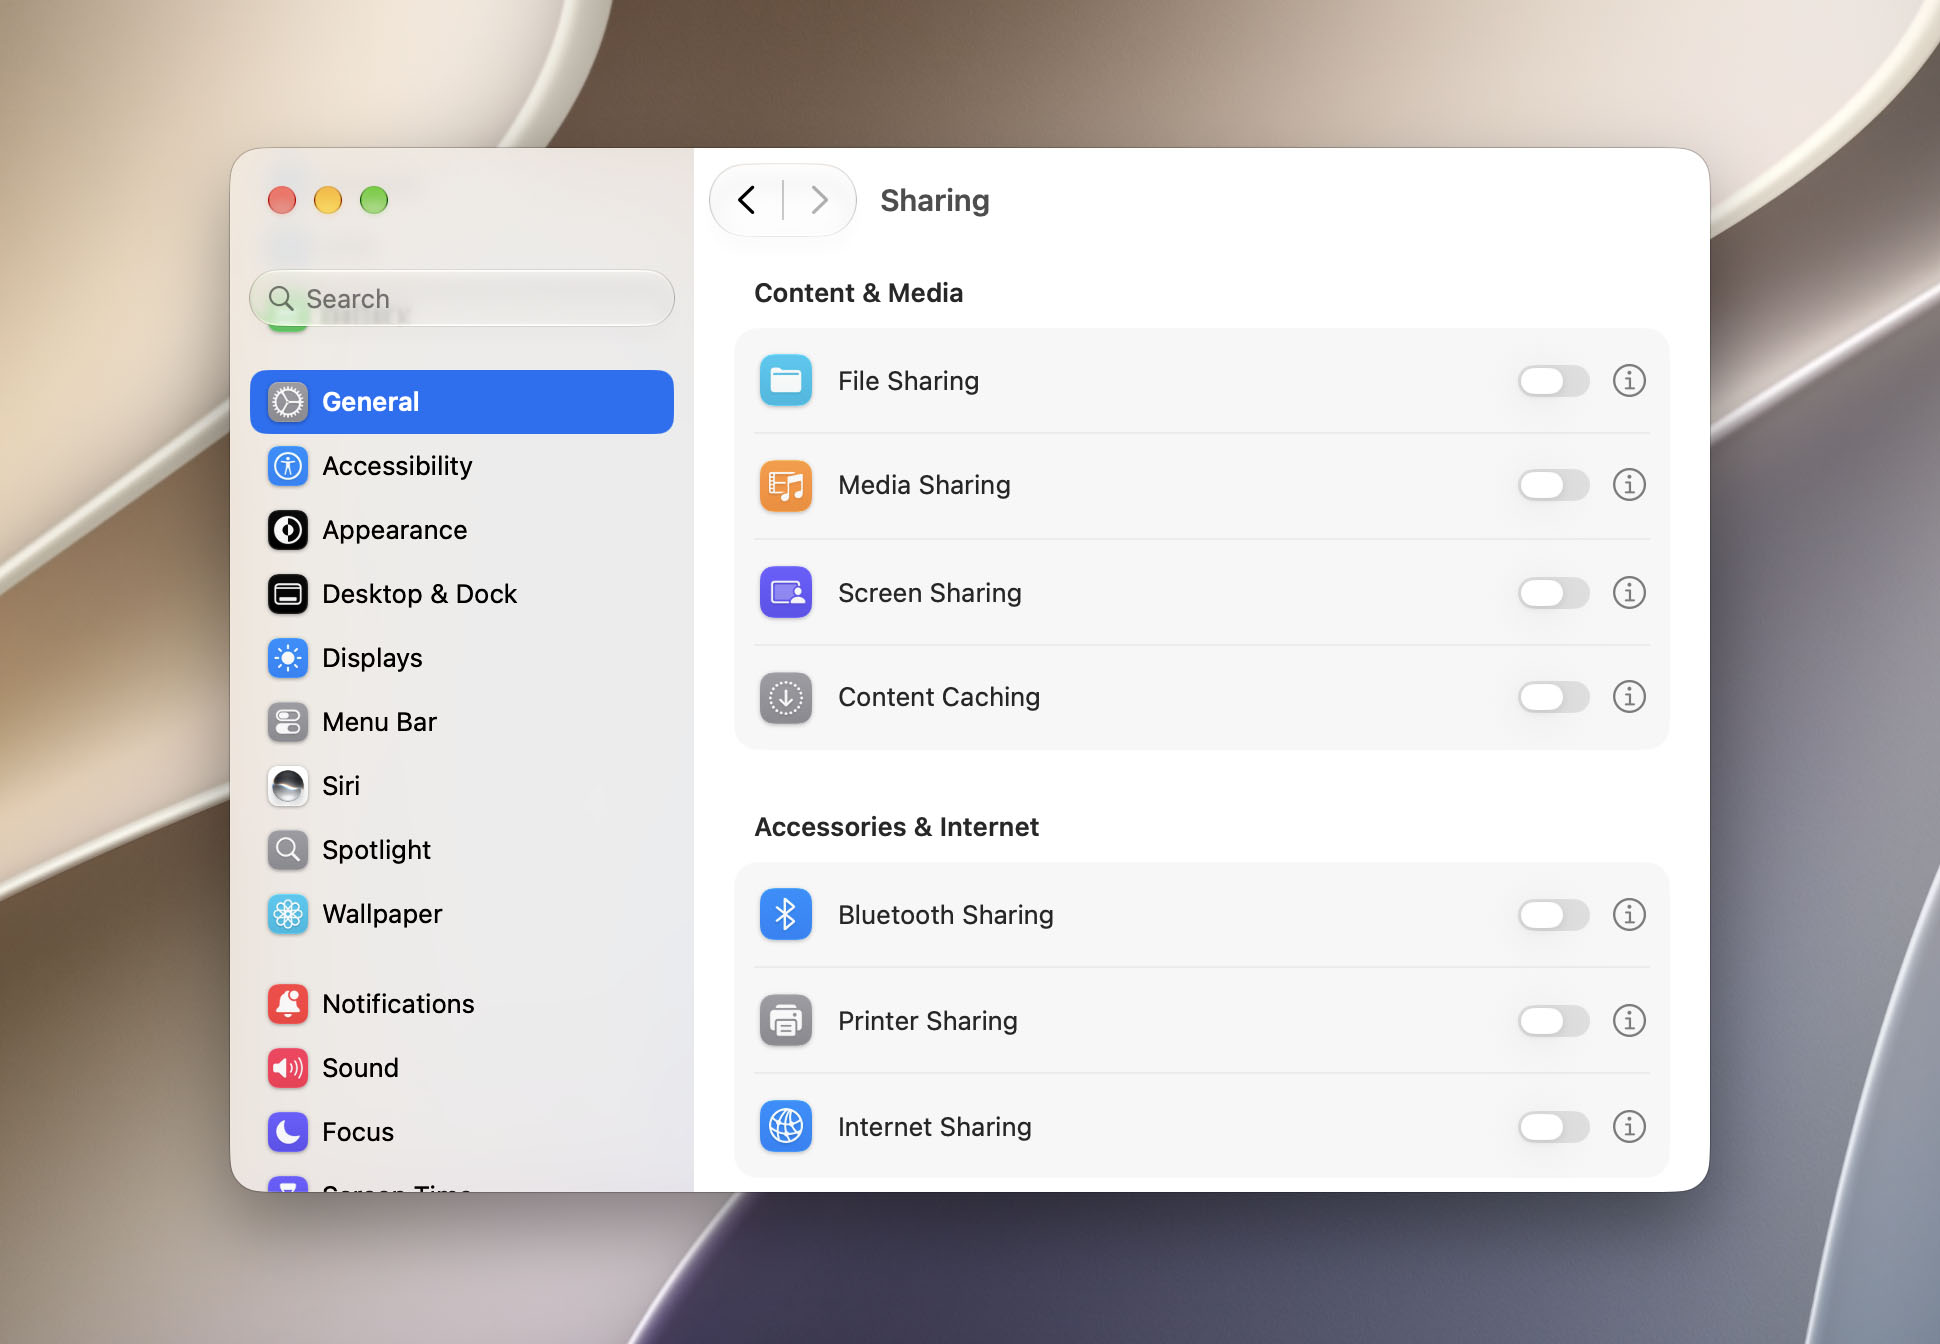
- Click the Info button next to File Sharing, select the folder you want to transfer, then click Options.
- Turn on Share files and folders using SMB and enable your Mac user account for Windows File Sharing.
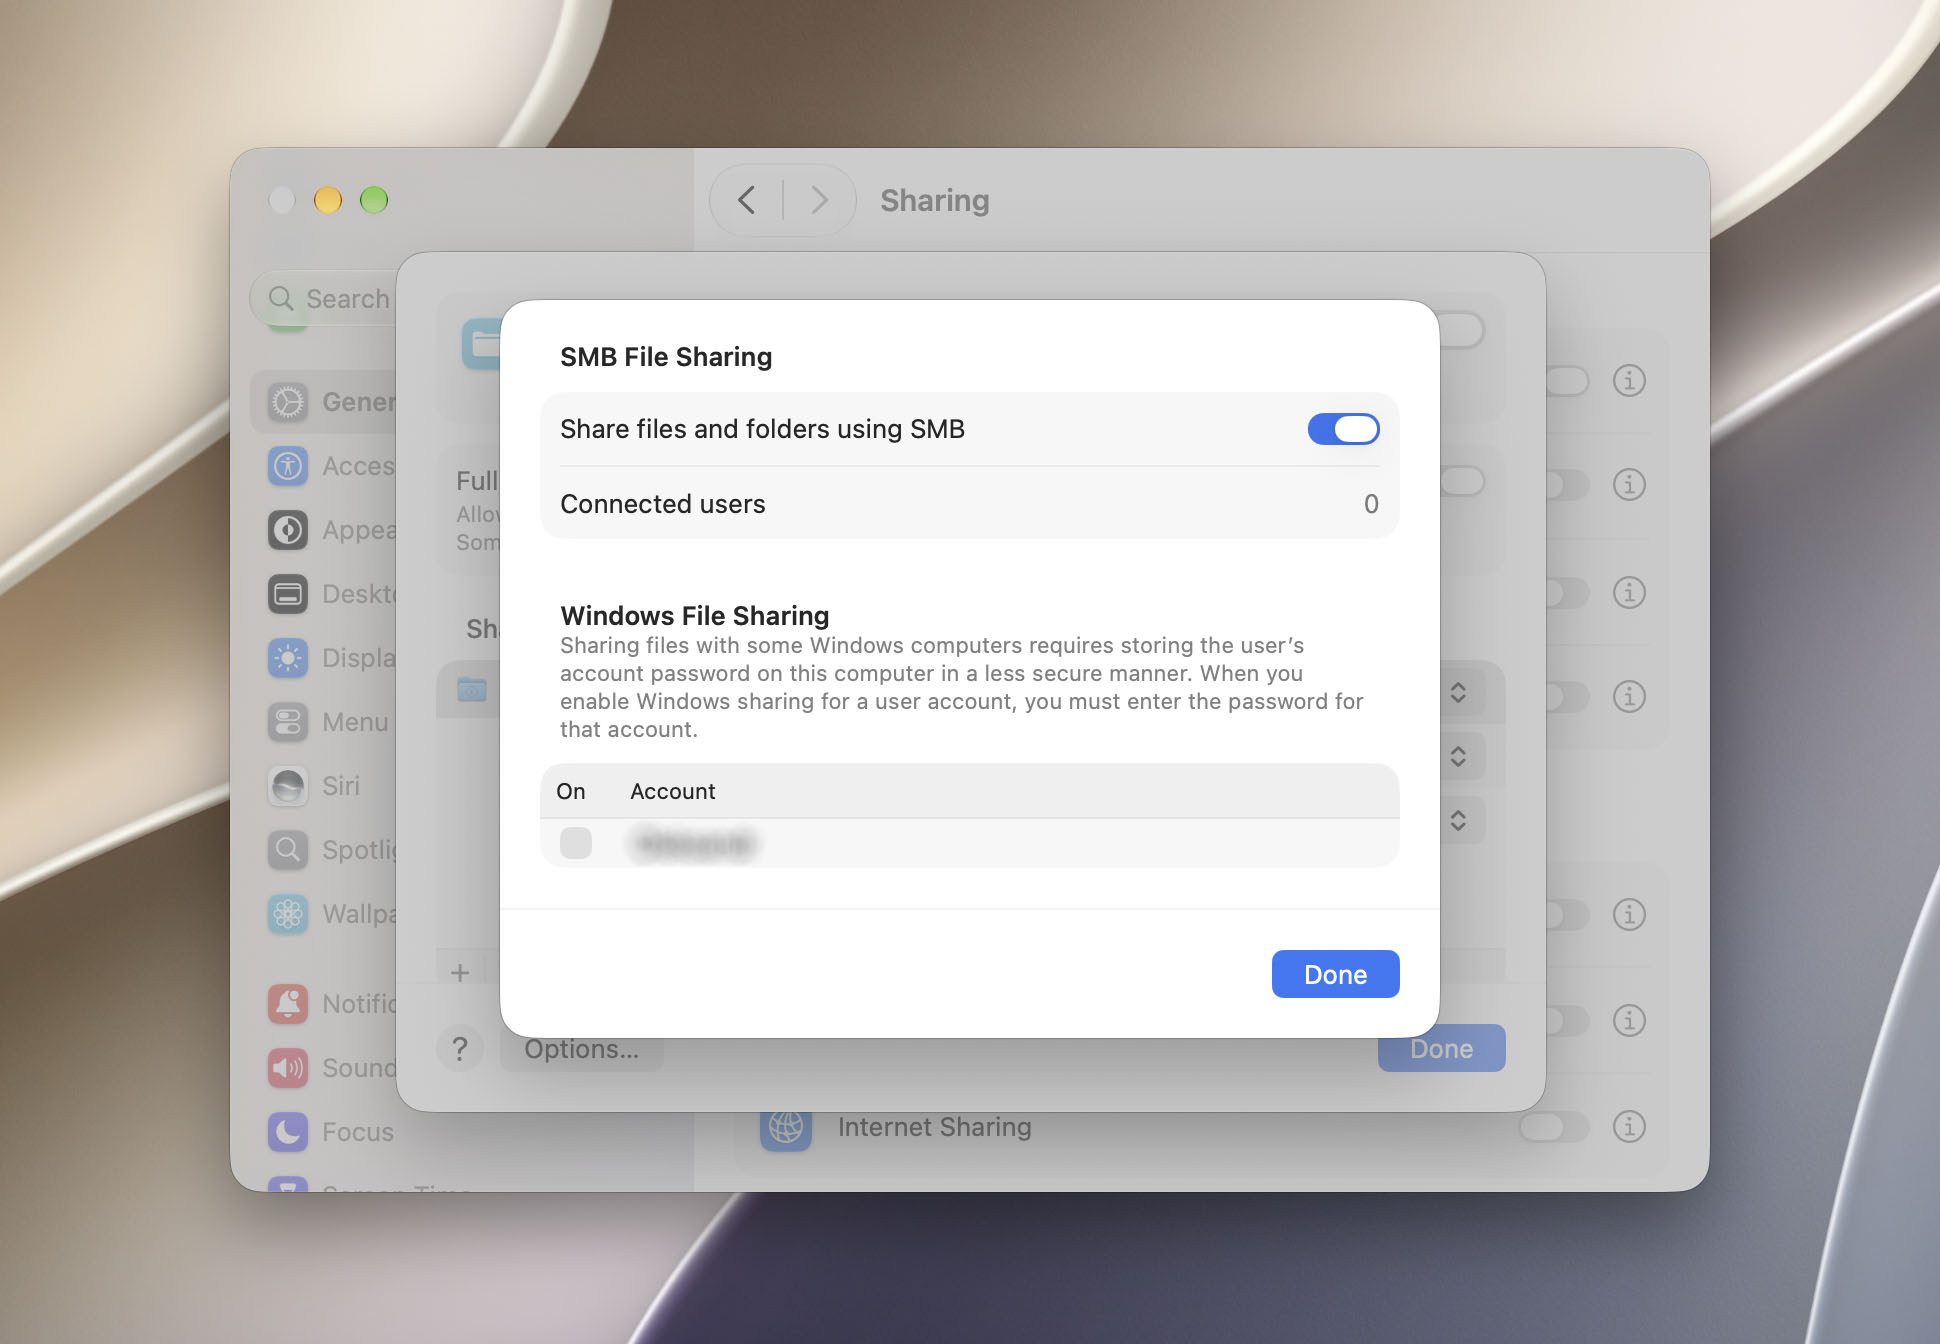
- Note the Mac’s network address shown in the File Sharing settings.
- On the Windows PC, open File Explorer and enter \\*Mac’s_local_network_address* in the address bar. Sign in with your Mac username and password if prompted.
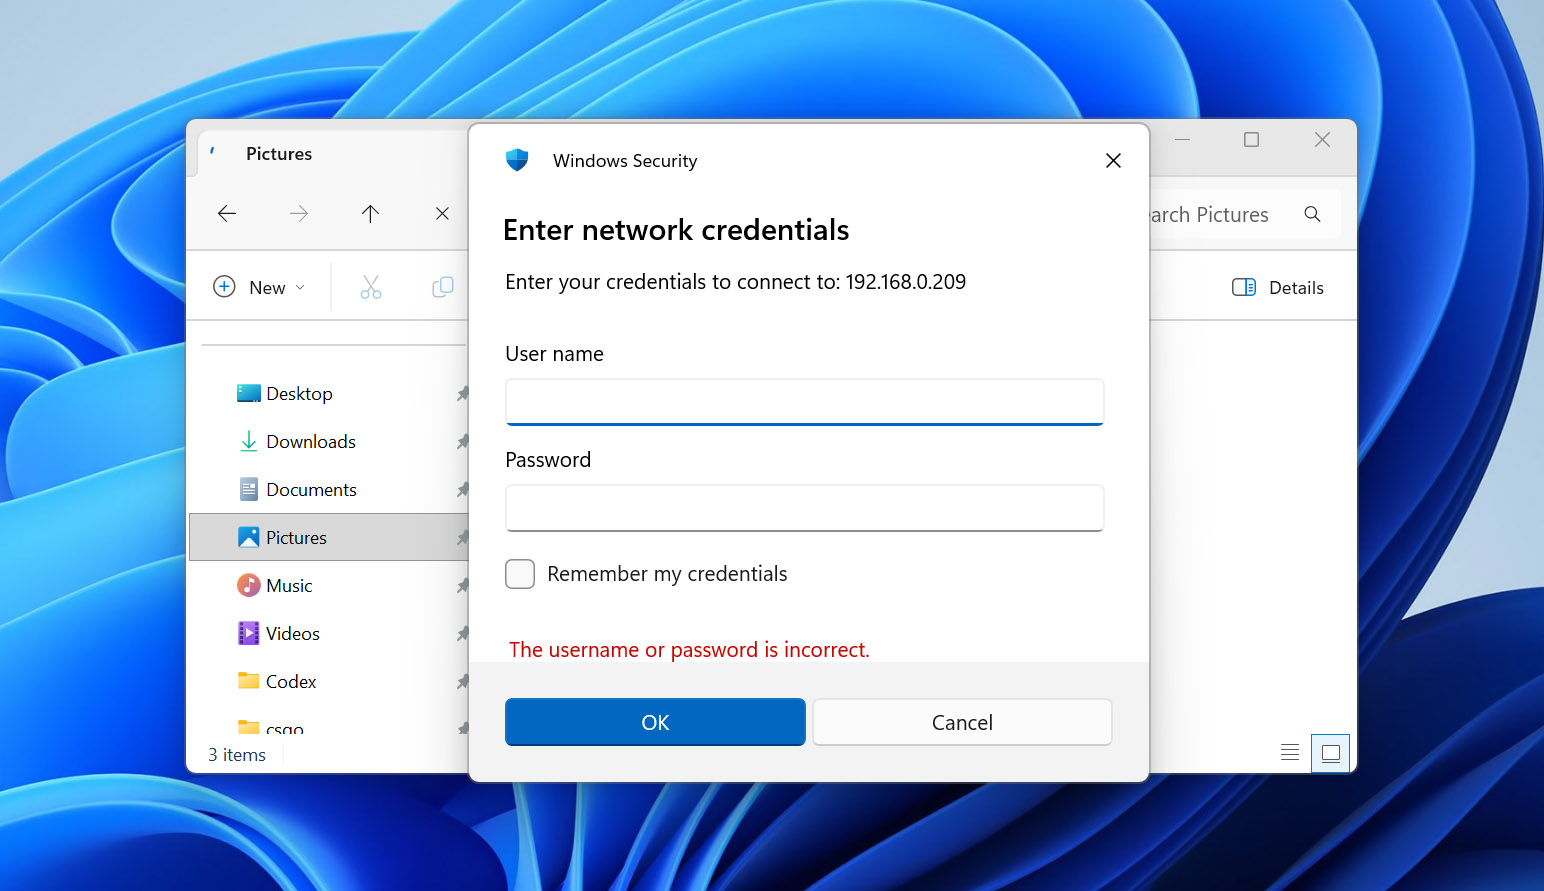
- Open the shared folder and copy the files to the PC.
You can also enable Allow guest users for a shared folder if you don’t want to sign in with a Mac account. Turn guest access off after the transfer is complete.
You can also create a shared folder on the Windows PC and copy files to it directly from your Mac.
- On the PC, open File Explorer, create a folder, right-click it, and select Show more options > Give access to > Specific people.
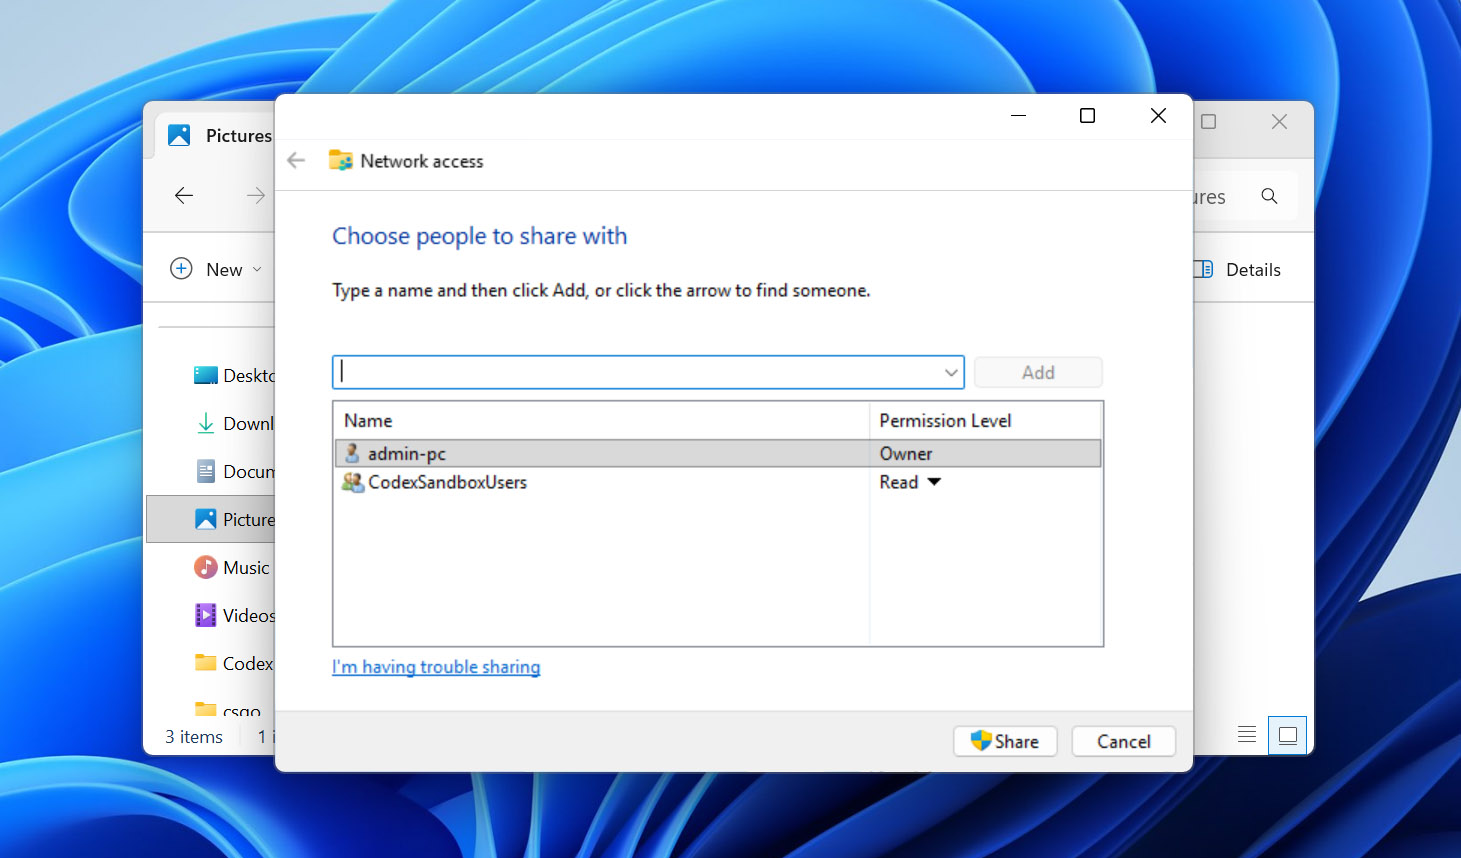
- Select Everyone and set the permission level to Read/Write, click Add > Share, and then Done.
- On the Mac, open Finder > Network and select your Windows PC.
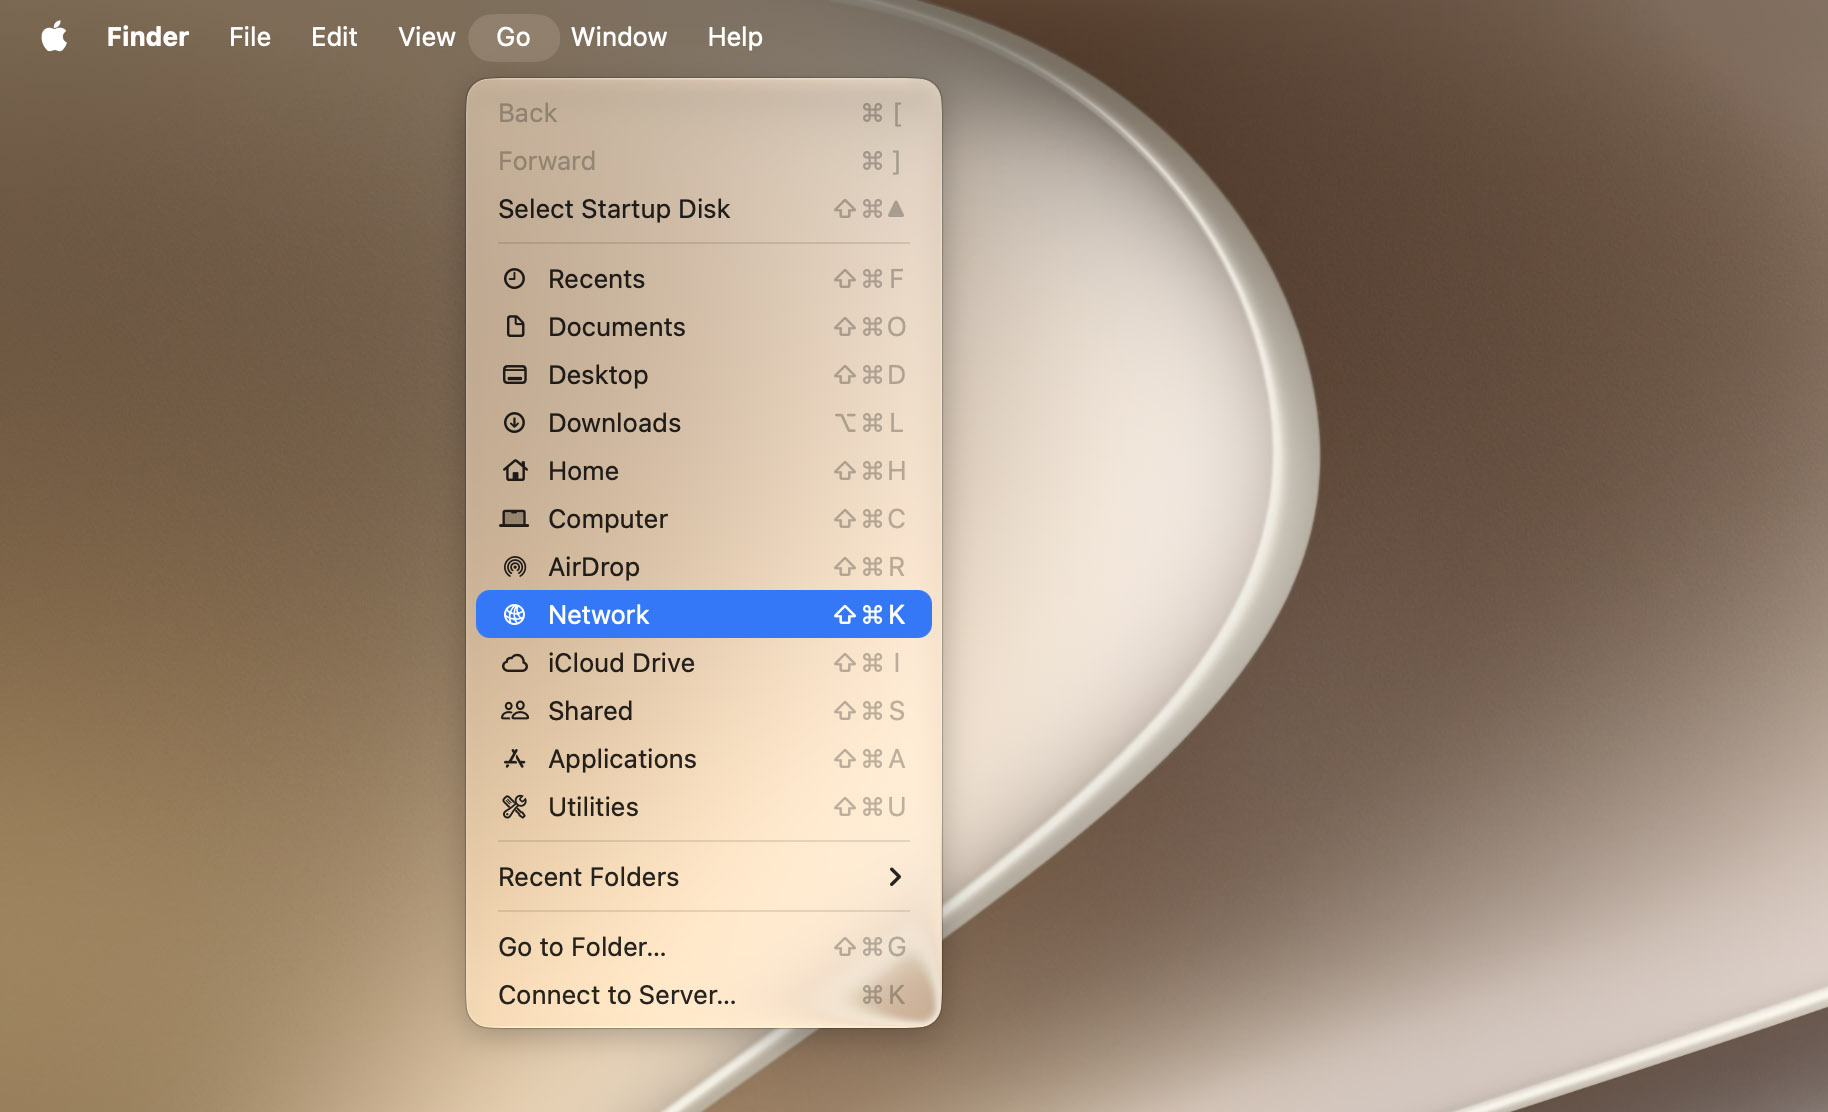
- Click Connect As, select Registered User, and enter your Windows username and password.
- Open the shared folder and copy the files from your Mac to it.
When the transfer is complete, remove Everyone from the folder’s sharing permissions if you no longer need network access to it.
[For a small number of files, using the network may be unnecessary. Copy the files from the Mac to a USB flash drive or external drive formatted as exFAT, then connect it to the PC. Both macOS and Windows can read and write to exFAT drives.
Method 5: Use a Professional Data Recovery Service
A professional data recovery service is the safest option when the storage device shows signs of physical failure. Stop using the drive and don’t attempt to scan or repair it if it:
- makes clicking, grinding, or other unusual noises;
- is not detected by the computer at all;
- appears with a capacity of 0 bytes or an incorrect capacity;
- stopped working after a drop or other physical impact;
- was exposed to water or another liquid.
Professional help may also be the only practical option for a MacBook with a soldered SSD that no longer powers on. On Macs with a T2 chip and Apple silicon models, the data is encrypted and tied to the hardware. Recovery may depend on whether a specialist can repair the logic board well enough to make the original system functional and access the encrypted storage.
Here’s what you can generally expect from a professional data recovery service:
- Contact the recovery company and describe the Mac, storage device, symptoms, and circumstances of the data loss.
- Ship the device or bring it to an approved drop-off location.
- The lab will evaluate it and provide a recovery estimate. Many services offer the initial evaluation for free.
- Review the quote and decide whether to proceed.
- If recovery is successful, the recovered files are typically returned on a separate storage device.
Final Thoughts
If the Mac drive is healthy and you only need to get files from the Mac hard drive to a PC, use an APFS/HFS+ driver or transfer the files over the network from a working Mac. For deleted files or a damaged file system, use data recovery software, while a physically failing drive or a MacBook with inaccessible soldered storage is a job for a professional recovery service. If copies are available in iCloud Drive or Time Machine, recovering from them may be simpler than working with the original storage. Keep a separate backup of important files, and if an external drive needs to work with both macOS and Windows, format it as exFAT.