

Deleted photos on a Mac usually go to Recently Deleted if you removed them from the Photos app, or to Trash if you deleted them as regular files through Finder. If they’re already gone from both locations, check iCloud and Time Machine next; if no copy exists, data recovery software may still be able to recover them from the original storage device.
Note: If you suspect permanent deletion, avoid unnecessary use of the Mac, SD card, external drive, or other device that stored the photos. New data can overwrite deleted photo data and reduce your recovery chances.
For the quickest route, follow the option that matches your situation:
| Scenario | What to do |
|---|---|
| I can’t find the photo, but I’m not sure it was deleted | Search Photos, Finder, and Spotlight first. The photo may simply be somewhere else on your Mac. |
| I deleted the photo from the Photos app | Check Photos > Recently Deleted. Deleted photos normally remain there for up to 30 days. |
| I deleted the photo as a regular file through Finder | Check Trash and use Put Back to restore it. If it came from removable media, reconnect that device first. |
| The photo isn’t in Recently Deleted or Trash | Check iCloud for another copy or a deletion that hasn’t synced yet. |
| I use Time Machine | Open a backup from before the deletion and restore the photo or an older copy of your Photos Library. |
| I have no usable backup | Try data recovery software as soon as possible. Scan the drive, SD card, or other device that originally stored the photo. |
| The storage device is damaged or unreliable | Consider a professional data recovery service, especially if the photos are irreplaceable. |
To summarize: The best recovery method depends on where the photo was stored and how it was deleted.
Start with the easiest options and work your way down:
- Search Photos, Finder, and Spotlight to make sure the photo is actually gone.
- Check Recently Deleted or Trash, depending on whether you deleted it from Photos or Finder.
- Look for another copy in iCloud or on another Apple device that hasn’t synced since the deletion.
- Check Time Machine for a backup from before the photo disappeared.
- Try data recovery software if you can’t find a backup or another copy.
- If the storage device is physically damaged or unreliable, consider a professional recovery service instead.
If you need data recovery software, minimize use of the affected storage device to avoid overwriting deleted photo data.
Where Do Deleted Photos Go on Macs?
Where a deleted photo goes on a Mac depends on where it was stored and how you deleted it. A photo deleted from the Photos app does not follow the same path as an image file deleted from Finder, and iCloud Photos can also affect what happens on your other devices.
Have a quick look:
| Scenario | Where the photo goes | What happens next |
|---|---|---|
| Deleted from the Photos app | Recently Deleted in Photos | Stays there for up to 30 days, then Photos permanently deletes it. You can recover it before then. |
| Deleted from Photos with iCloud Photos enabled | Recently Deleted, with the deletion synced through iCloud | The photo also disappears from other devices that use the same iCloud Photos library. You can recover it from Recently Deleted before permanent deletion. |
| Removed from an album with “Remove from Album” | Remains in your Photos library | Only the album reference is removed. The original photo remains in your library. |
| Deleted as a regular image file in Finder | Mac Trash | The file stays there until you empty the Trash. You can use Put Back to restore it. |
| Deleted from an external drive through Finder | Usually the drive’s hidden Trash, displayed through the Mac Trash while the drive is connected | You can restore the file before the Trash is emptied. |
| Trash was emptied | No longer accessible through Trash | The photo is permanently deleted from Finder, but it may still be recoverable with data recovery software if its data has not been overwritten. You can also check Time Machine or another backup. |
| Recently Deleted was emptied or the 30-day period expired | Permanently removed from the Photos library | Check your backups and other copies first. Data recovery software may also help in some cases, provided the underlying photo data still exists on the storage device. |
| Photo bypassed Trash and was permanently deleted | No Trash copy | Check your backups. If none exists, data recovery software may be able to recover the photo before its data is overwritten. |
The situation becomes more complicated once a photo is gone from Trash or Recently Deleted. On HDDs, the data may remain until it is overwritten, so recovery software can still have a chance. Most modern Macs, however, use SSDs with TRIM, which can clear the blocks that held deleted data. Once TRIM takes effect, recovery software cannot restore those photos, so recovery from a Mac’s internal SSD is often less likely.
Make Sure Your Photos Were Actually Permanently Deleted
A missing photo isn’t necessarily a deleted photo. Check a few common locations before you try backups or recovery software.
Step 1: Search for the Lost Photo
Photos can be surprisingly easy to lose track of on a Mac, especially if you have a large library with multiple folders and thousands of images collected over the years. A photo you think was deleted may simply be somewhere you don’t usually look, or you may have saved another copy outside the Photos app.
So, start with a simple search:
- Open the Photos app.
- Use the Search field to look for the photo by date, location, person, category, or another detail you remember.
- Check Library > All Photos and any albums where the photo might appear.
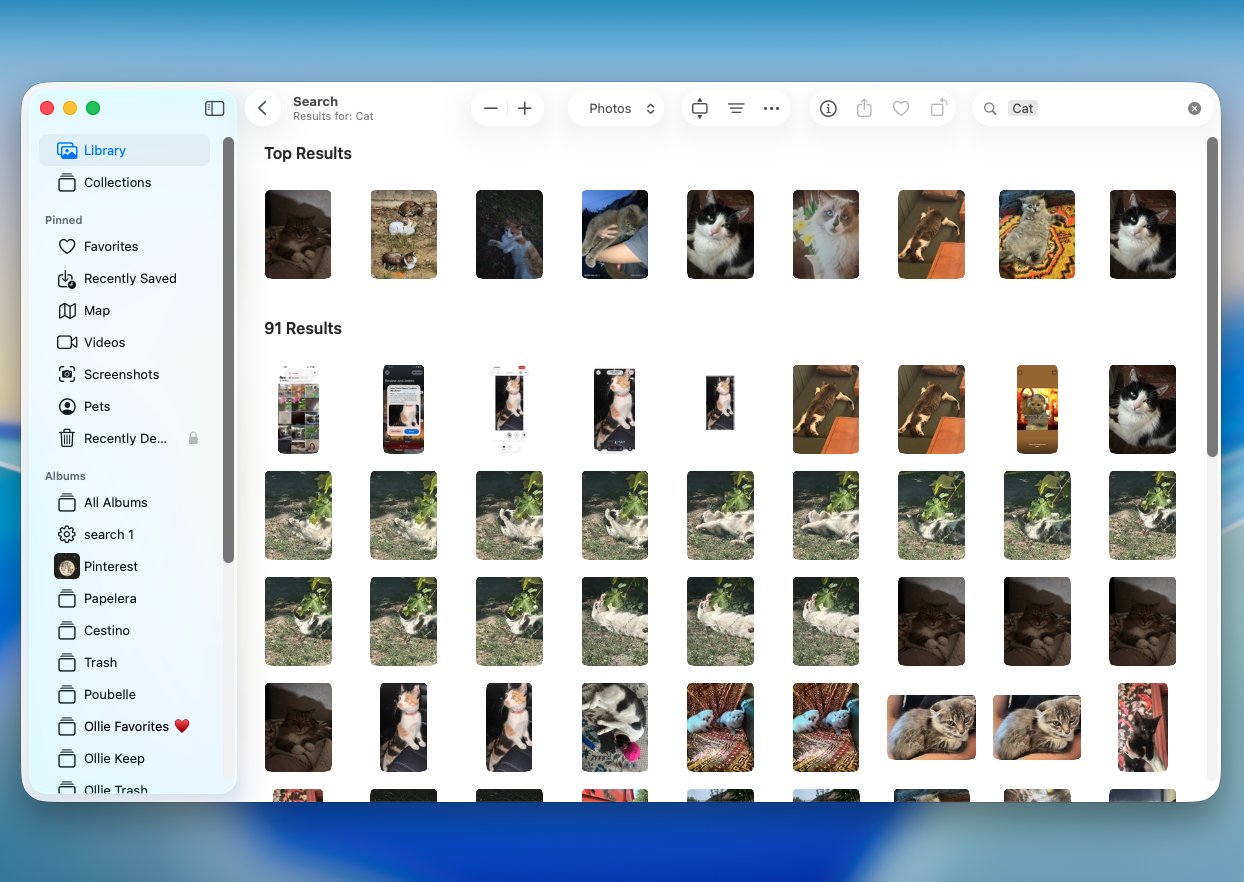
- If you originally stored the photo as a regular file rather than imported it into Photos, open Finder and search by the file name or extension, such as JPG, HEIC, PNG, or RAW.
Note: Another quick option is Spotlight. Press Command + Space and enter the photo’s name or any file details you remember.
Step 2: Check the Recently Deleted Album
If you deleted the photo from the Photos app, your next stop should be Recently Deleted. Photos don’t disappear immediately after normal deletion. Instead, macOS keeps them in this album for up to 30 days, which gives you a chance to change your mind and restore them.
Here’s how to recover a photo from Recently Deleted:
- Open the Photos app on your Mac.
- Scroll down the sidebar and select Recently Deleted under Utilities.
- Unlock the album with Touch ID or your Mac password if prompted.
- Find and select the photo or photos you want to restore.
- Click Recover in the upper-right corner.
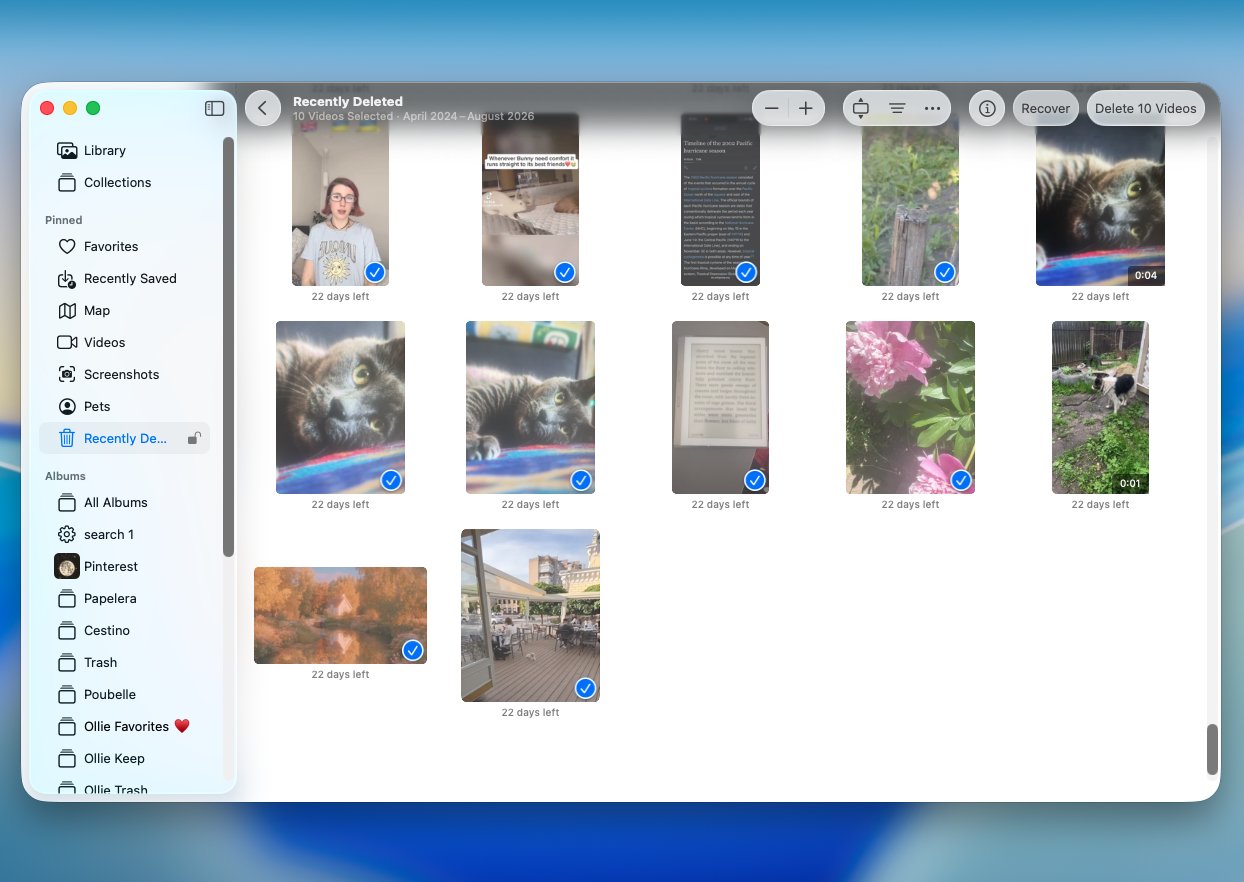
The recovered photos will return to your Photos library.
Step 3: Recover Deleted Photos from Trash
Not every photo on your Mac lives inside the Photos app. If you kept an image as a regular file in Downloads, Documents, Desktop, or another Finder folder, deleting it usually sends it to the Trash rather than the Recently Deleted album. The same can happen when you delete photos through Finder from external drives, USB flash drives, SD cards, and other removable media.
Note: For removable media, macOS stores the deleted file in a hidden Trash folder on that device. It can still appear in your Mac’s Trash while the device is connected.
Here’s how to restore the photo:
- Connect the external drive, SD card, or other device if that’s where the photo was stored.
- Click the Trash icon on the right side of the Dock.
- Find the photo you want to recover.
- Right-click it and select Put Back. macOS will return it to its original location.
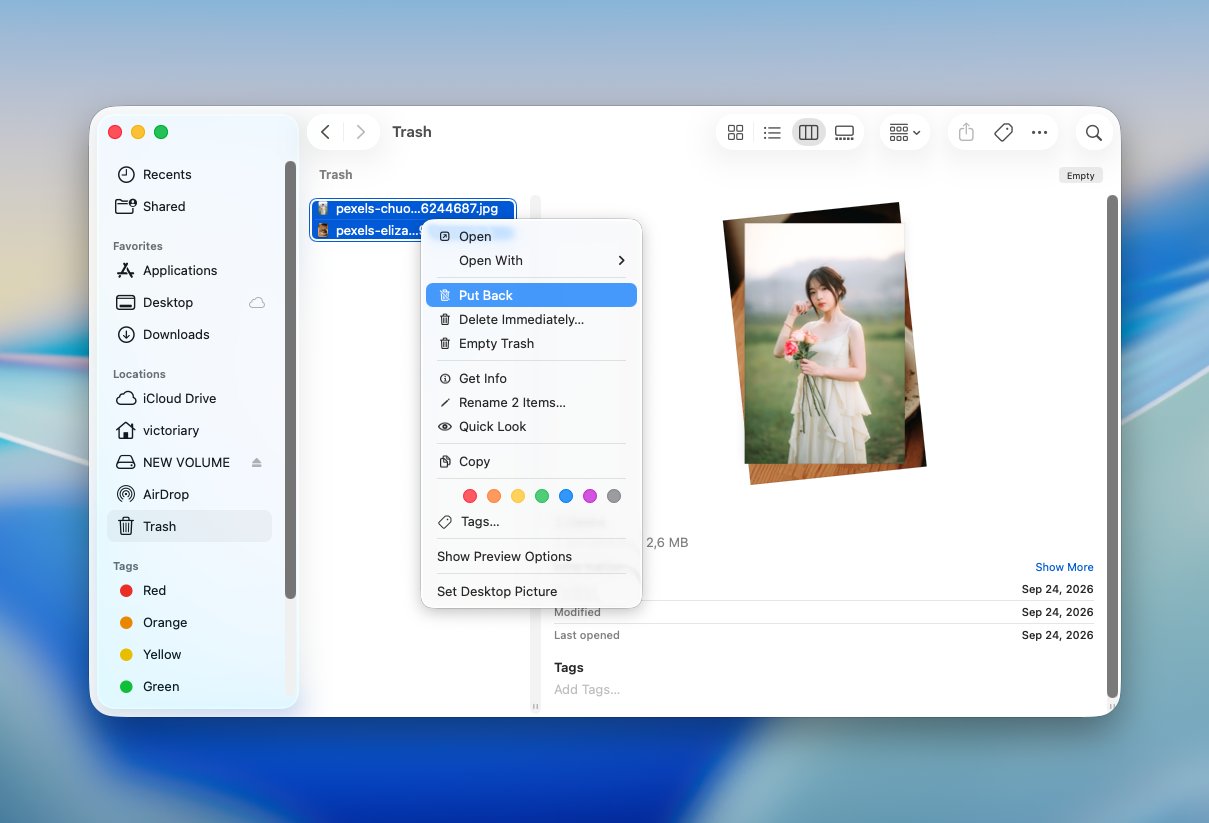
You can also drag the photo out of Trash and save it somewhere else. This can be useful with removable media if you’d rather restore the file directly to your Mac.
How to Recover Permanently Deleted Photos on Mac
If the photo is no longer in Recently Deleted or Trash, recovery takes a little more work. Check iCloud and Time Machine for another copy first. If neither helps, data recovery software may still help you to recover permanently deleted files on the original storage device.
Method 1: Restore Deleted Photos from iCloud
iCloud is worth checking, but whether it can help depends on how your Mac was set up before the photos disappeared. If iCloud Photos was enabled, your library syncs across your Apple devices. That means a photo you delete on your Mac is normally deleted from iCloud and your other synced devices as well. Once you also remove it from Recently Deleted, iCloud Photos generally won’t provide another copy to restore.
Note: If you have another Apple device that previously synced with iCloud Photos but has been offline or powered off since before the photo was deleted, the image may still be stored locally on that device. Keep it disconnected from the internet so the deletion doesn’t sync, then copy the photo somewhere safe, such as the Files app or an external drive.
Here’s what to check:
- Go to iCloud.com and sign in with the same Apple Account you use on your Mac.
- Open Photos.
- Search your library for the missing photo.
- If you find the photo, select it and click Download to save a copy to your Mac.
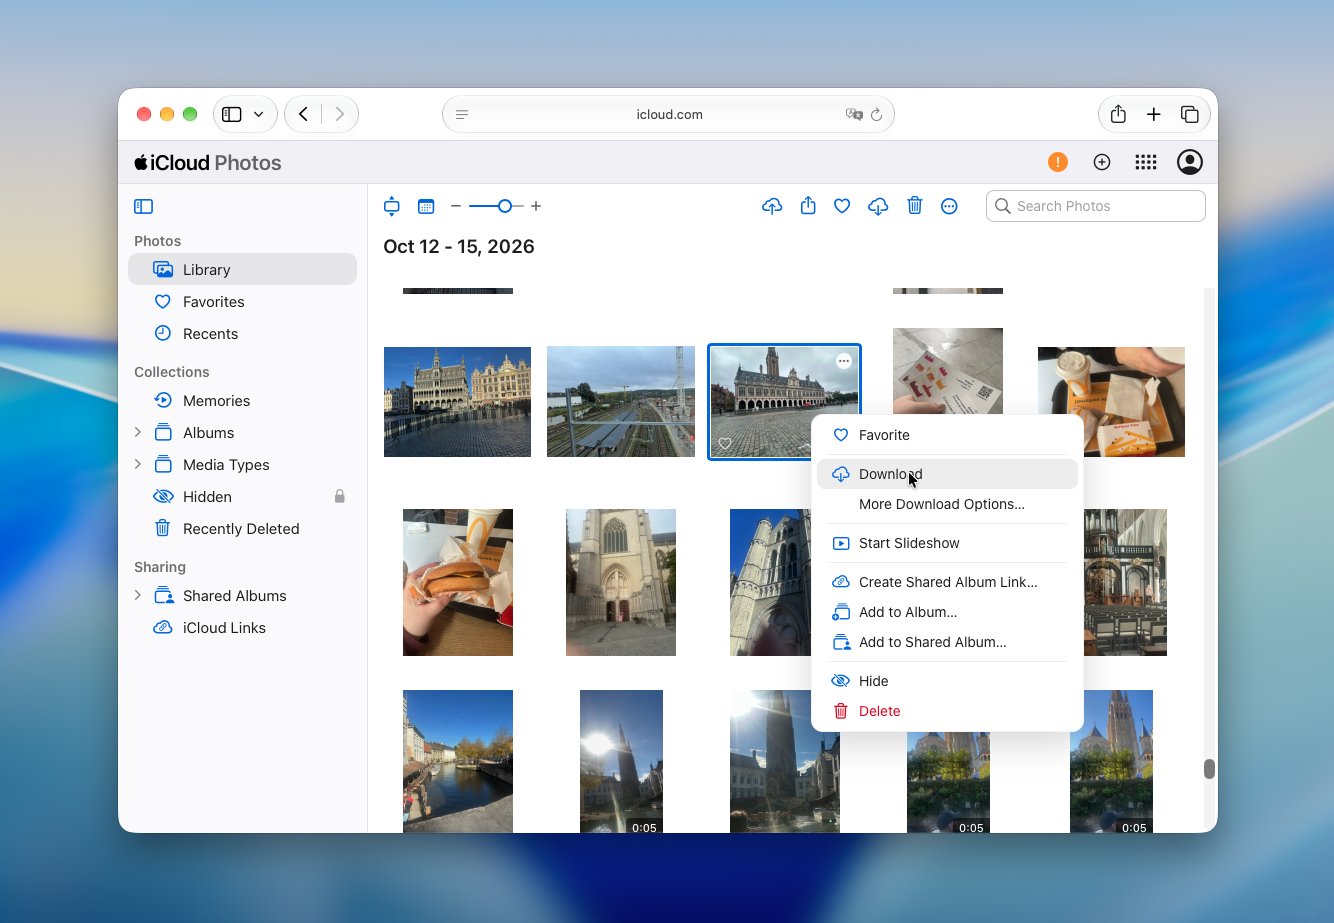
- If you previously saved the photo as a regular file in iCloud Drive, open Drive and search for it there too.
Method 2: Use Time Machine to Recover Permanently Deleted Photos
If you had Time Machine set up before the photos were deleted, there may be an older copy available in one of your backups. This method works best for photos that were stored as regular files in Finder, but it can also help if your Photos Library itself was included in a Time Machine backup.
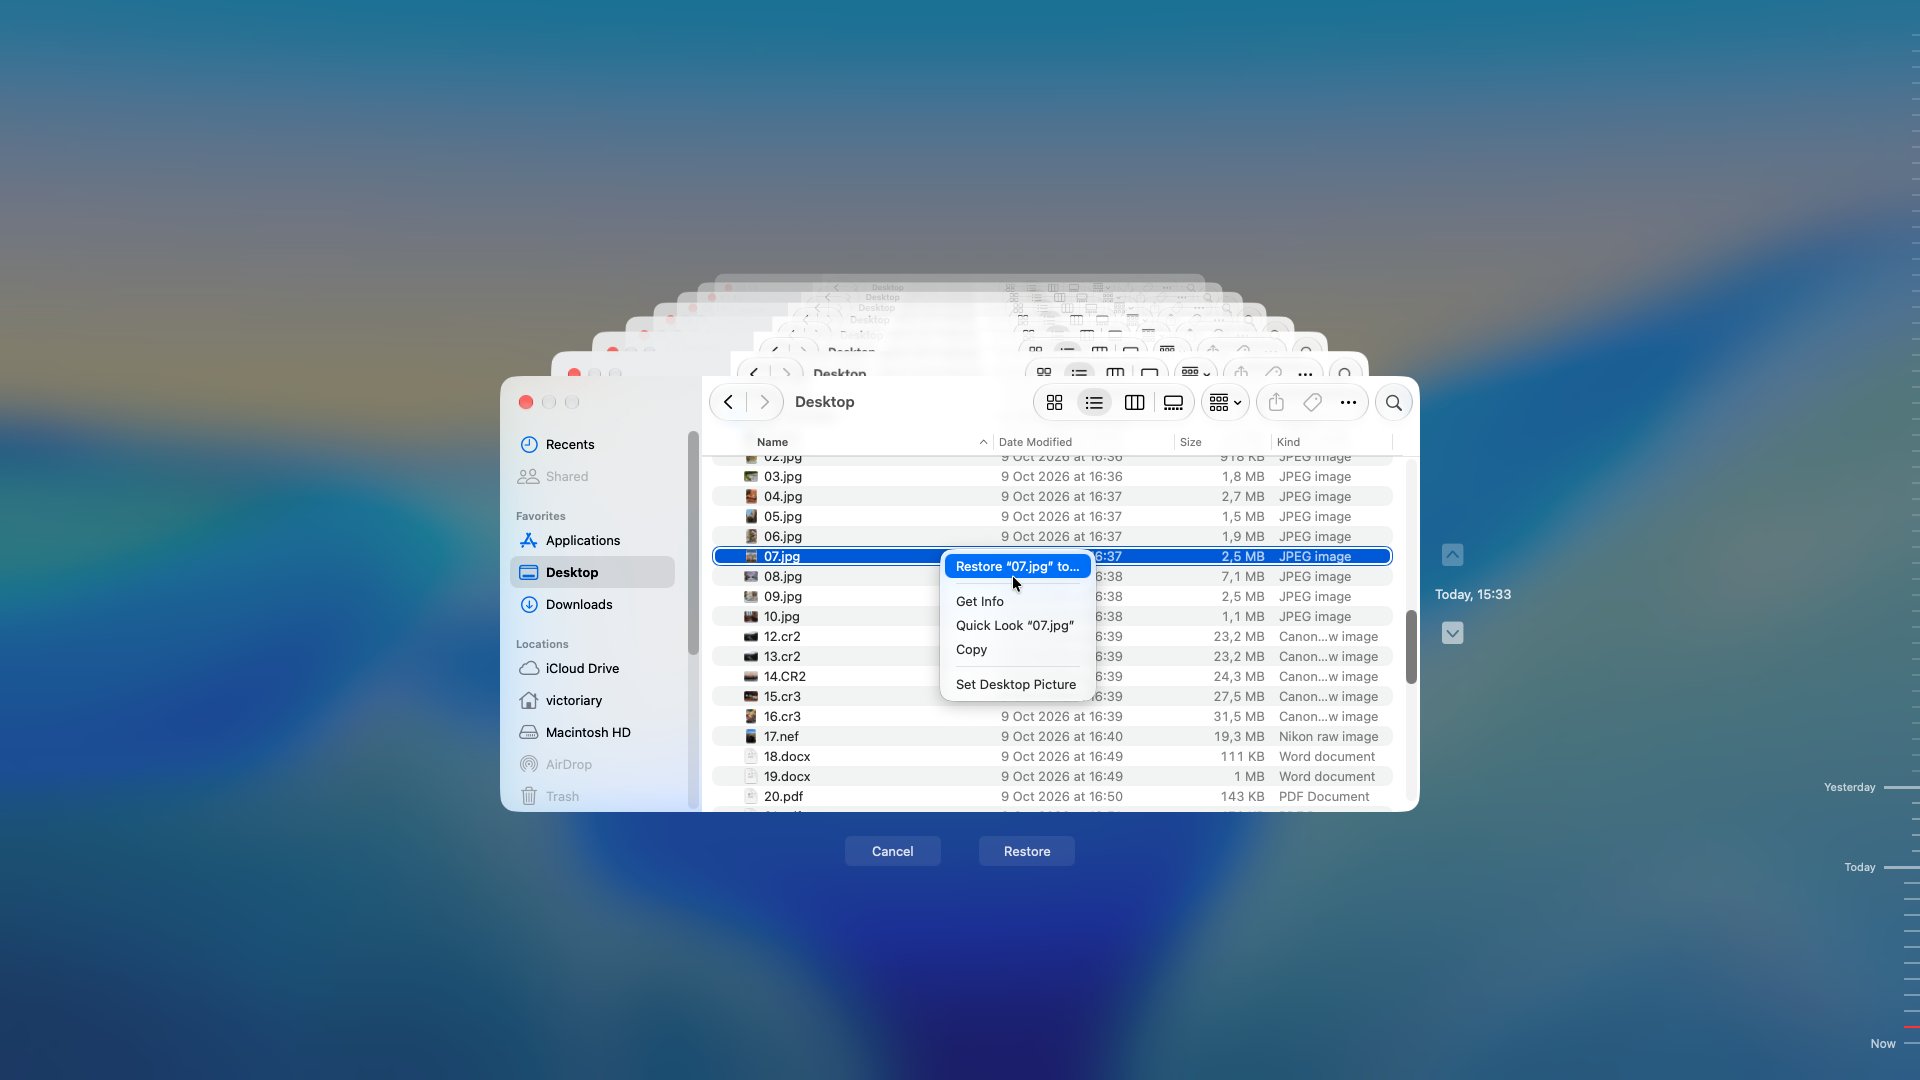
For photos that were stored in a regular folder, recovery is pretty simple:
- Connect the drive you use for Time Machine, if it isn’t already connected.
- Open Finder and navigate to the folder where the deleted photo was originally stored.
- Open Time Machine from the menu bar or search for it with Spotlight.

- Move back through the available backups until you reach a date from before the photo was deleted.
- Find and select the photo you want to recover.
- Click Restore. Time Machine will copy it back to its original location.
If the missing photo was stored inside the Photos app, the process is a little different because Photos keeps your library in a library package rather than as individual image files in Finder. This approach is most useful if the original photo was downloaded to your Mac when the Time Machine backup was created. If Optimize Mac Storage was enabled and only an optimized version or placeholder was stored locally, the Time Machine backup may not contain the original file.
Note: Before restoring an older Photos Library, disconnect your Mac from the internet. Then quit Photos, open your Pictures folder, and use Time Machine to locate and restore an older version of your Photos Library. Keeping the Mac offline is important because opening the restored library while connected to the internet may allow iCloud Photos to sync its current state from Apple’s servers, including the deletion you’re trying to recover from.
Be careful with this route, though. Restoring an older Photos Library can replace newer changes made after that backup. If possible, restore the older library to a different location rather than overwrite your current one, then open it separately and export the photos you need.
Method 3: Restore Permanently Deleted Photos with Data Recovery Software
If the photos are gone from Recently Deleted and Trash and you don’t have a usable backup, photo recovery software is the next option. It can scan the storage device directly for deleted photo data that macOS can no longer access normally.
Note: Before you start, avoid actively using the drive that contained the deleted photos. New files, app data, downloads, and other writes can overwrite deleted data. For this same reason, save recovered photos to a different storage device as well.
For photo recovery, it helps to use a tool that supports common camera and Apple image formats, including JPG, HEIC, PNG, TIFF, and RAW files, and lets you preview found photos before recovery. Preview is particularly useful because deleted files can lose their original names, so recognizing the actual image is often easier than searching by filename.
For this method, we’ll use Disk Drill. It works with Mac internal drives as well as SD cards, USB drives, and external disks, and its photo previews, file-type filters, and RAW format support make it a good fit for photo recovery.
Note: If you want a closer look at Disk Drill before you use it, check our Disk Drill review. We cover its recovery features, supported devices and file systems, scan performance, photo recovery capabilities, pricing, and the results from our own recovery tests.
Here’s how to recover permanently deleted photos with Disk Drill:
- Download Disk Drill, install it, and open the app. If the photos were deleted from an external drive or memory card, connect that device to your Mac first.
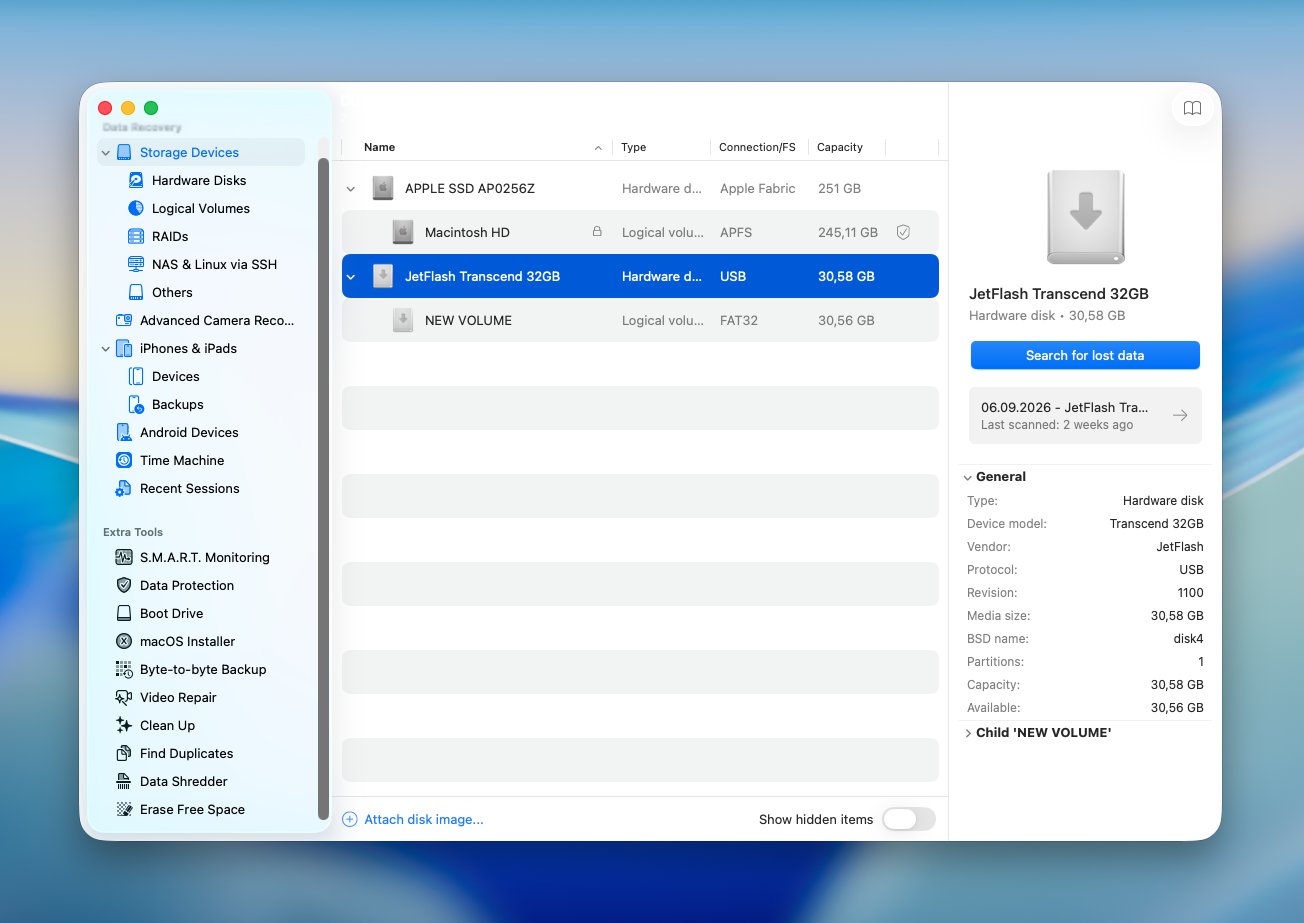
- Select Storage Devices from the sidebar and choose the drive that originally contained the photos. Click Search for lost data.
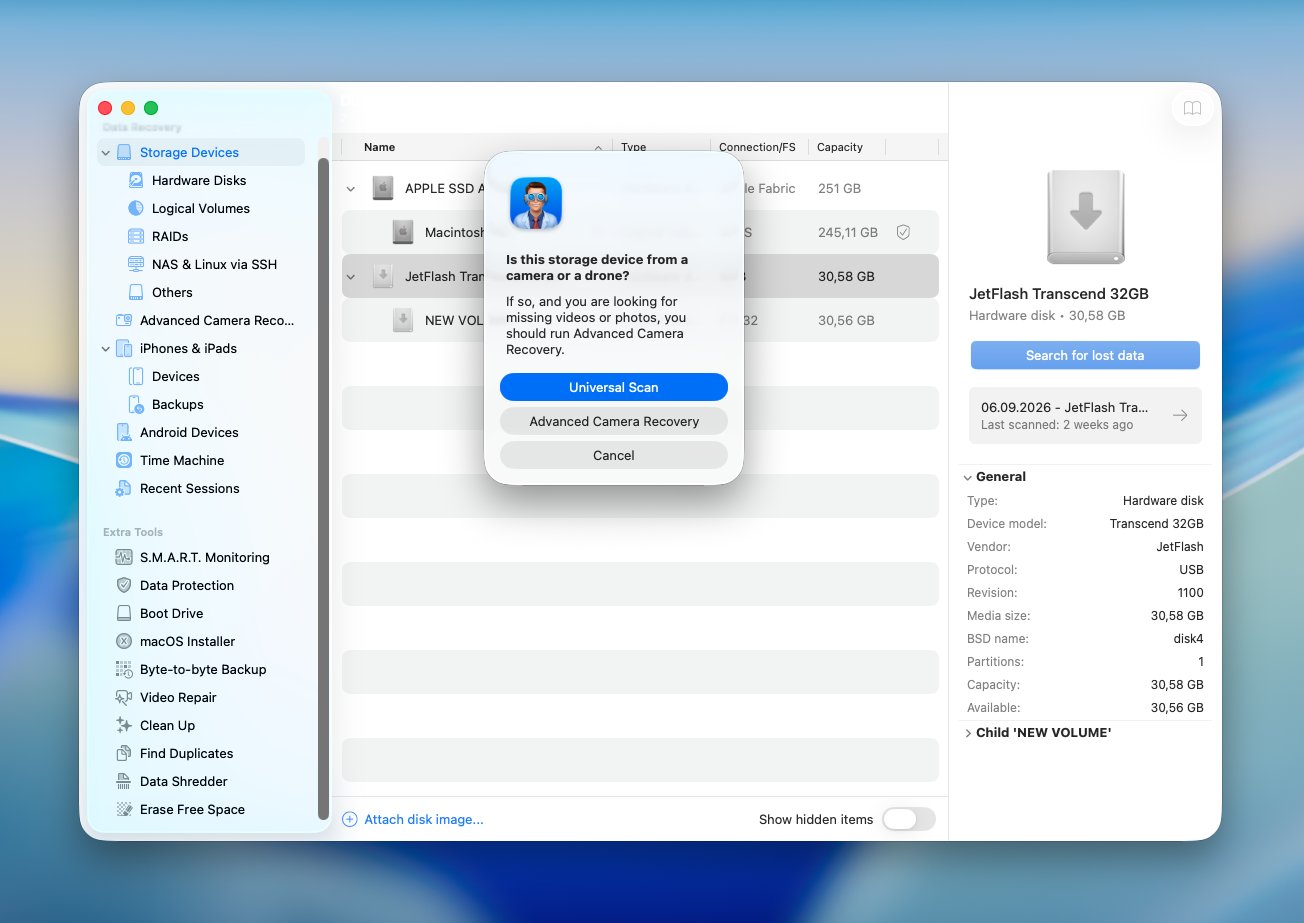
- If Disk Drill asks you to choose a scan type, select Universal Scan to run its available recovery methods together.
- Once the scan finishes, click Review found items.
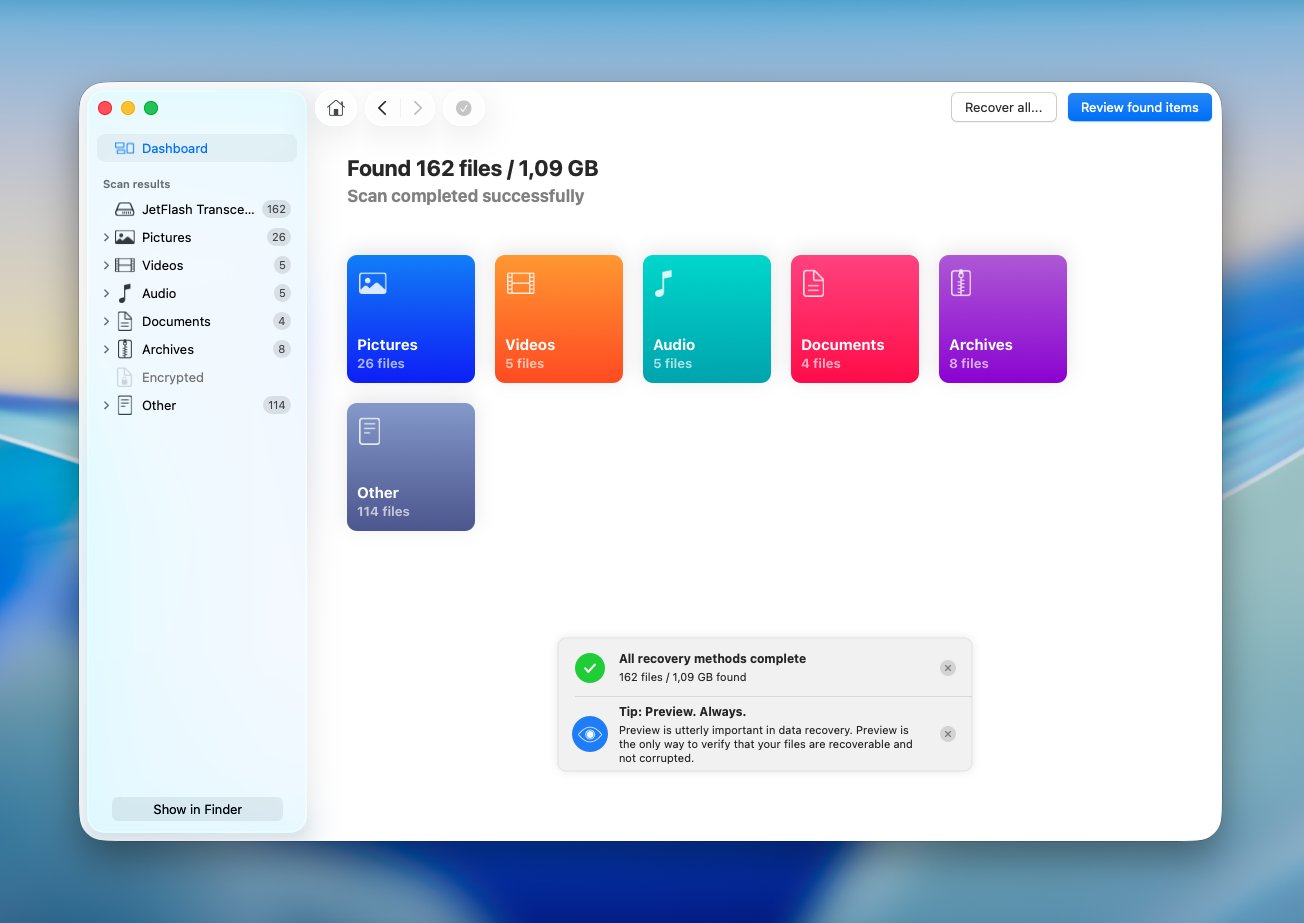
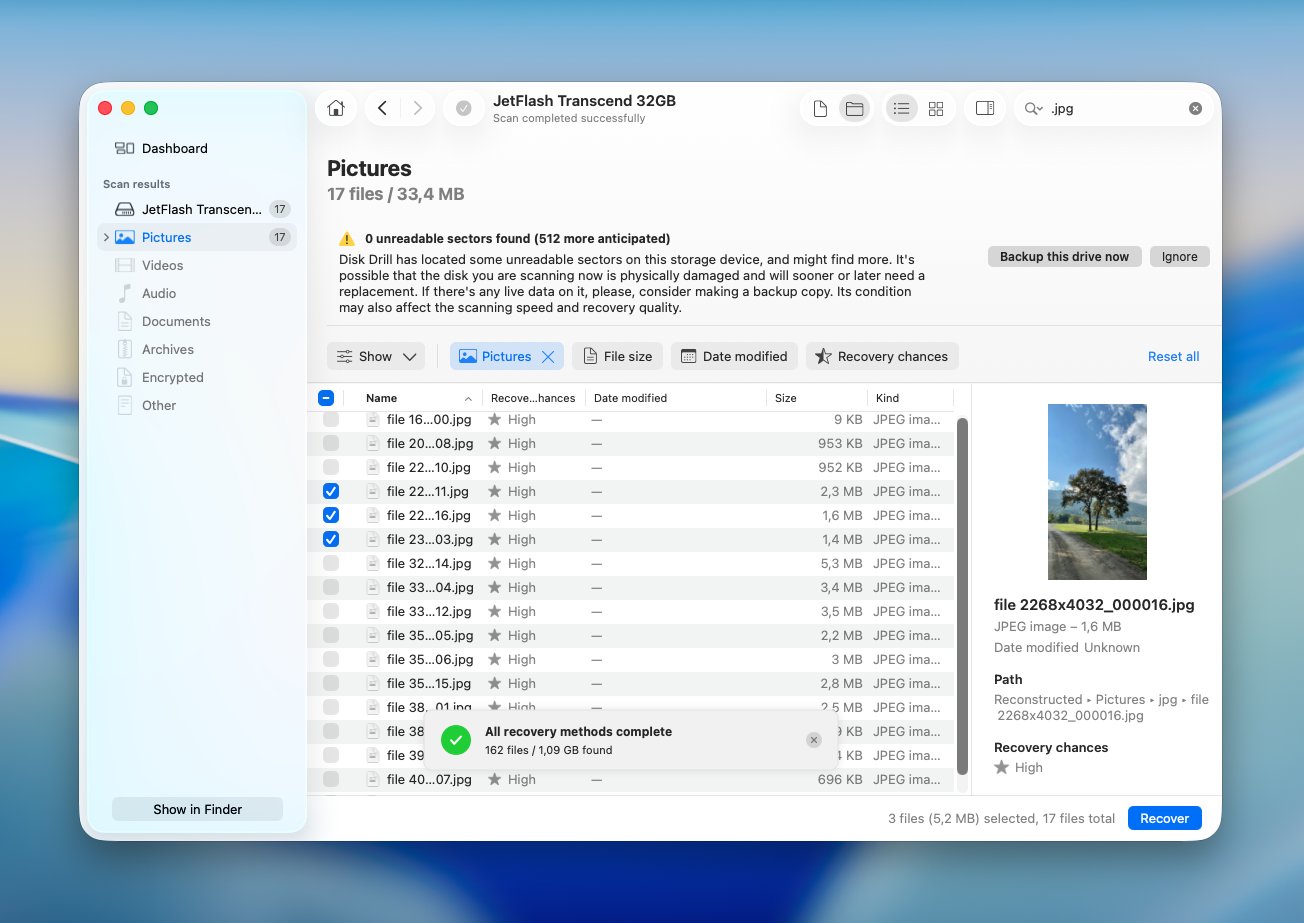
- Select Pictures to narrow the results to image files. You can also search by a filename or extension such as .jpg, .heic, .png, or a specific RAW format if you know what you’re looking for. Preview promising photos before you recover them. If a photo displays correctly in the preview, that’s a good sign that its data is still intact enough for recovery. Select the photos you want and click Recover.
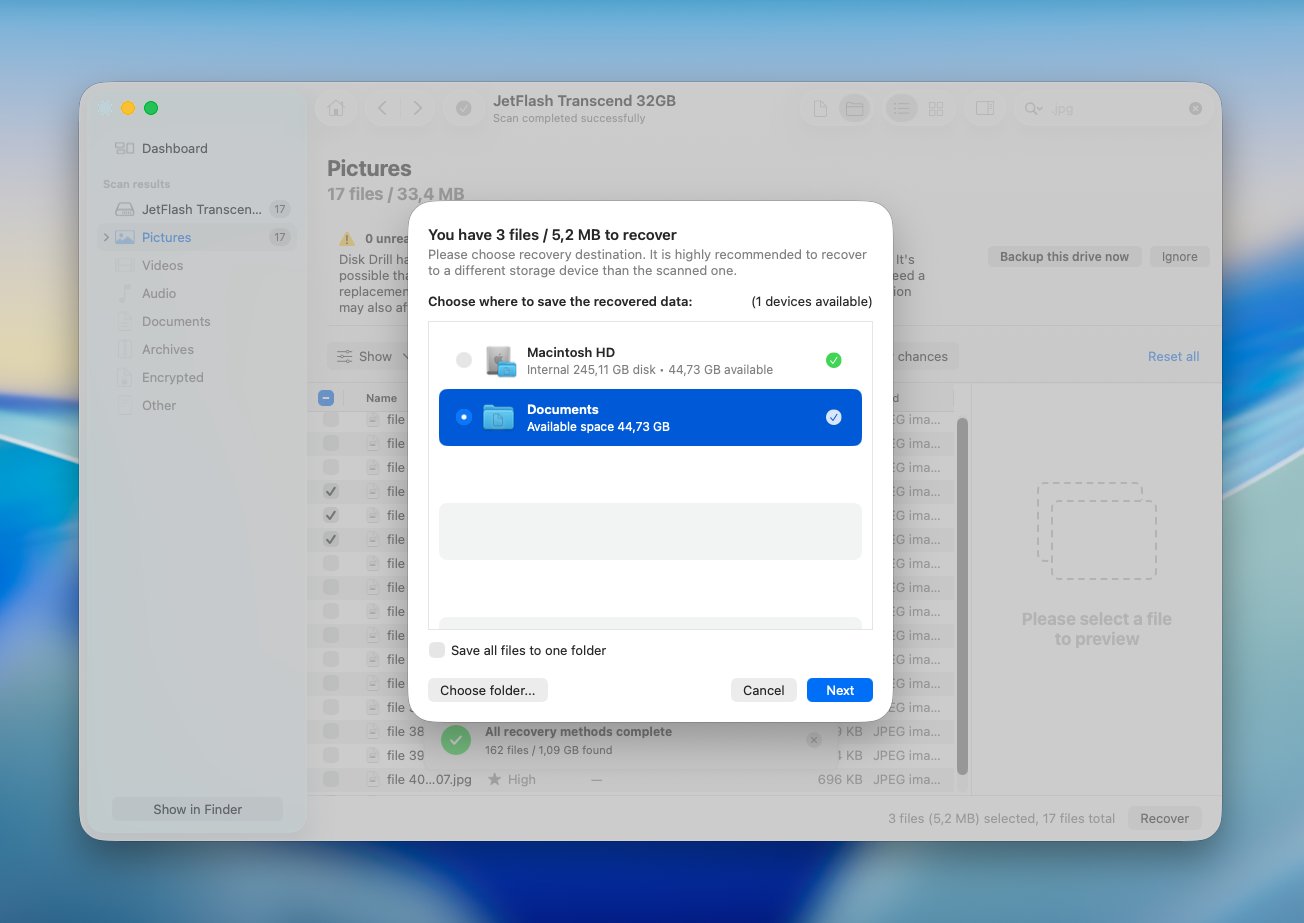
- Choose a recovery destination on a different drive whenever possible. This prevents recovered data from overwriting other deleted photos that may still be recoverable. Click Next to complete the recovery.
Disk Drill lets you scan and preview recoverable photos before you pay, although you’ll need a license to save recovered files on Mac. That makes the preview especially useful: you can first check whether the photos are actually there and intact before you purchase anything.
Note: If the photos are extremely important and the storage device shows signs of physical failure, consider a professional data recovery service instead of scanning it yourself. This is especially relevant for SD cards, external drives, or older Macs with drives that disconnect, make unusual noises, fail to mount, or produce read errors.
A recovery lab can work directly with damaged hardware using specialized equipment that consumer software can’t provide. For a healthy device with photos lost through accidental deletion or formatting, however, data recovery software is usually the more practical first option.
Final Thoughts
The sooner you notice that photos are missing, the more options you usually have. Start with Photos, Recently Deleted, and Trash because the files may not be permanently deleted at all. If those checks don’t find anything, look for another copy in iCloud or Time Machine before you try recovery software.
If you have permanently deleted photos and lack a backup, minimize use of the affected storage and attempt recovery as soon as you can. Data recovery software is a practical next step for a healthy drive, SD card, or other storage device, while a professional recovery service makes more sense when the device itself has physical problems.
You can also check our data recovery forum for similar cases and real-life experiences from other Mac users. You may find someone who lost photos under similar circumstances and see which recovery method worked for them.
FAQ
- Photos app: Deleted photos and videos move to Recently Deleted, where they normally remain for up to 30 days before permanent deletion.
- Finder: Photos stored as regular image files in Desktop, Downloads, Pictures, or other folders usually move to the Trash when you delete them.
- External storage: Photos deleted through Finder from an external drive, USB drive, or SD card may appear in the Mac’s Trash while that device is connected.