


 Do you wonder if permanently deleted videos can still be recovered? Based on our team’s hands-on testing across hundreds of video recovery cases, the answer is yes in many situations, but only if the conditions are right. When you delete a video, the operating system usually removes its reference from the file system, while the actual data remains on the storage device until new data overwrites it. Your chances of recovery depend on the device, the type of storage, and how much it has been used since the deletion.
Here is what to do:
- Stop saving new files to the drive or memory card where the videos were stored.
- Check the Recycle Bin, Trash, or Recently Deleted folder first.
- Look for cloud backups or sync services such as iCloud Photos, Google Photos, OneDrive, or Dropbox.
- If the videos were stored on an SD or microSD card, remove it from the device until you’re ready to scan it.
- If the videos aren’t in a backup, use reliable recovery software to scan the storage device as soon as possible.
We’ll explain how permanently deleted video recovery works on Windows, macOS, Android, and iPhone. You’ll also learn when recovery software can help, when a backup is your only option, and when it’s time to contact a professional data recovery service.
Common Causes of Video Loss
Before you choose a recovery method, it helps to identify what caused the videos to disappear. Different data loss scenarios affect your chances of recovery and determine which solution is most likely to work.
| Cause | What happens | Success chance | Recommended method |
| 🗑️ Accidental deletion | The video is deleted from the file system but the data often remains on the storage device until it is overwritten. | High | Check the Recycle Bin, Trash, or Recently Deleted folder first. If it’s not there, use the recovery methods for your device. |
| ♻️ Recycle Bin or Trash emptied | The video no longer appears in the operating system, but the data may still exist on the drive. | High to Moderate | Use the data recovery software method for your device. |
| 💽 Formatted drive or memory card | The file system is recreated and videos become inaccessible. | Moderate to High (after a quick format) | Scan the drive or memory card with recovery software as soon as possible. |
| ⚠️ File system corruption | The drive may appear as RAW, inaccessible, or ask to be formatted. | Moderate to High | Use recovery software before attempting any repairs or formatting. |
| 📹 Camera, drone, or dashcam deletion | Video files are often fragmented, making standard recovery more difficult. | High | Use recovery software with Advanced Camera Recovery support. |
| 📱 Phone reset or factory reset | The device erases user data and, on modern phones, usually removes the encryption keys. | Low without a backup | Restore from iCloud, Google Photos, Finder, iTunes, or another backup if available. |
| 💥 Hardware failure | The storage device becomes unreadable or starts showing errors. | Varies | If the drive is detected, create a backup image and scan it. If not, consider a professional recovery service. |
No matter what caused the video loss, start with the least invasive option. Leave repairs, formatting, and other write operations until after you’ve recovered your files whenever possible.
How to Recover Permanently Deleted Videos on Windows
Windows provides multiple methods for recovering deleted videos, including built-in backup options and specialized recovery software. The right way to do it depends on how the videos were lost and if there is a backup. We’ll begin with the easiest options and then go on to more advanced recovery methods that could be useful when the videos are no longer there in the Recycle Bin.
Method 1: Look in the Recycle Bin
The first place to check is the Recycle Bin. When you delete a video from an internal drive in Windows, it usually goes there instead of being removed immediately. If the Recycle Bin hasn’t been emptied, you can restore the file in just a few clicks.
To restore videos from the Recycle Bin:
- Double-click the Recycle Bin icon on your desktop.
- Browse the files or use the search box to find your video.
- Select the video or videos you want to recover.
- Choose Restore.

Windows will return the videos to their original locations. Keep in mind that not every deleted video ends up in the Recycle Bin. Files deleted with Shift + Delete, those removed from most USB flash drives, memory cards, and external drives, or files that were too large for the Recycle Bin are usually deleted immediately. If you can’t find your videos here, continue with the next recovery method.
Method 2: Use Data Recovery Software
If your videos aren’t in the Recycle Bin and you don’t have a backup, data recovery software gives you the best chance of getting them back. For this guide, we’ll use Disk Drill. It is one of the best video recovery tools that works with internal and external hard drives, SSDs, USB flash drives, SD cards, and other storage devices. It also supports all common video formats, including MP4, MOV, AVI, MKV, FLV, and many others.
If your videos were stored on an SD or microSD card from a camera, drone, dashcam, or Android phone (without internal storage mode enabled), remove the card and connect it to your PC with a card reader. This provides direct access to the card and usually leads to better recovery results.
To recover videos with Disk Drill:
- Download and install Disk Drill on your computer. Install it on a different drive than the one where the videos were lost.
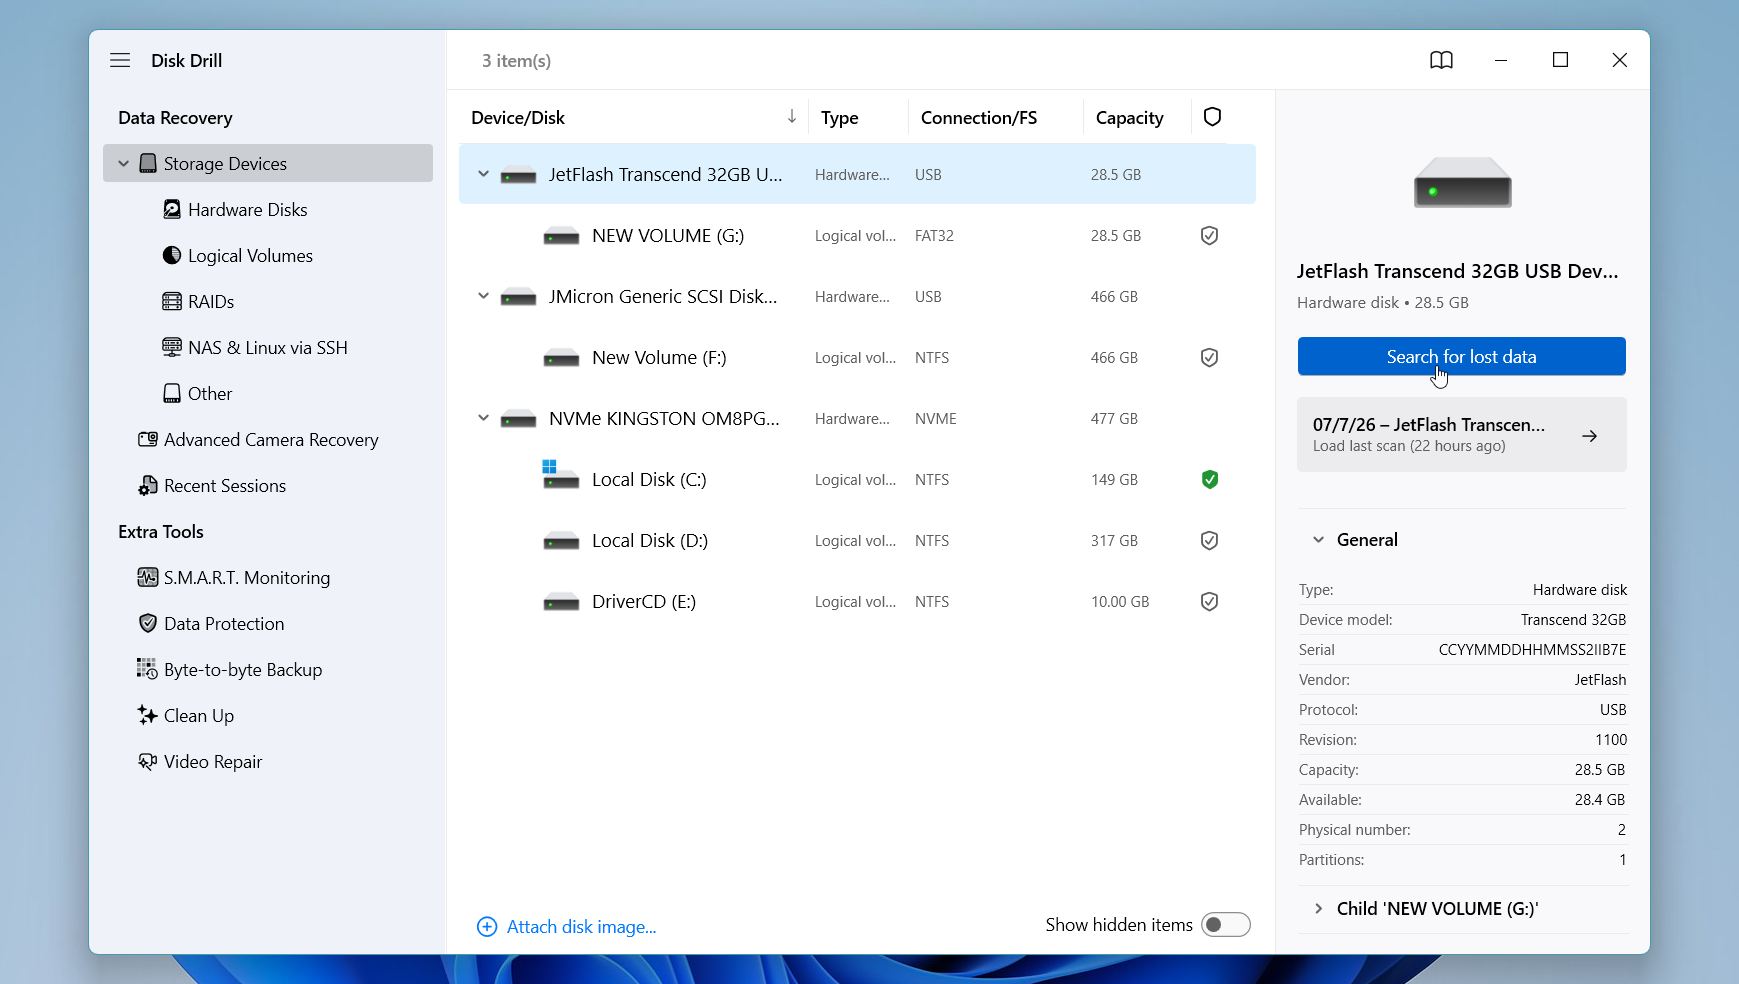
- Launch Disk Drill, select the drive or memory card that contained your videos, and click Search for Lost Data.
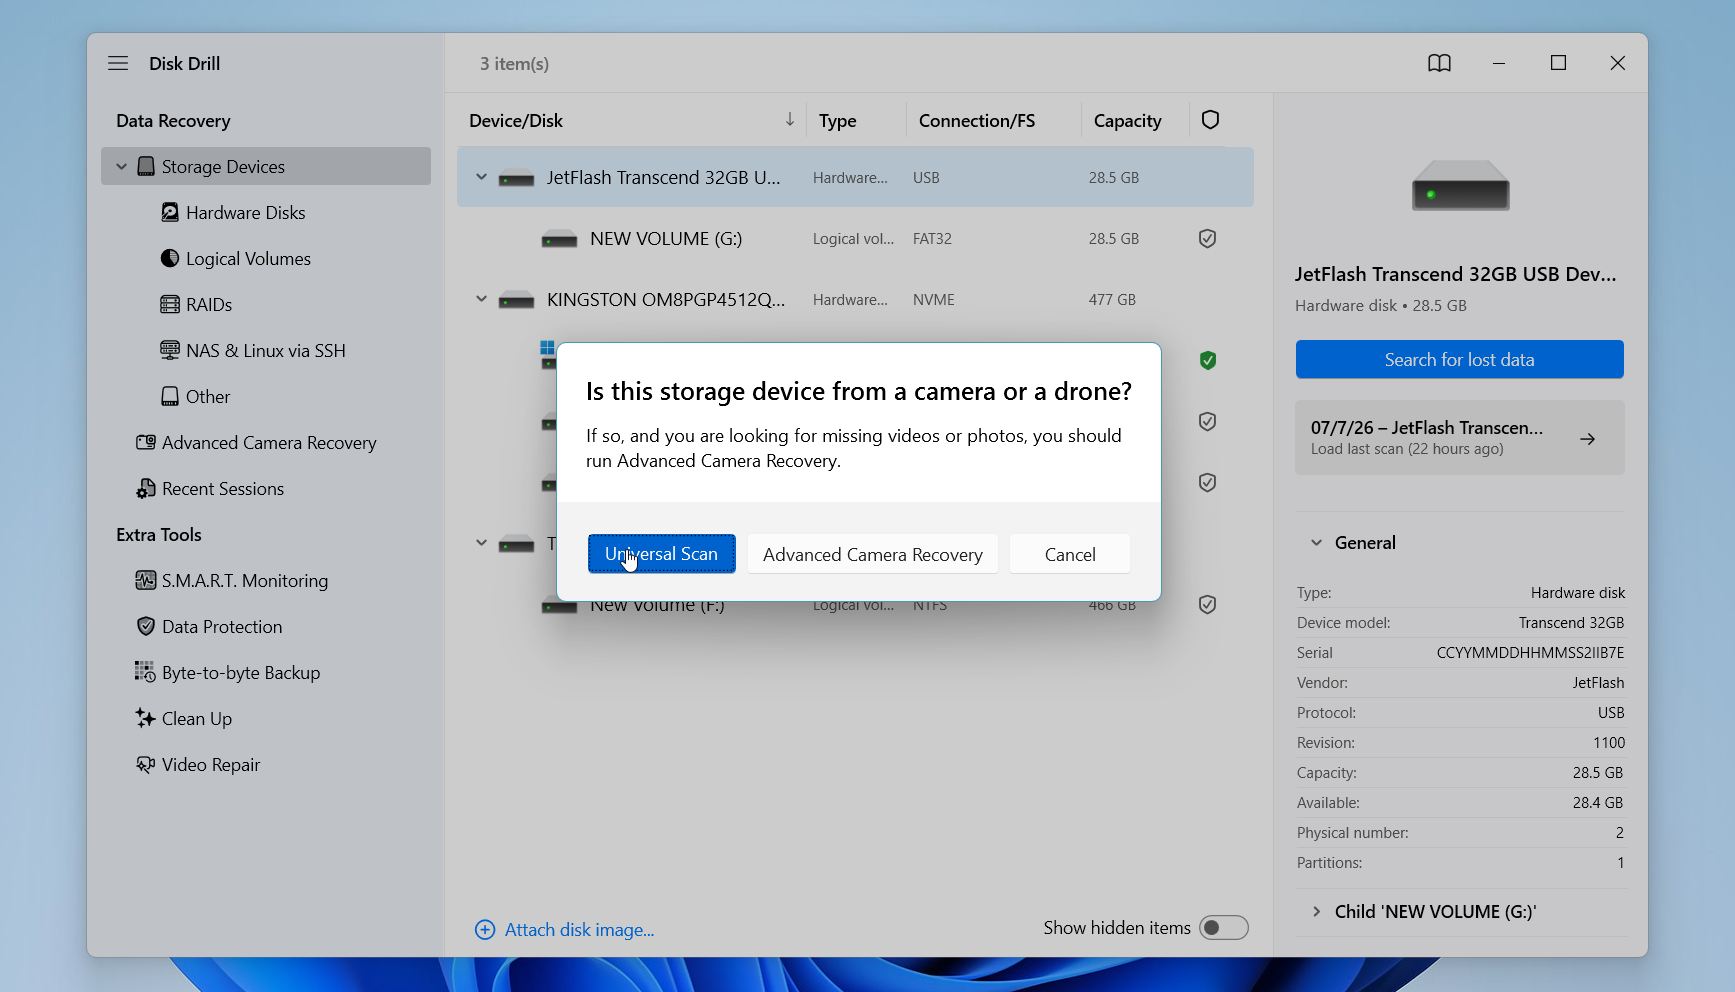
- If you’re scanning a memory card from a camera or another recording device, Disk Drill may ask you to choose a recovery mode. Select Advanced Camera Recovery if the videos come from a camera, drone, action camera, dashcam, or body camera. Otherwise, choose Universal Scan.
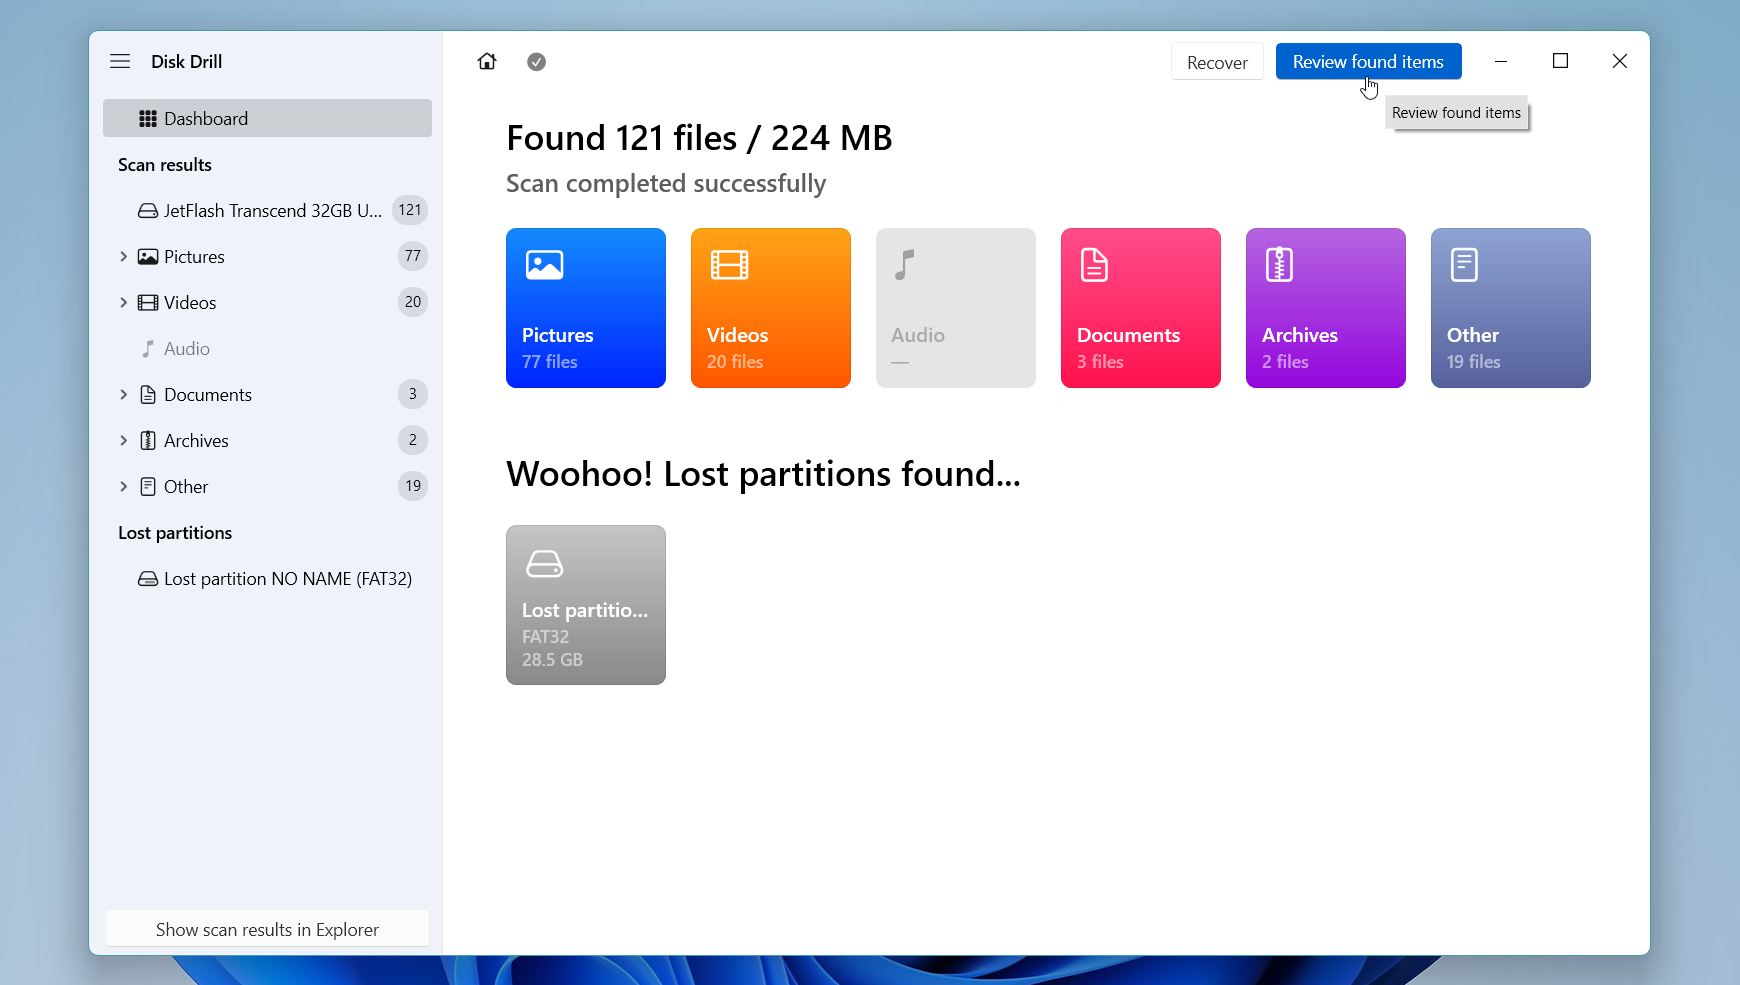
- Wait for the scan to finish, then click Review found items.
- Open the Videos category, or use the search box and filters to find the files you need. Preview each video before recovery. If the preview plays correctly, the recovered file should also be playable.
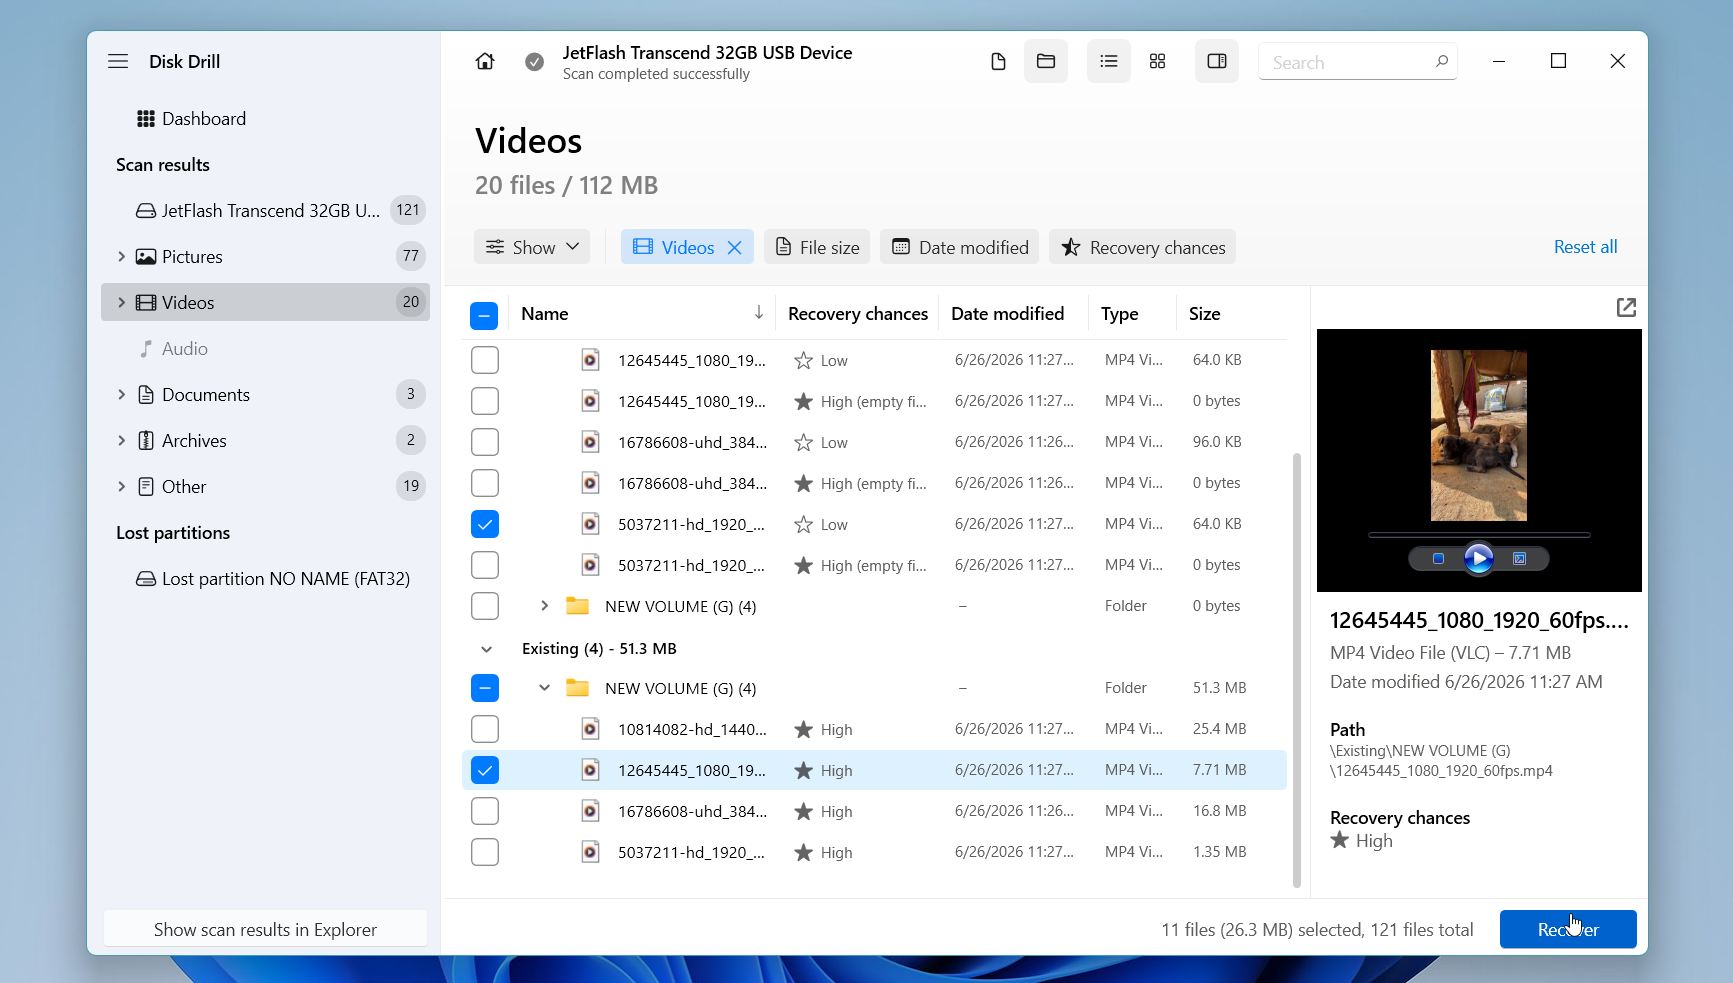
- Select the videos you want to recover, click Recover, and choose a different drive as the destination.
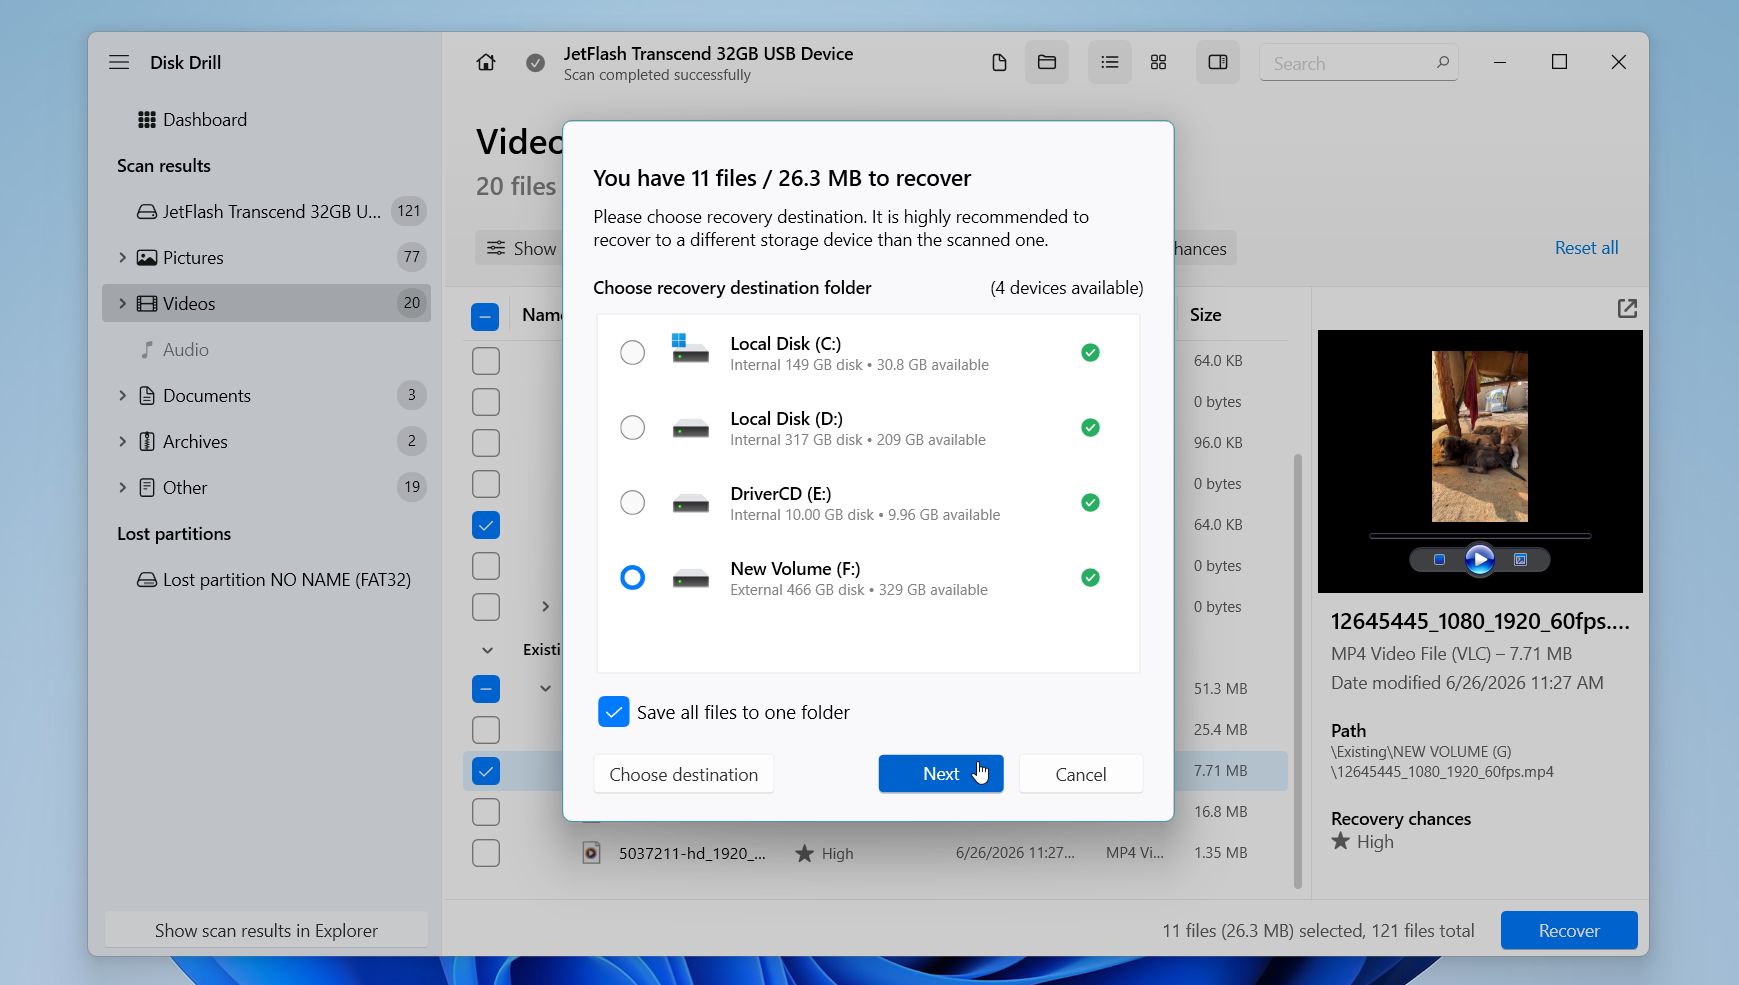
The Windows version lets you recover up to 100 MB for free, which is enough to verify that your videos can be recovered before you buy a license.
If you’d like to learn more about its features, recovery performance, and pricing, check out our detailed Disk Drill review.
Method 3: Recover Files from File History
If you enabled File History before the videos disappeared, Windows may have saved an older copy. File History automatically backs up files in common folders, such as Videos, Documents, Desktop, Pictures, and Music.
To restore videos with File History:
- Open the Control Panel.
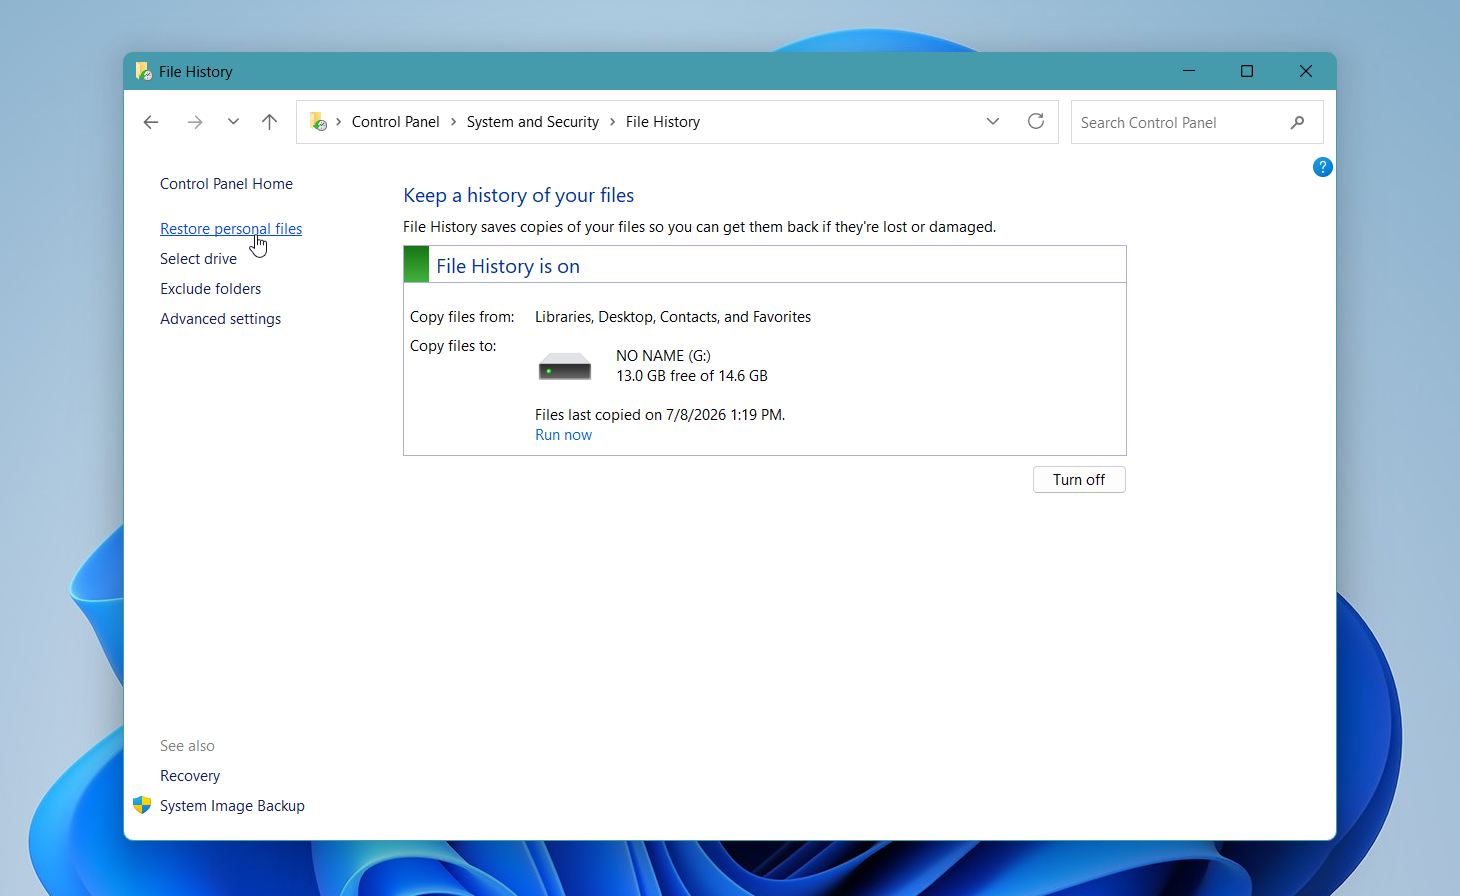
- Go to System and Security > File History.
- Click Restore personal files.
- Browse to the folder that originally contained your videos.
- Use the arrows at the bottom of the window to switch between available backup versions.
- Select the video you want to restore.
- Click the green Restore button.
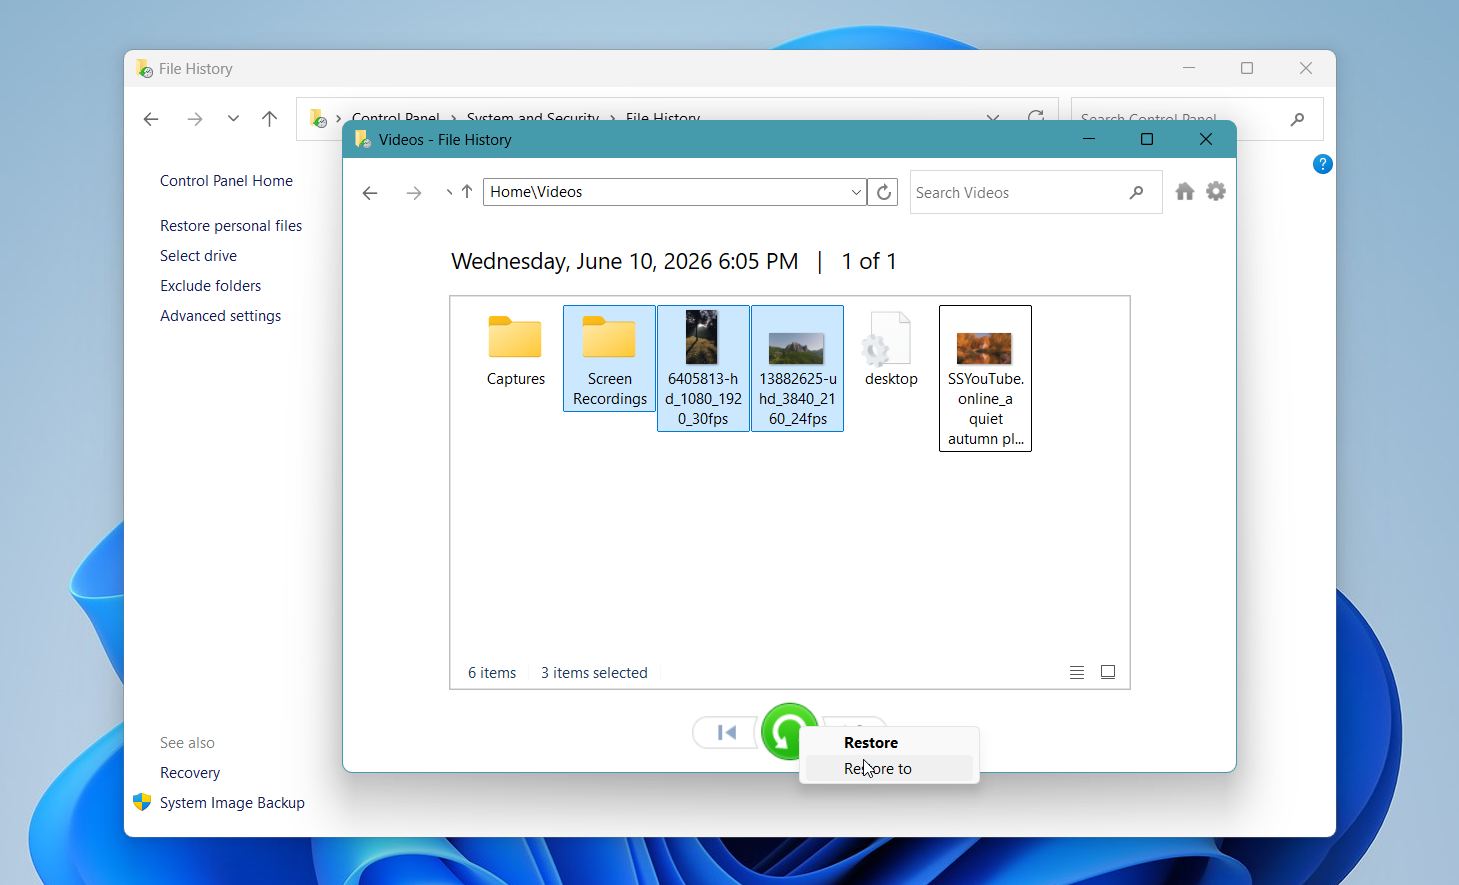
The video will return to its original location. If you want to restore it somewhere else, right-click the Restore button and choose Restore to, then select a different folder.
Method 4: Use Backup & Restore to Recover Deleted Videos
If you use the older Backup and Restore (Windows 7) feature, you may be able to recover deleted videos from one of your backups. Unlike File History, this feature restores files from complete backups that you created manually or on a schedule.
To restore videos with Backup and Restore:
- Open the Control Panel.
- Go to System and Security > Backup and Restore (Windows 7).
- Click Restore my files.
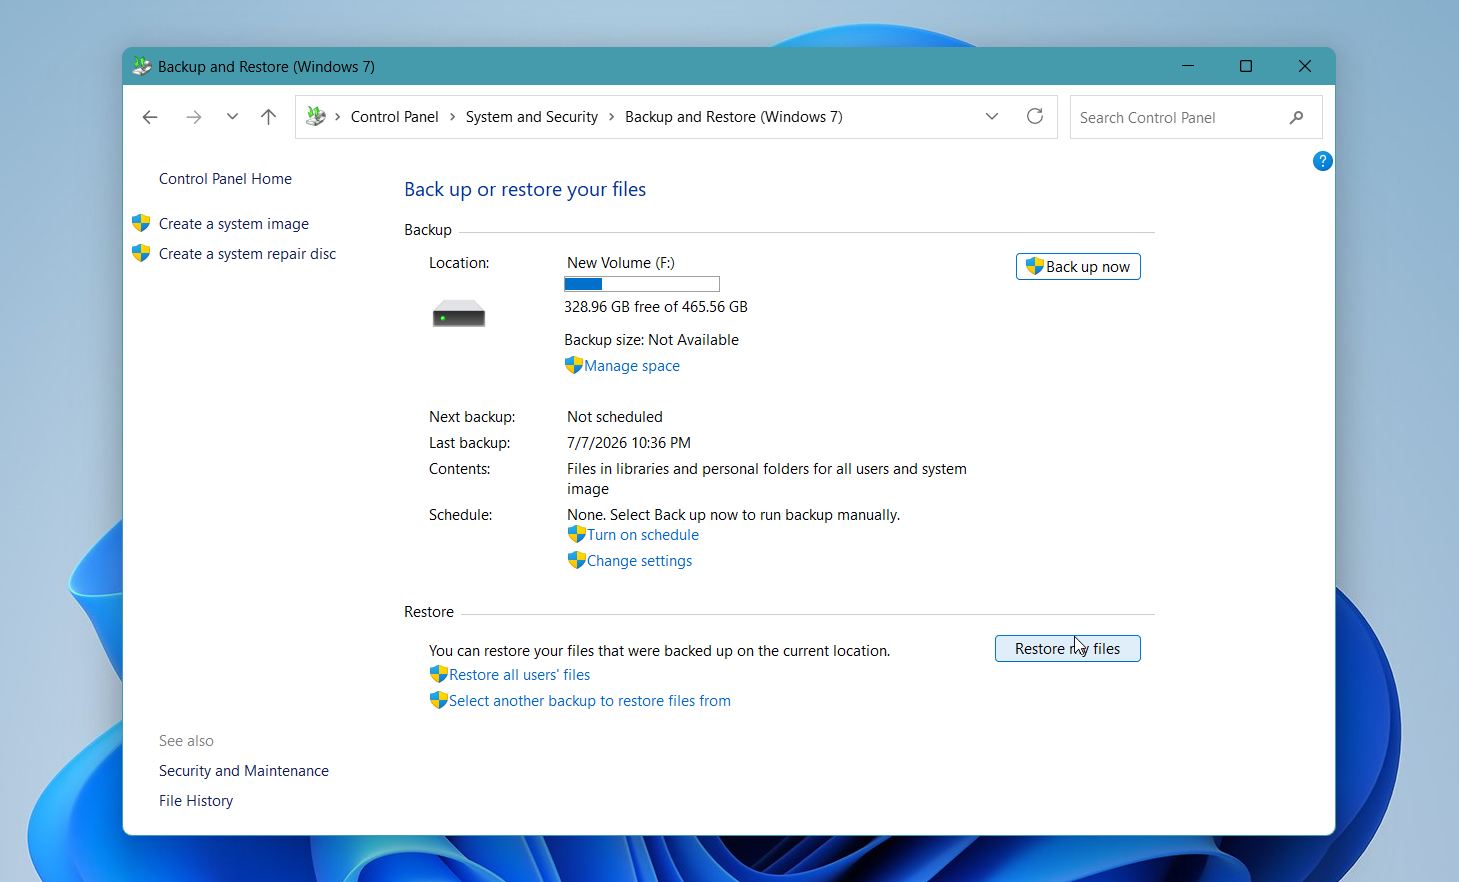
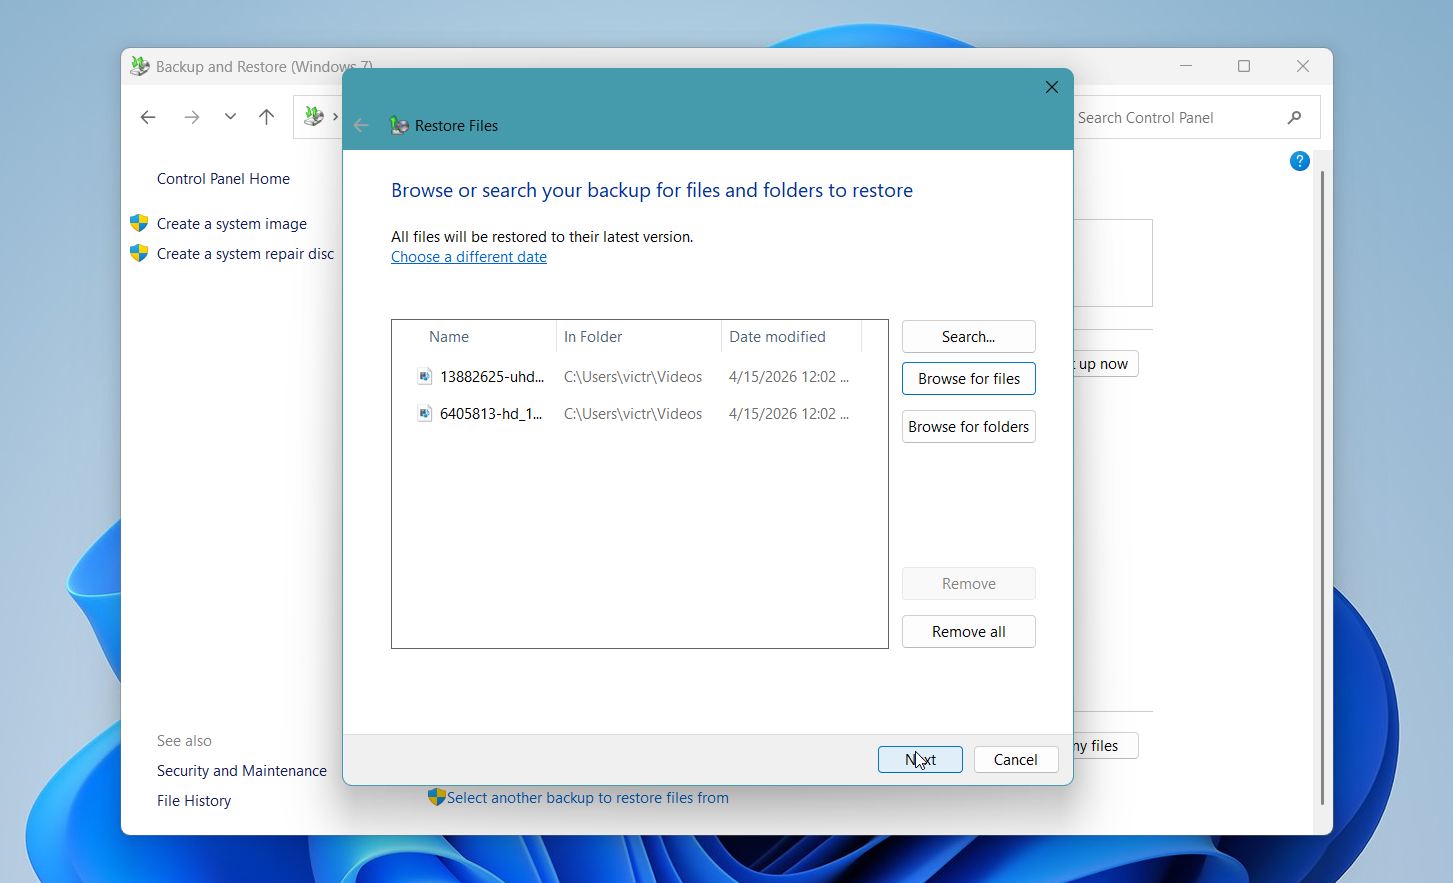
- Click Browse for files or Browse for folders to locate your videos. Select the files you want to restore and click Next.
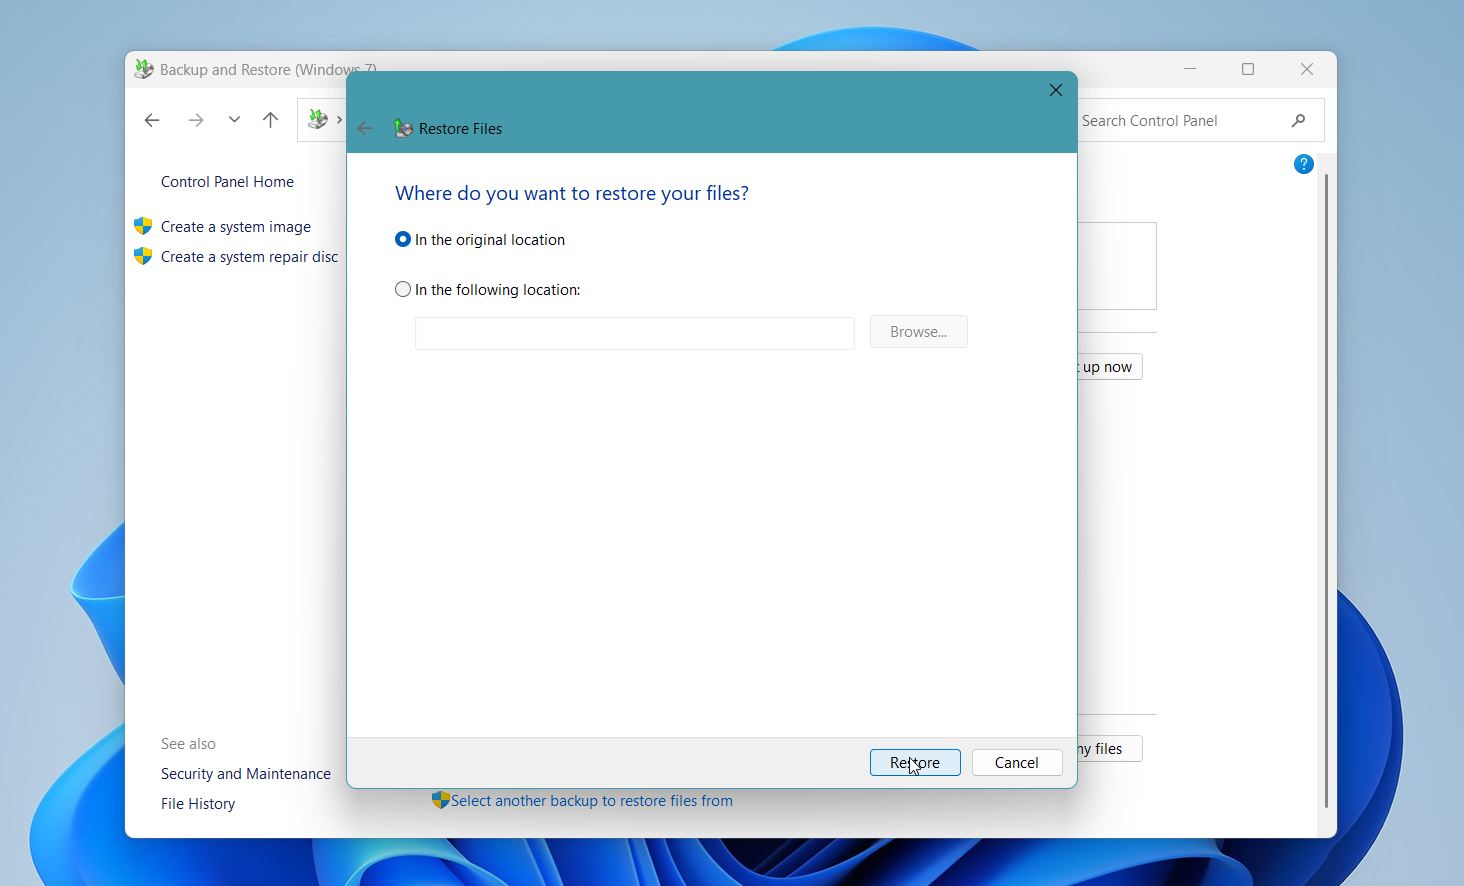
- Choose whether to restore the videos to their original location or to a different folder.
- Click Restore.
If you don’t see any backups, this feature was probably not enabled before the videos were deleted.
How to Restore Videos on Mac
If you’re using a macOS device, the recovery process is actually quite similar to Windows. The idea behind methods is the same at its core, just the steps and tools are a little bit different. Just like for Windows, your chances of recovery depend on what happened to the videos and whether new data has been written to the storage device since they were lost.
With that in mind, let’s look at the best methods to recover permanently deleted files on a Mac.
Method 1: Restore from Trash
We always recommend checking the Trash first, even if you’re sure the videos are gone. When a file is deleted normally on a Mac, it is usually moved to the Trash rather than removed immediately from the drive. If the Trash hasn’t been emptied, restoring the videos takes only a few clicks.
To restore videos from the Trash:
- Open the Trash from the Dock.
- Browse through the contents or use the search field to locate your videos.
- Select the video or videos you want to restore.
- Right-click the selection and choose Put Back.
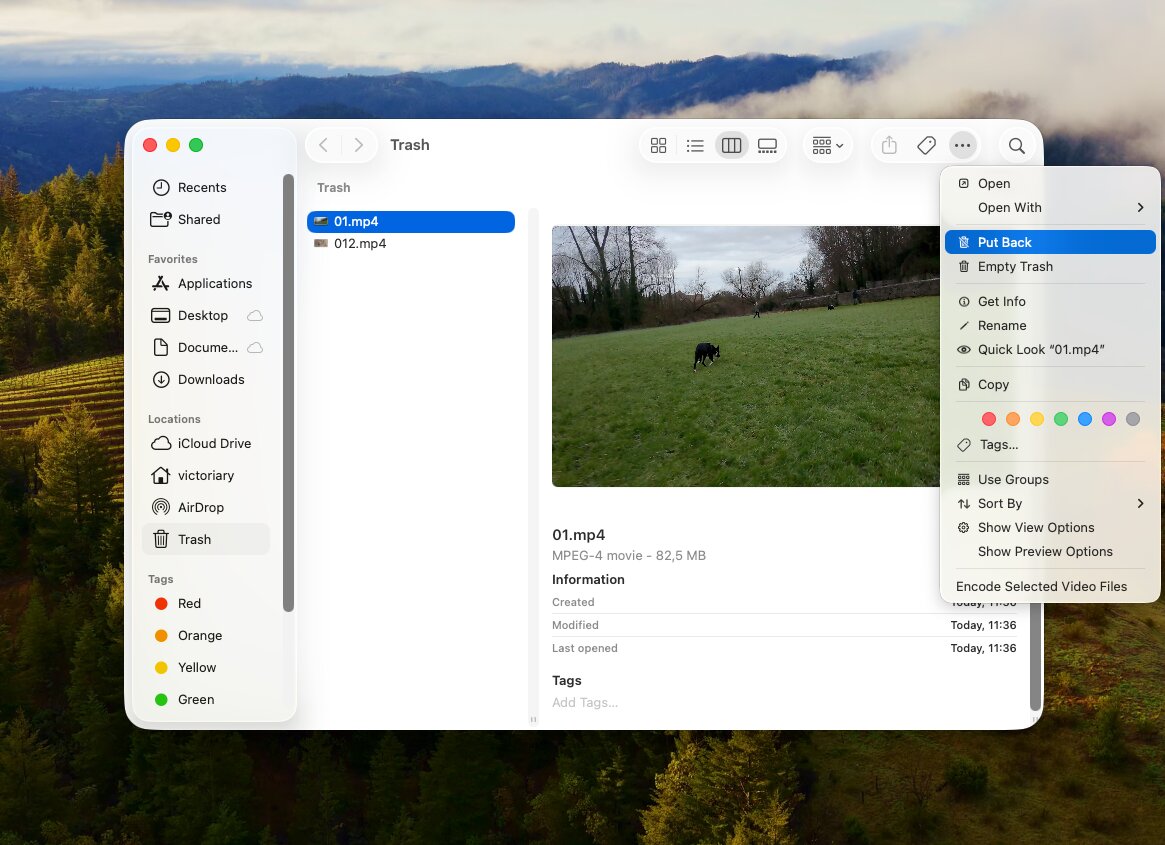
The videos will return to their original locations on your Mac.
Method 2: Use a Data Recovery Tool
Just like on Windows, we’ll use Disk Drill for this method. If your videos are no longer available in the Trash, a recovery scan can often locate deleted files on your Mac’s internal drive, external storage devices, SD cards, USB drives, and other media.
To recover videos with Disk Drill:
- Download and install Disk Drill on your Mac.
- Launch the application and grant any permissions it requests.
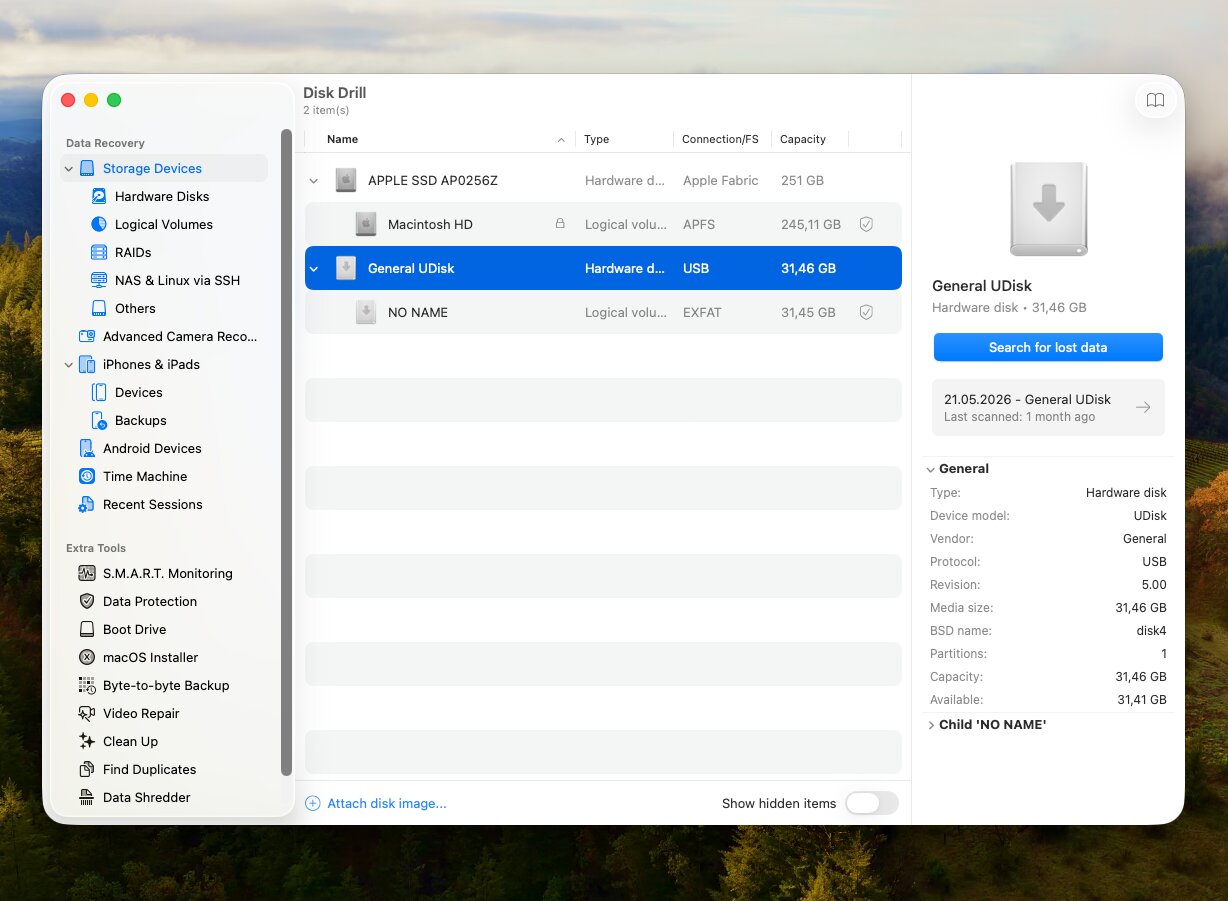
- Select the drive that originally stored your videos and click Search for Lost Data.
- If you’re scanning a removable storage device, such as an SD card or USB flash drive, Disk Drill may ask you to choose a recovery mode. If the videos come from a camera, drone, dashcam, or similar device, we recommend selecting Advanced Camera Recovery. This mode is designed to reconstruct fragmented video files and often delivers better results for footage recorded on dedicated cameras.
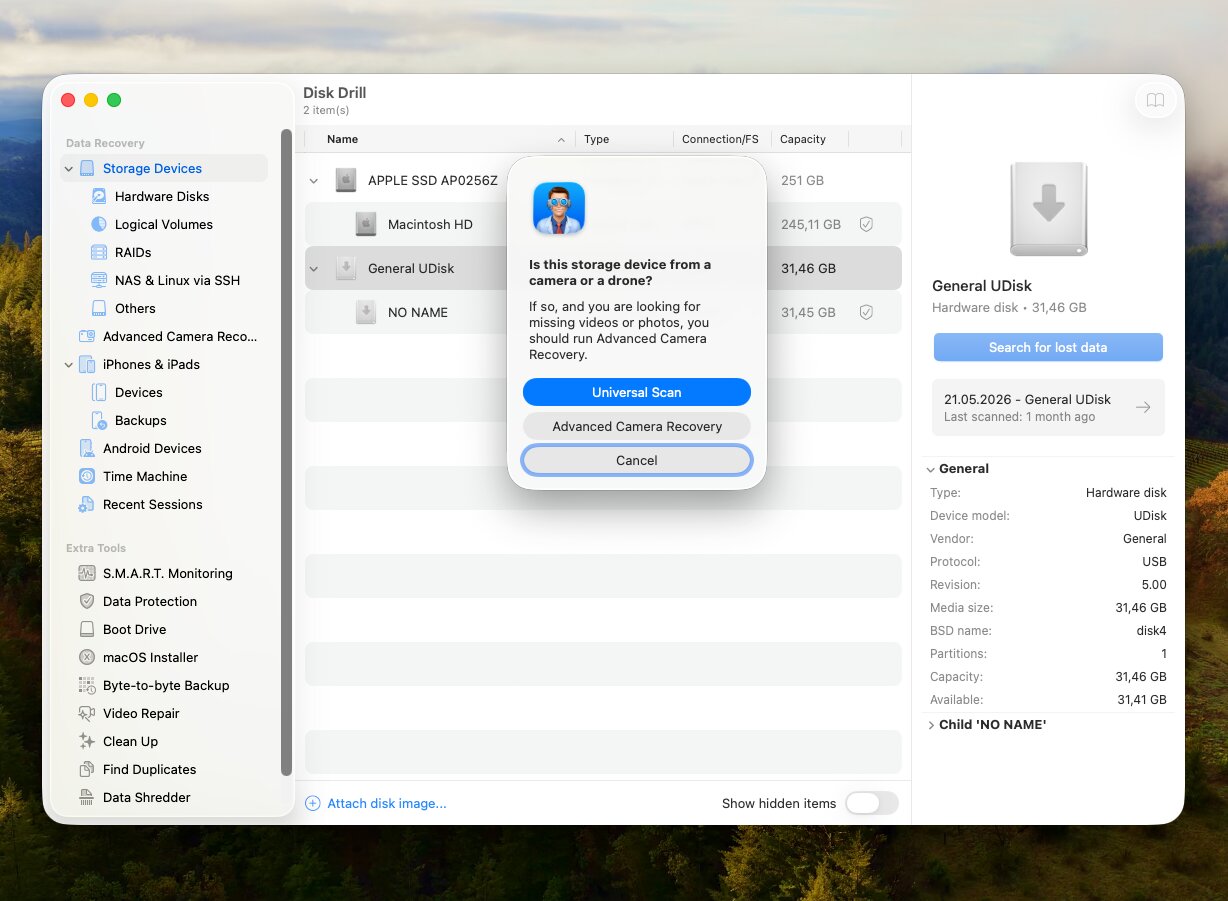
- Wait for the scan to finish, or open the Videos category to start reviewing found files immediately.
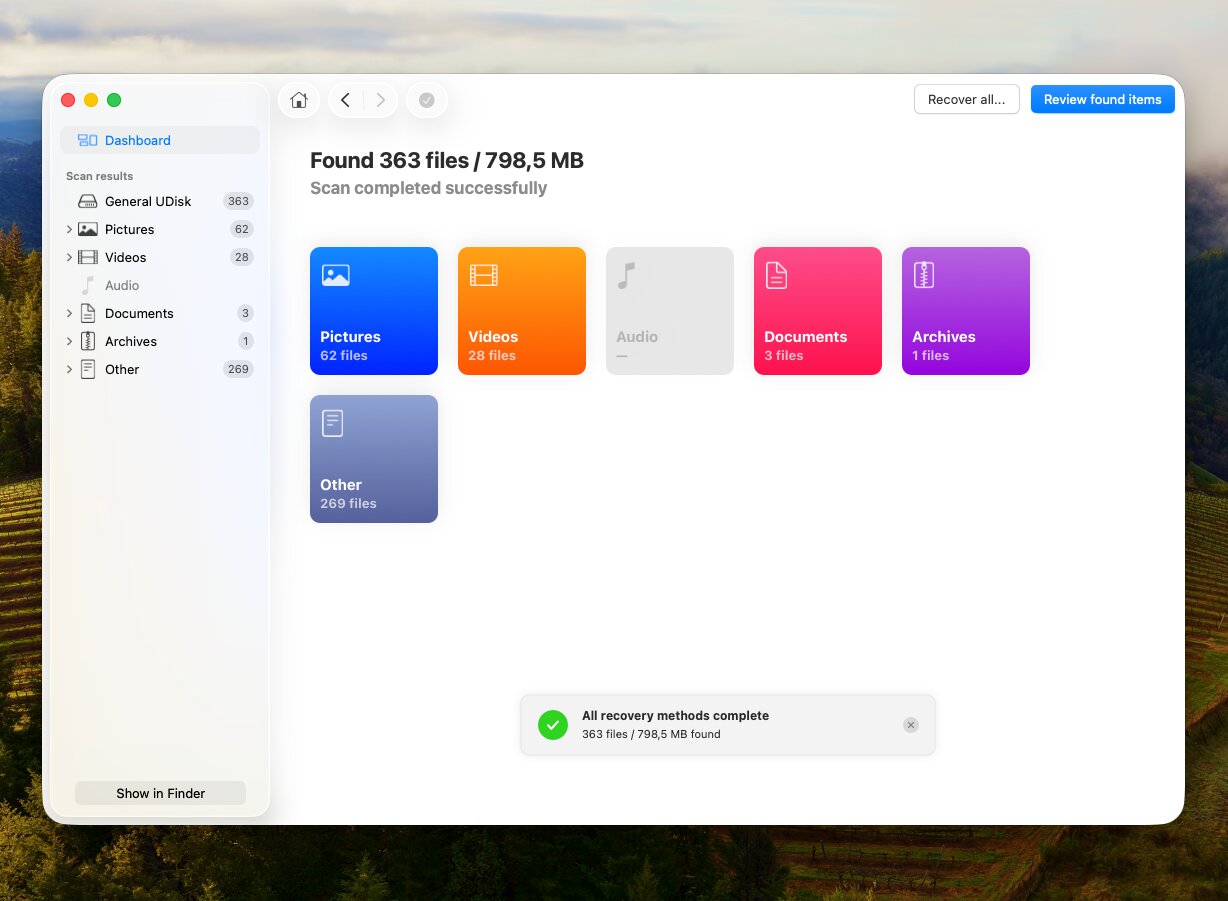
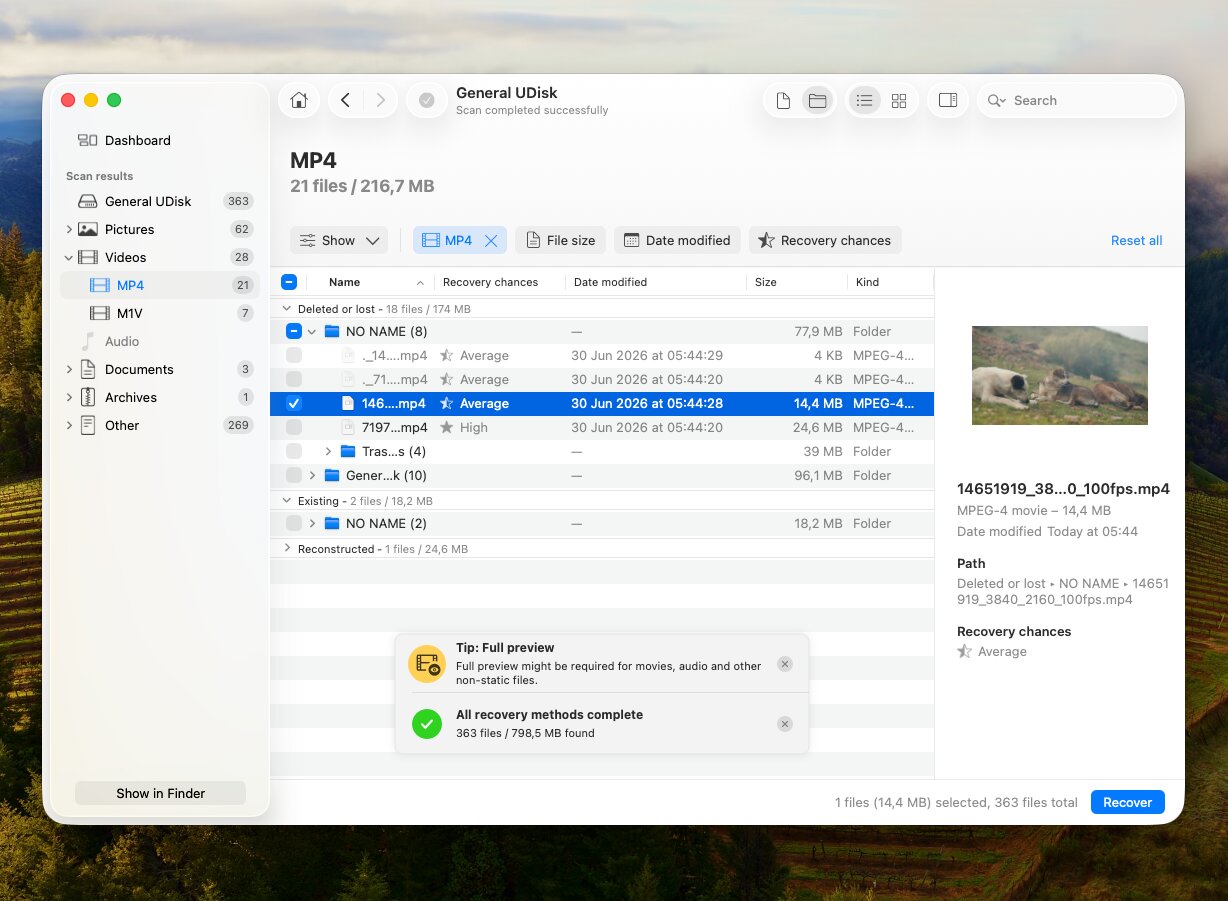
- Preview the videos you find. If a file plays correctly in the preview window, it is usually a good indication that the recovery will be successful. Select the videos you want to restore and click Recover.
- Save the recovered files to a different drive or location to avoid overwriting recoverable data.
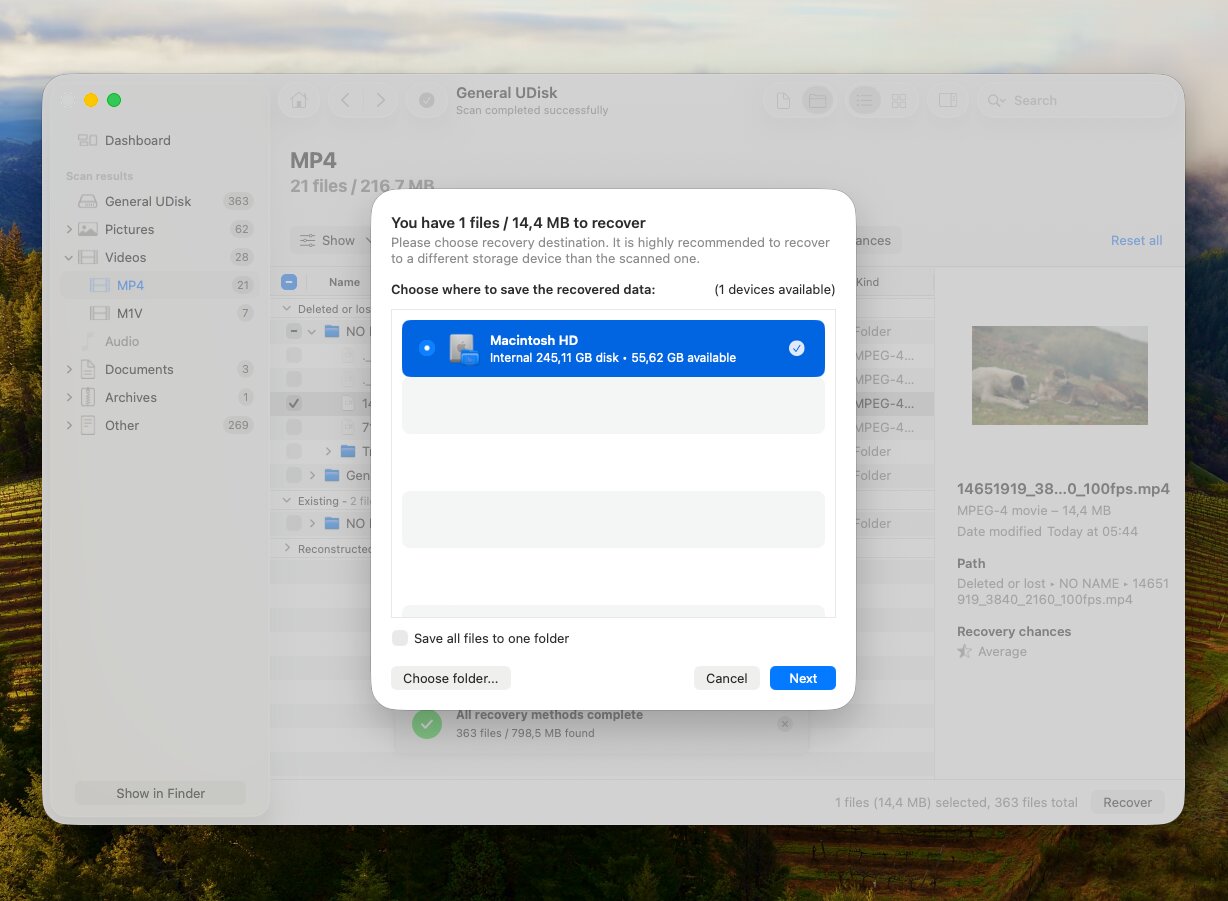
Unlike the Windows version, Disk Drill for Mac does not include free recovery. However, you can scan your storage devices, review the results, and preview recoverable videos at no cost before deciding whether to purchase a license.
Method 3: Recover Lost Videos with Time Machine
If you use Time Machine to back up your Mac, you may be able to restore deleted videos in just a few minutes. Time Machine saves previous versions of files and folders, which lets you return to a point in time before the videos disappeared.
To restore videos with Time Machine:
- Connect your Time Machine backup drive if it is not already connected.
- Open the folder where the videos were originally stored.
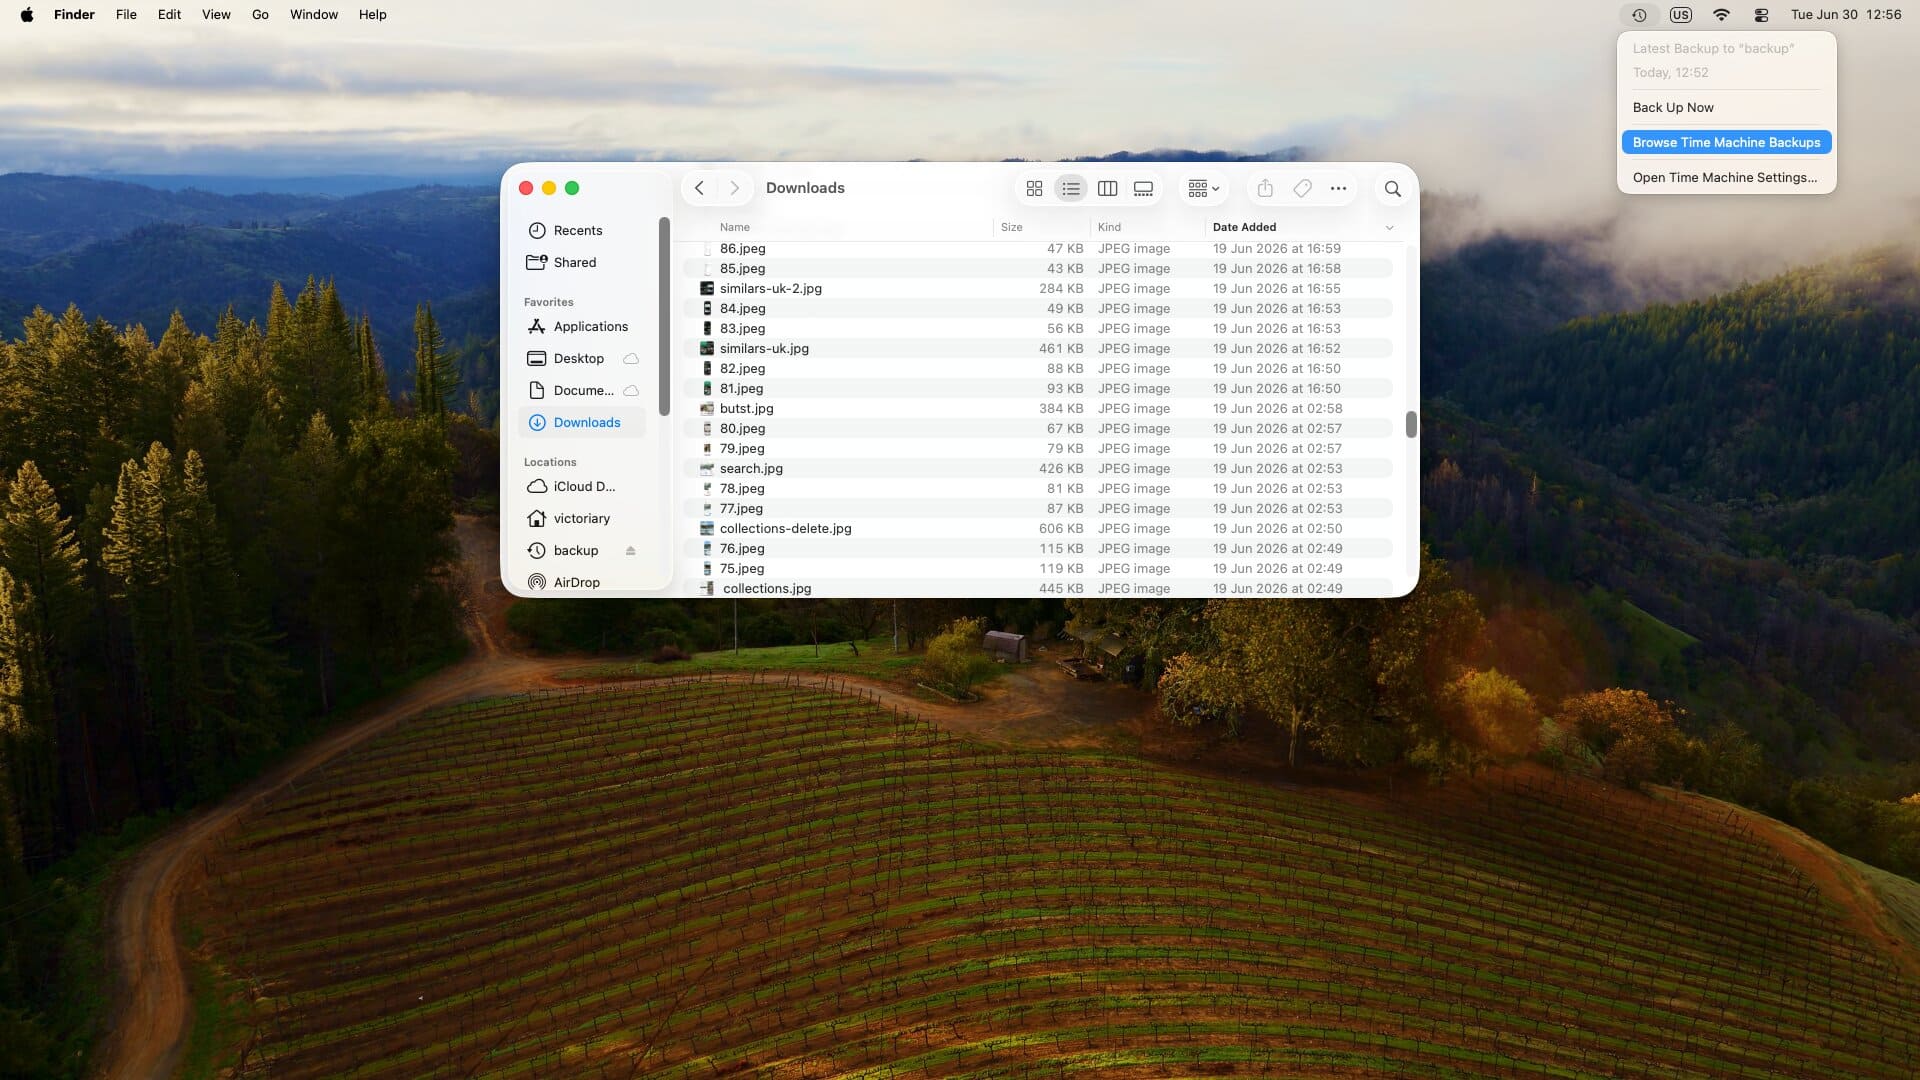
- Click the Time Machine icon in the menu bar and select Browse Time Machine Backups.
- Use the timeline on the right side of the screen to move through available backups.
- Find the videos you want to recover.
- Select the files and click Restore.

Time Machine will place the recovered videos back in their original location.
Even without a connected backup drive, you may still have another recovery option. macOS can create local Time Machine snapshots on the internal drive, which sometimes makes it possible to restore videos that disappeared within the previous 24 hours.
How to Recover Deleted Videos on a Phone
When it comes to phones, recovery is a little more complicated. Unlike computers, modern smartphones store data in ways that make direct access to internal storage much more difficult. Android and iPhone devices use encryption, restricted file access, and aggressive storage management features that can remove deleted data quickly. In addition, many recovery tools cannot scan a phone’s internal memory without special permissions or additional hardware.
We’ll go into more detail in the following sections. There are still several things you can do to recover your deleted videos.
Method 1: Check Recently Deleted/Trash folder
Before you try recovery software or backups, check the folder where deleted videos are stored temporarily. Both iPhone and Android devices keep deleted videos for a while before removing them permanently.
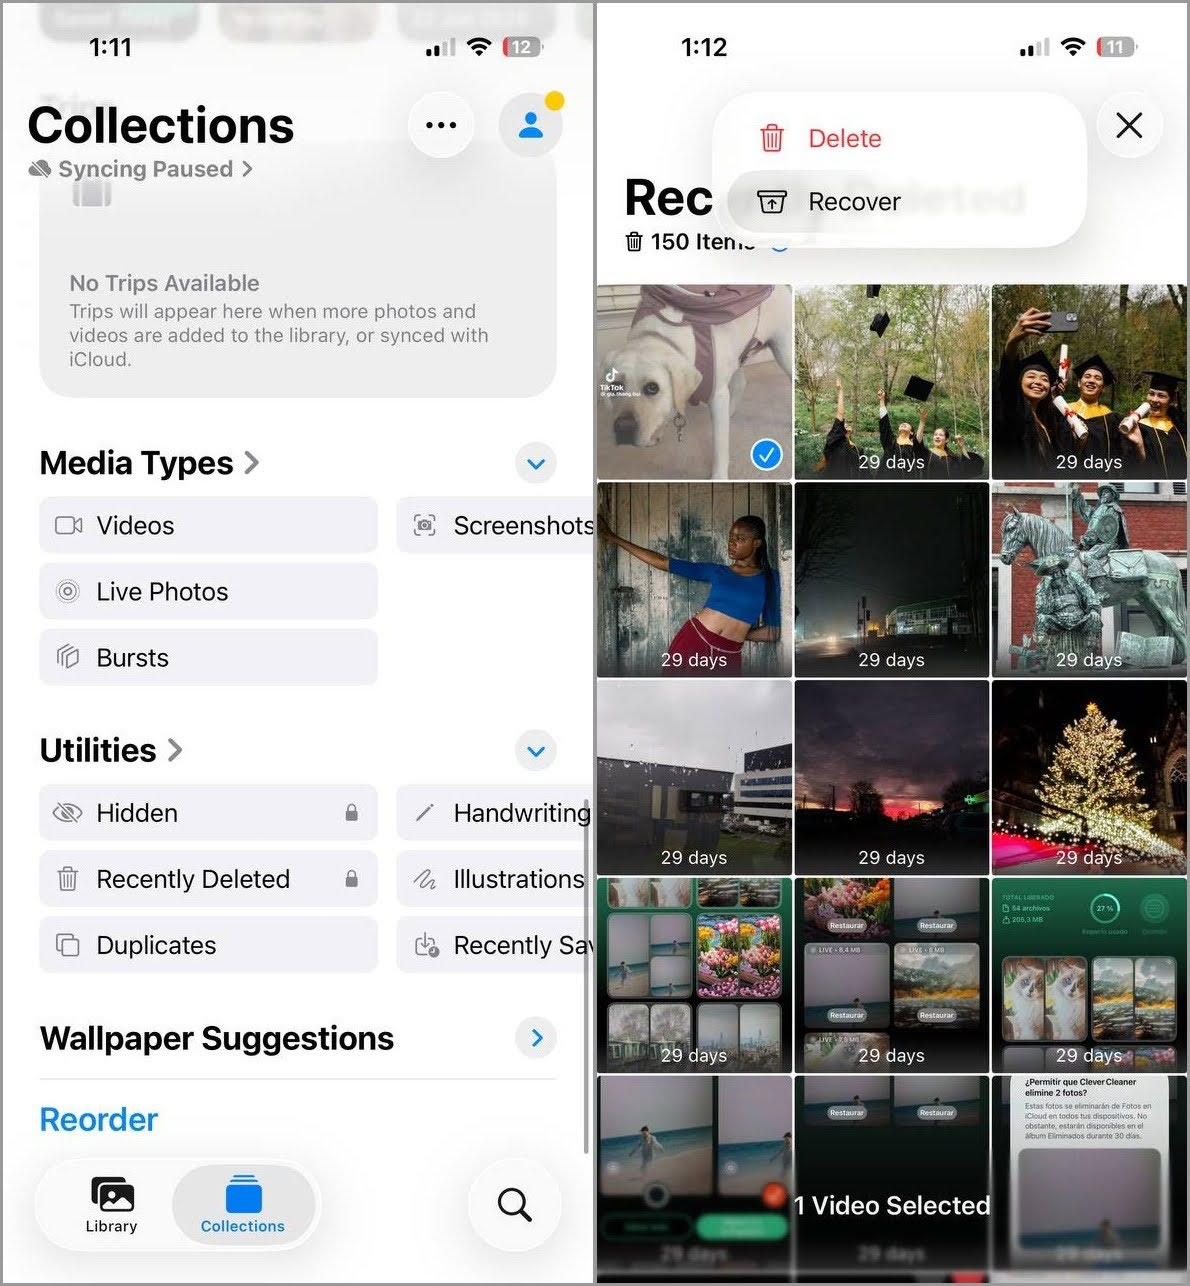
On iPhone:
- Open the Photos app.
- Scroll down and tap Recently Deleted.
- Unlock the album if prompted.
- Select the videos you want to recover.
- Tap Recover.
On Android:
- Open your gallery app, such as Google Photos or Samsung Gallery.
- Open the Trash, Recycle Bin, or Recently Deleted folder.
- Select the videos you want to restore.
- Tap Restore.

Most phones keep deleted videos in these folders for about 30 days, though the exact retention period depends on the device and app. If you can’t find your videos there, move on to the next recovery method.
Method 2: Use Data Recovery Software
Recovery software can sometimes help when videos are no longer available in the Recently Deleted or Trash folder. However, the process differs significantly between Android and iPhone devices.
On Android, recovery software may be able to scan the device’s storage directly, especially on older phones or rooted devices. A rooted phone gives recovery software deeper access to the file system, which can improve recovery results. Without root access, most apps can only perform limited scans and may recover fewer files.
If you need to recover files from an Android SD card, it is usually much easier. Remove the card from the phone, connect it to a computer with a card reader, and scan it with desktop recovery software. This approach typically provides better results than scanning through the phone itself.
There are also Android recovery apps that work directly on the device. One popular example is DiskDigger.
To scan for deleted videos with DiskDigger:
- Install DiskDigger from the Google Play Store.
- Launch the app.
- Choose Basic Scan if your phone is not rooted, or Full Scan if it is rooted.
- Wait for the scan to finish.
- Select the videos you want to restore.

- Save the recovered files to a safe location.
On iPhone, things are much more restrictive. Apple does not allow apps to access the device’s storage in the same way Android recovery apps can. Because of this, there are no iPhone equivalents to apps like DiskDigger that can scan the device directly for deleted files. Most iPhone recovery tools work by analyzing existing backups rather than scanning the phone’s internal storage itself.
Method 3: Check Cloud Storage
Many people don’t realize their phone automatically uploads photos and videos to a cloud service. Because of that, a video that seems lost on the device may still exist online.
Start by checking any cloud service where your photos and videos may be stored, such as iCloud Photos, Google Photos, OneDrive, Dropbox, or another backup service you use. Even if the videos are no longer on your phone, a copy may still be available in the cloud.
- Open the cloud app or sign in through a web browser.
- Look for the missing videos. Don’t forget to check any Trash, Bin, or Recently Deleted folder, since many cloud services keep deleted files for a limited time.
One important thing to know is that not all cloud services work the same way:
- iCloud Photos and Google Photos (when sync is enabled) keep your library synchronized. If you delete a video on your phone, it will usually be deleted from the cloud too. However, the video will typically remain in the service’s Recently Deleted or Trash folder for a limited time.
- iCloud Backup, Finder backups, iTunes backups, and many third-party backup services create separate backups of your device. If a backup was created before the video was deleted, you may still be able to restore it from that backup.
If you can’t find the videos in cloud storage or a cloud trash folder, continue to the next recovery method.
Is It Possible to Recover Videos on an iPhone?
Sometimes, yes, it’s possible to recover videos from an iPhone, but the outcome depends largely on where the videos were stored and what happened after they were deleted.
Recovery is often possible when:
- The videos are still in the Recently Deleted album.
- The videos exist in an iCloud backup.
- The videos are included in a Finder or iTunes backup.
- The videos were synchronized with another cloud storage service.
Recovery is often not possible when:
- The videos were permanently removed from the Recently Deleted album.
- No backup exists.
- The deletion happened a long time ago.
- The iPhone has been used normally since the videos disappeared.
The reason is that iPhones use encrypted flash storage and storage management technologies that can remove deleted data quickly. Unlike a traditional hard drive, there is usually no direct access to deleted files once they have been permanently removed from the device.
Recovery software can still help in some situations. Tools such as Disk Drill can scan existing iPhone backups or create a backup of the device and analyze it for recoverable photos, videos, messages, contacts, and other data. If you want to learn more about this process, check out our complete guide on how to recover deleted videos from an iPhone.
When Should You Consider a Data Recovery Service?
The methods in this guide can recover deleted videos in many situations, so they should always come first. However, some cases go beyond what backups and recovery software can handle.
A professional data recovery service may be worth considering if:
- The storage device has physical damage.
- The device is not detected by your computer or phone.
- The drive clicks, beeps, grinds, or shows other signs of hardware failure.
- Recovery software cannot find the videos or complete a scan.
- You aren’t sure how to perform the recovery yourself and want to avoid mistakes.
- The videos are valuable enough that the cost of professional recovery is justified.
- Previous recovery attempts did not produce the desired results.
Most recovery labs begin with an evaluation of the device. Technicians determine the cause of the data loss, estimate the chances of recovery, and provide a quote. If you approve the recovery, they use specialized equipment and software to extract the data. Once the process is complete, the recovered videos are usually copied to a new drive and returned to you.
The cost varies widely. Simple logical recovery cases, such as accidental deletion or file system corruption, often range from $300 to $1,000. Cases involving physical damage, failed SSDs, damaged memory cards, or malfunctioning phones can cost $1,000 to $3,000+. Fortunately, many labs offer a free evaluation and only charge if they successfully recover the requested data.
Most reputable recovery companies offer a free or low-cost evaluation, and many follow a “no data, no fee” policy, meaning you only pay if they successfully recover the requested files.
Final Thoughts
A permanently deleted video doesn’t always mean it’s gone forever. In many cases, the data remains recoverable until it is overwritten or removed by features such as TRIM on SSDs or automatic cleanup on mobile devices. The sooner you start the recovery process, the better your chances.
If you need to recover deleted videos, follow this order:
- Check the Recycle Bin, Trash, or Recently Deleted folder.
- Look for cloud copies and backups.
- Scan the storage device with reliable recovery software such as Disk Drill.
- Contact a professional data recovery service if the device is physically damaged or the videos are too valuable to risk.
If you decide to use recovery software, Disk Drill is a solid choice thanks to its broad device support, video preview, Advanced Camera Recovery mode, and additional tools for handling damaged drives. You can learn more or download it from cleverfiles.com.
To avoid the same problem in the future, keep regular backups, enable cloud synchronization only if it matches your workflow, and store important videos in more than one location. A simple backup routine is still the most reliable way to protect your footage.
If you’d like to see how video recovery works in real-world situations, take a look at our related forum discussion about recovering videos that were deleted months earlier. It complements this guide with additional advice and experiences shared by other users.