
A lost ReFS partition can be alarming, especially when an entire volume suddenly disappears from File Explorer. Depending on the cause, Windows may show the space as Unallocated, fail to mount the volume, or report that a Storage Spaces volume is unavailable. Fortunately, a missing ReFS partition does not necessarily mean the data is gone.
A lost ReFS partition can often be recovered. If the partition was accidentally deleted or the partition table became corrupted, the files frequently remain intact on the disk. Depending on the situation, you may be able to recover the data with Disk Drill, salvage files with the built-in Windows ReFSUtil tool, or restore the lost partition itself using TestDisk.
Your recovery chances are highest if you act quickly and avoid making changes to the affected drive. Before you do anything else:
- Stop using the drive immediately.
- Do not create a new partition in the unallocated space.
- Do not format the volume, even if Windows prompts you to do so.
- Avoid rebuilding a Storage Spaces pool until your data is secured.
We’ll discuss the most common causes of ReFS partition loss and show you how to recover both the missing partition and the data stored on it.
Common ReFS Error Messages
Different ReFS problems often produce different Windows error messages. While these messages do not always identify the exact cause, they can provide useful clues about whether the issue involves file system corruption, a missing partition, or a compatibility problem.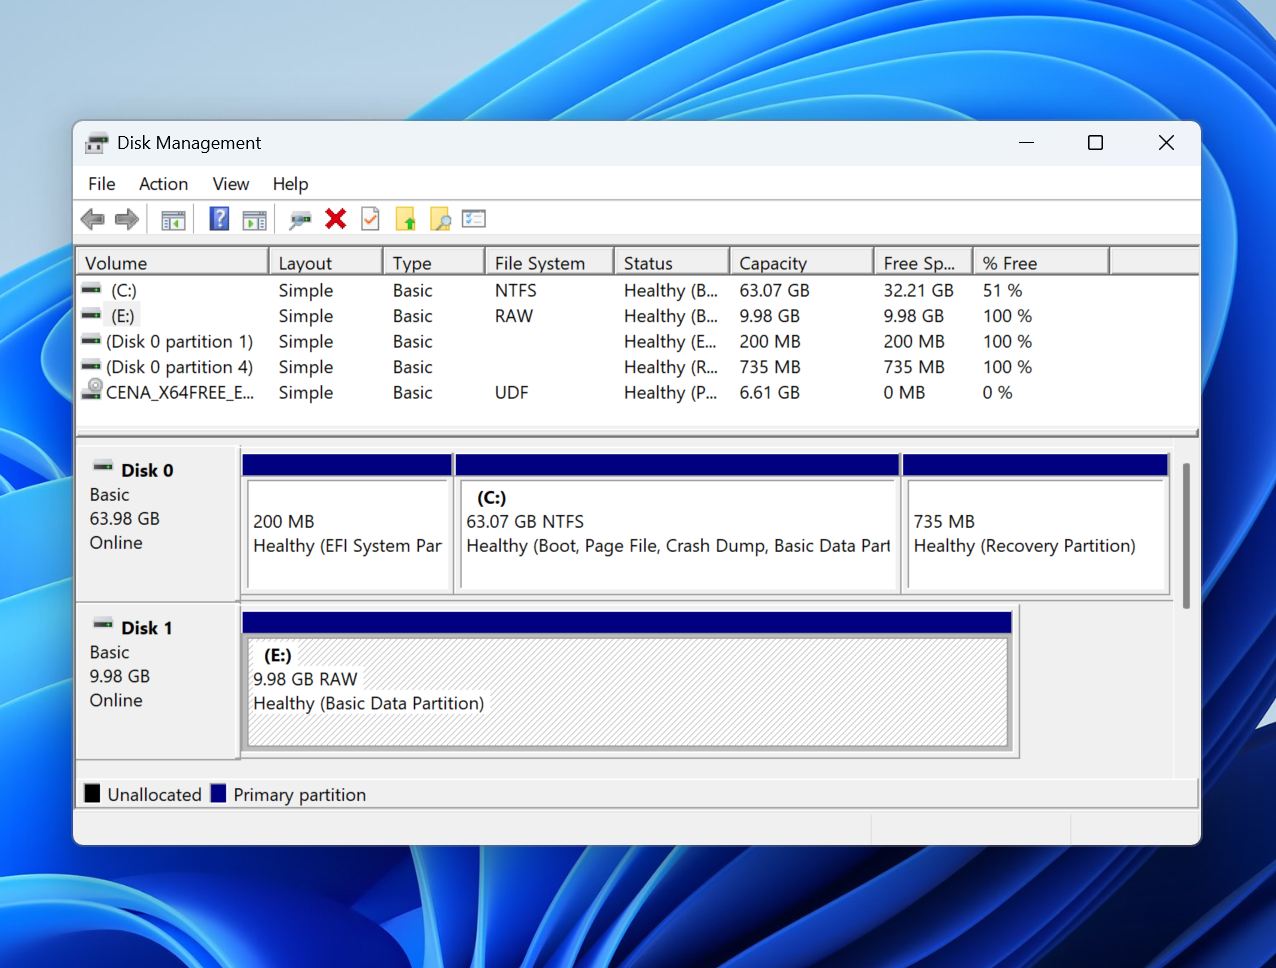
| Message | What It Means | Recommended Method |
| “You need to format the disk before you can use it.” | ReFS metadata is damaged or inaccessible, preventing Windows from mounting the volume correctly. | Recover files with data recovery software, then try TestDisk if the partition still exists. |
| “This version of Windows doesn’t support the ReFS format.” | The installed Windows edition does not support ReFS, or the volume was created with a newer ReFS version. | Connect the drive to a compatible Windows system that supports ReFS. |
| Volume appears as RAW in Disk Management | Windows can no longer recognize the ReFS file system due to corruption of critical file system structures. | Use data recovery software or ReFSUtil to salvage files before making repairs. |
| ReFSEvent 135: ReFS detected that the volume is corrupt or defective | ReFS has detected severe metadata corruption and may place the volume into a protective state to prevent further damage. | Recover data immediately, then use ReFSUtil or other recovery methods to assess the extent of the damage. |
These errors do not always mean that you have lost the data. Often, the files remain intact even when Windows can no longer access the ReFS volume normally. The safest approach is to recover important data before attempting repairs, formatting, or partition restoration.
Can You Recover the ReFS partition?
A lost ReFS partition does not automatically mean the files stored on it have been erased. What recovery looks like depends largely on what exactly was lost: the partition entry, access to the volume, or the data itself.
- For example, if a ReFS partition was accidentally deleted in Disk Management or became inaccessible after partition table corruption, the data often remains untouched on the drive. In these situations, recovery software may be able to locate the missing partition, reconstruct its structure, or scan the drive and recover files directly.
- Storage Spaces configurations add another layer of complexity. A ReFS volume may disappear if one or more member disks go offline, the storage pool degrades, or metadata becomes damaged. Recovery may require you to reconnect the original disks, restore the storage configuration, or scan the disks with software that supports Storage Spaces and ReFS.
- Physical issues are generally the most difficult scenarios. If bad sectors affect ReFS metadata or the drive itself is failing, recovery chances decrease drastically. Before attempting any repairs, it is often advisable to create a byte-to-byte backup of the affected disk and work from the backup instead of the original device.
The recovery process typically follows the same pattern regardless of the cause:
- Identify the affected physical disk and determine whether it is healthy enough to read.
- Create a byte-to-byte backup if there are signs of instability.
- Scan the entire disk rather than the missing partition, since the partition may no longer be visible to Windows.
- Review the discovered ReFS volumes or recoverable files.
- Recover important data to a separate storage device.
- Attempt partition or Storage Spaces repairs only after the data has been secured.
This “recover first, repair later” approach minimizes the risk of turning a recoverable ReFS partition loss into permanent data loss.
How to Recover a Lost ReFS Partition and Its Data
The best recovery method depends on what caused the ReFS partition to disappear. A deleted partition, a damaged partition table, a Storage Spaces problem, and file system corruption can all produce similar symptoms, but they often require different solutions. In general, you should start with the least invasive approach and progress to more advanced methods only if necessary.
Method 1: Recover Files With Data Recovery Software
Data recovery software is usually the best place to start because it allows you to secure your files before attempting any repairs. Operations such as partition restoration, Storage Spaces repairs, or volume reconstruction modify disk metadata and carry some risk. Recovering the files first gives you a safety net if those repairs do not go as planned.
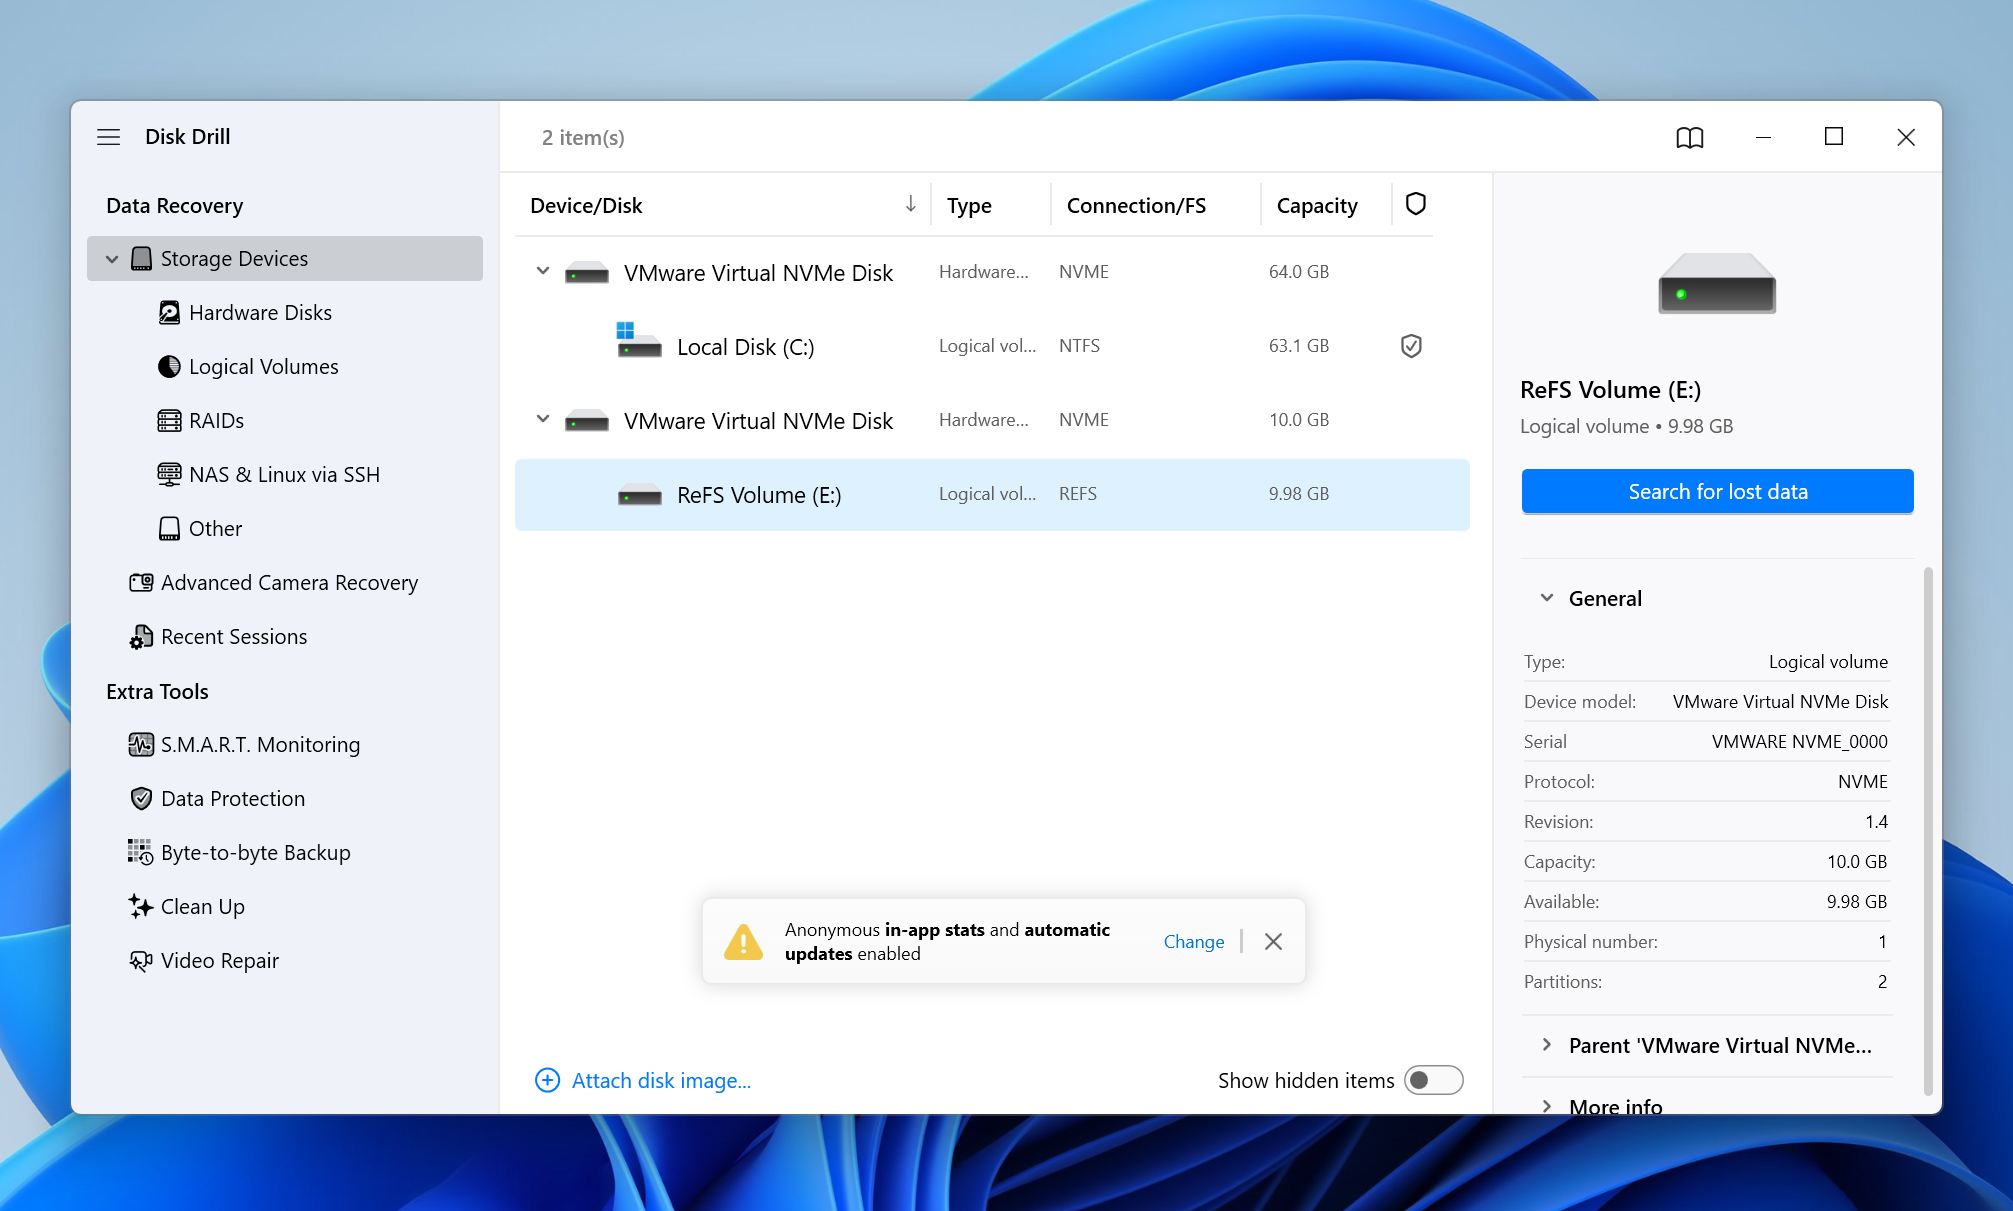
For this guide, we use Disk Drill because it supports ReFS and can scan the entire physical disk for lost partitions and recoverable files. This is important because a lost ReFS partition may no longer appear in File Explorer or Disk Management, while the data itself remains intact on the drive. Disk Drill can locate existing partitions, identify lost volumes, and recover files even when the original partition structure is damaged or missing.
Another advantage is its ability to create byte-to-byte backups of unstable drives. If bad sectors, read errors, or hardware problems are involved, you can create an image of the disk and perform the recovery from the image instead of the original device. This reduces stress on the drive and helps prevent further deterioration during the recovery process.
How to recover files from a lost ReFS partition with Disk Drill:
- Download and install Disk Drill on a drive other than the one that contains the lost ReFS partition.
- Launch Disk Drill and locate the affected physical disk.
- (Optional) If the drive appears unstable, create a byte-to-byte backup first and use the backup for recovery.
- Select the physical disk and click Search for lost data.
- Wait for the scan to finish, then click Review found items.
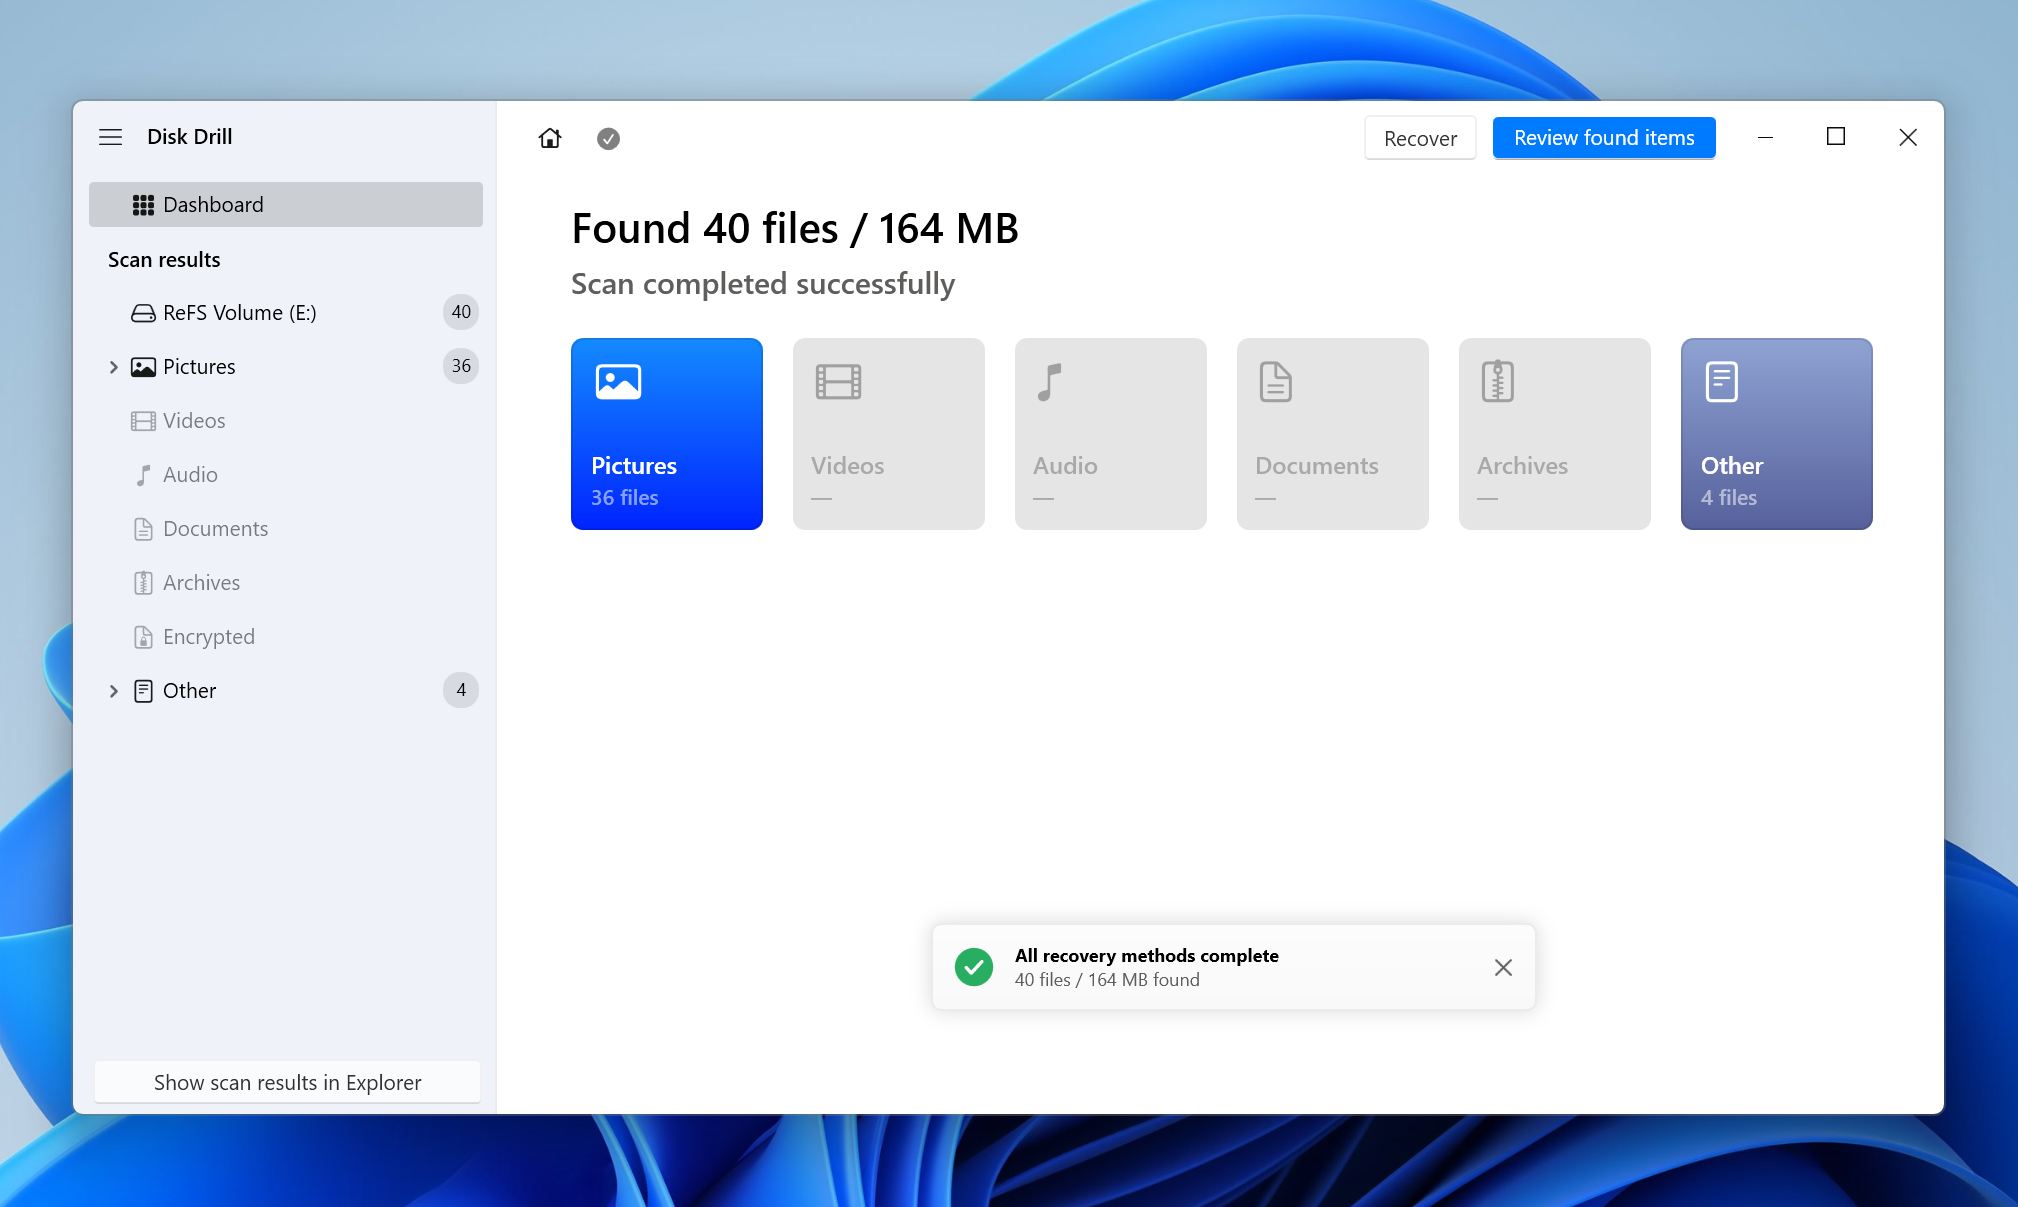
- Use filters, search, and file previews to locate the files you want to recover. Select the desired files and click Recover.
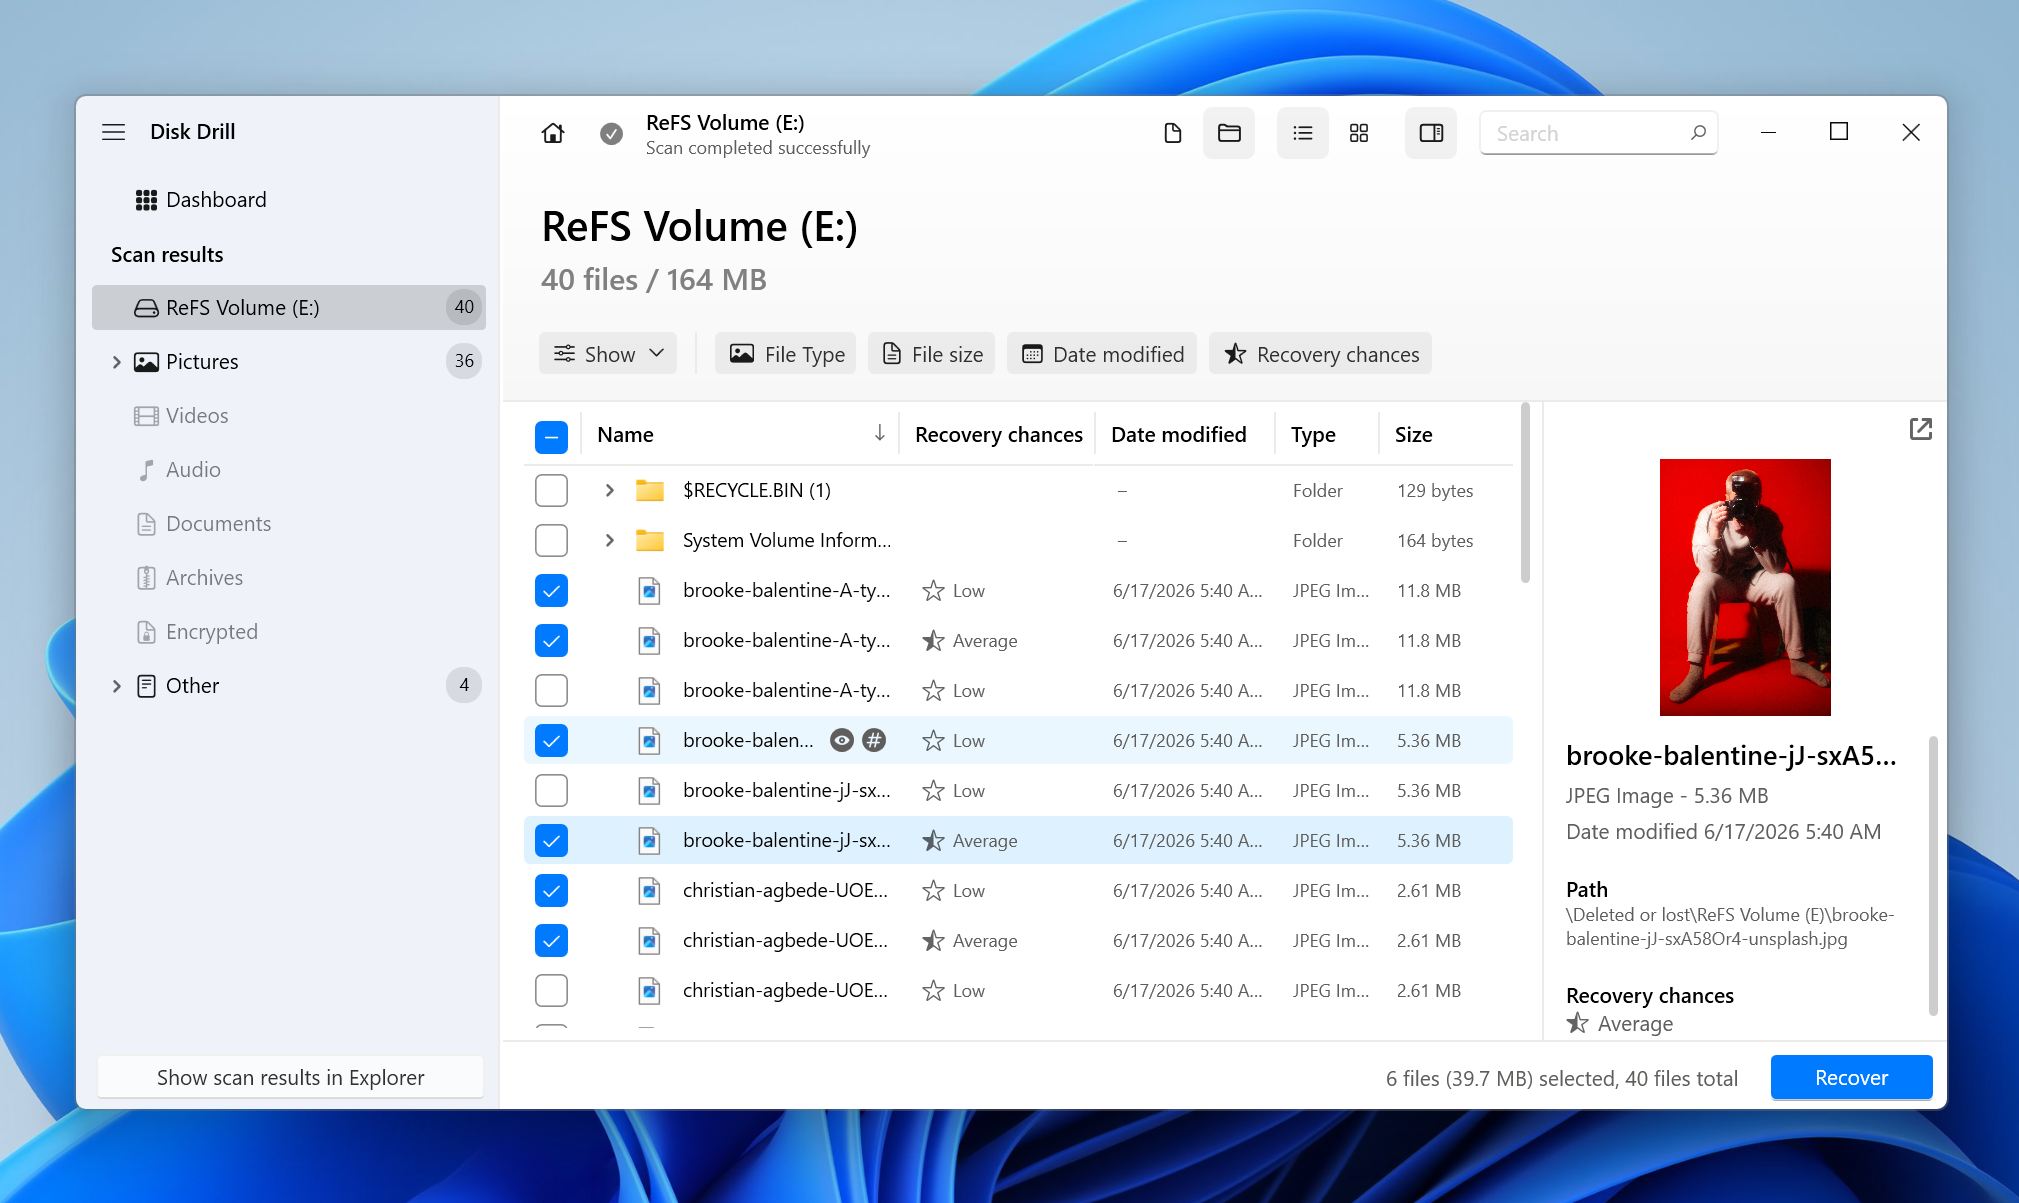
- Choose a different storage device as the recovery destination.
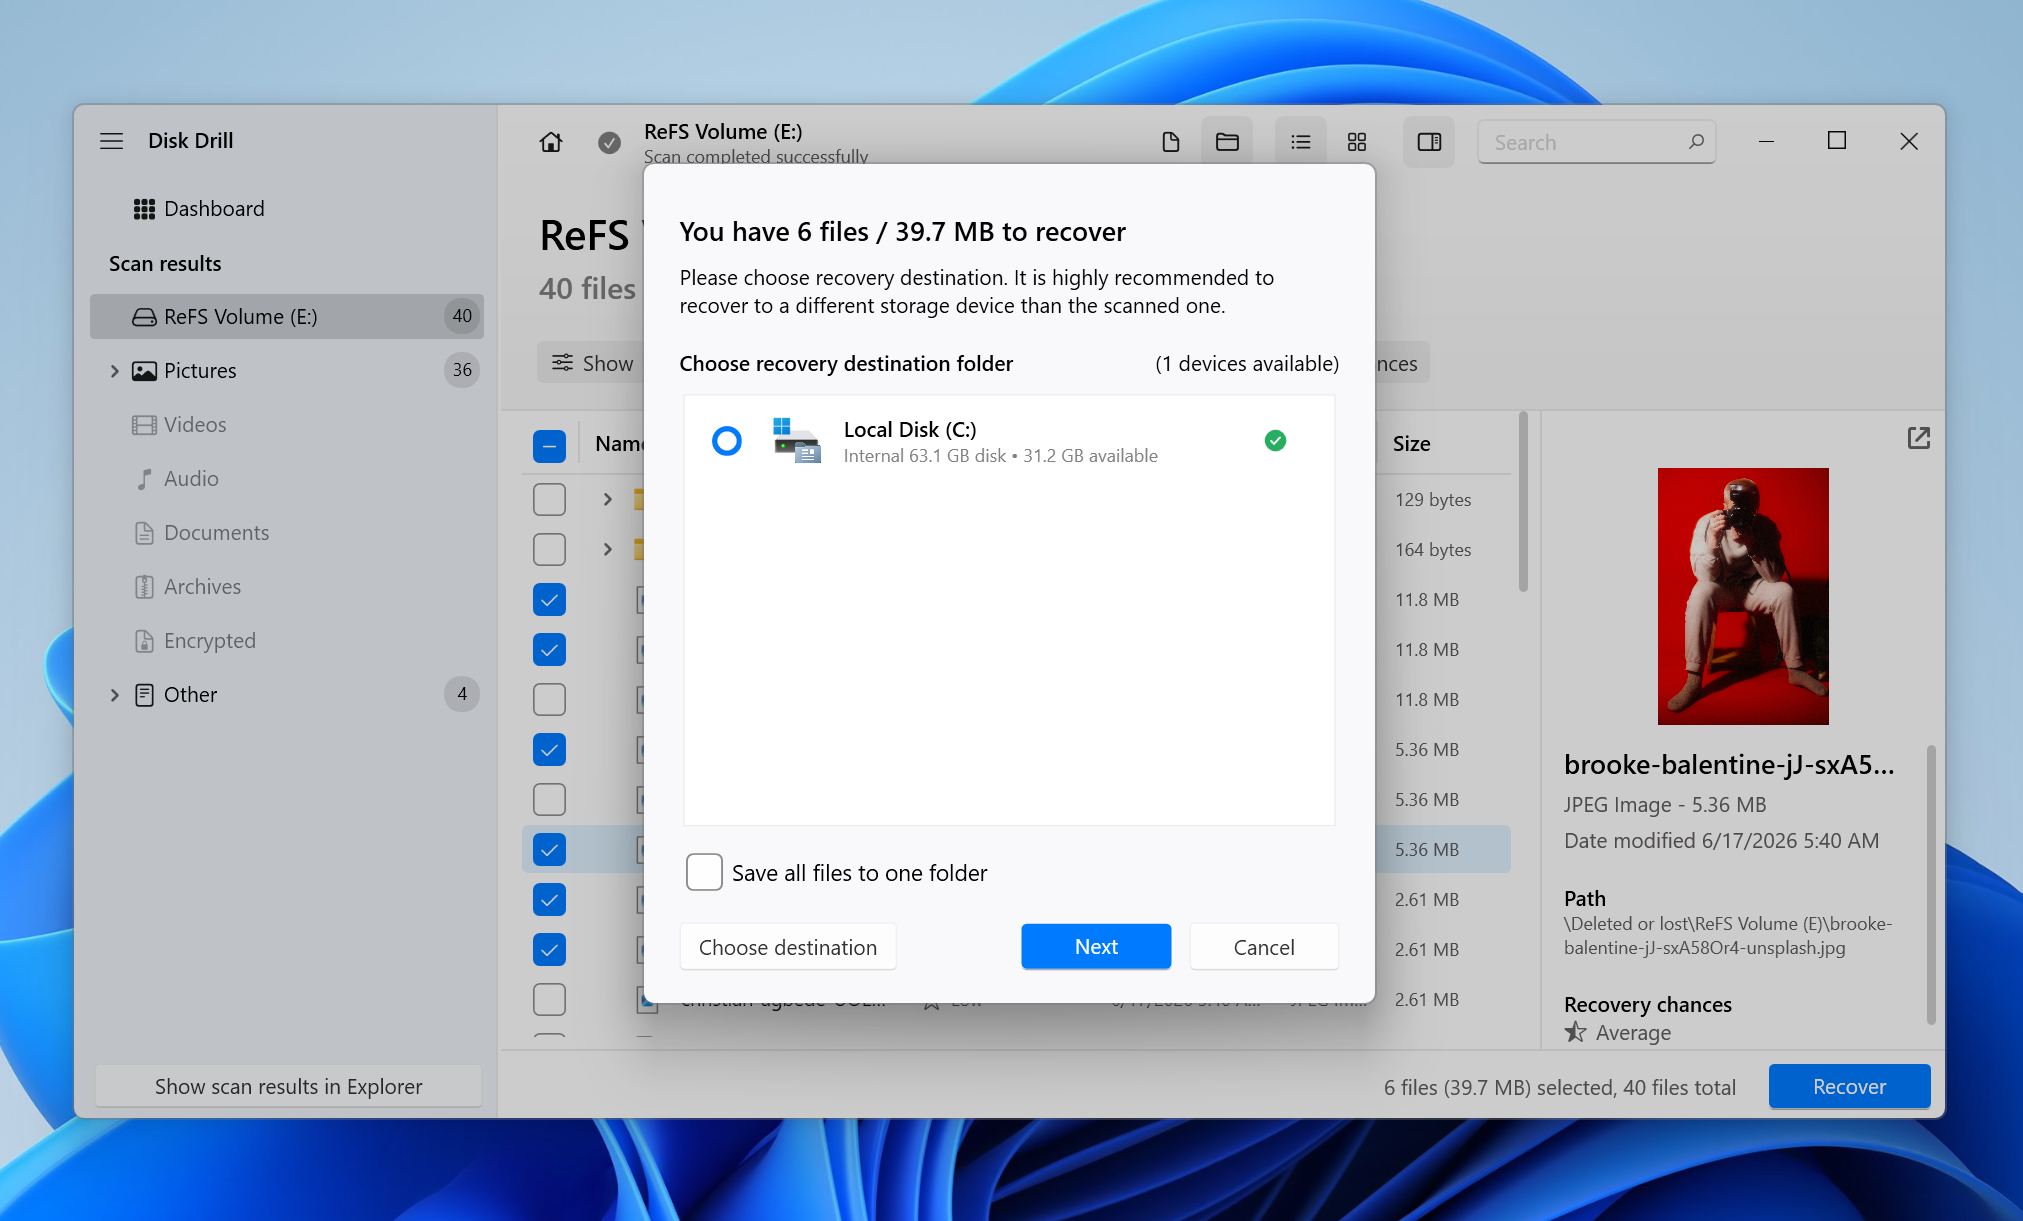
- Verify that the recovered files open correctly.
If Disk Drill discovers the lost ReFS partition during the scan, it may display the volume with its original folder structure. Even if the partition itself cannot be reconstructed, the software can often recover individual files directly from the disk.
If you’d like to learn more about Disk Drill’s features, recovery capabilities, supported file systems, and limitations, see our detailed Disk Drill review.
Method 2: Use Windows ReFSUtil (Built-in Tool)
If the ReFS partition still exists but the file system is corrupted, you can use Windows ReFSUtil to salvage files from it.
This method is most useful when the volume appears as RAW, refuses to mount, or shows ReFS corruption errors. It does not restore the partition itself; it scans the damaged ReFS volume and copies recoverable files to another drive.
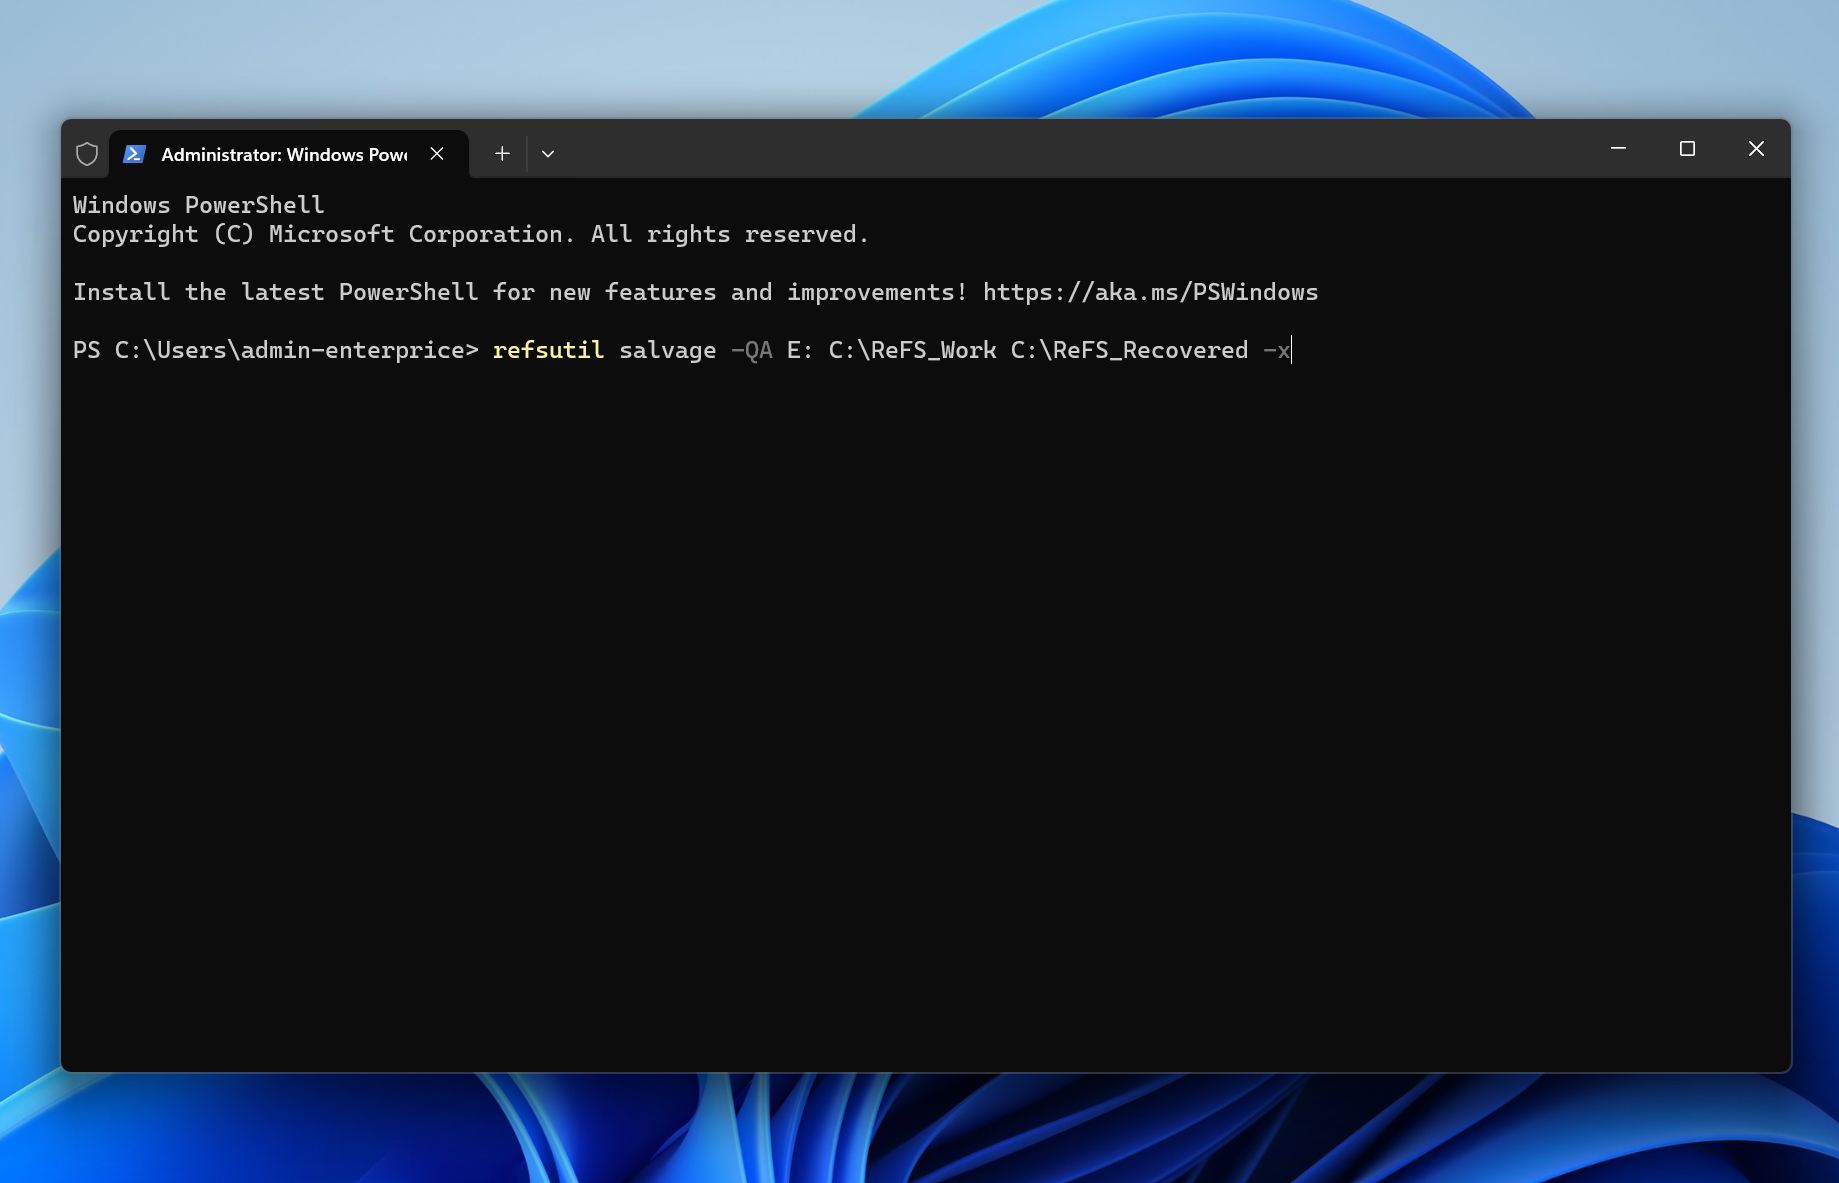
ReFSUtil works in two stages. First, the Scan Phase checks the damaged volume and identifies recoverable files. Then the Copy Phase transfers those files to a healthy destination. The -QA mode performs a quick automatic scan and copy process, while -FA performs a full automatic scan and may find more data but takes longer.
How to use ReFSUtil:
- Open Command Prompt as an administrator.
- Identify the drive letter of the damaged ReFS volume.
- Create a working folder on a healthy drive. Do not place it on the damaged volume.
- Choose a separate destination drive with enough free space for the recovered files.
- Run ReFSUtil in Quick Automatic mode first, using this structure: refsutil salvage -QA source-volume working-folder destination-folder.
- Wait for the scan and copy phases to complete.
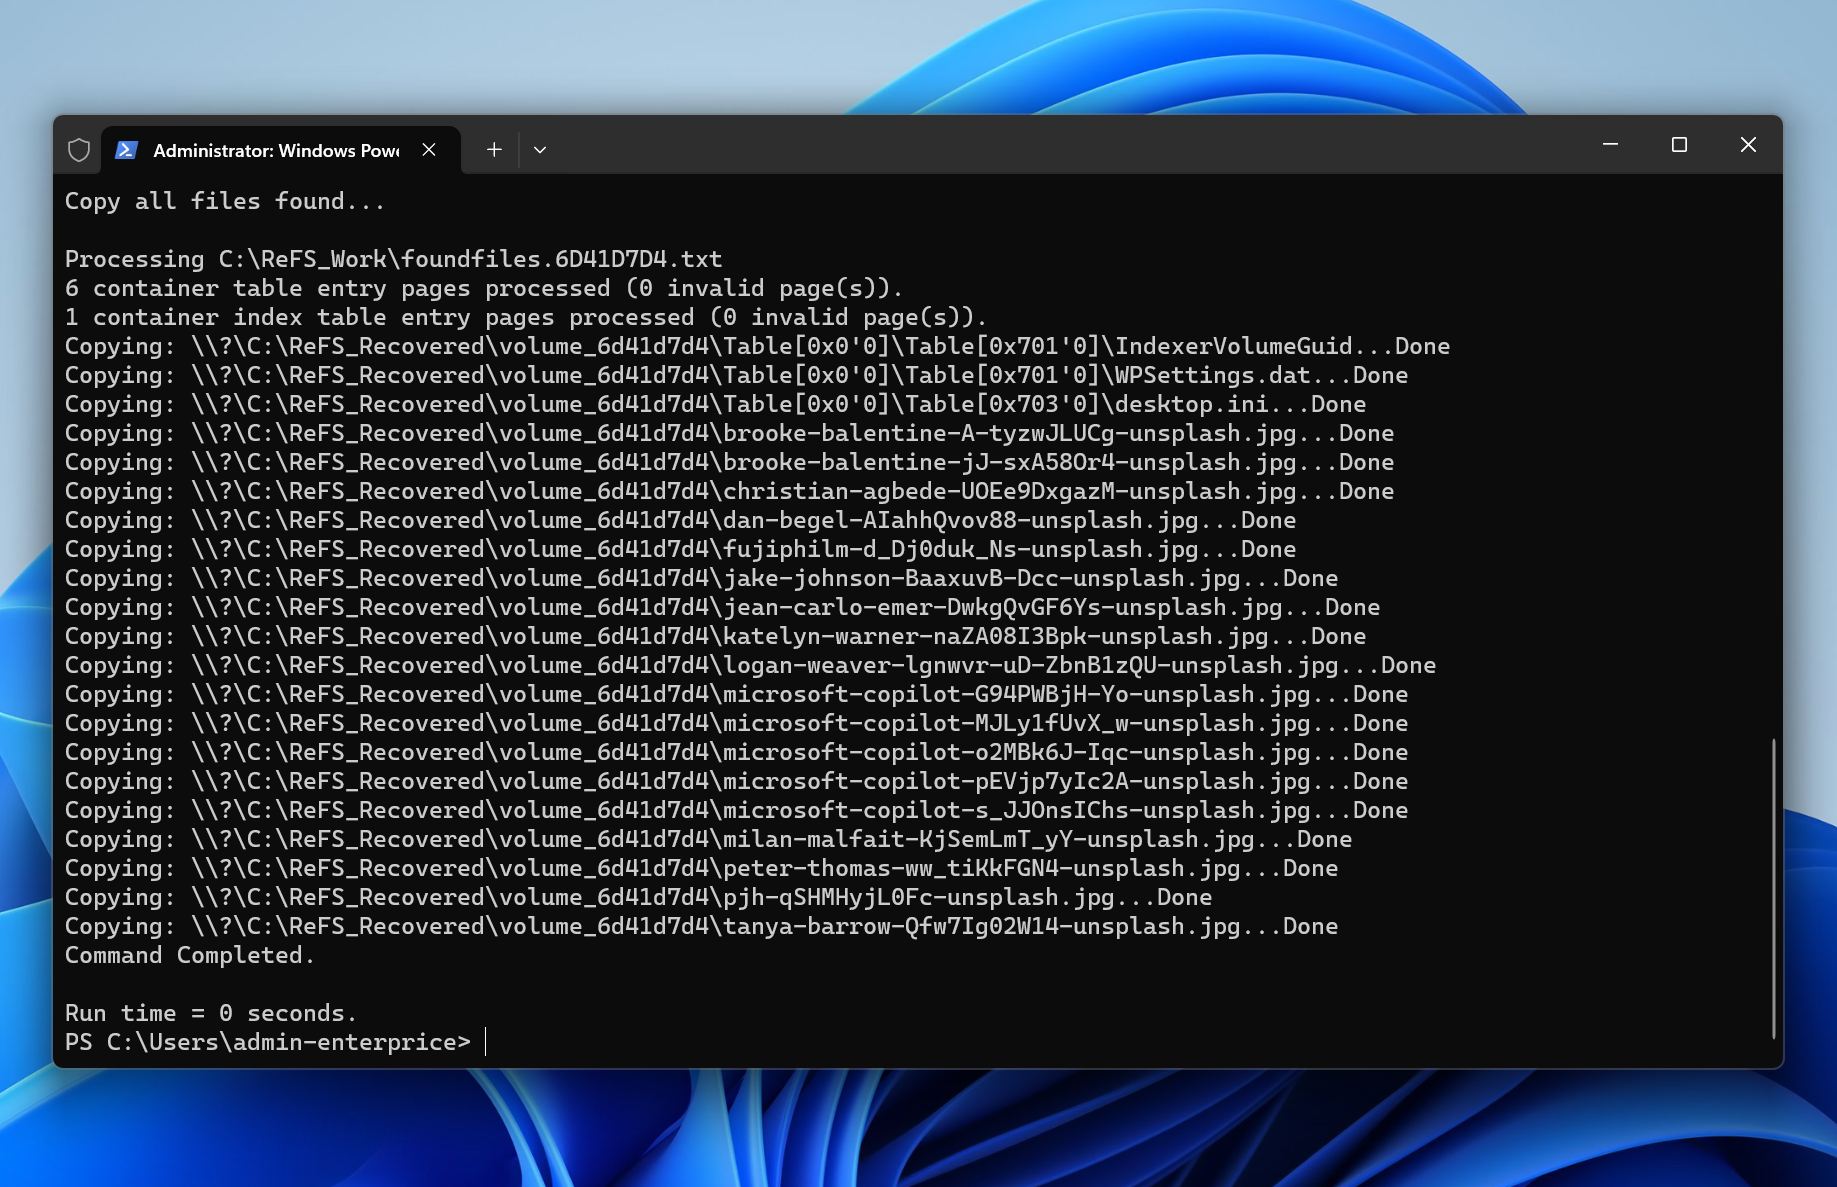
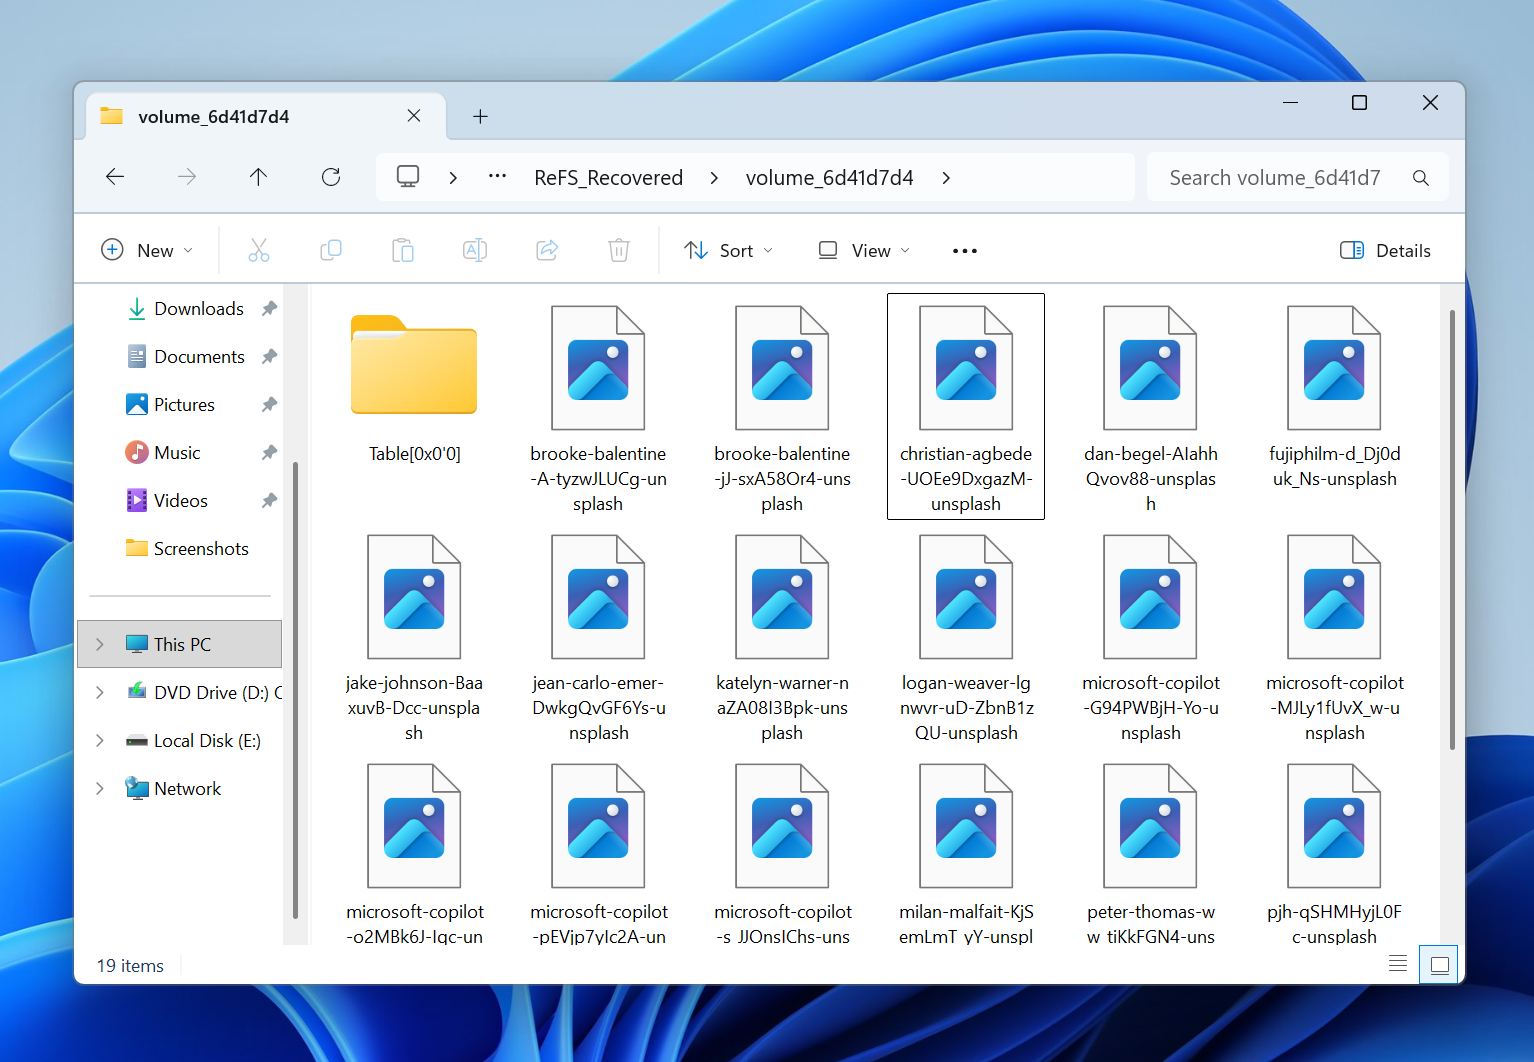
- Check the destination folder and verify that the recovered files open correctly.
- If the quick mode does not find the files you need, repeat the process with Full Automatic mode by replacing -QA with -FA.
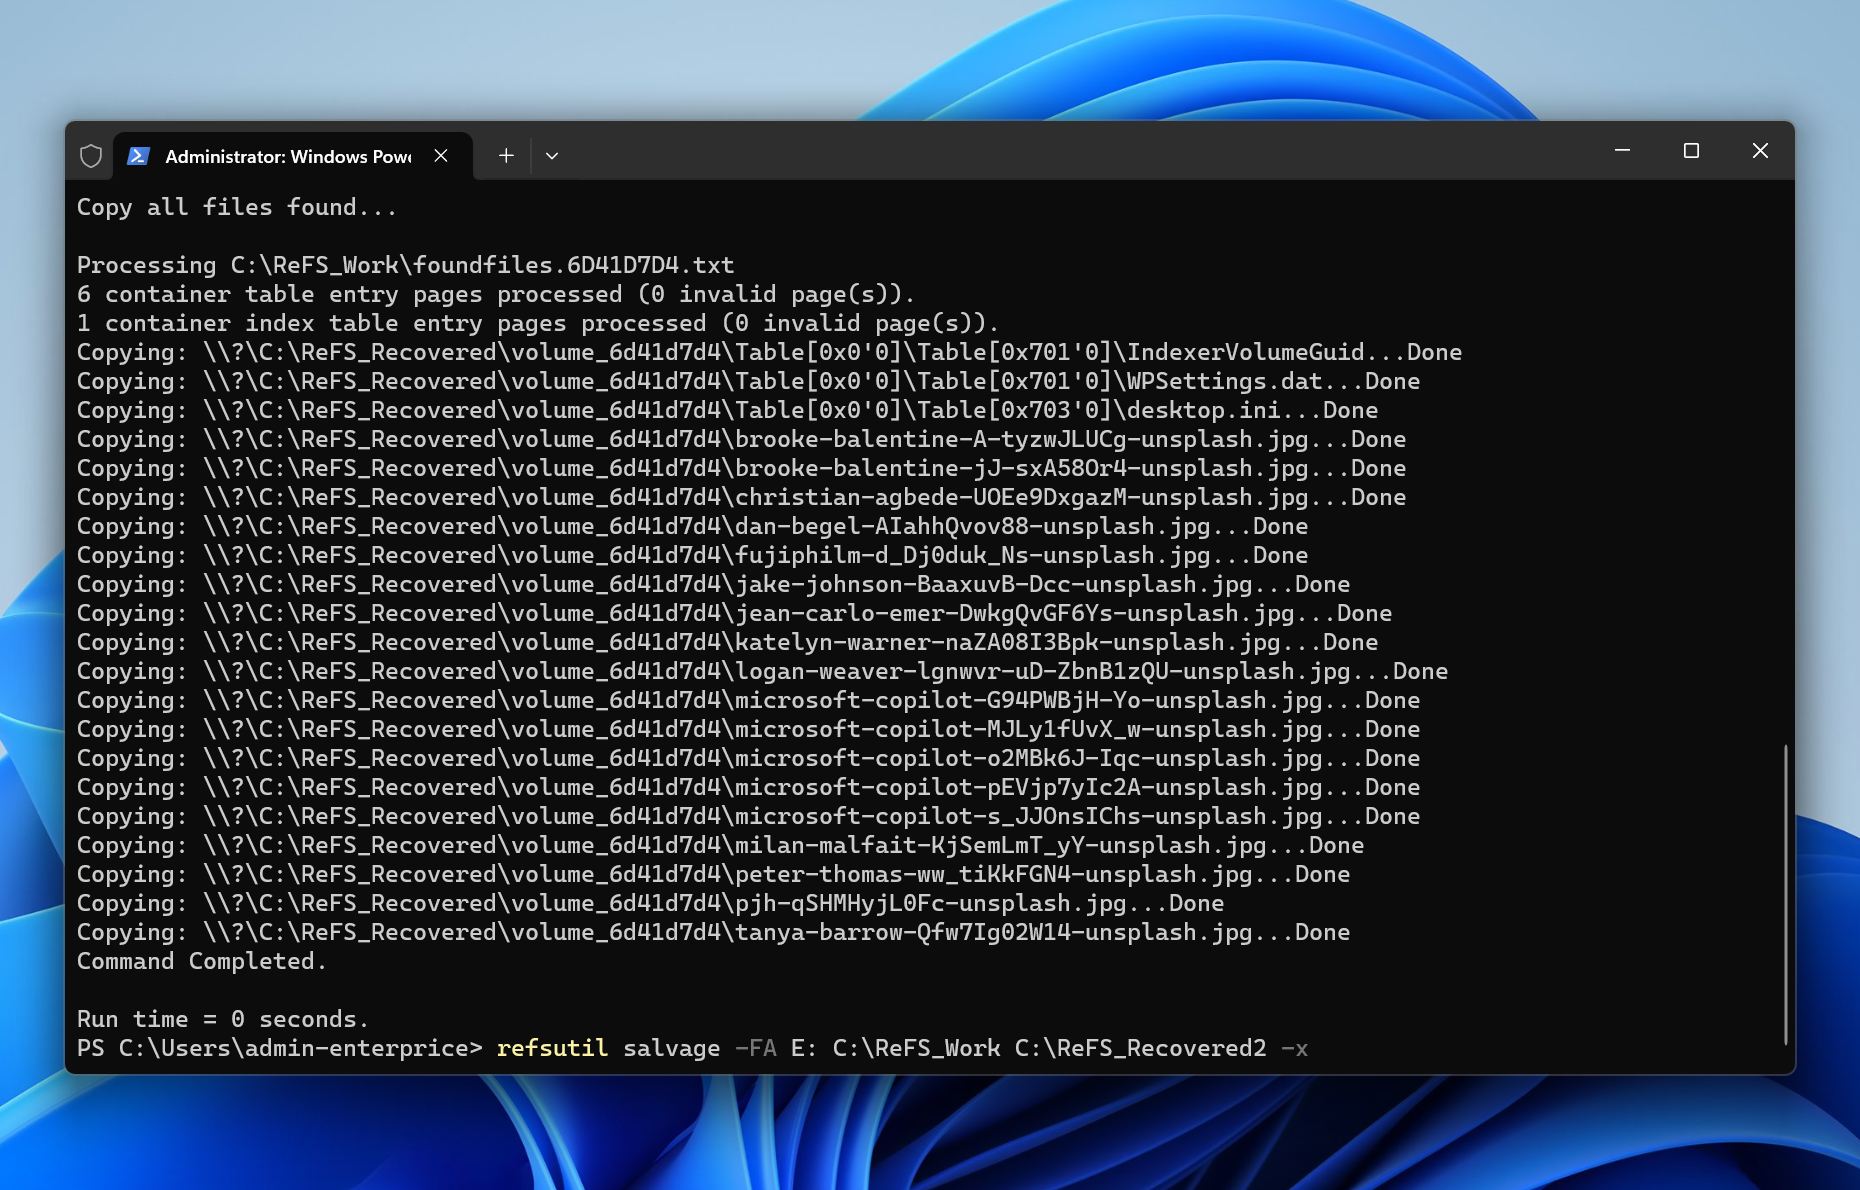
For example, if the damaged ReFS volume is E:, the working folder is C:\Temp, and the recovery destination is D:\Recovered, the command would use E: as the source, C:\Temp for logs and progress data, and D:\Recovered as the place where recovered files are copied.
Once ReFSUtil finishes, do not repair, recreate, or format the original volume until you confirm that the recovered files are usable. Keep in mind that ReFSUtil does not always recover files successfully. In some cases, it may restore files that remain partially corrupted or cannot be opened, so verify the recovered data carefully before making any changes to the original volume.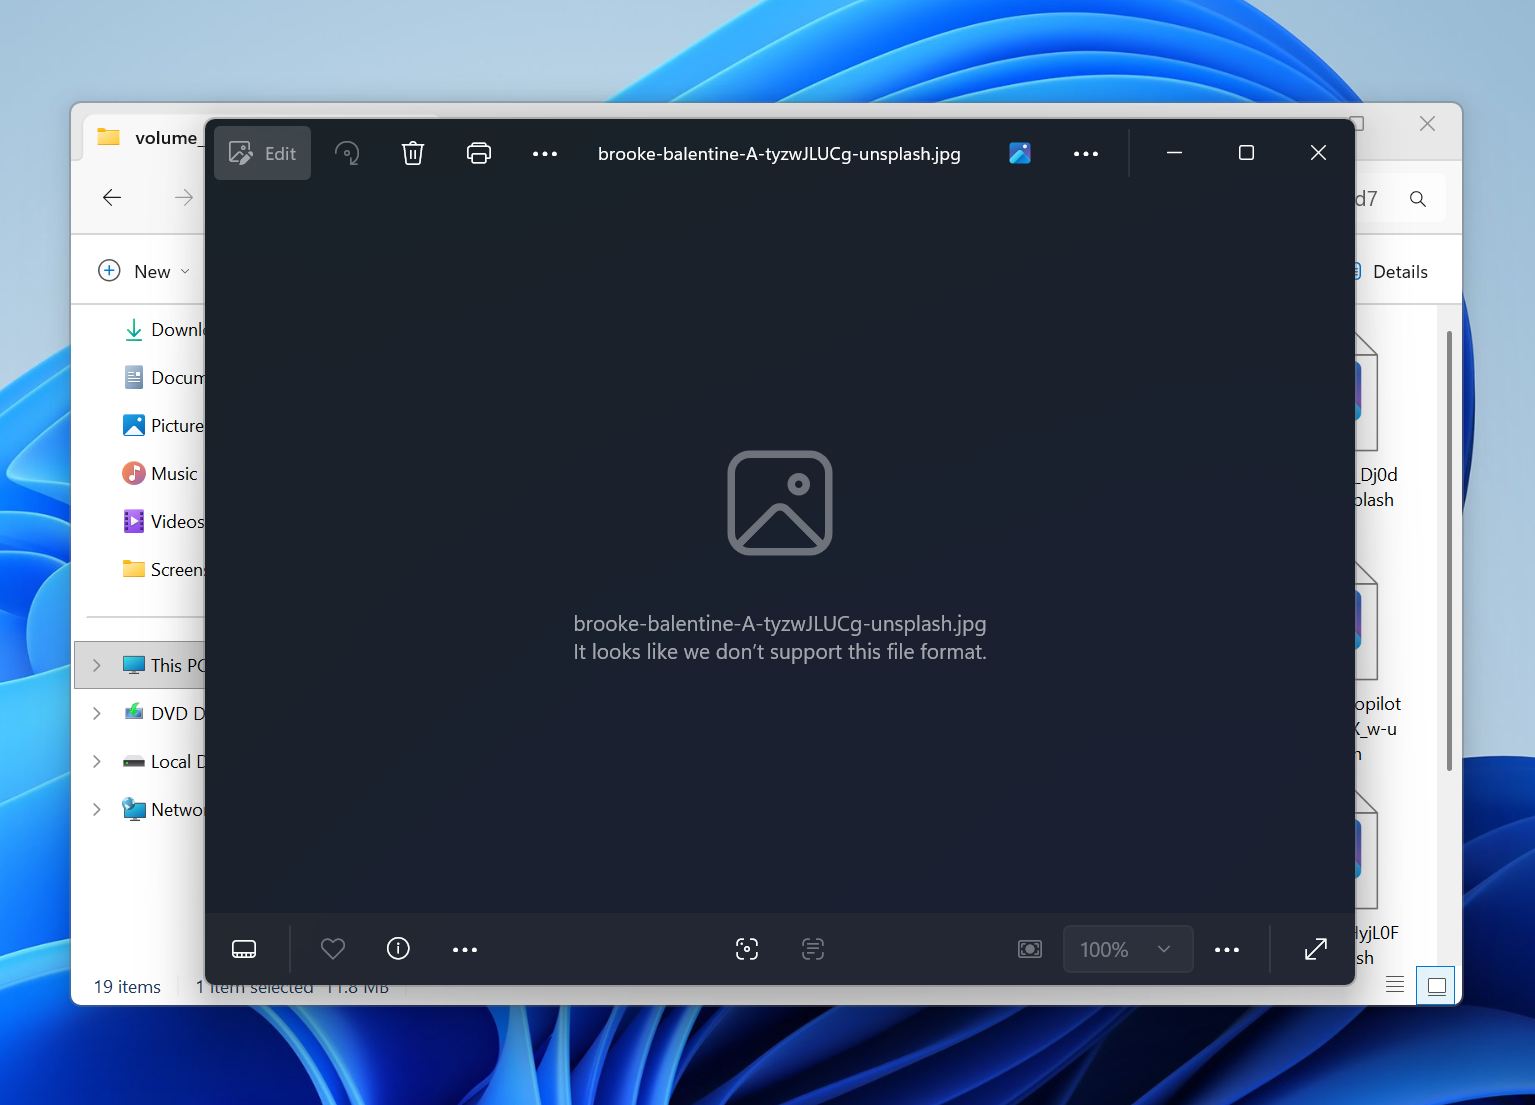
Method 3: Restore the Lost ReFS Partition Using TestDisk
Unlike file recovery software, which copies files from the affected drive to another location, partition recovery attempts to restore the original partition entry. If successful, the ReFS volume may reappear with its original folder structure and files intact.
Before you proceed, make sure any important data has already been recovered. Partition recovery modifies disk metadata, and a mistake during the process can make subsequent recovery attempts more difficult.
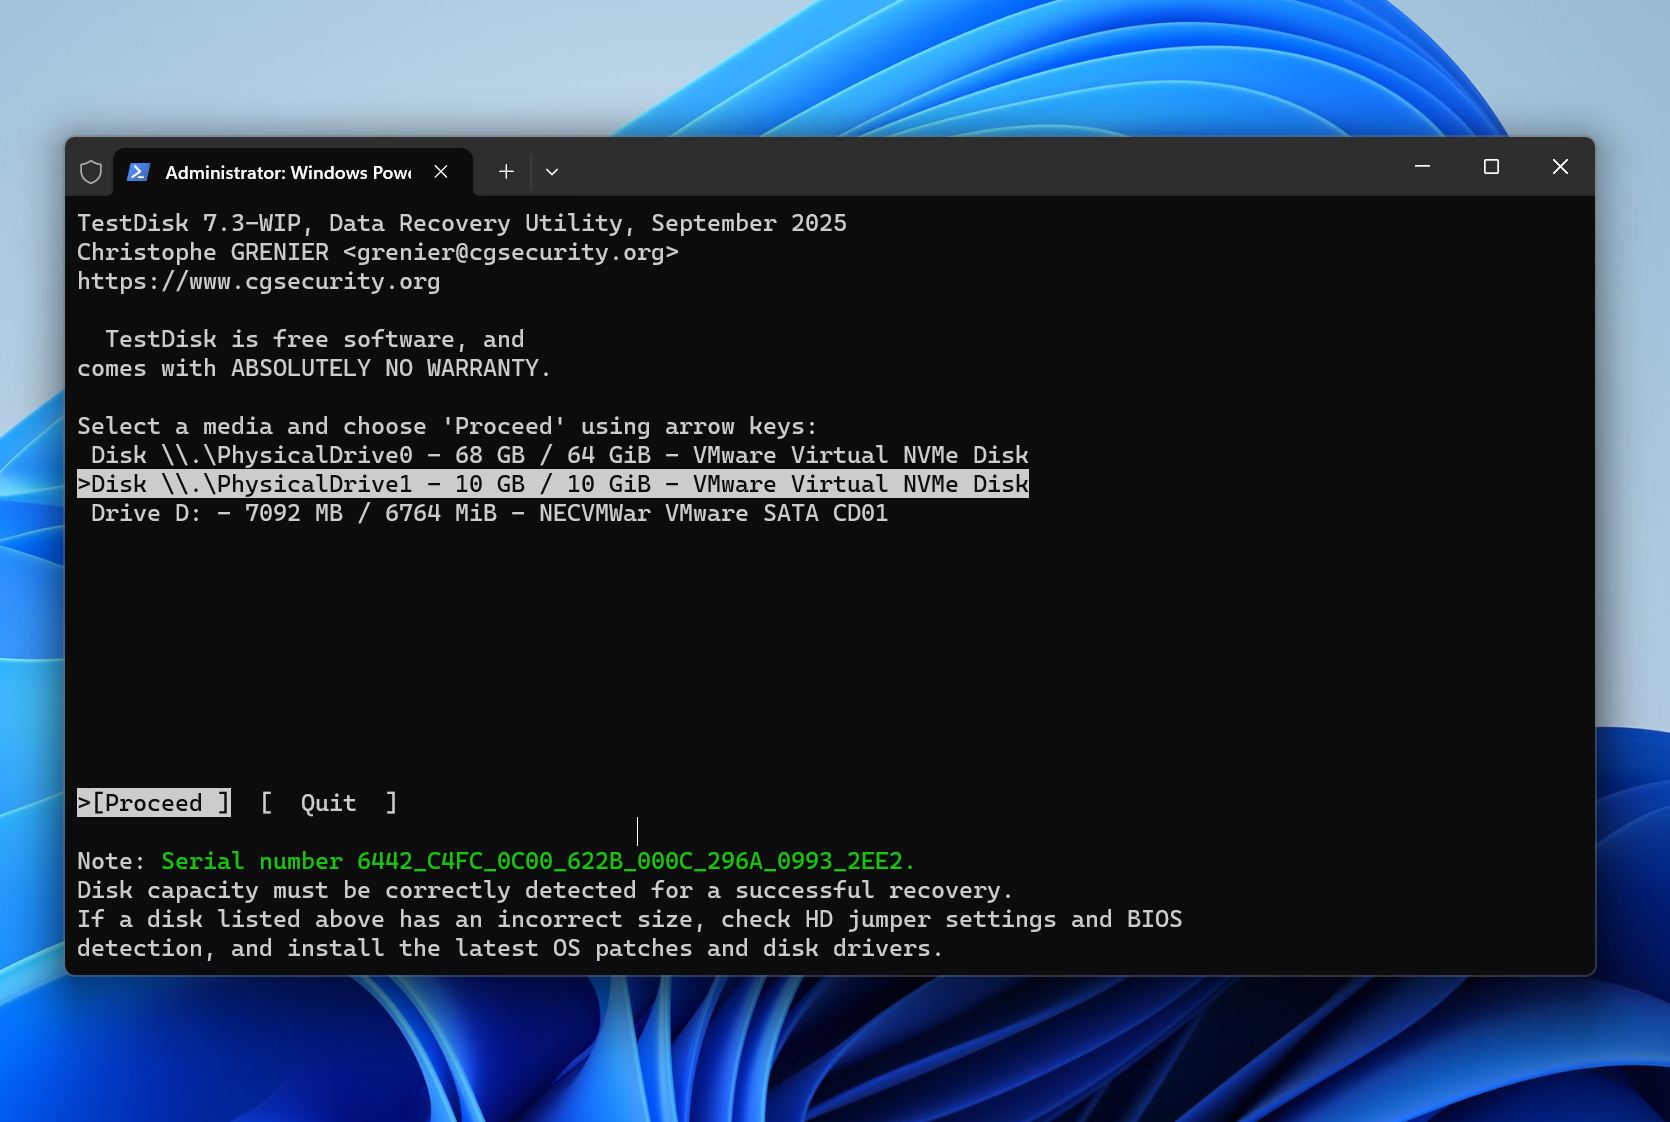
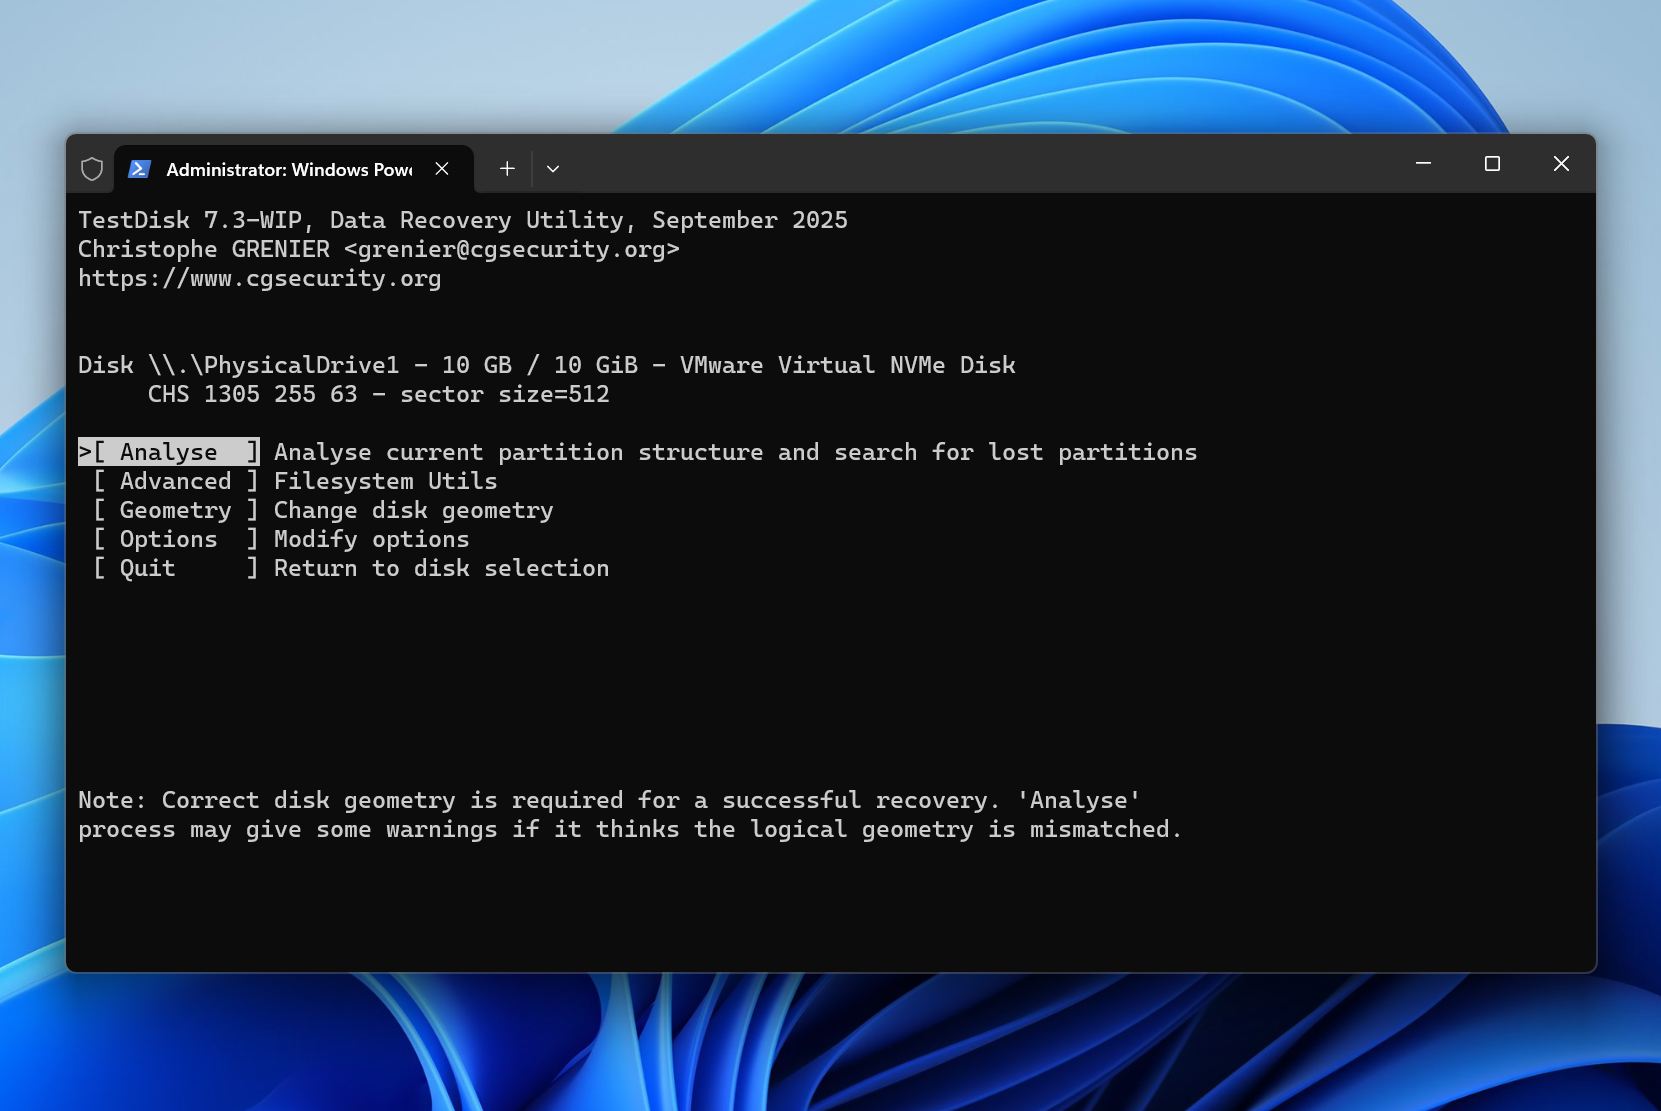
One of the most popular tools for partition recovery is TestDisk, a free utility capable of locating lost partitions and rebuilding damaged partition tables.
Here is how to restore a lost ReFS partition with TestDisk:
- Download and launch TestDisk with administrator privileges.
- Select the physical disk that contained the lost ReFS partition.
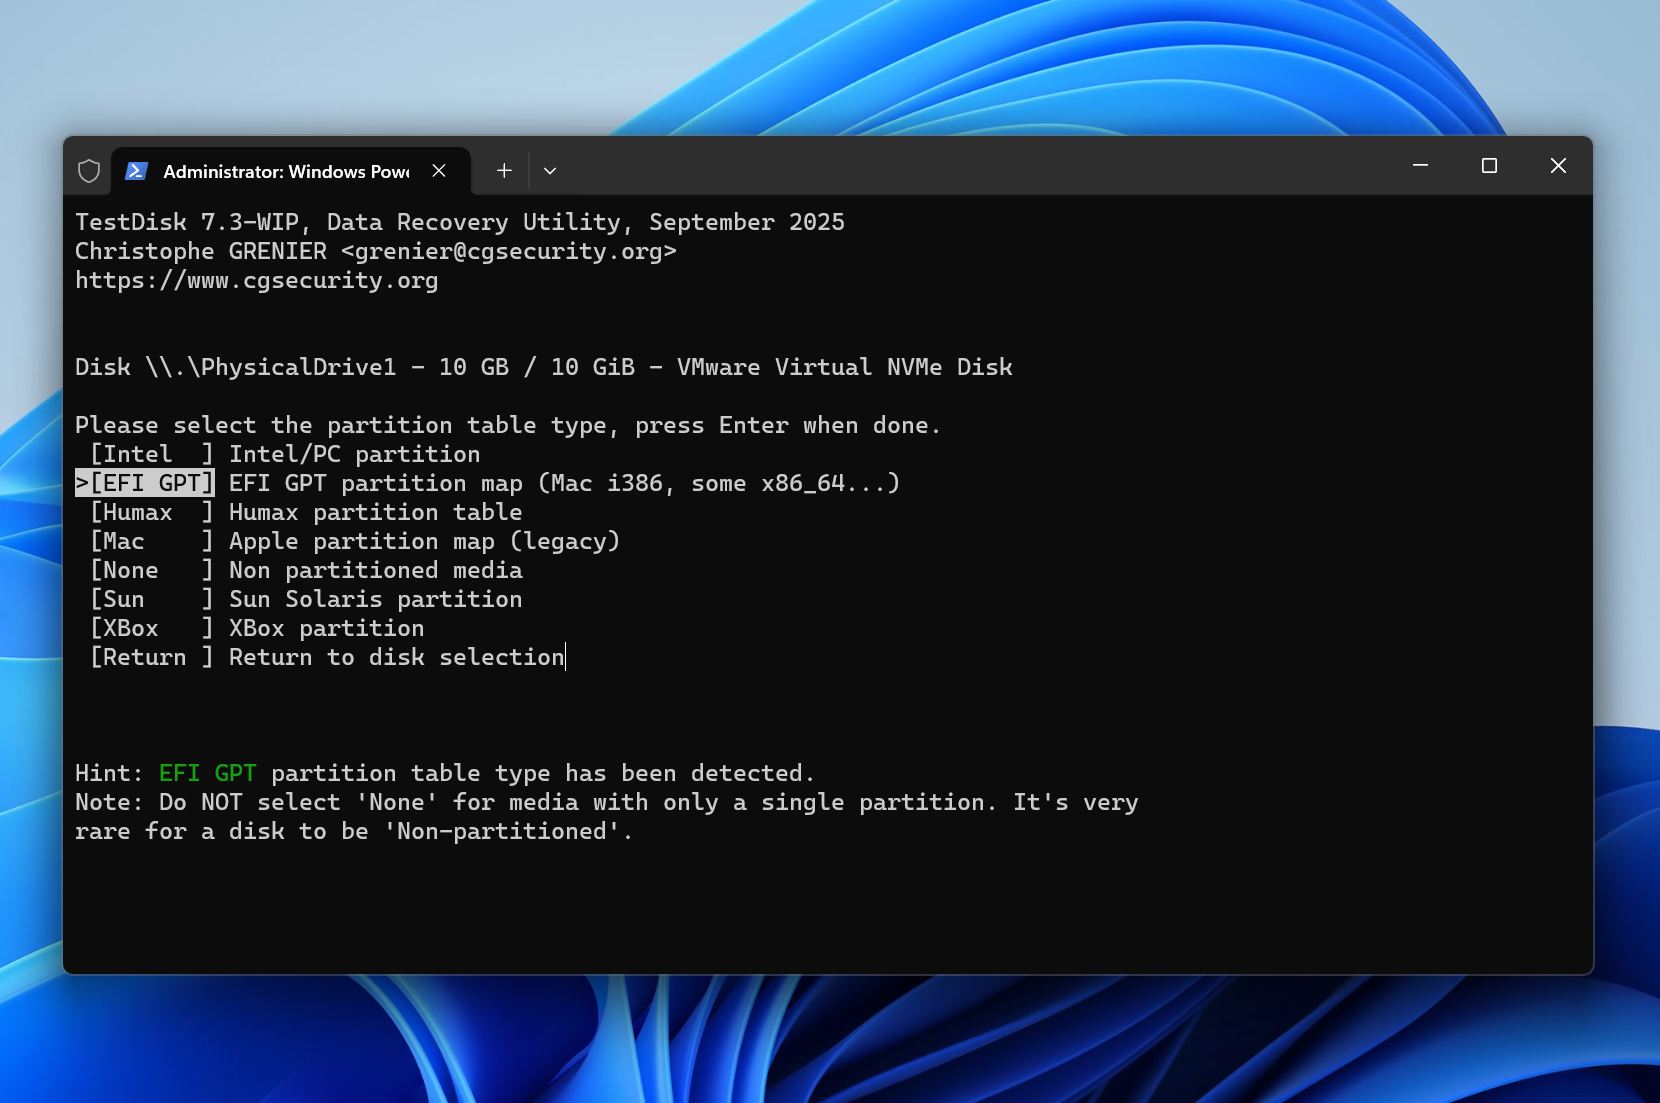
- Choose the partition table type suggested by TestDisk.
- Select Analyze and allow the program to search for existing and lost partitions.
- Review the discovered partitions and locate the missing ReFS volume.
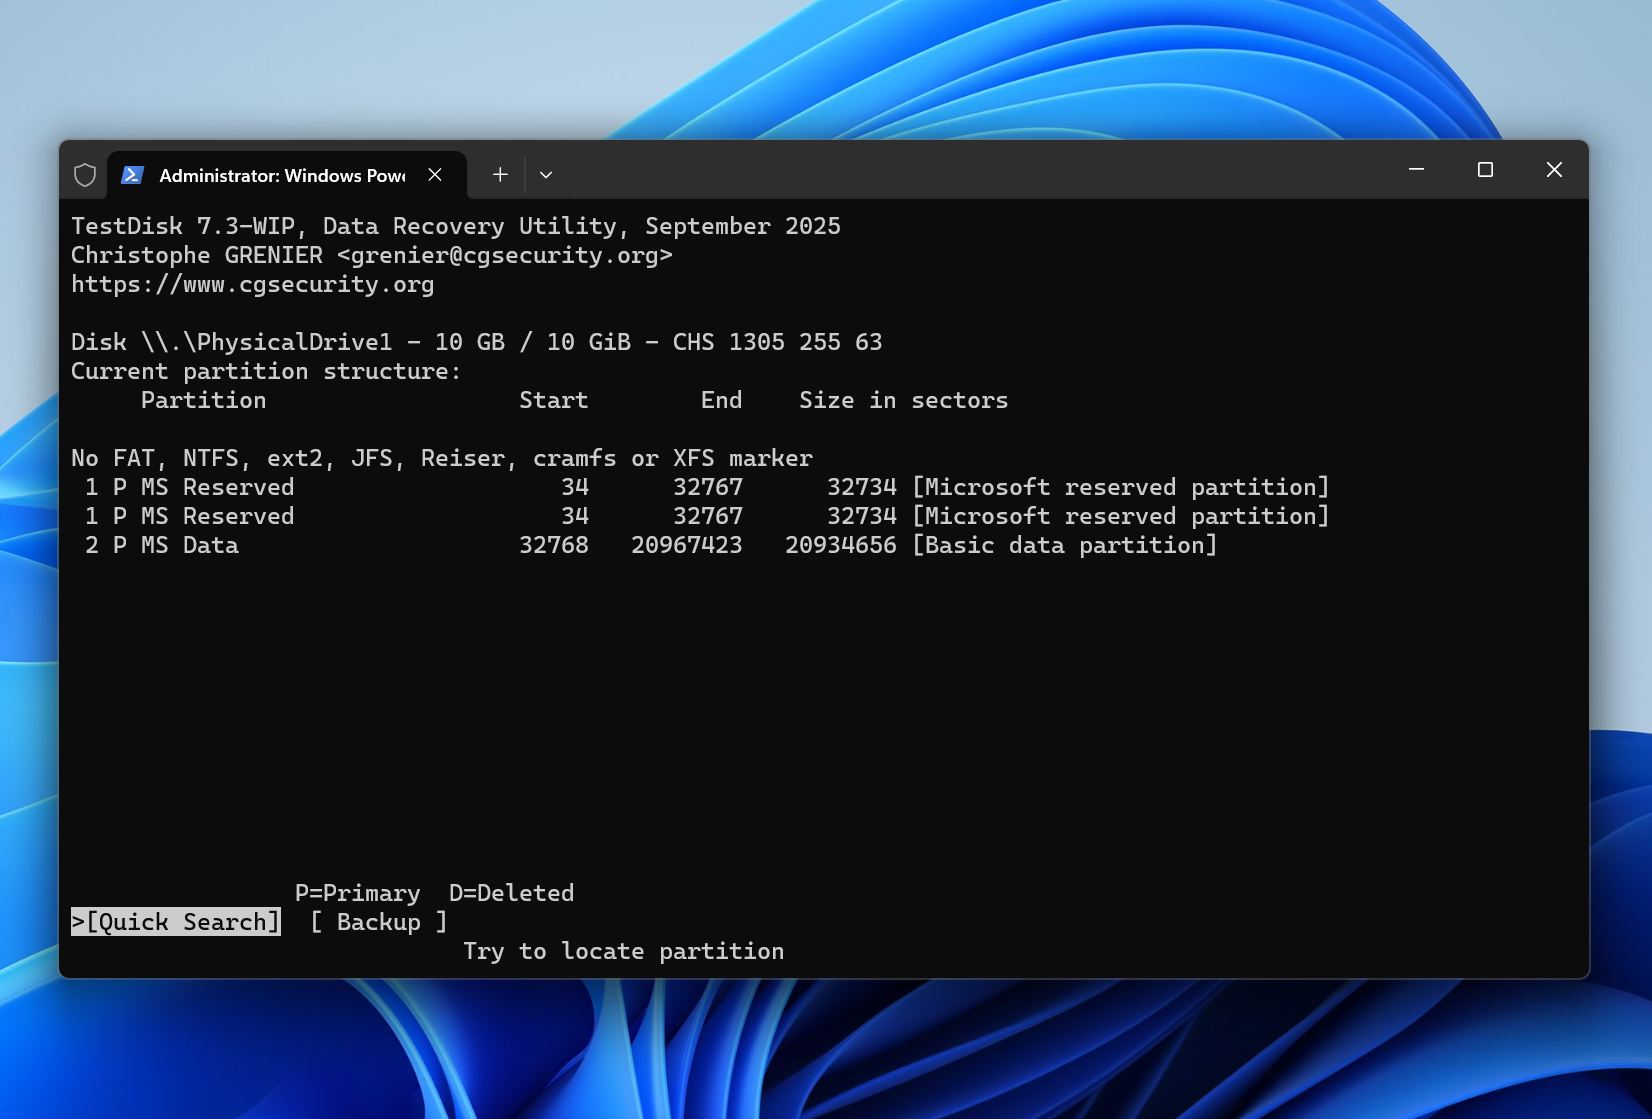
- If the partition appears correct, select it and use the available options to verify its contents.
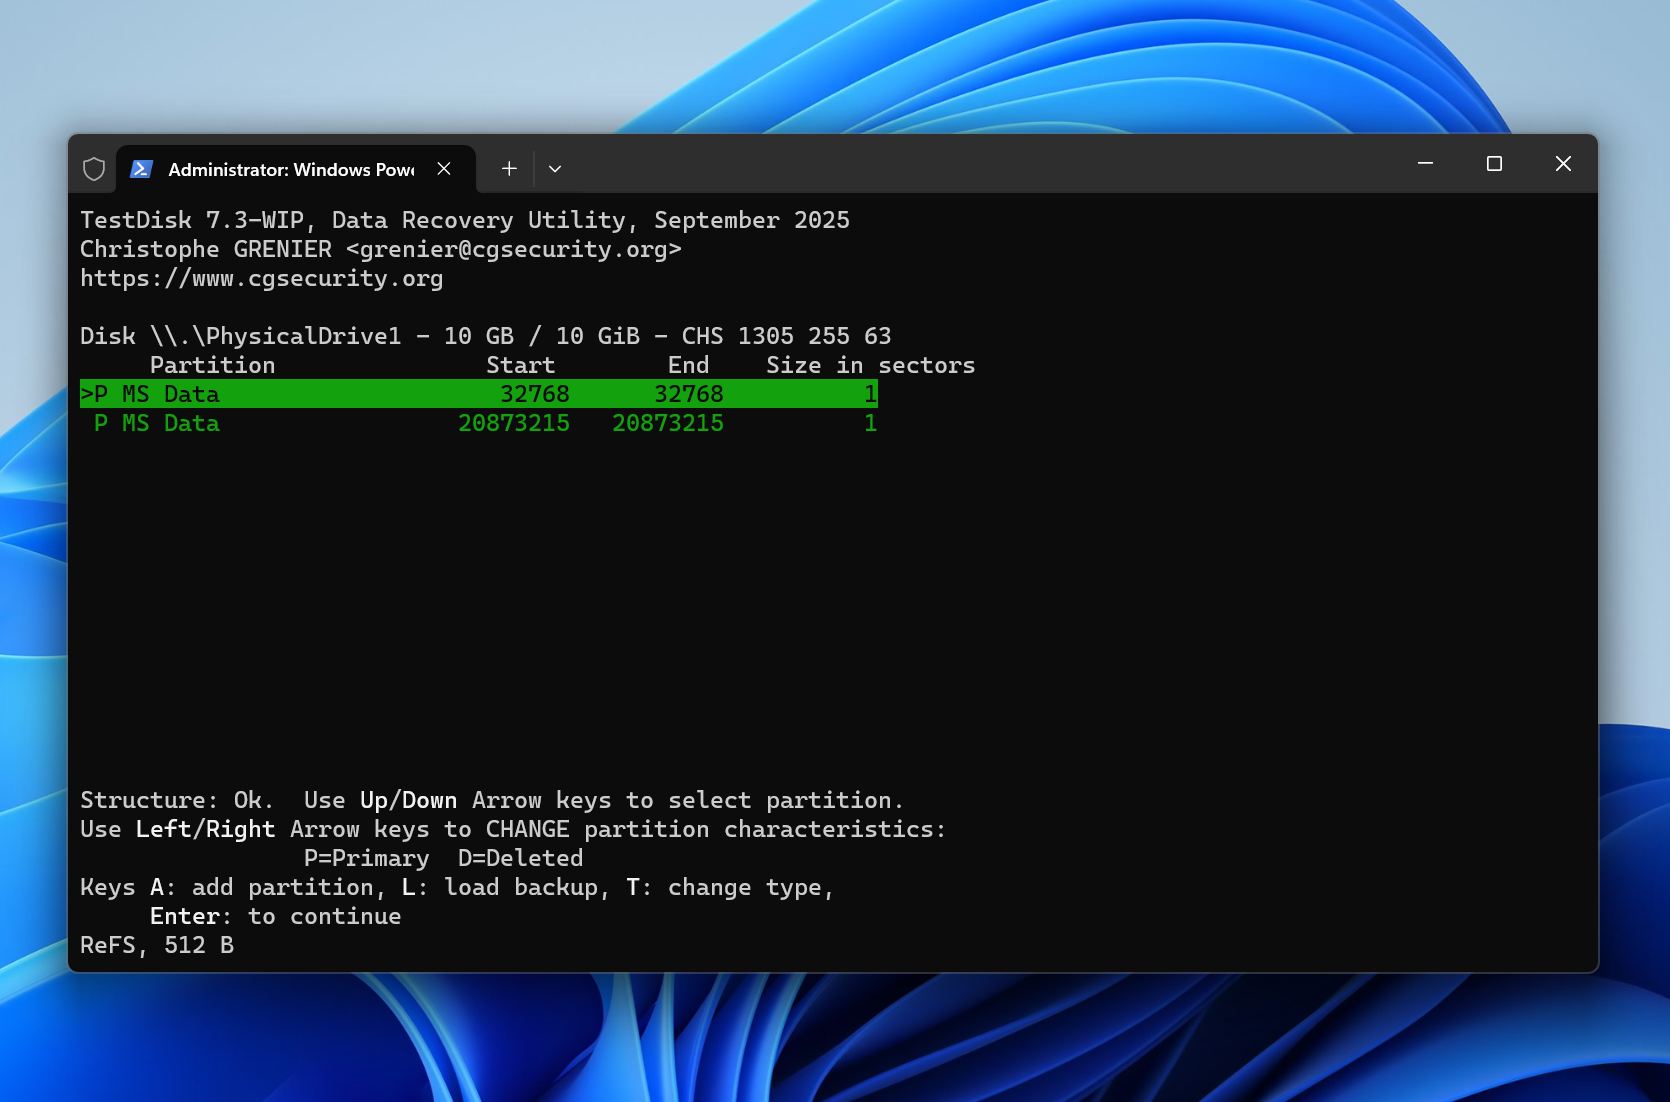
- Choose Write to restore the partition table.
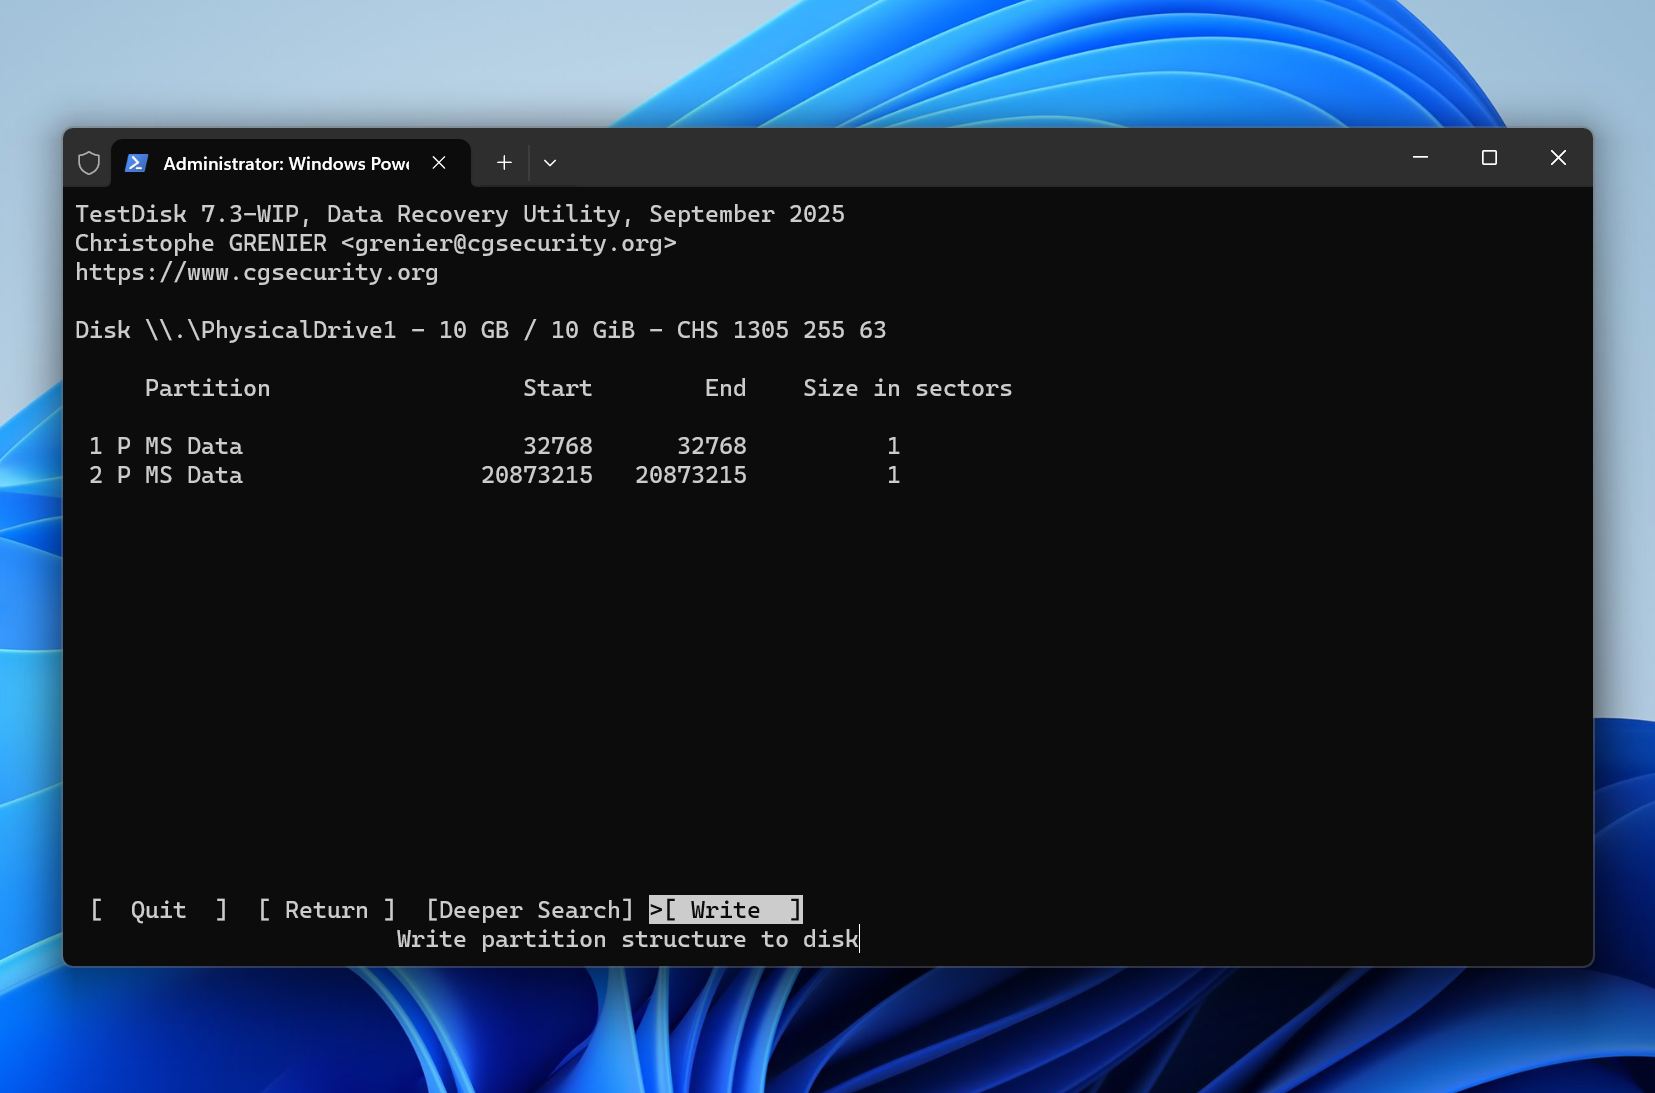
- Restart Windows if prompted.
- Open Disk Management and verify that the ReFS volume is accessible.
If TestDisk cannot locate the partition, avoid creating a new partition in the unallocated space. New partition entries and file system structures may overwrite metadata needed for recovery. In that situation, file recovery software is usually the safer option because it can recover data even when the original partition cannot be restored.
Method 4: Restore a Missing ReFS Volume in Storage Spaces
This method works when the ReFS volume disappeared because of a Storage Spaces issue rather than actual data loss. Examples include a disconnected drive, a degraded storage pool, a virtual disk that went offline, or a configuration problem that prevents Windows from mounting the volume.
This method is less likely to help if the storage pool suffered severe corruption, multiple member disks failed, or the drives have physical damage.
How to restore a missing ReFS volume in Storage Spaces:
- Open Control Panel > Storage Spaces.
- Check the status of the storage pool and all member drives.
- Reconnect any missing drives and verify that Windows detects them correctly.
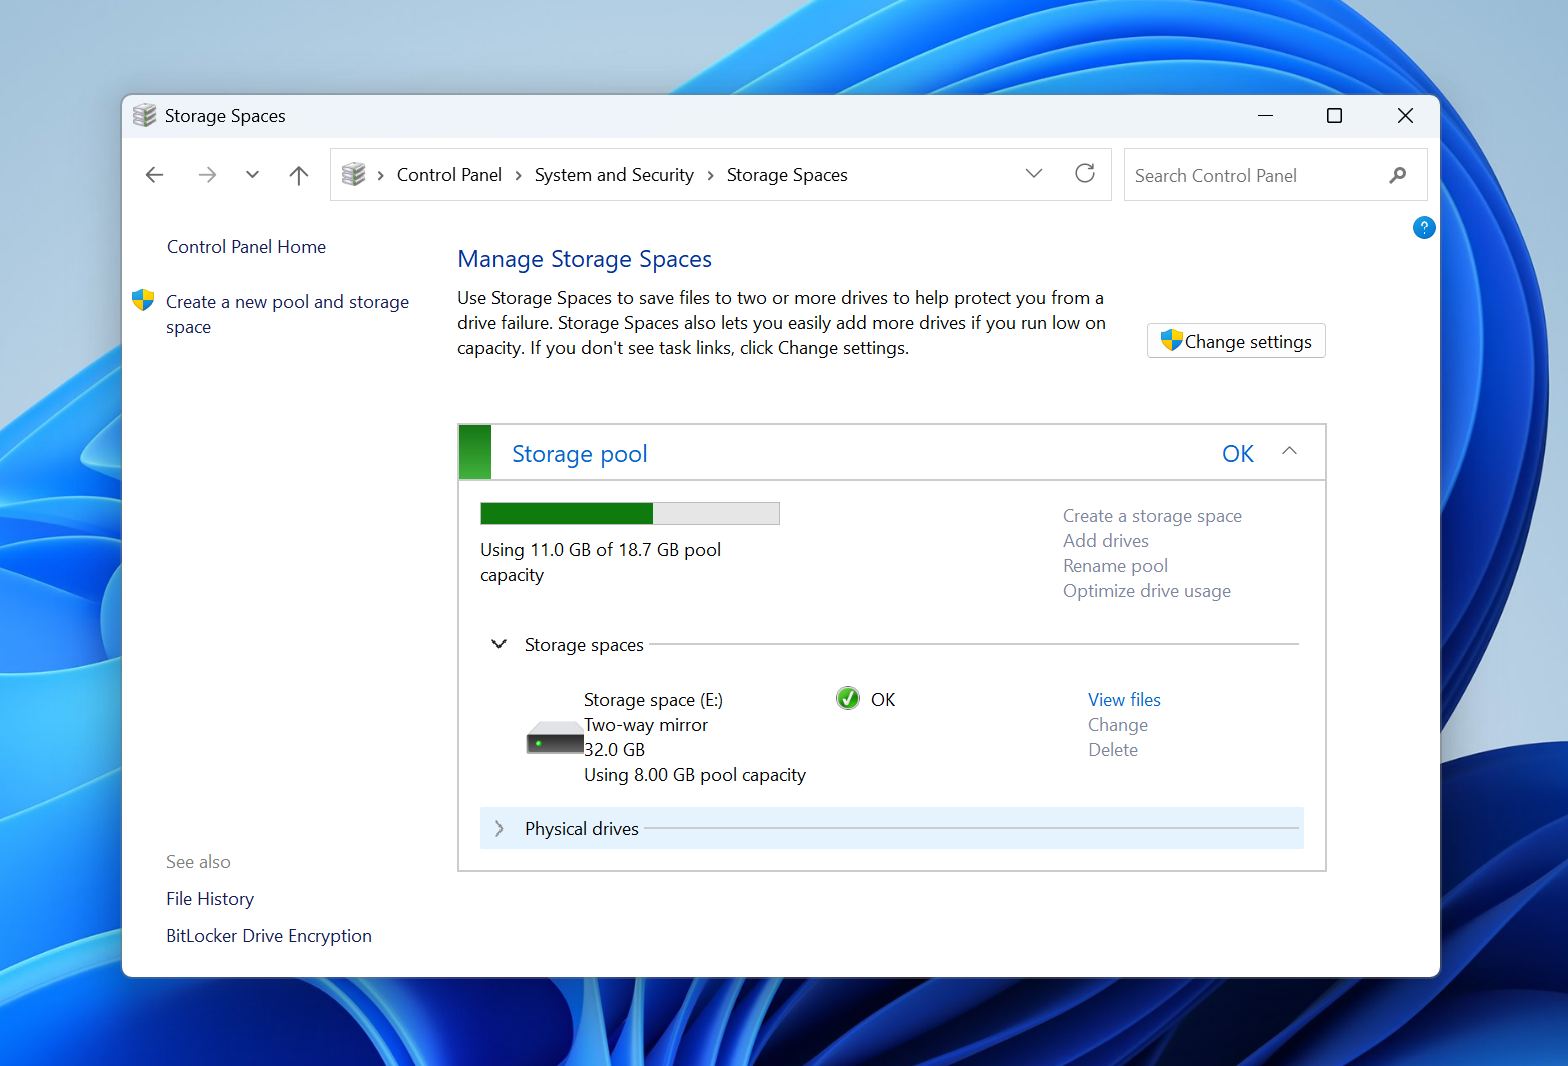
- If the pool shows a warning or degraded status, select the available repair option.
- Wait for Windows to complete the repair process and rebuild any missing redundancy.
- Open Disk Management and check whether the ReFS volume has reappeared.
- If the volume is present but offline, right-click it and choose Online.
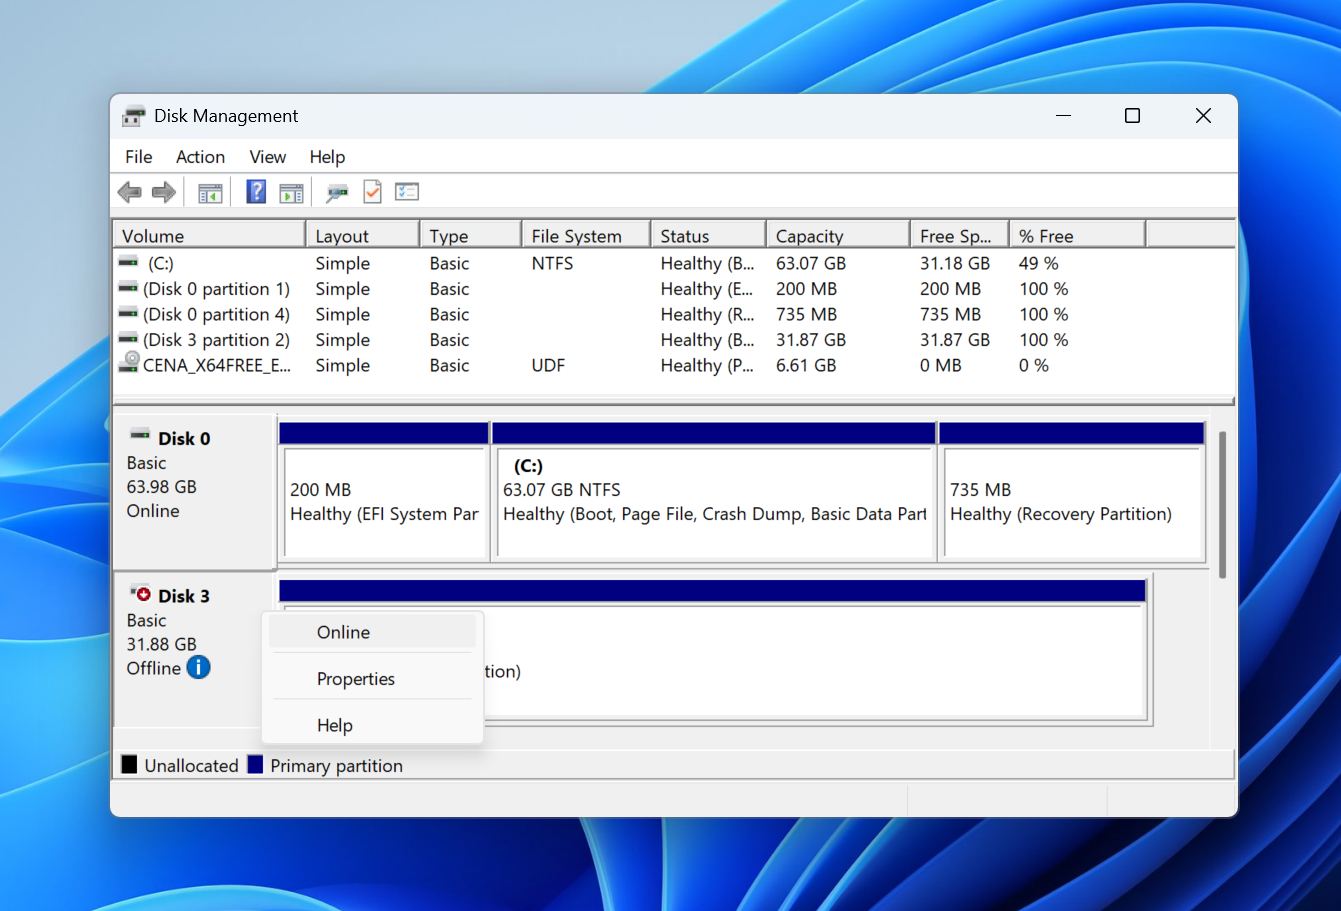
- Verify that the volume is accessible and that your files are intact.
If the volume does not reappear after the repair, avoid creating a new storage pool or removing the existing configuration. Both actions may complicate recovery and make it more difficult to restore the original ReFS volume. At that point, proceed with data recovery software or consider a professional recovery service if the data is particularly valuable.
When Professional Recovery Services Make Sense
Most lost ReFS partitions result from logical issues rather than physical damage. Common examples include accidental partition deletion, partition table corruption, Storage Spaces configuration problems, failed disk management operations, and unexpected power loss. Recovery software can often recover the data in these situations without professional assistance.
Some cases, however, require specialized equipment and expertise that software cannot provide. If the affected drive shows signs of physical failure, stop using it immediately. Every additional read or write operation may increase the damage, reduce the amount of recoverable data, or cause the drive to fail completely.
You should consider a professional data recovery service if:
- The drive makes clicking, grinding, or buzzing noises.
- The SSD is no longer detected or reports an incorrect capacity.
- Multiple disks in a Storage Spaces pool have failed or gone offline.
- The drive repeatedly disconnects during scans.
- The disk contains a large number of bad sectors.
- Recovery software cannot access the drive or complete a scan.
- The data is particularly valuable and you cannot risk additional damage.
Professional recovery labs can repair damaged hardware, create images of unstable drives, reconstruct Storage Spaces configurations, and recover data from devices that software cannot access. While these services can be expensive, they often provide the best chance of recovery when hardware failure or severe corruption is involved.
If you suspect physical damage, stop using the drive and avoid repeated recovery attempts. Each additional read operation may reduce the chances of a successful recovery.
Closing Thoughts
A lost ReFS partition does not automatically mean the underlying data has been erased. Depending on the cause, you may be able to recover the files, restore the partition, or bring the volume back online through Storage Spaces.
The key is to avoid unnecessary changes to the affected drive before recovery. Formatting the volume, creating a new partition, rebuilding a storage pool, or copying new data to the disk can overwrite important metadata and reduce the likelihood of a successful recovery.
For most logical failures, data recovery software should be your first choice because it allows you to secure important files before attempting repairs. Tools such as Disk Drill can scan physical disks for lost ReFS volumes, recover files from inaccessible partitions, and create byte-to-byte backups of unstable drives when necessary.
Once your data is safe, you can proceed with partition restoration or Storage Spaces troubleshooting if needed. If the drive shows signs of physical failure or contains highly valuable data, professional recovery services may provide the best chance of a successful outcome.
If you need additional recovery advice or a second opinion on your specific situation, the data recovery community at our forum can be a useful resource.


