


Can files deleted from a USB flash drive be recovered? Yes, in many cases, as long as new data hasn’t overwritten them. The most reliable way to recover deleted files is to scan the USB drive with a dedicated recovery tool like Disk Drill. However, a few quick checks can sometimes bring your files back without any recovery software, and we’ll walk you through all of the available methods.
Not sure where to start? Jump straight to Method 1: Use Disk Drill to Scan and Recover Files, or keep reading to learn more about the USB data recovery process.
What to Do Immediately After You Delete Files From a Flash Drive
When you delete a file from a USB flash drive, the file usually doesn’t disappear right away. Instead, the file system marks its storage space as available for new data, while the original contents often remain on the drive until new data replaces them. Because of this, every write to the USB drive reduces your chances of a successful recovery.
Here’s the approach we recommend:
- Stop using the USB drive immediately. New data can overwrite deleted files and make recovery impossible.
- Scan the USB drive with Disk Drill. If the Recycle Bin is empty or doesn’t exist, Disk Drill offers the best chance of recovering deleted, formatted, or otherwise lost files.
- Recover the files to a different drive. Never save recovered files back to the same USB drive until the recovery is complete.
These steps work for most logical data loss scenarios, including accidental deletion and quick formatting. However, your chances of recovery and the best method to try depend on how the files were lost:
| Data loss situation | Chances of recovery | Best method |
| Accidental deletion | High if you stopped using the USB drive soon after deletion and the data hasn’t been overwritten. | Disk Drill is the best first choice. You can also try Windows File Recovery as a free alternative. |
| Permanently deleted files | High to moderate, depending on how much the USB drive has been used since deletion. | Disk Drill or Windows File Recovery. If a copy of the file existed on your PC and File History backed it up, you can restore that copy instead. |
| Quick-formatted USB drive | Moderate to high if little or no new data has been written to the drive since the format. | Disk Drill. It can scan the formatted drive for lost files even when the original file system information is no longer available. |
| Previously copied files deleted from the USB | High if File History contains a backup of the copies stored on your PC. | File History. This doesn’t recover data from the USB itself; it restores a previously backed-up copy. |
If your USB flash drive has visible physical damage, isn’t recognized by any computer, or repeatedly disconnects, skip the DIY methods in this guide. In those situations, a professional data recovery service is the safest option.
How to Recover Deleted Files From a USB
Alright, now that we’ve covered the basics, it’s time to look at the methods you can use to recover deleted files from a USB drive. Each one aims to restore your lost data, but the steps, requirements, and chances of success can differ. We recommend reading through all of the options first, then choosing the method that best matches your situation.
Before you start, it’s worth taking a brief look in the Recycle Bin. Files deleted directly from a USB drive usually bypass it, but there are exceptions.
Have a Mac instead? This guide focuses on Windows methods. If you’re trying to recover deleted files from a USB flash drive on macOS, check out our guide on how to recover files from a USB drive on Mac, where we cover the available recovery methods and walk through the process step by step.
Method 1: The Best Way to Recover Permanently Deleted Files
If your USB flash drive doesn’t have a Recycle Bin, you’ll need a data recovery tool to restore deleted files. We recommend Disk Drill because it works well across most USB data loss scenarios and is easy to use, even if you’ve never recovered files before. During a scan, it uses multiple recovery methods to look for lost data, including file system information and known file signatures. These methods work together to find files after accidental deletion, formatting, file system damage, and many other common data loss situations.
If your USB drive disconnects randomly, freezes during transfers, or behaves unpredictably, we recommend creating a disk image first and scanning that image instead of the original drive. Disk Drill includes a built-in disk imaging feature, which helps reduce stress on an unstable USB drive while giving you the option to run additional scans without accessing the physical device again.
We tested Disk Drill on different USB flash drives with capacities ranging from 8 GB to 256 GB, and it consistently recovered deleted files across the most common data loss scenarios. If you’d like to see the full results, take a look at our detailed Disk Drill review.
Here is how to use Disk Drill to recover deleted files from a USB drive:
- Download and install Disk Drill on your computer. During installation, the system will ask for administrator credentials. Follow the on-screen prompts, the installer guides you through every step.
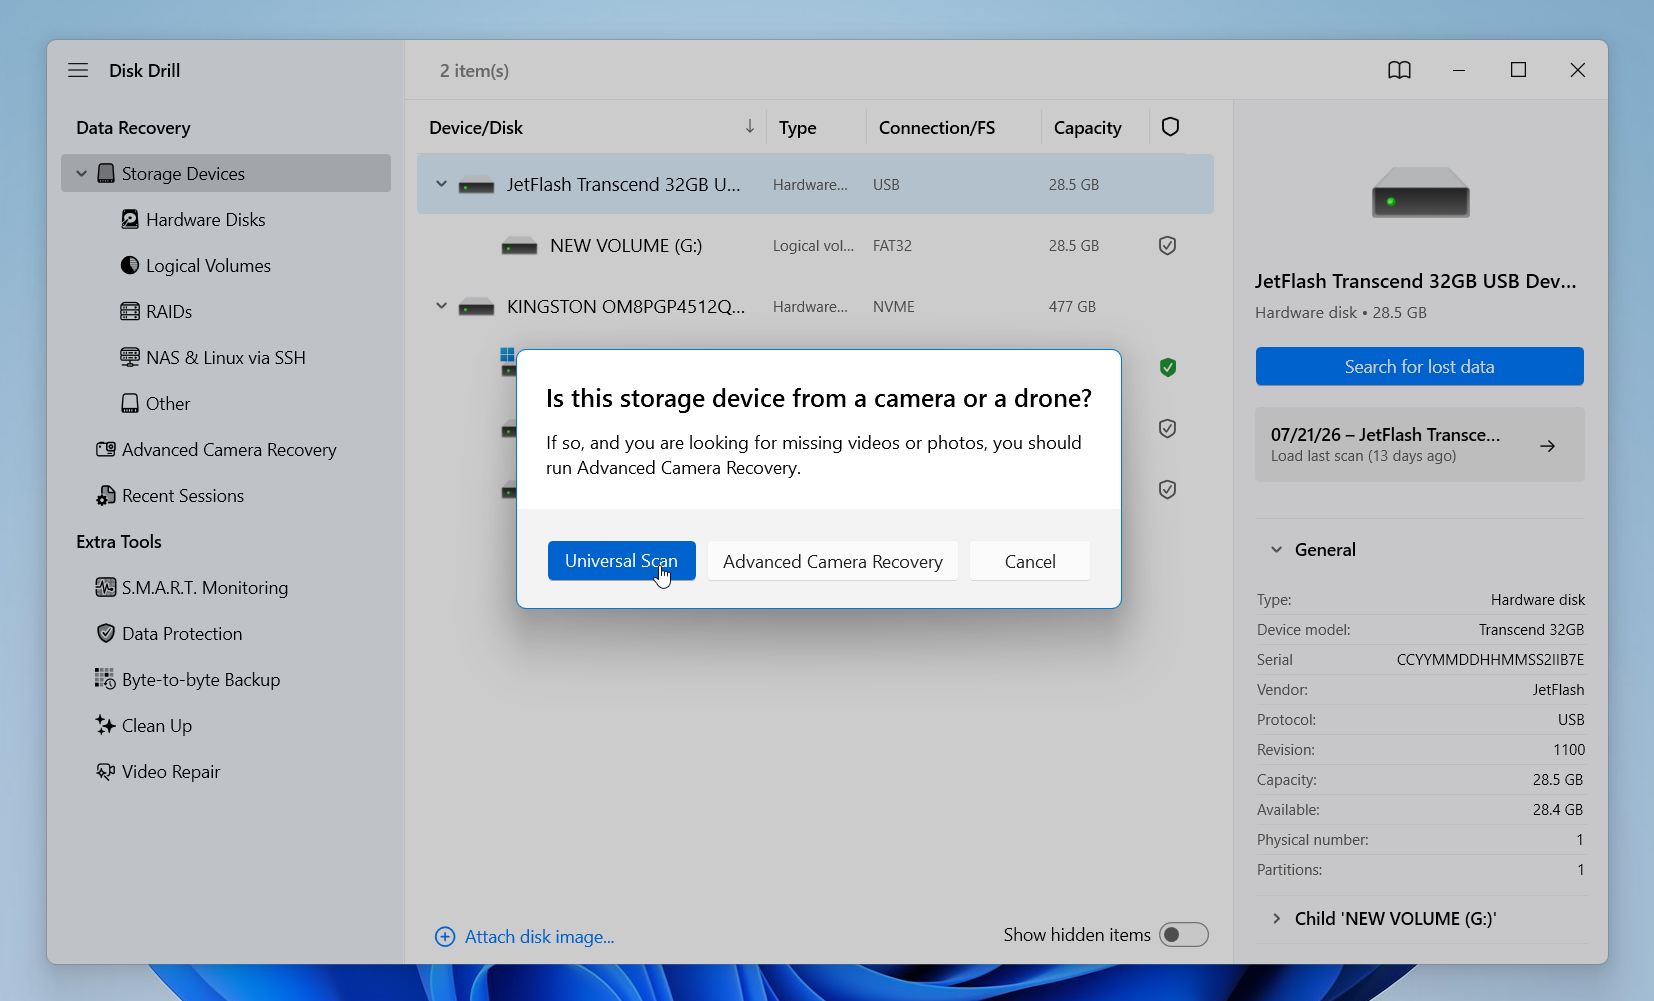
- Connect your USB flash drive. Make sure the operating system detects it. If the drive doesn’t appear, resolve the connection issue first. When the flash drive shows up, launch Disk Drill and select it from the list of available devices and click Search for lost data.
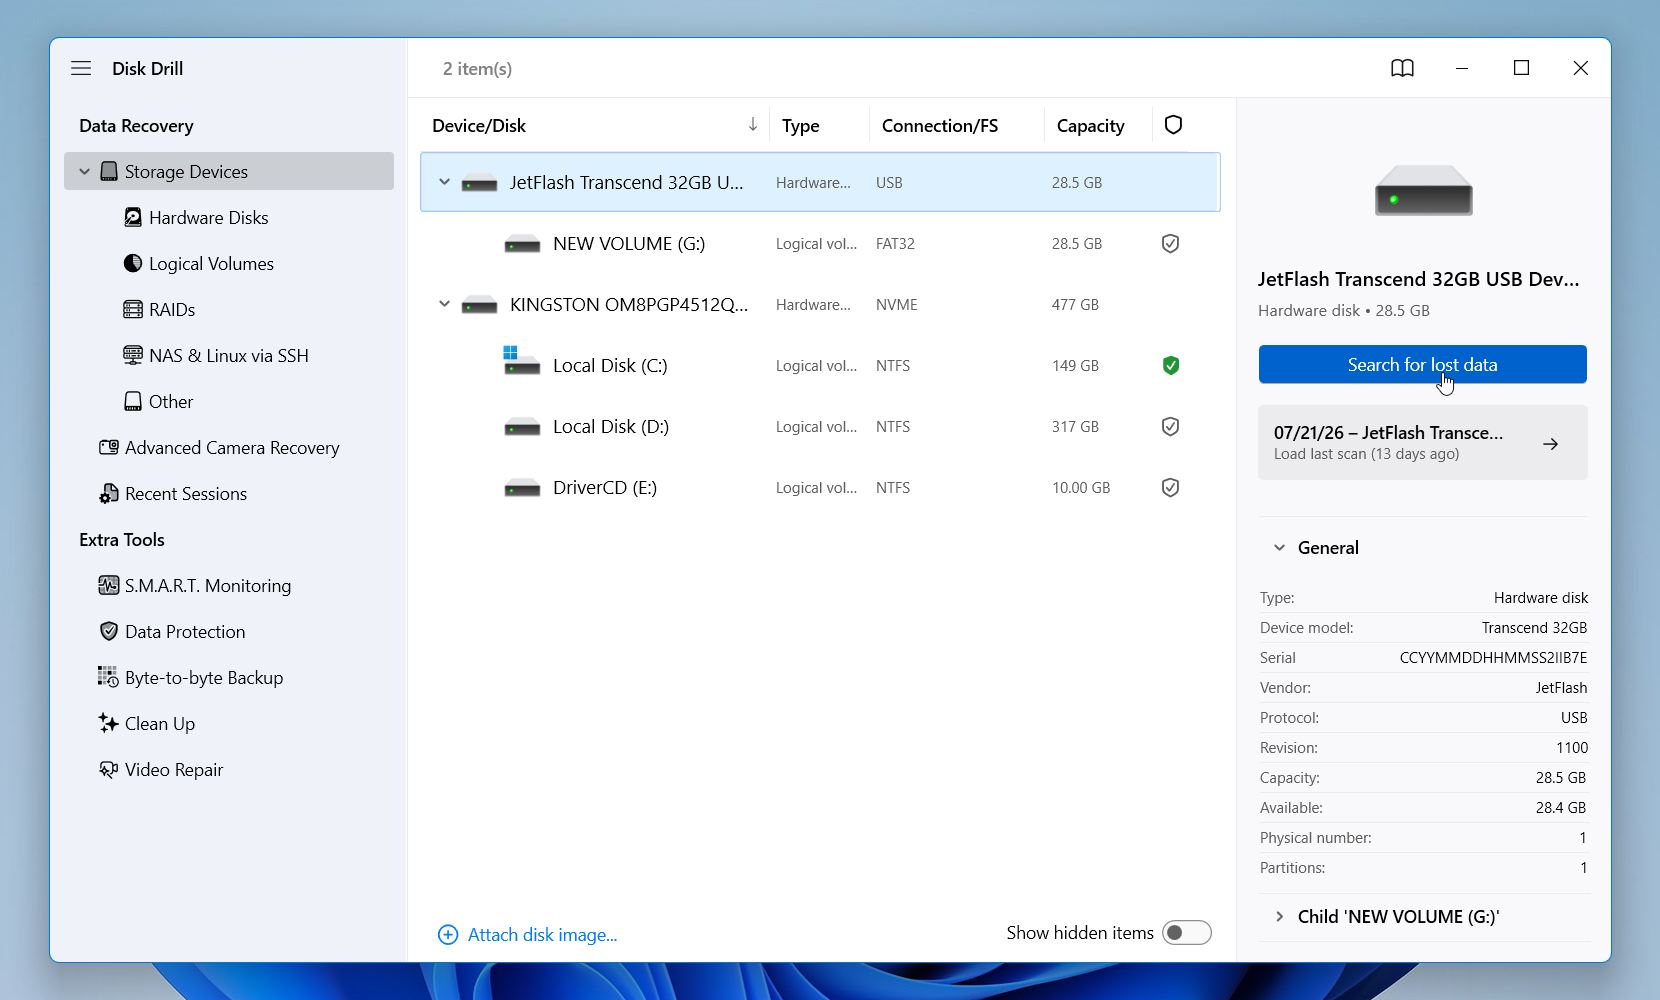
- Disk Drill will offer two scan types: Universal Scan and Advanced Camera Recovery. Choose Universal Scan, it works well for most USB data recovery situations. Advanced Camera Recovery is intended for recovering fragmented video files from camera or drone SD cards, so it isn’t suitable for this scenario.
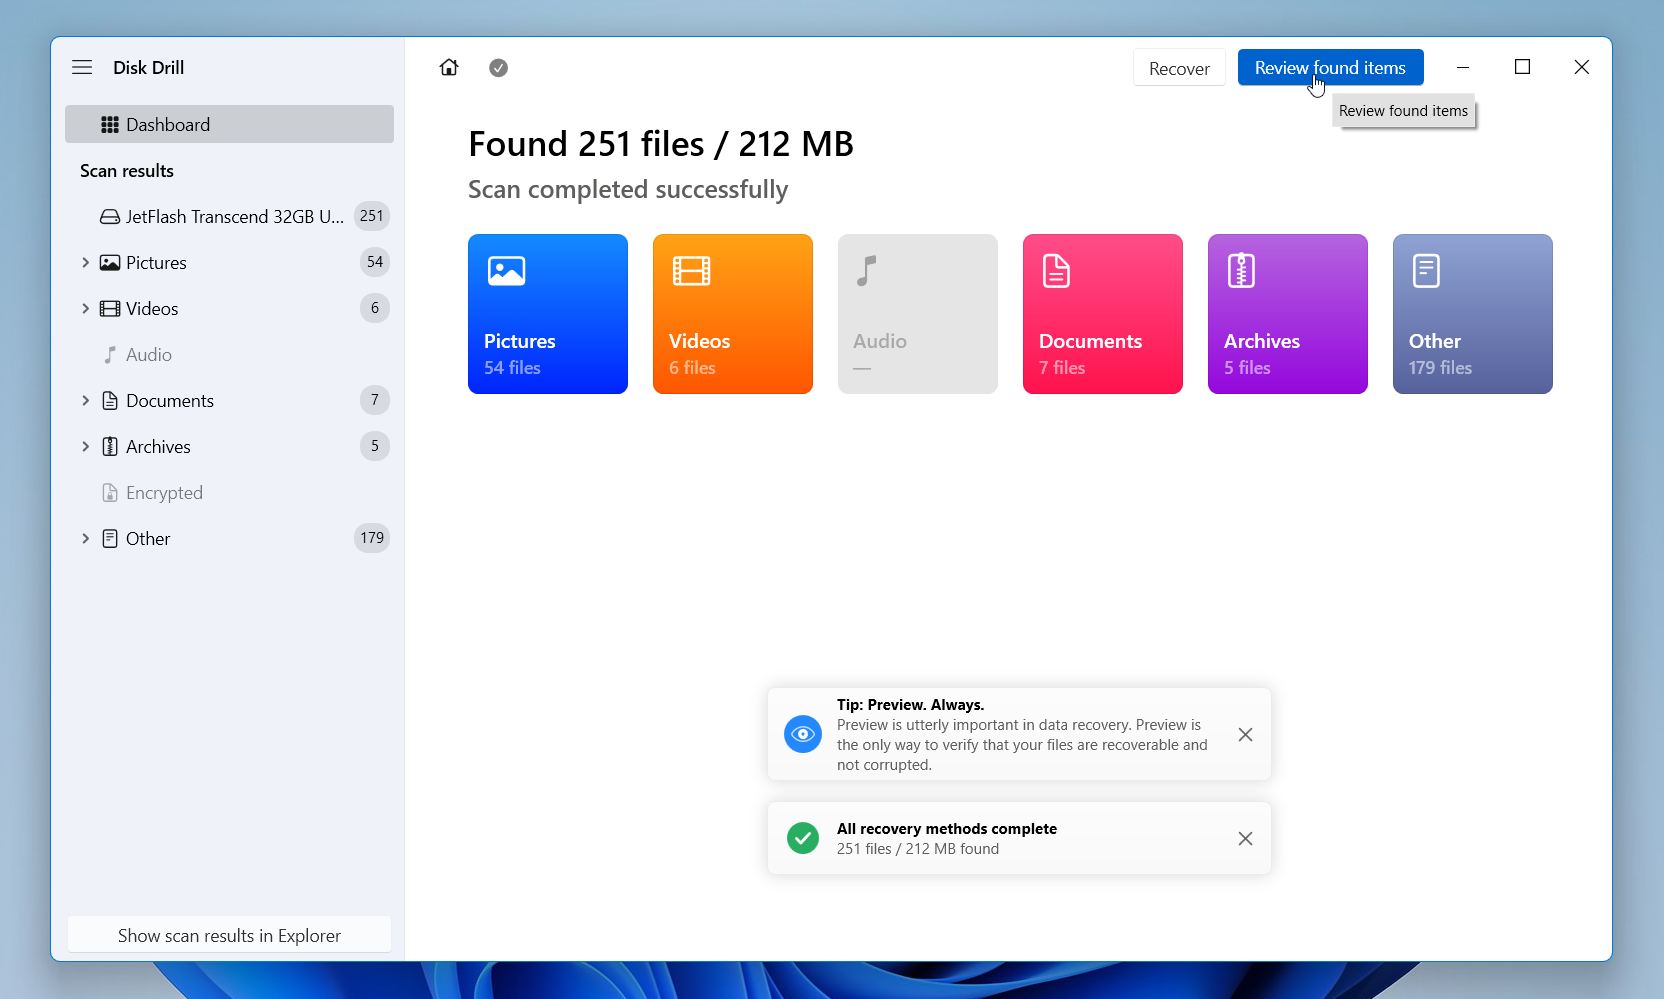
- You can view results in real time, but it’s better to allow the scan to finish. Once completed, Disk Drill will show recovery chances for each file so you know which items are likely to be restored successfully.
- Browse results by category (Pictures, Video, Audio, Documents, Archives) or click Review found items to see everything.
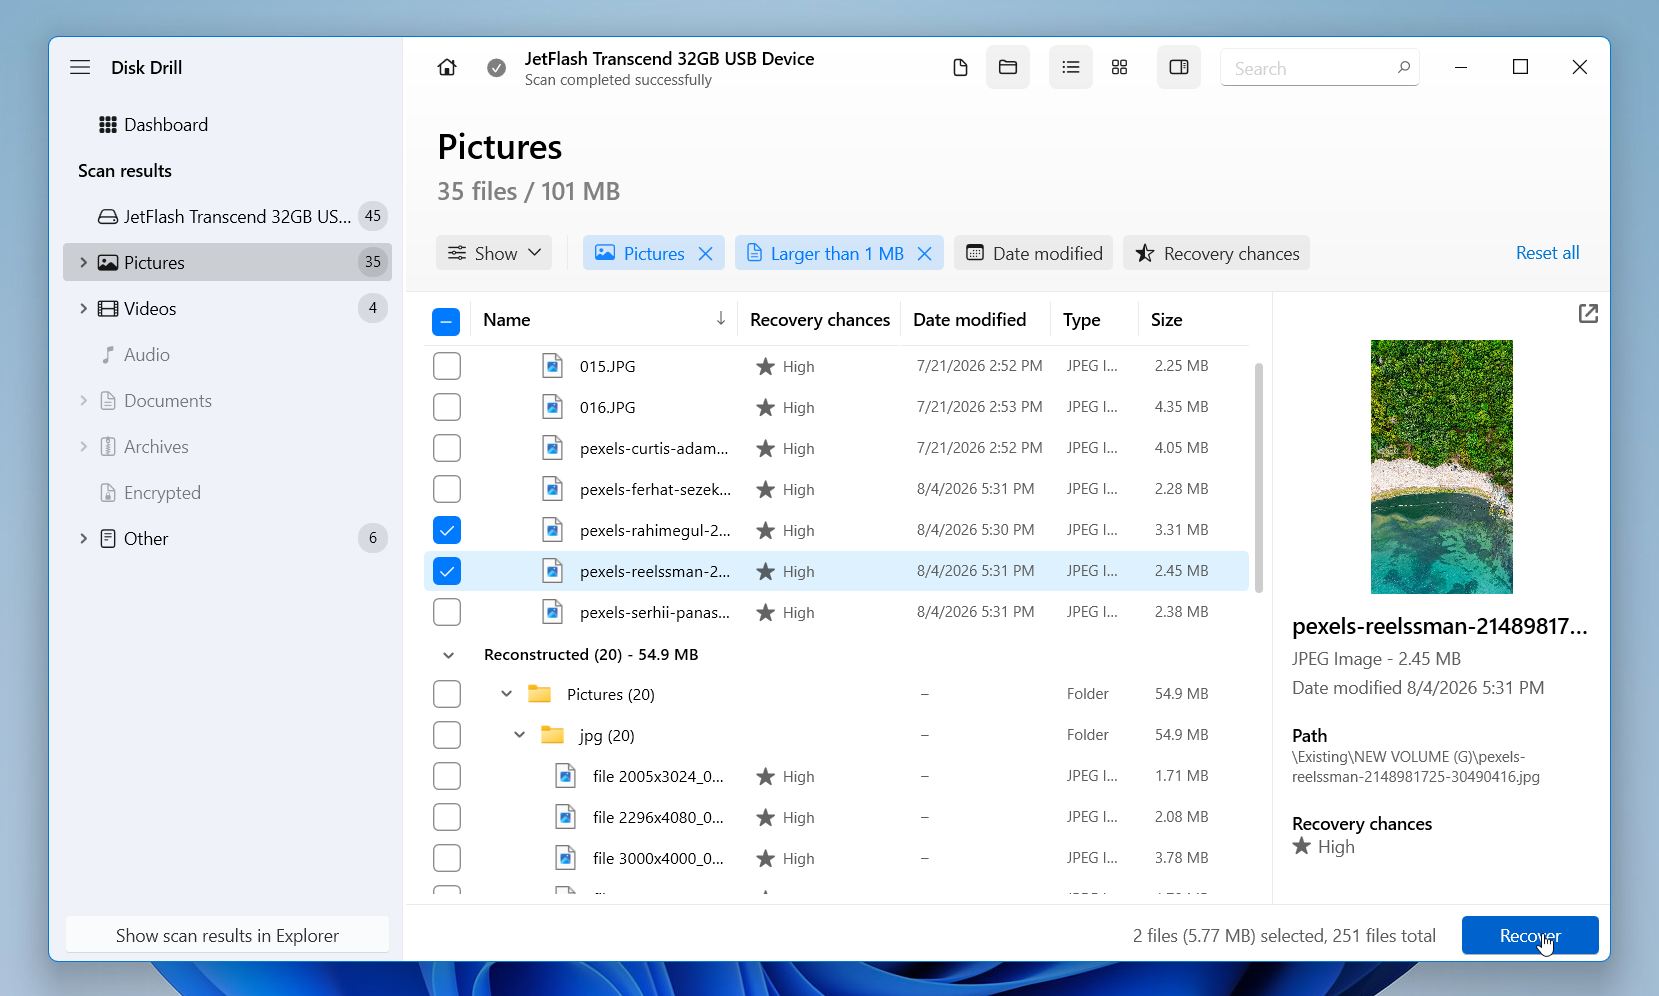
- You can apply filters like file extension, modification date, size, and more. You can also use the Preview feature to check whether a file is intact before recovering it. Place checkmarks next to the necessary items and click the Recover button in the bottom-right corner.
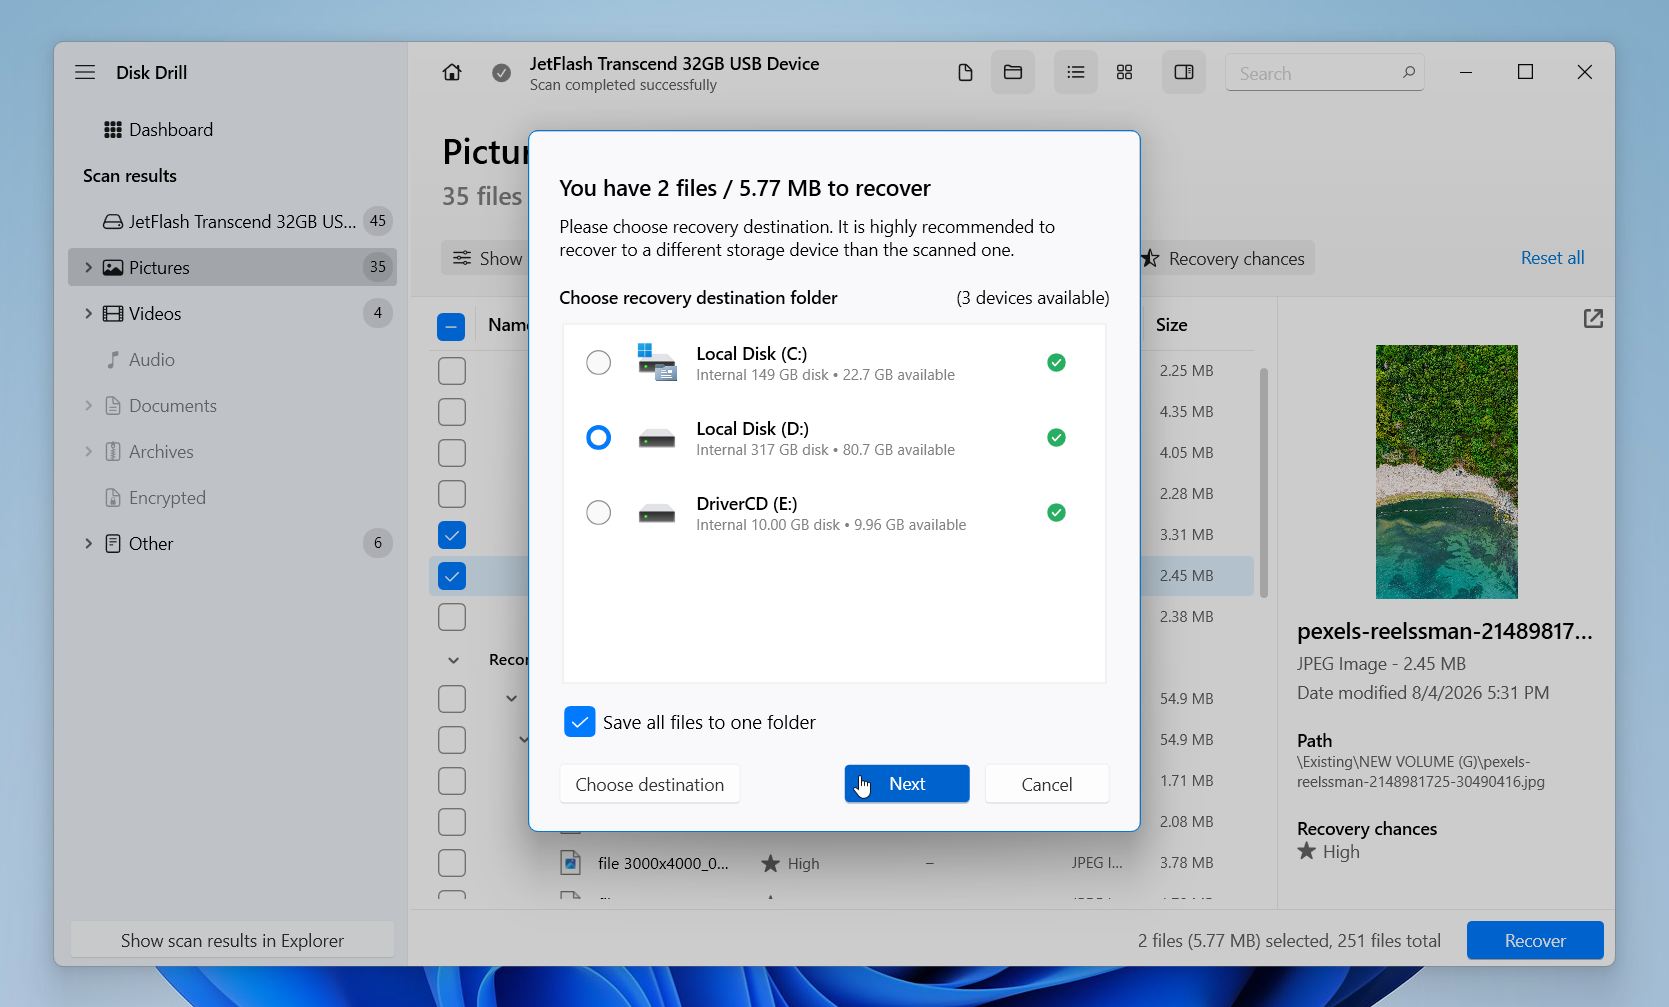
- Disk Drill will ask where to save the restored files. Do not save them back to the same USB flash drive (this may overwrite the very data you’re trying to recover). Pick any folder on your system drive, or connect an external SSD, HDD, or another flash drive. Click Next and let Disk Drill complete the process.
You can take advantage of the free version of Disk Drill, which lets you recover up to 100 MB of data without upgrading. That’s usually enough to test the software, verify that it can find your files, and even recover a few important documents or photos. The free version also includes the app’s data protection features, so you can explore its functionality before deciding whether you need to upgrade.
Method 2: Recover Deleted USB Files from a File History Backup
This method doesn’t recover files directly from the USB drive. Instead, it restores copies that were previously backed up by File History.
By default, File History backs up folders such as Documents, Desktop, Pictures, Videos, Music, and any other libraries you add manually. It doesn’t include USB flash drives, so if the files only ever existed on the USB drive, this method won’t help.
However, there’s one common exception. Many people copy files from a USB drive to their computer before editing or organizing them. If those copies were saved in one of File History’s protected folders, you may still be able to restore them from a backup, even if the USB drive itself was never backed up.
If that sounds like your situation, follow these steps:
- Connect the external drive or network location that stores your File History backups.
- Open the Start menu, type Control Panel, and open it.
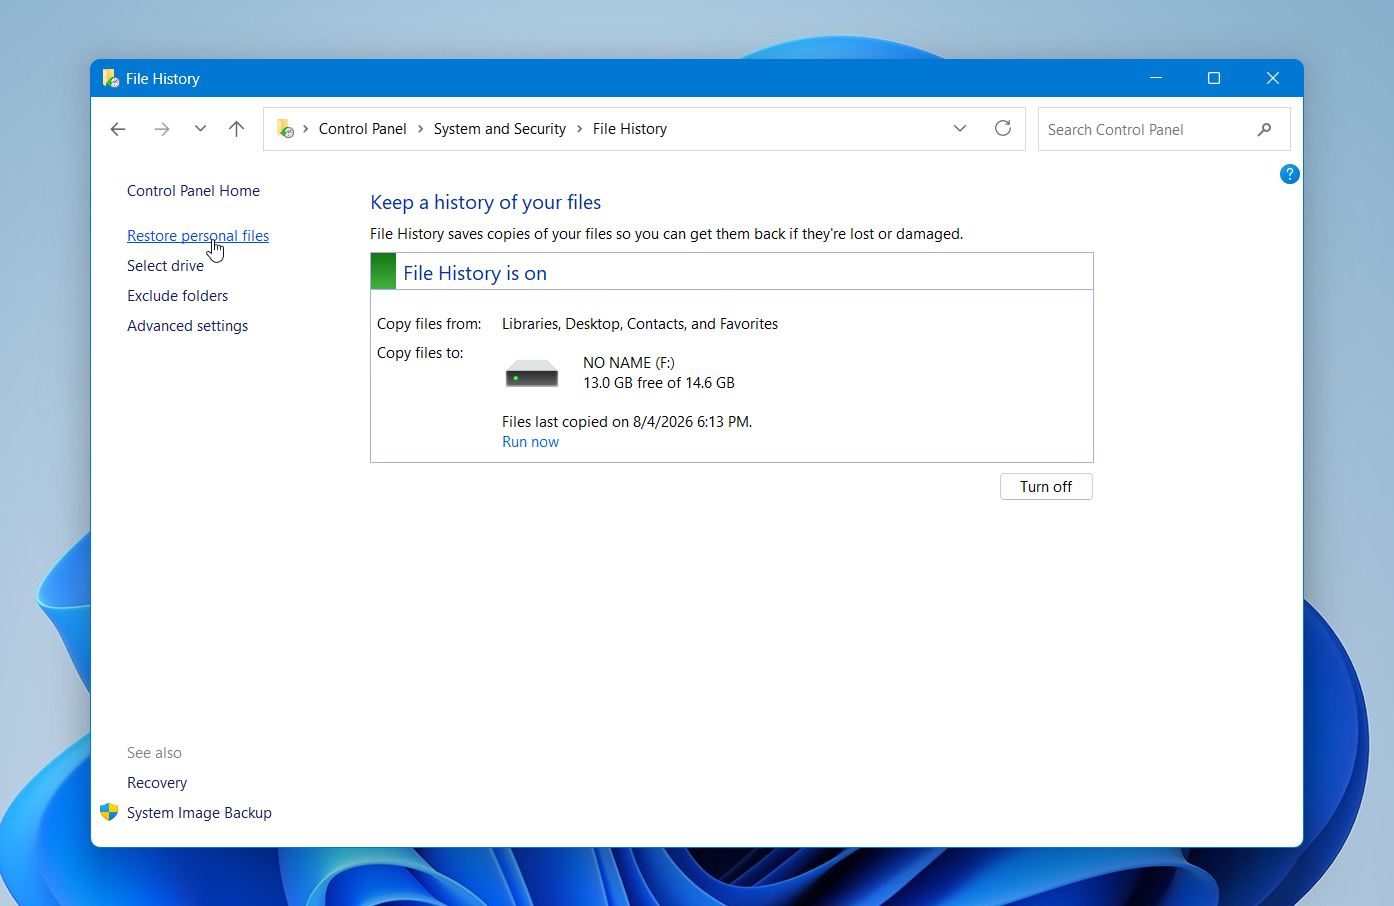
- Go to System and Security > File History.
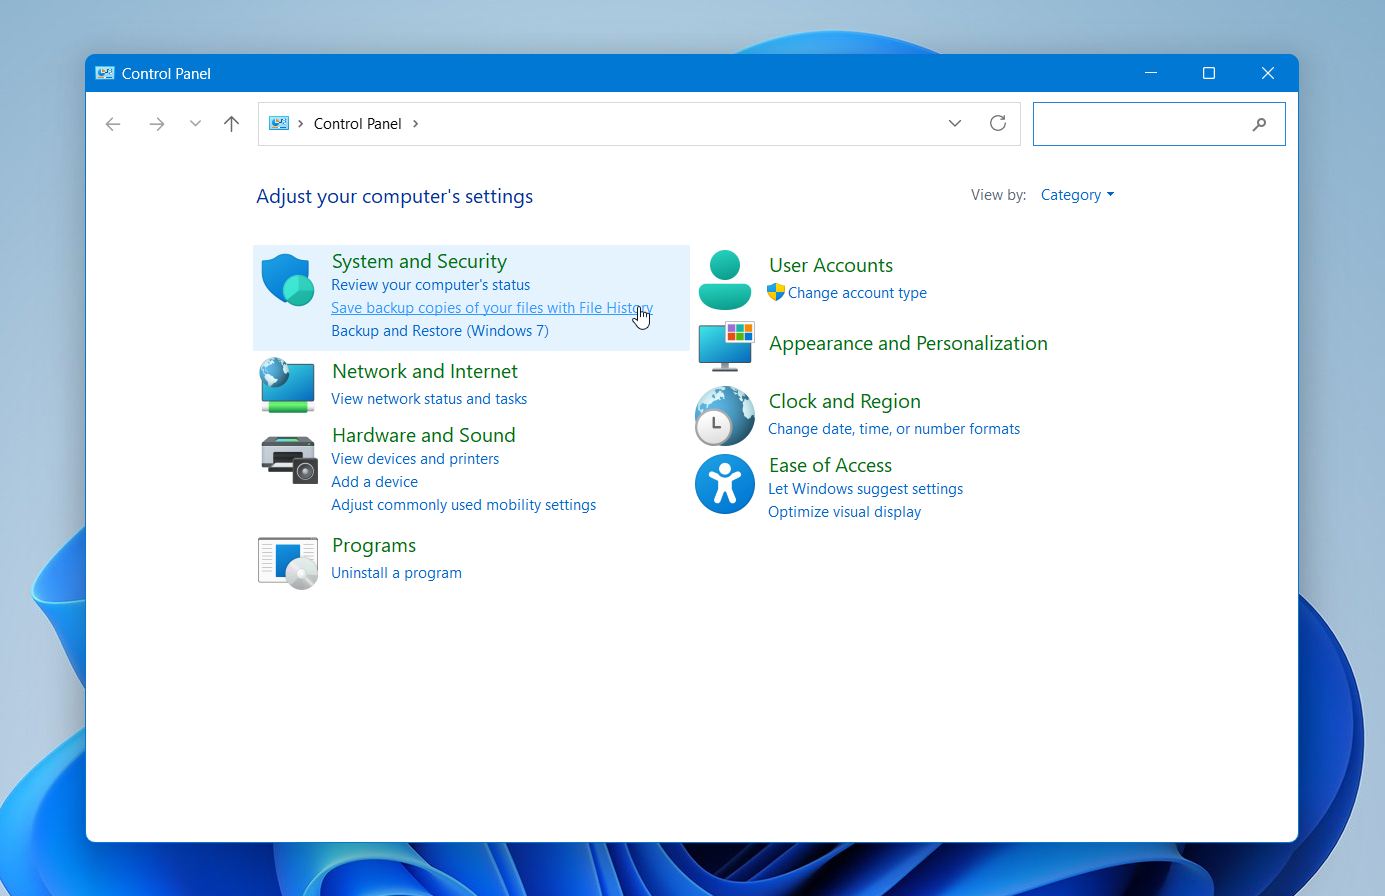
- Click Restore personal files in the left pane.
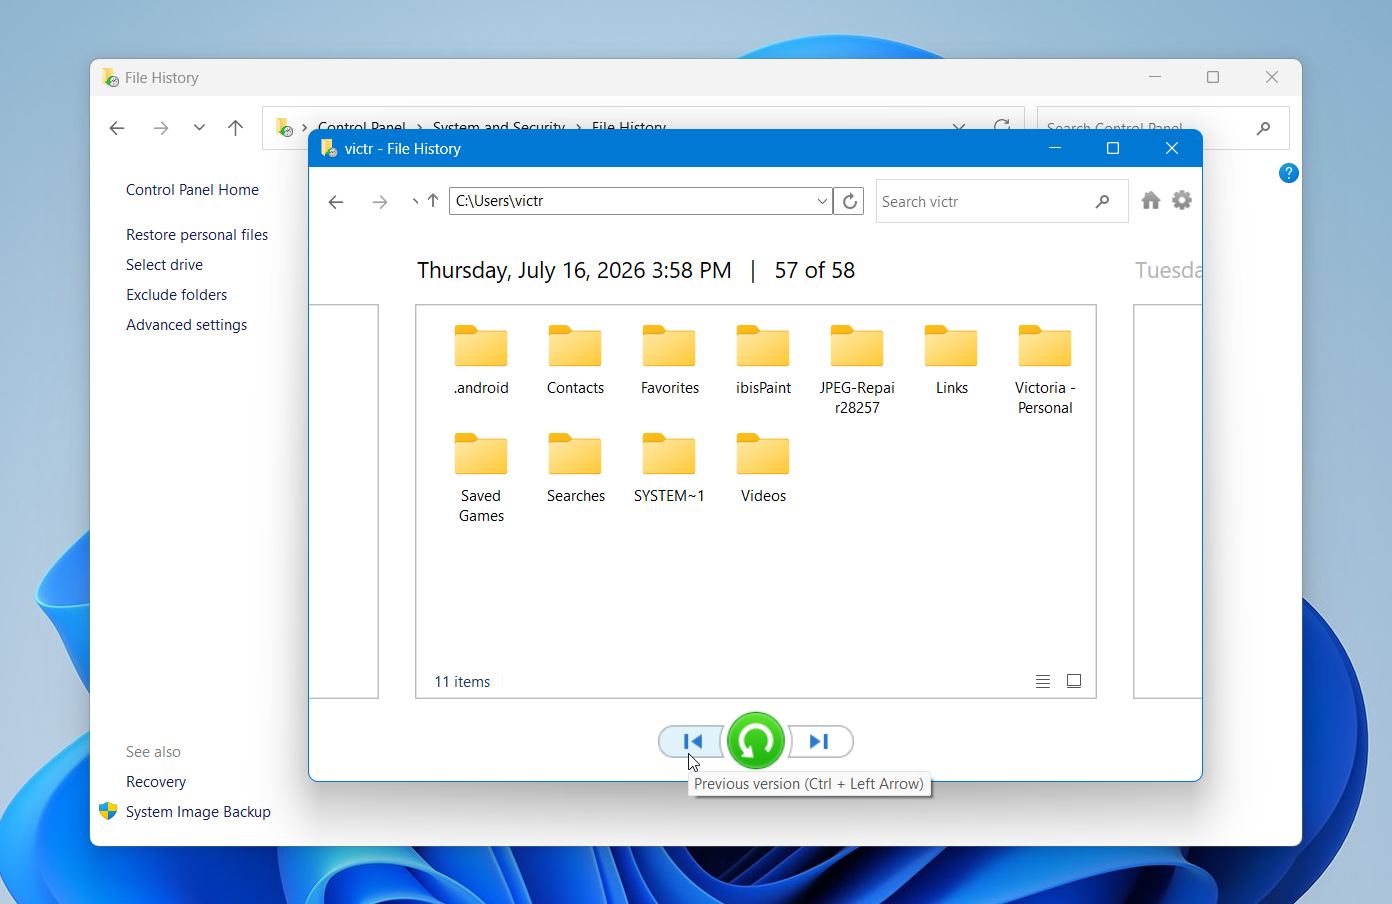
- Browse the available backups and look for your files in folders such as Documents, Desktop, or Pictures. Use the arrows at the bottom of the window to switch between backup dates.
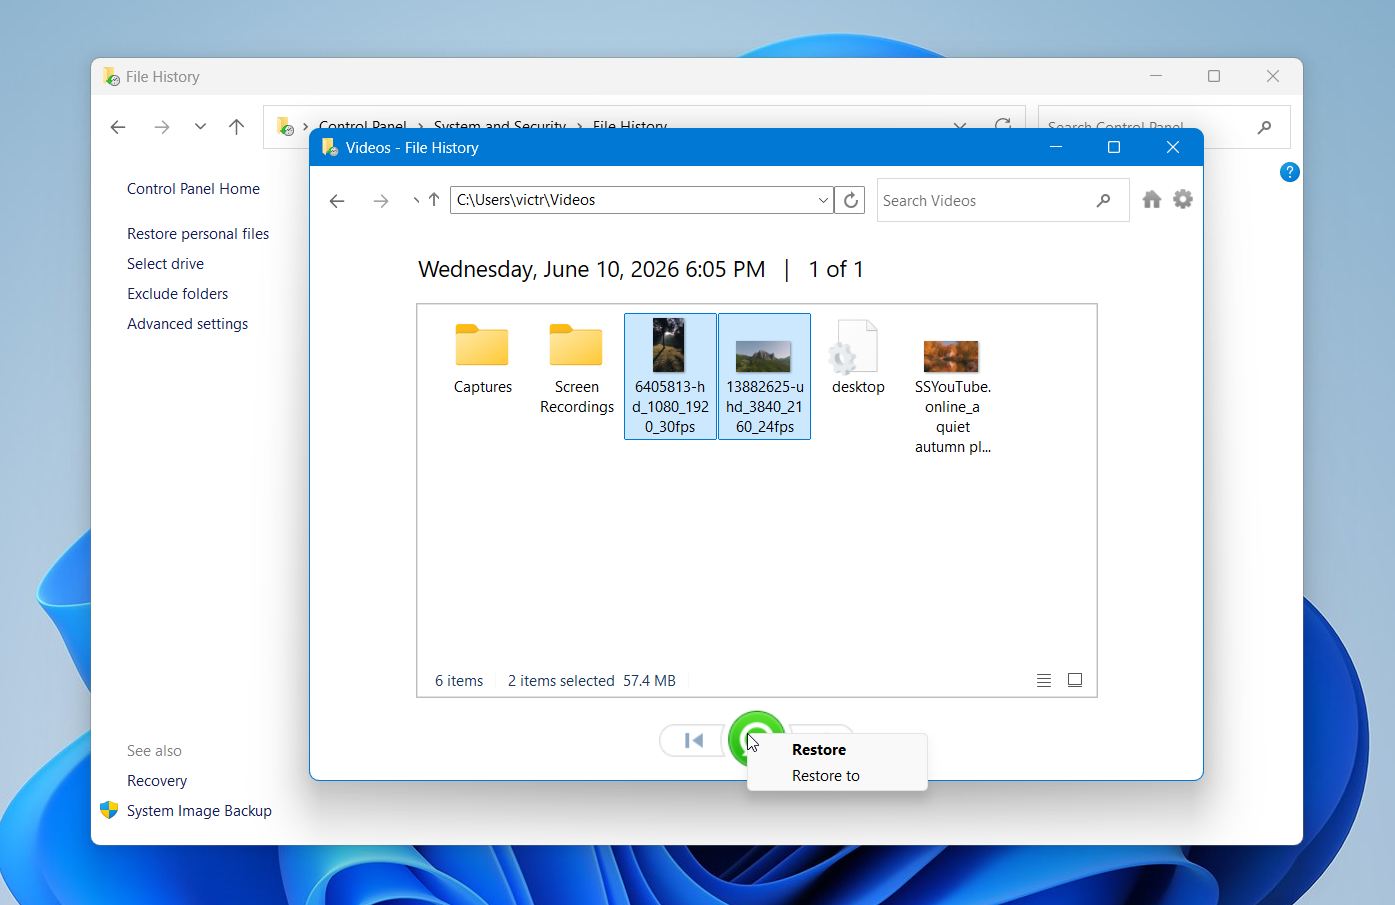
- Select the file or folder you want to restore and click the green Restore button. Windows will return it to its original location. If a file with the same name already exists, you’ll be able to replace it, keep both copies, or skip the restore.
If you can’t find the files in File History or never enabled it before the deletion, go back to Method 1 or move on to the next one.
If your USB flash drive has physical damage, isn’t recognized by any computer, disconnects constantly, or can’t be scanned with recovery software, consider a professional data recovery lab. Look for a reputable service that offers a free evaluation, clear pricing, and a No Data – No Charge policy. Professional recovery can cost several hundred dollars or more, so it generally makes the most sense when the drive has hardware problems or other issues that prevent software-based recovery.
Method 3: Try Windwows File Recovery
If you prefer a free Microsoft tool, you can try Windows File Recovery. It’s a command-line utility for Windows 10 and Windows 11 that can recover deleted files from USB flash drives, external drives, and internal storage.
Unlike Disk Drill, Windows File Recovery doesn’t have a graphical interface. You’ll need to enter a recovery command manually, so it takes a little more effort to use. Still, it’s a useful option if you don’t mind working in Terminal or Command Prompt.
Here’s how to use it:
- Download Windows File Recovery from the Microsoft Store and install it.
- Connect the USB flash drive that contained your deleted files and check its drive letter in File Explorer. For example, it may appear as E:.
- Connect another drive that will hold the recovered files. For example, we’ll use D:.
- Open Windows Terminal or Command Prompt as administrator.
- Enter a command using the following format:
winfr source-drive: destination-drive: /regular. For example:winfr E: D: /regular. - Press Enter, then confirm when Windows File Recovery asks whether you want to continue.
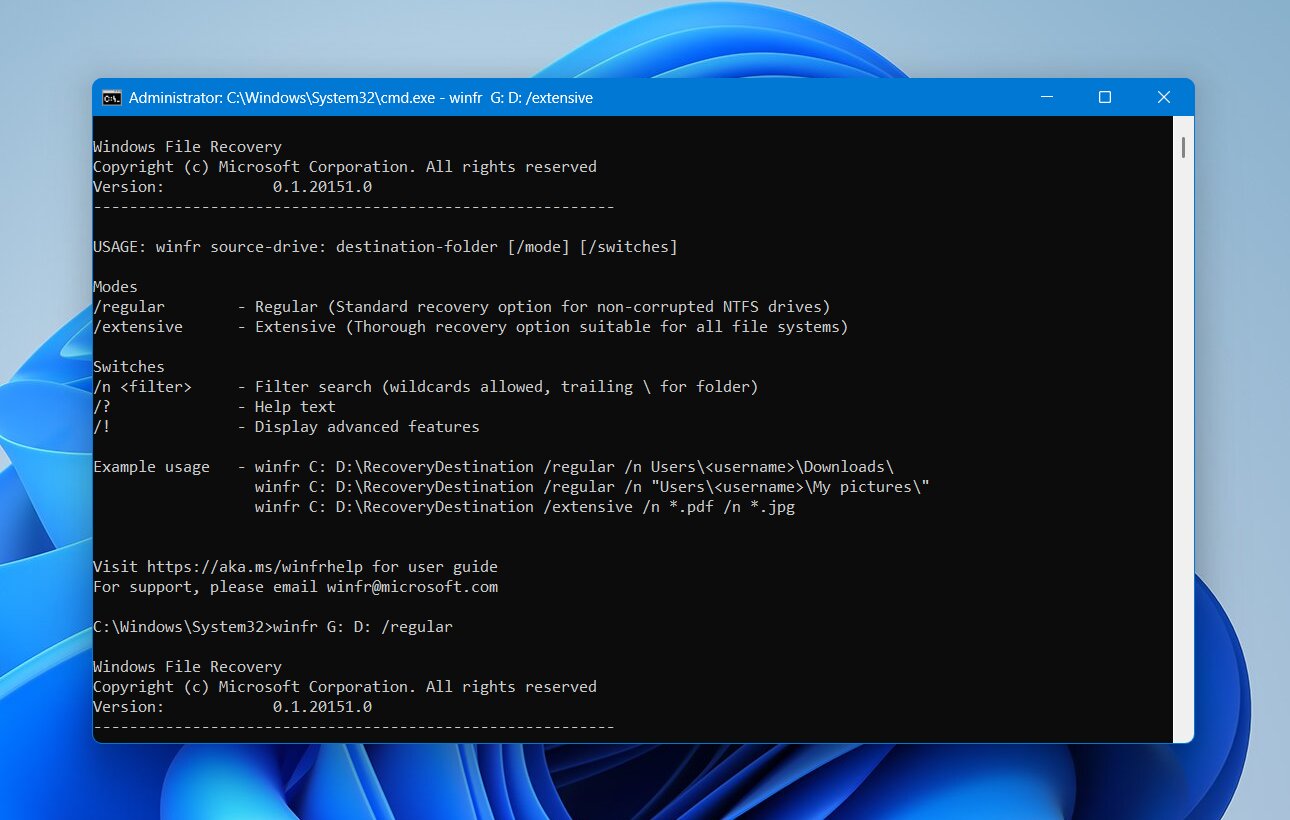
- Let the scan finish. The tool will create a recovery folder on the destination drive where you can check the files it managed to restore.
- If Regular mode doesn’t find the files you need, try Extensive mode, which performs a more thorough search:
winfr E: D: /extensive.
Windows File Recovery is worth a try, but it has some limitations. There’s no visual file browser or preview feature, and the commands can feel less intuitive than graphical recovery software.
Final Notes
Deleted files don’t always mean lost files. If you act quickly and avoid writing new data to the USB drive, you often have an excellent chance of getting your files back. Disk Drill is our top recommendation because it combines powerful recovery algorithms with an easy-to-use interface, supports virtually all common USB file systems, and performs well across the most common data loss scenarios.
If software can’t access the drive because of physical damage or hardware failure, don’t keep experimenting with different fixes. A professional data recovery service offers the best chance of recovering your files in those situations.
If you’d like to see how these methods work in real life, visit our forum. You’ll find real recovery stories, troubleshooting discussions, and advice from people who’ve successfully recovered files from USB flash drives, SD cards, external drives, and other storage devices.
FAQ:
- 8–32 GB drives in about 5–15 minutes.
- 64–256 GB drives in roughly 15–30 minutes.
- 512 GB–1 TB drives may take 40 minutes to an hour or longer, especially if they contain many files.