


External hard drives offer a great way to extend the storage capabilities of your computer or share data with other users. However, they are just as susceptible to data loss as any other type of disk-based storage media. But lost or deleted files can often be recovered. Start by checking simple recovery options first, such as the Recycle Bin or available backups (if you have them), and then use data recovery software.
In this article, we’ll show you how to recover deleted files from external hard drive using several different methods, from built-in Windows recovery options to specialized data recovery software.
Before you start: Once you notice that files are missing, stop using the external hard drive until you’re ready to recover them. Don’t format the drive, copy or save new files to it, or install recovery software on the same drive. Any of these actions can overwrite recoverable data and reduce your chances of getting the deleted files back.
Which External Hard Drive Recovery Method Should You Use?
The right recovery method depends on what happened to your files. In some cases, you may be able to restore them with a built-in Windows feature, while deleted or formatted data usually requires specialized software. Use the table below to find the method that best matches your situation.
| What happened to your files? | Recovery chances | Recommended method |
| You deleted the files and the external hard drive is still connected | High | Check the Recycle Bin first. If the files are there, you can restore them without recovery software. |
| You deleted the files and have since disconnected the external hard drive | High | Use data recovery software to scan the drive for deleted files. |
| You deleted the files with Shift + Delete | High | The files bypass the Recycle Bin, so use data recovery software. |
| You quick-formatted the external hard drive | Moderate to high | Stop using the drive and scan it with data recovery software. |
| You deleted a partition | High | Use a partition recovery tool designed to locate and restore lost partitions. |
| You performed a full format | None | Recovery is generally not possible because a full format overwrites the volume with zeros. |
| Windows asks you to format the drive or the drive appears as RAW | Moderate to high | Do not format it yet. Follow our guide on how to recover data from a corrupted hard drive. |
| The external hard drive is physically damaged, makes unusual noises, disconnects repeatedly, or is no longer detected | Unpredictable | Stop using the drive and contact a professional data recovery service. Avoid further DIY recovery attempts, as they may make the damage worse and reduce the chances of successful recovery. |
Note: This table doesn’t cover cases where you already have a backup of the lost files. If you do, you likely already know how to use it to restore the files to your external hard drive, so there’s no need to go through the recovery methods below.
How to Recover Data from an External Hard Drive
Now, let’s move on to external hard drive recovery methods available to you. We’ve arranged them in the same order as in the table above. If you’ve already assessed your situation and identified the right method, you can jump straight to it. If you’re not sure which one applies, we recommend trying the methods in order until you find one that works.
Method 1: Check the Recycle Bin
If you deleted the files normally while the external hard drive was connected to your Windows computer, check the Recycle Bin first. Depending on how the drive and Recycle Bin are configured, Windows may move deleted files there instead of removing them immediately.
Note: This method won’t help if you used Shift + Delete, emptied the Recycle Bin, or the files otherwise bypassed it.
Here’s how to check the Recycle Bin and restore your files:
- Keep the external hard drive connected to your computer.
- Open the Recycle Bin from the desktop.
- Look for the files or folders deleted from your external hard drive. You can use the search bar if there are many items in the Recycle Bin.
- Select the files you want to recover, right-click them, and choose Restore.
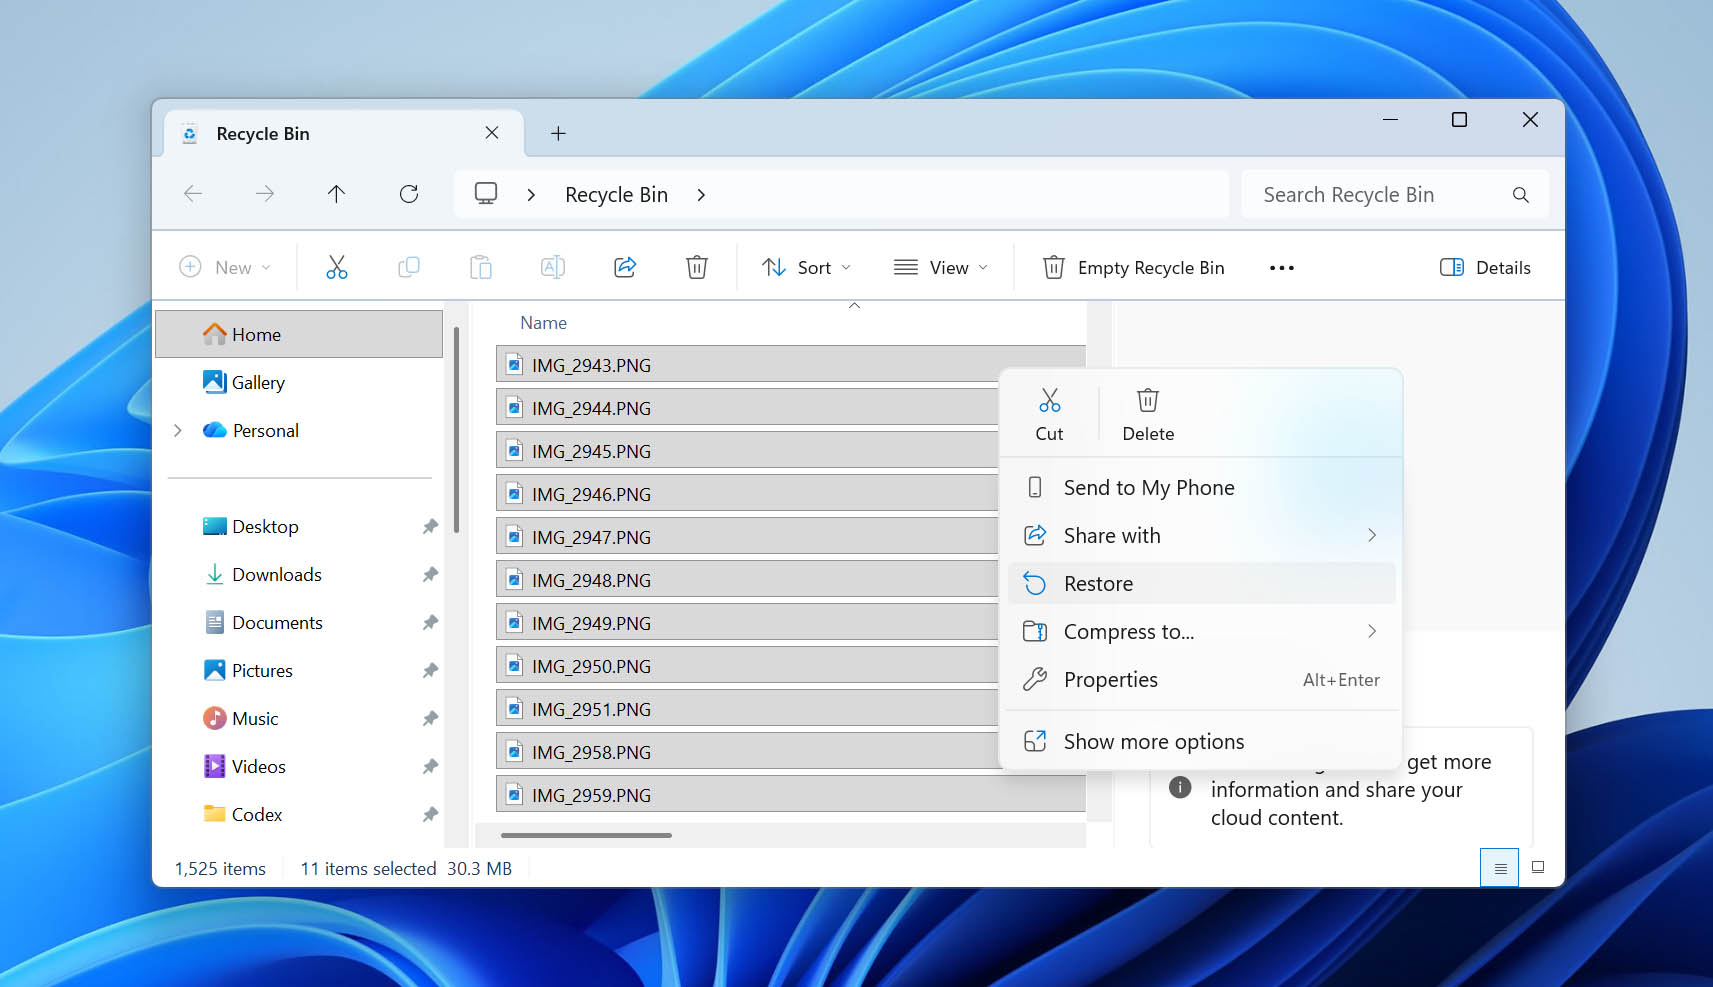
- Windows will restore the files to their original location on the external hard drive.
Method 2: Recover Data from an External Hard Drive with Data Recovery Software
When a file is deleted from an external hard drive, its data usually isn’t erased immediately. Instead, the file system marks the space it occupied as available for new data. Until that space is overwritten, data recovery software may be able to locate the deleted file and restore it.
This is why it’s important to stop using the external hard drive as soon as you notice that files are missing. The more new data you write to it, the greater the chance that deleted files will be partially or completely overwritten.
Below, we’ll show you how to recover deleted files with Disk Drill, followed by Windows File Recovery as a free alternative.
Option 1: Use Disk Drill
Over the years, our team has tested a lot of data recovery programs, and lately, we keep coming back to Disk Drill. It combines ease of use with strong recovery capabilities and can work with corrupted or otherwise problematic storage devices, so recovering files that were simply deleted from an external hard drive is well within its capabilities.
Disk Drill supports nearly all major file systems commonly found on external hard drives, including FAT16, FAT32, exFAT, NTFS, HFS, and others. It can recover hundreds of file types, from documents and photos to videos and archives, and lets you preview recoverable files before you decide what to restore.
- Download and install the program on your Windows machine. Since you are recovering data from an external hard drive you can install the program on your computer’s main hard drive.
- Connect the external hard drive to your machine and launch Disk Drill.
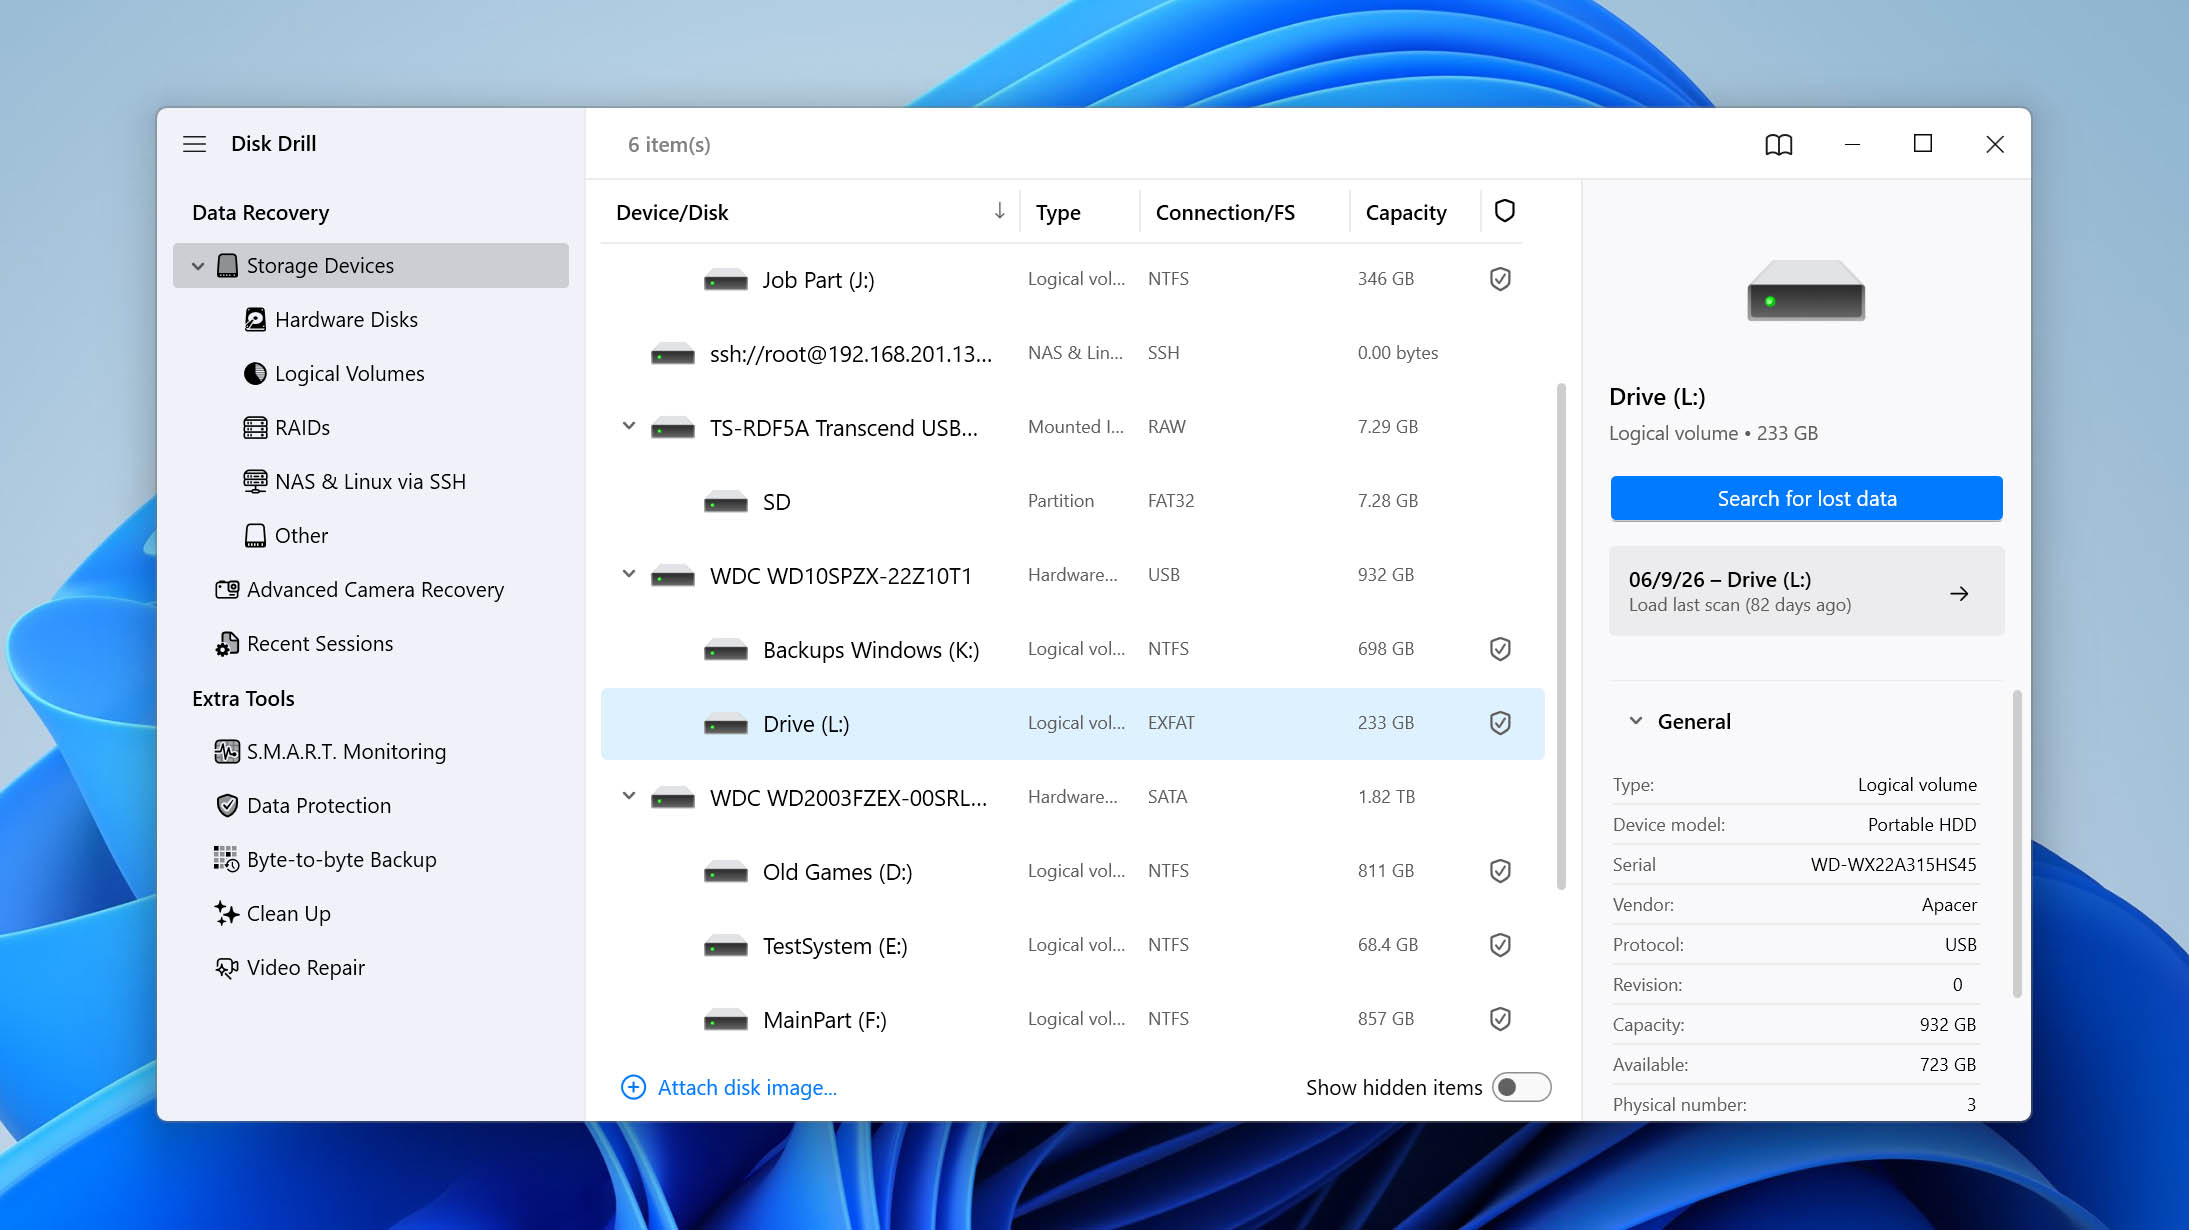
- Select the external drive from the app’s list of available disks. Click on Search for lost data.
- Disk Drill will ask you to choose a scan type. Select Universal Scan for regular external hard drive recovery. Advanced Camera Recovery is designed primarily for fragmented video files from SD cards used in cameras and drones.
If your external hard drive contains this type of footage and Universal Scan doesn’t recover it as expected, you can run Advanced Camera Recovery as a second scan.
- Wait for the scan to finish, then click Review found items.
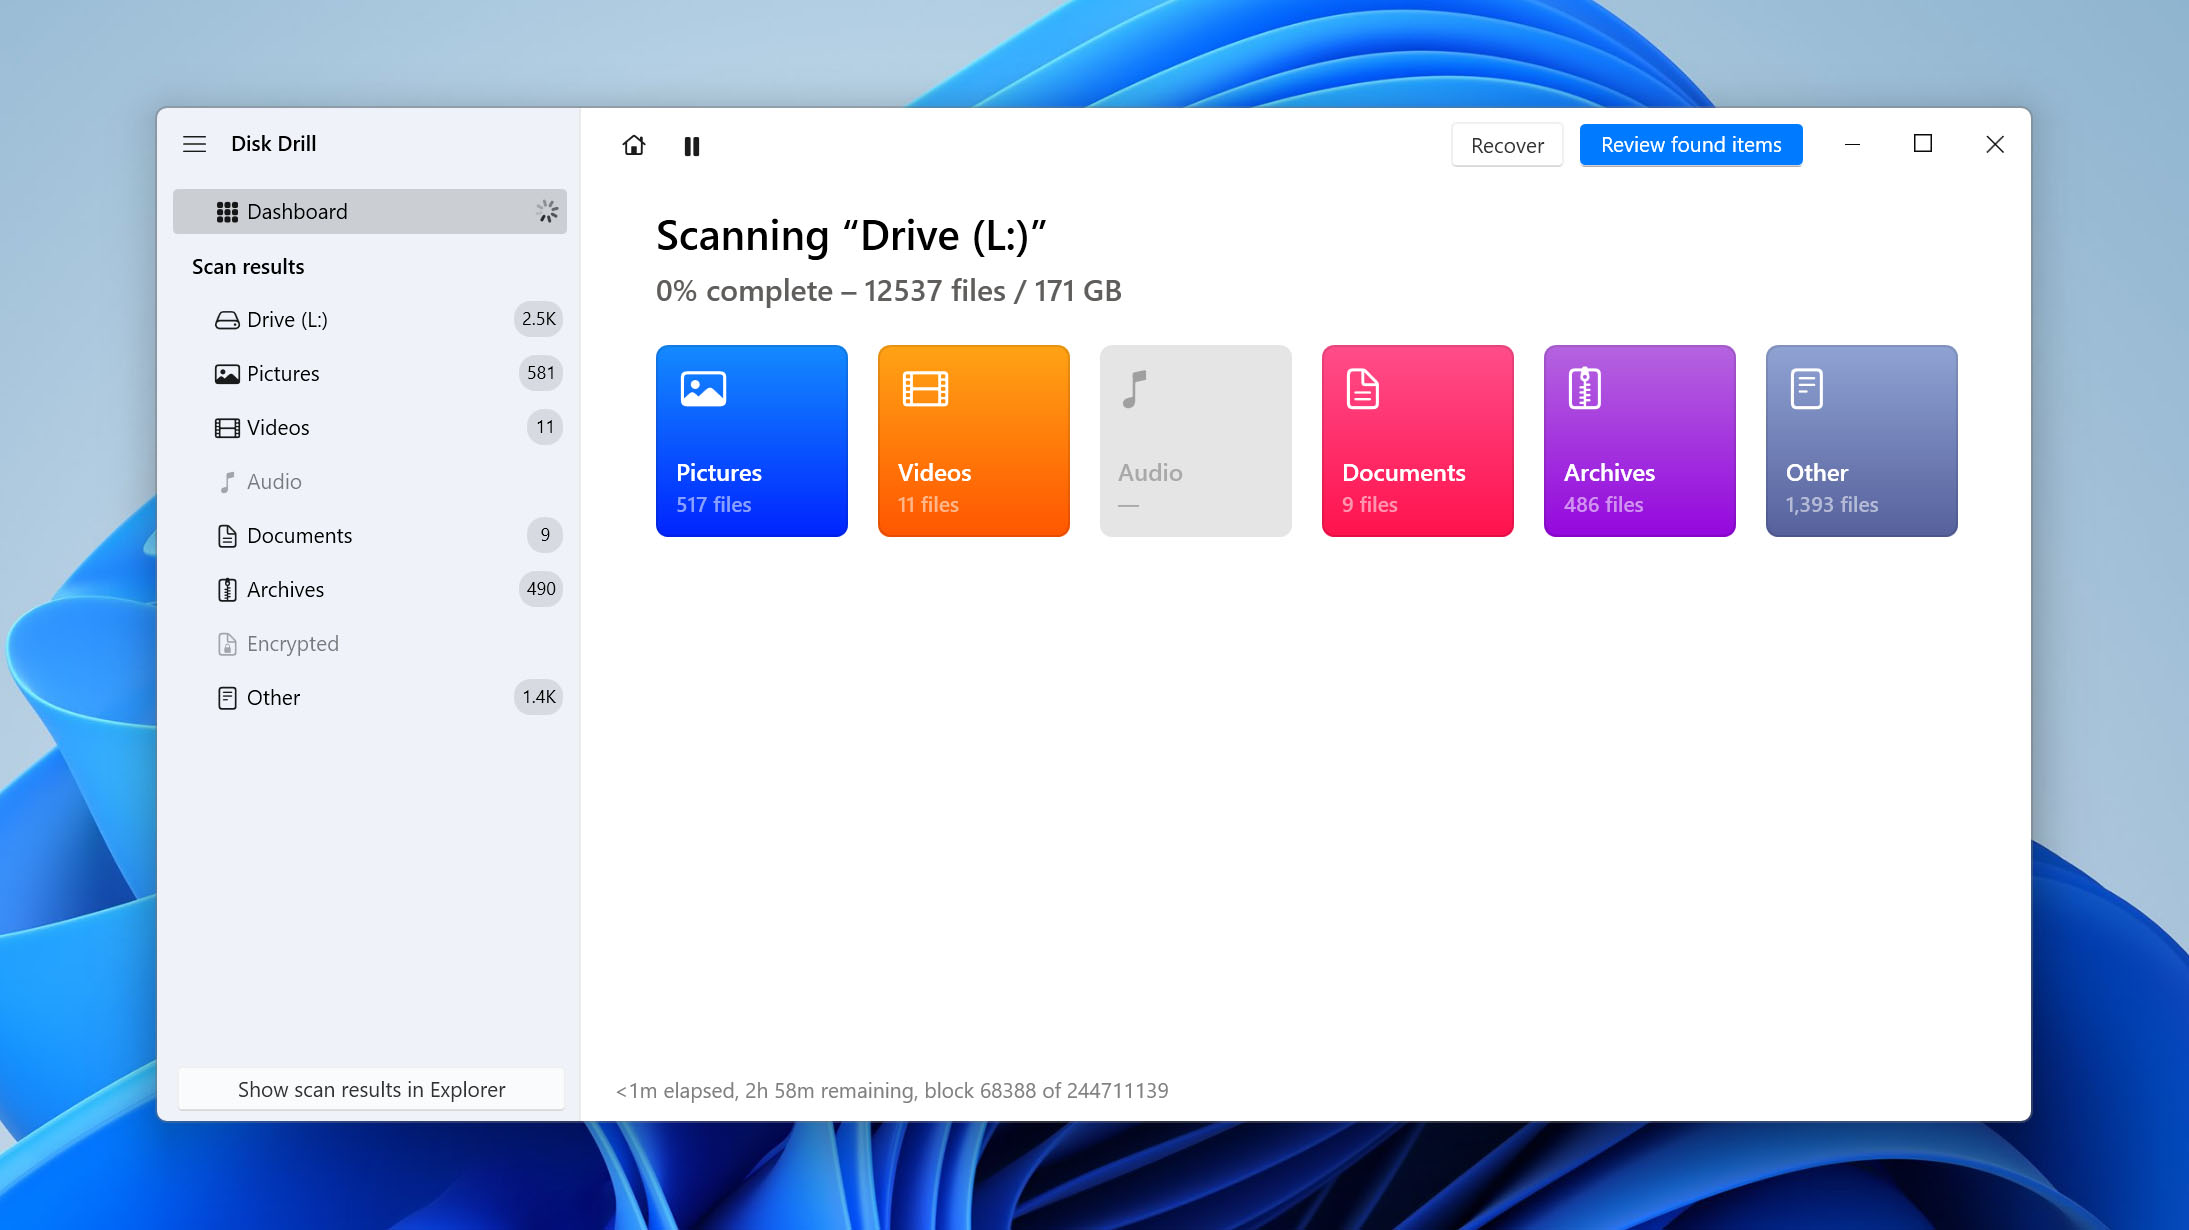
- Preview the files Disk Drill found and select the ones you want to restore. Previewing important files can also help you check whether they are intact before recovery.
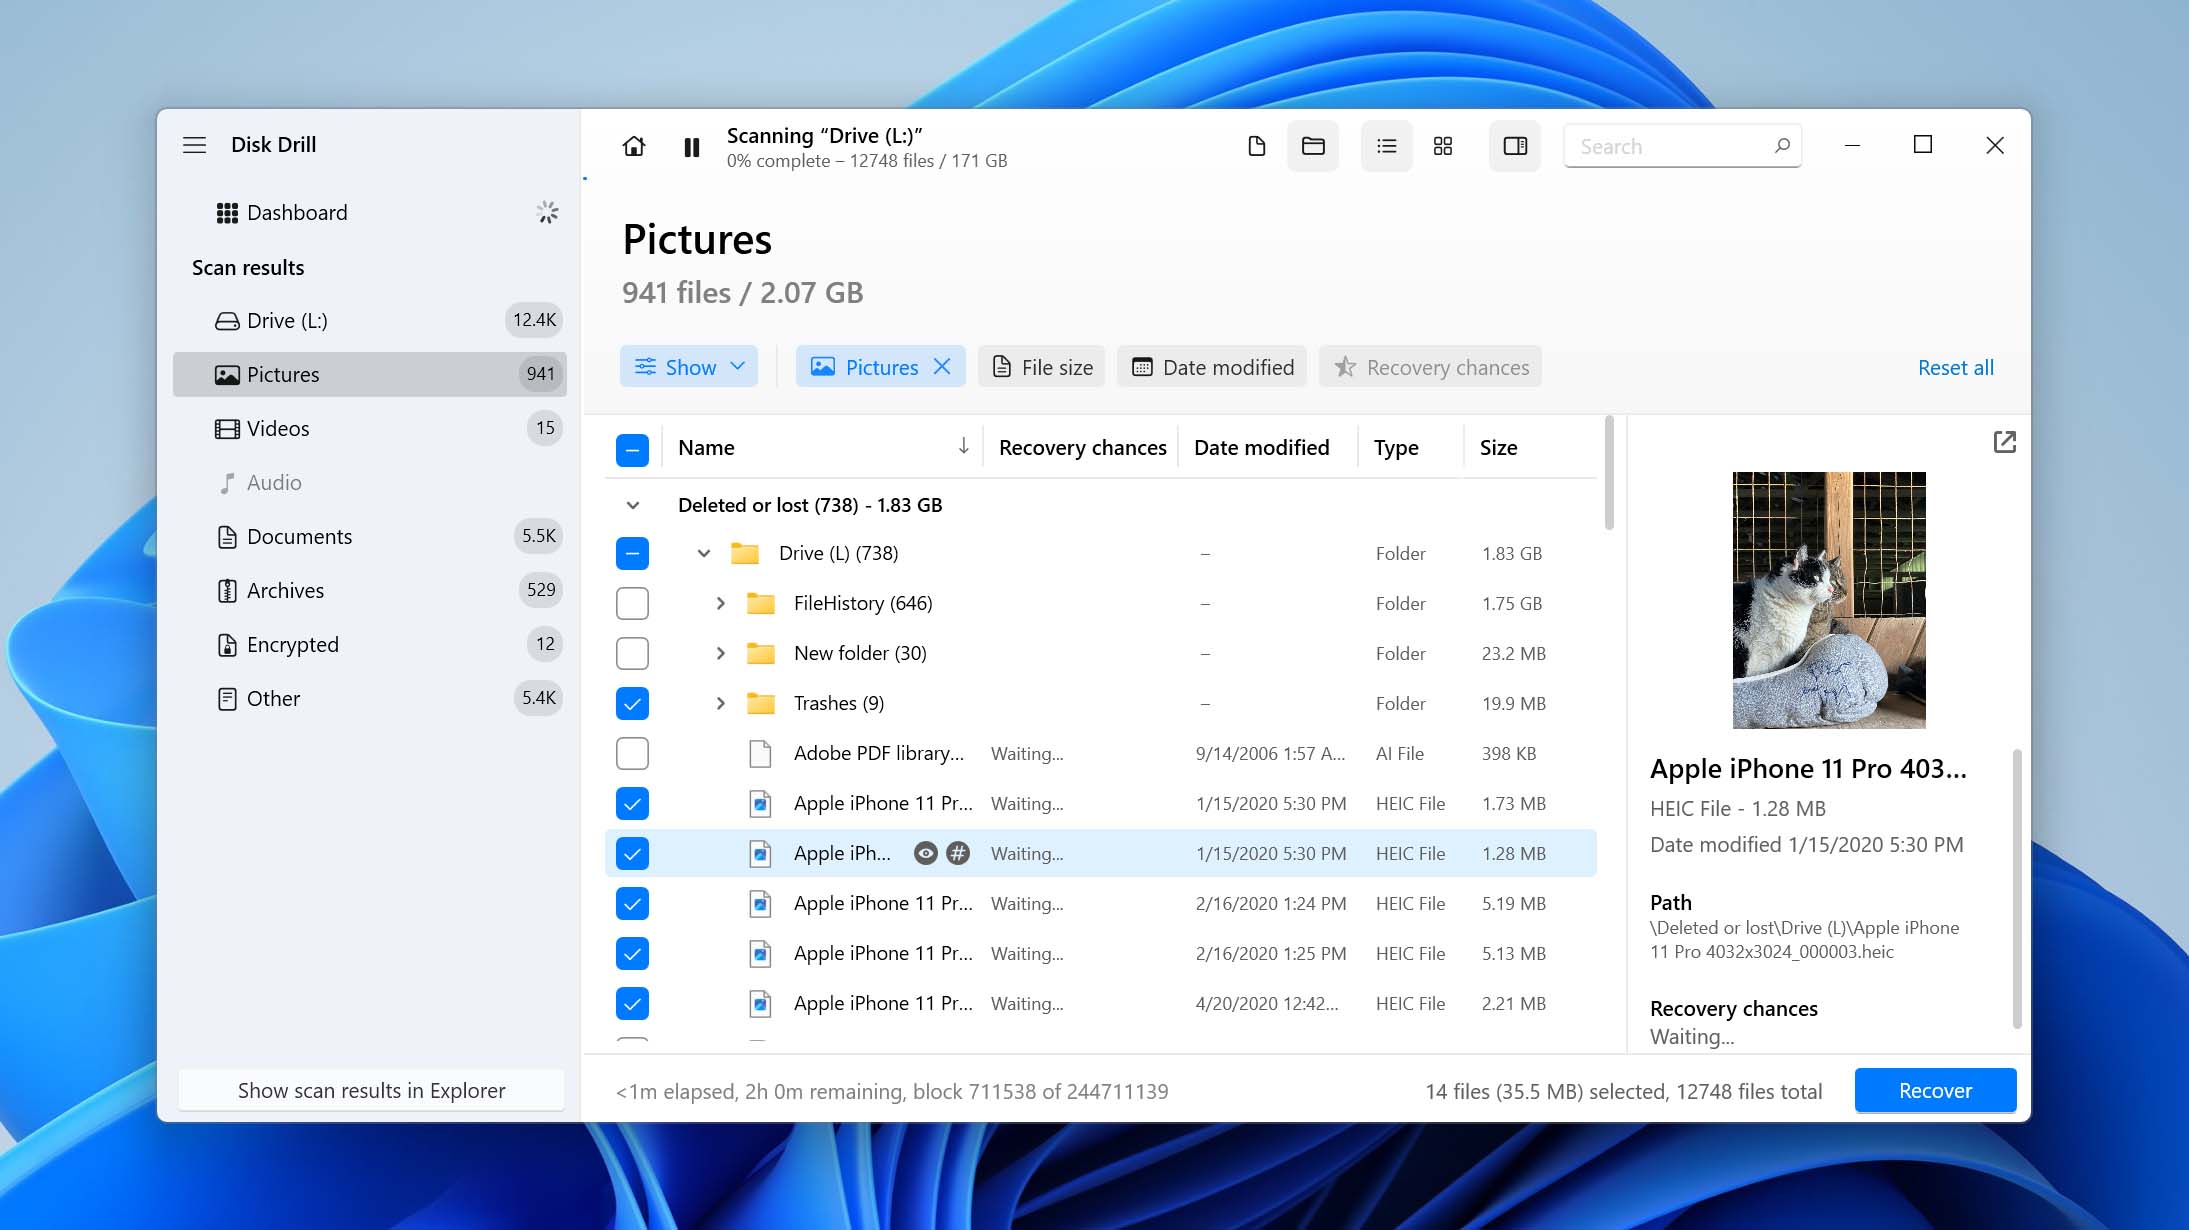
- Click Recover, choose a storage location for the recovered files, and click Next. Don’t save the files back to the same external hard drive, as writing new data to it may overwrite other recoverable files.
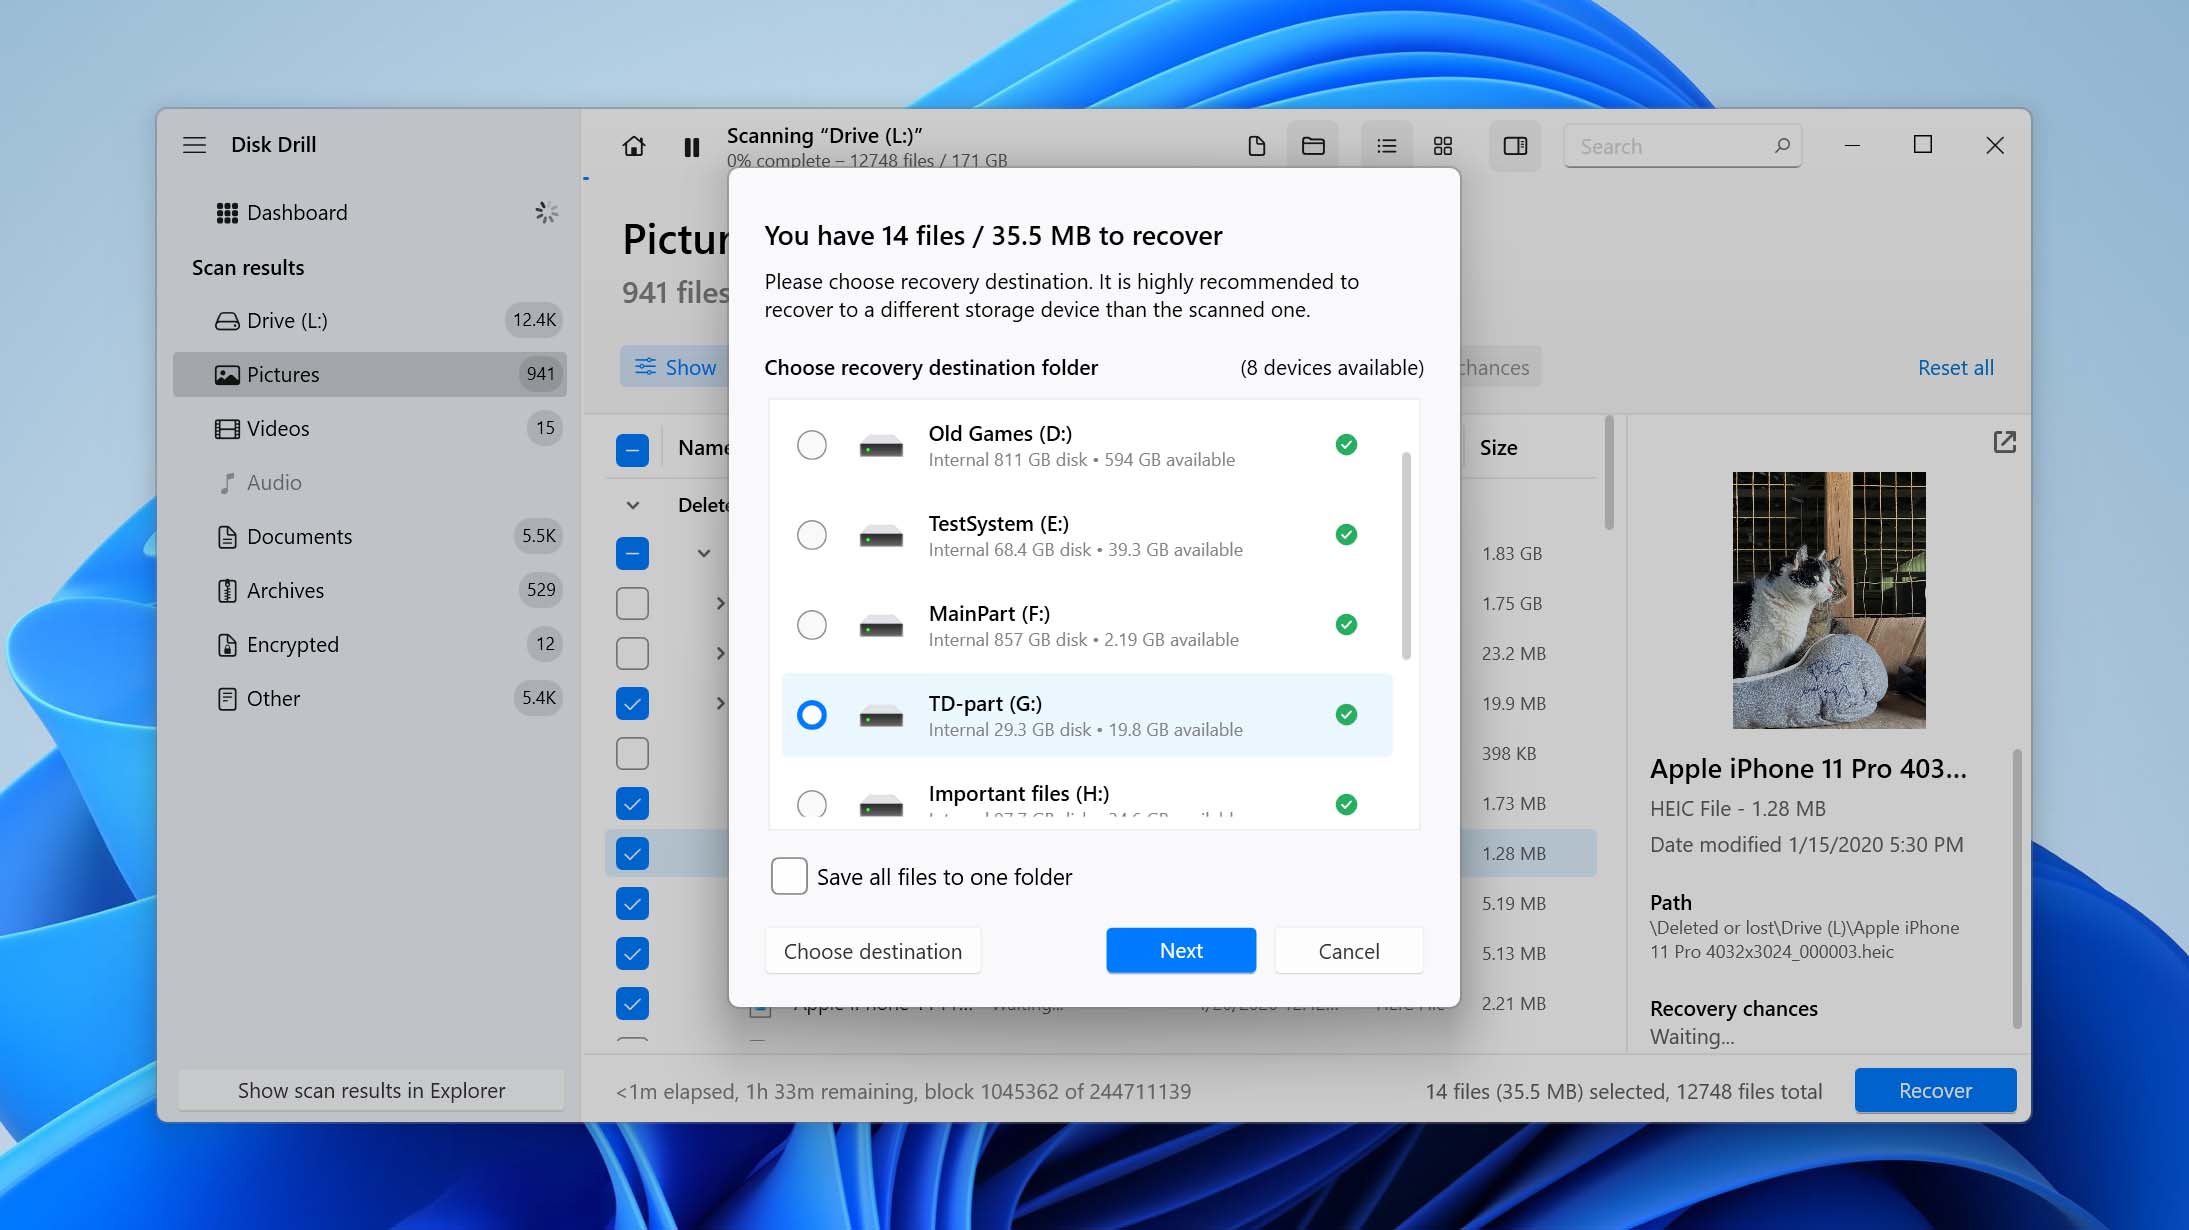
That’s all there is to it. In the space of a few clicks, you can restore data that has disappeared from an external hard drive.
Advanced Camera Recovery is just one of Disk Drill’s standout features. The program also includes tools for creating a byte-to-byte image of a drive, checking its S.M.A.R.T. data, and more. If you’re interested in what else it can do, check out our full Disk Drill review, where we cover each feature separately. And if you want to see how it compares with other recovery tools, take a look at our list of the best data recovery software.
Option 2: Use Windows File Recovery App
If you’d rather start with a free option, you can try Windows File Recovery. We included it because it’s Microsoft’s own data recovery tool for Windows and can recover deleted files from external hard drives, USB drives, and other storage devices.
The main drawback is that Windows File Recovery has no graphical interface. Everything is done through Windows Terminal or Command Prompt using commands, and there’s no built-in file preview to check the files before recovery. This makes it less convenient than Disk Drill, particularly when you need to find specific files among a large number of deleted items.
Here’s how to use Windows File Recovery to recover files from an external hard drive:
- Download Windows File Recovery from the Microsoft Store and install it on your computer.
- Connect the external hard drive and note its drive letter in File Explorer. You’ll also need another drive where Windows File Recovery can save the recovered files.
- Open Windows Terminal as administrator. To do this, right-click Start and select Terminal (Admin).
- Enter the recovery command using the following format: winfr source-drive: destination-drive: /regular. For example, if the external hard drive is E: and you want to recover the files to C:, enter: winfr E: C: /regular.
- Press Y when Windows File Recovery asks you to confirm the operation. The tool will scan the external hard drive and copy the files it can recover to a recovery folder on the destination drive.
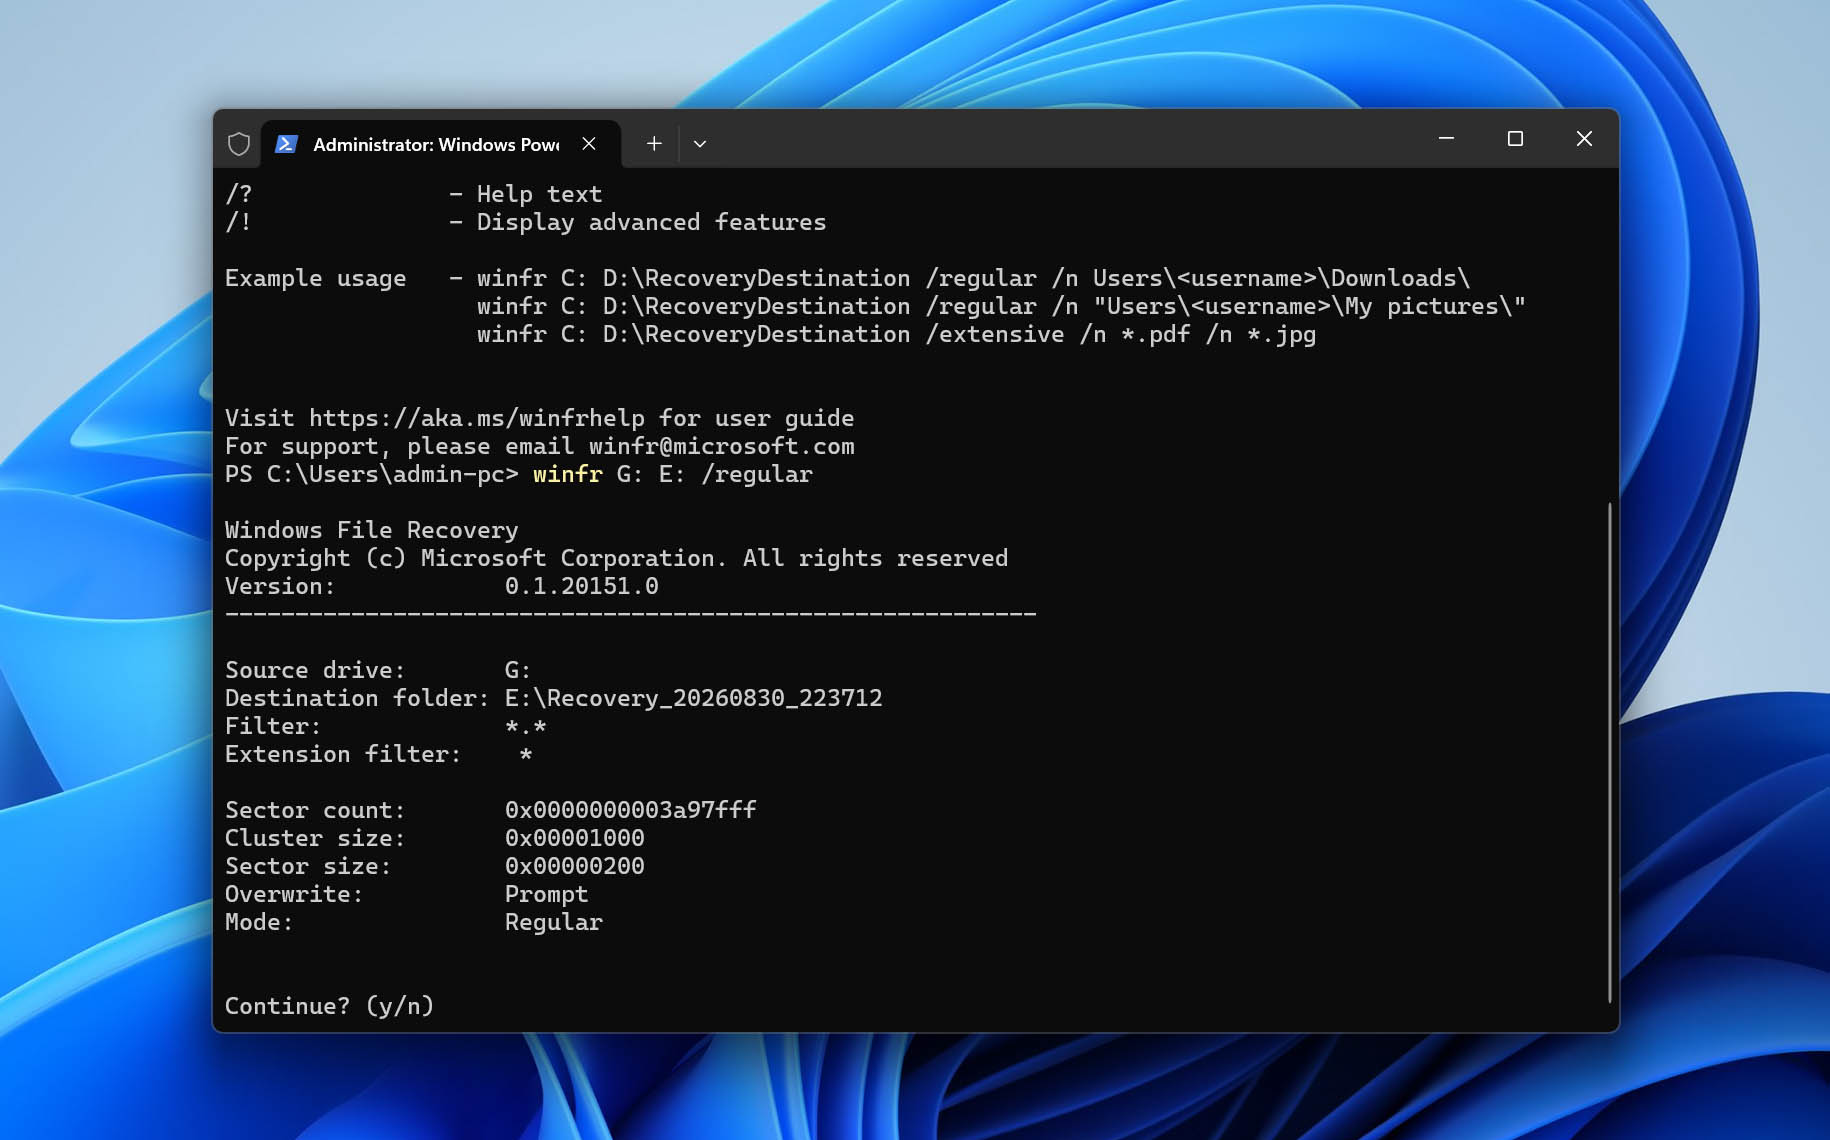
- Once the recovery is complete, open the destination drive and check the recovery folder for your files.
- If Regular mode doesn’t find the files you need, you can run another scan using Extensive mode: winfr E: C: /extensive.
Extensive mode performs a more thorough search and is also the appropriate option when the drive is formatted with a file system other than NTFS. Remember to replace E: and C: with the actual source and destination drive letters on your computer.
Method 3: Recover a Deleted Partition on an External Hard Drive
If your files disappeared because you accidentally deleted an entire partition from the external hard drive, you may be able to recover the partition itself instead of restoring individual files. For this, you can use TestDisk, a free and open-source partition recovery tool.
TestDisk can search a drive for lost partitions and, when enough file system information is still available, restore the deleted partition to the partition table. It uses a text-based interface, so the process is less intuitive. However, it’s completely free and is a good option when the partition itself is what you need to recover.
- Download TestDisk from the official CGSecurity website. Extract the downloaded archive to a folder on your computer. Don’t extract or install anything on the external hard drive you’re trying to recover.
- Connect the external hard drive to your computer. Open the extracted TestDisk folder, right-click testdisk_win.exe, and select Run as administrator.
- TestDisk will ask whether you want to create a log file. Select Create and press Enter.
- You’ll see a list of detected storage devices. Use the arrow keys to select your external hard drive. Check the drive capacity carefully to make sure you’ve selected the correct disk, then choose Proceed.
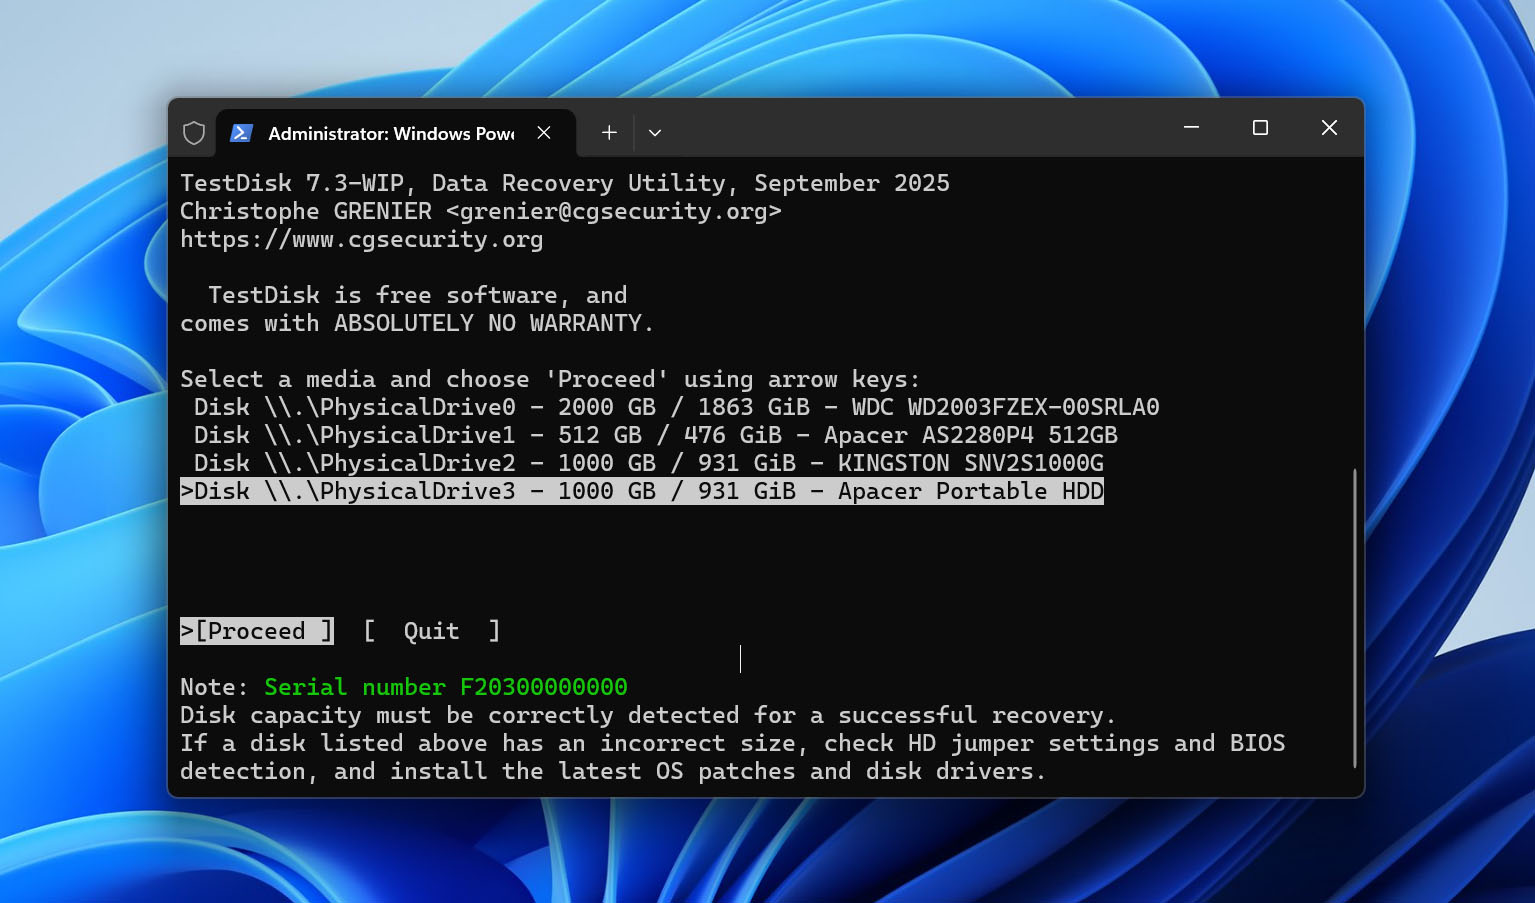
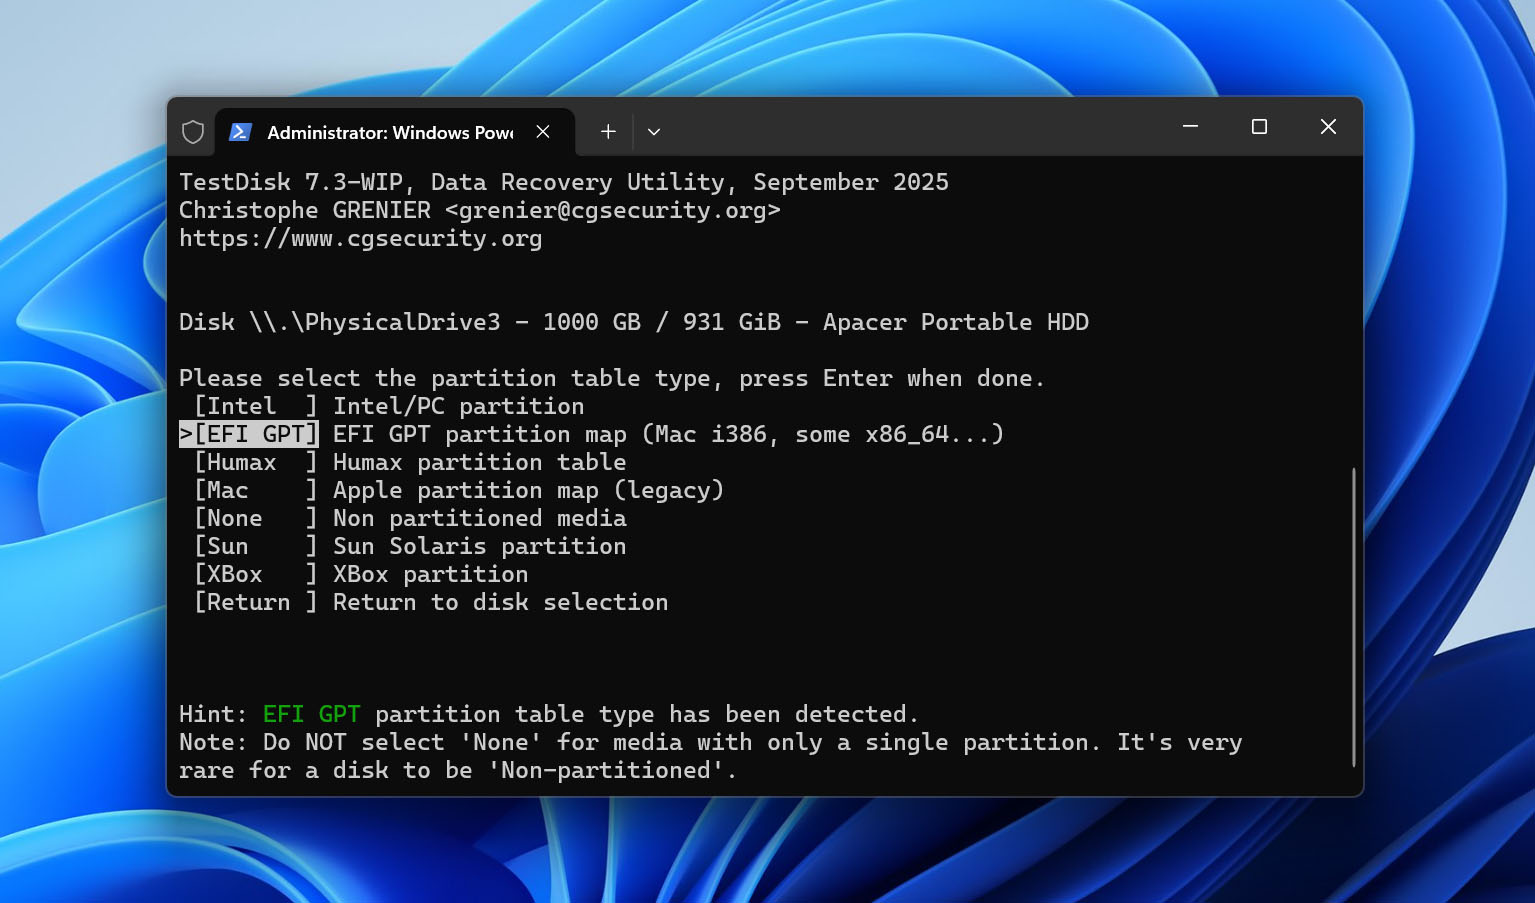
- TestDisk will usually detect the partition table type automatically. Leave the suggested option selected and press Enter. For most modern Windows drives, this will typically be EFI GPT or Intel/PC for drives using an MBR partition table.
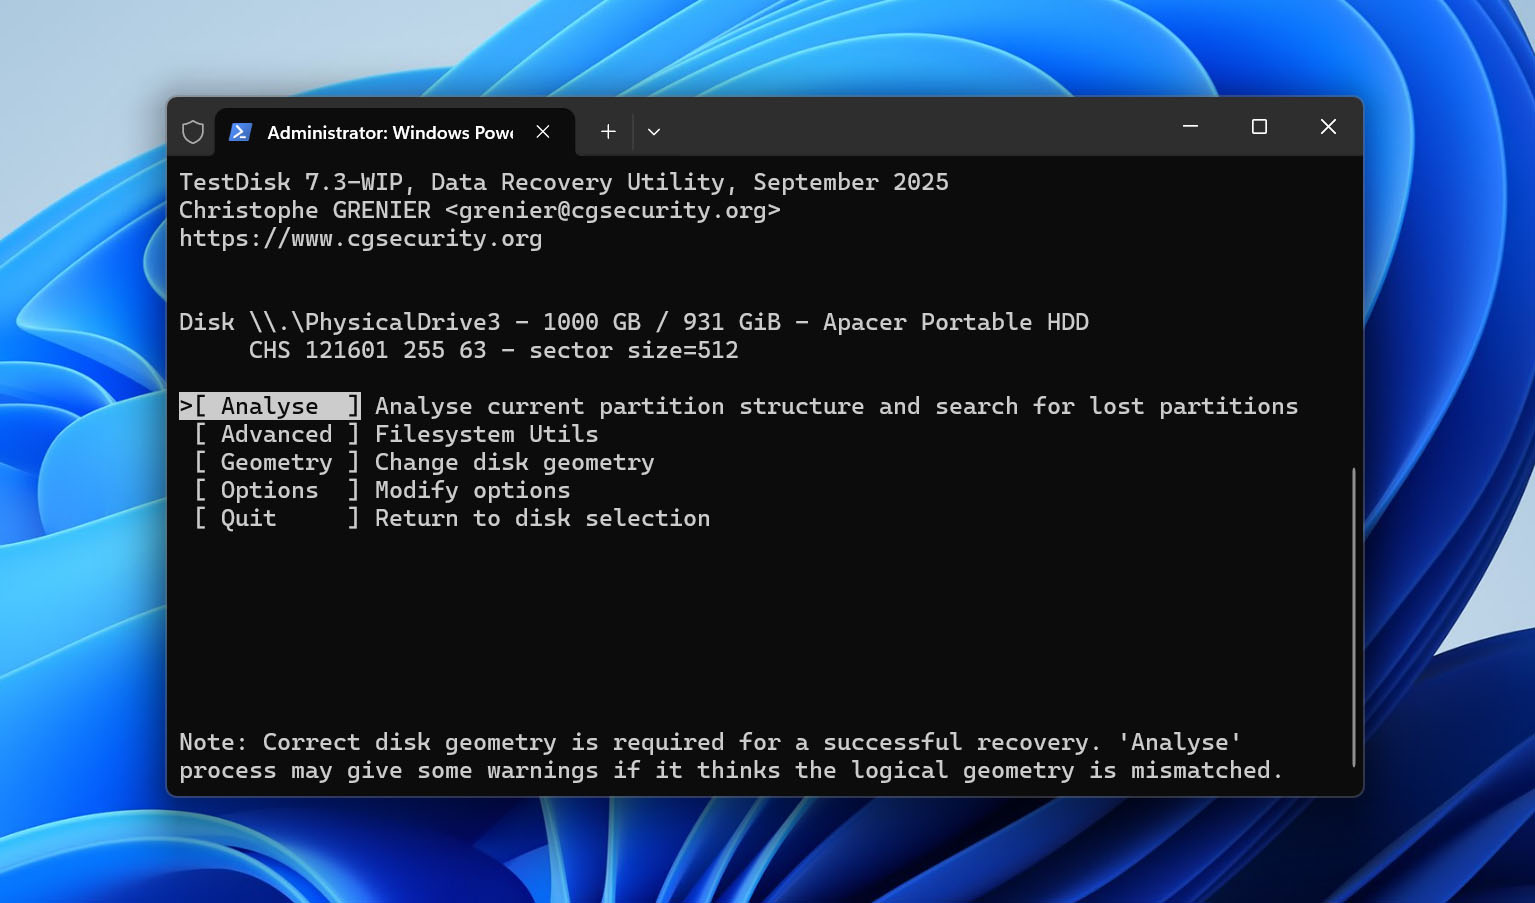
- Select Analyse to examine the current partition structure and search for lost partitions.
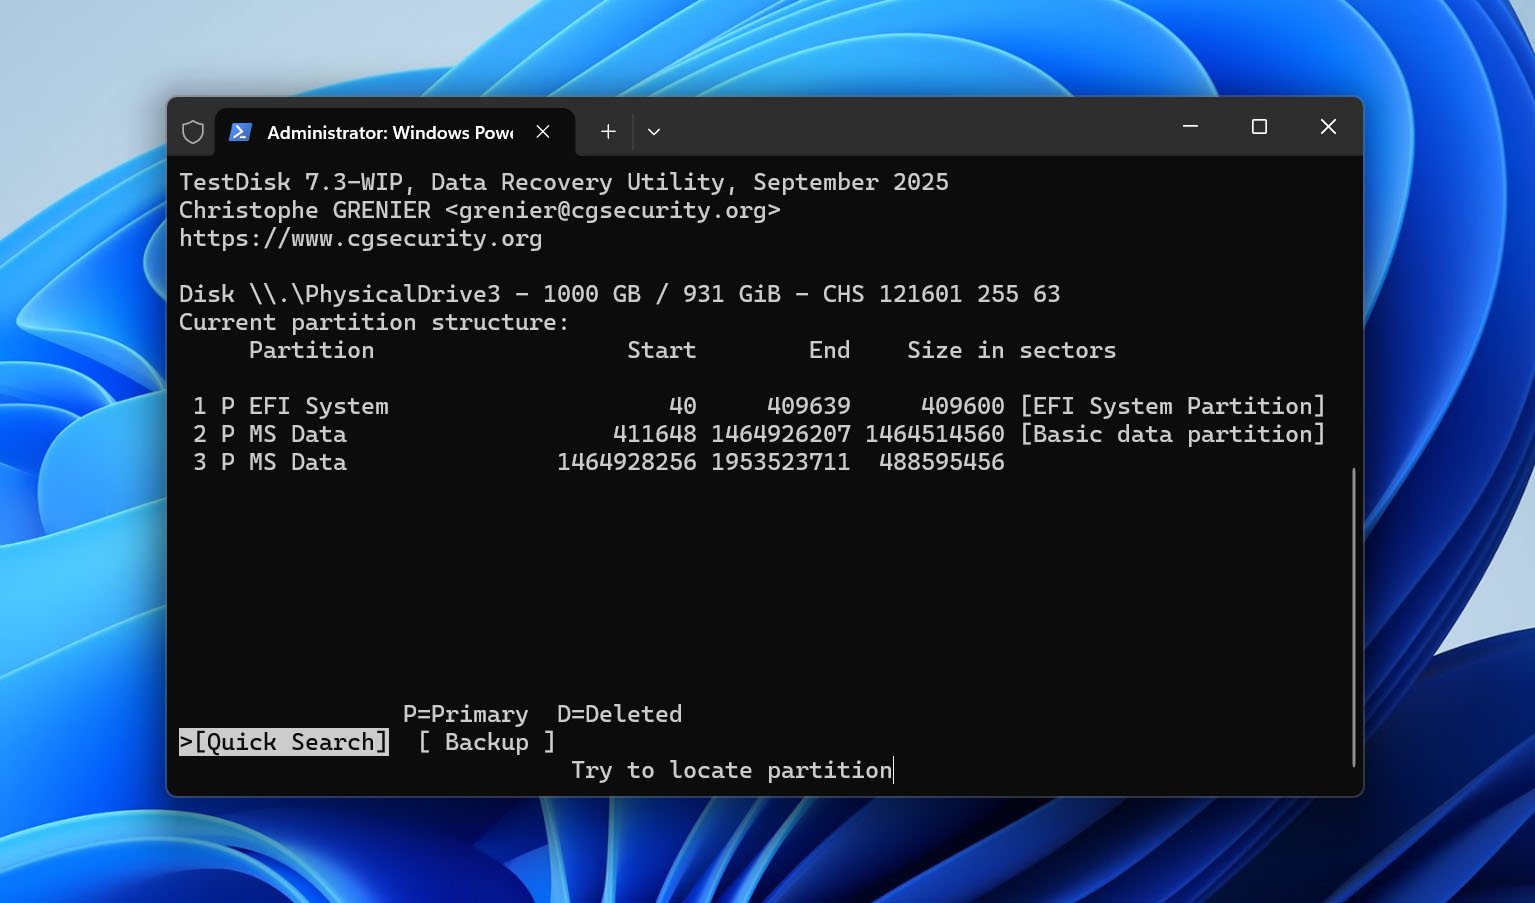
- Select Quick Search and wait while TestDisk scans the external hard drive for partitions.
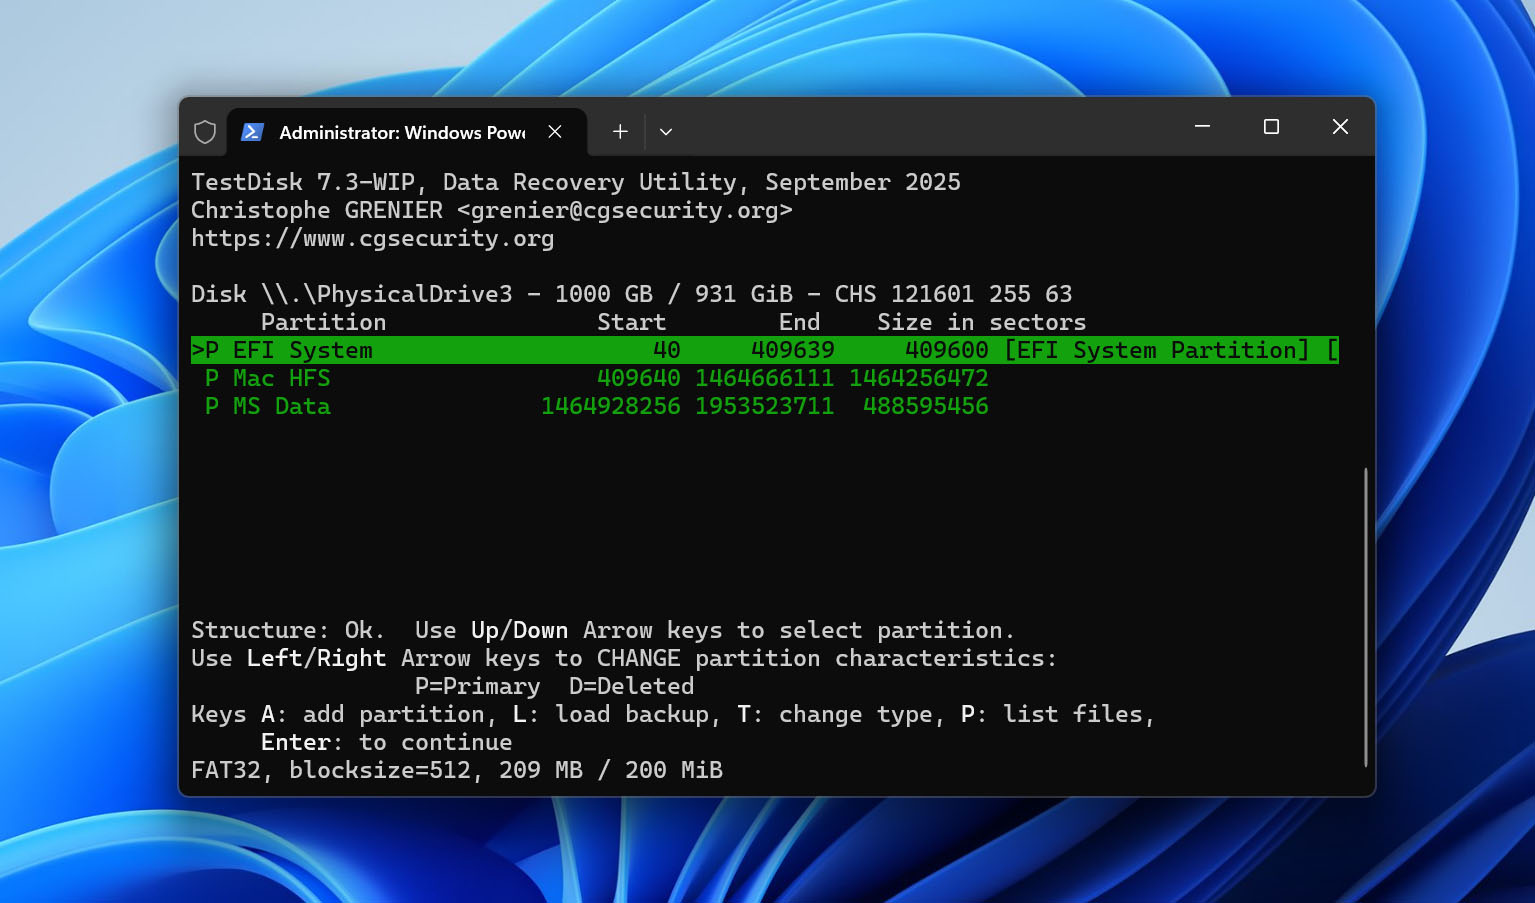
- If your deleted partition appears in the results, highlight it and press P to list its files. Check whether you can see the files and folders you expect. Press Q to return to the partition list.
- If the missing partition doesn’t appear after Quick Search, select Deeper Search. This scan takes longer but can locate partitions that the initial search missed.
- Once you’ve identified the correct partition and verified its contents, make sure its partition type/status is correct. Then press Enter, select Write, and confirm with Y to write the recovered partition structure to the drive.
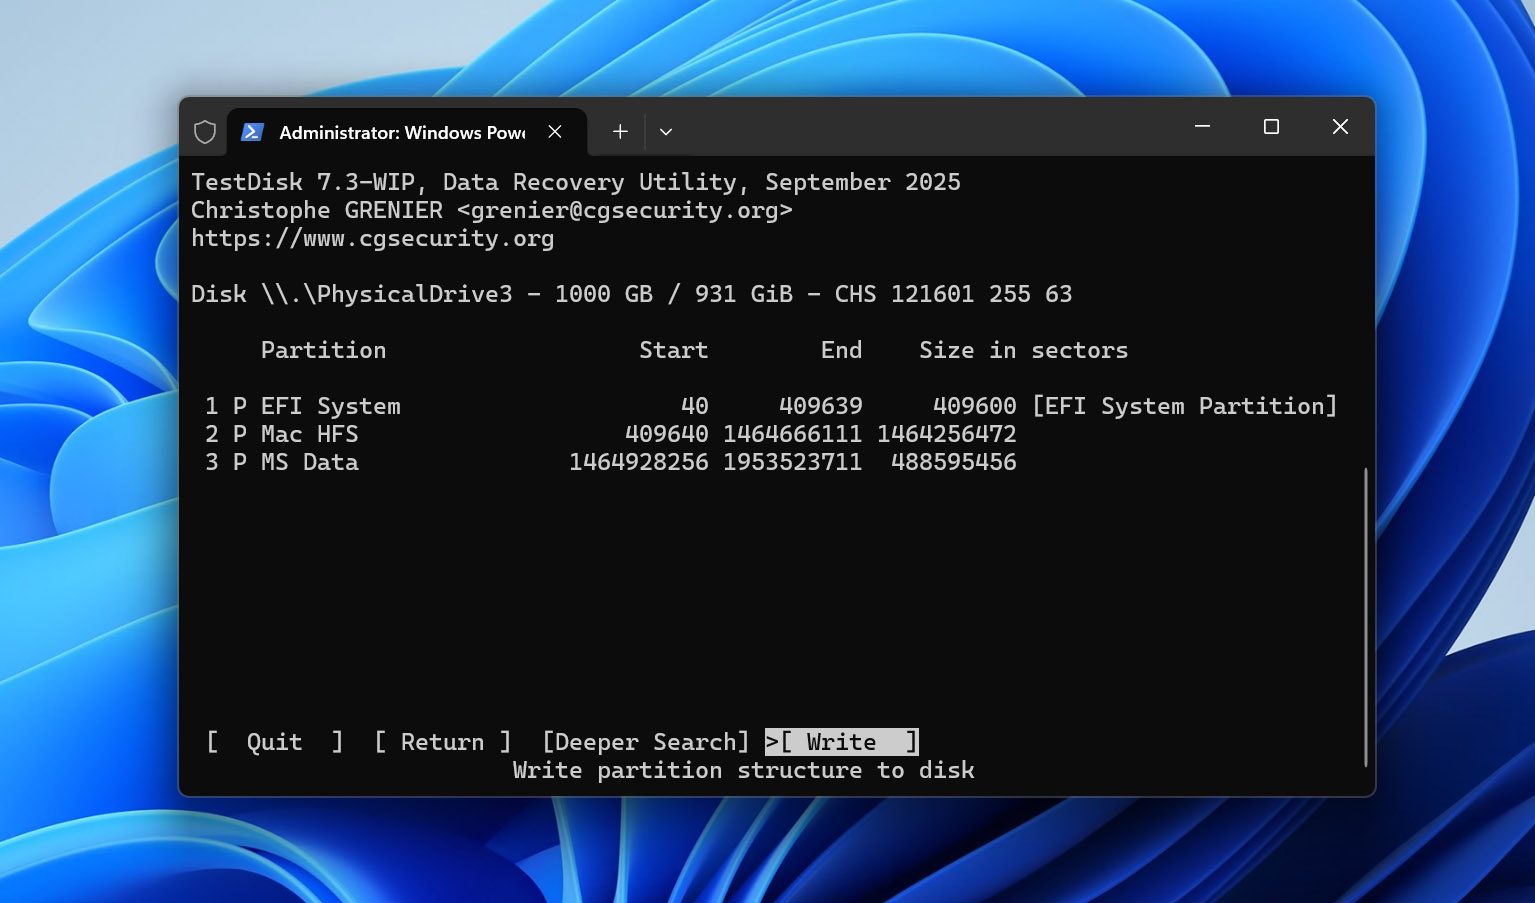
- Quit TestDisk and restart your computer if prompted. Check File Explorer to see whether the restored partition and its files are accessible again.
Note: You can also use Disk Drill if files were lost after a partition was deleted. Disk Drill can detect the lost partition during its scan and let you recover files from it to another drive. However, it doesn’t restore the partition itself. After recovering your files, you’ll need to create a new partition manually if you want to use that space on the external hard drive again.
Method 4: Recover Data From a Damaged External Hard Drive
When a hard disk has undergone severe physical damage, data recovery software might not help. The data on your hard drive is stored in sectors. Physical damage renders those sectors unreadable, which means the information on those sectors is lost.
When you can’t recover data using data recovery software, a professional data recovery service may be able to help. When selecting a data recovery service, consider the following factors:
- Range of services: Not all services support all types of hardware. For example, many services don’t offer data recovery service for RAID arrays. So make sure the service you select does recover data from the type of storage device you have.
- Success rate: Naturally, you want a service that has a high success rate, especially when you’re trying to recover important data such as confidential documents.
- Locations: Data recovery happens in a recovery lab. The closer the lab, the faster you’ll get your data recovered, and the less you’ll pay for shipping.
You may also want to consider other factors like ISO certifications and technology depending on the data’s sensitivity.
Note: If you need to recover data from an external hard drive on a Mac, the overall process is very similar, although some of the tools and built-in recovery options are different. For Mac-specific methods and step-by-step instructions, see our guide on how to recover data from an external hard drive on Mac.
Final Thoughts
As you can see, deleted files can often be recovered from an external hard drive, but how they were lost matters. Your next step should depend on what happened to the data:
- Drive still connected after deletion > check the Recycle Bin first.
- Files permanently deleted or the drive was disconnected > scan the drive with data recovery software.
- Drive was quick-formatted > stop using it and run a recovery scan before new data overwrites the old files.
- Partition was deleted > use a partition recovery tool such as TestDisk to search for and restore it.
- Drive is physically damaged or unstable > stop DIY recovery attempts and contact a professional data recovery service.
Once you’ve recovered your files, it’s a good time to make sure the external hard drive isn’t their only home. Keep another copy on a separate storage device or use cloud storage, so a deleted file, failed drive, or accidental format doesn’t leave you going through the same recovery process again.
FAQ
- Keep the drive away from excessive heat or moisture. Keep your external drive out of the sunlight and out of hot parked cars.
- Always maintain strong antivirus protection with a quality commercial application. Periodically running a scan on the external drive is a good idea to keep it free of malware.
- Take care when deleting files or formatting partitions. Make sure you have specified the target correctly. Check your work before pressing that button!