



Permanently deleted photos can often still be recovered, but the right recovery method depends on where they were stored. An SD card or camera handles deleted data differently from a computer or smartphone, so there is no single method that works in every case.
Your options also depend on whether the photos still exist in a Trash or Recently Deleted folder, were saved in a backup or cloud storage, or have already been removed from these locations. In this guide, we’ll cover how to recover deleted photos from SD cards, cameras, computers, iPhones, and Android phones, with separate methods for each type of device.
What to do first? Stop using the device as soon as you realize your photos have been permanently deleted. If they were stored on a camera or SD card, don’t take any new photos or videos, as new files may overwrite the deleted data. If the photos were stored on a computer, iPhone, or Android phone, it’s best to avoid using the device altogether. Even background processes can write new data to the storage and potentially affect the results of recovery.
Where Were Your Photos Deleted From?
The best way to recover permanently deleted photos depends on where they were stored. Use the table below to start with the methods that make sense for your device.
| Where were the photos deleted from? | What to try first |
| SD card | Check Trash if the photos were deleted while the card was connected to a computer. Otherwise, scan the SD card with data recovery software. See SD card recovery methods ✅ |
| Camera | Remove the memory card and connect it to a computer. Check for available backups, then scan the card with data recovery software. See camera photo recovery methods ✅ |
| Computer | Check Recycle Bin or Trash, then look through your backups. If the photos aren’t there, scan the drive with data recovery software. See computer photo recovery methods ✅ |
| iPhone/iPad | Check Recently Deleted first, then iCloud and your device backups. See iPhone and iPad recovery methods ✅ |
| Android | Check Gallery Trash or Recently Deleted, then Google Photos and other available backups. If no copy is available, try an Android data recovery app or software. See Android recovery methods ✅ |
What does permanently deleted photos mean? Photos are generally considered permanently deleted once they are no longer available in Trash, Recycle Bin, or Recently Deleted. Still, checking these locations one more time doesn’t hurt. It’s also worth checking any backups or cloud storage before moving on to data recovery software or other recovery methods.
How to Recover Deleted Photos from Camera SD Card
This section covers the main recovery methods for camera SD cards. For a more detailed walkthrough, see our complete guide on how to recover deleted photos from an SD card.
SD cards are particularly prone to accidental photo deletion because they are frequently used to take, delete, and transfer files between devices. If you’ve deleted photos from your camera’s SD card, there are several ways to try to recover them.
Method 1: Check Trash Bin on Mac
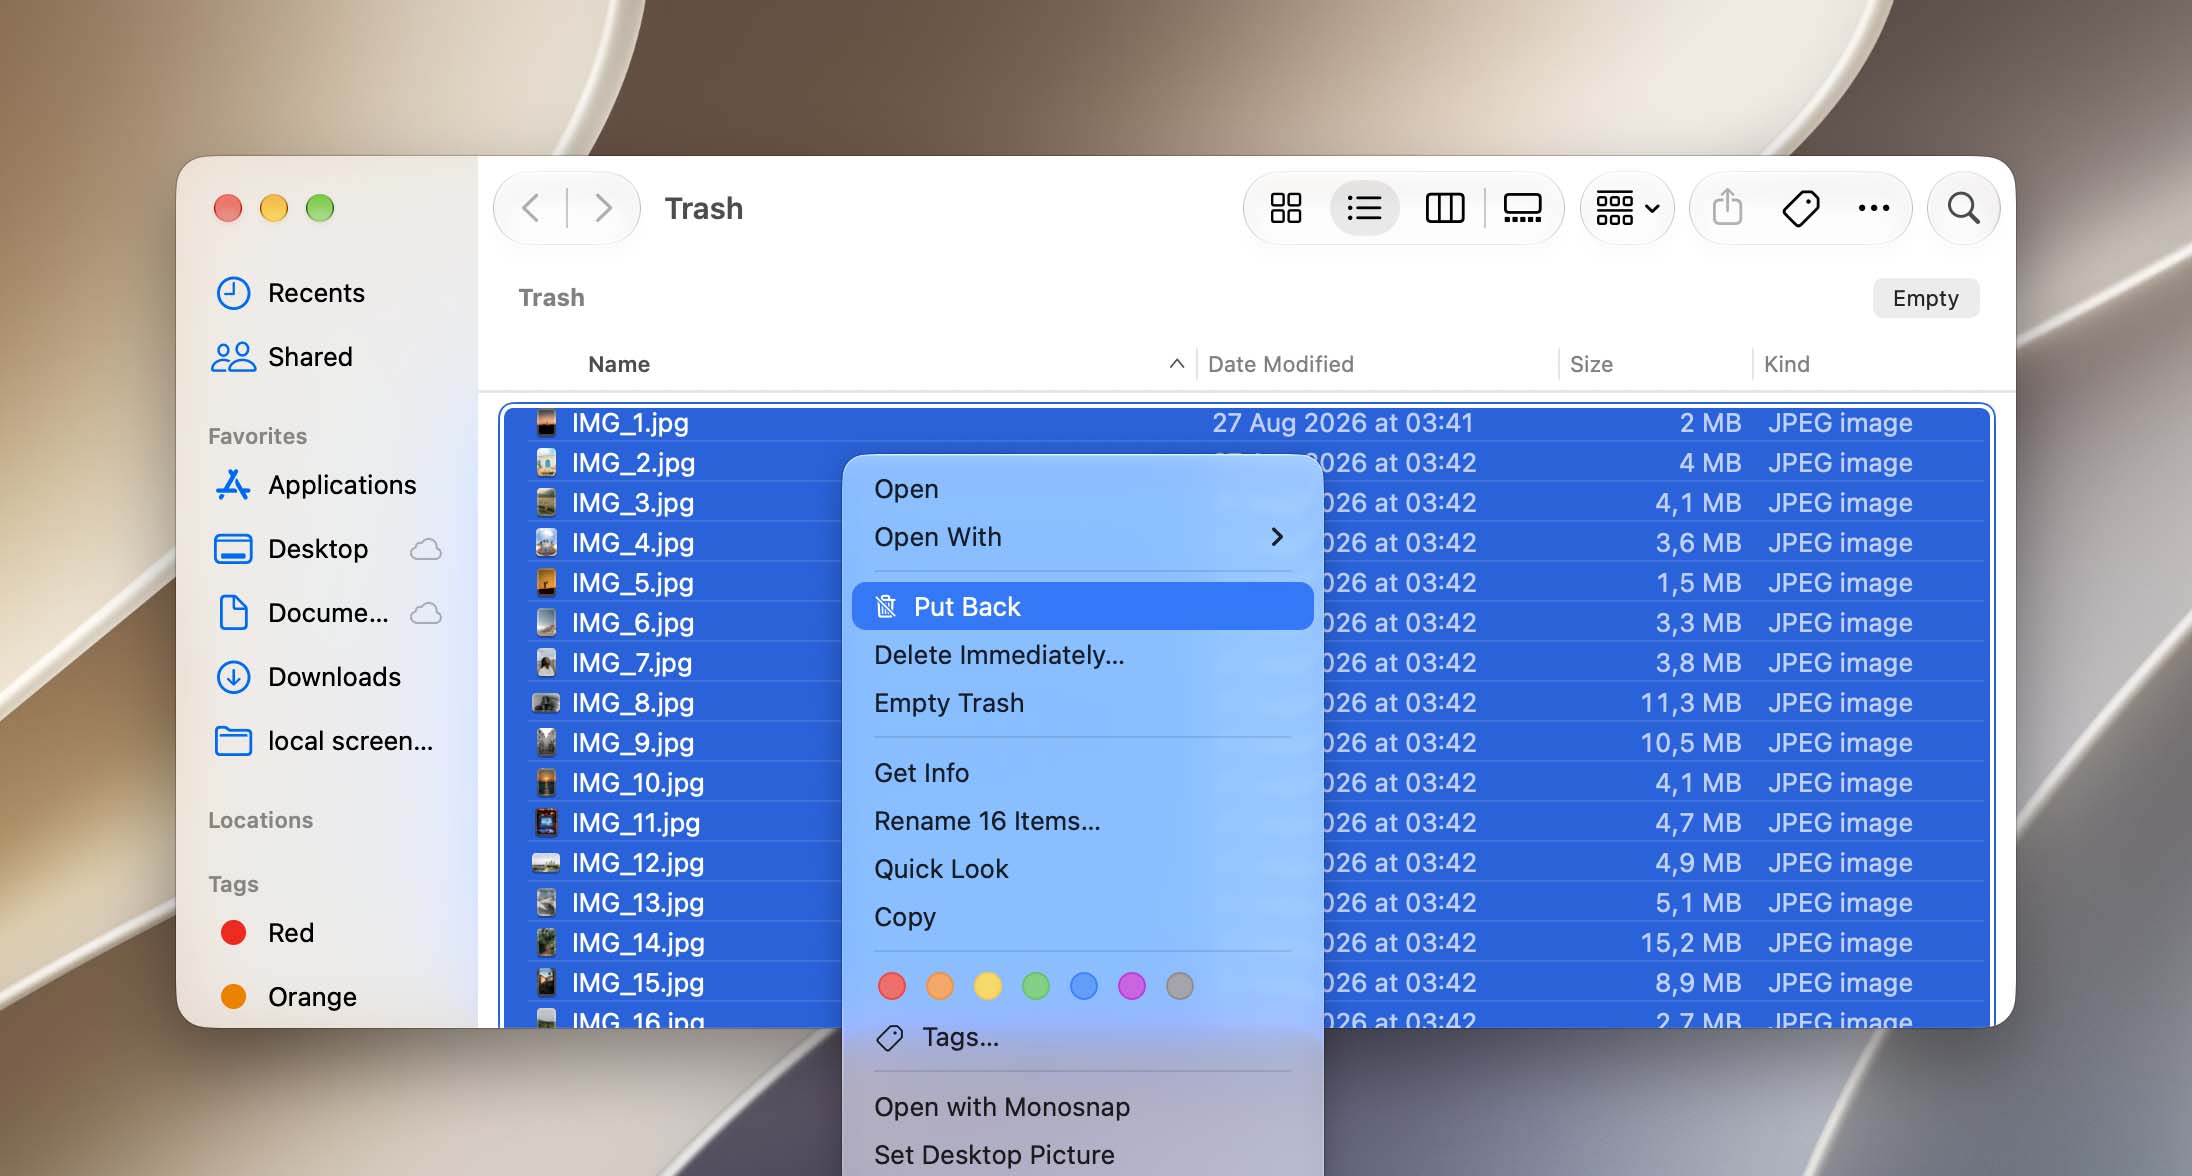
Did you notice that the photos on your camera have gone missing after attempting to transfer data to your computer? You may have accidentally deleted your photos while your SD card was connected. Fortunately, deleted files usually stay in the system’s Trash folder until the user manually empties it.
To recover deleted photos from Trash on a Mac:
- Open the Trash folder from your dock.
- Right-click the photo (or multi-select > right-click if multiple) and click Put Back. You will find your photos in their original folder.
Windows handles files deleted from removable storage differently. Photos deleted directly from an SD card through File Explorer typically bypass the Recycle Bin, so if you deleted them this way, move on to the recovery software method below.
Method 2: Recover Deleted Photos Using Data Recovery Software
If the photos were permanently deleted directly from the SD card, data recovery software is usually the next option to try. It can scan the card for deleted data that is no longer accessible through the file system and recover photos if their data is still present on the card and hasn’t been overwritten.
Among the many SD card data recovery tools available, our top pick is Disk Drill. It supports a wide range of image formats, including common files such as JPG and PNG and camera RAW formats such as CR2, GPR, and NEF. Scans are relatively fast, and the preview feature lets you check found photos before recovery. You can learn more about its features and our testing results in our full Disk Drill review.
We’ll show you how to recover permanently deleted photos from an SD card using Disk Drill for Mac. If you’re using Windows, you can follow the same steps (the recovery process is nearly identical in both versions):
- Download and install Disk Drill.
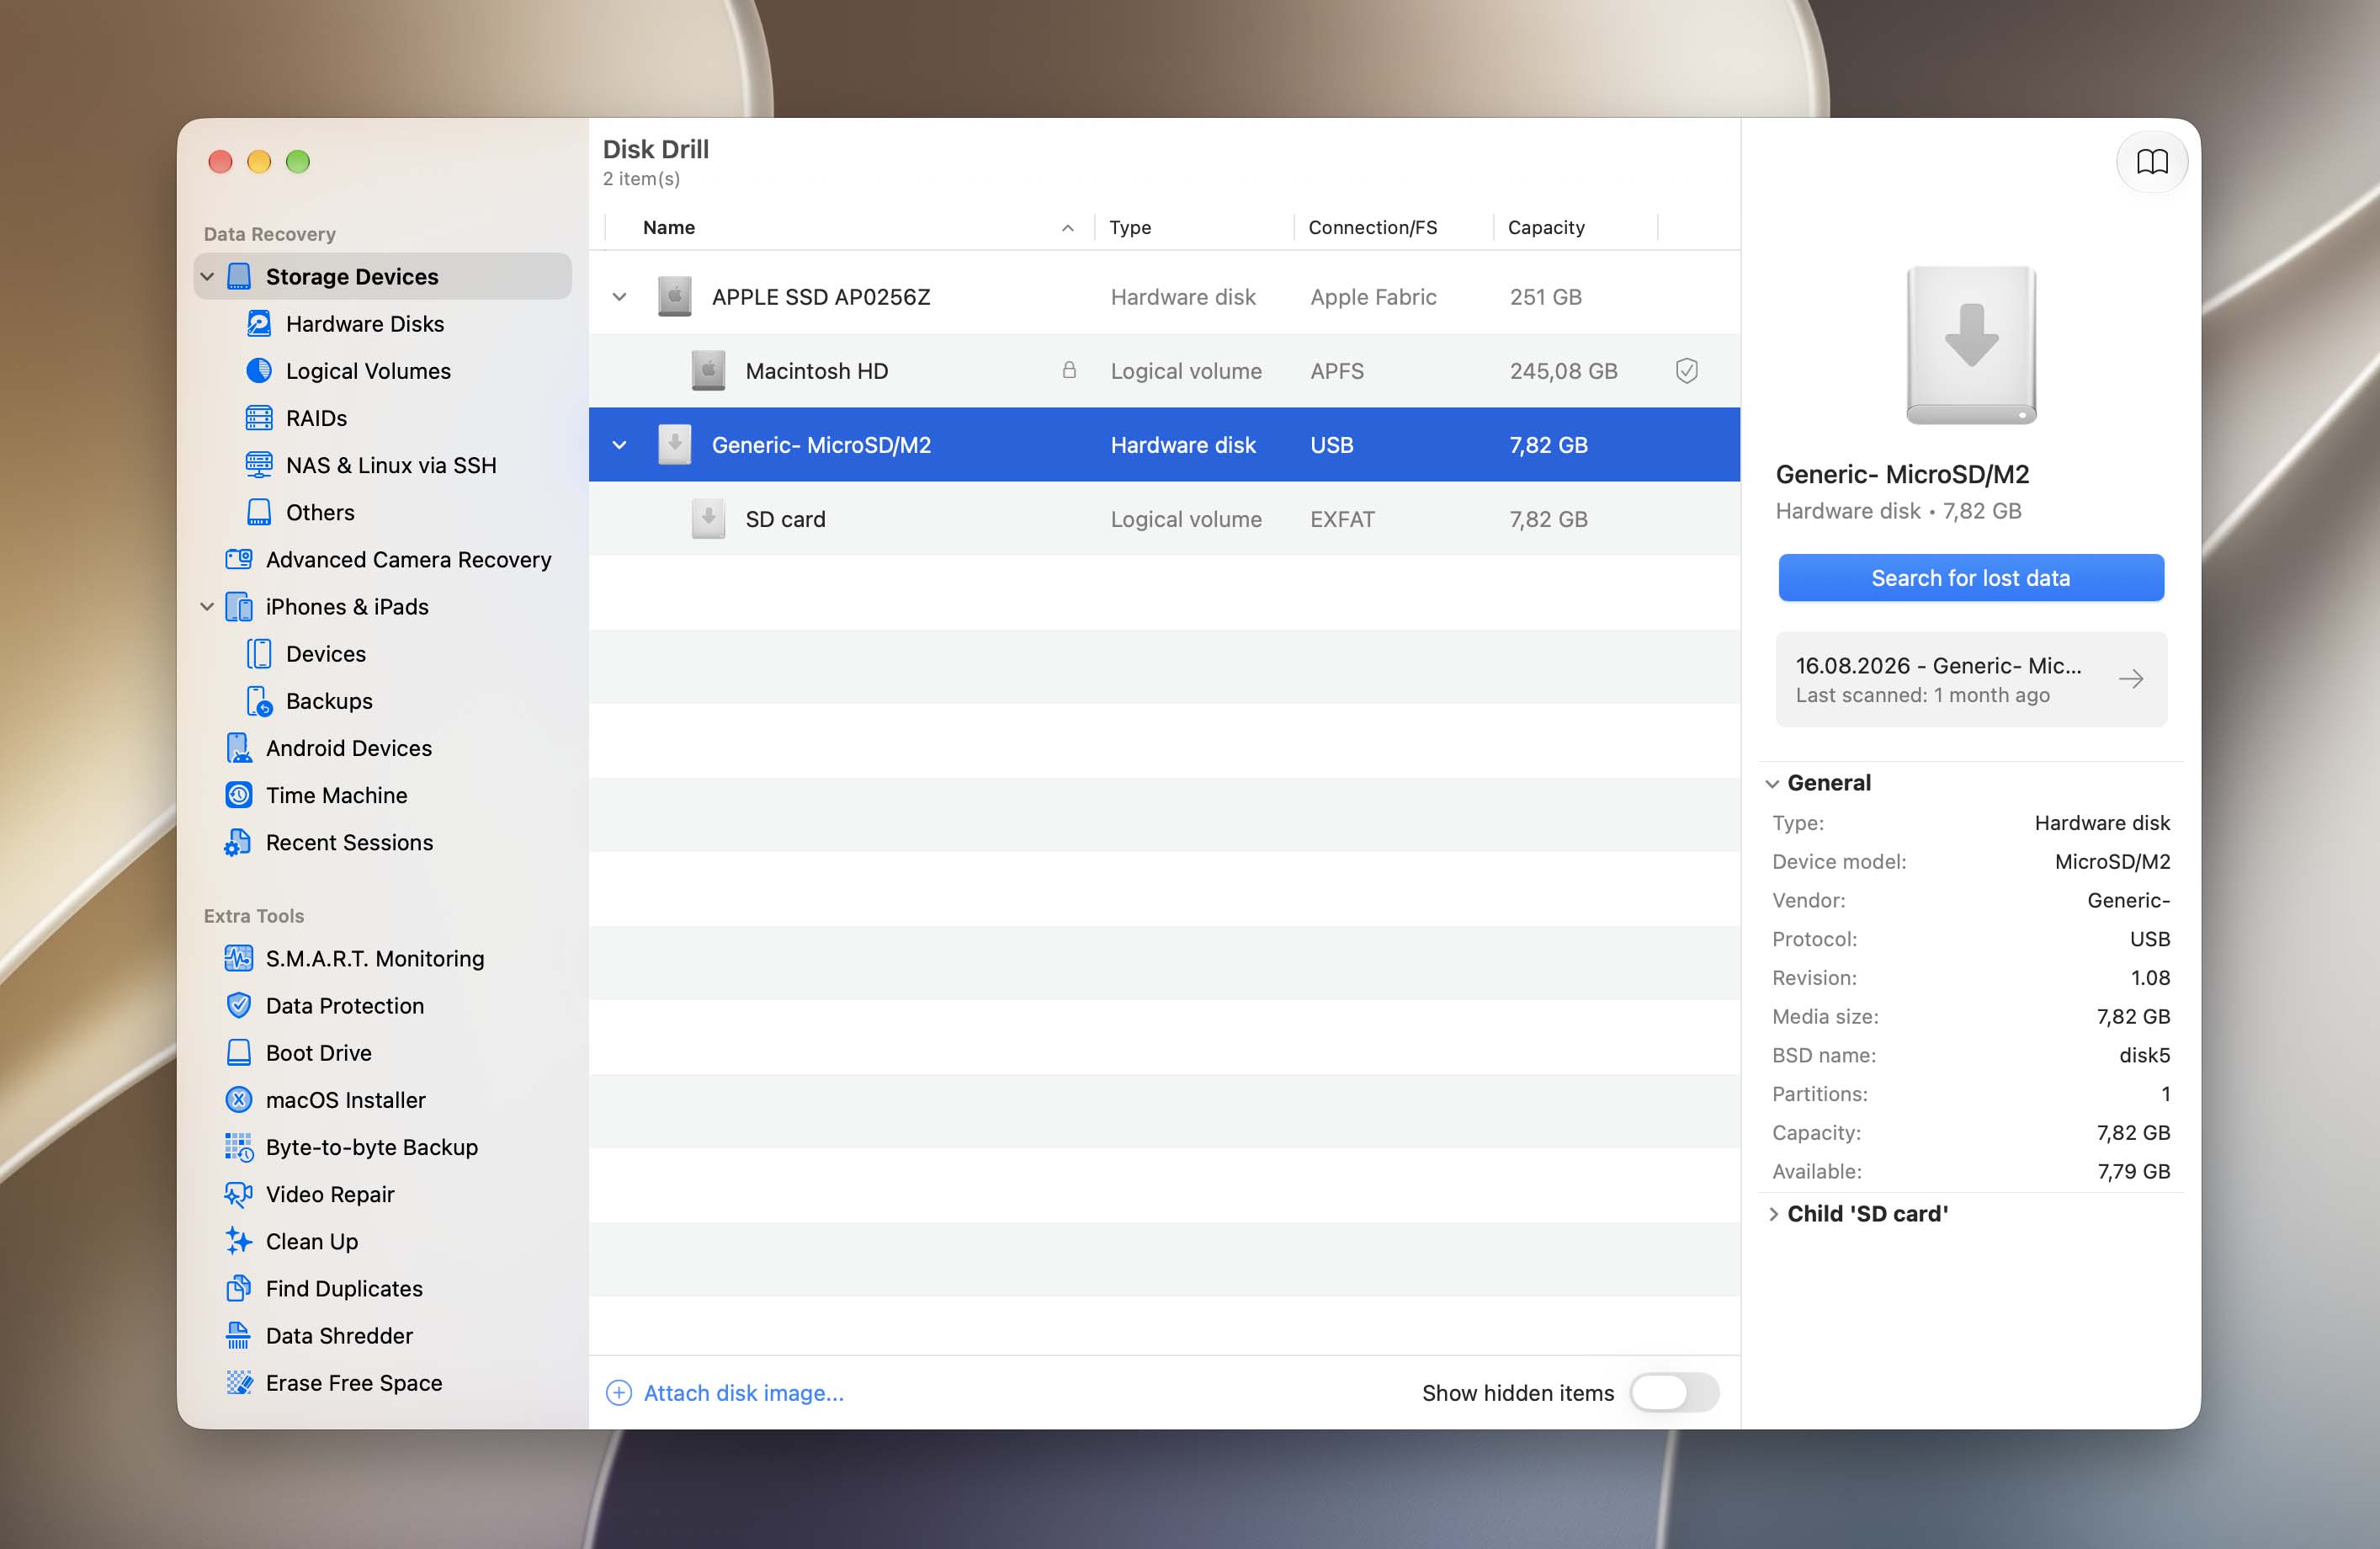
- Connect the SD card to your Mac using a card reader or adapter. Then, launch Disk Drill (Finder > Applications).
- Select your SD card and click Search for lost data. If you’re using a USB card reader, it may appear as “Generic Storage Device.”
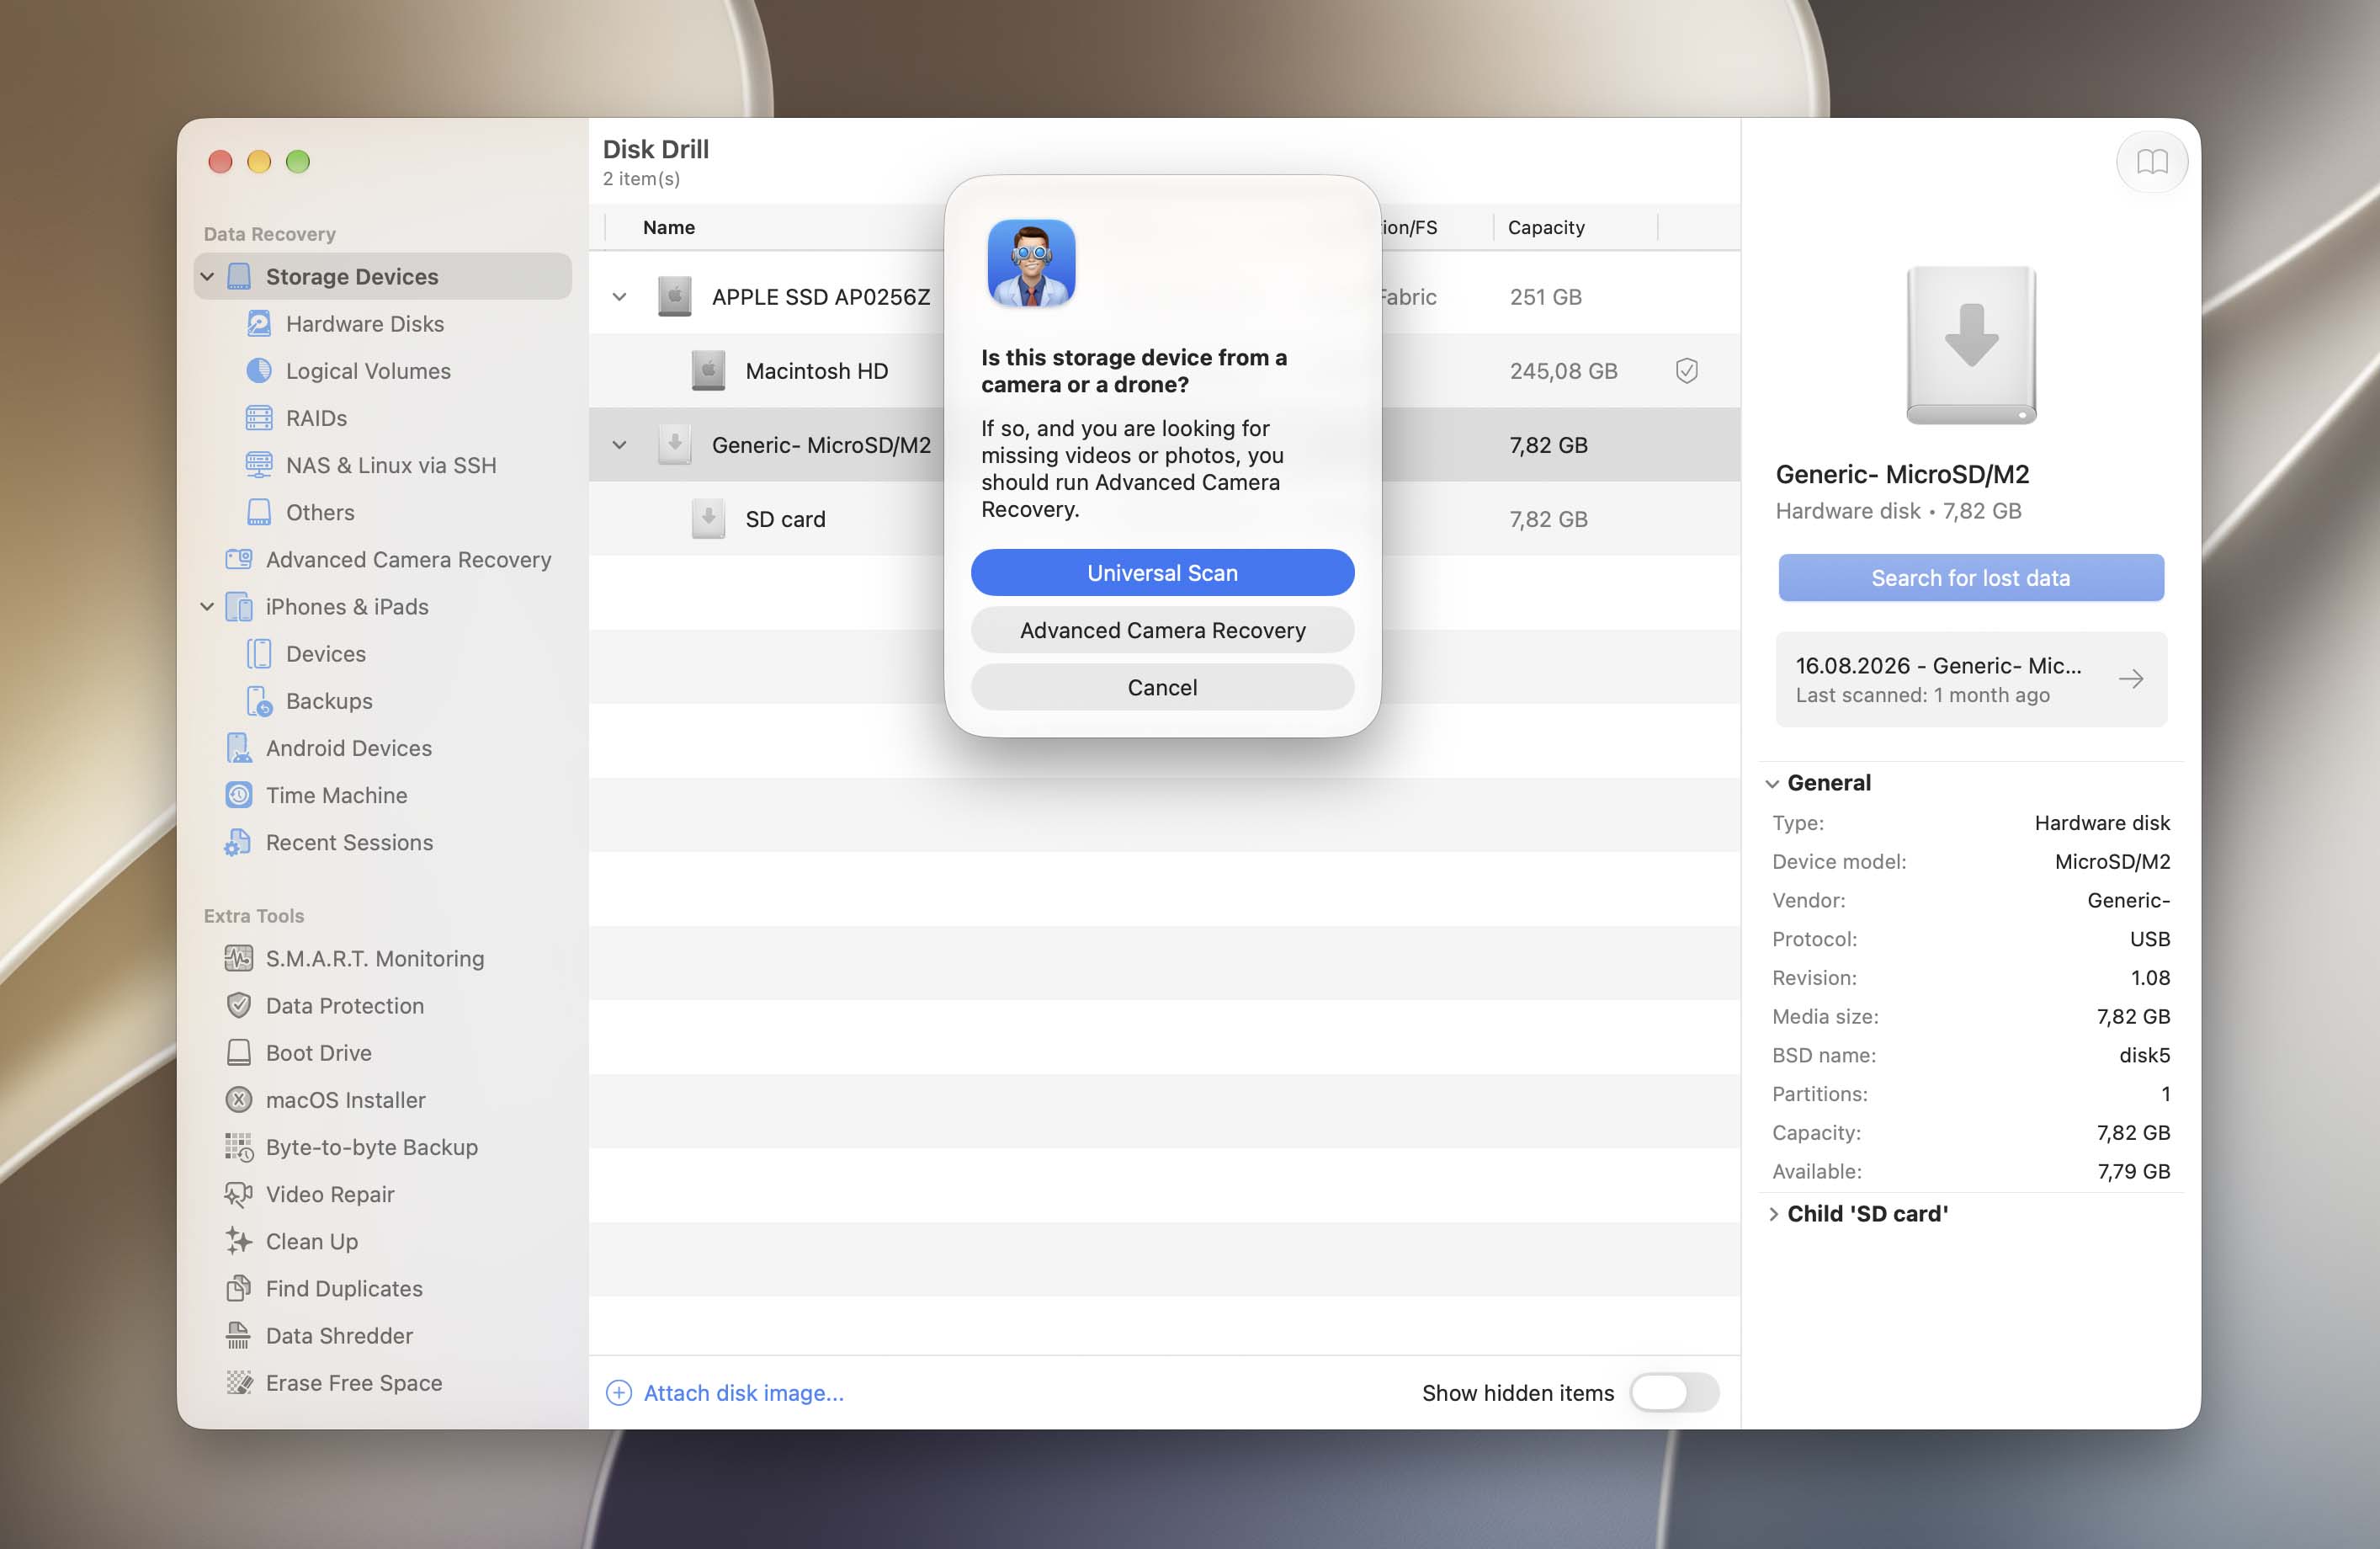
- Disk Drill will ask you to choose between Universal Scan and Advanced Camera Recovery. If you only need to recover permanently deleted photos, Universal Scan is enough. If you also want to recover permanently deleted videos from the camera SD card, choose Advanced Camera Recovery, which is designed specifically for reconstructing fragmented camera video files.
- Wait for Disk Drill to finish scanning your memory card. Then, click Review found items.
- Select Pictures in the left sidebar and filter the data by file extensions using the search tool in the top-right corner of the window. Then, open the Deleted or lost tab and locate your photos. If you hover your mouse pointer beside them, an eye button will appear that, when clicked, will display a preview of your photo.
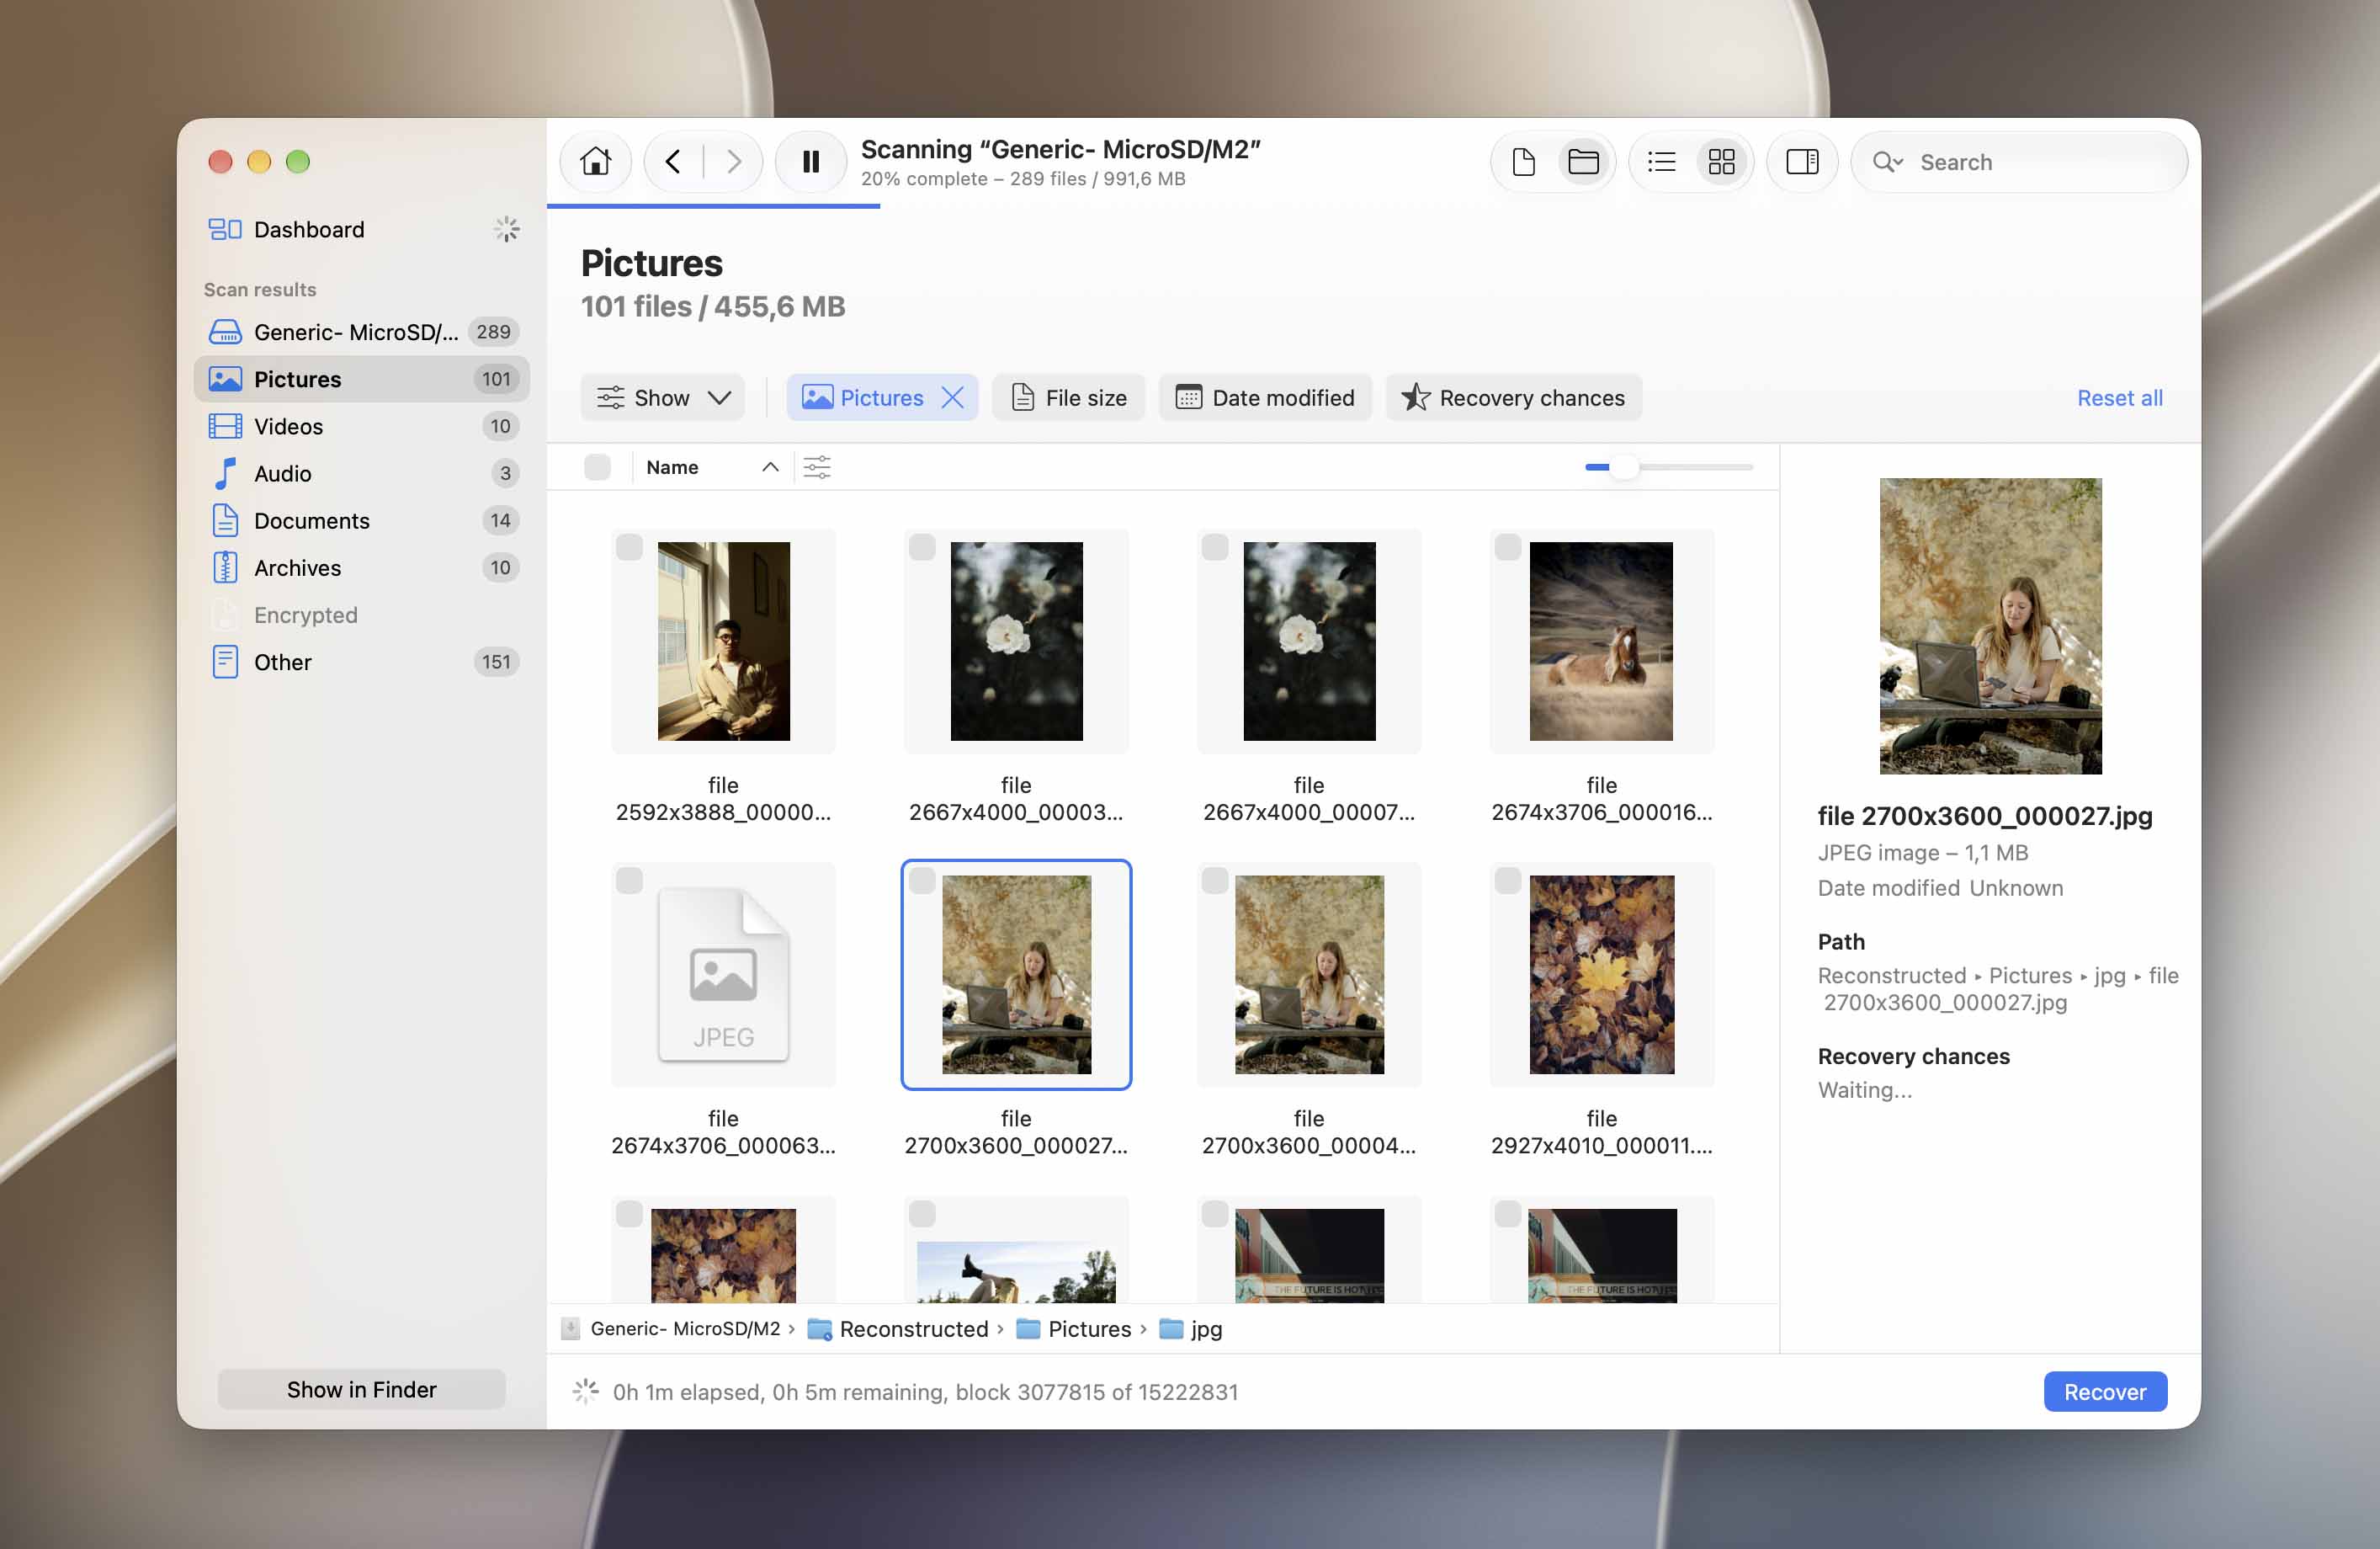
- Use the boxes in the leftmost column to select the photos you want to restore. Then, click Recover.
- Select a location on your computer where Disk Drill will save the recovered files. Then, click Next.
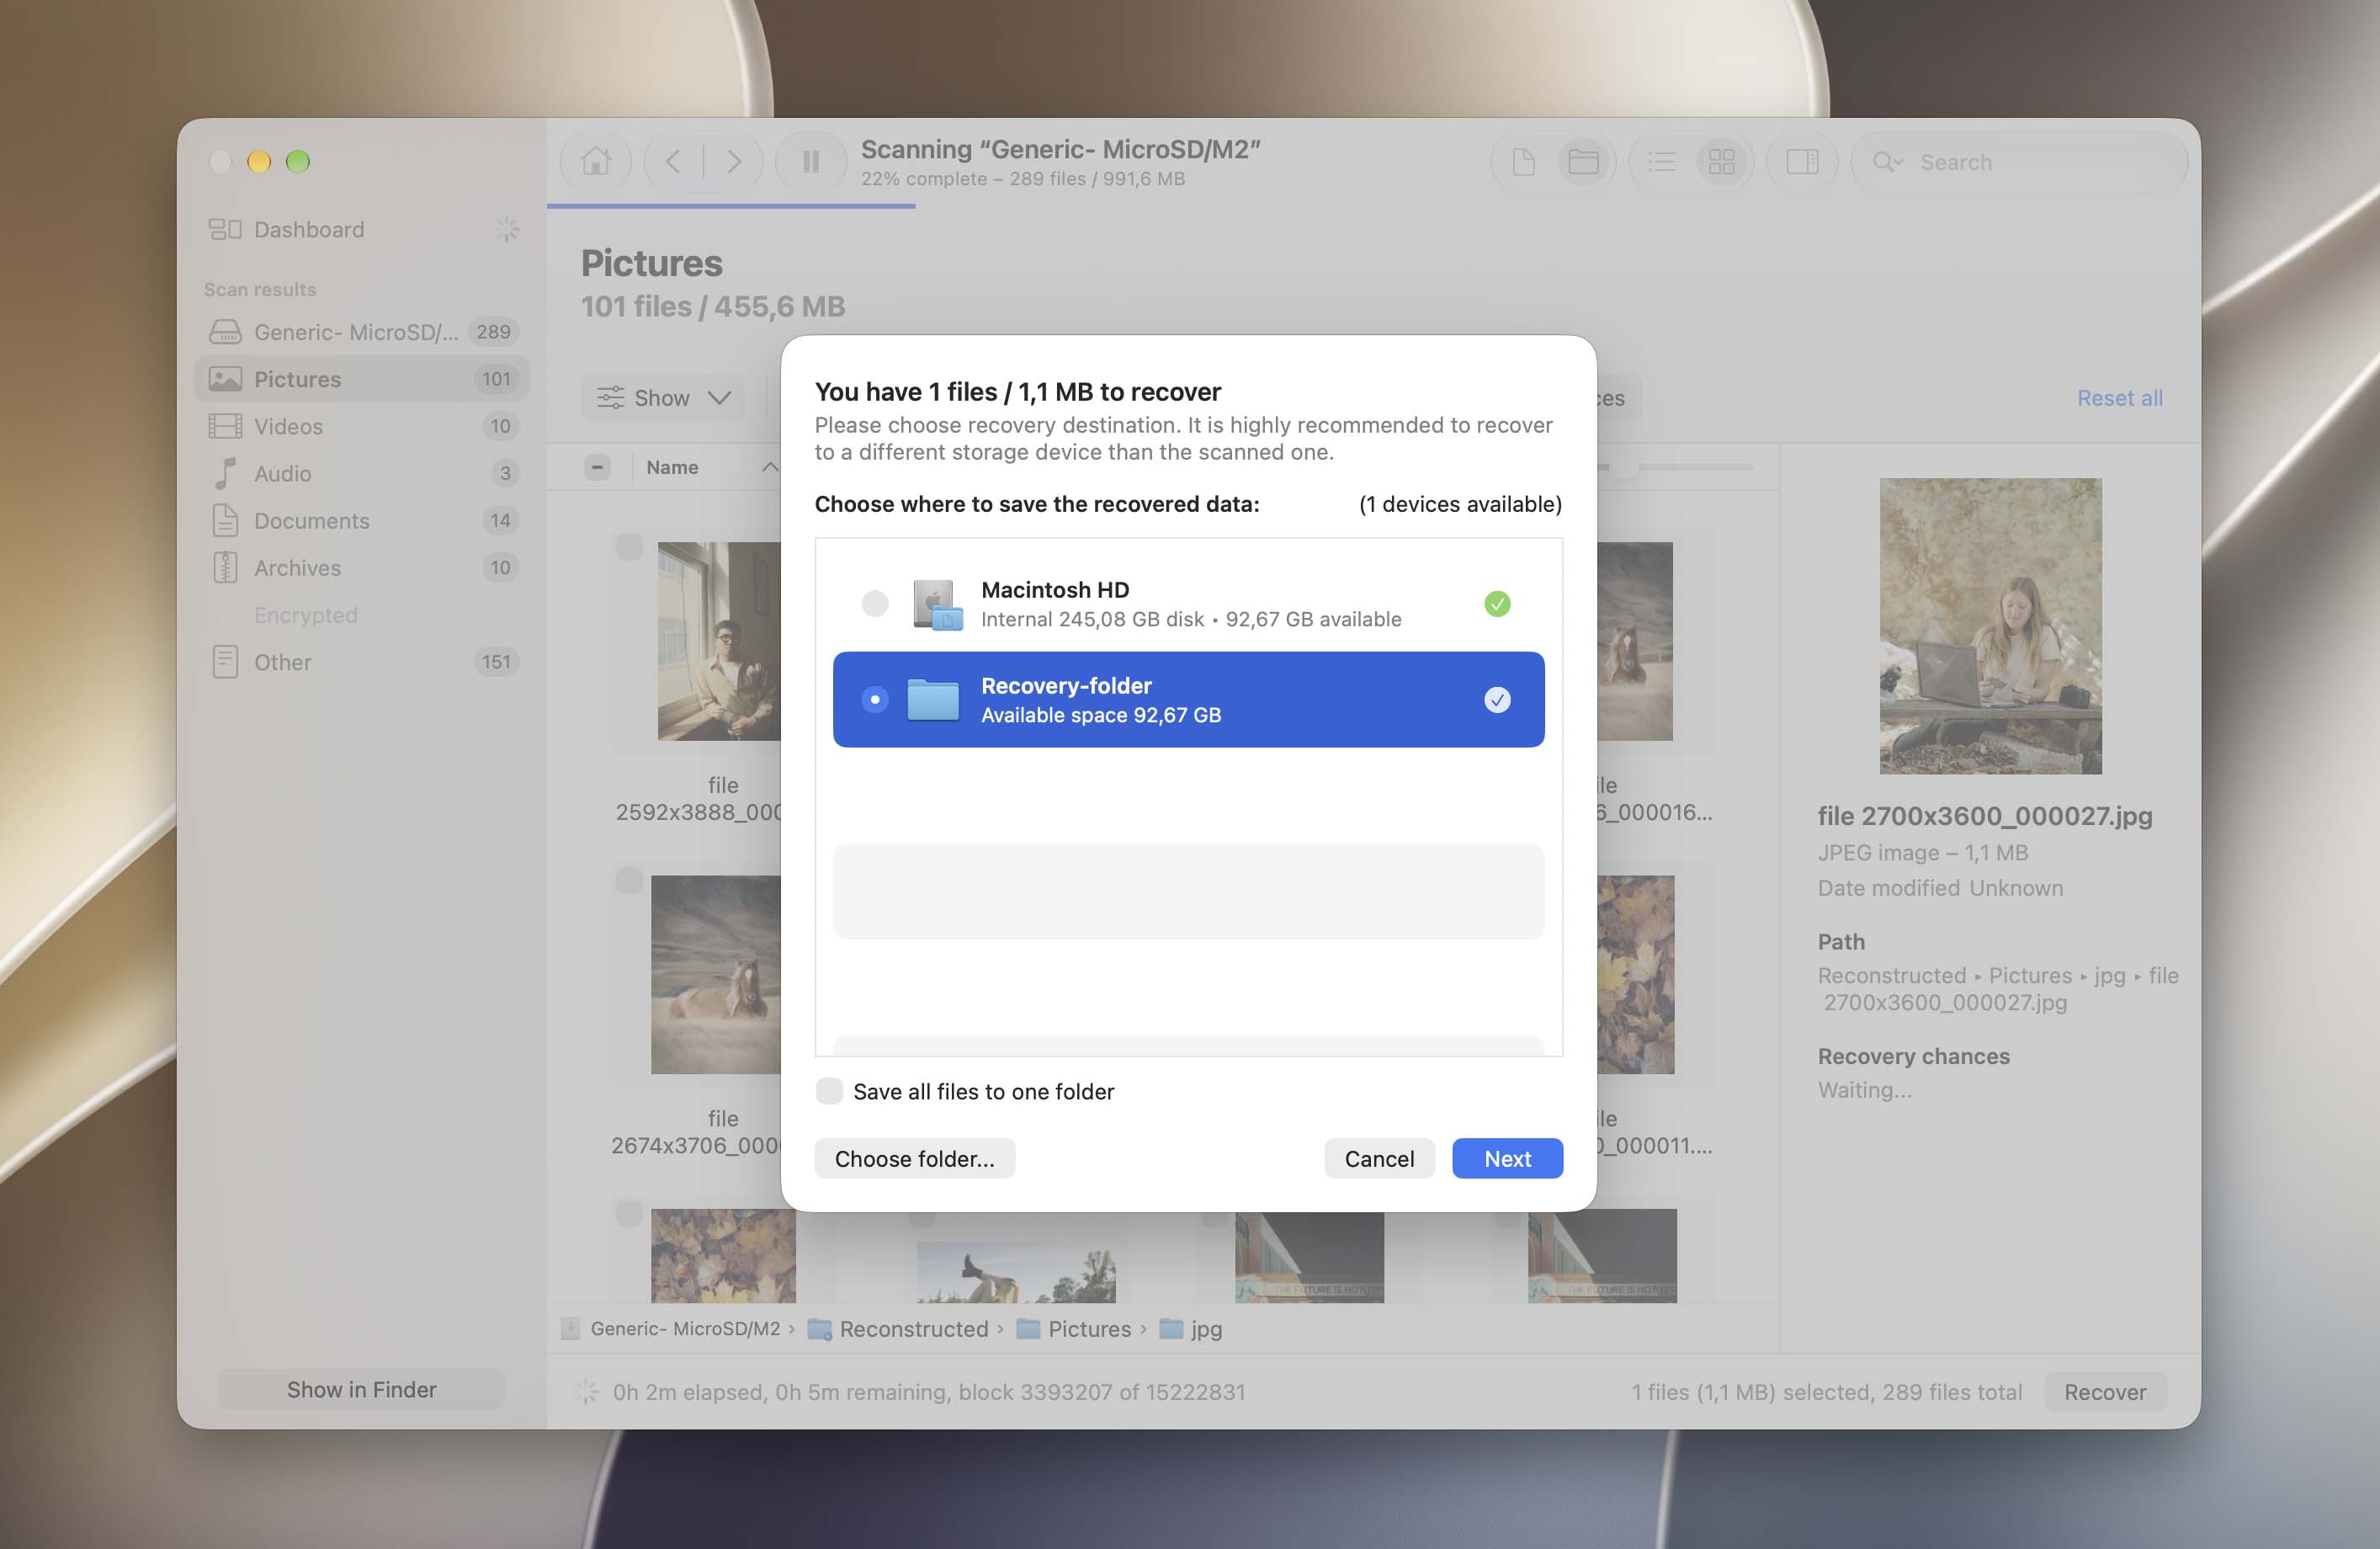
On Mac, Disk Drill lets you scan the SD card and preview found photos for free, so you can check whether the files you need are recoverable before upgrading. Free recovery itself is not included in the Mac version. If you’re using Windows, Disk Drill Basic allows you to recover up to 100 MB of data for free.
Method 3: Send Your SD Card to a Data Recovery Service
If you think the data loss was a result of physical damage, we highly suggest that you send your SD card to a professional data recovery service. Retrieving deleted photos yourself from a damaged storage device may lead to permanent data loss.
A professional data recovery service consists of specialists that are trained to physically take apart storage devices and perform more advanced data recovery operations. They also have special tools and facilities to protect the technology.
Here are some tips for selecting the right service:
- Clean Room – Make sure the shop uses a Class 100 Clean Room. This protects the storage devices from further damage caused by particles and debris.
- No data, no charge – Some shops will only charge you if they recover the data you were specifically looking for.
- Free phone estimate – Experienced data recovery specialists should be able to give you a rough estimate over the phone – this is also an indication that they are confident in their pricing.
- Good reviews – Most major data recovery services have reviews on Google and websites like Trustpilot. Find as much information as you can (don’t hesitate to call them) to properly weigh your options.
If the deleted photos have already been overwritten by new data, even a professional data recovery lab won’t be able to recover them. Recovery is only possible while the original photo data still remains on the SD card.
How to Retrieve Photos Deleted from a Camera
If you deleted photos directly on your camera, there usually aren’t many additional recovery options to check on the camera itself. Most digital cameras store photos and videos on a removable memory card rather than keeping recoverable copies in internal storage. Once the photos have been permanently deleted, remove the SD card from the camera and use data recovery software to scan it, as described in the section above.
There is one more place worth checking before recovery: any app or cloud service connected to your camera. If you previously transferred or automatically synced your photos, copies may still be available there. Depending on the camera, this could include apps such as Canon Camera Connect, Nikon Imaging Cloud/NX MobileAir, Sony Creators’ App, or FUJIFILM XApp. Also check the photo library on the phone or computer you normally transfer your camera photos to.
If you use a specific camera brand, we also have dedicated recovery guides with more detailed instructions:
How to Recover Permanently Deleted Photos on a Computer
For more detailed instructions, see our complete guides on how to recover permanently deleted files on Windows and how to recover permanently deleted files on Mac.
Permanently deleted photos can also be recovered from a computer, although the chances are often lower than with an SD card. Computers continuously write new data to their drives during normal use, which can affect deleted files even when you aren’t intentionally saving anything. SSDs add another complication because TRIM can make deleted data unavailable for recovery much sooner. For this reason, the less you use the computer after deleting the photos, the better.
Method 1: Check Recycle Bin or Trash
Before treating the photos as permanently deleted, check the system’s deleted-files folder one more time. On Windows, open the Recycle Bin; on Mac, open Trash. If the photos are still there, select them and choose Restore on Windows or Put Back on Mac to return them to their original location.
If you have already emptied Recycle Bin or Trash, or the photos aren’t there, move on to your backups.
Method 2: Restore Photos From a System Backup
A backup created before the photos were deleted can give you another copy even after the originals have been permanently removed from the computer. Both Windows and macOS have built-in backup tools worth checking.
Check File History On Windows
If File History was enabled before you deleted the photos, it may contain an older copy of the folder where they were stored.
- Open the Start menu, search for Control Panel, and open it.
- Go to System and Security > File History.
- Click Restore personal files.
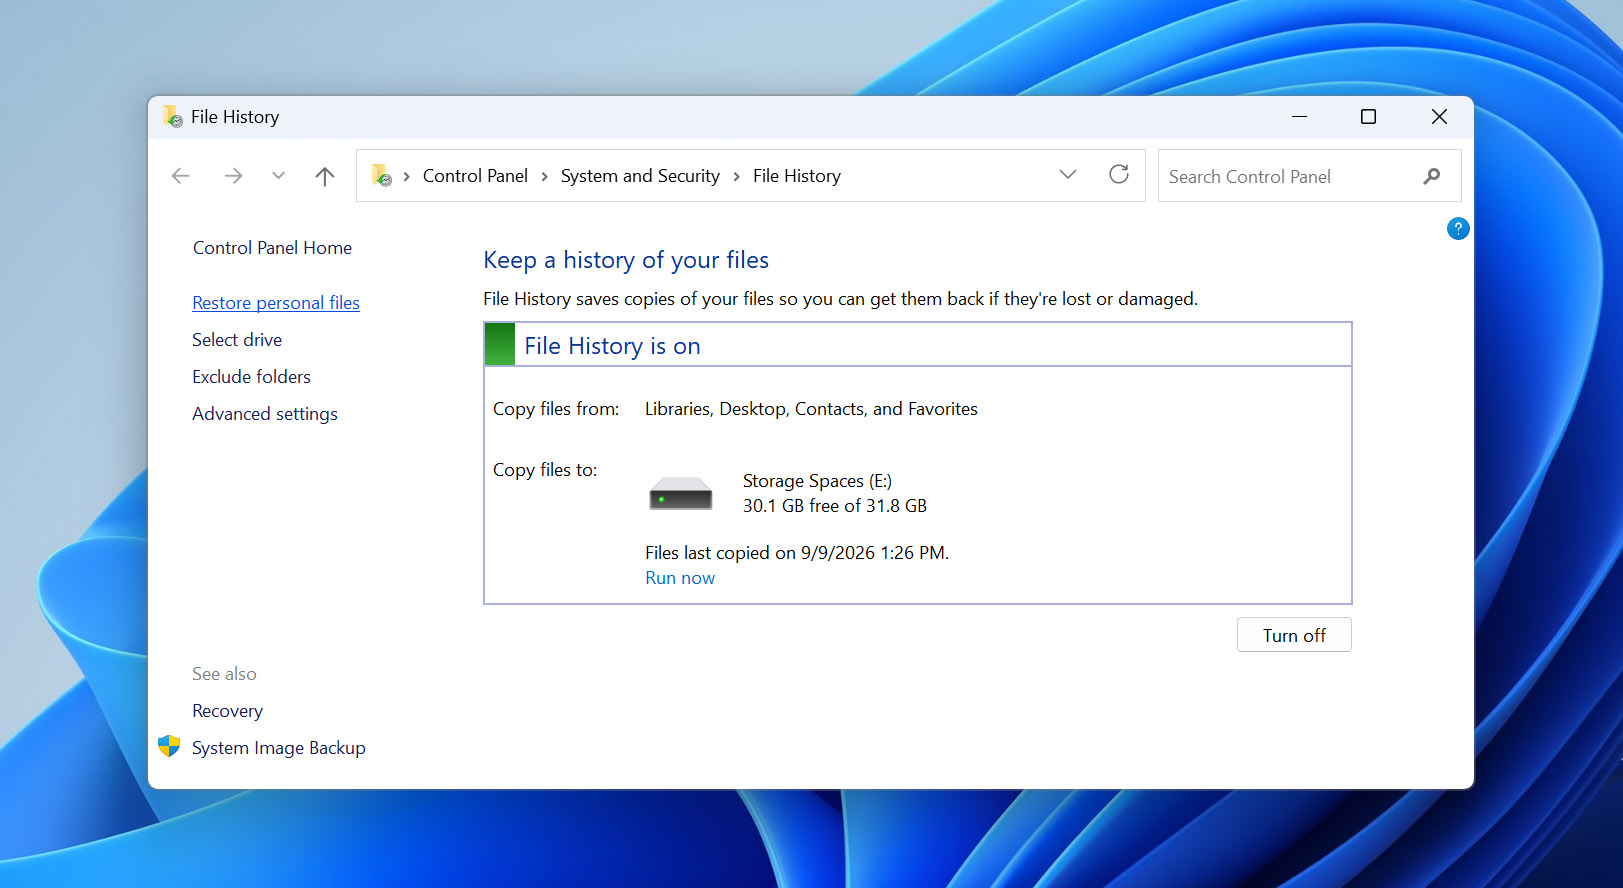
- Browse through the available backups until you find the folder that contained your photos.
- Use the arrows to move between backup dates and find the version created before the photos were deleted.
- Select the photos you want and click the Restore button.
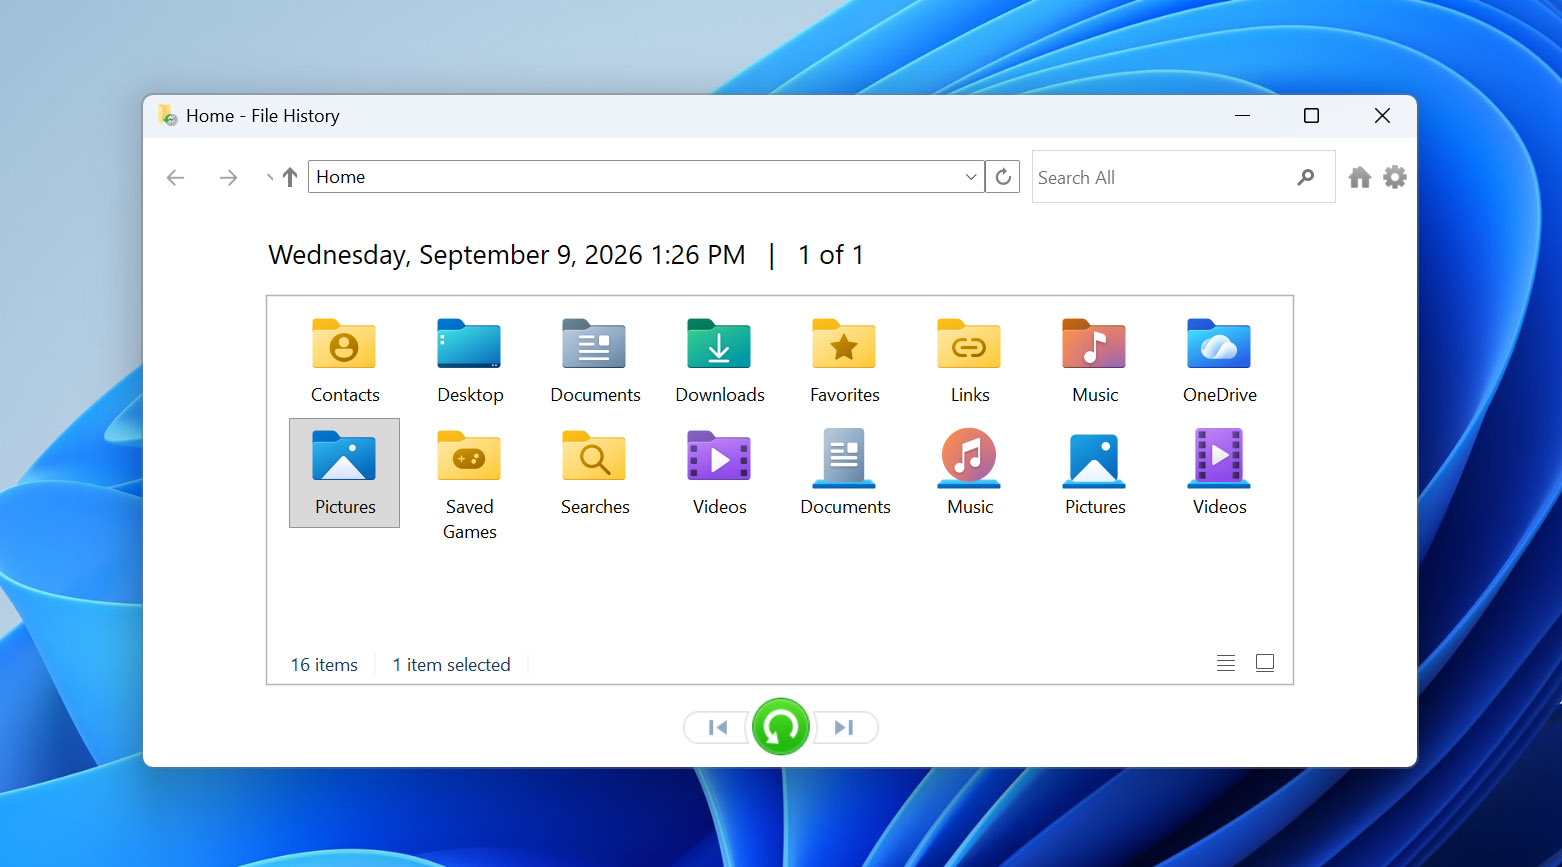
The files will be restored to their original location. You can also right-click the Restore button and choose Restore to if you want to save them somewhere else.
Check Time Machine On Mac
If you had Time Machine enabled before the photos were deleted, check whether an older backup contains them.
- Open Finder and navigate to the folder where the photos were stored.
- Open Time Machine.
- Use the timeline to go back to a date before the photos were deleted.
- Find and select the photos you want to recover.
- Click Restore.
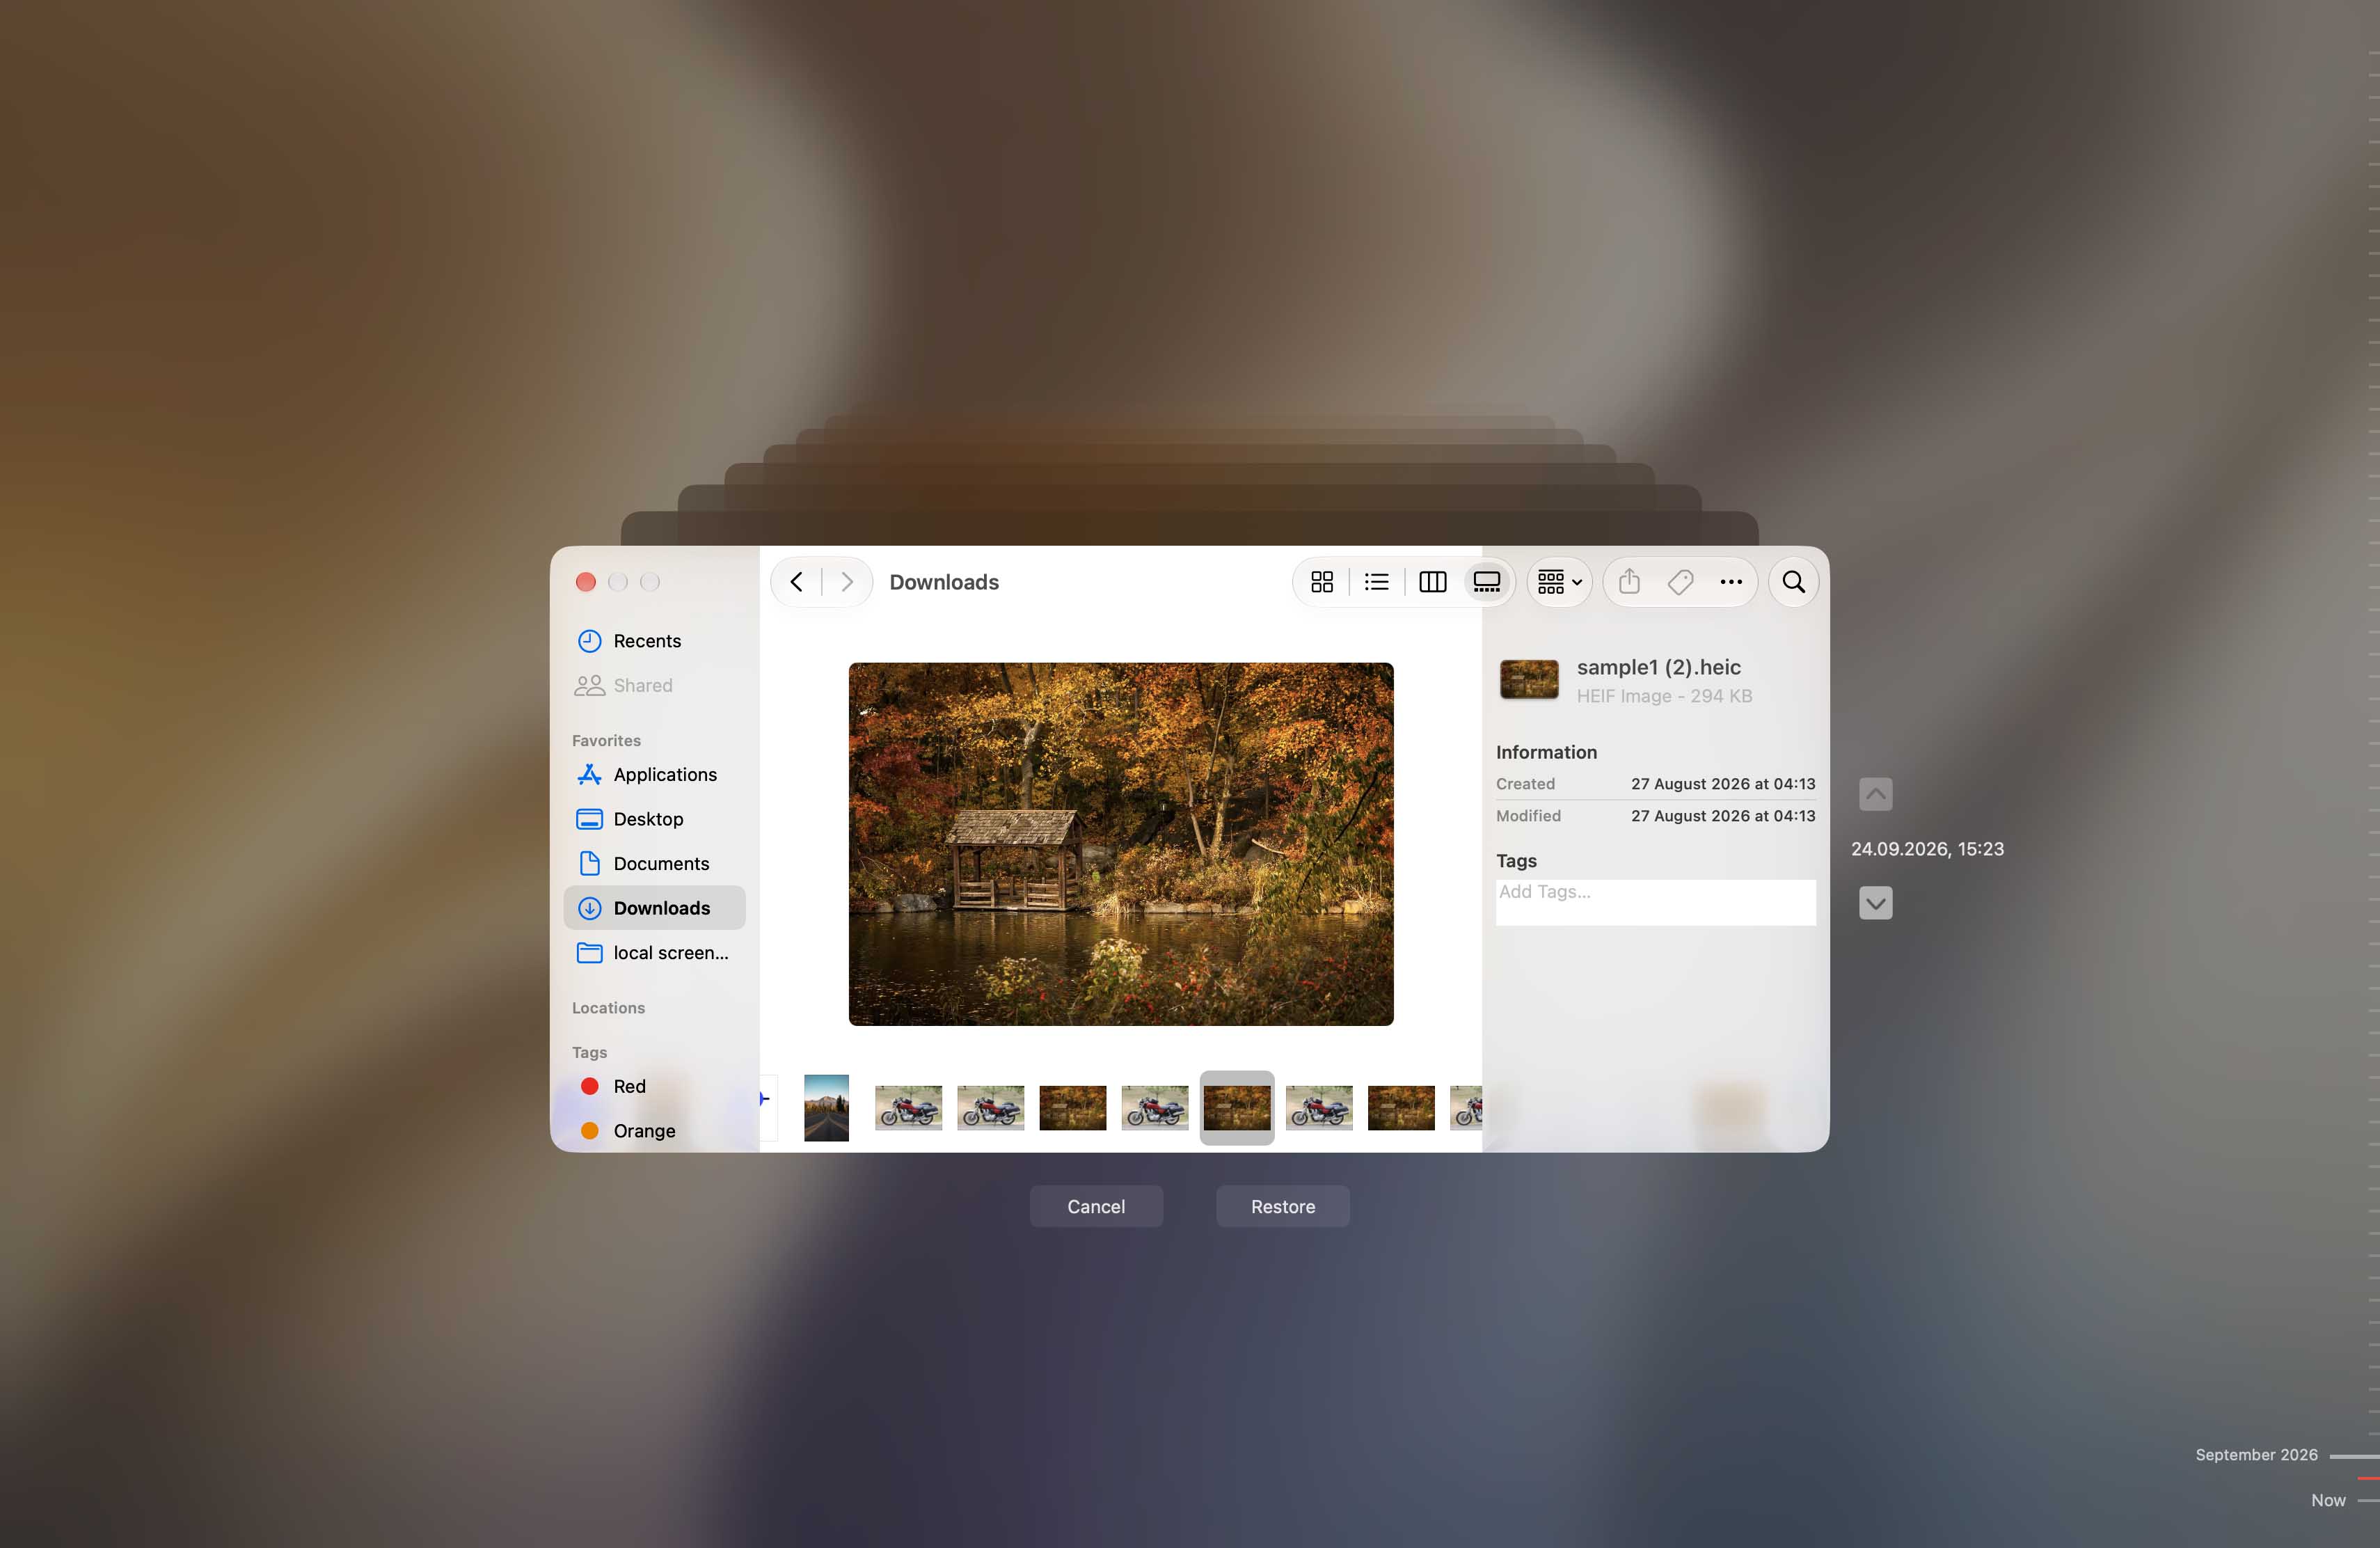
Time Machine will copy the selected photos back to their original location.
Method 3: Use Data Recovery Software
If the photos are no longer in Recycle Bin or Trash and you don’t have a backup containing them, data recovery software is another option. The process is similar to the SD card recovery method we described above (scan the drive, review and preview the photos found by the software, select the ones you need, and recover them to a different physical drive).
However, recovery from a computer’s internal drive can be less predictable than recovery from an SD card. This is particularly true for SSDs. Modern operating systems can send TRIM commands for deleted data, after which the old contents may no longer be returned to recovery software. On HDDs, deleted photos can remain recoverable until their space is overwritten by new data.
If the deleted photos were stored on your system drive, avoid installing recovery software on that same drive. Installing it creates new data and could overwrite some of the files you’re trying to recover.
How to Retrieve Photos Deleted from an iPhone/iPad
For more recovery options and a detailed explanation of how data recovery works on iPhone, see our complete guide on how to recover deleted photos on iPhone.
If you deleted photos directly from your iPhone, you can use different devices to employ a variety of data recovery methods. In the sections below, we’ll demonstrate 3 iPhone recovery methods that you can try yourself.
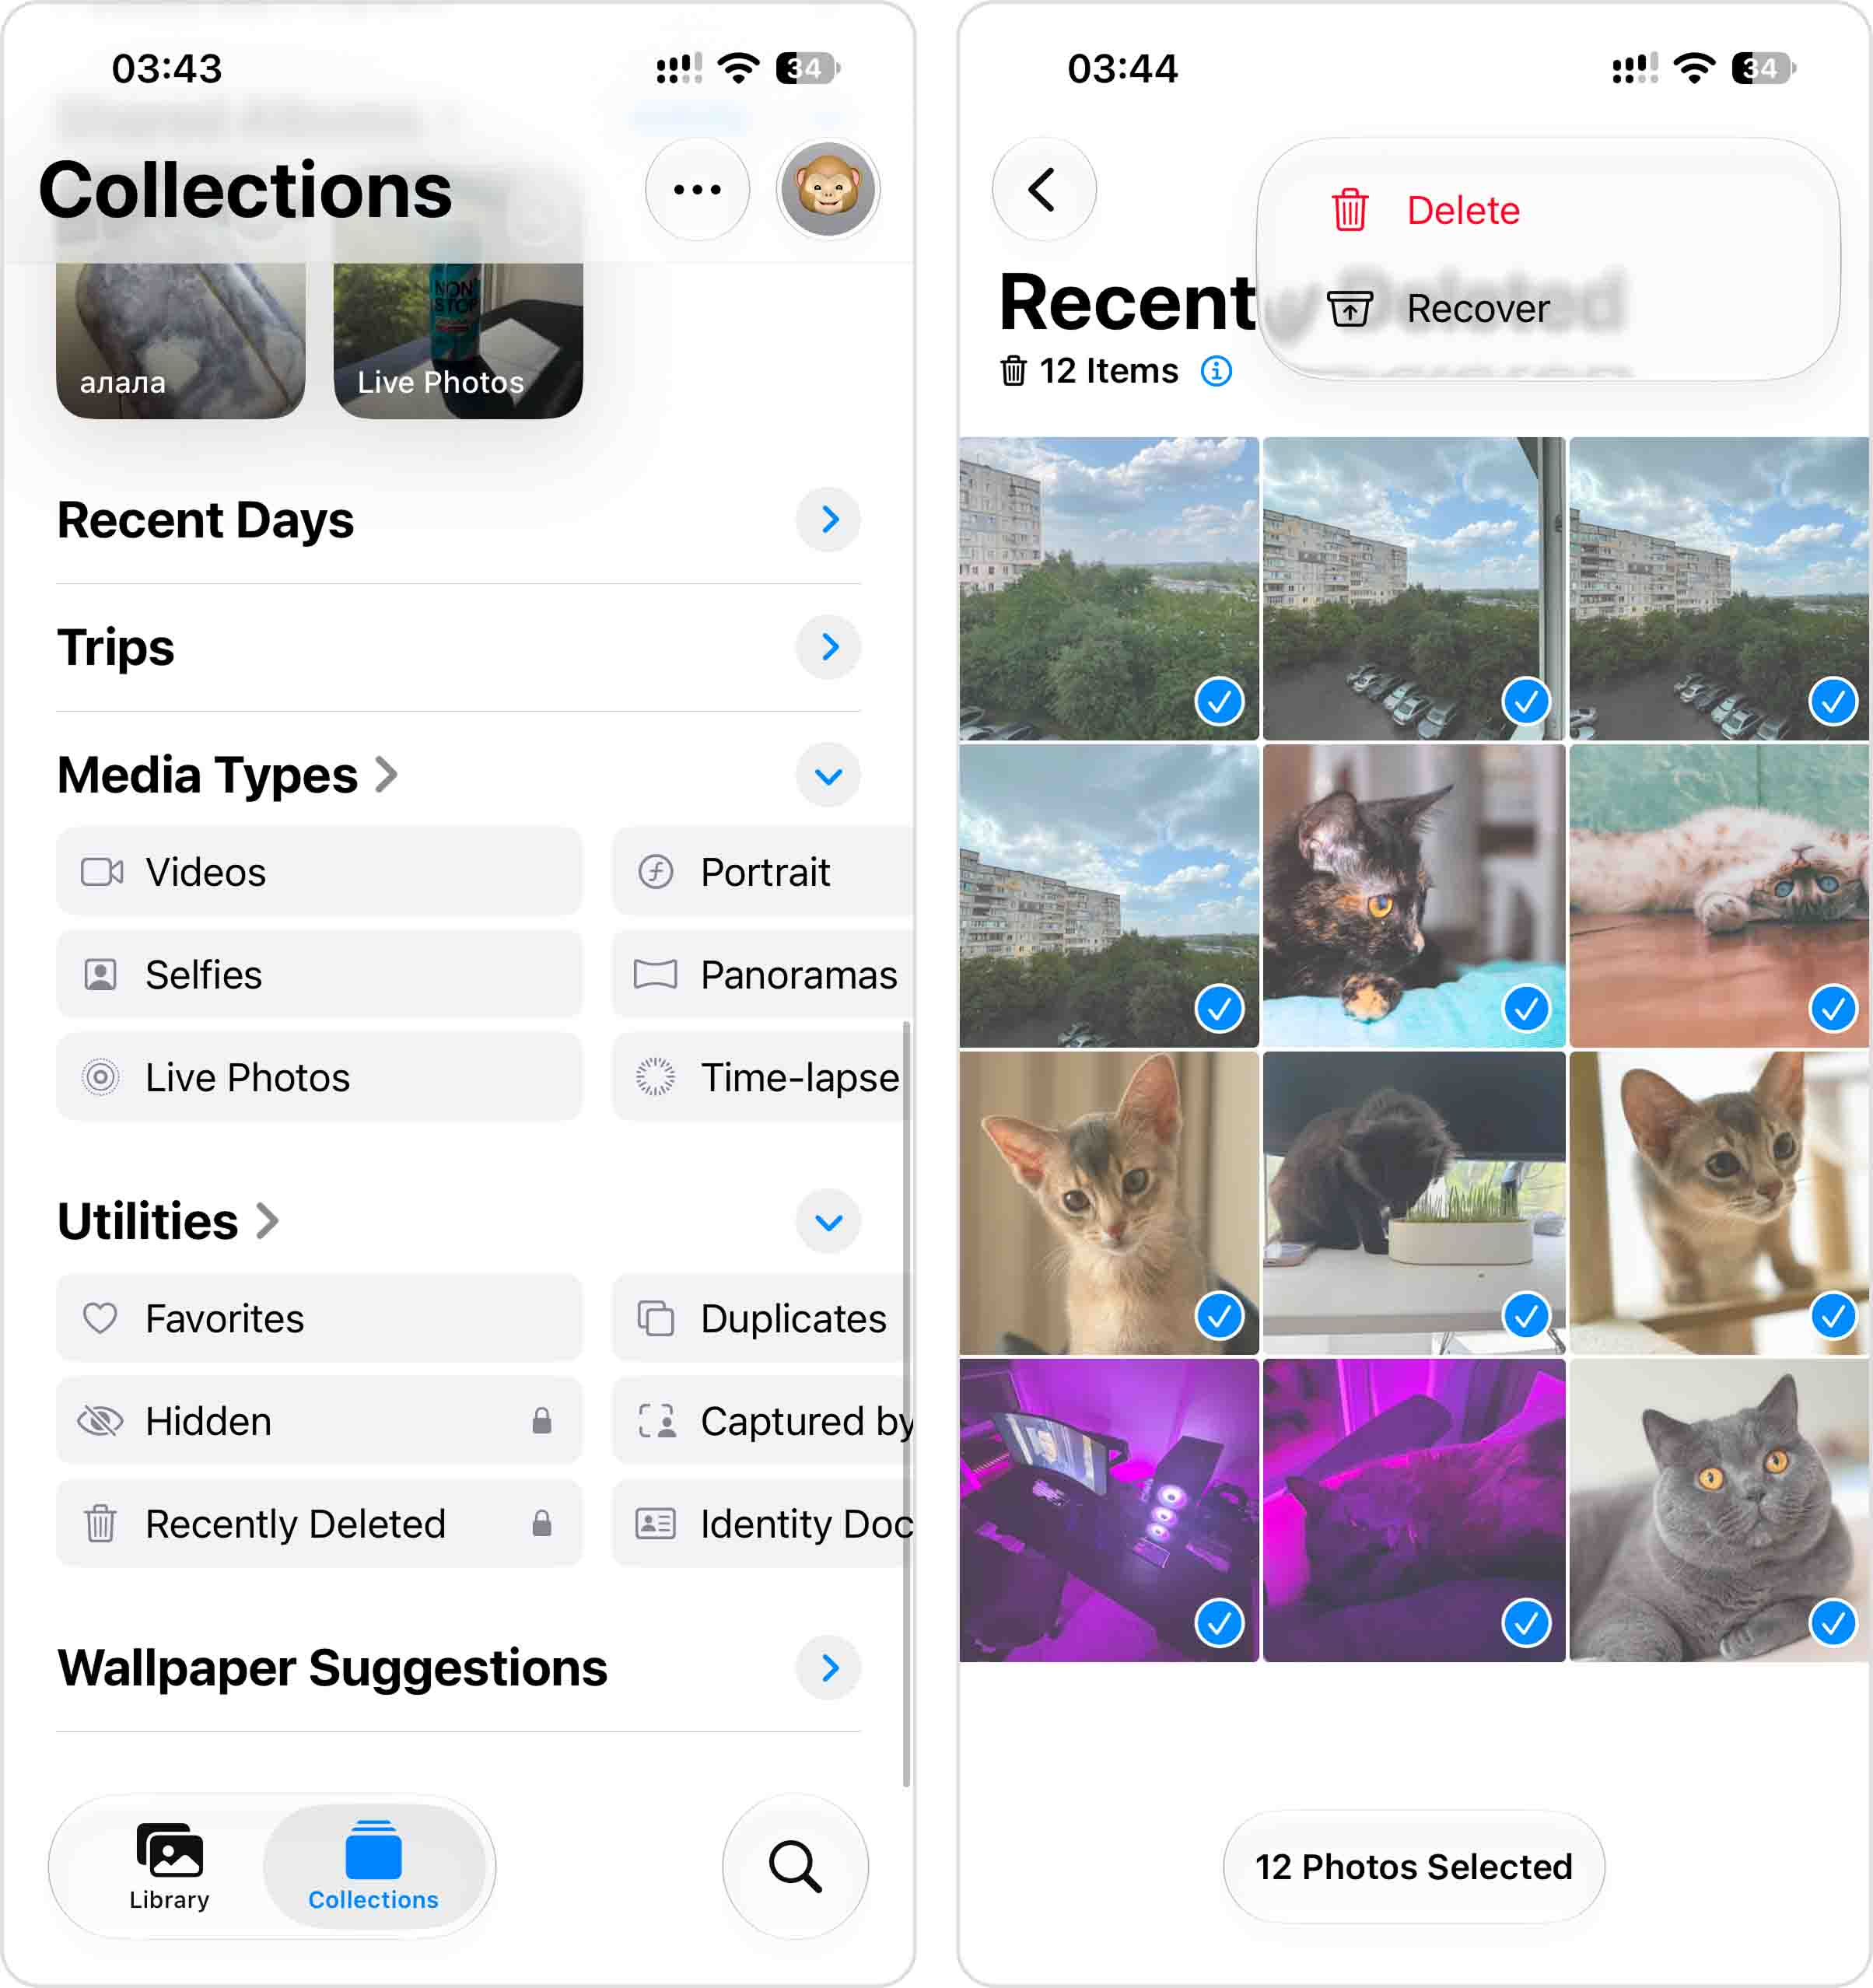
Method 1: Check the Recently Deleted Folder in the Photos App
When you delete photos from the Photos app, they are moved to the Recently Deleted folder also within the Photos app. You can check your recently deleted photos for 30 days, after which they are permanently deleted.
How to retrieve deleted photos from the Recently Deleted folder in the Photos app:
- Open the Photos app.
- Tap Recently Deleted (you may have to scroll a bit) and input your Face ID, Touch ID, or PIN when prompted.
- Tap on the photo you want to restore and tap Recover. You can also tap the Select button to select multiple photos at once.
- Tap Recover Photo to confirm the action. You should find your missing photos in their original albums.
Keep in mind that the Files app has its own separate Recently Deleted folder, so if the missing photos were stored or deleted through Files rather than Photos, check there as well.
Method 2: Restore Photos From an iCloud Backup
If iCloud Backup was enabled before you permanently deleted the photos, an older backup may contain copies of them. This method only works if you have a backup created while the missing photos were still on your iPhone. You’ll also need to erase the iPhone before you can restore an iCloud backup, so check the backup date before proceeding.
If iCloud Photos was enabled, your photos and videos were synced separately with iCloud and were not included in your iCloud Backup.
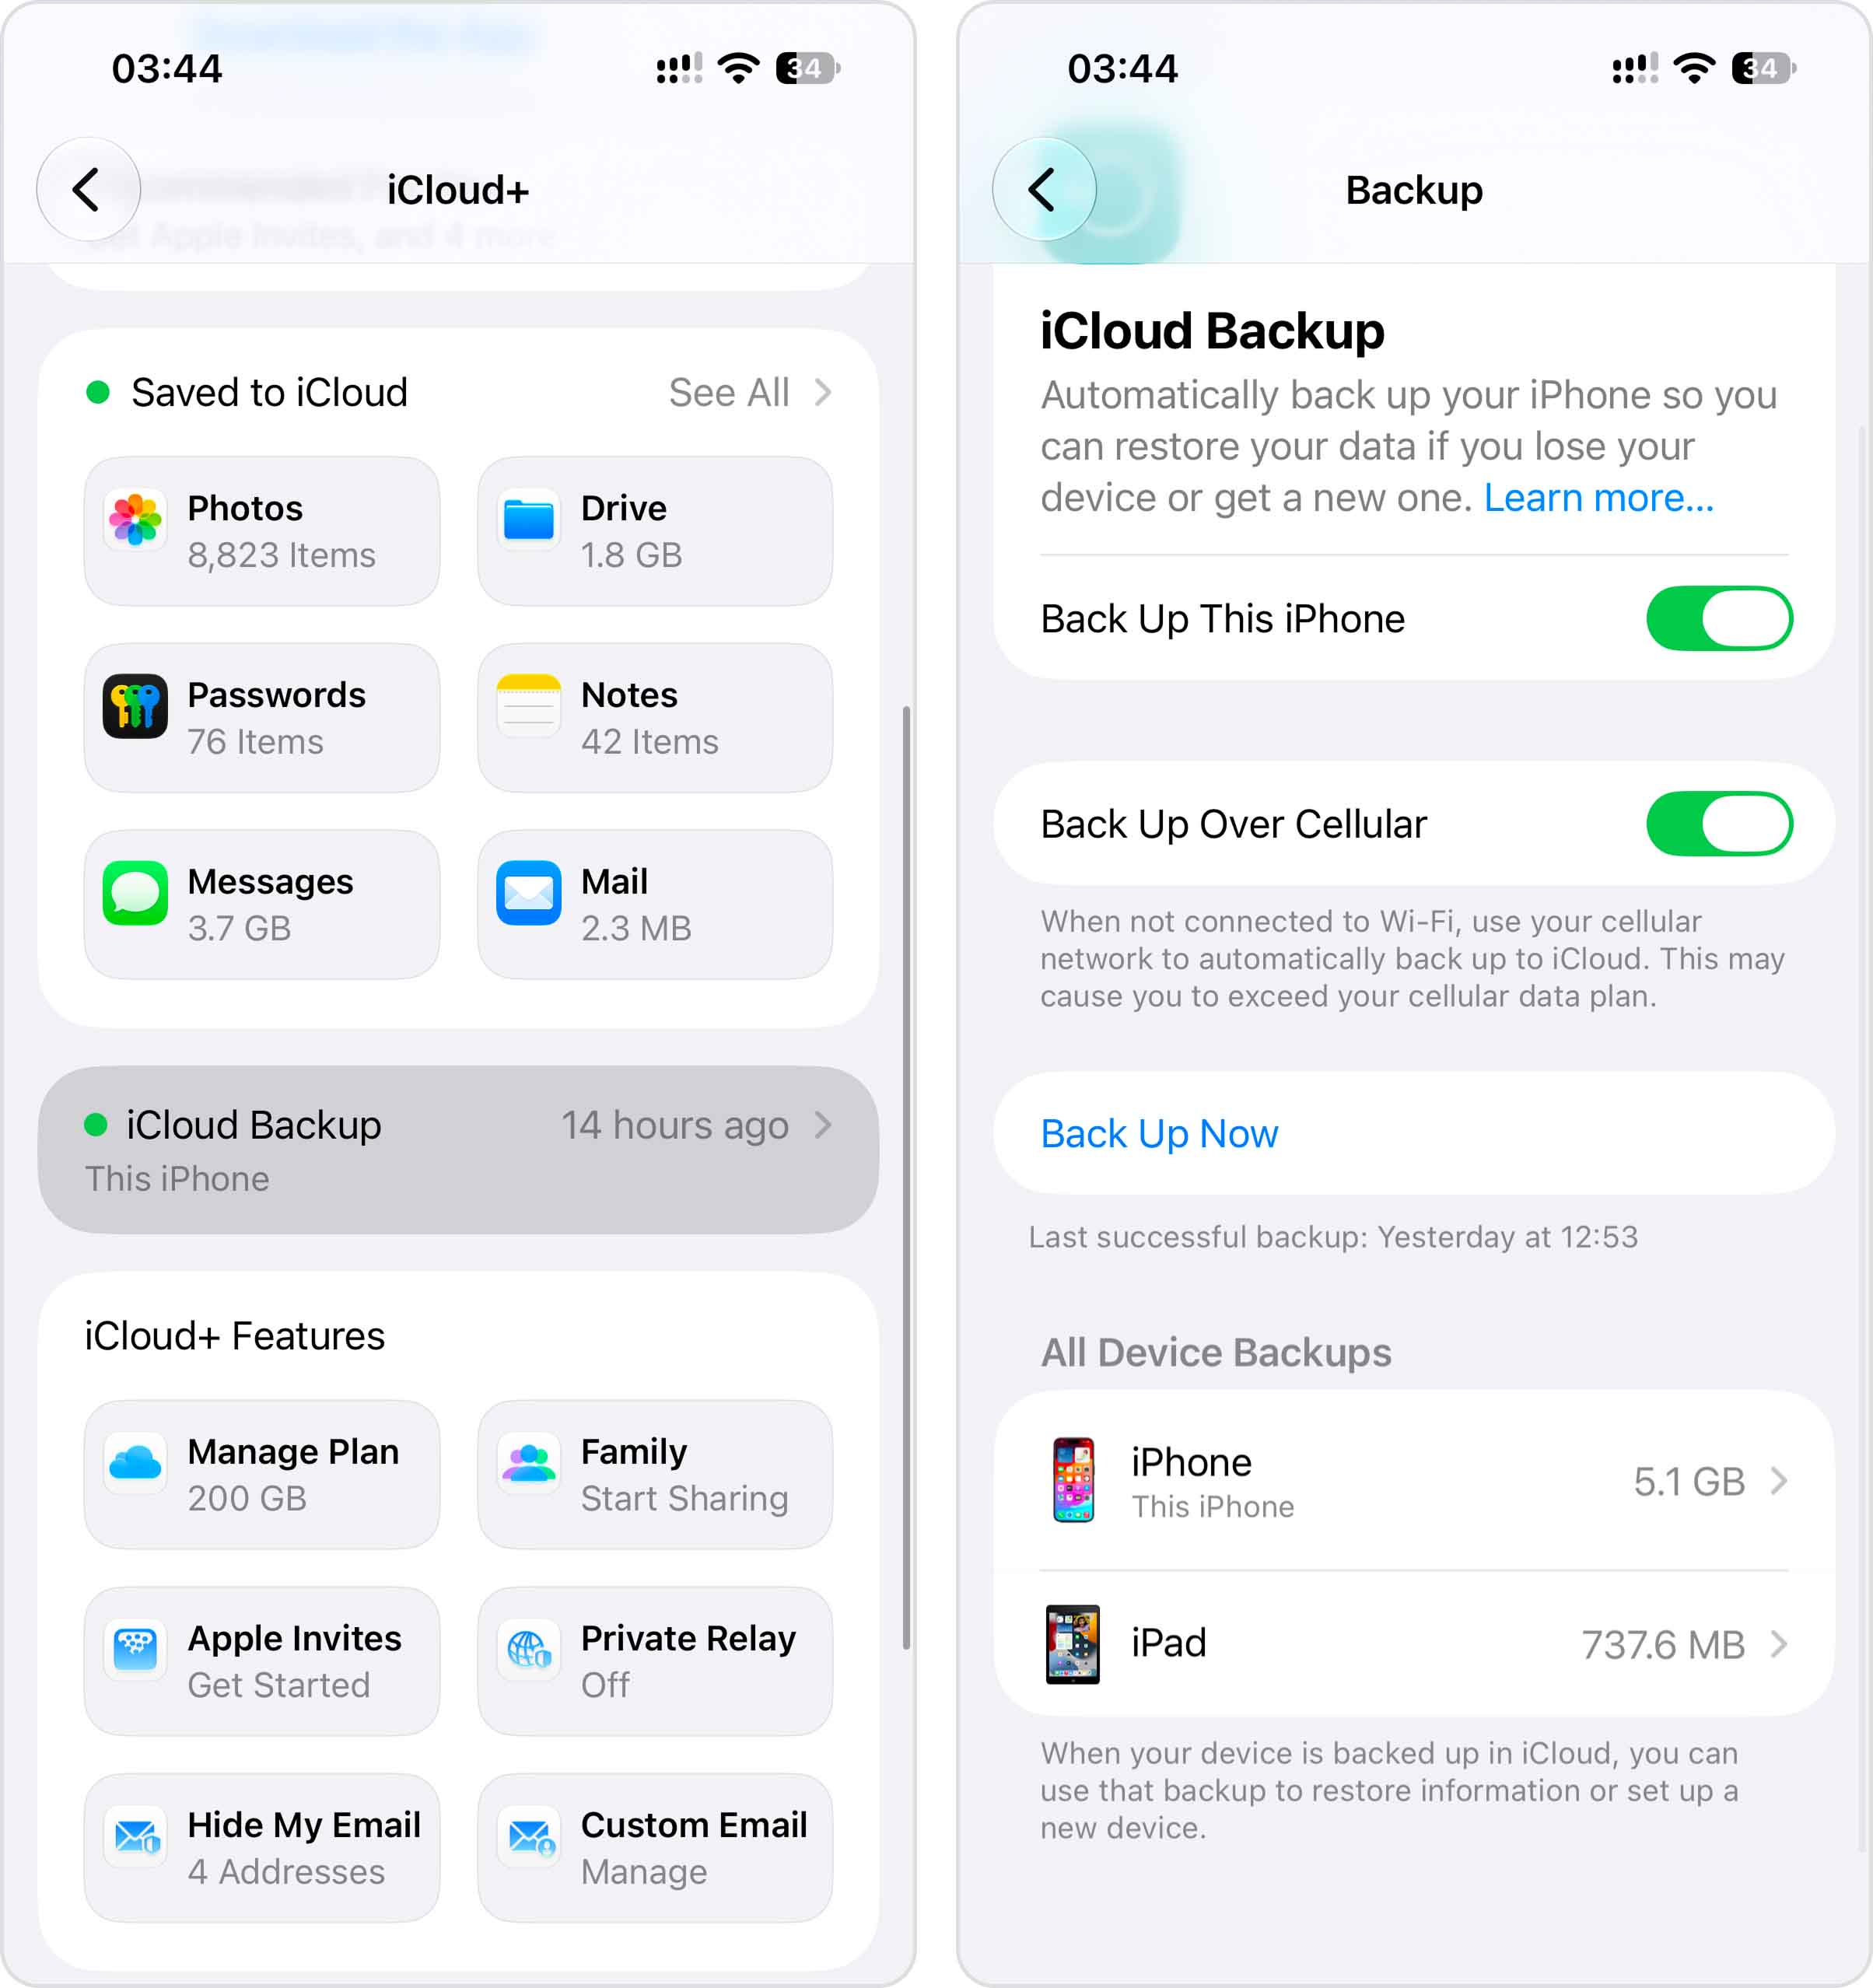
First, check whether you have a suitable iCloud backup:
- Open Settings and tap your name.
- Go to iCloud > iCloud Backup.
- Check the date and time of the available backup. You need one created before the photos were deleted.
If you have a suitable backup, you can restore your iPhone from it:
- Before proceeding, save any important data currently on your iPhone that isn’t already backed up elsewhere.
- Open Settings > General > Transfer or Reset iPhone.
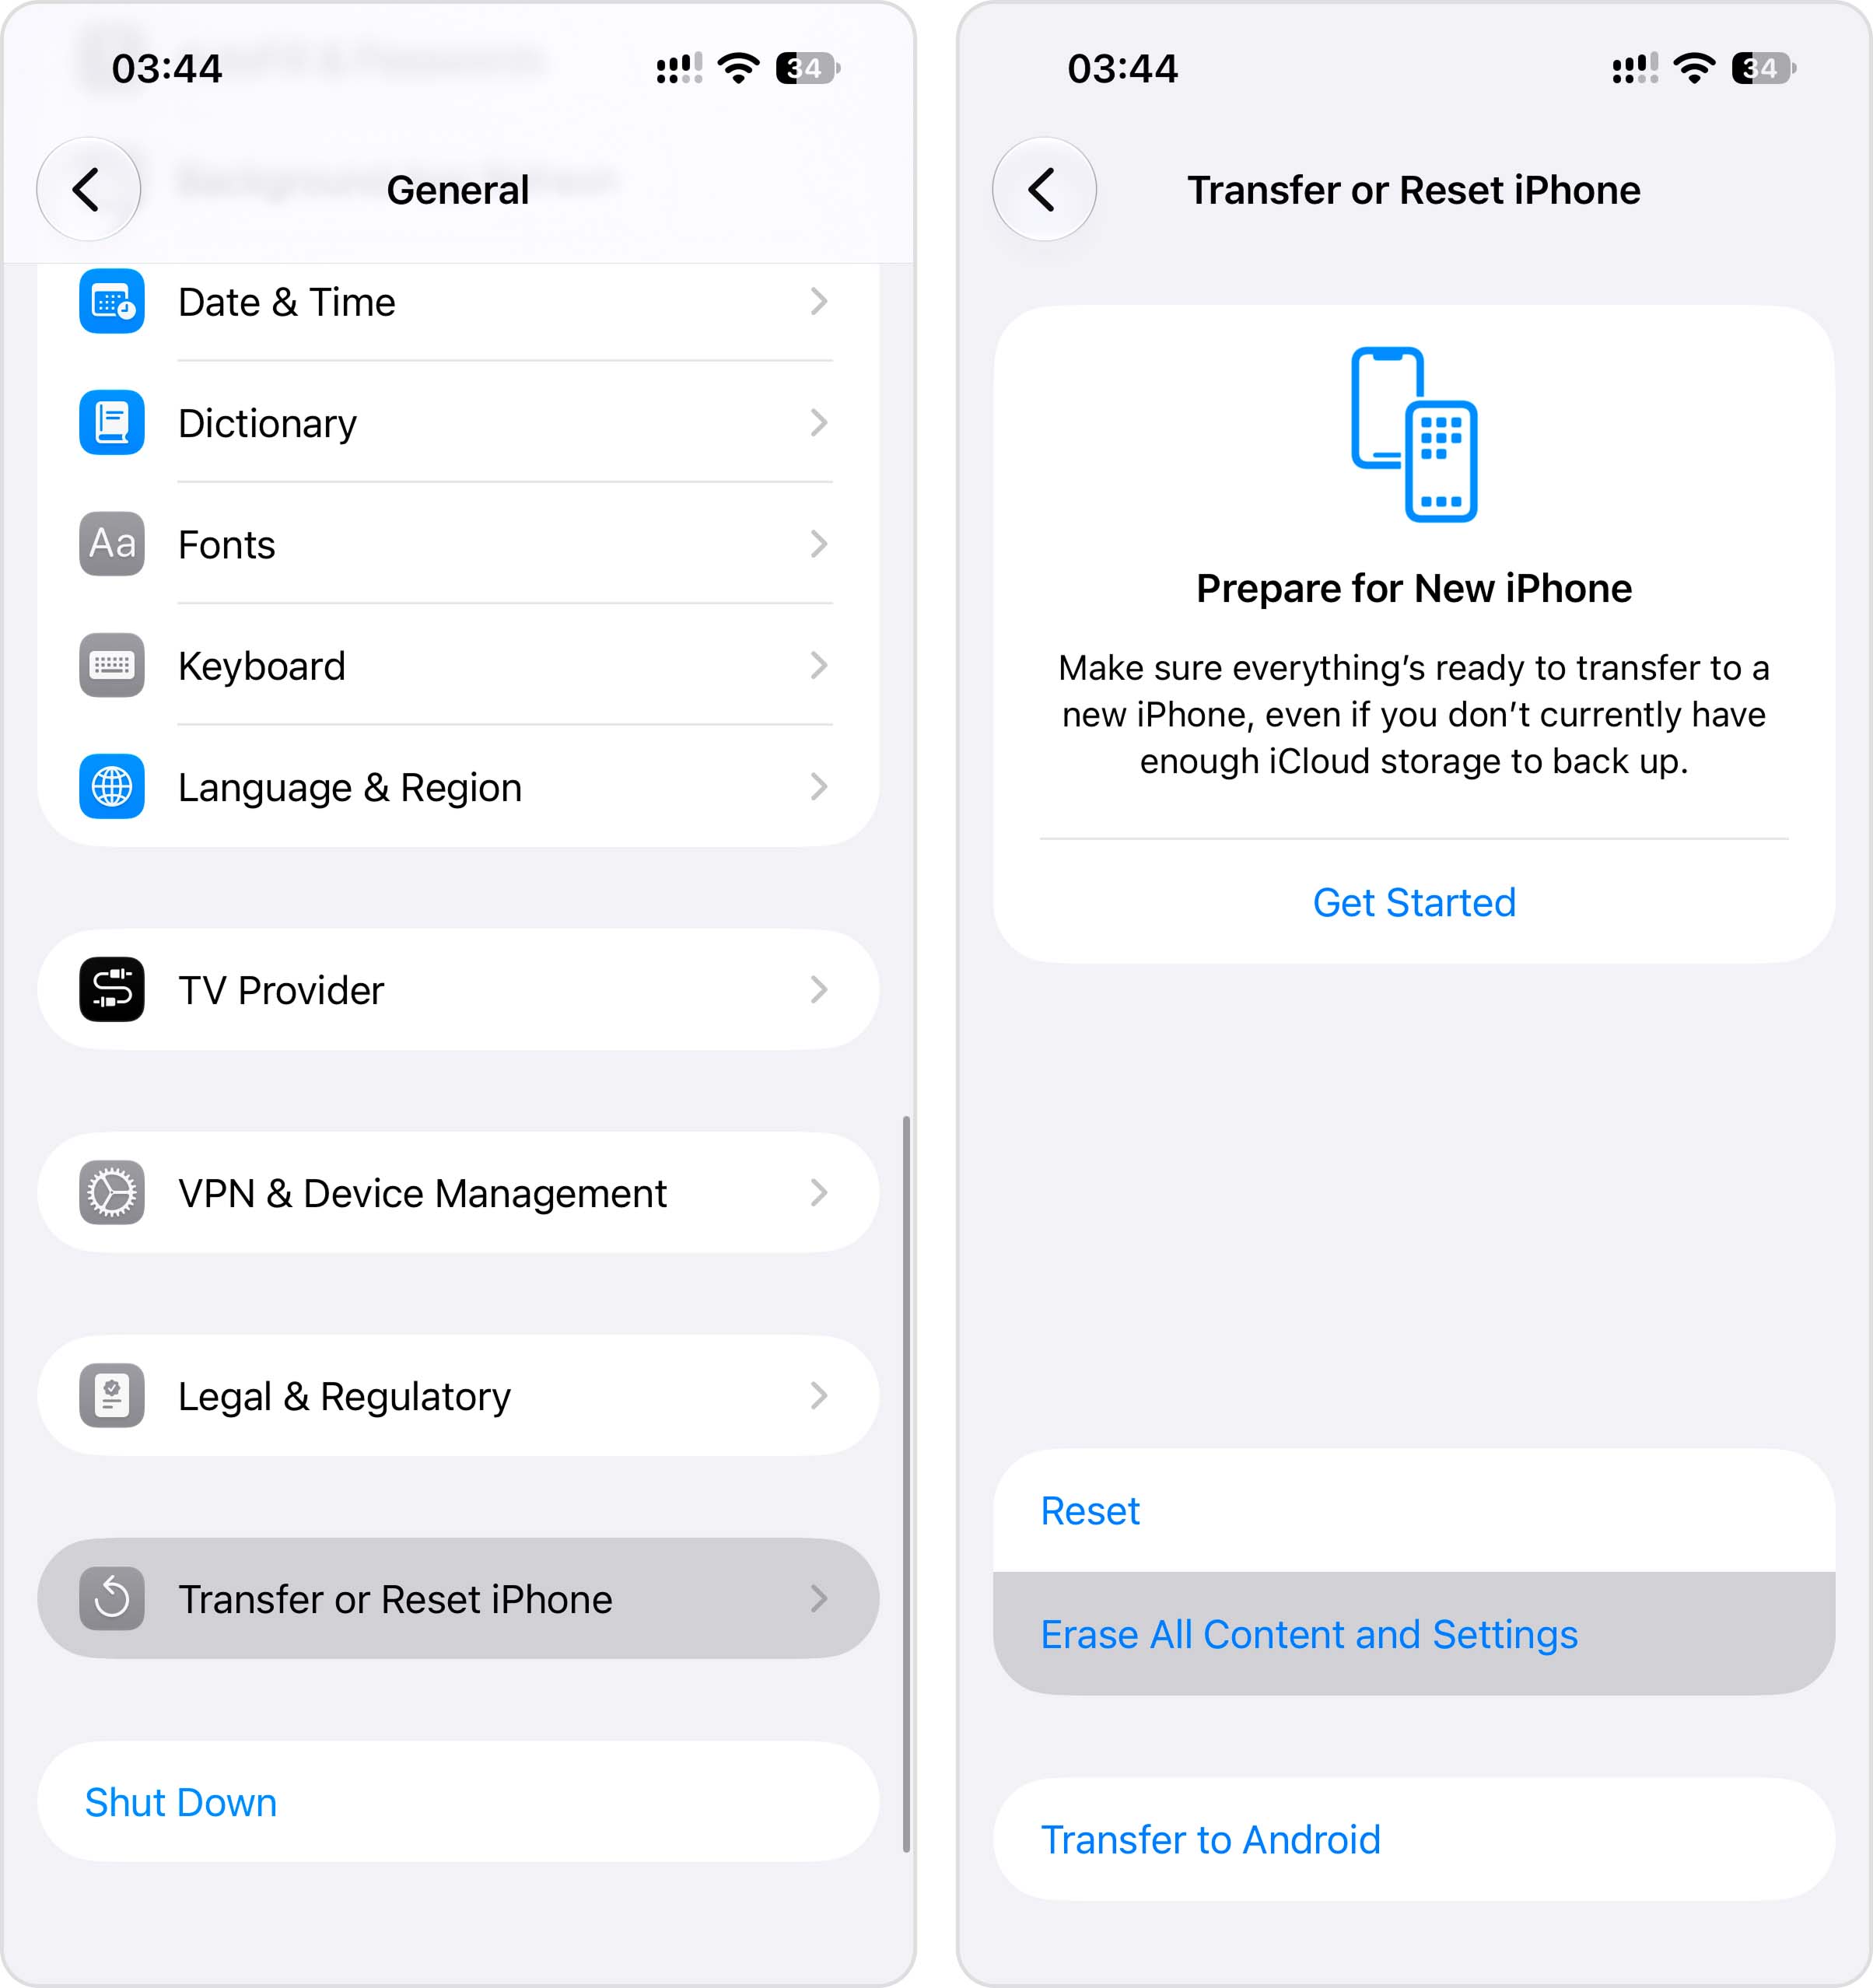
- Tap Erase All Content and Settings and follow the prompts.
- When the iPhone restarts, follow the setup process until you reach the Transfer Your Apps & Data screen.
- Select From iCloud Backup and sign in to your Apple Account.
- Choose the backup created before your photos were deleted and start the restore.
Keep the iPhone connected to Wi-Fi and power after setup. Some data can continue restoring in the background after you regain access to the device.
Method 3: Restore Backup With Finder
If you previously backed up your iPhone to your Mac using Finder, that backup may contain the photos you permanently deleted later. The backup must have been created before the photos were deleted.
Restoring a Finder backup replaces the current data on your iPhone with the data stored in that backup, so save any important new files before proceeding.
- Connect your iPhone to your Mac and open Finder.
- Select your iPhone from the left sidebar and navigate to the General tab. Under the Backups section, click Restore Backup…
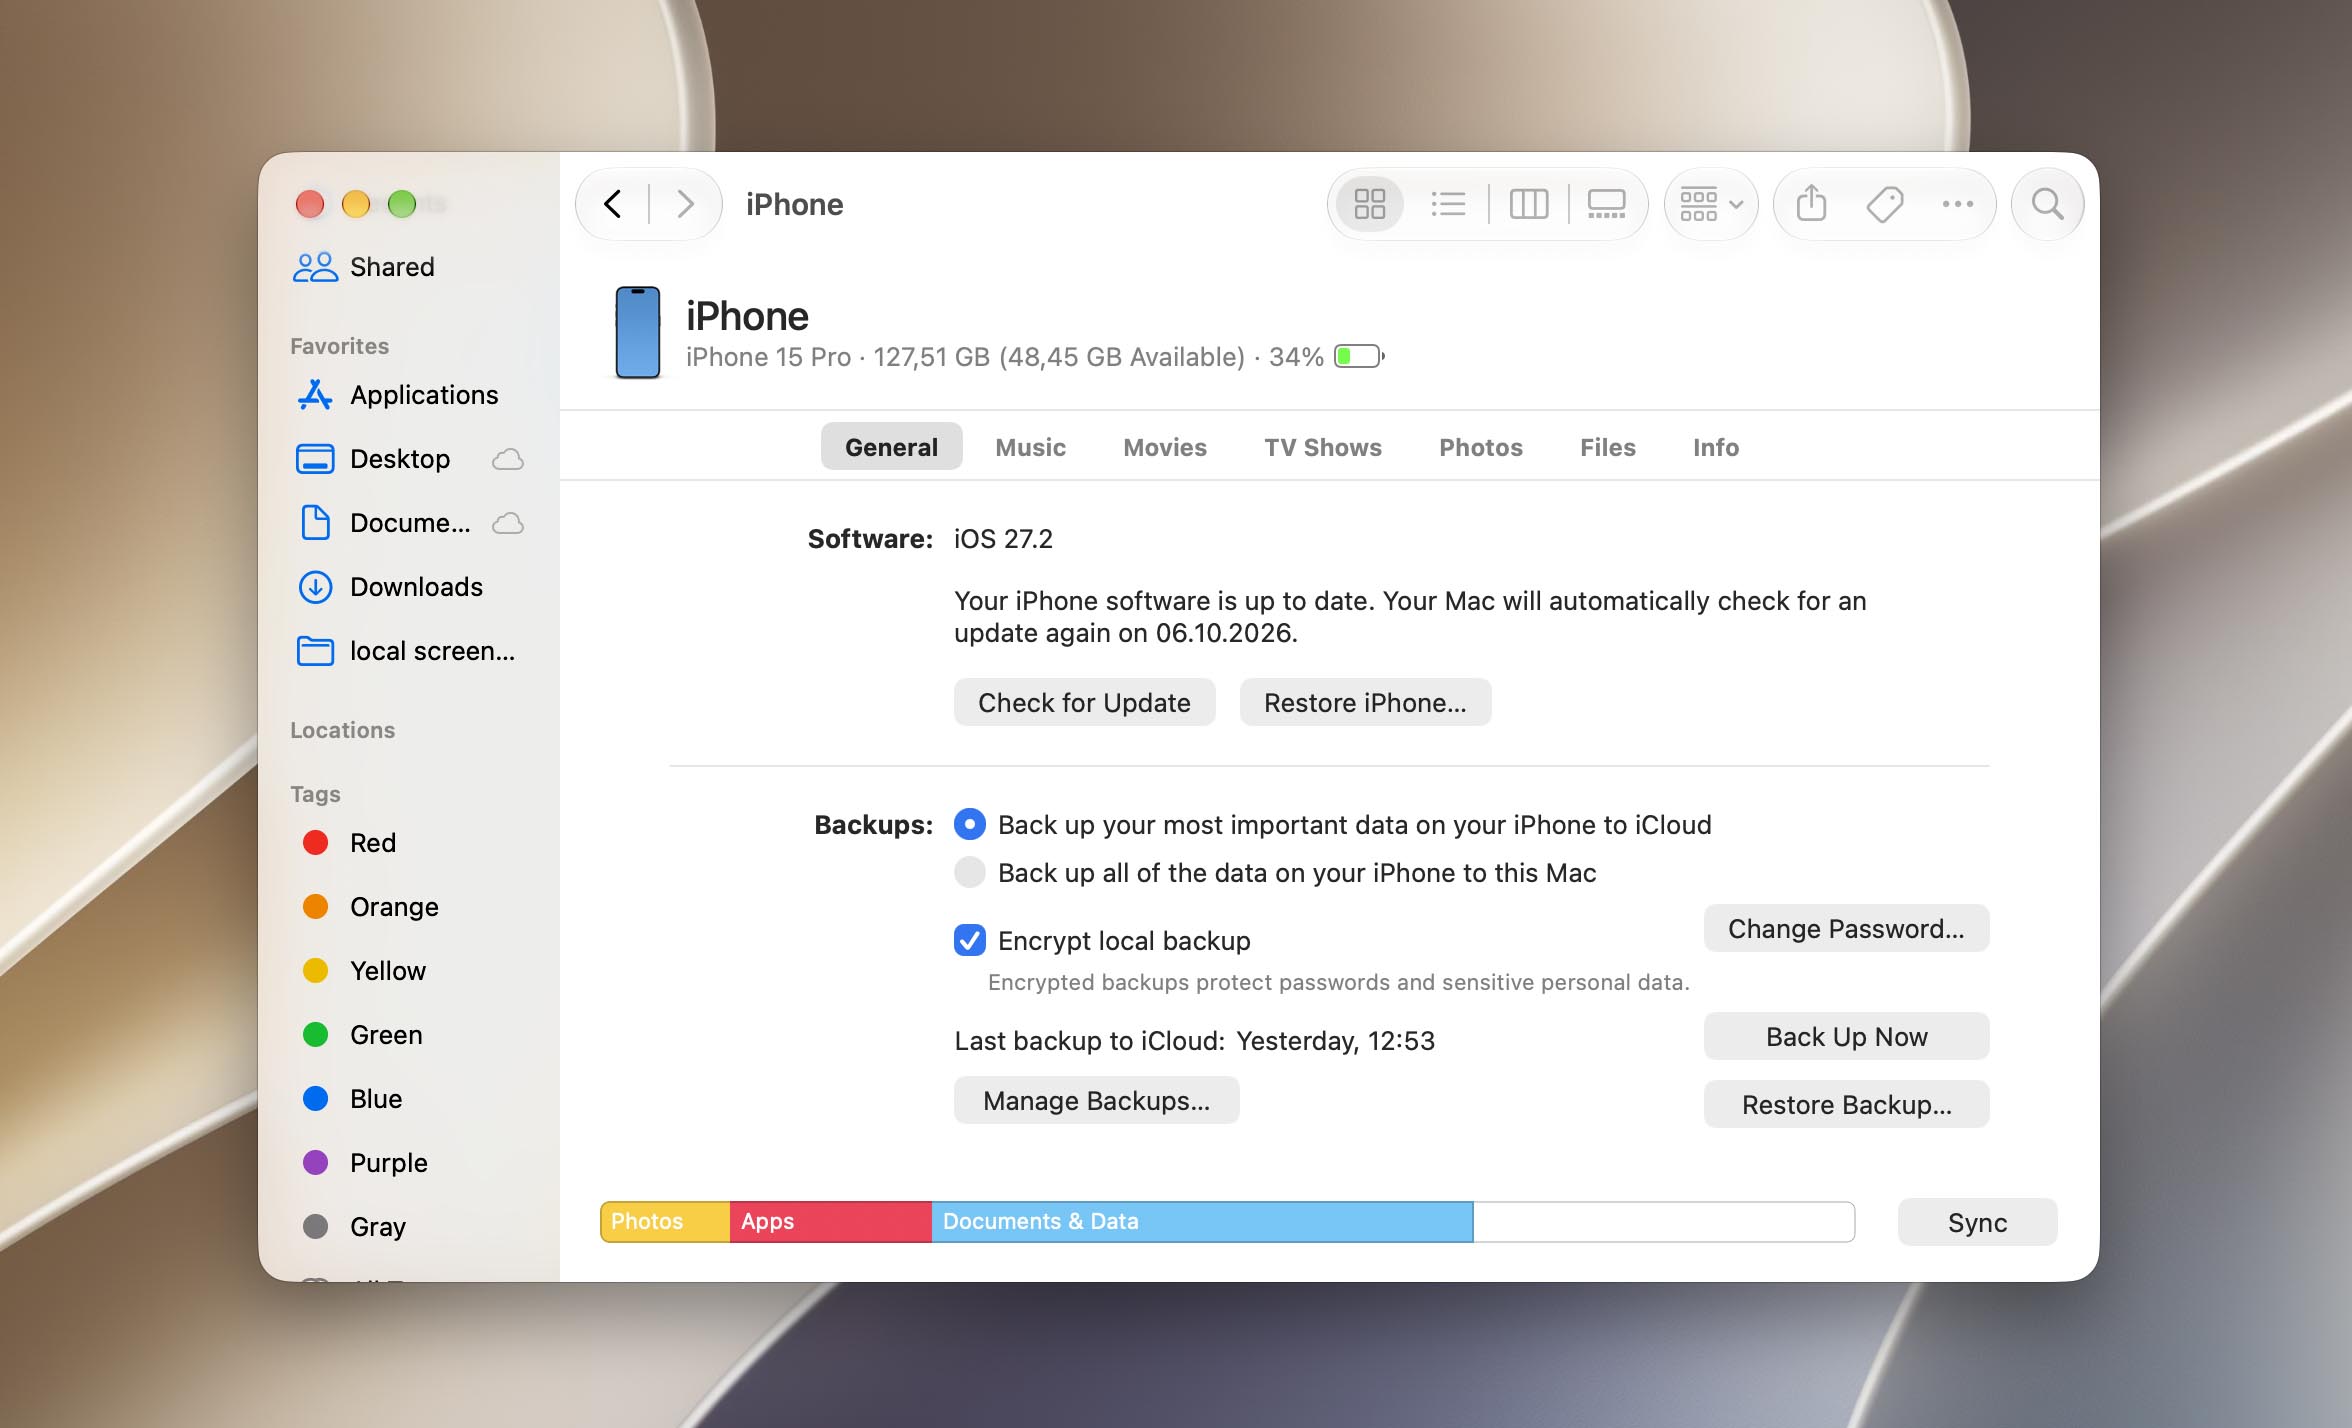
- Choose the backup that contains your photos. Then, click Restore.
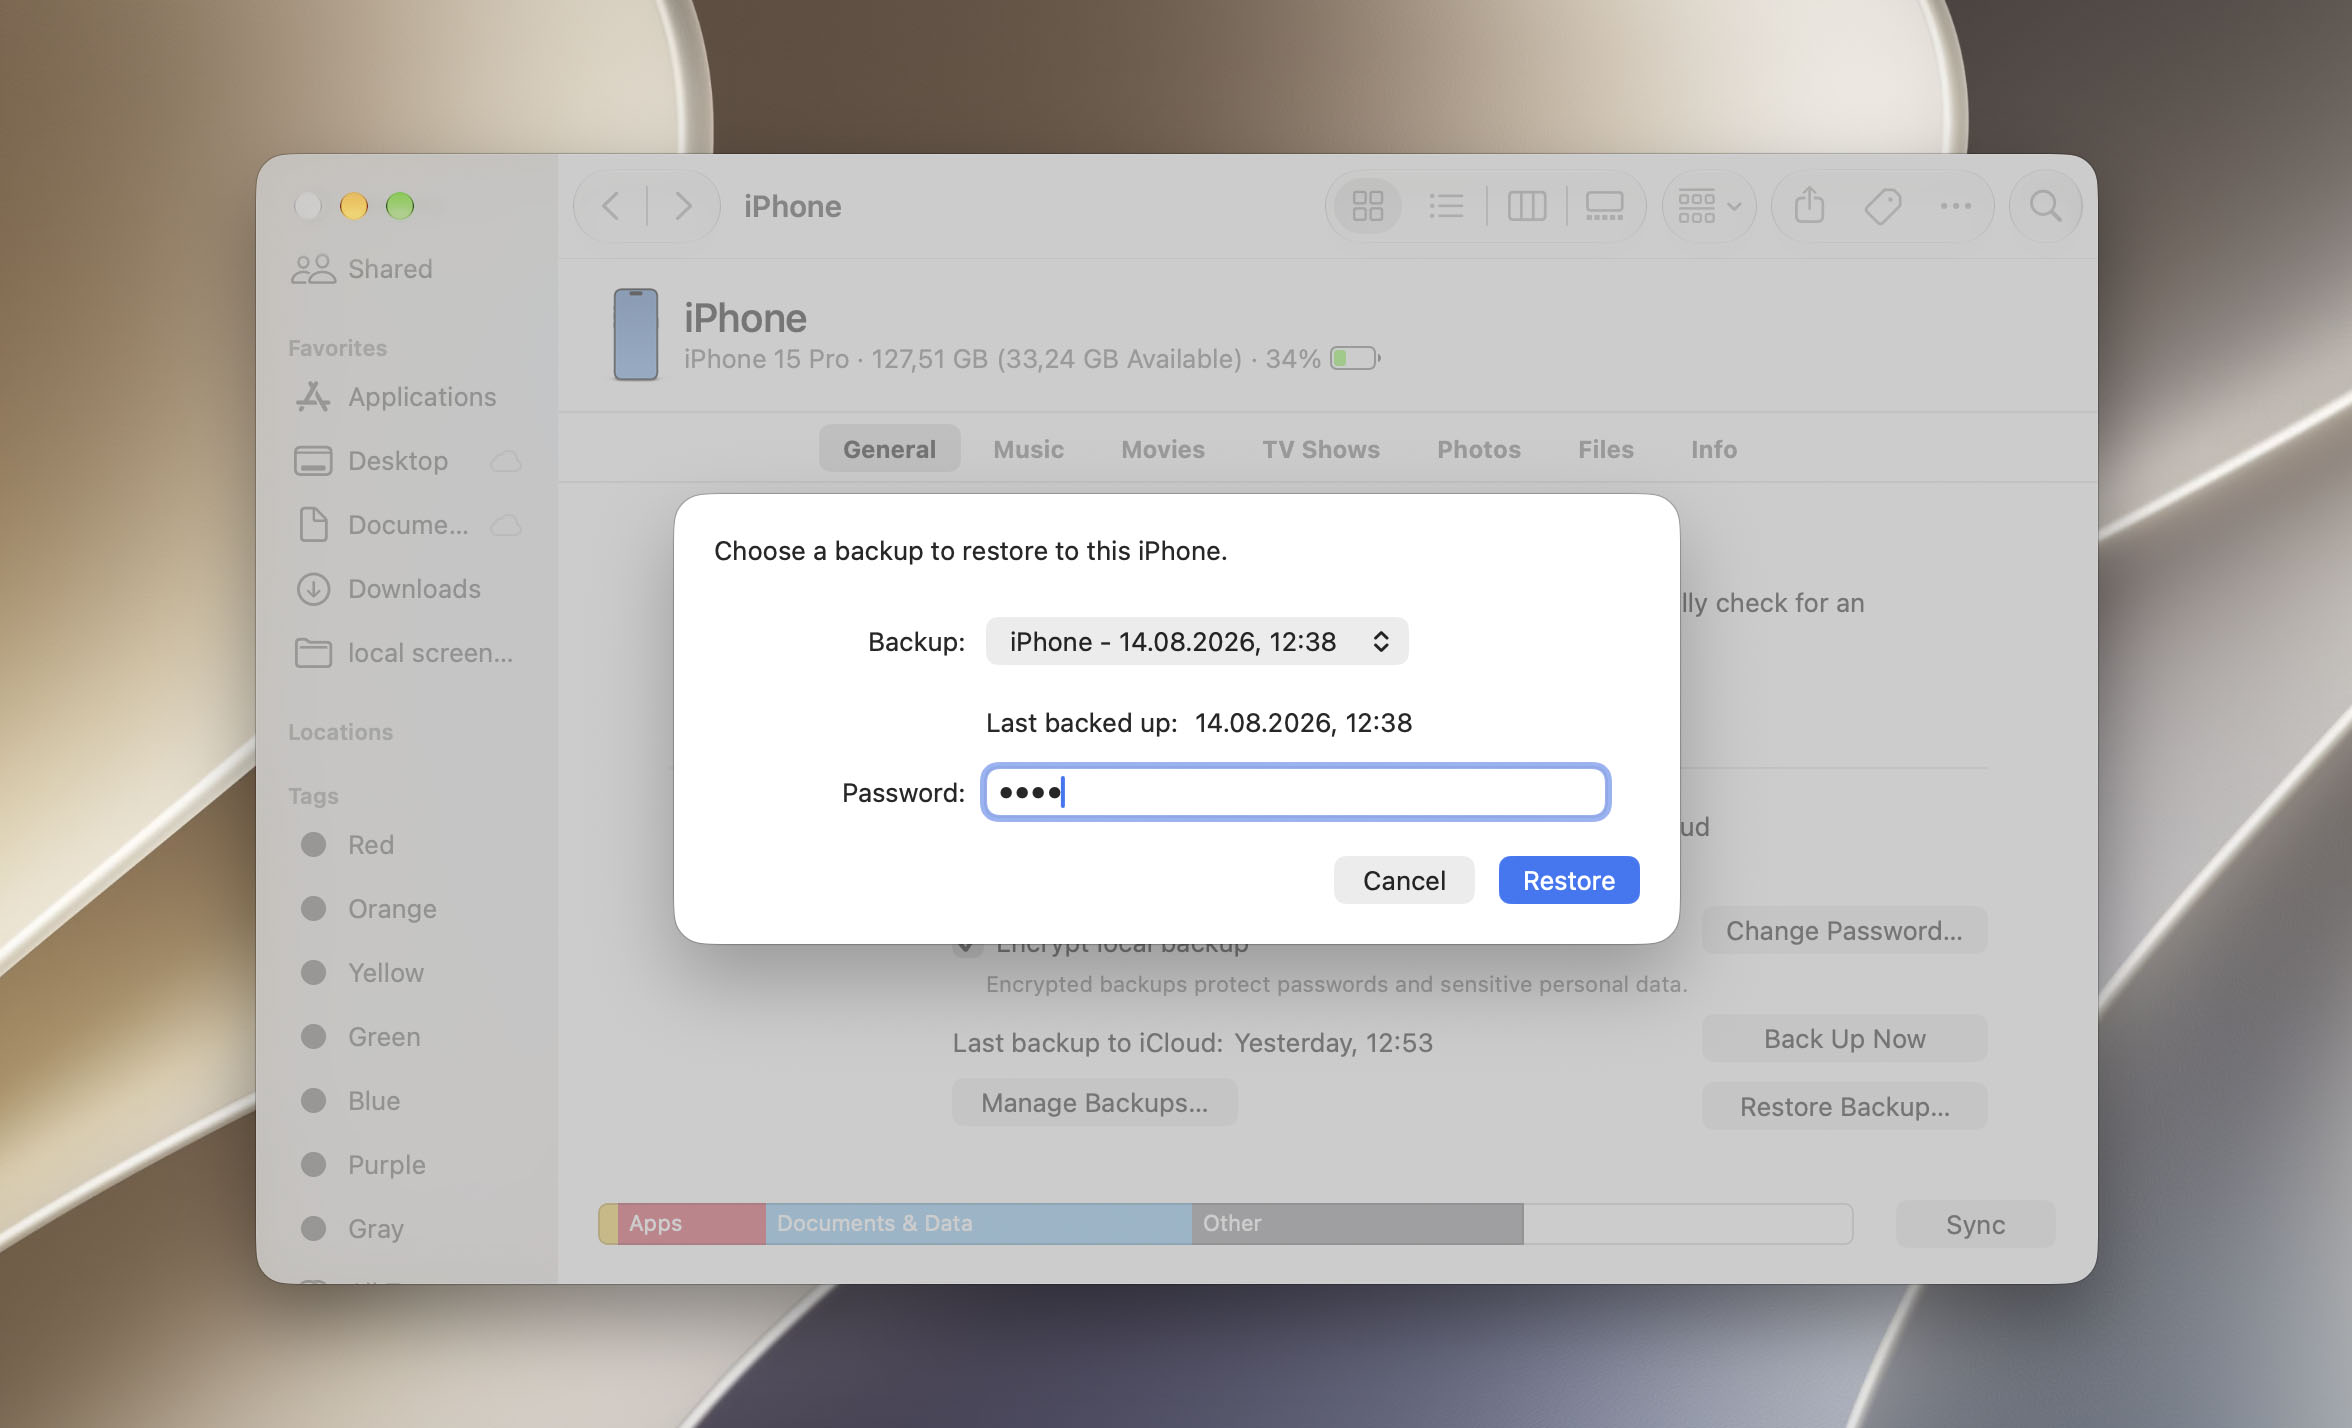
Don’t disconnect your iPhone from your Mac while your iPhone is being restored! Wait until the process is complete then if your photos have been recovered.
What about iPhone data recovery software? Unlike an SD card or computer drive, an iPhone doesn’t provide third-party software with direct block-level access to its internal storage. This means recovery tools can’t scan the iPhone for permanently deleted photos in the same way they can scan an SD card.
However, some iPhone data recovery tools can analyse a local backup created with Finder and extract individual files from it. This can be useful if the backup contains the photos you need but you don’t want to restore the entire backup and replace the current data on your iPhone. For more details on how these tools work and what they can actually recover, see here.
How to Get Deleted Photos Back on Android Phone
If the permanently deleted photos were stored on your Android phone’s SD card, we recommend following our separate guide on how to recover deleted photos from an Android SD card.
Depending on how you set up your Android phone, there are 3 different methods to recover deleted photos. Unlike iPhone recovery, Android recovery is (mostly) done on the device itself. We’ll walk you through each method in the sections below.
Method 1: Check Recycle Bin in Gallery
Depending on the OS version of your Android smartphone, your Gallery app should have a Recycle Bin or Recently Deleted folder that stores deleted photos for 30 days. Then, the photos are permanently deleted.
If you enabled Back up and Sync, your files will stay in the Trash folder for 60 days instead of 30.
To restore Gallery photos from the Recycle Bin/Recently Deleted folder on Android:
- Open the Gallery app. Then, tap Albums and scroll down and tap Recently Deleted.
- Tap on the photo you want to recover. Then, tap Restore.
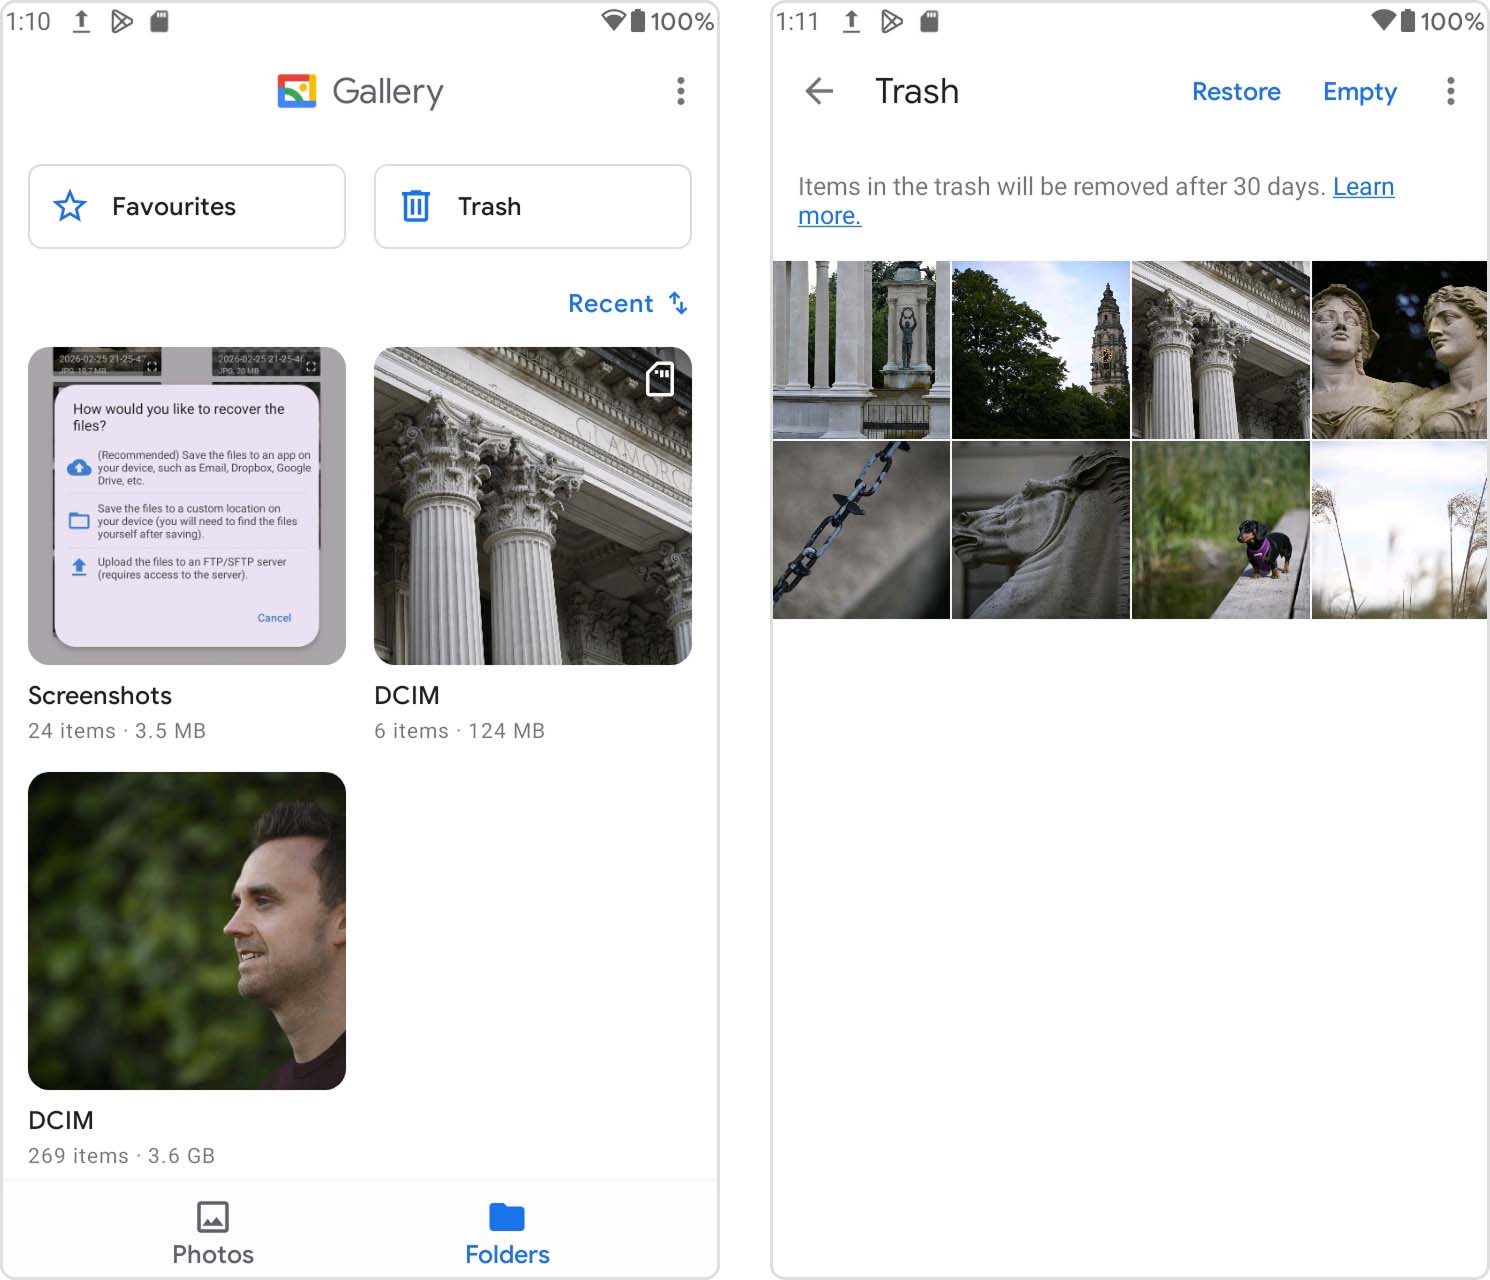
Your phone’s Gallery might look different, but the steps shouldn’t deviate much (and the Recycle Bin or Recently Deleted folder is always in the Gallery app).
Method 2: Restore From Google Photos
Did you back up your photos with Google Photos? If you deleted them from your Gallery (and from the Trash on your Android phone), Google Photos will have moved them to its own Trash folder.
You can follow this method using the Google Photos app on Android or by accessing Google Photos using a browser.
To restore deleted photos from the Google Photos Trash folder:
- Open the Google Photos app. Then, tap Library > Trash.
- Tap Select in the top-right corner of the screen. Then, tap the photos you want to recover and tap Restore.
You should find the restored photo in the Gallery app or Google Photos in its original album.
Aside from Google Photos, there are other popular cloud storage services commonly used on Android devices. Some examples are Samsung Cloud, OneDrive, and Dropbox. These mobile apps usually prompt users to enable camera upload backups – in other words, every new photo you take gets uploaded automatically to the cloud. Even if you delete these photos from your local storage, you can simply download the copy that was uploaded online.
Method 3: Use an Android Data Recovery App
If you deleted your photos from the Trash folders of both your internal storage and cloud storage, you can’t access them the normal way anymore. However, their data is still on your device’s disk. The only way to access them is by using data recovery software.
Android smartphones have a wider variety of tools to choose from across different platforms. In the spirit of this article, we’ll give you our top recommendations for Mac, Android, and Windows devices.
- Disk Drill (Mac) – The Mac version of Disk Drill supports iOS and Android recovery as part of its all-in-one tool. Basically, you’ll be paying near the cost of a specialist tool (Android-only) for a full-suite data recovery software that you can use for all your devices forever. Disk Drill is highly-rated and looks great too – but you need to root your device for it to work.
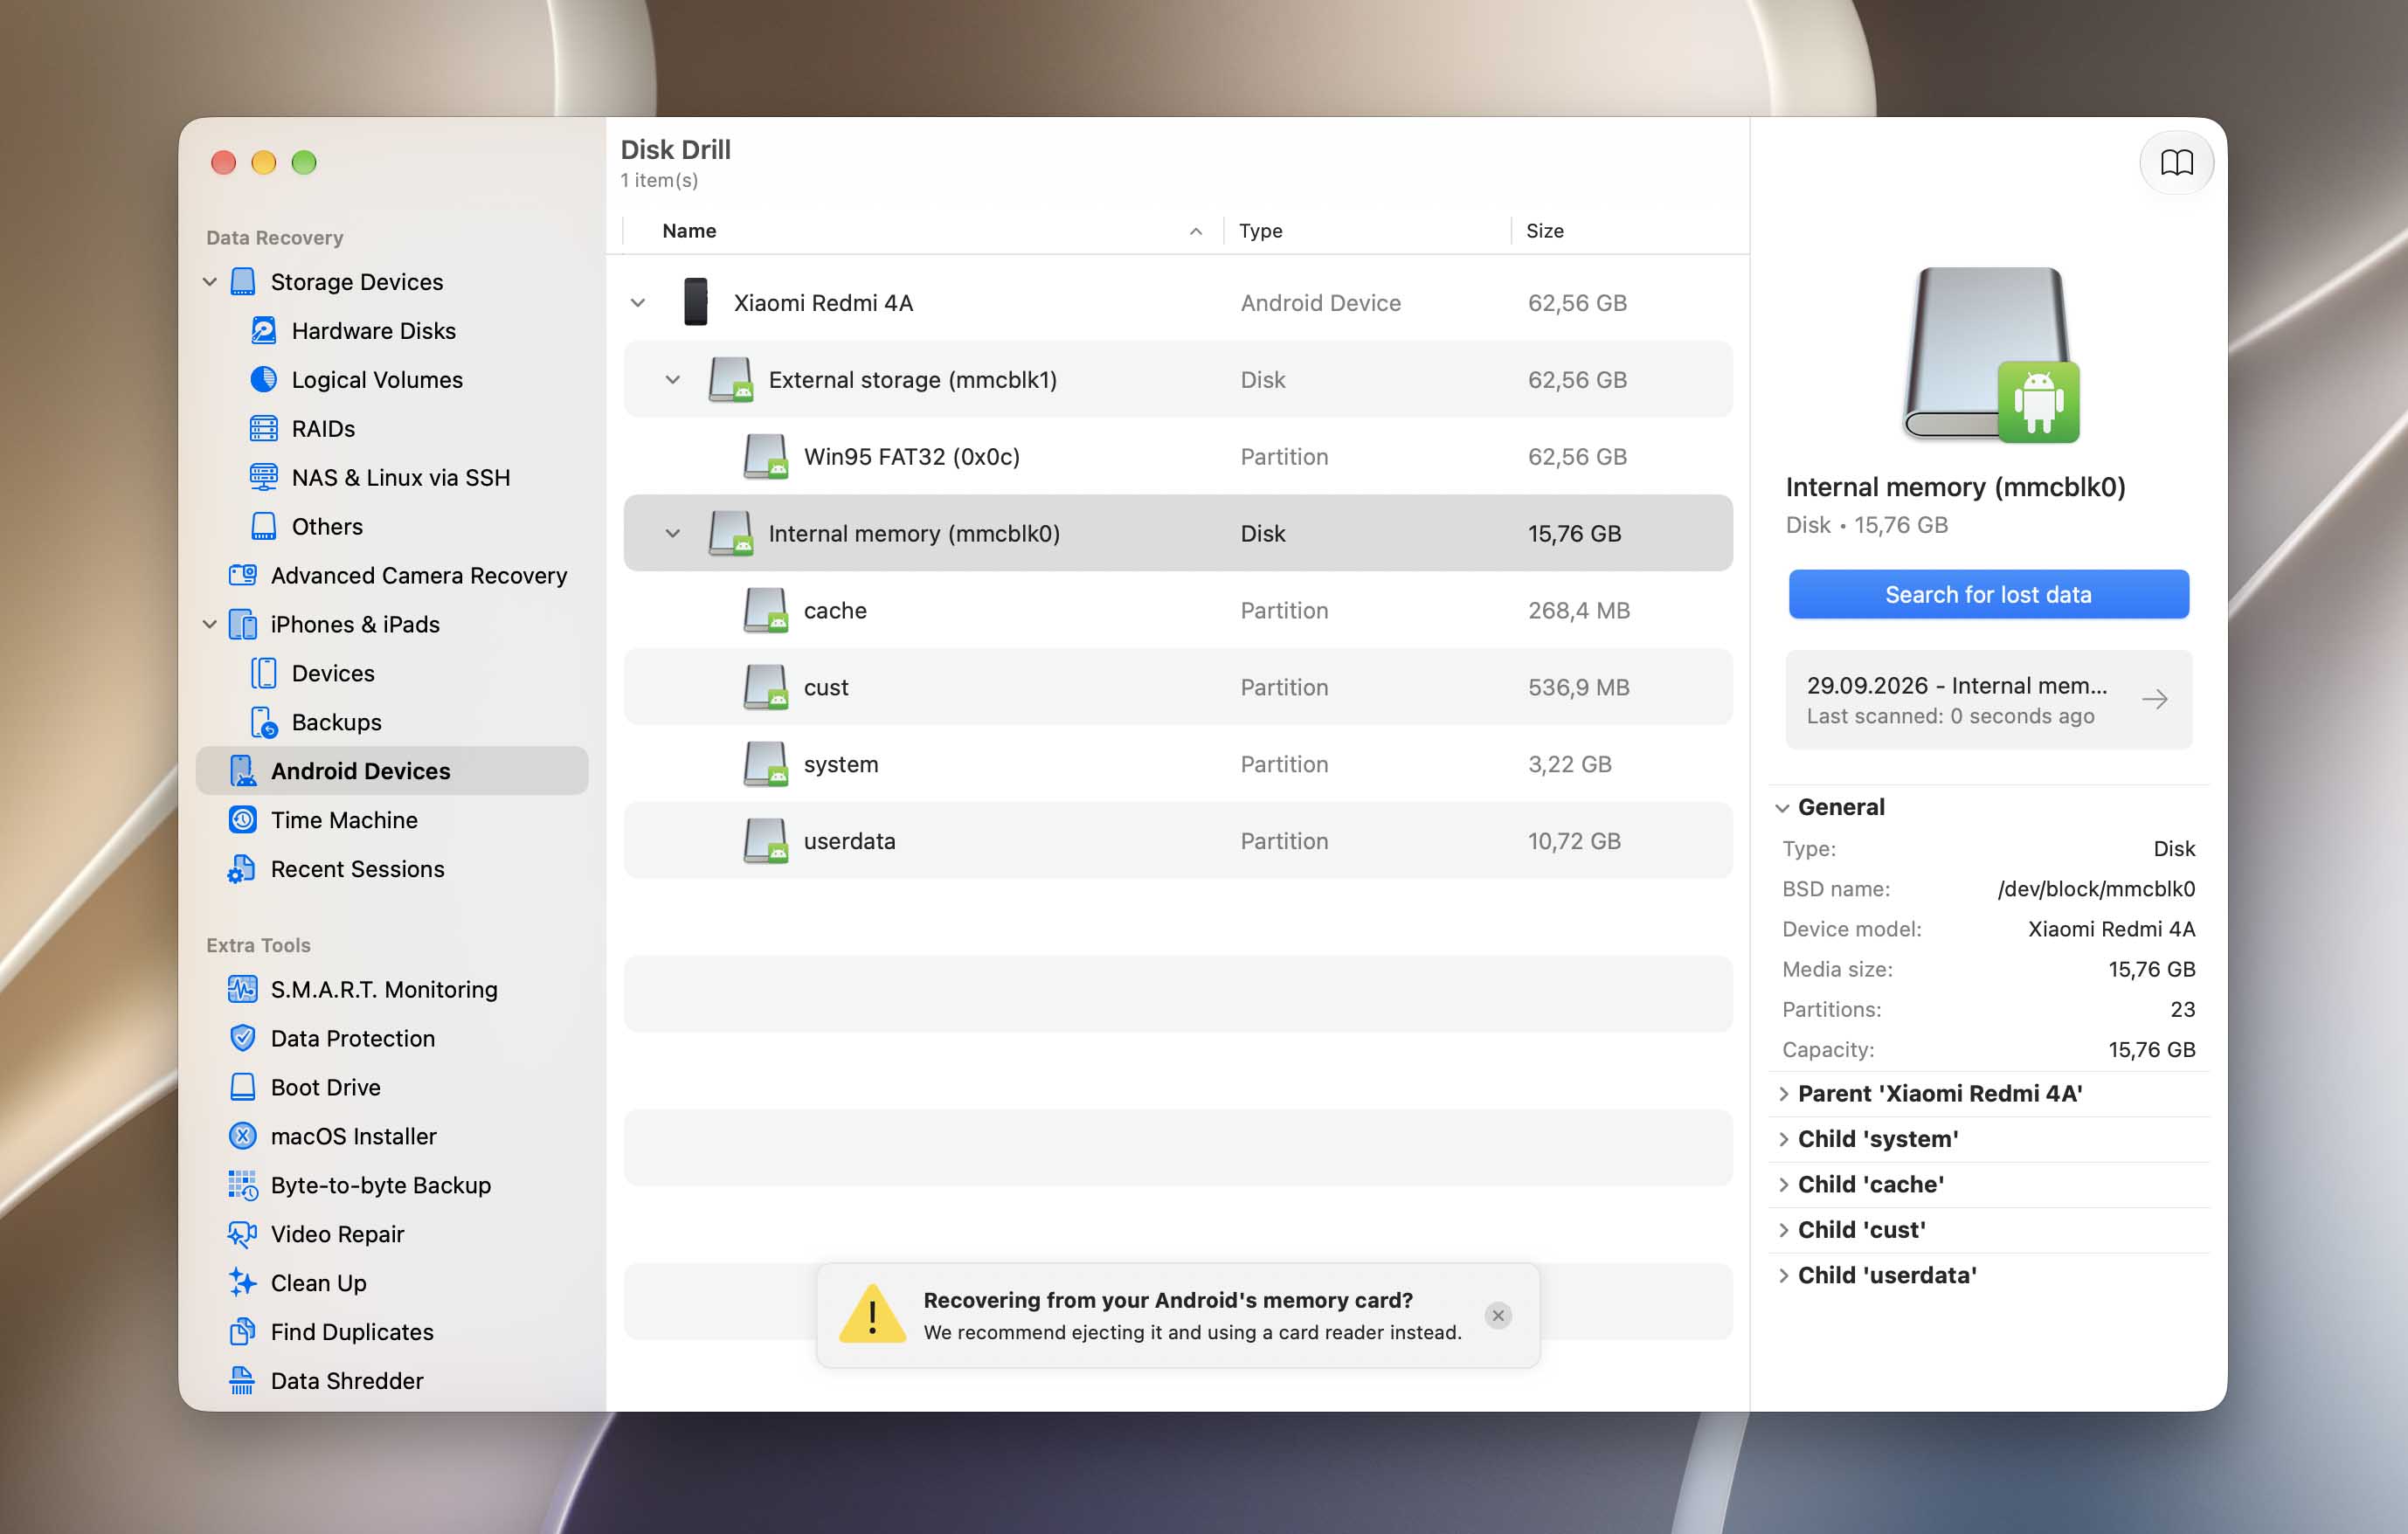
- DiskDigger (Android) – If you want data recovery software that you install directly on your phone, we recommend DiskDigger. DiskDigger can restore photos and videos from your device’s internal memory or from your SD card. Even its free version and Basic Scan restored a lot of data. To use the Full Scan, you need to root your phone.
- Dr. Fone (Windows/Mac) – Dr. Fone by Wondershare is an Android-only data recovery software, but you can upgrade your license to support iOS too. Aside from general data recovery, it can recover files from broken photos and extract data from Android backups uploaded to Google Drive. As far as specialist tools go, it’s the best across the board.
To scan an Android phone’s internal storage for deleted files, data recovery apps typically require root access. Rooting gives software elevated system permissions that Android normally restricts, including deeper access to the device’s storage. Without root access, recovery apps generally can’t perform the type of low-level scan used to search for permanently deleted photos.
Final Thoughts
The chances of recovering permanently deleted photos depend largely on where they were stored and what happened to that storage after deletion. Photos on an SD card or HDD may remain recoverable as long as their data hasn’t been overwritten, while recovery from SSDs and the internal storage of modern smartphones can be much more limited. This is why one of the most important things you can do after losing photos is stop using the affected device or storage media.
No recovery method works in every situation, so backups remain the safest protection against permanent photo loss. Enable automatic backups or syncing where appropriate, and keep additional copies of important photos on another device or storage service.
If you’re dealing with a more complicated recovery case or aren’t sure which method fits your situation, you can also describe what happened on the 7 Data Recovery forum and get advice specific to your case.
FAQ:
- Use data recovery software like Disk Drill (Mac), DiskDigger (Android), and Dr. Fone (Windows)
- Download a copy of the deleted photos from cloud storage or backup
- Restore a device backup